
Overview
We were probably the first of the Joomla template clubs to introduce Mega Menu feature with our first generation T3 framework way back in 2009. It was an instant hit and we have refined the mega menu workflow since then and in our latest T3 framework V3, we moved to jquery instead of mootools. In the template userguides, we provide screenshots of how we configure the Mega Menu as in the demo site. But what if you are trying to configure Mega Menu without any userguides? That is when this tutorial comes in to play its role.

Step by step guide - How-to build Mega Menu in your Joomla 3.0
Things are getting easier with Joomla 3.0 T3 Framework. Just follow the following steps to build yourself a Mega Menu from absolutely nothing.
Step 1: Create a new menu
Under Menus categories in the back-end, navigate to Menu Manager > Add New Menu

Then fill in the Menu’s title, Menu’s type and its description

Step 2: Create New Menu Items
As you already have your new Mega Menu, we are going to need categories for it. This can be easily done by navigating to Menus > MegaFubix (or to whatever name you are going to name your new Menu as) > Add New Menu Item.
To start off fresh with MegaFubix Mega Menu, we are going to create Hot News category. Fill in all the necessary fields and select your Menu Item Type as Featured Articles (used to generate all the featured articles for your Hot News button) with the select button. Leave all the other fields as they are and select JA Fubix - Home for the template style.

Repeat this step several times until you get all your desired categories for you Mega Menu. Sub-menu can be created the same way, but you have to select the correct Parent Item field to coordinate your sub-menus. So far, we have the following Mega Menu in JA Fubix front-end:

Step 3: Configure your Mega Menu
3.1 Adding module into your Menu Item
What we want to achieve: Display the Latest Articles, Most Read Articles and an ad all are aligned in the same row whenever we hover over Hot News Menu items.

You have to:
- Navigate to Extensions > Template Manager > Choose your desired template to configure your Mega Menu at (in this case we choose JA Fubix - Home)
- Under Navigation tab, select your Mega Menu name to configure in the Mega Menu Configuration toolbox (in this case we choose MegaFubix as named above)
- You’ll see all the menu items you have created in the above steps. Select Hot News menu item to work on.
- Simply choose Yes for Submenu, set your Submenu width and the alignment for it as your prefer. For this example, we’ll set 820px (or any value you wish, we choose 820px due to the actual JA Fubix Mega Menu demo) as the desired width and keep left alignment for it.
- Time to add row. For Hot News, we need 1 row only. If you want to add more, please go ahead. Columns are meant to be configured later after you are done with all the required rows.
- To configure each individual row, you have to select the row first then add columns as you wish. Toggle No for Hide when collapse option to hide it on the mobile version for all the cells. If you feel like showing them on mobile version, please keep the option as a Yes. Then set your column width accordingly.
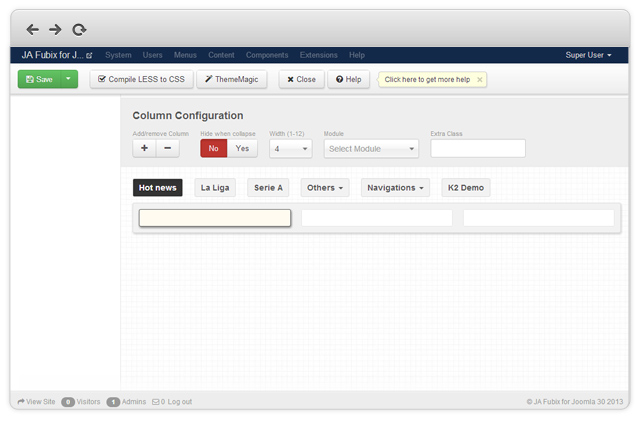
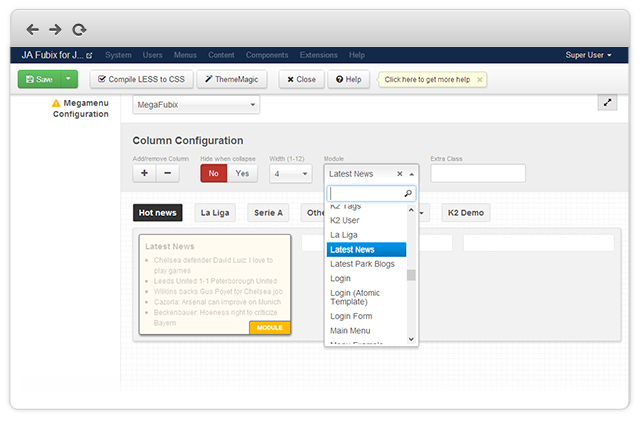
- Select your first column then start to browse your Latest News module for it.
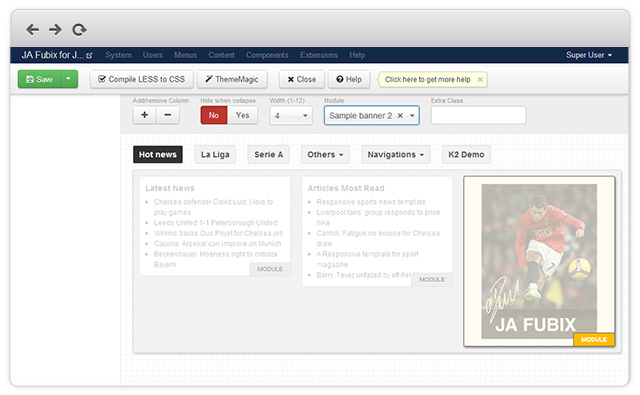
- Finish off for Hot News button, we’ll have the Articles Most Read module for the second column and Sample Banner 2 for the third column.
3.2 Adding Module into existing Sub-Menu item
What we want to achieve: Two columns for your 2 sub-menus instead of 2 rows. Have all the sub-categories under these two sub-menus items listed right under and can be viewed without hovering over sub-menu items as previously.
You have to:
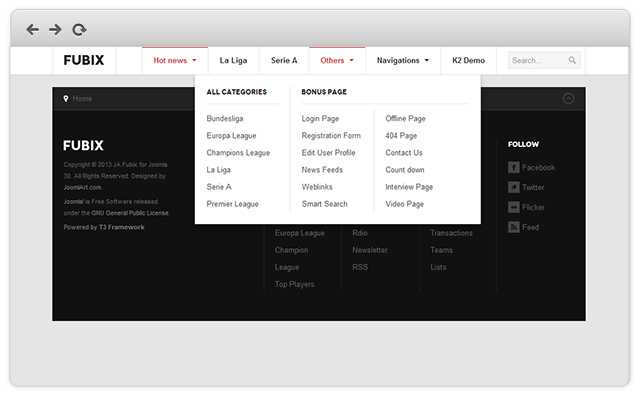
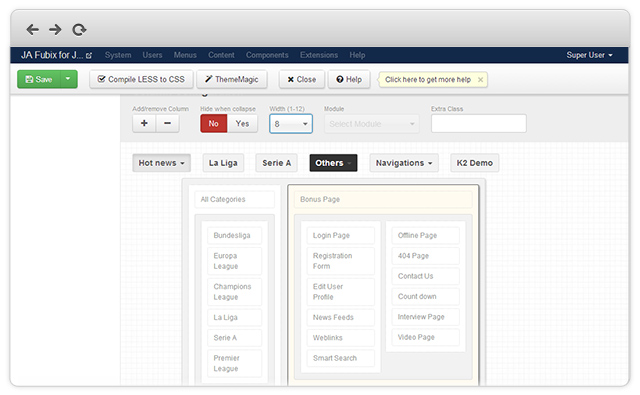
- “Others” item already has two sub-menu items, meaning you only need to style them. As you need them to be in the same rows, let’s set the width to be a bit wider with 500px and make it aligned center for a good-looking menu.
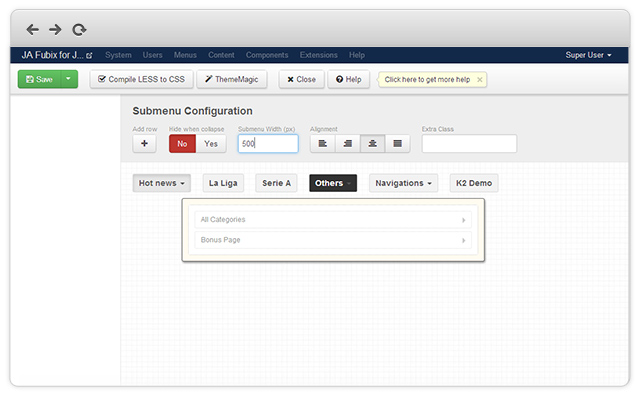
- Select the Bonus Page menu item then click on the right arrow button to move the Bonus Page menu item to the second column

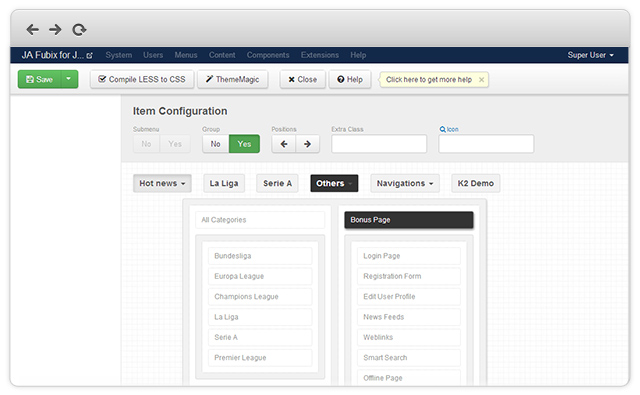
- To move all the categories under the sub-menu items to its parent, select each individual sub-menu item and toggle Group to Yes
- We have more categories under Bonus Page than we have under All Categories. Let’s split the Bonus Page column in two individual ones. Select whichever categories under Bonus Page menu item and start moving the categories from there downward to the right columns. In this case, we’ll start the second column with Offline Page.
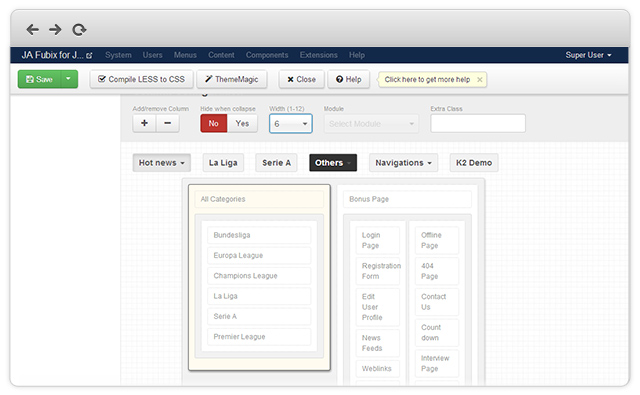
- You can also move others categories to the right in order to make sure your menu items look nice afterward. Redo these splitting steps by clicking on the minus button under your Bonus Page submenu item.
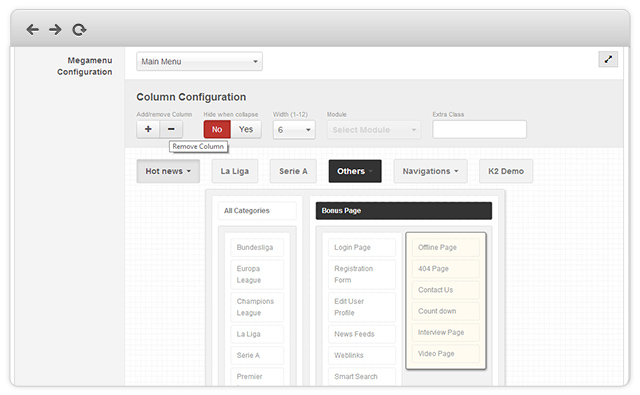
- Now all we are left with is styling those columns and make them look balanced. Set width for All Categories sub-menu item at 4(span) and Bonus Page at 8(span). Then you’ll have something looking as following:
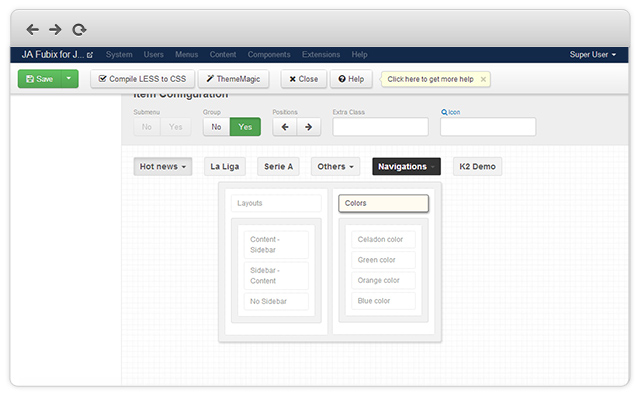
- Repeat the steps above for Navigations as well to achieve the following:
That’s it.
For further customization of CSS style, you can start digging in these CSS files:
\templates\ja_fubix\less\megamenu.less
\templates\ja_fubix\less\megamenu-responsive.less
These are the steps you need to take in order to build your own Joomla 3.0 Mega Menu with T3 Framework. Showcase us your version of Mega Menu or share your experience on mega menu in the comment section below.
T3 Framework Mega Menu Video Tutorial
You can also check out our recent T3 Framework Tutorial video on Building Mega Menu for more visualization.