
For those who own a Magento eCommerce site, having the suitable payment methods and implementing these methods properly are really vital.
As an open-source eCommerce platform, Magento fully supports resourceful payment methods. You can offer your customers different types of payment flexibly: either payment through the bank, the cash collecting agencies, PayPal, Amazon or Google, nation-wide or overseas. Those methods are ready to be set up in the back-end of Magento core.
In this series of blog posts we will look into the popular payment solutions for a Magento store with the pros and cons of each method and also quick guide of how to set it up with our Magento themes. The first part: we will primarily focus on COD, bank transfer and Paypal.
eCommerce Magento sites payment methods
1. Cash on Delivery (COD)
You can offer the Cash on Delivery payment method for your e-stores
The most straightforward way of paying: you collect cash right upon the receipt of the products. To implement COD, you may have to ship on your own, build a network of transportation and/or have a third party service to delivery and collect cash for you.
| Pros |
|
| Cons |
|
>> How to setup the COD. Click to extend! <<
At first, from the Admin Panel, navigate to System > Configuration > Sales > Payment Methods tab > Cash on Delivery section. Here we go:

1. To activate the method, set Enabled to Yes.
2. In the Title field, fill in 'Cash on Delivery' to identify this method during the checkout process.
3. Set New Order Status to 'Pending' to define all the new generated orders as pending in prior of any finished process.
4. In the Payment from Applicable Countries field, define the countries available Cash on Delivery or just choose 'All Allowed Countries'.
5. In the Instructions field, you can add some notes or guides for customers referring to Cash on Delivery payment method.
6. In the Minimum Order Total and Maximum Order Total fields, determine the smallest and largest order totals limit the amount of items that works for Cash on Delivery method.
7. In the Sort Order field, you can define the order of Cash on Delivery option within the displayed payment methods list in checkout page.
8. Tada! Click Save Config to finish.
2. Bank Transfer Payment
Bank Transfer Payment method for your eCommerce Magento site
Bank transfer payment method is safe for both your customers and your eCommerce Magento site. Let’s consider some plus and minus.
| Pros |
|
| Cons |
|
>> How to setup the Bank Transfer payment method. Click to extend! <<
From the Admin Panel, navigate to System > Configuration > Sales > Payment Methods tab > Bank Transfer Payment section.

1. To activate the method, set Enabled to 'Yes'.
2. In the Title field, fill in 'Bank Transfer Payment' to identify this method during the checkout process.
3. Set New Order Status to 'Pending' to define all the new generated orders as Pending in prior of any finished process.
4. In Payment from Applicable Countries field, define the countries available Bank Transfer method or just choose 'All Allowed Countries'.
5. In the Instructions field, you can add some notes or guides for customers referring to Bank Transfer method. Especially don’t forget to add details about your account name and account number, Bank routing code, Bank name and address.
6. In the Minimum Order Total and Maximum Order Total fields, determine the smallest and largest order totals limit the amount of items that works for Bank Transfer method.
7. In the Sort Order field, you can define the order of Bank Transfer Payment option within the displayed payment methods list in checkout page.
8. Click Save Config. Now it’s all set!
3. Paypal
PayPal provides the most popular payment solutions for your eCommerce Magento site
PayPal can be considered as the most popular payment processor nowadays for any eCommerce site. Let’s dig in more!
| Pros |
|
| Cons |
|
>> How to setup the PayPal payment method. Click to view details! <<
From the Admin panel, navigate to System > Configuration > Sales > Payment Methods tab > PayPal Payment Gateway, click to Configure the PayPal Payflow Pro section.

In the Required PayPal Settings tab, for the Payflow Pro and Express Checkout section, go through these steps below.

1. This is optional: you can add the Email Address associated with your PayPal merchant account.
2. Add 'PayPal' as Partner.
3. For the User field, you can fill in the additional user setup for your PayPal account or the username to log in to your PayPal merchant account.
4. In the Vendor field, enter your PayPal user login name.
5. Fill in your PayPal account Password.
6. Set Test Mode to 'Yes' while testing the configuration and then return to set to No when you are ready.
7. To complete, set Enable this Solution to 'Yes'.
Secondly, enter the Basic Settings - Payflow Pro.
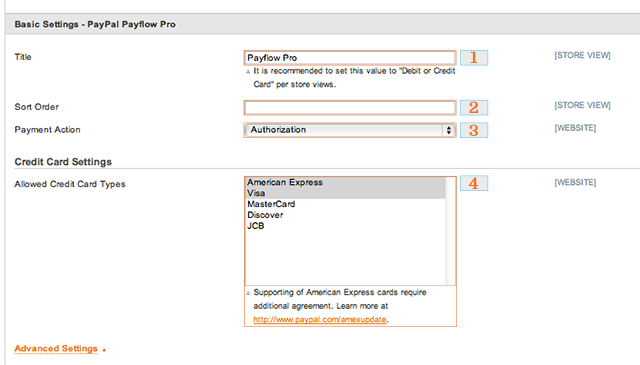
1. Fill in the Title for PayPal Payflow Pro during checkout. You can simply add “Debit or Credit Card” as suggested.
2. Add a numeric value to define the order of PayPal Payflow Pro option to be listed within the payment methods list in checkout page in the Sort Order field.
3. Set Payment Action to 'Authorization' or 'Sale' to determine whether the payment needs authorizing in advance or not.
4. In Credit Card Settings, select 'Allowed Credit Card Types' that you accept for payment. You can hold the Ctrl/Cmd key down while clicking to pick various types of cards.
Third, scroll down to the Advanced Settings.
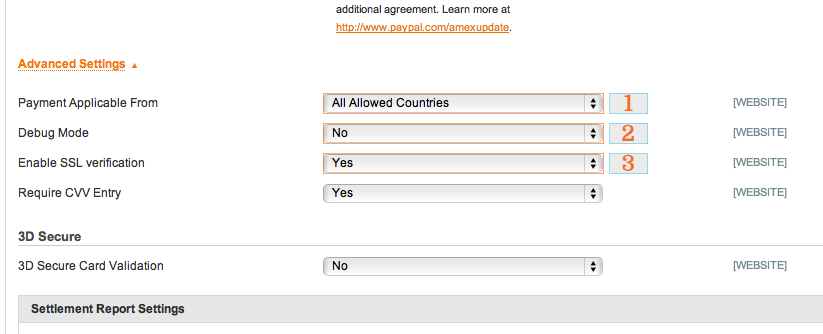
1. Set Payment Applicable from to some specific countries or just simply choose 'All Allowed Countries'.
2. Set Require CVV Entry to 'Yes'.
3. If you have registered for the 3D Secure Card Validation and want to activate this system in front-end, set all the fields 3D Secure Card Validation to 'Yes'.
4. Enter your Centinel API URL to get your PayPal go live. Don’t forget to read your Cardinalcommerce agreement in advance.
Next, enter the Settlement Report Settings.
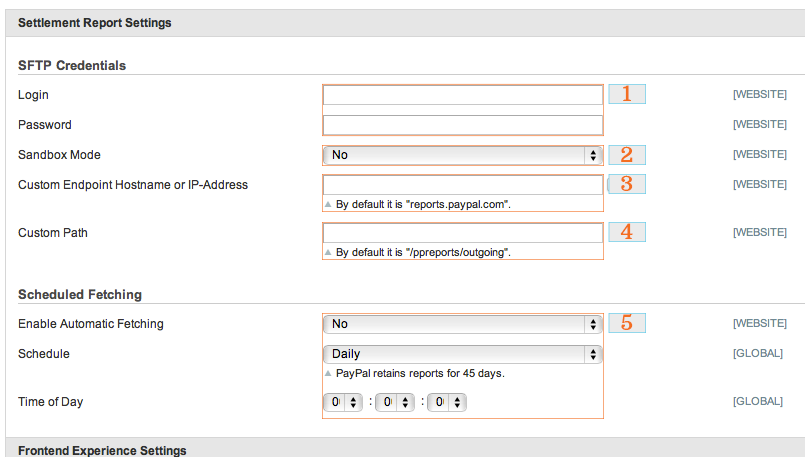
1. Enter the Username and Password for PayPal’s Secure FTP Server.
2. If you want to test the configuration first, set Sandbox Mode to 'Yes'.
3. Fill in the Custom Endpoint Hostname or IP-Address field. By default, the value is: reports.paypal.com.
4. Fill in the Custom Path where reports are saved. By default, the value is: /ppreports/outgoing.
5. The Scheduled Fetching allows you to generate reports occasionally. Just Set Enable Automatic Fetching to 'Yes' and chose the frequency that you want. PayPal will keep each report for 45 days. You can even set Time of Day to define time for the system to generate the reports.
Finally, head over the Frontend Experience Settings to decorate your PayPal payment section for your eCommerce Magento site.
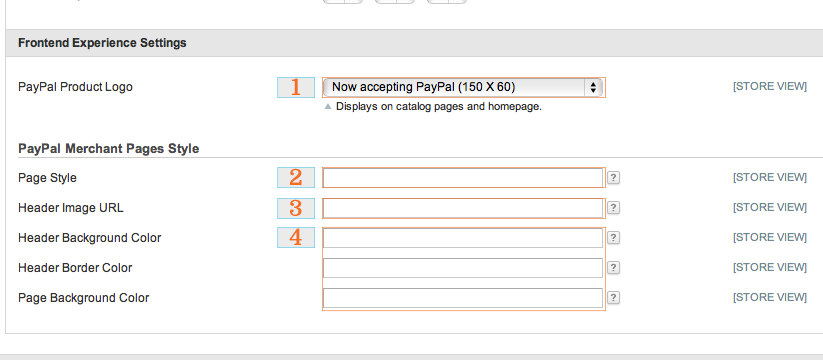
1. Choose the PayPal Product Logo for your eCommerce site.
2. Enter to define the Page Style for your PayPal merchant pages: ‘paypal’ for using the PayPal page style, ‘primary’ for the defined “primary” style in your account profile or you can add ‘page_system_name’ for the PayPal page style that you have customized.
3. In the Header Image URL field, fill in the image URL for the upper-left corner of the payment page with the dimension of 750 x 90 px.
Note: image should be on a https server or in some customers’ browsers it may disappear with the warning “the page contains both secure and nonsecure items.”
4. To customize the page colors, add the HTML hex color codes for the Header Background, Header Border and Page Background.
Extra: 3D Secure Validation - Payment Security Services
3D Secure Validation to have a better security level for your eCommerce Magento sites
Besides payment methods, the payment security is something that you should also consider to use. Here we are talking about one of the security service: 3D Secure Validation. 3D Secure Validation is a security gateway to add one more level of safe for the transactions with credit cards. Once someone is processing a payment, the system will kindly ask for more information and foremost the registered 3D password to verify if this is truly the card holder. Only when the provided information is correct can customers continue with the payment.
| Pros |
|
| Cons |
|
>> How to setup the 3D Security Validation <<
Firstly, register for the authentication process in the websites for Verified by VISA and MasterCard SecureCode payer authentication.
Secondly, in your Admin Panel, navigate to System > Configuration > Sales > Payment Services section.
Enter the 3D Secure Credit Card Validation section.

1. Enter the information of your 3D Secure Validation account.
2. To test the configuration, set Test Mode to 'Yes'. When everything is perfect, you can return and set it to 'No'.
3. To record the information exchanging between your eCommerce Magento site and the 3D Secure, set Debug to Yes. For security purpose, the credit card information is not shown in this debug log file.
4. Click the Save Config button to finish.
Finally, enter the Payment Methods section, and activate the 3D Secure for the payment gateways that are available in your eCommerce site by setting the Enable 3D Secure Card Validation on Front-end field to 'Yes'.
That’s this for 3D Secure Validation configuration!
To be continued
That's it for now. We will be back with more payment methods: both review and setup instruction. If you have any method in mind and want our review on it, feel free to comment in this blog post and we will make it for you.