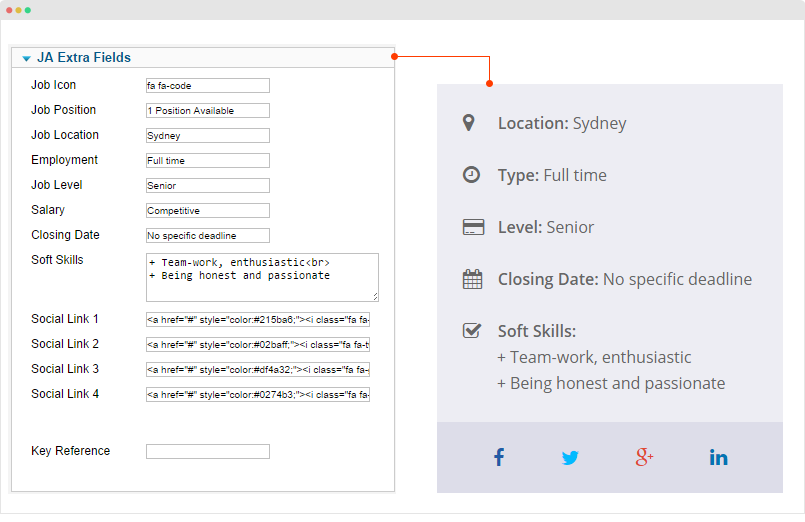
Extra fields for Job
In Uber template, we use extra fields for article to add some special content for the article. We have Extra field for Job article and for Product article. In this section, we will show you how to use extra fields for Job article.
How to use the extra fields ?
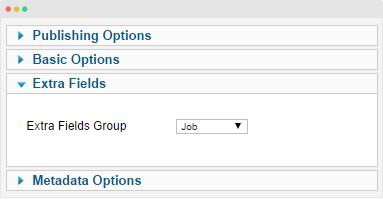
Step 1 - create category and assign extra field group - Job in the JA Extra Fields tab.
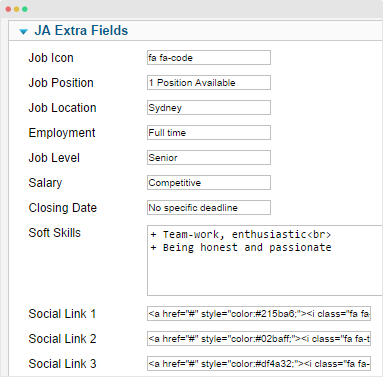
Step 2 - open article editing panel of the category that we assigned extra field group for, in the JA Extra Fields tab, add content for extra fields.
Get the extra fields displayed in front-page
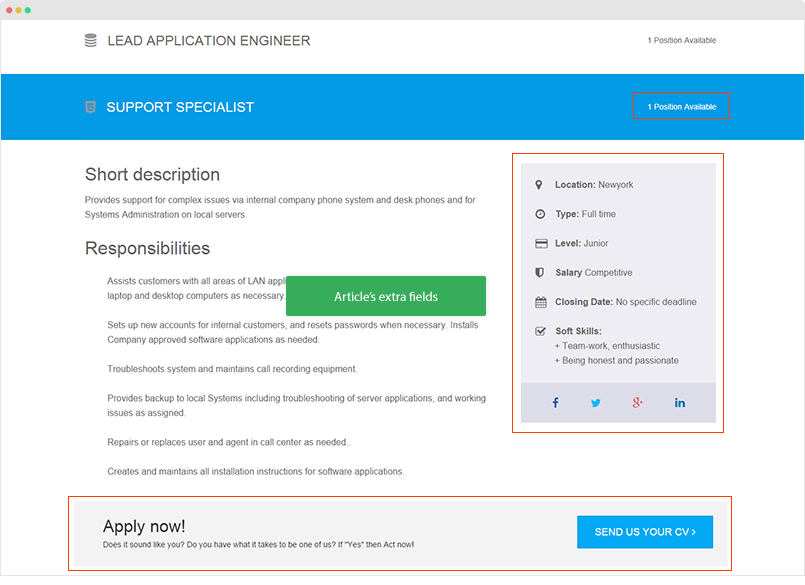
The extra fields are defined to load in Articles Category module. Here is the front-page of the Articles Category that load articles that has extra fields for Job.
Follow the steps to create such module:
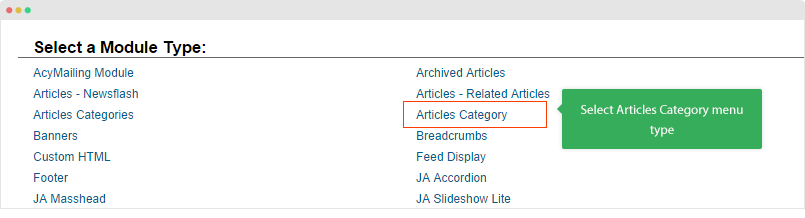
Create Articles Category module
Go to Extensions → Module Manager then hit the "New" button, select Articles Category menu type.
Module setting
Module position: home-corporate
Module Suffix:  job-layout
Alternative layout:  job-layout
The module position depends on which layout your site is using. In this case, the module is assigned to home-coporate position this mean it's using
Configure the module as in the SCREENSHOT
How to add new extra fields ?
Step 1 - define extra fields in .xml file
All the extra fields of extra field group - Job are included in the templates\uber\etc\extrafields\job.xml file. Let see how the extra fields are defined.
<?xml version="1.0" encoding="utf-8"?>
<form>
<fields name="attribs">
    <fieldset name="extra-fields_1" label="TPL_GROUP_EXTRA_FIELDS_LABEL" description="" group="extrafields">
		    <field name="icon" type="text" label="TPL_ICON_AWESOME" description="TPL_ICON_AWESOME_DESC"/>
			<field name="position" type="text" label="TPL_POSITION_JOBS" description="TPL_POSITION_JOBS_DESC"/>
		    <field name="location" type="text" label="TPL_LOCATION" description="TPL_LOCATION_DESC"/>
			<field name="employment" type="text" label="TPL_EMPLOTMENT" description="TPL_EMPLOTMENT_DESC"/>
			<field name="job" type="text" label="TPL_JOBLEVEL" description="TPL_JOBLEVEL_DESC"/>
			<field name="salary" type="text" label="TPL_SALARY" description="TPL_SALARY_DESC"/>
			<field name="closing" type="text" label="TPL_CLOSING_DATE" description="TPL_CLOSING_DATE_DESC"/>
			<field name="soft" type="textarea" label="TPL_SOFT_SKILL" description="TPL_SOFT_SKILL_DESC" cols="40" rows="5" filter="RAW"/>
			<field name="link_1" type="text" label="TPL_LINK_SOCIAL_1" description="TPL_LINK_SOCIAL_DESC" size="40" filter="RAW"/>
			<field name="link_2" type="text" label="TPL_LINK_SOCIAL_2" description="TPL_LINK_SOCIAL_DESC" size="40" filter="RAW"/>
			<field name="link_3" type="text" label="TPL_LINK_SOCIAL_3" description="TPL_LINK_SOCIAL_DESC" size="40" filter="RAW"/>
			<field name="link_4" type="text" label="TPL_LINK_SOCIAL_4" description="TPL_LINK_SOCIAL_DESC" size="40" filter="RAW"/>
			<field name="link_5" type="text" label="TPL_LINK_BUTTON" description="TPL_LINK_BUTTON_DESC" size="40" filter="RAW"/>
    </fieldset>
</fields>
</form>
You can add new extra field to the file using the format above.
Language of extra fields in back-end is added to the file: en-GB.tpl_uber.sys.ini and for front-page, please add to the file: en-GB.tpl_uber.ini.
; Extra fields for Article
TPL_LOCATION			="Location"
TPL_EMPLOYMENT			="Type"
TPL_JOB					="Level"
TPL_CLOSING				="Closing Date"
TPL_SOFT				="Soft Skills"
Step 2 - call the extra fields in the override layout of Articles Category module.
We created a layout for Articles Category, open the layout file: templates\uber\html\mod_articles_category\job.php, call the extra fields that you just added to the job.xml file. Here is a sample code to call a new extra field.
<?php if($extrafields->get('location')) :?>
	<div class="element">
		<i class="fa fa-map-marker"></i>
		<b><?php echo JText::_('TPL_LOCATION'); ?>: </b>
		<?php echo $extrafields->get('location'); ?>
	</div>
<?php endif ;?>Extra fields for Product page
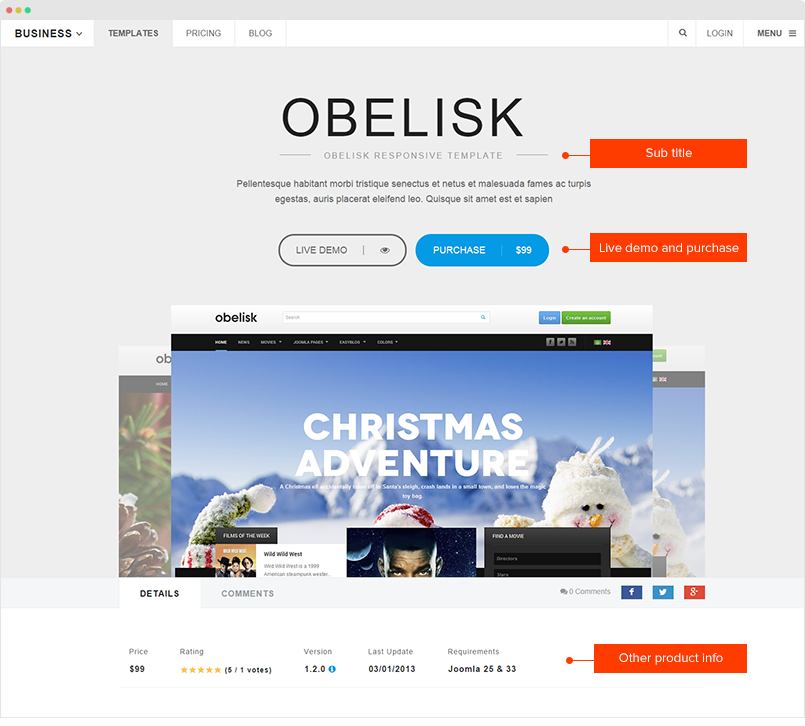
In this section, we will show you how to create special content on Product page like Live Demo, Purchase, Pricing, etc using Extra fields.
How to use the extra fields ?
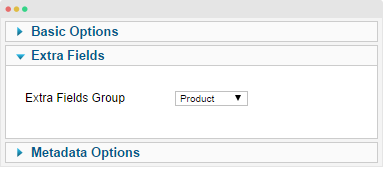
Step 1 - create category and assign extra field group - Product in the JA Extra Fields tab.
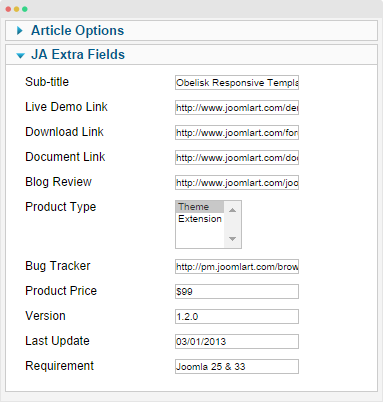
Step 2 - open article editing panel of the category that we assigned extra field group for, in the JA Extra Fields tab, add content for extra fields: Sub-title, live demo link, download link, product type, etc.
Get the extra fields displayed in front-page
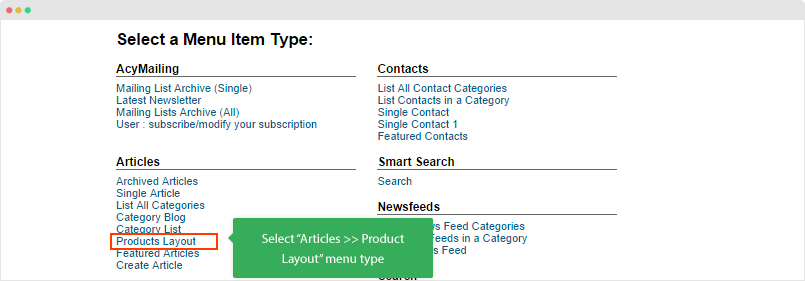
The extra fields are defined to load in Articles » Products Layout menu type. Follow the steps to create such module:
1. Create menu with "Articles » Products Layout" menu type
Go to Menu → Add new menu item, select "Articles » Products Layout" menu type.
Menu setting
Selecting category that you assigned the extra field group product for, add the Page Class product-layout are the main settings for the menu. For more detail, please check out the detail menu setting SCREENSHOT
How to add new extra fields ?
Step 1 - define extra fields in .xml file
All the extra fields of extra field group - Job are included in the templates\uber\etc\extrafields\product.xml file. Let see how the extra fields are defined.
<?xml version="1.0" encoding="utf-8"?>
<form>
<fields name="attribs">
    <fieldset name="extra-fields" label="TPL_GROUP_EXTRA_FIELDS_LABEL" description="" group="extrafields">
		    <field name="title_caption" type="text" label="TPL_CONTENT_SUB_TITLE_LABEL" description="TPL_CONTENT_SUB_TITLE_DESC"    />
			<field name="live_demo" type="text" label="TPL_CONTENT_LIVE_DEMO_LABEL" description="TPL_CONTENT_LIVE_DEMO_DESC" />
		    <field name="download" type="text" label="TPL_CONTENT_DOWNLOAD_LABEL" description="TPL_CONTENT_DOWNLOAD_DESC" />
		 	<field name="document"  type="text" label="TPL_CONTENT_DOCUMENT_LABEL" description="TPL_CONTENT_DOCUMENT_DESC" />
			<field name="blogreview" type="text" label="TPL_CONTENT_BLOGREVIEW_LABEL" description="TPL_CONTENT_BLOGREVIEW_DESC" />
		  	<field name="type" type="list" multiple="true" default="theme" label="TPL_CONTENT_TYPE_LABEL" description="TPL_CONTENT_TYPE_DESC">
				<option value="theme">Theme</option>
	            <option value="extension">Extension</option>
			</field>
		    <field name="bugtracker" type="text" label="TPL_CONTENT_BUGTRACKER_LABEL" description="TPL_CONTENT_BUGTRACKER_DESC" />
			<field name="price" type="text" label="TPL_CONTENT_PRICE_LABEL" description="TPL_CONTENT_PRICE_DESC" />
		    <field name="version" type="text" label="TPL_CONTENT_VERSION_LABEL" description="TPL_CONTENT_VERSION_DESC" />
		    <field name="lastupdate" type="text" label="TPL_CONTENT_LASTUPDATE_LABEL" description="TPL_CONTENT_LASTUPDATE_DESC" />
			<field name="requirement" type="text" label="TPL_CONTENT_REQUIREMENT_LABEL" description="TPL_CONTENT_REQUIREMENT_DESC" />
    </fieldset>
</fields>
</form>
You can add new extra fields to the file using the format above or change the existing fields.
Language of extra fields is added to the file: en-GB.tpl_uber.sys.ini.
Step 2 - call the extra fields in the override layout
We created a layout for product layout, open the layout file: templates\uber\html\com_content\article\product.php, call the extra fields that you just added to the product.xml file. Here is a sample code to call a new extra field.
Define parameter:
$title_caption = $extraContent['title_caption'];
Then call the defined parameter to the position in the article you want.
<?php if($title_caption): echo '<p class="product-tagline blockline">'.$title_caption.'</p>'; endif; ?>
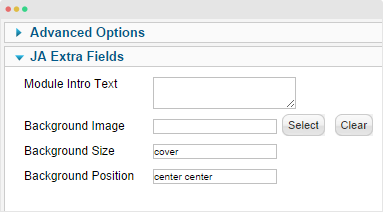
Extra fields for module

For modules used in Uber template, it supports extra fields. Open module setting panel, you would see the JA Extra Fields tab, open the tab and add content for the extra fields.
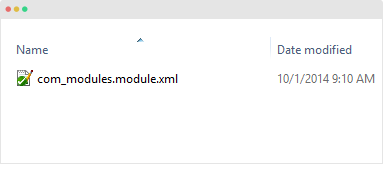
How to add new extra fields ?
All the extra fields for module are defined in the templates/uber/etc/form/com_modules.module.xml file. To add new extra fields, just define the extra field in the .xml file.
Here is the extra fields defined in the .xml file.
<?xml version="1.0" encoding="utf-8"?>
<form>
	<fields name="params">
		<fieldset name="custom-field" label="JA Extra Fields" description="">
			<field name="module-intro" type="textarea" default="" label="TPL_MENU_ITEM_MODULE_INTRO_LABEL" description="TPL_MENU_ITEM_MODULE_INTRO_DESC" filter="RAW" />
			<field name="module-background" type="media" default="" label="TPL_MENU_ITEM_MODULE_BACKGROUND_LABEL" description="TPL_MENU_ITEM_MODULE_BACKGROUND_DESC" />
			<field name="module-background-size" type="text" default="cover" label="TPL_MENU_ITEM_MODULE_BACKGROUNDSIZE_LABEL" description="TPL_MENU_ITEM_MODULE_BACKGROUNDSIZE_DESC" />
			<field name="module-background-position" type="text" default="center" label="TPL_MENU_ITEM_MODULE_BACKGROUNDPO_LABEL" description="TPL_MENU_ITEM_MODULE_BACKGROUNDPO_DESC" />
    </fieldset>
  </fields>
</form>
Language of the extra fields are defined in the file en-GB.tpl_uber.sys.ini.
Call the extra fields to display in front-page
The Extra fields are called in the templates\uber\html\modules.php. Open that file and call new added extra fields in the .xml file. Here is the function to call default extra fields.
function modChrome_T3section($module, &$params, &$attribs)
{
$badge = preg_match ('/badge/', $params->get('moduleclass_sfx'))? ' ' : '';
$moduleTag = htmlspecialchars($params->get('module_tag', 'div'));
$headerTag = htmlspecialchars($params->get('header_tag', 'h3'));
$headerClass = $params->get('header_class');
$bootstrapSize = $params->get('bootstrap_size');
$moduleClass = !empty($bootstrapSize) ? ' col-sm-' . (int) $bootstrapSize . '' : '';
$moduleClassSfx = htmlspecialchars($params->get('moduleclass_sfx'));
$moduleIntro = $params->get('module-intro');
$bgImage = $params->get('module-background');
$bgImageSize = $params->get('module-background-size');
$bgImagePo = $params->get('module-background-position','center center');
$moduleBg = $bgImage ? 'style="background-image: url('/ . JUri::base(true) . '/' . $bgImage . '); background-repeat: no-repeat; background-position: '.$bgImagePo.'; background-size: '.$bgImageSize.'"' : '';
if (!empty ($module->content)) {
$html = "<{$moduleTag} class=\"section{$moduleClassSfx} {$moduleClass}\" id=\"section-{$module->id}\" " . $moduleBg . ">" .
"" . $badge;
if ($module->showtitle != 0) {
$html .= "<{$headerTag} class=\"section-title {$headerClass}\">{$module->title}{$moduleIntro}
";
}
$html .= "{$module->content}";
echo $html;
}
}