Creating new Template style
Template style feature (version 2.5 and above) is to assign different template styles to individual menu items. The default template style can be partially or completely overridden by assigning different template styles to the desired menu items in order to obtain a different look for their respective pages.
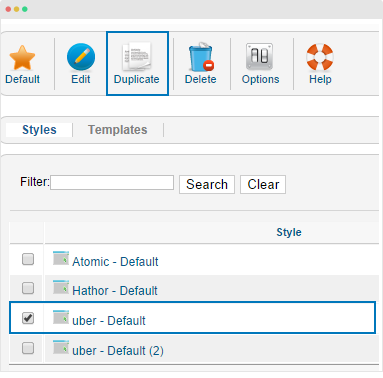
Step 1 - duplicate the default template style:
From back-end setting, go to: Extensions → Template manager. Select the "uber - Default" template style then hit the "Duplicate" button to clone the template style.
Step 2 - assign the template style for menu items:
The duplicated template style inherits all settings from its parent template style except the menu assignment (the cloned template style is not assigned to any menu items). Open the cloned template style → Menu Assignment, then assign the template style to menu items. Those menu items will have template style overridden the default template style.
Logo Configuration
By default, all pre build site based on UBER template use Text logo.
![]()
You can change to logo text or replace the logo text with logo image. Please go to: Extensions > Template Manager > open setting panel of Uber template style that you want to change logo. In the Theme setting panel, you will see the logo settings.
![]()
There are 2 logo types: Text or Image. Based on selected logo type, logo options will be displayed for you to configure. Please note that the settings are only applied for current template style only.
Layout configuration
1. Layout Structure configuration
Open the template style you want to configure layout then go to "Layout" tab. The layout is applied for the template style only.
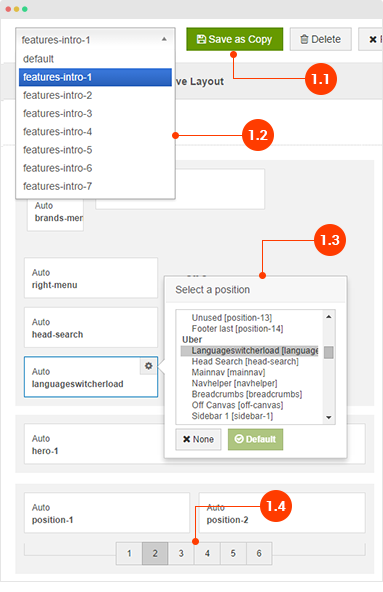
1.1 Clone layout
To quickly create new layout, clone layout in the layout setting panel, all you have to do is hit the "Save as Copy" button. If you are new to T3, you should clone layout to customize so that you always has backup layout.
1.2 Switch layout for any template style
Open any template style, go to "Layout" tab, switch layout for current template style.
1.3 Assign module position
To assign module position, hover the position you want to change, hit the setting icon then select position. To change number of positions for spotlight block, just select number of position in the spotlight block.
1.4 Change number of position in spotlight block
For spotlight block, you can select number of positions. It supports up to 6 positions.
2. Responsive layout configuration
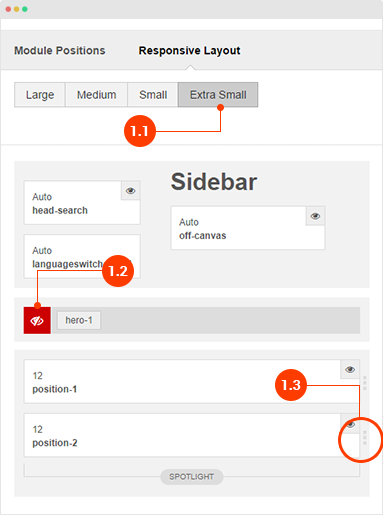
1.1 Select responsive layout
In configuration panel, you will see supported responsive layouts: Large, Medium, Small and Extra Small, select responsive layout to configure.
1.2 Disable any position
For responsive purpose, some elements in your site does not fit in specific layout, you can disable the position in the layout. The configuration is only applied for current layout.
1.3 Resign positions in spotlight block
For modules in spotlight block, you can drag to resize its size.
3. Layout customization
Uber template is built with T3 Framework, you can refer to T3 documentation for more detail:
ThemeMagic configuration
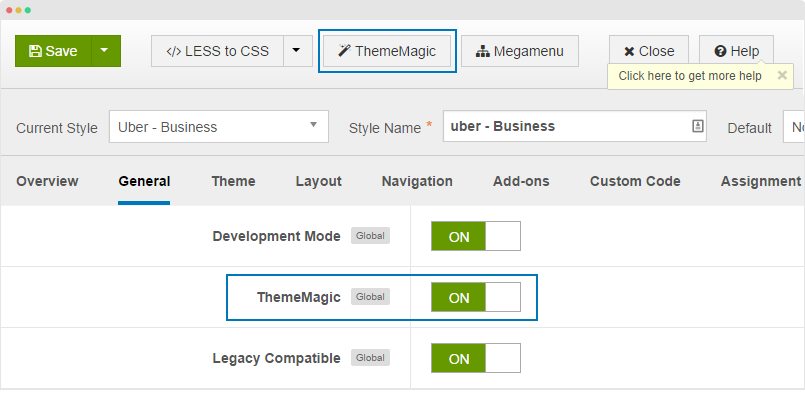
ThemeMagic is to customize your themes based on pre-define parameters without changing any style file.
Firstly, you have to enable the "ThemeMagic" feature. Open any template style manager, in the General tab, enable the ThemeMagic option. Next, hit the "ThemeMagic" button on the top bar list to open the ThemeMagic working panel.
Customize your theme with pre-defined parameters
Step 1 - select theme: all your themes will be listed here, select the theme you want to customize.
Step 2 - customize your theme with pre-defined parameters. In the setting bar, open the parameter group you want to configure, change value for the pre-defined parameters.
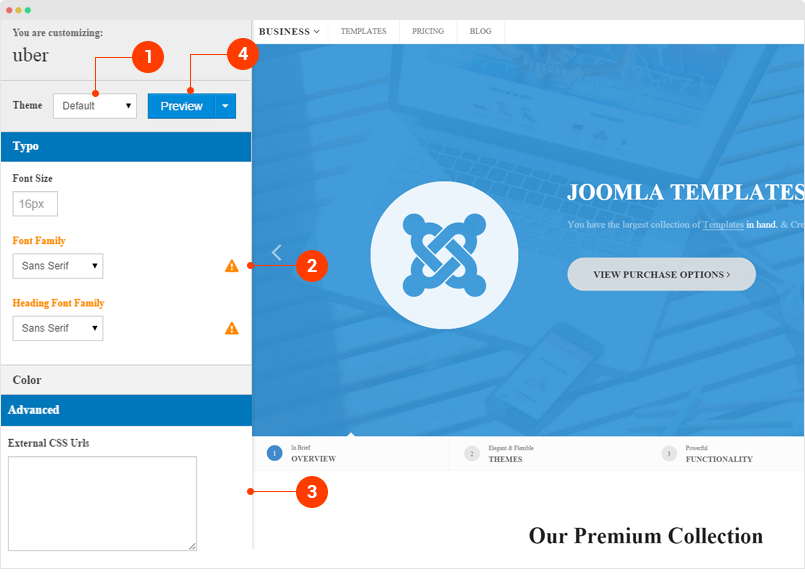
Step 3 - you can add External CSS Urls to import and use for ThemeMagic. It's very useful to load web fonts such as Goggle fonts. You can add many external CSS urls, just make sure each external CSS url is in one line. Opening the "Advanced" group, adding your external CSS url, change setting of pre-defined parameters then save as the theme.
Step 4 - hit the Preview button to view the changes, if you satisfy with the changes, please save as the theme.
Adding new group and parameters to ThemeMagic
If you want to add new group, parameters to ThemeMagic to customize your themes, please refer to T3 documentation.
Megamenu Configuration

Uber template supports Megamenu that allows you to build flexible menu with columns, icons, loading modules, etc. Here are the instruction to create Megamenu for your site.
Step 1 - enable Megamenu
From back-end of Uber template style, open the "Navigation" setting panel, scroll down and enable the "Megamenu" option, you can select animation for Megamenu. Next, select Menu that will be displayed as Main Menu.

Step 2 - configuring Megamenu
Hit the "Megamenu" button on the top option bar to open the Megamenu configuration panel.
Now configure the megamenu as you want it to be with the available options in the panel.

Off-canvas Configuration

The Off-canvas sidebar displays content from any module. In Uber demo site, Off-canvas is also used for Mobile navigation system. Here are the steps to create Off-canvas for your site.
Step 1 - enable Off-canvas Sidebar
From back-end of Uber template style, open the "Add-on" setting panel, enable the Off-Canvas Sidebar then select animation when opening the Off-canvas Sidebar.
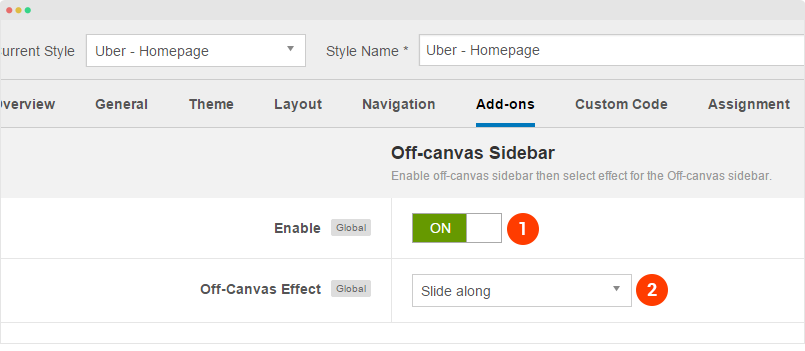
The Off-canvas setting is only applied for the template style only. That means, only menu items that are assigned in the template style will have Off-canvas enabled.
Step 2 - create module and assign to "off-canvas" position

Also remember to assign the module to display in the pages that you enable Off-canvas sidebar for.