Developing a T3 Framework Template
Introduction
In this section we are going to cover all about developing a T3 Framework 2.0 Template: ja_purity_iii with the very same design as ja_purity_ii. Generally we are going to explain the development steps, style customizing basics, file & folder management and principles.
This section explores the template developer development procedures on how to create a new template with core layouts, themes and settings. All these developer created files and themes should use the core folder, as end-user can use them as examples for their design goals.
Video Tutorials
If you need further assistance, please watch our video tutorials on User Theme:
- Part 1 - preparation, customizing header and spotlights
- Part 2 - customizing Mega Menu, links, HTML overrides, suffix class,etc.
Preparation
Technical Requirements
To be able to develop your own template, you will need to prepare:
- the software tools
- Adobe Photoshop CS3/CS4 or Gimp for graphics;
- Adobe Dreamweaver or Notepad++ for code editing;
- Mozilla Firefox with Firebug plugin for CSS play around;
- FileZilla or any other FTP client;
- the enviromnent
- localhost xampp, wamp or any Apache with PHP and MySQL server;
- or
- livesite preferably on a subdomain.
- Joomla! 1.5 installed on your development server, check server requirements here;
- other resources will be added to this section shortly.
Create template folder
If you are developing on localhost, create a ja_purity_iii folder inside the templates folder. To do that on your livesite, you will need to use your FTP client.
Copy general template files
The new template will need the basic files to be able to work as a Joomla! template. To do that please follow these steps:
- Browse the ja_t3_blank folder in your templates folder;
- Copy the following files from this folder to your new template folder:
- component.php
- favicon.ico
- index.php
- template_thumbnail.png
- templateDetails.xml
- params.ini
Create template file and folder structure
To override the basic design of the core framework, you will need to have a correct file and folder structure. To do that, you can simply copy the files and folders from the ja_t3_blank into the ja_purity_iii folder as follows:
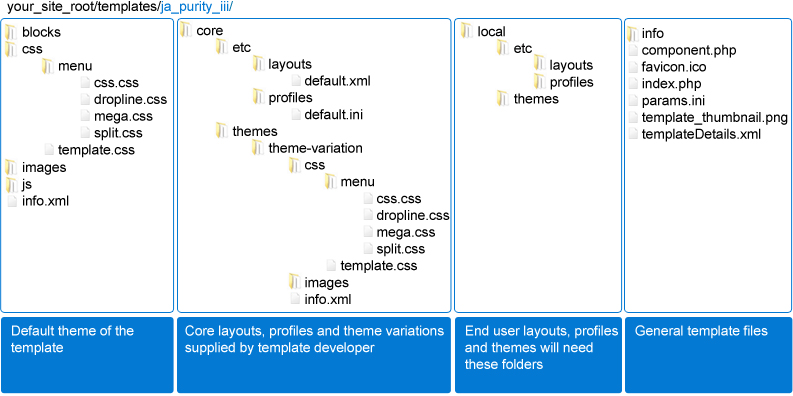 As you can see in this image, the template files and folders are grouped so you can easily follow and suggest copying only the default theme, layout, profile and general template files.
Edit the default theme XML file
Next, we are going to enable the default theme of the ja_purity_iii template.
- Find file your_site/templates/ja_purity_iii/info.xml
- Edit this file accordingly, here is an example:
<?xml version="1.0" encoding="utf-8"?>

<theme>

	<name>default</name>

	<description>Default theme for JA Purity III Template</description>

	<date>July 2010</date>

	<version>1.0.0</version>

	<author>JoomlArt</author>

	<copyright>JoomlArt</copyright>

</theme>
Adjust templateDetails XML file
The new template is ready to go, it only needs to have it's own information. To do that, you have to adjust the templateDetails.xml file as follows:
- replace "ja_t3_blank" to "ja_purity_iii"
- replace all other information to your convenience, see our example below
<?xml version="1.0" encoding="utf-8"?>

<install version="1.5" type="template">

	<name>JA_Purity_III</name> // update the template name here, no spaces are allowed

	<version>1.0.0</version> // remember to update the template version

	<creationDate>02/07/10</creationDate>  // update the creation date here

	<author>JoomlArt.com</author>  // update the author of the template as you wish

	<authorEmail>webmaster@joomlart.com</authorEmail>   // update the contact details as you wish

	<authorUrl>http://www.joomlart.com</authorUrl>   // update the author website as you wish

	<copyright>J.O.O.M. Solutions Ltd.</copyright>    // update the copyright owner of the template as you wish

	<license>GNU/GPL version 2</license>  // update the licence type: commercial or GNU/GPL 2.0

	<description>Clean and beautiful template powered by T3 Framework 2.0.</description>   // update the template description as you wish

	<engine>t3</engine>   // update the framework version if necessary

	<files>

......common code deleted.....

	</files>
	<languages>

		<language tag="en-GB">en-GB.tpl_ja_purity_iii.ini</language>   // create these language files and update here accordingly, more instructions here

	</languages>

	<administration>

		<languages folder="admin">

			<language tag="en-GB">en-GB.tpl_ja_purity_iii.ini</language>  // create these language files and update here accordingly, more instructions here

		</languages>

	</administration>
	<positions>

......common code deleted.....

	</positions>
	<params addpath="/plugins/system/jat3/core/element">

......common code deleted.....

	</params>

</install>
Create language files
Now your template will need language files. This is not mandatory if you create a template for you, the framework will use the core plugin default language files, but if you are a template developer, you might want to deliver fully functional templates. Here is what you have to do:
- create back-end language file
- open your template folder ja_purity_iii, and create a folder called admin
- copy & paste inside the file from same folder of the ja_t3_blank template folder
- rename the file from en-GB.tpl_ja_t3_blank.ini to en-GB.tpl_ja_purity_iii.ini
- open the file and edit it accordingly;
- create front-end language file
- open your template folder ja_purity_iii, and copy & paste inside the en-GB.tpl_ja_t3_blank.ini file from same folder of the ja_t3_blank template folder
- rename the file from en-GB.tpl_ja_t3_blank.ini to en-GB.tpl_ja_purity_iii.ini
- open the file and edit it accordingly.
Install your new template in Joomla! 1.7
With Joomla! 1.7, you have to Discover the new template, so please follow this quick guide:
- Go to the "Extensions" menu, and click "Extensions Manager"
- Click to open the "Discover" tab
- Click the "Discover" button in the top-right toolbar
- Select your template and click the "Install" button.
Set the new template as default
To be able to customize the template, you will have to set it as default template, so to do so, please go to your site back-end, and follow these steps:
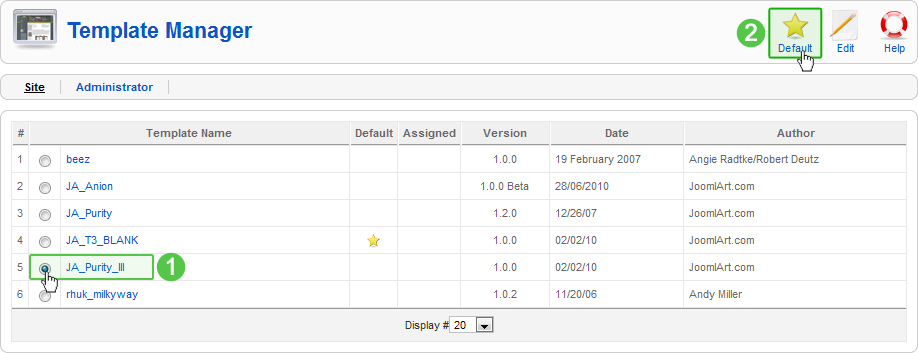
- Step 1 - select the JA Purity III template;
- Step 2 - click the Default button.
Enable Development Mode
Now you have to make sure your customizations are applied instantly every time you change the code or images, so you have to disable the framework core cache and enable development mode. To do that, you must browse the JA_Purity_III template administration, and then follow these steps:
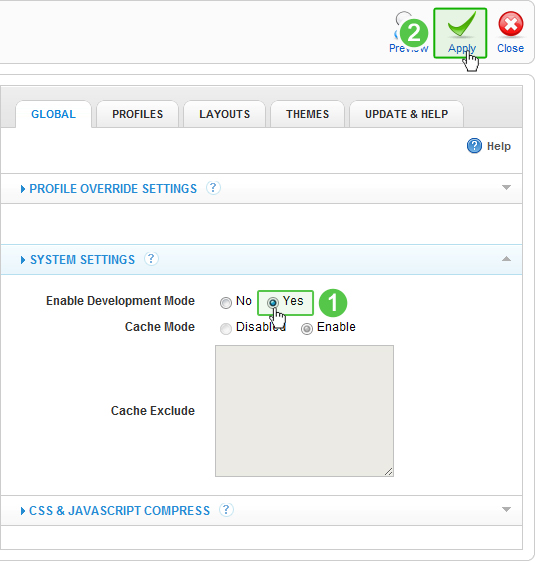
- Step 1 - select Yes for the Enable Development Mode option;
- Step 2 - click the Apply button.
Now you can start customizing your new template so go to your front-end, and refresh the page to to make sure new template works.
Building the default layout
Layouts are stored in ja_purity_iii/core/etc/layouts folder. Firstly, we will build the default layout having 3 columns: Left - main - Right in main content.
For this design, we could have this configuration:
- TOP:
- header
- mainnav
- spotlight
- MIDDLE:
- left
- main content body
- right (rounded)
- BOTTOM:
- spotlight
- navhelper
- footer
With these blocks, the default layout XML file (default.xml) will look like this:
<?xml version="1.0" encoding="utf-8"?>

<layout name="desktop">

	<!--Extra css load for this layout-->

	<stylesheets>

	</stylesheets>

	<blocks name="top" style="xhtml">

		<block name="header" type="header" main-inner="1"></block>

		<block name="mainnav" type="mainnav" main-inner="1"></block>

		<block name="cpanel" type="usertools/cpanel"></block>

		<block name="topsl" type="spotlight" main-inner="1">user1,user2,user3,user4,user5</block>

	</blocks>

	<blocks name="middle" colwidth="20">

		<block name="left1">left</block>

		<block name="right1" style="JArounded">right</block>

	</blocks>

	<blocks name="bottom" style="xhtml">

		<block name="botsl" type="spotlight" main-inner="1">user6,user7,user8,user9,user10</block>

		<block name="navhelper" type="navhelper" main-inner="1"></block>

		<block name="footer" type="footer"></block>

	</blocks>

</layout>
Save above XML into ja_purity_iii/core/etc/layouts/default.xml, then check it in your front-end (refresh the page to test the layout change).
Calling additional files into layout
In some cases you might want to call for additional stylesheets or js files, here is an example on how to do that:
- Create new folders called js or css (if none) in your template root folder;
- Copy the files into the new folders;
- Edit the default (or any other) layout like in the example below:
<?xml version="1.0" encoding="utf-8"?>

<layout name="desktop">

	<!--Extra css load for this layout-->

	<stylesheets>

	<file>css/your-file-name.css</file>

	</stylesheets>

	<scripts>

	<file>js/your-file-name.js</file>

	</scripts>

	<blocks name="top" style="xhtml">

		<block name="header" type="header" main-inner="1"></block>

		<block name="mainnav" type="mainnav" main-inner="1"></block>

		<block name="cpanel" type="usertools/cpanel"></block>

		<block name="topsl" type="spotlight" main-inner="1">user1,user2,user3,user4,user5</block>

	</blocks>

	<blocks name="middle" colwidth="20">

		<block name="left1">left</block>

		<block name="right1" style="JArounded">right</block>

	</blocks>

	<blocks name="bottom" style="xhtml">

		<block name="botsl" type="spotlight" main-inner="1">user6,user7,user8,user9,user10</block>

		<block name="navhelper" type="navhelper" main-inner="1"></block>

		<block name="footer" type="footer"></block>

	</blocks>

</layout>
Building the default theme
The default theme of the template has a higher priority than the core styling. The best thing to do is to use the default theme from the ja_t3_blank template and customize it for your needs.
For our example here, we are going to modify this theme to recreate the ja_purity_ii template design, so in the following sections we are going to show you a step by step guide on the customization techniques.
Default theme info
First thing to do is to update the your-site-root/template-name/info.xml file. Here is an example:
<?xml version="1.0" encoding="utf-8"?>

<theme>

	<name>Default</name>

	<description>Default theme for JA Purity III Template</description>  Please update the Theme Description

	<date>April 2010</date>  Please update the Theme Creation Date

	<version>1.0.0</version>  Please update the Theme Version

	<author>JoomlArt</author>  Please update the Theme Author

	<copyright>JoomlArt</copyright>  Please update the Theme Copyright Information

	<stylesheets>

	</stylesheets>

</theme>
Calling additional files into the theme
You can also add additional files to be used for the default theme (or any other). Here an example:
<?xml version="1.0" encoding="utf-8"?>

<theme>

	<name>Default</name>

	<description>Default theme for JA Purity III Template</description>

	<date>April 2010</date>

	<version>1.0.0</version>

	<author>JoomlArt</author>

	<copyright>JoomlArt</copyright>

	<stylesheets>

		<file>css/your-file-name.css</file>

	</stylesheets>

	<scripts>

		<file>js/your-file-name.js</file>

	</scripts>

</theme>
Main style
The main style of the new template is in the your_site/templates/ja_purity_iii/css/template.css file now.
To reproduce the ja_purity_ii design we are going to modify this file as it holds the styling for the default theme of the ja_purity_iii template. All other core or local theme variations are only going to override just a few stylesheets.
Please note that we are not insist on all design details, we are only going to show you the files you need to edit, and explain how.
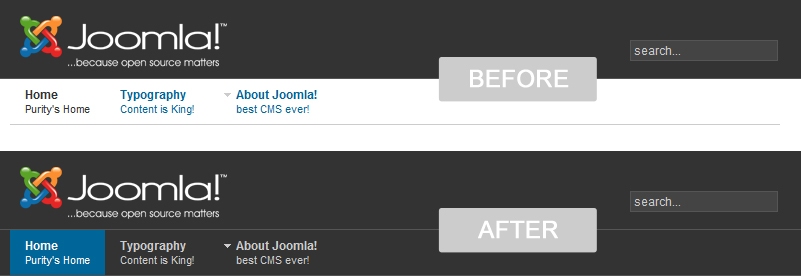
The Header
To customize the header, please follow these steps:
find line 158 in file your_site\templates\ja_purity_iii\css\template.css
#ja-header .main { border-bottom: 1px solid #ccc; }
and replace with
#ja-header  {background:#333; border-bottom: 1px solid #555;}

#ja-header .main { padding:0; }
Changes preview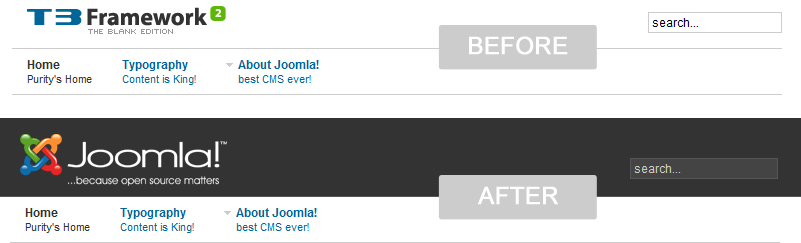
These changes also need you to customize the logo and the search module.
Customizing the logo
You will need the default logo from JA Purity II Template, and copy it inside the your_site\templates\ja_purity_iii\images folder. Then you will have to edit the same CSS file, so..
find lines starting 163
h1.logo { width: 184px; height: 28px; }
h1.logo a {

	background: url(../images/logo.gif) no-repeat left;

	display: block;

	width: 209px;

	height: 30px;

}
replace with
h1.logo { width: 205px; height: 78px; }
h1.logo a {

	background: url(../images/logo.png) no-repeat left;

	display: block;

	width: 207px;

	height: 80px;

}
See changes in this section.
Customizing the search module
This code change is so easy, we are only going to change text color, background color and border-color, so..
find line 51 of the same file your_site\templates\ja_purity_iii\css\template.css
/* Search ---*/
and add after it
#ja-search .inputbox {
	background: #444444;
	border-color: #555555;
	color: #CCCCCC;
}
See changes in this section.
In the same file your_site\templates\ja_purity_iii\css\template.css
find line 203
#ja-mainnav .main { border-bottom: 1px solid #ccc; }
and replace with
#ja-mainnav {background:#333; border-bottom: 1px solid #ccc;}

#ja-mainnav .main { }
Changes preview
Changes you can see in this picture also require changes described in this section.
The spotlights
In the same file your_site\templates\ja_purity_iii\css\template.css
TOP SPOTLIGHT
find line 245
#ja-topsl .main { padding: 10px 0; border-bottom: 1px solid #ccc; }
replace with
#ja-topsl {border-bottom: 1px solid #ccc; background:#f6f6f6;}

#ja-topsl .main { padding: 10px 0;  }
BOTTOM SPOTLIGHT
then find line 248
#ja-botsl .main { padding: 10px 0; border-bottom: 1px solid #ccc; }
replace with
#ja-botsl {border-bottom: 1px solid #ccc; background:#e6e6e6;}

#ja-botsl .main { padding: 10px 0;}
Changes preview for Top Spotlight
The pathway
In the same file your_site\templates\ja_purity_iii\css\template.css
find line 205
#ja-navhelper .main {
	text-transform: uppercase;
	border-bottom: 1px solid #ccc;
}
and replace with
#ja-navhelper {border-bottom: 1px solid #ccc; background:#f6f6f6;}

#ja-navhelper .main {

	text-transform: uppercase;

}
Changes preview

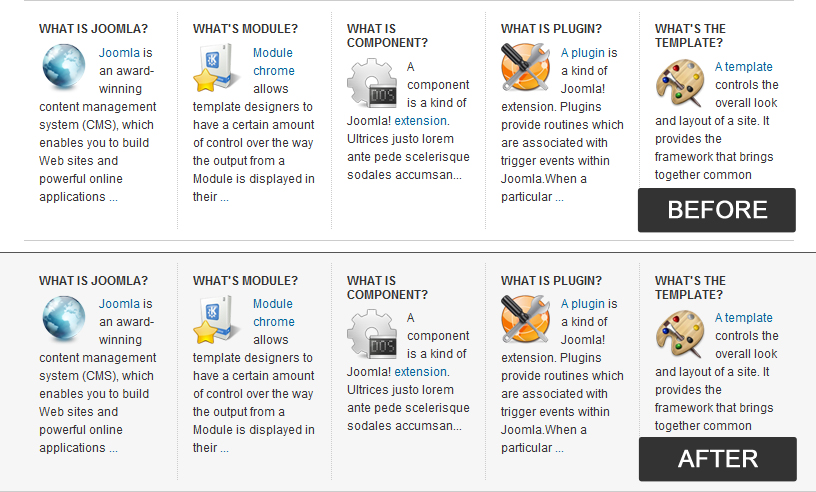
Styling custom block styles
We have previously setup to use JArounded style for the right block, and this will need some additional styling the default theme of our new template. Please open your_site/templates/ja_purity_iii/css/template.css and find line 149
/* Rounded Module

 */
and add after it the following code:
.ja-box-br {

	background: url(../images/b-br.gif) no-repeat bottom right #fff;

}
.ja-box-bl {

	background: url(../images/b-bl.gif) no-repeat bottom left;

}
.ja-box-tr {

	background: url(../images/b-tr.gif) no-repeat top right;

}
.ja-box-tl {

	background: url(../images/b-tl.gif) no-repeat top left;

	padding: 0 15px 10px;

}
Next, we are going to correct the module title border-bottom, so find these lines 169-175
div.ja-module h3, div.module h3 {

	font-size: 100%;

	text-transform: uppercase;

	font-family: Helvetica, Arial, sans-serif;

	border-bottom: 1px solid #ccc;

}
and replace with
div.ja-module h3, div.module h3 {

	font-size: 100%;

	text-transform: uppercase;

	font-family: Helvetica, Arial, sans-serif;

	border-bottom: 1px solid #ccc;

	margin:0 -15px;

	padding:5px 15px;

}
Files needed for this customization can be found in the images folder of JA Purity II template. You will have to copy these files in the your_site/templates/ja_purity_iii/images folder.The next case of block style is JAxhtml (block style="JAxhtml"). This will generate the HTML code for modules different than the JArounded style, and can be styled this way:
div.ja-moduletable,  div.moduletable {

/* your CSS code goes here */

}
Customizing module class suffixes
If you want to create a blue class suffix to use for your modules, just open the template.css of your default theme. Find modules styling and add this code:
/* blue */

div.moduleblue {

	background: url(../images/bb-br.gif) no-repeat bottom right #2C77B6;

}
div.moduleblue .ja-box-bl {

	background: url(../images/bb-bl.gif) no-repeat bottom left;

}
div.moduleblue .ja-box-tr {

	background: url(../images/bb-tr.gif) no-repeat top right;

}
div.moduleblue .ja-box-tl {

	background: url(../images/bb-tl.gif) no-repeat top left;

}
You will have to find these images in the images folder of the JA Purity III template and copy them into the images folder of your default theme.
Please note: color fill module class suffixes only work for block style="JArounded".
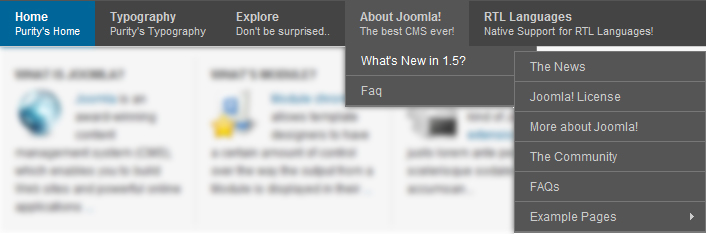
Mega Menu
If you have copied the CSS folder from the default theme, you only have to adjust some lines to make it's design similar to the one from JA Purity II.
Please find this file your_site\templates\ja_purity_iii\css\menu\mega.css and replace it's complete content with this code:
.ja-megamenu a.active { background: #069 !important; color: #fff !important; }

.ja-megamenu a.over {background: #555; color: #fff !important;}

.ja-megamenu ul.level0 li.mega a.mega { color:#ccc;}
/* lv - 1 and below


*/

/* Styling ---*/

.ja-megamenu ul.level1 li.mega { border-top: 1px dotted #777; }
.ja-megamenu ul.level1 li.first { border-top: 0; }

.ja-megamenu ul.level1 li.mega a.mega {

	border: 0;

}

/* CHILD CONTENT


*/

.ja-megamenu .childcontent-inner {

	background: #555;

	border: 1px solid #777;

	border-top: 0;

	color: #ccc;

}
.ja-megamenu .level1 .childcontent-inner { border-top: 1px solid #777; }
.ja-megamenu .childcontent .ja-moduletable { color: #ccc; }

.ja-megamenu .childcontent .ja-moduletable a {color:#ccc;}

.ja-megamenu .childcontent .ja-moduletable a:hover {color:#fff;}
.ja-megamenu .childcontent .ja-moduletable h3 {

	background: none;

	border-bottom: 1px dotted #777;

	text-transform: uppercase;

}
/* Grouped --- */

.ja-megamenu .group-title { border-bottom: 1px solid #777; }
.ja-megamenu .group-title .menu-title {

	color: #ccc;

	text-transform: uppercase;

	font-weight: bold;

	font-size: 115%;

}
.ja-megamenu .group-title .menu-desc {

	color: #ccc;

	padding-left: 0 !important;

}
Let's preview the changes!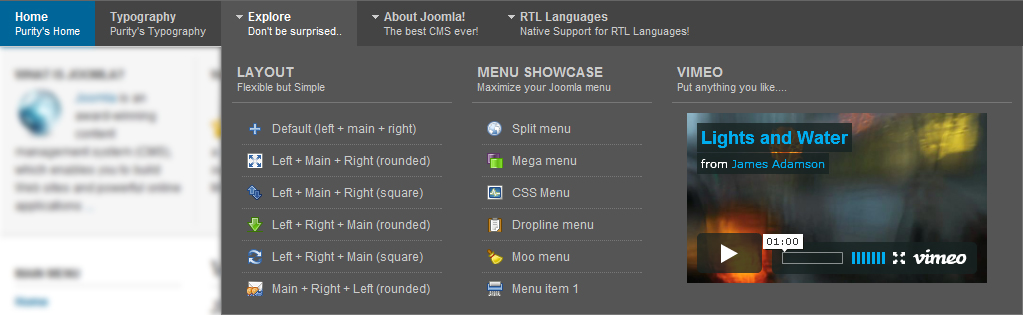
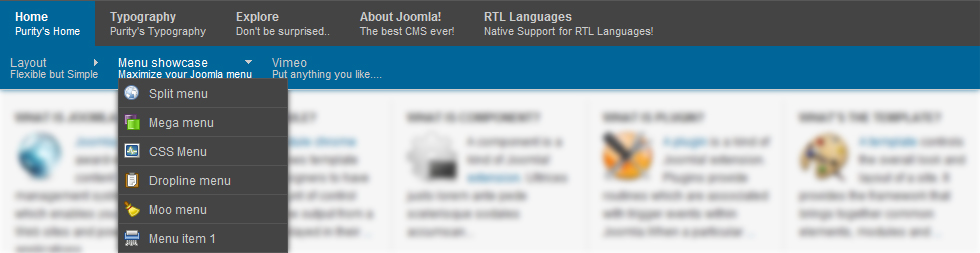
Split Menu
To style the Split Menu please find this file your_site\templates\ja_purity_iii\css\menu\split.css and replace it's complete content with this code:
#ja-splitmenu li a {color:#ccc;}

#ja-splitmenu li a:hover {color:#fff; background: #555;}
#ja-splitmenu li.active a,

#ja-splitmenu li.active a:hover,

#ja-splitmenu li.active a:active,

#ja-splitmenu li.active a:focus {

	background: #069;

	color: #FFF;

}
/* Sub Nav ---*/

#ja-subnav {background: #069;}
#ja-subnav ul li a {color:#ccc;}

#ja-subnav ul li a:hover {color:#fff;}
/* Sub Nav (lv2) ---*/

#ja-subnav ul li ul {

	background: #333;

	border: 1px solid #555;

}
#ja-subnav ul li ul li {

	border-top: 1px solid #555;

}
#ja-subnav ul li ul li:first-child {

	border: 0;

}
Let's preview the changes!
CSS Menu
To style the Split Menu please find this file your_site\templates\ja_purity_iii\css\menu\css.css and replace it's complete content with this code:
/* STYLING THE MENU


*/

/* 1st level */

#ja-cssmenu li a.active,

#ja-cssmenu li a.active:hover,

#ja-cssmenu li a.active:active,

#ja-cssmenu li a.active:focus {

	color: #fff;

}
#ja-cssmenu li .active,

#ja-cssmenu li .active:hover {

	background:#069;

}
#ja-cssmenu li:hover,

#ja-cssmenu li:active,

#ja-cssmenu li:focus {

	background:#555;

}
#ja-cssmenu li a {color:#ccc;}

#ja-cssmenu li a:hover {color:#fff;}
/* 2nd level and above */

#ja-cssmenu li ul {

	border: 1px solid #777;

	border-top: 0;

	background: #555;

}
#ja-cssmenu li ul ul {

	border-top: 1px solid #777;

}
#ja-cssmenu li ul li {

	border-bottom: 1px solid #777;

	background: none;

}
Let's preview the changes!
Dropline Menu
To style the Split Menu please find this file your_site\templates\ja_purity_iii\css\menu\dropline.css and replace it's complete content with this code:
/* Main Nav ---*/

#jasdl-mainnav a {color: #ccc;}

#jasdl-mainnav a:hover {color:#fff; background:#555;}
#jasdl-mainnav li.active a,

#jasdl-mainnav li.active a:hover,

#jasdl-mainnav li.active a:active,

#jasdl-mainnav li.active a:focus {

	background: #069;

	color: #fff;

}

/* Sub Nav ---*/

#ja-subnav { background-color: #069; }

#ja-subnav ul.active li a {color:#ccc;}

#ja-subnav ul.active li a:hover {color:#fff;}
/* Sub Nav (lv2) ---*/

#ja-subnav ul li ul {

	background: #444;

	border: 1px solid #555;

}
#ja-subnav ul li ul li {

	border-top: 1px solid #555;

}
#ja-subnav ul li ul li:first-child {

	border: 0;

}
#ja-subnav ul li a {color:#ccc;}

#ja-subnav ul li a:hover {color:#fff;}
Create your own module/component HTML override
T3 Framework 2.0 based template themes have the ability to manage component and modules HTML overrides. These themes can override the default overrides from the core plugin, so we are going to show you an example on how to style the leading frontpage article by using HTML overrides. Here are the steps:
- Step 1 - Create a new folder html folder inside your ja_purity_iii template folder;
- Step 2 - Create a new folder com_content folder inside your ja_purity_iii/html folder;
- Step 3 - Create a new folder frontpage folder inside your ja_purity_iii.html/com_content folder;
- Step 4 - Browse the your_site/plugins/system/jat3/base-themes/default/html/com_content/frontpage folder and copy the default.php file;
- Step 5 - Now browse the your_site/plugins/system/jat3/base-themes/default/html/com_content/frontpage/ folder and paste the default.php file into your_site/tempaltes/ja_purity_iii/html/com_content/frontpage folder;
- Step 6 - Open the your_site/templates/ja_purity_iii/html/com_content/frontpage/default.php file and find line 18
<div class="leading<?php echo $this->params->get('pageclass_sfx'); ?> clearfix">
replace with
<div class="leading-frontpage<?php echo $this->params->get('pageclass_sfx'); ?> clearfix">
- Step 7 - Finally we are going to style this new class, so please open the your_site/templates/ja_purity_iii/css/template.css file and find line 71
.leading { border-bottom: 1px solid #ccc; }
and add after it
.leading-frontpage {padding: 10px 15px; border:1px solid #ccc; background: #f6f6f6; border-top:none;}
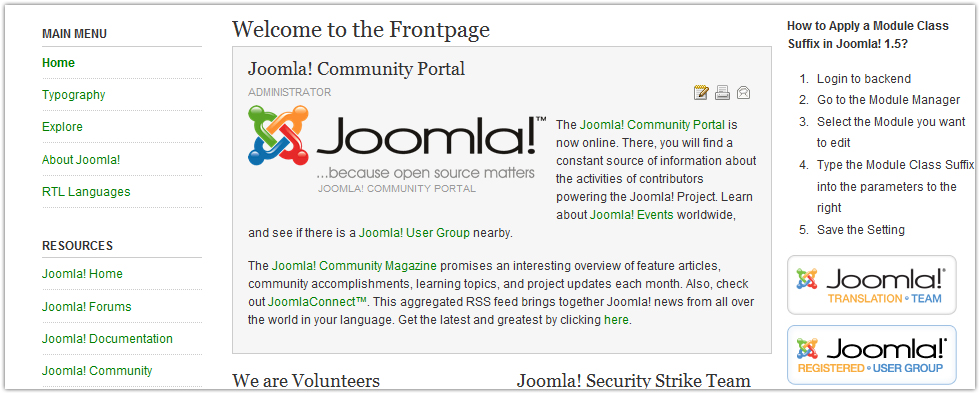
Let's see the frontpage now!
Create your own blocks
T3 Framework 2.0 themes have the ability to also override blocks used by layouts. You can override every block supplied by default and coming with the T3 Framework plugin:
- header.php
- mainnav.php
- middle.php
- footer.php
- other blocks.
- Create / remove module positions.
- Modify module order or position within the block. Click here to find out more.
- Modify block parameters: style, width, type, inset, etc. Click here to find out more.
- the blocks folder of the template.
Example: your_site/templates/ja_purity_iii/blocks. - the blocks folder inside any core / local theme.
Example: your_site/templates/ja_purity_iii/core/themes/variation_theme/blocks
Extra layouts
Main-Left-Right Layout
To create a new core layout, please follow these steps:
- Step 1 - Browse the your_site/templates/ja_purity_iii/core/etc/layouts folder.
- Step 2 - Create a empty file called main-left-right.xml.
- Step 3 - Edit it and paste inside this code
<?xml version="1.0" encoding="utf-8"?>

<layout name="desktop">

	<blocks name="middle" colwidth="20">

		<block name="right1">left</block>

		<block name="right2">right</block>

	</blocks>

</layout>
As you can see, this layout only needs to override the layout positions for left and right blocks, no need to duplicate the rest of the layout code.
Left-Right-Main Layout
To create a new core layout, please follow these steps:
- Step 1 - Browse the your_site/templates/ja_purity_iii/core/etc/layouts folder.
- Step 2 - Create a empty file called left-right-main.xml.
- Step 3 - Edit it and paste inside this code
<?xml version="1.0" encoding="utf-8"?>

<layout name="desktop">

	<blocks name="middle" colwidth="20">

		<block name="left1">left</block>

		<block name="left2">right</block>

	</blocks>

</layout>
Just like the example above, this layout only needs to override the layout positions for left and right blocks.
Main-Right-Rounded Layout
To create a new core layout, please follow these steps:
- Step 1 - Browse the your_site/templates/ja_purity_iii/core/etc/layouts folder.
- Step 2 - Create an empty file called 2cols-right-round.xml.
- Step 3 - Edit it and paste inside this code
<?xml version="1.0" encoding="utf-8"?>

<layout name="desktop">

	<blocks name="middle" colwidth="20">

		<block name="right1" style="JArounded">left</block>

		<block name="right2" style="JArounded">right</block>

	</blocks>

</layout>
As you can see, this layout overrides the default style of the left and right layout and also their positions.
Left-Main-Rounded Layout
To create this layout, please follow these steps:
- Step 1 - Browse the your_site/templates/ja_purity_iii/core/etc/layouts folder.
- Step 2 - Create a empty file called 2cols-left-round.xml.
- Step 3 - Edit it and paste inside this code
<?xml version="1.0" encoding="utf-8"?>

<layout name="desktop">

	<blocks name="middle" colwidth="20">

		<block name="left1" style="JArounded">left</block>

		<block name="right1" style="JArounded">right</block>

	</blocks>

</layout>
As you can see, this layout overrides the default style of the left and right layout and also their positions. To customize this style, please follow these instructions.
Extra themes
To create a new theme, you only need to override the code or images, so please follow these steps:
- Step 1 - create a green theme folder in your_site/templates/ja_purity_iii/core/themes folder;
- Step 2 - create a file&folder structure inside this theme like this:
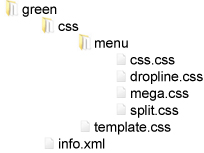
Please note that files must be empty. - Step 3 - edit the info.xml file and paste this code inside

<?xml version="1.0" encoding="utf-8"?>

<theme>

	<name>green</name>

	<description>Green theme for JA Purity III Template</description>

	<date>July 2010</date>

	<version>1.0.0</version>

	<author>JoomlArt</author>

	<copyright>JoomlArt</copyright>


</theme>
- Step 4 - open template.css file of this theme and paste this code inside:
/* Normal links ---*/

a { color: green;}
/*--  Cpanel --*/

a#ja-cpanel-toggle:hover, #ja-cpanel-toggle.open {

	background: green;

}
- Step 5 - Paste this code inside css.css
#ja-cssmenu li .active, #ja-cssmenu li .active:hover {

	background: green;


}
- Step 6 - Paste this code inside dropline.css
#jasdl-mainnav li.active a,

#jasdl-mainnav li.active a:hover,

#jasdl-mainnav li.active a:active,

#jasdl-mainnav li.active a:focus {

	background: green;

}
#ja-subnav {

	background-color: green;


}
- Step 7 - Paste this code inside mega.css
.ja-megamenu a.active { background: green !important;}
- Step 8 - Paste this code inside split.css
#ja-splitmenu li.active a,

#ja-splitmenu li.active a:hover,

#ja-splitmenu li.active a:active,

#ja-splitmenu li.active a:focus {

	background: green;

}
#ja-subnav {

	background: green;

}
You can repeat these steps to create multiple themes with your desired colors. Now you can assign this theme to a profile, so follow instructions below.
Building the default profile
Your new template now needs a default profile to save everything that is default. You can copy the default profile from ja_t3_blank template or you can create it yourself following these steps:
- Step 1 - browse the your_site/templates/ja_purity_iii/core/etc/profiles folder;
- Step 2 - create a default.ini file;
- Step 3 - paste this code inside:
logoType=image

setting_font=3

setting_screen=fixed

screen_fixed_width=

hide_content_block=0

setting_direction=ltr

setting_t3logo=t3-logo t3-logo-light

gfont_global=\|\|

gfont_logo=\|\|

gfont_slogan=\|\|

gfont_moduletitle=\|\|

gfont_pageheading=\|\|

gfont_contentheading=\|\|

menutype=mainmenu

setting_menu=mega

startlevel=0

endlevel=-1

ja_menu_mega_animation=slide

ja_menu_mega_duration=300

ja_menu_mega_delayhide=

option_font=0

option_screen=1

option_profile=1

option_layouts=1

option_direction=1

option_menu=1

themes=

desktop_layout=default

handheld_layout=handheld

iphone_layout=iphone

android_layout=iphone
Building profile variations
Now your new layouts and themes can be assigned to new profiles. Profile variations will override the default profile, and will not require the entire code for same settings.
To create a new profile, follow these steps:
- Step 1 - Open your your_site/templates/ja_purity_iii/core/etc/profiles folder.
- Step 2 - Create a new profile empty file called for instance green-content-left.ini
- Step 3 - Paste inside this file the following code:
themes=core.green
desktop_layout=main-left-right
As you may guessed, this profile will override the default profile themes setting and desktop_layout setting.
End-user Customization
This section explores the end-user template customization process. Generally here you will learn how to customize the logo, modules styling, user created layouts, user created themes and user custom settings. You will be introduced to the techniques, procedures of editing files to achieve a custom design, outside the core code of the template.
All user created themes and uploaded via the administration panel, and all user created custom layouts and blocks must use the local folder, so users can easily update the core plugin and template, without losing any customizations.
Before you go, you may want to check color schemes so click here to see some samples.
End user theme development
In order to prepare the template for production website, end users are going to create their own themes to override the default theme, and upload them to the local folder, then assign them to various profiles. The reason for using local themes is the ease of updating the core and general template files without losing end user customization.
We are going to fill the blank CSS files with styling for most known elements, to get closer to the JA Purity II template design.
How to use Firebug
Preparation
In order to customize the style of your template, we find a good idea documenting the best practices using Firebug extension for Mozilla Firefox.
- First we are going to download and install Mozilla Firefox, so please click here to download.
- Next click here to download and install Firebug.
Firebug Overview
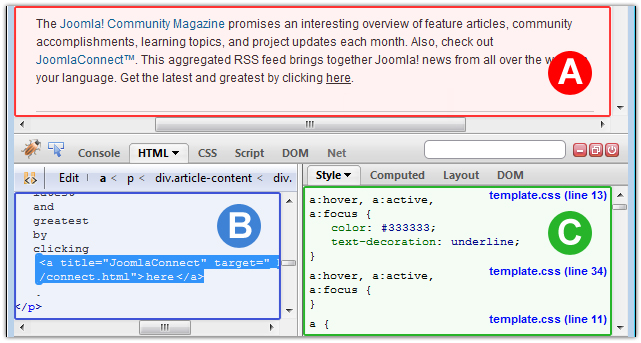
A - The web page
This is the output of the code, the front-end of Joomla! powered website.
B - The HTML source
This is the HTML code of the page rendered by all scripts and front-end view of components and modules.
C - The computed styling
This is where the magic happens as this is where we are going to play around to change the design of various template elements.
Please note that computed style may look different than it looks in your CSS files.
Firebug Usage Example
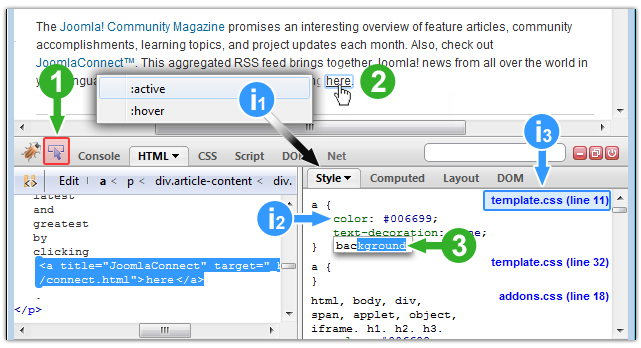
- Step 1 - click the Inspect element button.
- Step 2 - hover any element of the template that you want to style, and click it, let's say we want to style the links.
- Info 1 - after you have selected a link, the C - The computed styling section will instantly display the element specific styling, in our case
a:hover, a:active, a:focus {color:#333333; text-decoration: underline;}
but you can always switch to :hover / :active anytime. - Info 2 - on mouse out (when you are not hovering the link), the C - The computed styling will instantly display normal links styling
a {color:#006699; text-decoration:none;}. - Info 3 - when you are watching a computed style, Firebug also shows you the file and line number where you can find the style.
- Step 3 - click the computed style for this element and add your styling. Click here to read a good CSS reference.
- Step 4 - copy any additional style you have added to the CSS code (template.css in our case).
Preparing files and folders
In order to create your own theme ready for your production website, you can create a new file & folder structure in your computer similar to this one:
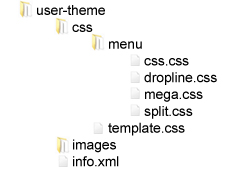
- these files must be empty (blank).
- this theme is going to override the default theme, this means you don't have to use all the default styling, just the style for the elements you override.
Editing theme info file
Your new theme will need to be recognized as unique by the framework so you can also recognize it. Notice the info.xml file in the newly created theme structure? Please open it with your favorite code editor, and paste this code inside and customize to your needs.
<?xml version="1.0" encoding="utf-8"?>

<theme>

	<name>user-theme</name>

	<description>User theme for user website</description>

	<date>July 2010</date>

	<version>1.0.0</version>

	<author>mySite.com</author>

	<copyright>mySite.com</copyright>


</theme>
Customizing logo
Getting started with logo
To use your own logo, you can either create your own, use the one you already have, or let others do it for you. We are going to show you a quick and simple guide on how to customize the logo for your production website.
All commercial JoomlArt templates come with full PSD sources used for template design, and this guide you are going to read applies for them as well.
Editing logo
- Using your favorite graphics tool (check software requirements here), create your own logo.
- Wrap it in a slice (please write down the dimensions of the slice, you are going to need them for CSS edits</span.>). See our example below:

- Export it as transparent PNG-24 file,
- Rename it to your convenience. Example: website-name.png, (we used user-logo.png in our example)
- Copy the new logo to your_site/templates/ja_purity_iii/local/user-theme/images/ folder.
Editing CSS
The new logo will need proper CSS in order to override the logo of the default theme. Open the user-theme/css/template.css file and paste this code inside:
/* Logo Image ---*/

h1.logo { width: 118px; height: 28px; padding:20px 0; margin-left:0;} // change here the width and height of the logo according to yours
h1.logo a {

	background: url(../images/user-logo.png) no-repeat left; // change here the file-name according to your logo

	width: 118px; // change here the width of the logo according to yours

	height: 28px; // change here the height of the logo according to yours

}
User design for the search module
We are going to modify the search module to look even closer to JA Purity II design by adding an icon and some padding. Here are the steps:
- Step 1 - find ja_purity_ii/images/icon-search.gif image and copy it into ja_purity_iii/local/themes/user-theme/images folder;
- Step 2 - open the user-theme/css/template.css file and add this code
/*--- Search module ---*/

#ja-search {top:25px;}
form.search {

	background: url(../images/icon-search.gif) no-repeat left;

	padding-left: 20px;

}
Customizing links
Your links will need your own color theme, so open the user-theme/css/template.css file and paste this code inside:
/* Normal links ---*/

a { color: #e38600;}
Customizing Read-more link
Now we are going to style the Read-more link, so in the same file user-theme/css/template.css add this code at the bottom:
/* Read-more link ---*/

a.readon {

	background: #FFFFFF;

	border: 1px solid #E38600;

	padding: 0 5px;

}
a.readon:hover, a.readon:active, a.readon:focus {

	background: #E38600;

	color: #fff;

	text-decoration: none;

}
Starting JA T3 Blank v1.1.4, the Read-more class rule has changed into p.readmore a so the code will be:
/* Read-more link ---*/

p.readmore a {

	background: #FFFFFF;

	border: 1px solid #E38600;

	padding: 0 5px;

}
p.readmore a:hover, p.readmore a:active, p.readmore a:focus {

	background: #E38600;

	color: #fff;

	text-decoration: none;

}
Next we are going to customize the menu systems to look exactly like JA Purity II design.
User design for Mega Menu
Please open user-theme/css/menu/mega.css, and paste this code inside:
/* root (level0) menu items border */

.ja-megamenu ul.level0 li.mega  {border-left:1px solid #555;}

.ja-megamenu ul.level0 li.last {border-right:1px solid #555;}
/* active and hovered content links */

.ja-megamenu a.active {background: #e38600 url(../../images/grad1-mask.png) repeat-x center top !important;}

.ja-megamenu a.over {background: #555 url(../../images/grad1-mask.png) repeat-x center top;}
/* root (level0) hovered menu items*/

ul.level0 li.over, ul.level0 li.haschild-over {

	background: url(../../images/grad1-mask.png) repeat-x top #666666;

}
/* root (level0) active menu items */

ul.level0 li.active {

	background: url(../../images/grad1-mask.png) repeat-x top #e38600;

}
/* level1 and above hovered menu items */

.ja-megamenu ul.level1 li.over, ul.level1 li.haschild-over {background:#777;}
/* level1 and above active menu items */

ul.level1 li .active {

	background: #E38600 !important;

	color:#333 !important;

}
User design for Split Menu
Please open user-theme/css/menu/split.css, and paste this code inside:
/* forcing the height of the items*/

#ja-splitmenu li a { height: 34px; }
/* Level0 (root) menu items borders */

#ja-splitmenu li {border-left: 1px solid #555;}

#ja-splitmenu li.last-item {border-right: 1px solid #555;}
/* Level0 (root) active menu items */

#ja-splitmenu li.active a,

#ja-splitmenu li.active a:hover,

#ja-splitmenu li.active a:active,

#ja-splitmenu li.active a:focus {

	background: url(../../images/grad1-mask.png) repeat-x scroll center top #e38600;

}
/* Level0 (root) hovered menu items */

#ja-splitmenu li a:hover {

	background: url(../../images/grad1-mask.png) repeat-x center top #555555;

}
/* Subnav background */

#ja-subnav {

	background: #444;

}
/* Level1 only */

#ja-subnav li {

	margin:0 10px 0 0;

}
#ja-subnav li a {

	border-left:1px dotted #999999;

	padding-left:15px;

}
/* Level2 and above menu items */

#ja-subnav li ul li a {

	border-left: none;

	padding-left: 5px;

}
/* Level2 and above active menu items */

#ja-subnav ul li.active a.active,

#ja-subnav ul li.active a.active:hover,

#ja-subnav ul li.active a.active:active,

#ja-subnav ul li.active a.active:focus {

	color:#fff;

}
User design for Dropline Menu
Please open user-theme/css/menu/dropline.css, and paste this code inside:
#jasdl-mainnav  a {

	height:34px;

}
#jasdl-mainnav li {border-left: 1px solid #555;}

#jasdl-mainnav li.last-item {border-right: 1px solid #555;}
#jasdl-mainnav li.active a,

#jasdl-mainnav li.active a:hover,

#jasdl-mainnav li.active a:active,

#jasdl-mainnav li.active a:focus {

	background: url(../../images/grad1-mask.png) repeat-x center top #e38600;

}
#jasdl-mainnav a:hover {

	background: url(../../images/grad1-mask.png) repeat-x center top #555555;

	color:#FFFFFF;

}
#ja-subnav {

	background-color: #444;

}
#ja-subnav li {

	margin:0 10px 0 0;

}
#ja-subnav li a {

	border-left: 1px dotted #999999;

	padding-left: 15px;

}
#ja-subnav li ul li a {

	border-left: none;

	padding-left: 5px;

}
#ja-subnav ul li.active a.active,

#ja-subnav ul li.active a.active:hover,

#ja-subnav ul li.active a.active:active,

#ja-subnav ul li.active a.active:focus {

	color:#fff;

}
User design for CSS Menu
Please open user-theme/css/menu/css.css, and paste this code inside:
#ja-cssmenu li .active, #ja-cssmenu li .active:active, #ja-cssmenu li .active:hover, #ja-cssmenu li .active:focus {

	background: #e38600;

}
#ja-cssmenu li {border-left: 1px solid #555;}

#ja-cssmenu li.last-item {border-right: 1px solid #555;}

#ja-cssmenu li ul li {border-left:none;}

#ja-cssmenu li ul li.last-item {border-right: none;}
#ja-cssmenu li a:hover,

#ja-cssmenu li a:active,

#ja-cssmenu li a:focus,

#ja-cssmenu li a.sfhover {

	color: #fff;

}
#ja-cssmenu li:hover,

#ja-cssmenu li.sfhover,

#ja-cssmenu li.havechildsfhover,

#ja-cssmenu li.havechild-activesfhover {

	background: url(../../images/grad1-mask.png) repeat-x top #555;

	color: #fff;

}
#ja-cssmenu li a.active,

#ja-cssmenu li a.active:hover,

#ja-cssmenu li a.active:active,

#ja-cssmenu li a.active:focus {

	background: url(../../images/grad1-mask.png) repeat-x top #e38600;

	color: #fff;

}
#ja-cssmenu li ul a:hover,

#ja-cssmenu li ul a:active,

#ja-cssmenu li ul a:focus,

#ja-cssmenu ul li:hover,

#ja-cssmenu ul li.sfhover,

#ja-cssmenu ul li.havesubchildsfhover,

#ja-cssmenu ul li.havesubchild-activesfhover,

#ja-cssmenu ul ul li:hover,

#ja-cssmenu ul ul li.sfhover,

#ja-cssmenu ul ul li.havesubchildsfhover,

#ja-cssmenu ul ul li.havesubchild-activesfhover {

	background: #777;

	color: #fff;

}
#ja-cssmenu ul li a.active,

#ja-cssmenu ul li a.active:hover,

#ja-cssmenu ul li a.active:active,

#ja-cssmenu ul li a.active:focus {

	background: none !important;

	color: #fff;

	font-weight: bold;

}
Customizing user layouts
Using custom width for LEFT and RIGHT blocks
In some cases you may want to use a custom width for left or right column. To do that you have to edit your desired layout, or all layouts in case you want to apply this change for all cases.
For instance let's override the width of the right column to be 25% wide. With the internal editor, open this layout and change the code like this:
		<block name="left1">left</block>
		<block name="right1" width="25">right</block>
This will increase the width of the right column and decrease the width of the content body and left column. To find out more about this block attribute, click here. To learn how to edit layouts in back-end, click here.
Create User Profile
We have shown you how to develop a customized theme ready for your production website, now we are going to create a user-profile to assign this theme to be used for all your pages. We are also going to disable T3 Framework logo at the bottom of the page and the profiles switcher. Here is a quick guide:
- Step 1 - In the Profiles panel, click the New button and type in a profile name. Example: user-profile.
- Step 2 - Select the Don't show option for T3 logo to hide the logo at the bottom. Click here to find out more.
- Step 3 - Select the Hide option for Show/Hide Profile Tools setting to hide profile switcher in front-end. Click here to find out more.
- Step 4 - Click the Apply button to save the changes to your profile.
- Step 5 - Click here to find out more about profiles editing.
Global Configuration
Now you can assign your profile to All Pages or specific pages. Quick guide:
- Step 1 - In the Global. Profile Override Settings section, select user-profile
- Step 2 - Click the Apply button to save the changes to global template configuration.
- Click here to find out more.
Google Analytics
The last step before publishing the live site, you might need your Google Analytics code. This can be done without changing core files. Here is a quick how to:
- Create a new Custom HTML module and paste inside your Google Analytics code.
Remember: use the HTML button to open the HTML editor, or your code will be parsed as text.
- Publish your custom module in the debug position, don't worry if the Joomla! debug is disabled, your Google Analytics code will be parsed as it should be.
- Check your front-end source code at the bottom, you will see the Google Analytics code.
Updating T3 Framework
JoomlArt provide regular updates for all T3 Framework based templates and also an easy way to update your customized templates. All quickstart packages come with latest version of JA Extensions Manager but you can always download it here and check installation guide here. Watch a video tutorial here.
Update T3 Framework plugin
- In the JA Extensions Manager find T3 Framework plugin;
- Click the Check update link;
- If new version was found, click the Upgrade link;
- Click here to find out more.
Update T3 Framework based template
- Back-up the Local folder, you are going to re-upload it later.
- In the JA Extensions Manager find purity iii (or any other commercial) template;
- Click the Check update link;
- If new version was found, click the Upgrade link;
- Cross check the differences between files, especially your_site/templates/ja_purity_iii/params.ini and profile files located in the your_site/templates/ja_purity_iii/core/etc/profiles folder and notice any difference (new feature) that might interest you. Click here to find out more.
- Re-upload the local folder using your favorite FTP client.
- Reassign your profile to all the pages or specific ones. Click here to find out more.
- Click here to find out more about JA Extensions Manager Usage.
Update JA Typography plugin
- In the JA Extensions Manager find Typo plugin;
- Click the Check update link;
- If new version was found, click the Upgrade link;
- Click here to find out more.
JA Purity III Demo
JA Purity III Template for Joomla! 1.5 was developed and documented in this section for educational purpose only. There is no release date planned.
Click here to see live demo | Download here (user theme tutorial version)