Introduction
The new Megamenu came out from the need to push the web development to the next level. It's arrival also changed the classic navigation systems by adding improvements. Megamenu upgraded it's brothers by giving them additional class and menu item description or slogan line, but also upgraded the template functions by adding menu override options.
In this section we are going to show you how to set up the Megamenu, the third generation navigation system. This is a step by step guide on how to edit your main menu to add more value to your website.
Basically, we are going to show you examples on:
- how to add menu icons;
- how to manage the menu item parameters;
- how to manage specific megamenu parameters;
- how to load different types of modules as menu items;
- the document ends with a complete parameter reference that will explain all parameters and their relations to the classic navigation systems.
If you need a hand understanding the basics of Joomla! Menu Management, please refer to Menu Management Reference.
Editing menu items
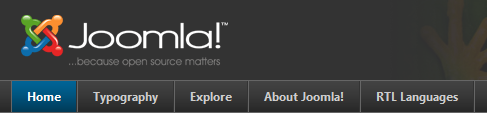
When you install JA Purity II template or any other T3 Framework based template for the first time, you will have a navigation menu system looking similar to this:
This image suggests no parameters used in this particular case. We will start to set more and more parameters and explain how to make it look just like the demo, but first let's see the checklist.
Checklist
In order to be able to enable the complete features list of the T3 navigation systems, you have to check:
- you have installed the JA Menu Parameters Plugin located in ja_purity_ii_-_stable_version.v1.X.zip/Extensions/plg_system_jamenuparams.zip. (JA T3 Framework 1.0 only)
- you have your T3 Framework based template set as your default template;
- you have set up megamenu as your default navigation system, so this way you can set up all your desired settings;
Please note that using JA Purity II or JA T3 Blank quickstart packs do not require to follow this checklist, it is only for manual installation.
Adding menu icons
To be able to add icons to your menu items, first you are going to upload your favorite icons to the your_site_root/images/stories folder.
Please note that the icons must not exceed 16x16 pixels, a must if you want avoid layout breaks. Advanced users can make this possible by customizing menus style classes.
Next, in the backend administration of your website, navigate to Menus - Main Menu, and then we will click on Home to add an appropriate icon for it.
![]()
- Step 1 - Click the Parameters (System) tab;
- Step 2 - Select your desired icon for Home menu item;
- click the Save button to apply these changes.
Now let's do the same for Typography menu item, then go to the frontend, refresh the page and see how it looks like!
![]()
Editing additional menu parameters
The first versions of T3 templates used to add these megamenu parameters in the menu item titles and this caused SEO related problems. To find out what changed, please read this forum announcement.
Grouping menu items
When you enable megamenu for the first time, menu items will have no megamenu parameter, therefore it will show up similar to a regular Moo Menu:
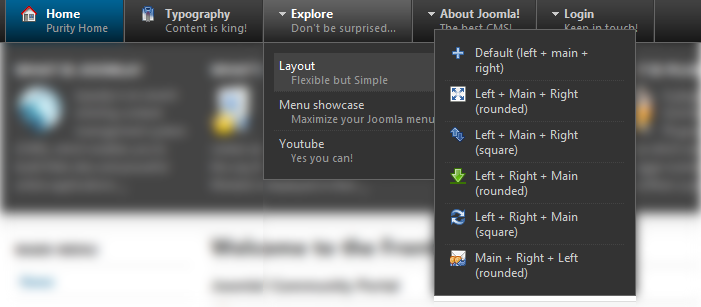
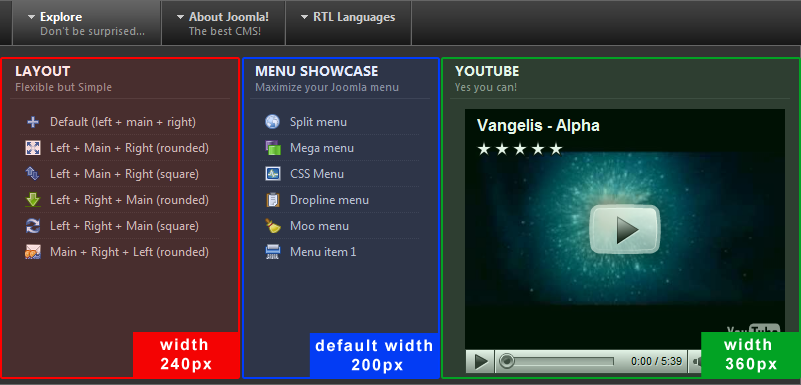
In the image above, you can see the Explore menu item having three child menu items:
- Layout,
- Menu Showcase,
- Youtube (originally was Vimeo, but we changed it just to show you later how to deal with it).
We are going to edit each one of them, as we need to show up their child menu items or child content along with these parent items. We are going to click the Layout menu item to edit it.
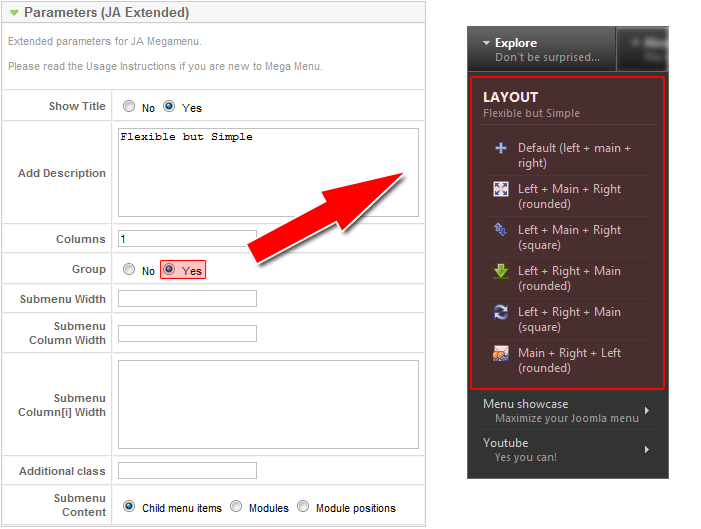
As you see in the image above, just by selecting Yes for the Group option will group the Layout menu item with it's child menu items into a compact column, and the parent menu item Layout becomes the head of the first column of the main menu item Explore. Now we can do the same thing for the other two parent menu items: Menu Showcase and Youtube.
Please note that this parameter only applies for megamenu navigation system.
Setting up columns
We find a good idea to show you now the Explore menu item structure. Take a closer look at the menu structure in the left side and the frontend view in the right side. This makes sense to edit some more menu parameters:
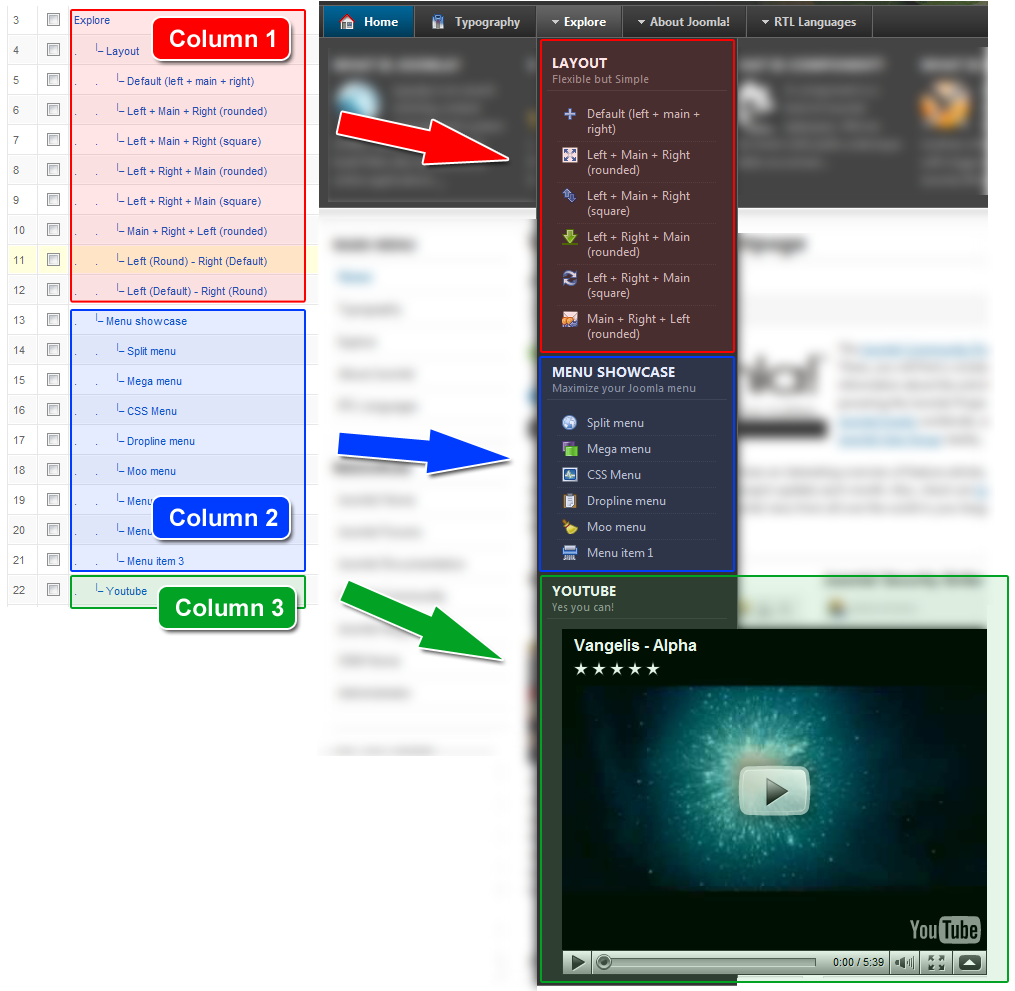
As we marked the columns, we have to change the Explore menu item parameters to show up properly it's child menu items in frontend, so let's click this menu item and customize it:
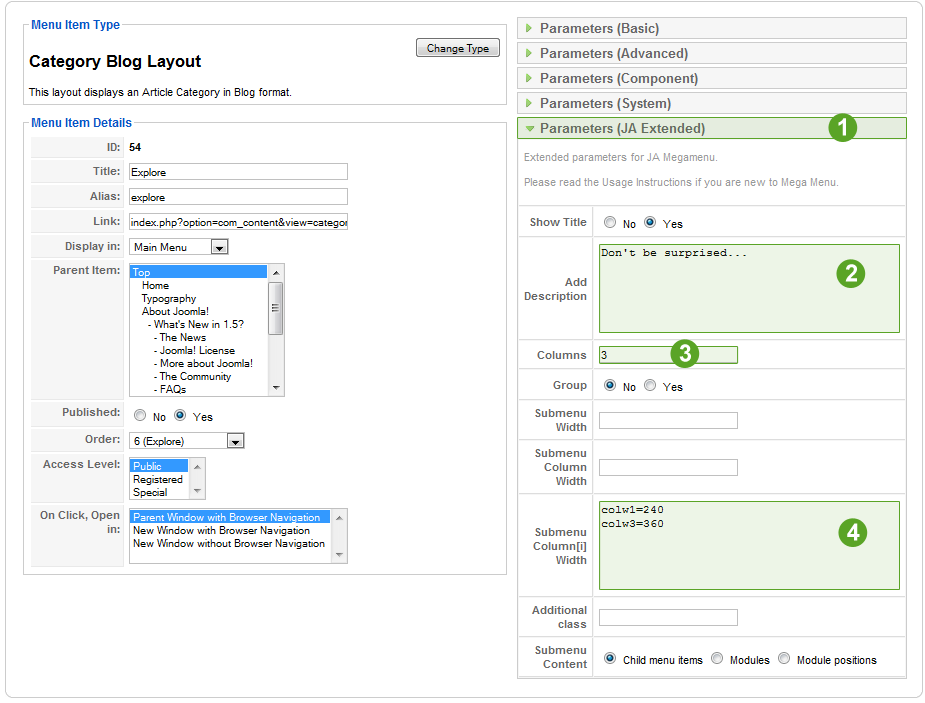
- Step 1 - click the Parameters (JA Extended) tab to edit the megamenu parameters;
- Step 2 - add a description or a slogan for the menu item;
- Step 3 - set the columns number to three, it will apply for each menu item: Layout, Menu Showcase and Youtube;
- Step 4 - add a custom width for each column to make it more visual appealing, especially for the Youtube video player that exceeds the default column width of 200 pixels;
- Click the Save button, go to frontend, refresh the page and see the changes.
Please note that this parameter only applies for megamenu navigation system.
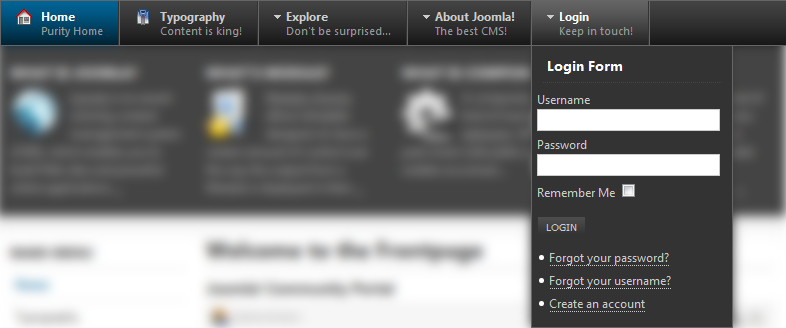
Loading modules as menu items
In this section we are going to show you how to load different types of modules as menu items. Basically you can load any type of module:
- custom HTML: embedded videos, external content, advertising (Google Ads or any other affiliated adds service), community links, etc;
- regular Joomla! modules: login module, quick contact module, external content feeds, generally all modules you have installed in your setup;
- you can also load unique module positions you have set for your modules, position that are not defined in your template.
Please note that child content items will only show up for megamenu navigation system, for the others, CSS Menu, Moo Menu, Split Menu and Dropline Menu, the navigation bar will only show up menu titles.
Loading regular modules
Just to so show you an example, we are going to load the default Joomla! Login Module as a menu item, so first go to Menu Item Manager of the Main Menu. Now click the New button to add a new menu item, then proceed with the folowing steps:
loading....
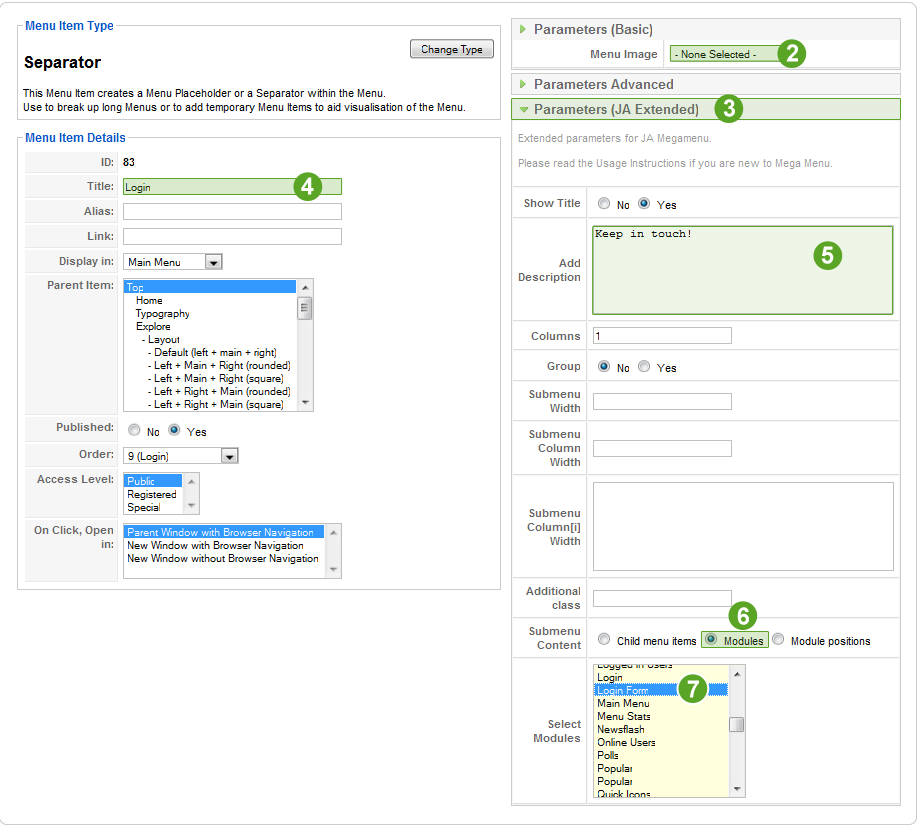
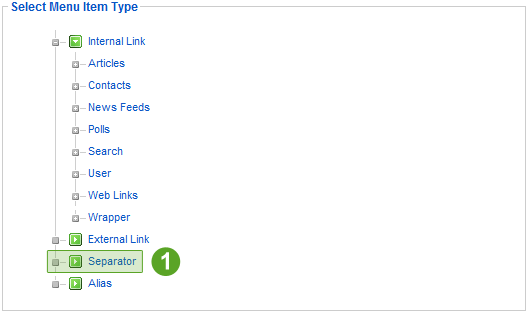
- Step 1 - click Separator Menu Item Type, as it is the most appropriate type for us to load modules, we are going to load the Login Module as the child content of this menu item;
- Step 2 - select an icon for this menu item if you want;
- Step 3 - click the Parameters (JA Extended) tab to open megamenu parameters;
- Step 4 - type in a Title for this menu item;
- Step 5 - type in an appealing slogan/description for this menu item;
- Step 6 - select Modules content type;
- Step 7 - scroll down and select Login Form, this is the module we are going to load;
- we are going to leave all other parameters untouched;
- click the Save button and go to frontend, refresh the page, and hover your mouse over the new menu item.
Loading embedded video
We have shown you above a Youtube video player as a menu item. Now we are going to explain how to do that, so first let's create a new Custom HTML module. Go to Module Manager, then click the New button.
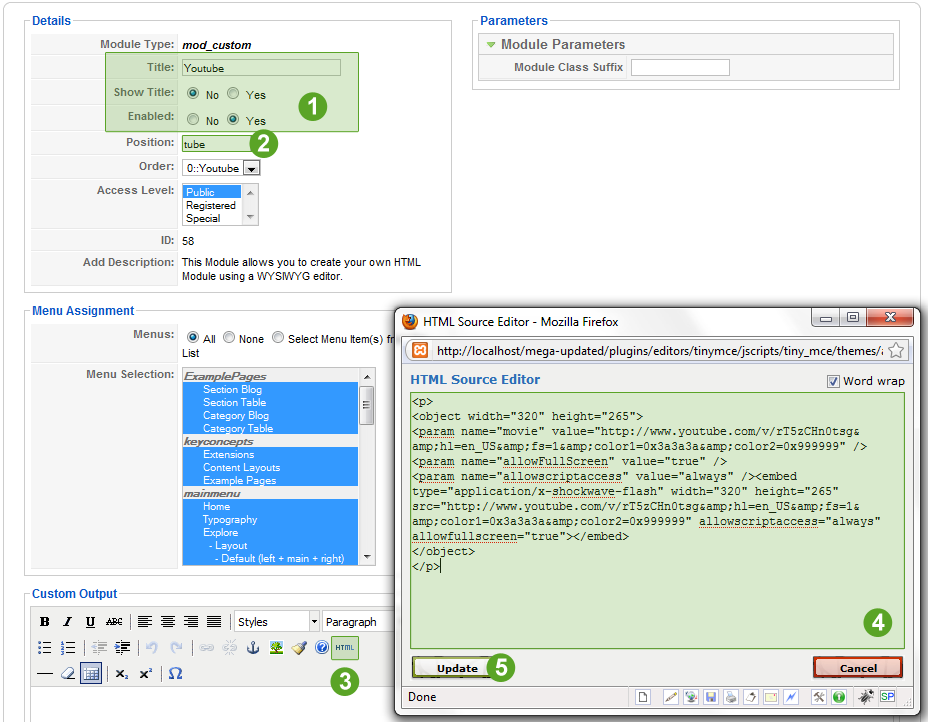
- Step 1 - type in a module name so you can recognize this module later, but select not to show this module name;
- Step 2 - type in a unique module position name, we are going to need this position name later;
- Step 3 - click the HTML link in the editor to open the HTML Source Editor;
- Step 4 - paste the video embedded code inside the text area;
- Step 5 - click the Update button;
- now you are going to click the Save button to save the module configuration.
Next, we will open Menu Item Manager for Main Menu, and click the New button in the top-right corner of your administration panel. Same as the example above, click the Separator menu item type, then continue with the following steps:
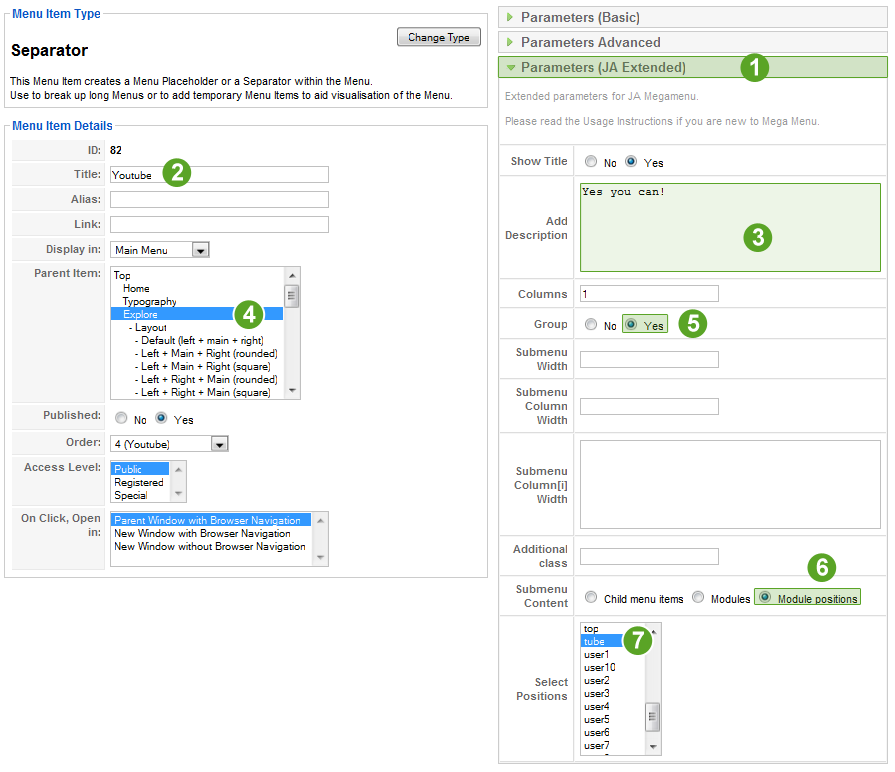
- Step 1 - click the Parameters (JA Extended)tab to open the megamenu parameters;
- Step 2 - type in a menu item title;
- Step 3 - type in an appealing slogan/description for the menu item;
- Step 4 - make sure you have assigned this separator menu item to the proper parent menu item;
- Step 5 - select Yes for the Group option to show the child content item (the Youtube flash video player) along with the menu item title;
- Step 6 - select Module positions option to be able to select one;
- Step 7 - remember the unique module position name tube we have assigned our custom module to? We are going to select it now!
- click the Save button to save the new menu item configuration, go to frontend, refresh the page and see the changes.
The result of these changes can be viewed in the Setting up columns section.
Parameters reference
In this section we would like to build a complete reference for all T3 Navigation System Parameters. We are going to explain each parameter: functions, usage, values and examples of best practices.
TIP: hovering your mouse pointer over each of the parameters in the menu item editing panel, basic usage instructions will pop-up and give you a hint on how to setup the parameters.
Show the menu title
![]()
Setting this parameter to No, will hide the menu item title.
So, for menu items from the second level or above, you might want to hide the menu title. The most important things to remember:
- the default value for this parameter is Yes, meaning Yes, show the title;
- you might find this useful for advertising modules, tag clouds or special external content;
- this parameter also applies to description parameter;
- setting this parameter to No, will hide the title and also other child content (menu items/modules) for a menu item;
- this parameter only applies to megamenu navigation system.
This parameter is useful for menu items you don't want to show up in frontend, but you need a unique Itemid value for that menu item to be used by child content pages. Example: you want to use a menu item for user registration, but you don't want this menu item to be visible, because registered users that click this menu item while are logged in, they will get a critical error, so it is better to hide this menu item's title, as long as we have it published and passing it's Itemid value to all registration links.
Menu item description or slogan
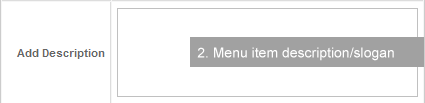
A nice new feature to make your menu items appealing, interesting or just funny. What is important here to point out:
- this parameter has no default value;
- keep it simple - you don't want to break the template because of long known quotes or irrelevant information;
- keep it clean - the menu description can be applied for all of your menu items, but we find a good idea to use this feature only for the most important menu items, the menu items from the first two levels;
- this parameter applies for all navigation systems: CSS Menu, Moo Menu, Split Menu, Dropline Menu and Mega Menu.
Number of columns
![]()
This parameter defines the number of columns needed to display child menu items of a parent menu item. There are some things you must always remember:
- the default value of this parameter is 1 (one);
- if you have for instance 4 child menu items, you will have to set this parameter to 4 columns for the parent item of these menu items;
- you can create as many columns as you need into your navigation structure, but it is better to use columns only for the main menu items, those in your menu root, this way you will avoid template breaks;
- this parameter is a pair parameter with Group option parameter;
- this parameter only applies to megamenu navigation system.
Group option
![]()
This parameter will group the parent menu item with it's child menu items or content items to form compact columns. Remember:
- the default value of this parameter is No;
- it only groups the parent item with it's direct child items (EG: parent from level 1 with child1, child2, ... childn from level 2);
- this parameter is a pair parameter for Number of columns parameter;
- this parameter only applies to megamenu navigation system.
Submenu width
![]()
This parameter will override the width of the entire child content area. Some info about this parameter:
- this parameter has no default value;
- this parameter must be used for parent menu items and applies to child content area, no matter the number of columns;
- this parameter is useful for a single column of child items, especially for special advertising or different types modules having a higher width value than the default 200 pixels column width;
- this parameter only applies to megamenu navigation system.
Submenu column width
![]()
This parameter will override the default column width of 200 pixels for all columns. So:
- this parameter has no default value;
- this parameter is used for parent menu items, and applies to all direct child items columns;
- this parameter might be useful when you have relatively long menu item titles or you just want to add a distinctive look to your navigation;
- this parameter only applies to megamenu navigation system.
Specific submenu column width
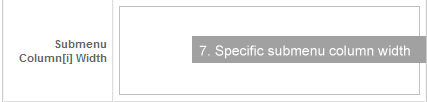
This parameter will override the default width of 200 pixels for a specific column or more.
- this parameter has no default value;
- this parameter is used for parent menu items, and applies to specific direct child items columns;
- this parameter is very useful when you have more columns with distinctive menu item title lengths or larger images and you want to use a custom width for certain columns, just like we have done for the Youtube video player;
- for each of the child items, you have to define the width using this variable: colw1 - meaning width of the first column;
- this parameter only applies to megamenu navigation system.
Example:
- root_parent - regular Joomla! menu item,
- child1 - parent of other regular menu items <-> this is the first column
- child2 - custom module with a 200x250px banner <-> this is the second column.
For the root_parent menu item we are going to setup custom width for the second column as it's width exceeds the default 200px column width. So we are going to type in this parameter value:
colw2=270
Please note that loading objects as menu items sometimes requires to use a column width of 15-20px higher value than the width of the object. We have done the same thing in this example here, to let the child content area wrap around the object.
Additional styling class
![]()
This parameter will allow you to extend the styling for each of your menu items. Some guidelines and ideas:
- this parameter has no default value;
- using this parameter you can override/extend the styling of each menu item, just by creating a special styling class, and use it as a value for this parameter;
- this parameter applies to all navigation systems.
Submenu content
This parameter defines the behavior of a parent or child menu item in terms of loading additional content. At this moment you have three options:
Child menu item
![]()
- this is the default option for the Child Content parameter;
- this option will define the menu item behavior as a regular Joomla! menu item;
- the significance of this option is that the menu item will load no additional content, furthermore it will not load any scripts for such actions, just like we would disable loading modules;
- using this option will produce no effect on any menu system, but switching to this option, will disable loading additional content for megamenu navigation system.
Child module
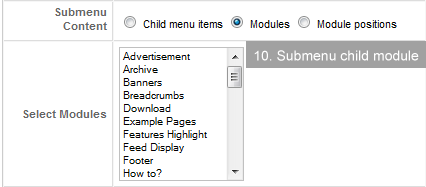
- using this option will allow you to load a module by it's title, with other words if you set your module title "Related news", this is what you are going to see here for module selection, so do not confuse this with mod_module-name;
- this option only affects megamenu and enables the first method of loading modules as menu items.
Child module position
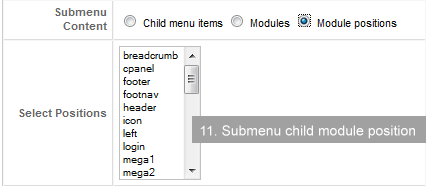
- using this option will allow you to load a module by it's unique position, with other words if you set your module position to "my-position", this is what you are going to see here for module position selection;
- this option only affects megamenu and enables the second method of loading modules as menu items.
Parameter notes
- these are all megamenu parameters, and two of them (Menu item description and Additional class) also apply to the other menu systems;
- using the megamenu navigation system, if you set to No the Show the menu title parameter for a parent item, and No for Group option parameter for all child items of that parent item, it will hide the complete menu structure;
- before introducing the JA Menu Parameters plugin there were 2 parameters: left=1 and right=1, used to make the child content area of a parent item float to the left or to the right, to avoid displaying portions of the child content area outside the template wrapper, but now, if the width of the child content area is very wide, the child content is moved to the left (or right in RTL mode) just enough to display the child content properly.
Final notes
- If you want to find out how to customize T3 Navigation Systems, please visit our designated documentation section.
- For any questions you might have regarding usage or customization of T3 Navigation Systems, please feel free to ask in our forums.
- Enjoy developing with T3 JA Framework!