Introduction
In this chapter we are going to show you how to customize JA Purity II template, a step by step guide on how to customize the logo, the layouts & blocks, the menus, the colors and how to check your new template validity. Generally we will try to answer here to all the most important questions you might have regarding customization of T3 framework based templates.
First we will remind you some tips about building layouts and blocks, and then we will go ahead with the most important details of the template development.
Why customize
Most of the new business models pop-up with a new idea, a new strategy, and mostly with a unique visual strategy. Having a custom design became a necessity over the years. Having a unique content is almost the same thing as having a unique design. Now your website can have multiple functions and frontend options your users will enjoy.
Just for example, we are going to show you how to create a Mesolite like template based on the T3 Framework. Please note that we are not going to insist on all small design details, our main purpose is to show you how to develop a new template with 3 different layouts (1 default and 2 variations), and each of them will use a certain menu system and color theme.
After reading this chapter you will know what files to modify, you will also understand some CSS tricks and hopefully enjoy doing it yourself.
Tools you need
To be able to develop your own template, you will need to prepare:
- the software tools
- Adobe Photoshop CS3/CS4 or Gimp for graphics;
- Adobe Dreamweaver or Notepad++ for code editing;
- Firefox with Firebug plugin for CSS play around;
- the enviromnent
- localhost xampp, wamp or any Apache with PHP and MySQL server;
- or
- livesite preferably on a subdomain.
- Joomla! 1.5 installed on your development server, check server requirements here;
- resources
- You might need to check the resources used to customize the logo, and other graphic elements, so please click here to read more.
Creating the structure
In order to achieve your design goals, you need to better define what you need in terms of layouts, colors, module positions, functions and overrides. Knowing this information will give you a good start building the file structure.
By default JA Purity II comes with 5 layout variations, but using the default.php layout you can create your own custom layouts to achieve several goals:
- allow users to turn ON / OFF adds;
- allow users to turn ON / OFF visual effects;
- allow users to change the color of the layout;
- make your template capable to switch the layout automatically on certain pages;
- make your template capable to switch the menu system automatically on certain pages.
Now let's turn these design goals into technical goals. Generally, for every need you will create a new layout, and a new block, and this block should have different code, so let's explain for each case, what we need to do:
- to allow users to turn the adds ON / OFF, you have to create a new block without the module position you have assigned the adds custom module, so this new block should use a new layout file calling this new block;
- to allow users to turn ON / OFF the visual effects, you can create a new block file based on the head.php block that should miss the javascript calls, and then create a new layout file calling this new block;
- to allow users to change the color of the template goal can be accomplished by creating a new template.css file you can create in a blue color folder in your CSS folder, and this file can be called again by different block and layout files;
(Please note: the future versions of JA Purity II will provide multi-color themes feature for each layout, a feature already available on commercial templates) - last two goals can be accomplished with page override settings we are going to explain in this chapter, and need the goals above accomplished.
Based on the default.php layout of JA Purity II and it's blocks, we will build a template with the following configuration:
- shop.php layout, the default layout of the template, with red color and dropline menu system, with special module positions for Featured Products and Latest Products, Virtuemart component needed;
- blog.php layout, blue color and megamenu menu system, and special module positions for Latest posts and Popular Posts;
- news.php layout, green color and css menu system, with special module positions for Latest news, Popular news and Advertising.
Other details of the template design will show up as you go further with the reading of this page.
Creating a custom default layout
In your templates folder, locate ja_purity_ii\layouts folder. You will find there:
- default.php - the default layout of JA Purity II, we will rename this into shop.php;
- default-joomla.php - we are going to delete this one as we don't really need it;
- handheld.php - we are going to keep this one, this is one of the two mobile ready layouts;
- iphone.php - we are going to keep this one also as it is developed for iphone mobile devices;
- left-main-right.round.php, left-main-right.square.php, left-right-main.round.php, left-right-main.square.php, maine-right-left.round.php - we are going to delete these, as these are variations of the default.php layout and we don't need them anymore.
The new shop.php file is going to use this code, (we present only the code that suffered changes) with small changes to blocks calls:
$positions = array (


   'left1'				=>'left',

   'left2'				=>'',

   'left-mass-top'			=>'',

   'left-mass-bottom'		=>'',

   'right1'			=>'',

   'right2'			=>'',

   'right-mass-top'		=>'',

   'right-mass-bottom'		=>'',

   'content-mass-top'		=>'',

   'content-mass-bottom'		=>'',

   'content-top'			=>'',

   'content-bottom'		=>'',

   'inset1'			=>'',

   'inset2'			=>''


);
..... common code deleted .......
<div id="ja-wrapper">


 <a name="Top" id="Top"></a>


   <?php $this->loadBlock('header') ?>


<?php $this->loadBlock('mainnav') ?>


<div id="ja-container" class="wrap <?php echo $this->getColumnWidth('cls_w'); ?>">


<div class="main clearfix">

		 <div id="ja-mainbody" style="width:<?php echo $this->getColumnWidth('mw') ?>%">

		   <?php $this->loadBlock('main-shop') ?>

		   <?php $this->loadBlock('left') ?>

		   </div>

 </div>

   </div>


   <?php $this->loadBlock('footer') ?>


</div>
<jdoc:include type="modules" name="debug" />
<?php if ($this->isIE6()) : ?>
<?php $this->loadBlock('ie6/ie6warning') ?>
<?php endif; ?>
</body>
</html>
Blocks of the default layout
Like in the code we presented above, our shop.php layout is going to use these blocks:
- head.php,
- header.php,
- mainnav.php,
- left.php,
- main-shop.php,
- footer.php.
We will not use topsl.php and botsl.php for the default layout. We will only show you the code changes in the blocks used by this layout.
Creating new blocks
In the layouts/blocks folder, create a new file called main-shop.php and paste inside the content from main.php file.
Creating new module positions
The classic way
Open the newly created main-shop.php file, and add after line 60 the following code:
<div class="ja-mass clearfix">

	   <jdoc:include type="modules" name="featured-products" style="JAxhtml" />

</div>

<div class="ja-mass clearfix">

	   <jdoc:include type="modules" name="new-products" style="JAxhtml" />

</div>
This code will add two new module positions you are going to use for Virtuemart Featured Products and Virtuemart Latest Products modules. Please note that only the shop.php layout will use these module positions, as it is the only layout to load the main-shop.php block.
To make these new module positions available for selection in module management, we will need to add them in the templateDetails.xml file, so open this file and add after line 38, the folowing code:
   <position>featured-products</position>
<position>new-products</position>
The T3 way
Create a new file products.php in the layouts/blocks and paste inside the following code:
<?php // no direct access

defined( '_JEXEC' ) or die( 'Restricted access' );

?>


  <div class="ja-mass clearfix">

		   <jdoc:include type="modules" name="featured-products" style="JAxhtml" />

   </div>

 <div class="ja-mass clearfix">

		   <jdoc:include type="modules" name="new-products" style="JAxhtml" />

   </div>
Now open your layout file, shop.php in our case, and find lines 17-32:
$positions = array (

   'left1'                                 =>'left',
   'left2'                                 =>'',
   'left-mass-top'                         =>'',
   'left-mass-bottom'                      =>'',
   'right1'                                =>'',
   'right2'                                =>'',
   'right-mass-top'                        =>'',
   'right-mass-bottom'                     =>'',
   'content-mass-top'                      =>'',
   'content-mass-bottom'                   =>'products', // set the new block position here
   'content-top'                           =>'',
   'content-bottom'                        =>'',
   'inset1'                                =>'',
   'inset2'                                =>''

)
Next we are going to call the new block into the layout. So find line 67:
       <?php $this->loadBlock('main') ?> // Change here to main-shop

<?php $this->loadBlock('left') ?>
and add after it:
<?php $this->loadBlock('products') ?>
Next you can add the new module positions in the templateDetails.xml file, just like we have done the classic way.
Creating layout variations
Based on the info in this documentation section, we will now create layout variations for the default layout shop.php. Please note that the code you are about to see is copy-paste ready, but for you to be sure you have proper code, you better use your own code and change only the blocks calls.
Now using the code from the original default.php, we are going to create two new layouts:
- blog.php - paste the code from shop.php, but customize to load specific blocks:
- head-blog.php - we have to create a new block called this way and add custom code inside for different styling and javascript,
- header.php,
- mainnav.php,
- main.php,
- right-xhtml.php,
- botsl.php,
- footer.php.
- news.php - paste the code from shop.php, but customize to load specific blocks:
- head-news.php - we have to create a new block called this way and add custom code inside for different styling and javascript,
- header.php,
- topsl.php.
- mainnav.php,
- main.php,
- left.php,
- botsl.php,
- footer.php.
At this point the code for the blog.php layout file:
..... common code deleted .......
$positions = array (


       'left1'				=>'',

       'left2'				=>'',

       'left-mass-top'			=>'',

       'left-mass-bottom'		=>'',

       'right1'			=>'right',

       'right2'			=>'',

       'right-mass-top'		=>'',

       'right-mass-bottom'		=>'',

       'content-mass-top'		=>'',

       'content-mass-bottom'		=>'',

       'content-top'			=>'',

       'content-bottom'		=>'',

       'inset1'			=>'',

       'inset2'			=>''


);

..... common code deleted .......
<head>

<?php $this->loadBlock('head-blog') ?>

</head>
<body id="bd" class="fs<?php echo $this->getParam(JA_TOOL_FONT);?> <?php echo $this->browser();?>">
<div id="ja-wrapper">


     <a name="Top" id="Top"></a>


       <?php $this->loadBlock('header') ?>


	<?php $this->loadBlock('mainnav') ?>


	<div id="ja-container" class="wrap <?php echo $this->getColumnWidth('cls_w'); ?>">


     <div class="main clearfix">

              <div id="ja-mainbody" style="width:<?php echo $this->getColumnWidth('mw') ?>%">

               <?php $this->loadBlock('main') ?>

               </div>

               <?php $this->loadBlock('right-xhtml') ?>


     </div>

       </div>


     <?php $this->loadBlock('botsl') ?>


       <?php $this->loadBlock('footer') ?>


</div>
<jdoc:include type="modules" name="debug" />
<?php if ($this->isIE6()) : ?>
	<?php $this->loadBlock('ie6/ie6warning') ?>
<?php endif; ?>
</body>
</html>
And the code for news.php layout file:
..... common code deleted .......
$positions = array (


       'left1'				=>'left',

       'left2'				=>'',

       'left-mass-top'			=>'',

       'left-mass-bottom'		=>'',

       'right1'			=>'',

       'right2'			=>'',

       'right-mass-top'		=>'',

       'right-mass-bottom'		=>'',

       'content-mass-top'		=>'',

       'content-mass-bottom'		=>'',

       'content-top'			=>'',

       'content-bottom'		=>'',

       'inset1'			=>'',

       'inset2'			=>''


);

..... common code deleted .......
<head>

<?php $this->loadBlock('head-news') ?>

</head>
<body id="bd" class="fs<?php echo $this->getParam(JA_TOOL_FONT);?> <?php echo $this->browser();?>">
<div id="ja-wrapper">


      <a name="Top" id="Top"></a>


       <?php $this->loadBlock('header') ?>


       <?php $this->loadBlock('topsl') ?>


	<?php $this->loadBlock('mainnav') ?>


	<div id="ja-container" class="wrap <?php echo $this->getColumnWidth('cls_w'); ?>">


      <div class="main clearfix">

               <div id="ja-mainbody" style="width:<?php echo $this->getColumnWidth('mw') ?>%">

               <?php $this->loadBlock('main') ?>

               <?php $this->loadBlock('left') ?>

               </div>


      </div>

       </div>


       <?php $this->loadBlock('botsl') ?>


       <?php $this->loadBlock('footer') ?>


</div>
<jdoc:include type="modules" name="debug" />
<?php if ($this->isIE6()) : ?>
	<?php $this->loadBlock('ie6/ie6warning') ?>
<?php endif; ?>
</body>
</html>
Now open the layouts/blocks folder. You can delete the joomla folder as we don't need it anymore, it is used by default-joomla.php layout we have just deleted. You can also delete: left-rounded.php, main-rounded.php and right.php blocks as we don't need them anymore.
In the same folder, create two new block files: head-blog.php and head-news.php and paste the content from head.php into the two new files.
Generally, you have to leave the content of the .php files as it is, change only the block/css/javascript calls the way you need, but let's have a look at the file structure we have created:
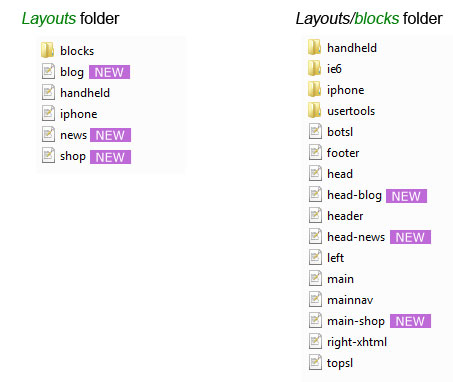
Code presented above is for you to make sure you have the block&layout structure properly according to your design goals. Now we have the structure we need, we can start customizing the look and feel!
Customizing the style
In order to customize the width, the colors, the logo, the graphics, you should have in mind the overall design you are going to develop. You can now prepare the graphics and CSS files needed for the template.
After reading this section, you will learn how to:
- use custom width for main blocks;
- change module positions;
- customize the menu systems;
- customize colors;
- customize the logo.
Using custom width
Generally you can use custom width for any block or module position, but we recommend that this custom width must be always percent based, to avoid layout breaks and keep a grid based template.
If you want to have special width for a module position, you can add module's width percent after module position, separated by comma as the instructions below:
//$this->customwidth('right1', 25); <== override right1 column width to 25%. Must call before call definePosition. Can call many time to override many columns.
This commented code is actually from all default layouts of T3 framework based templates and it is the first width override option that work for all T3 templates.
The default base width is 20% and it is used for left1, left2 and right1, right2 positions.
Using fixed custom width in pixels for module positions complicates things because you have to alter the code, and sometimes even eliminate the screen-size switcher. The future versions of the T3 based templates will provide such option and we will also update this section.
So for our goal here we will leave this code as it is, but explain to you how to use this option.
For instance you need to have a custom width for right.php block. You assign this block to left2 position to have a left-right-main like layout. In this case, your positions configuration will look like this:
$positions = array (

       'left1'                        =>'left',
       'left2'                        =>'right',
       'left-mass-top'                =>'',
       'left-mass-bottom'                =>'',
       'right1'                        =>'',
       'right2'                        =>'',
       'right-mass-top'                =>'',
       'right-mass-bottom'                =>'',
       'content-mass-top'                =>'',
       'content-mass-bottom'                =>'',
       'content-top'                        =>'',
       'content-bottom'                =>'',
       'inset1'                        =>'',
       'inset2'                        =>''

);
Now, after this line ..
$this->_basewidth = 20;
you will need this code:
$this->customwidth('left2', 25);
This means that right.php block will use the 25% custom width, and the width of the main.php block and left.php block will have new width sizes, automatically calculated by the template framework.
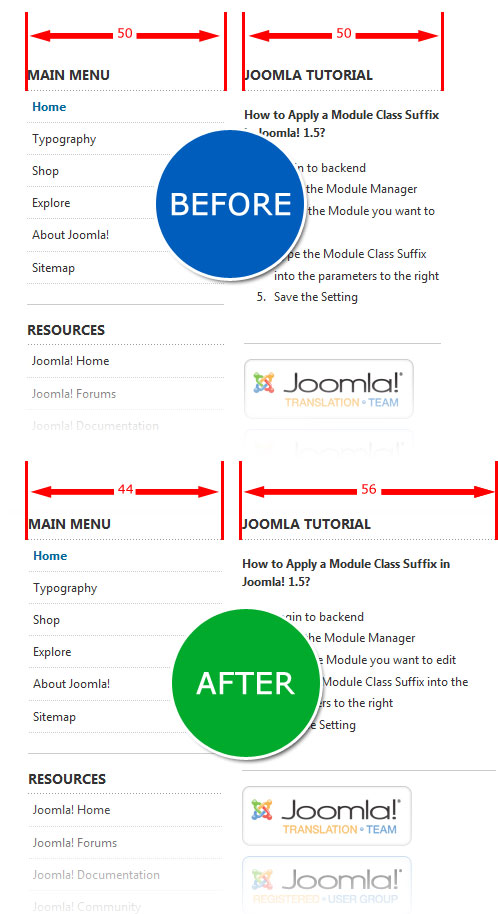
In the image above, you can see the new width size for both left.php and right-xhtml.php recalculated after applying the width override for left2 position. You can also use a custom width for left.php and this way, only the main.php block will get a new automatically calculated width.
Changing module positions
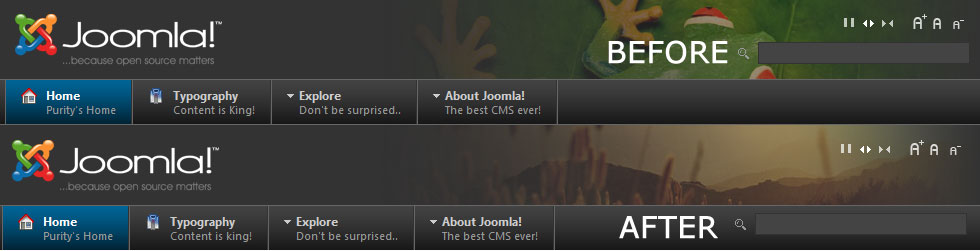
To make our template look like the JA Mesolite template, we have to move the search module position from header block to mainnav block, so open header.php, cut this code:
      <?php if($this->countModules('search')) : ?>
       <div id="ja-search">
               <jdoc:include type="modules" name="search" />
       </div>
       <?php endif; ?>
and paste into mainnav.php, right after the line 2.
 Now let's modify the CSS code to make the search and main navigation similar to JA Mesolite template. Find the templates/ja_purity_ii/CSS folder and open the template.css file. Now find line the line 610:
#ja-search {

       padding-left: 20px;
       background: url(../images/icon-search.gif) no-repeat center left;
       position: absolute;
       bottom: 15px;
       right: 15px;

}
and replace with
#ja-search {

      padding-left: 20px;
       background: url(../images/icon-search.gif) no-repeat center left;
       position: absolute;
       bottom: 13px;
       left: 15px;

}
Of course we have to adjust the input box width of the search module, so to do that, we will go to line 620, and replace
#ja-search .inputbox {

       width: 200px;
       border: 1px solid #333;
       padding: 3px 5px;
       color: #ccc;
       background: #444;
       font-size: 100%;
       font-weight: bold;

}
replace with
#ja-search .inputbox {

      width: 80%;
       border: 1px solid #333;
       padding: 3px 5px;
       color: #ccc;
       background: #444;
       font-size: 100%;
       font-weight: bold;

}
This code change will make the search input box always have a suitable width no matter the screen size you might use. You can also find and replace the icon-search.png to suit your design.
Now we have to move the main navigation menu to the right. Remember the width of the left.php block? We left it untouched to 20%, well this proportion we are going to use to move the menu to the right with a 20% margin-left. So to do that, open templates/ja_purity_ii/CSS/menu folder. You can delete the split.css as it is not needed anymore for this template.
We will edit all menu systems position that we are going to use for our template, so first open css.css file to move the CSS menu to the right. Find around line 23:
#ja-cssmenu {

      margin: 0; /* all lists */
       padding: 0;
       border-right: 1px solid #666;
       float: left;

}
and replace with
#ja-cssmenu {

      margin: 0 0 0 20%; /* all lists */
       padding: 0;
       border-right: 1px solid #666;
       float: left;

}
Next, open mega.css and find line 13
.ja-megamenu { margin: 0; padding: 0; }
and replace with
.ja-megamenu { margin: 0 0 0 20%; padding: 0; }
The last menu system, open dropline.css and find line 23:
#jasdl-mainnav {

	   position: relative;
       border-right: 1px solid #666;
       float: left;
}
and replace with
#jasdl-mainnav {

       position: relative;
       border-right: 1px solid #666;
       float: left;
       margin:0 0 0 20%;

}
Now let's have a look at the search module again:

Customizing the layout style
Main blocks width
To make our template look even more closer to our design goal, we will start changing the styling for shop.php layout, our default layout. The template.css file manages styling for all layouts by default, but for our template here, it will be the only one to manage the styling for the default layout, for the other two layouts, we are going to use different CSS files.
First we will change the class from wrap to main for the following divs:
- ja-header - located in templates/ja_purity_ii/layouts/blocks/header.php, line 1;
- ja-mainnav - located in templates/ja_purity_ii/layouts/blocks/mainnav.php, line 1;
- ja-subnav ja-mainnav - located in templates/ja_purity_ii/layouts/blocks/mainnav.php, line 15;
- ja-container - located in:
- templates/ja_purity_ii/layouts/shop.php, line 63;
- templates/ja_purity_ii/layouts/news.php, line 67;
- templates/ja_purity_ii/layouts/blog.php, line 64;
- ja-navhelper - located in templates/ja_purity_ii/layouts/blocks/footer.php, line 1;
- ja-footer - located in templates/ja_purity_ii/layouts/blocks/footer.php, line 20;
- ja-botsl - located in templates/ja_purity_ii/layouts/blocks/botsl.php, line 7;
- ja-topsl - templates/ja_purity_ii/layouts/blocks/topsl.php, line 7.
Changing wrapper look
Now we are going to add a background color for the layout wrapper, and also a padding, so open templates/ja_purity_ii/css/template.css and find line 854:
#ja-wrapper { }
and replace with:
#ja-wrapper { padding:30px 0; background: #e6e6e6; }
Now let's see how it looks like!
The rounded corners
To make the corners rounded, we need to modify the header and the footer. You might need to check the resources used to add rounded corners, click here to read more. So first we have to add two new divs in the header block, so open header.php and add the following code after line 1:
<div id="corner-top-left"> </div>
<div id="corner-top-right"> </div>
Now open template.css, and find line 922:
#ja-header { background: #333; position: relative; z-index: 10; }
and add after it the following code:
#corner-top-left {background: #333 url(../images/top-left.jpg) no-repeat top left;float:left;height:10px;width:10px;}

#corner-top-right {background: url(../images/top-right.jpg) no-repeat top right;position:absolute; right:0; top:0; height:10px;width:10px;z-index:12;}
Now let's see how the header looks like!
 Now lets add rounded corners to the footer, so open footer.php and find line 20:
<div id="ja-footer" class="main">
and add after:
<div id="corner-bot-left"> </div>
<div id="corner-bot-right"> </div>
Now we need to add some styling, so in template.css find line 1297:
#ja-footer {

       background: url(../images/grad3.gif) repeat-x bottom #F6F6F6;
       border-top: 1px solid #fff;
       clear: both;
       padding: 20px 0;

}
replace with:
#ja-footer {

       background: #F6F6F6;
       border-top: 1px solid #fff;
       clear: both;
       padding: 20px 0;

}
and now add after this code the following code:
#corner-bot-left {background: url(../images/bot-left.jpg) no-repeat bottom left;position:absolute; left:0; bottom:0; height:10px;width:10px;}

#corner-bot-right {background: url(../images/bot-right.jpg) no-repeat bottom right;position:absolute; right:0; bottom:0; height:10px;width:10px;z-index:12;}
We will also disable the banner module, as it does not fit our design here. Next, we change styling of the footer elements, so find line 1308:
#ja-footer .main {

      background: url(../images/dot1.gif) repeat-y 22% 0;
       color: #666666;
       padding: 0;
       position: relative;

}
and replace it with:
#ja-footer .main {

      color: #666666;
       padding: 0;
       position: relative;
}
This change will remove the doted border from the left side of the copyright module position. Next, we will move the menu to the right, and the copyright module to the left, in the same line, so find line 1320:
#ja-footer .ja-footnav {

       float: right;
       font-size: 100%;
       margin: 0 0 10px;
       overflow: hidden;
       position: relative;
       width: 75%;

}
and replace it with
#ja-footer .ja-footnav {

      float: right;
       font-size: 100%;
       margin: 0 0 10px;
       overflow: hidden;
       position: relative;

}
Now we can move the copyright module to the left, so find line 1314:
#ja-footer .inner { float: right; padding: 0; width: 75%; }
and replace it with:
#ja-footer .inner { float: left; padding: 0 15px; }
Now let's see how the footer looks like!

Customizing menu systems
In this section we are going to show you how to customize the menu systems, as a step by step guide on how to change the stylesheets to meet your design goals.
First, you may wish to change the navigation bar color (you can have a different color for each layout if you want, but we will explain this part, in the next section), in file template.css find line 984:
#ja-mainnav {

      background: url(../images/grad1-mask.png) repeat-x top #444; /* you can change/delete the transparent gradient image or the background color */
       border-top: 1px solid #666; /* you can change the color of the border */
       line-height: 1;
       position: relative;
       z-index: 9;

}
For instance, removing the gradient (yes, the url(../images/grad1-mask.png)), will produce this effect:

Please note that we haven't made any automatic layout/menu switch settings, we are going to deal with those later in the page override options documentation section, so for this reason you should switch the menu system manually by clicking the menu items we have prepared for you within the quickstart package.
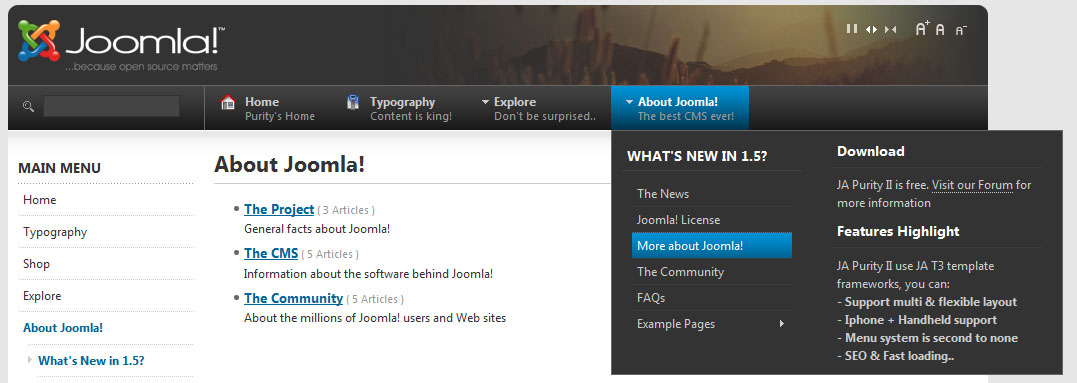
Mega Menu
Since the megamenu is the menu system we are going to use for the news.php layout, we will only show you how to to adjust it's css file located in templates/ja_purity_ii/css/menu/mega.css.
The first change you can try is to remove the left&right borders of the menu items. To do that, find line 36:
ul.level0 li.mega a.mega {

       border-left: 1px solid #666666; /* you should comment/delete this line */
       border-right: 1px solid #333333; /* and this line */
       color: #cccccc;
       display: block;
       font-weight: bold;
       line-height: normal;
       margin: 0;
       padding: 8px 15px;
       text-decoration: none;

}
This change requires to also change line 21:
ul.level0 {

      border-right:1px solid #666666; /* you can remove/comment this line or move the border to the left*/
       float:left;
       margin:0;
       padding:0;

}
To change the main menu items background color on mouse hover, find line 69:
ul.level0 li.over, ul.level0 li.haschild-over {

       background: url(../../images/grad1-mask.png) repeat-x top #666666; /* you can change/remove the transparent gradient or the color */

}
and then for child menu items in line 174:
ul.level1 li.over, ul.level1 li.haschild-over { background: #444444; }
To change the main menu active items color, find line 84:
ul.level0 li.active {

        background: url(../../images/grad1-mask.png) repeat-x top #006699;

}
You can change/remove here the gradient url(../../images/grad1-mask.png) repeat-x top by uploading a different gradient image, but for our design purpose here we are only going to change the color from #006699 to #0095db. This change also affects the child menu items.
To change the child content div, find line 180:
.childcontent {

       background: #333333;  /*change here the color to match the new color you have set for mainnav */
       border: 1px solid #666666; /* change here the border color to match the new border color you have set for mainnav */
       color: #ccc; /* after changing code above, you might want to change this color to make the text color readable  */
       z-index: 999;

}
After applying these changes, your megamenu should look like this:
Dropline Menu
Dropline is the menu system we are going to use for the shop.php layout, we will show you how to adjust it's styling by changing the file located in templates/ja_purity_ii/css/menu/dropline.css.
Same as for the megamenu, you can try to remove the left&right borders of the menu items. To do that, find line 38:
#jasdl-mainnav a {

     border-left: 1px solid #666; /* you can comment/delete this line */
       border-right: 1px solid #333; /* and this line */
       color: #ccc;
       display: block;
       float: left;
       font-weight: bold;
       line-height: normal;
       margin: 0;
       padding: 8px 15px;
       text-decoration: none;

}
This change requires to also change line 23:
#jasdl-mainnav {

       position: relative;
       border-right: 1px solid #666; /* you can remove/comment this line or move the border to the left*/

       float: left;
       margin:0 0 0 20%;

}
To change the main menu items background color on mouse hover, find line 51:
#jasdl-mainnav a:hover,
#jasdl-mainnav ul li.hover a {

       background: url(../../images/grad1-mask.png) repeat-x top #666; /* you can change/remove the transparent gradient or the color */
       color: #fff;

}
To change the main menu active items color, find line 57:
#jasdl-mainnav li.active a,

#jasdl-mainnav li.active a:hover,

#jasdl-mainnav li.active a:active,

#jasdl-mainnav li.active a:focus {


       background: url(../../images/grad1-mask.png) repeat-x top #006699;
       color: #fff;

}
You can change/remove here the gradient url(../../images/grad1-mask.png) repeat-x top by uploading a different gradient image, but for our design purpose here we are only going to change the color from #006699 to #ff0000. Child items that will show up in the subnav have no styling when active or on mouse hover. The file template.css lines 1056-1116 contain all the code you may modify to style both dropline and split menu systems.
A nice customization you may try is to align the subnav menu with the main menu, so to do that, find line 67:
#jasdl-subnav { display: none; }
and replace it with
#jasdl-subnav { display: none; margin-left:20%;}
and the line 65:
#jasdl-subnav .first-item { border-left: 0; }
replace it with:
#jasdl-subnav .first-item { /*border-left: 0;*/ }
and the same for template.css line 1035:
#ja-subnav li.first-item { /*border-left: 0;*/ }
After applying these changes, your dropline menu should look like this:

CSS Menu
We will use the css menu system for our news.php layout, so let's go ahead and modify css.css located in templates/ja_purity_ii/css/menu/css.css.
#ja-cssmenu li a.active,

#ja-cssmenu li a.active:hover,

#ja-cssmenu li a.active:active,

#ja-cssmenu li a.active:focus {

      background: url(../../images/grad1-mask.png) repeat-x top #006699;
       color: #fff;

}
We are going to change here the background color from #006699 to #0E9500.
Next you can remove the left&right borders of the menu items, just as we did for the other menu systems. To do that, find line 85:
#ja-cssmenu li a {

     margin: 0;
       padding: 8px 15px;
       border-left: 1px solid #666; /* you can comment/delete this line */
       border-right: 1px solid #333; /* and also this one */
       display: block;
       color: #ccc;
       font-weight: bold;
       line-height: normal;
       text-decoration: none;

}
To change the main menu items background color on mouse hover, find line 104:
#ja-cssmenu li:hover,

#ja-cssmenu li.sfhover,

#ja-cssmenu li.havechildsfhover,

#ja-cssmenu li.havechild-activesfhover {

      background: url(../../images/grad1-mask.png) repeat-x top #666;
       color: #fff;

}
and then for child menu items level 2 and above in lines 121-176.
To change the main menu active items color, find line ..:
#ja-cssmenu li a.active,

#ja-cssmenu li a.active:hover,

#ja-cssmenu li a.active:active,

#ja-cssmenu li a.active:focus {

     background: url(../../images/grad1-mask.png) repeat-x top #006699;
       color: #fff;

}
You can change/remove here the gradient url(../../images/grad1-mask.png) repeat-x top by uploading a different gradient image, but we are going to change the color from #006699 to #0E9500.
After applying these changes, your css menu could look like this:

Moo menu
This menu system uses an almost identical CSS code as the CSS Menu, so you need to modify the moo.css and for instructions, please refer to the CSS Menu documentation section.
Split Menu
This menu system has a similar styling as the dropline menu. To learn how to customize the look of this menu system please refer to dropline menu customization section. However there are a few style classes and div ids that are different, so you might have to check them using Firebug analyze feature in this case.
Customizing template logo
We will customize the logo for all three layouts. We will need a red logo, a blue logo and a green logo. You might need to check the resources used to customize the logo, click here to read more.
First we are going to change the logo for shop.php layout, and we are going to modify template.css, line 938:
h1.logo a {

      background: url(../images/logo.gif) no-repeat left;
       display: block;
       height: 79px;
       width: 207px;

}
replace with your new logo image name and dimensions (keep same width as the original to avoid layout brakes):
h1.logo a {

       background: url(../images/logo-red.gif) no-repeat left;
       display: block;
       height: 79px;
       width: 174px;

}
Now we are going to change the logo for the news.php layout, so we will edit news-template.css, line 938:
h1.logo a {

       background: url(../images/logo.gif) no-repeat left;
       display: block;
       height: 79px;
       width: 207px;

}
replace with your new logo image name and dimensions:
h1.logo a {

       background: url(../images/logo-green.gif) no-repeat left;
       display: block;
       height: 79px;
       width: 174px;

}
Finally we are going to change the logo for the blog.php layout, so we will edit blog-template.css, line 938:
h1.logo a {

      background: url(../images/logo.gif) no-repeat left;
       display: block;
       height: 79px;
       width: 207px;

}
replace with your new logo image name and dimensions:
h1.logo a {

       background: url(../images/logo-blue.gif) no-repeat left;
       display: block;
       height: 79px;
       width: 174px;

}
Customizing colors
Creating additional stylesheets
Remember we will use specific color themes for each layout, so for this reason we are going to create new template.css files for news.php layout and blog.php layout. We will name these new css files like this for example:
- blog-template.css
- news-template.css.
Move these two new files in the templates/ja_purity_ii/css folder and paste into both of them the complete code from template.css. Now we have to link these new files into the corresponding head.php block, like this:
- head-news.php will link news-template.css;
Open head-news.php and find line 8:
<link rel="stylesheet" href="/<?php echo $this->templateurl(); ?>/css/template.css" type="text/css" />
and replace it with:
<link rel="stylesheet" href="/<?php echo $this->templateurl(); ?>/css/news-template.css" type="text/css" />
- blog-news.php will link blog-template.css.
Open head-blog.php and find line 8:
<link rel="stylesheet" href="/<?php echo $this->templateurl(); ?>/css/template.css" type="text/css" />
and replace it with:
<link rel="stylesheet" href="/<?php echo $this->templateurl(); ?>/css/blog-template.css" type="text/css" />
Updating the new stylesheets
You can customize now all basic elements to match the new color themes. With this procedure you will make the readon link, the normal link, the menu module active items have same color for each color theme we have created. It is more like a quick find&replace procedure.
We are going to start with template.css, the stylesheet for shop.php layout. Open it with your code editor and find all #069 and replace with #ff0000.
Next is the news-template.css, the stylesheet for news.php layout. Find all #069 and replace with #0E9500.
The last one is blog-template.css, the stylesheet for blog.php layout. Find all #069 and replace with #0095DB.
At this point our design goals are achieved. All we need to do now is to create some template overrides, check browser compatibility, make final adjustments and validate the template.
Making it mobile ready
For iPhone
To be able to style this layout, you should set this layout as the default layout of the template, and browse a page in frontend that has no page override settings.
Of course Firefox cannot load this layout as any iPhone device would, we force showing this layout only to play around with Firebug and find out lines of the stylesheet code we would like to customize.
To customize this layout, you will need to upload your custom template to a test server, and view it with your iPhone device. All you need to know is that iphone.php layout uses these stylesheets:
- iphone.css located in templates/ja_purity_ii/css/handheld folder;
- template.css located in templates/ja_purity_ii/css/handheld folder, a file shared with handheld.php layout for common styling;
- template.css file located in templates/ja_purity_ii/css, but now you can change to load the news-template.css or blog-template.css, for color themes.
To call a different general template.css stylesheet file, you can simply change the line 12 of the head.php located in templates/ja_purity_ii/layouts/blocks/iphone folder.
For Handheld
Same as for the iPhone ready layout, you should set this layout as the default layout of the template, and browse a page in frontend that has no page override settings.
Checking the layout with both Firebug and your handheld device, you may change these stylesheet files:
- layout.css located in templates/ja_purity_ii/css/handheld folder;
- template.css located in templates/ja_purity_ii/css/handheld folder, a file shared with iphone.php layout for common styling;
- template.css file located in templates/ja_purity_ii/css.
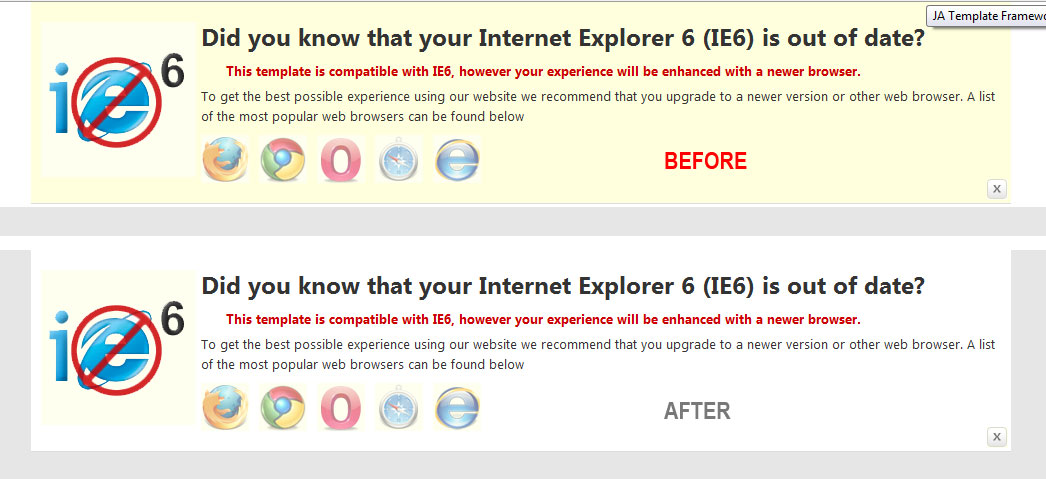
The IE6 warning
The IE6 warning is actually a special block designed to pop-up and inform users browsing your website with Microsoft Internet Explorer version 6 that their browser is out of date, and also advertises most popular browsers that are up to date. You can imagine this is pretty absolete by now, mostly because within the next few years, we will enter the next generation development environment: CSS 3.0, Web 3.0 and Joomla! 1.7!
Disable browser detection
To be able to customize the look and feel of the warning, you might want to make it show up in your default layout and check it with Firebug. Well this is not possible by default, so we need to change some code. In your default layout.php (in our case shop.php) find around line 84 this code, and comment like this:
<?php //if ($this->isIE6()) : ?>


      <?php $this->loadBlock('ie6/ie6warning') ?>


<?php //endif; ?>
This will disable the browser detection capabilities, and will show the IE6 warning on all browsers, including Firefox. Please note that the block can look different in Firefox then it would look in IE6.
Warning settings
Let's have a closer look at this piece of code of the ie6warning.php block located in templates/ja_purity_ii/layouts/ie6:
define ('SHOW_IE6_WARNING', 'close');
/*
Setting for this message. Clear cookie if you change this setting.

'none': Not show warning

'once': Show one time only

'close': Show until user check box "Not show again" and close the message

'always': Always show this message

*/
This code actually define the behaviour of the warning and the commented lines instruct on how this this feature can be configured:
- none - never show the warning;
- once - show the warning only the first time the user browses your website;
- close - show every time the user browses every page of your website, but not show up again if the user checks the option "Not show again";
- always - show the warning always.
Styling the warning
To style the IE6 warning, locate the file ie6warning.css located in templates/ja_purity_ii/layouts/ie6 and open it with your code editor.
To make it match our template we are only going to change some background colors, so first find line 4:
#ie6-warning {

      position: absolute;
       top: 0;
       z-index: 999;
       font-size: 110%;
       height: 0;
       overflow: hidden;
       background:#e6e6e6; /* and add the background color that you have set for your template */

}
Next, we are going to change the background color of the content area, so find around line 14:
#ie6-warning .main {

       background: #fff;  /* we changed here to #fff, for white */
       border-bottom: 1px solid #ddd;
       padding: 10px 0;

}
Now let's see our warning again!
Now you can un-comment around the lines 84 in your layout.php (in our case shop.php) to have default settings back.
Please note that the future versions of the T3 Framework based templates will no longer have this feature.
Managing overrides
By using overrides you can customize your content extensions look and feel by using the template, and ignore their default styling. Basically, you call div ids, style classes, with specific HTML tags into template.css or any other CSS file.
Template overrides
MVC overrides
In this section we are going to show you how template override work and also how to style the extensions. Extensions built on the MVC style (Model View Controller) are much easier to style using the template. Joomla! CMS is capable to detect the overrides and shows the content according to your new rules.
For instance you may want to override the styling for Latest News module. Locate your_site_root/modules/mod_latestnews/tmpl/default.php and copy this file into your_site_root/tempaltes/ja_purity_ii/html/mod_latestnews folder you have to create. Then open this file and change div structure and classes, then call these new class names into the template.css to add different styling.
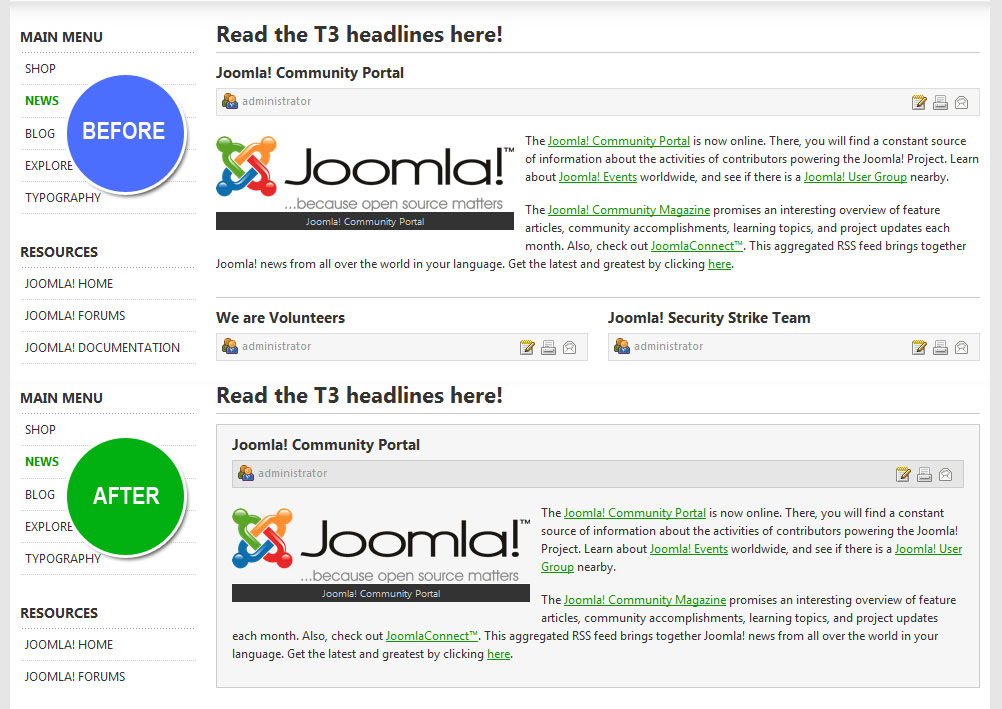
We are going to show you a nice override you might find useful: styling the leading article for the frontpage view of the content core component. Open your_site_root/tempaltes/ja_purity_ii/html/com_content/frontpage/default.php line 28:
<div class="leading<?php echo $this->params->get('pageclass_sfx'); ?> clearfix">
and replace it with:
<div class="leading-frontpage<?php echo $this->params->get('pageclass_sfx'); ?> clearfix">
Now open your template.css file (news-template.css in our case), and find line 266:
.leading {

       border-bottom: 1px solid #ccc;
       padding-bottom: 10px;
       padding-top: 10px;

}
and add after:
.leading-frontpage {

       background:#f6f6f6;
       border: 1px solid #ccc;
       padding-bottom: 10px;
       padding-top: 10px;
       margin-top:10px;
       padding:10px 15px;

}
.leading-frontpage .article-tools {background:#e6e6e6; border:1px solid #ccc;}
This change will highlight the leading article for the frontpage view. Using the new class in combination with any class of the elements inside, you can override even more styling, just as we did for the .article-tools class. Let's see how it looks like:
 Please note that using MVC template overrides requires you update the views you store into the html folder of the template according to the latest version of the extension you use the override.
Non-MVC overrides
Although you don't have the same power as for the MVC style extensions, non-MVC extensions still can be styled with template override, by calling specific element IDs or style classes, and add your custom styling to match the template and the overall design goals.
For instance you may want to override the styling for Virtuemart 1.1. In this case, you can create a new dedicated CSS file, link it into the proper head.php block, then check Firebug for any element you might want to create/override the style. If an element is already styled, copy it's style into your new CSS file, and add your personal touch.
Please note that calling non-MVC extension HTML tags IDs or classes sometimes require adding the tags to make the override possible.
For instance your extension styles
<div class="class-name">
into it's CSS file with
.class-name { }
In your new CSS file you created for the extension, to make the override work you might have to call the class with
div.class-name.
Page overrides
Remember we have set some design goals, we want to display:
- Virtuemart powered shop with the red layout shop.php and dropline menu,
- news section (frontpage view of the core content component) using the green layout news.php and megamenu,
- blog section (section or category view of the core content component or any blog extension like MyBlog or K2) using a blue layout blog.php and megamenu.
Generally using the option variable is better than Itemid, because you might have child menu items for that the layout can be switched back to the default one you have set in backend. So it is very important to be sure how the menu items you assign a layout or menu system. You may use Itemid variable only for single page content extensions, this way the framework will always load proper layout.
We want the framework to always use shop.php layout for all option=com_virtuemart links. Also we want to always use news.php layout for Itemid=1, the menu item loading the frontpage view. Finally the blog section of your website (blog view of a category of articles/posts in our case here, but as we said, you can use a dedicated blog extension) can use blog.php layout for Itemid=27.
Please note that using both menu system override and layout override will require to use them for all your components: Contact, Search, User, etc.
Menu system override
Open template administration panel, and scroll down to Customize menu for page. In that text area we will write down:
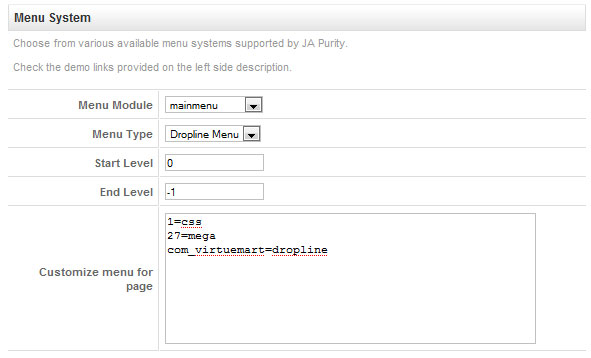
- 1 is for Itemid=1,
- 27 is for Itemid=27,
- com_virtuemart is for option=com_virtuemart.
Layout override
Now scroll down to Page Layouts Overwrite text area, and type in:
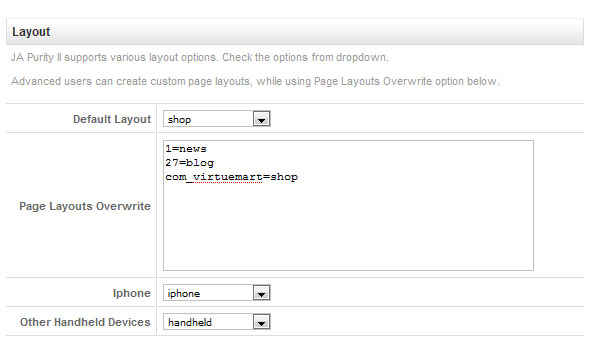
- 1 is for Itemid=1,
- 27 is for Itemid=27,
- com_virtuemart is for option=com_virtuemart.
Template validity
After all the customizations, you have to check validity, so to do that, write in your browser address bar:
http://validator.w3.org/check?verbose=1&uri=http://yourwebsite.com
Your template will be valid, when it shows results like this.
Screenshots
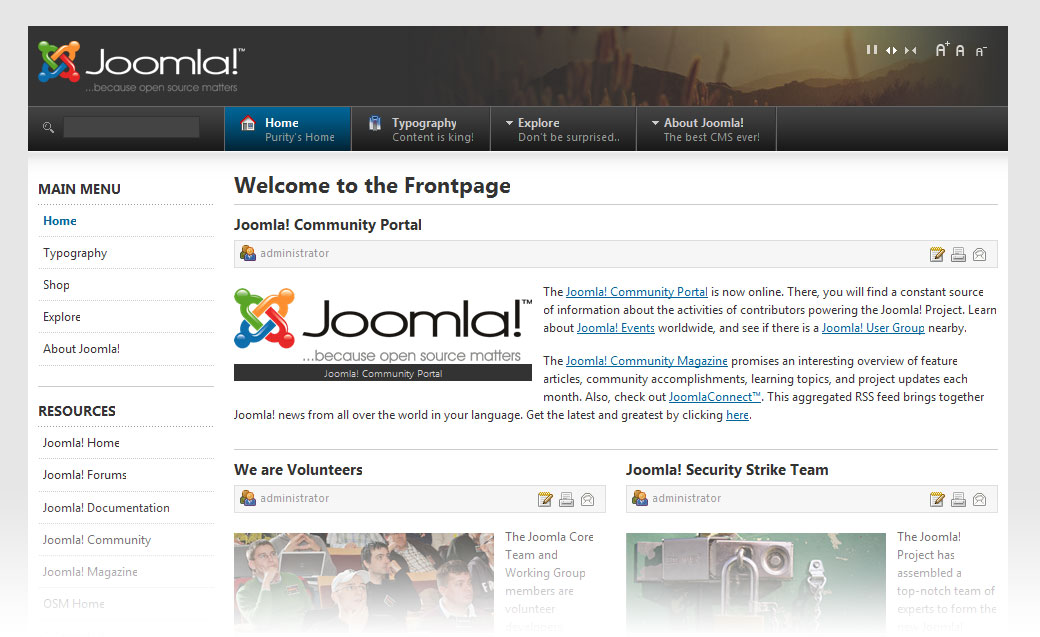
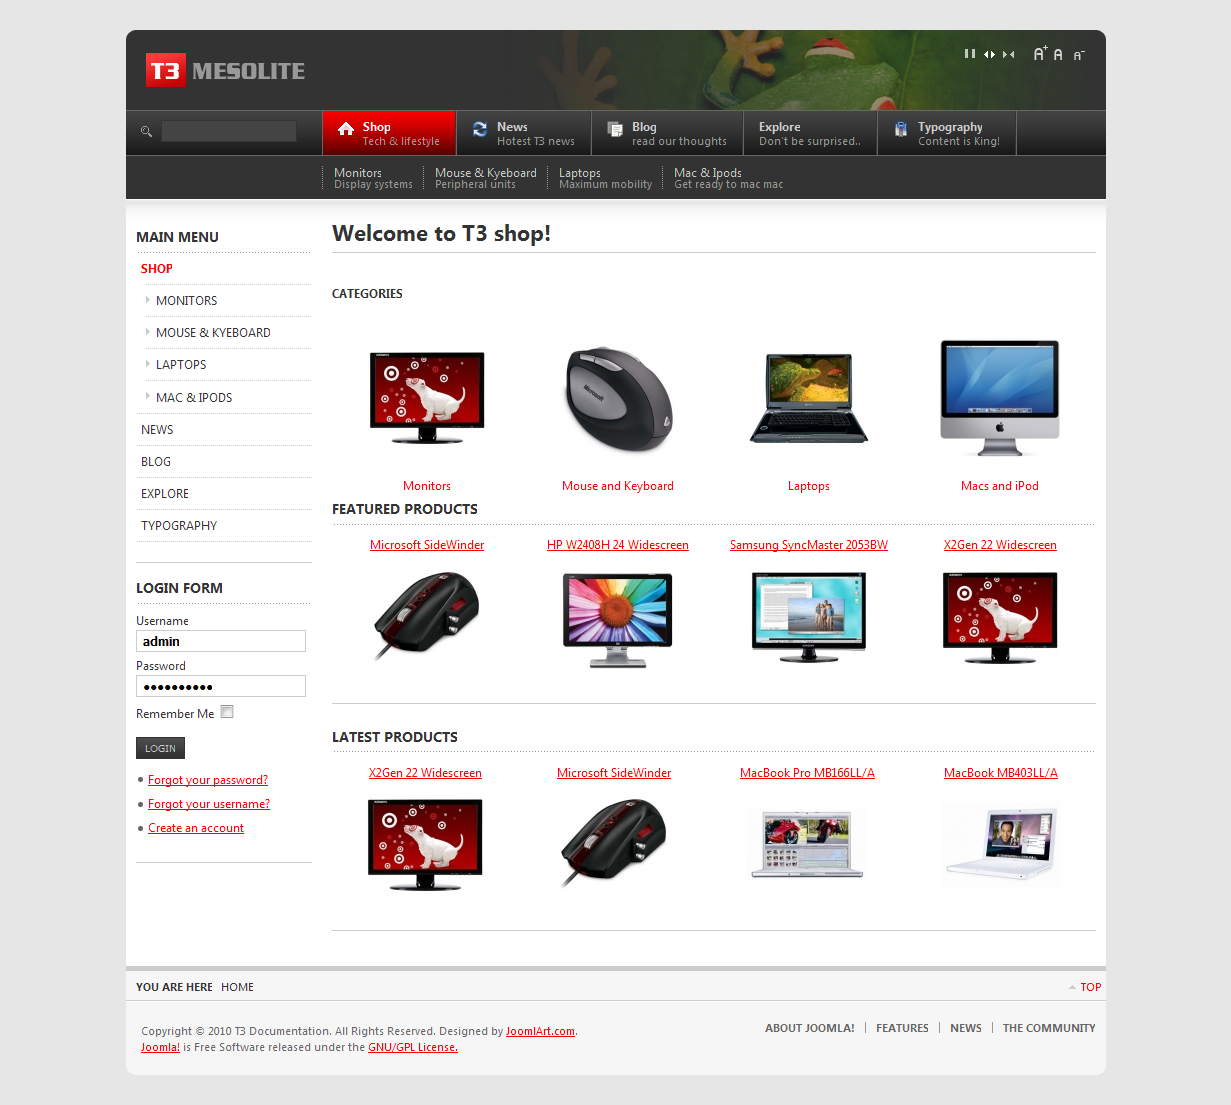
If you have followed these instructions, after making some changes in the menu structure, adding/rearranging some modules, your template should look like this:
The shop layout
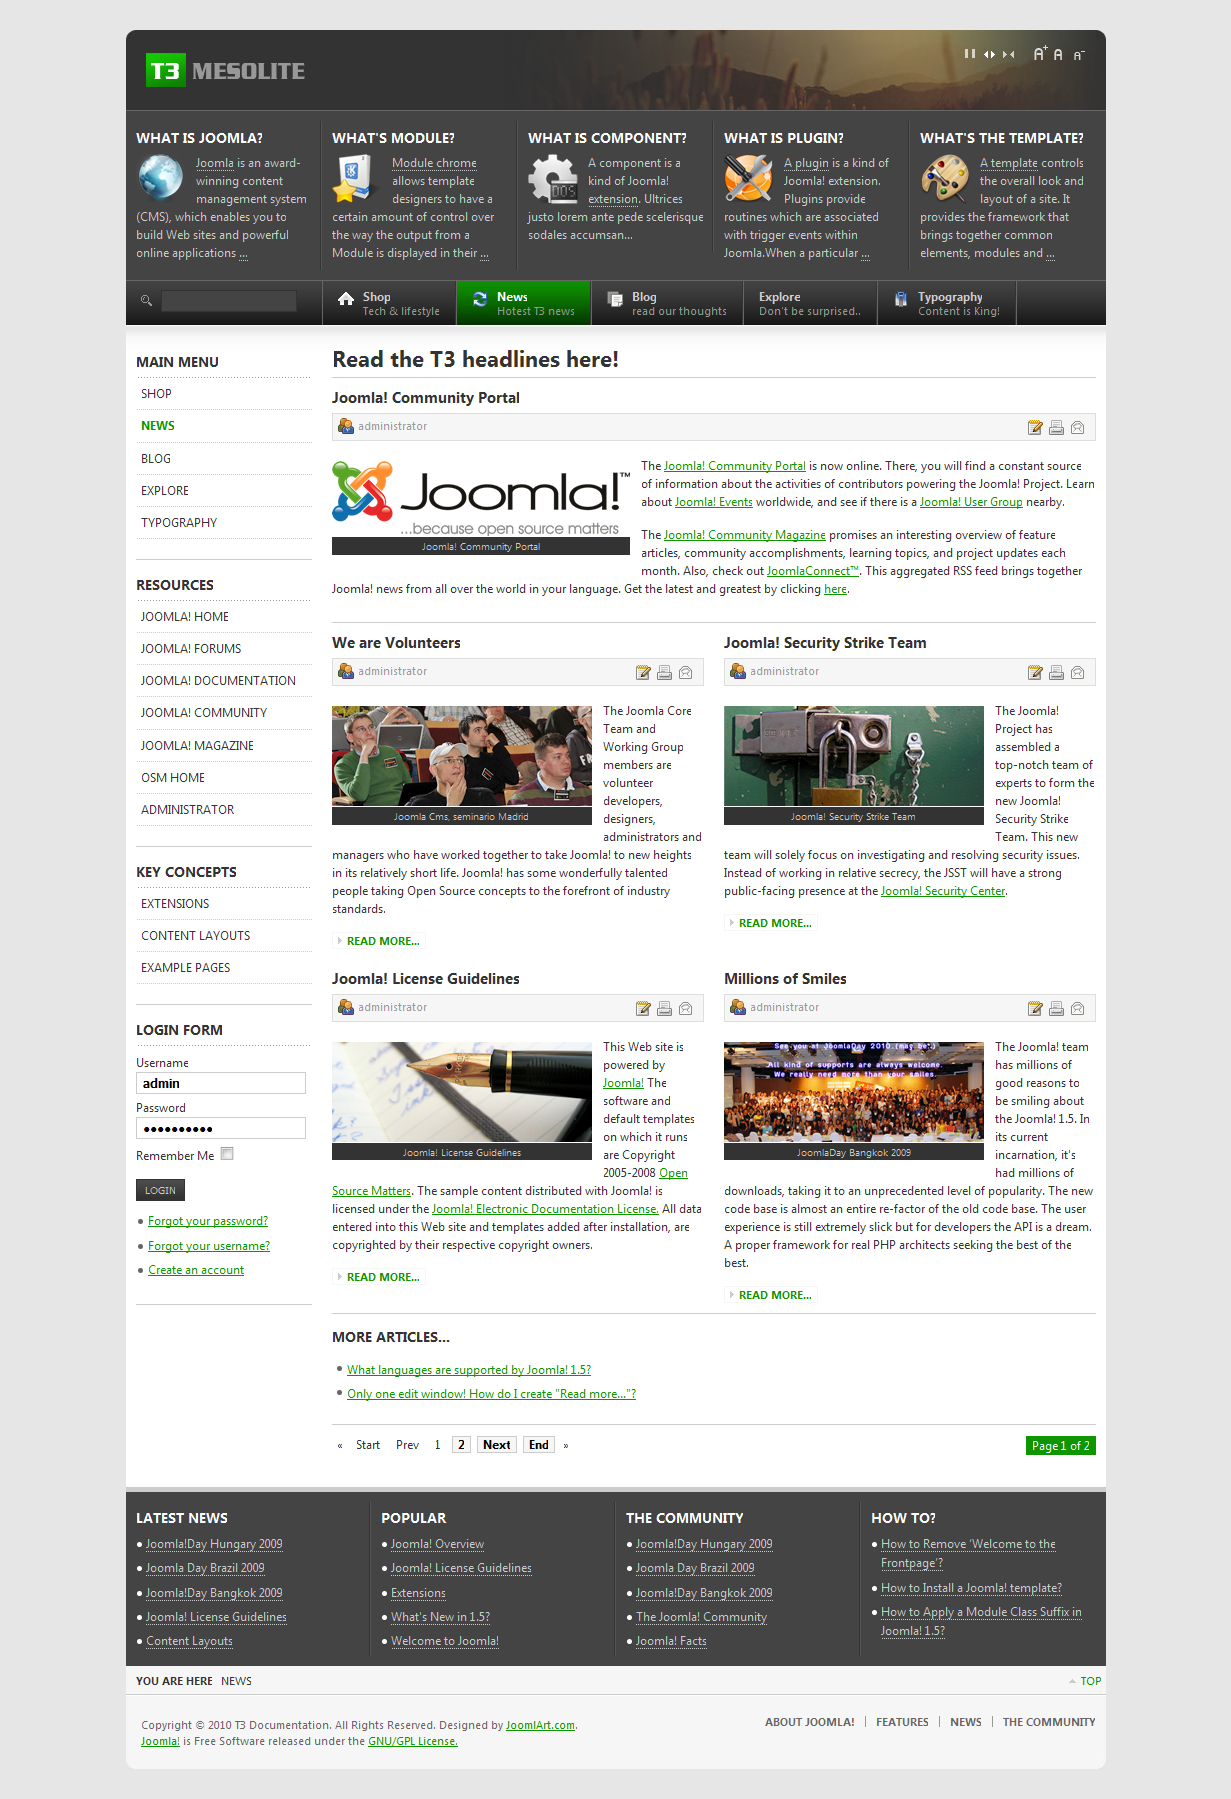
The news layout
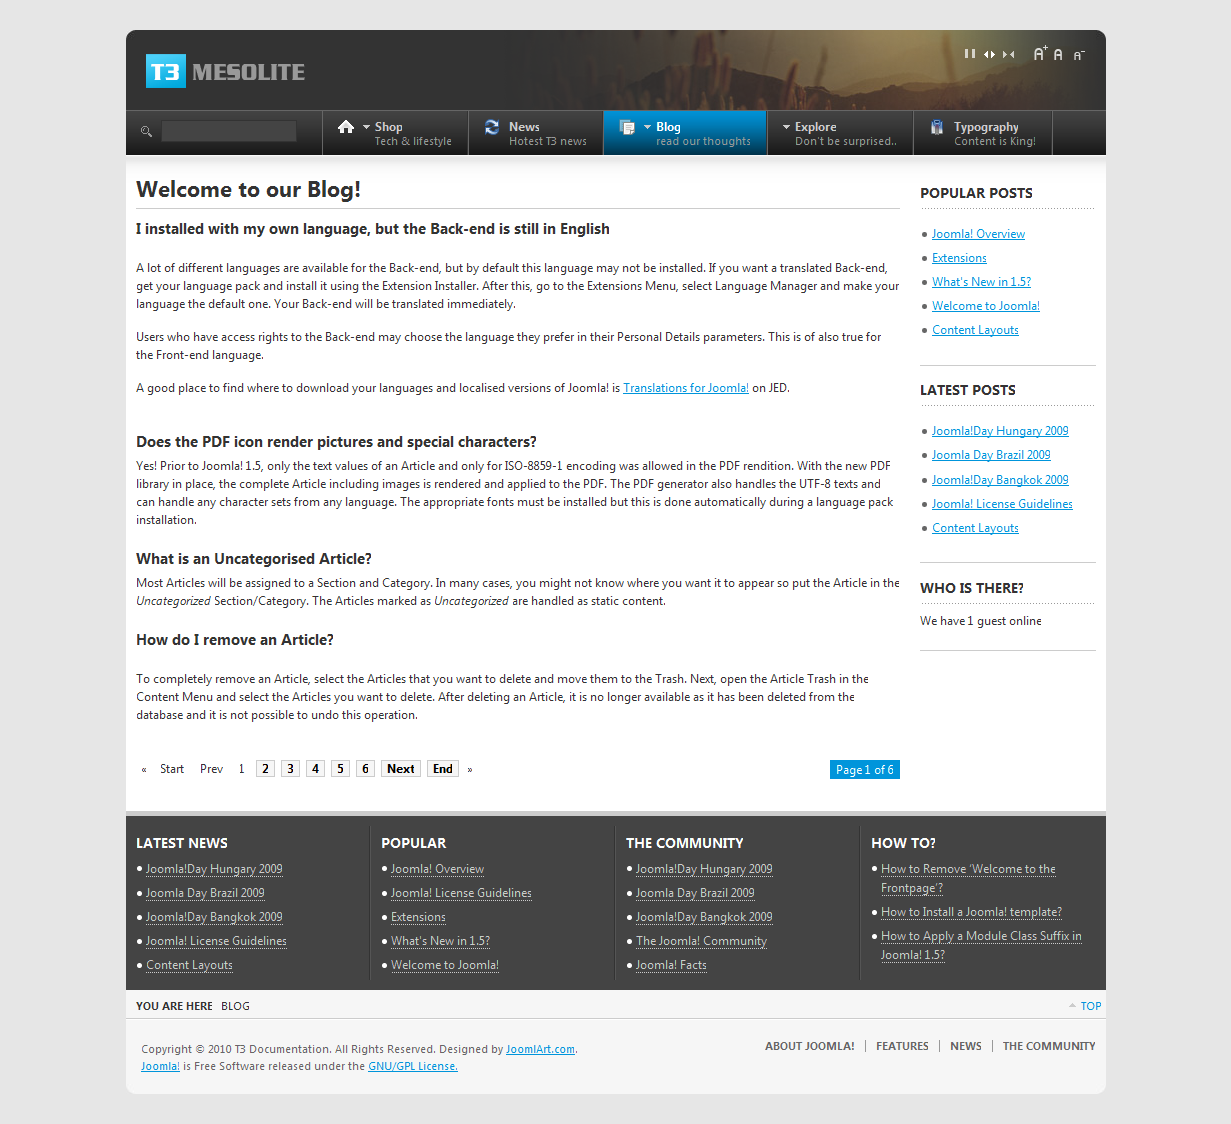
The blog layout
Resources
You might need image files used to customize JA Purity II template. Here you will find the psd with graphics used and also the exact files used to style the new template.