JA Sugite Introduction
Responsive Joomla template for Joomla 2.5 and Joomla 3. We have written this the documentation based on Joomla 2.5, please do consider this factor if you are using it for Joomla 3. No worry, there aren't any big differences between the two.
1. Joomla template for Designer Portfolio and Business Portfolio
JA Sugite is a beautiful responsive Joomla template for Designer Portfolio, Business and Corporate Portfolio. It supports Bootstrap 3 at core, RTL Language layout, the Joomla blogging component - EasyBlog, is fully responsive, all props go to T3 Framework.
View Demo for Responsive Joomla template - JA Sugite
2. Main Features
- Multi layouts and 2 blog styles
- Portfolio, Printable page
- Fully Responsive Template
- Joomla 2.5 and Joomla 3 native
- Bootstrap 3 integration
3. JA Extensions Supported
- JA Slideshowlite module
- JA Facebook Like box module
- JA Masshead
- JA Extension Manager
- T3 Framework
4. Supported Third party extensions
- Easyblog
5. Supported Joomla pages (by default)
- Blog page
- Login
- Registration Page
- Edit User Profile
- Web Links
- News Feeds
- Contact Us
- Smart Search
- Offline Page
- Tag Item Page
- 404 Page
6. Site structure and Module position

System requirement
JA Sugite is compatible with Joomla 3 and Joomla 2.5. Please make sure your system meets the following requirements:
Joomla 3 System requirement
Software
- Software: PHP (Magic Quotes GPC off): 5.3.1 + (5.4+ recommended)
Databases
- MySQL(InnoDB support required): 5.1+
- MSSQL 10.50.1600.1+
- PostgreSQL 8.3.18+
Web Severs
- Apache 2.x+
- Microsoft IIS 7
- Nginx 1.0 (1.1 recommended)
Joomla 2.5+ system requirement
Software
- Software: PHP 5.2.4+ (5.4+ recommended)
- MySQL: 5.0.4+
Web Sever
- Apache: 2.x+
- Microsoft: IIS 7
- Nginx: 1.0 (1.1 recommended)
Browser requirement
The requirements are the same for both Joomla 2.5 and Joomla 3
- Firefox 4+
- IE (Internet Explorer) 8+
- Google Chrome 10+
- Opera 10+
- Safari 5+
Development Environment
The requirements are the same for both Joomla 2.5 and Joomla 3
During development process, Localhost is preferred. You can use the following servers on your PC to develop your site.
Windows
- WAMPSEVER
- XAMPP for Windows
Linux
- LAMP Bubdle
- XAMPP for Linux
Mac OS
- MAMP & MAMP Pro
- XAMPP for Mac OS
Download and Installation
1. Plan your site Development
- Kick-start a New Joomla Site? - If you are planning to start fresh with a new Joomla site, then use our Quickstart package to quickly clone the demo site, then replace the demo content with yours. Check the How to install Quickstart Package documentation for the in-depth how-to guide for Quickstart Installation.
- Installing on your existing live site ? - If you are planning to use this template for your existing Joomla site, then you should follow the How to make your site look like demo site guide first to dig in the steps involved.
2. Download Template and Extensions
Please proceed to JA sugite's Download page, where it holds all the related files and template zip file that you need.
3. Install Template and Extensions
Once you successfully Download the files you need, You'll have to:
- Install the template file onto your Joomla system.
- At default, during the installation process, JA Sugite template will be installed with the settings we're used as on the demo website. Therefore, if you would like to make any changes in configuration, it's recommended that you should complete the setup (including installing all the modules and plugins along with the templates as on demo) then carry out any customization afterwards.
View how to install extensions guide
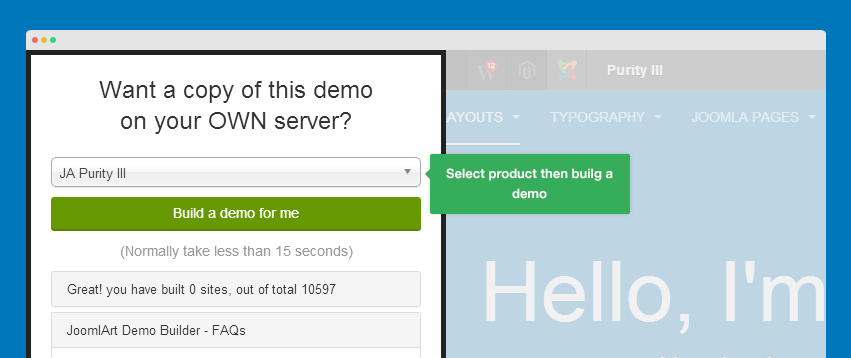
4. Build demo with our Demo Builder
If you are not yet familiar with JoomlArt Demo Builder, more information on this can be read here. To be short, the demo builder service allows you to quickly clone demo for any JoomlArt's Joomla template and test-drive it. As we have recently improved and re-developed the Demo Builder system, you can now play around and experiment with it up to 3 days.

Note:
Custom HTML Module: We have styled (CSS) for several Custom HTML modules using different div classes. You should check out the HTML codes in these module and follow the same format in order to get it displayed correctly. We do also provide the HTML code in this user-guide down below for your references.
Extensions Configuration
I. JA Extension Configuration
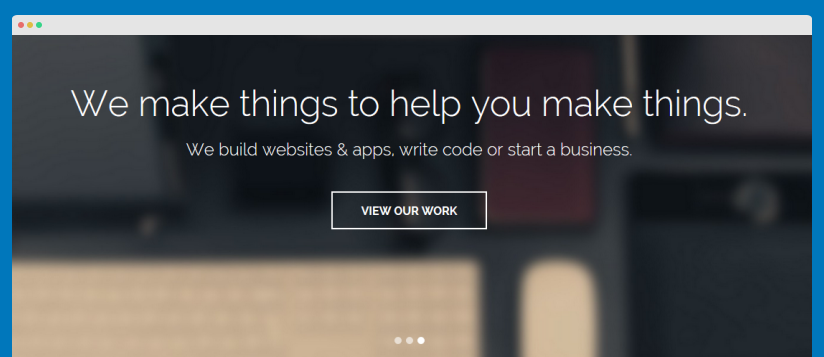
1. JA Slideshow Lite module
  Module Position: slideshow
  Module Suffix: NOT USED
- Module Back-end Settings
- Front-end Appearance
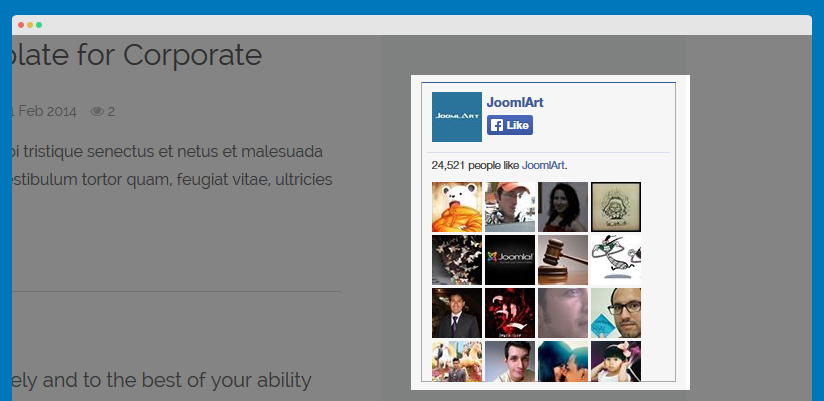
2. JA Facebook Likebox module
  Module Position: sidebar-2
  Module Suffix: Not used
- Module Back-end Settings
- Front-end Appearance
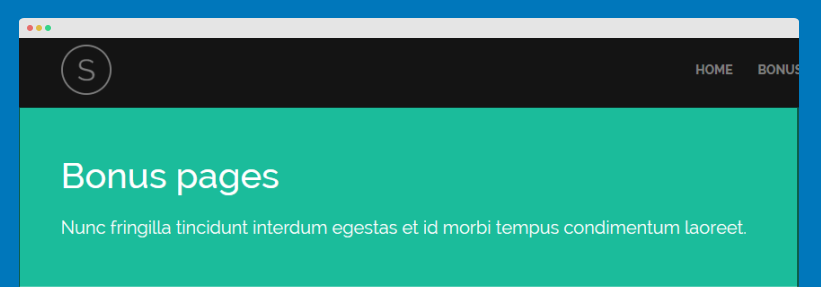
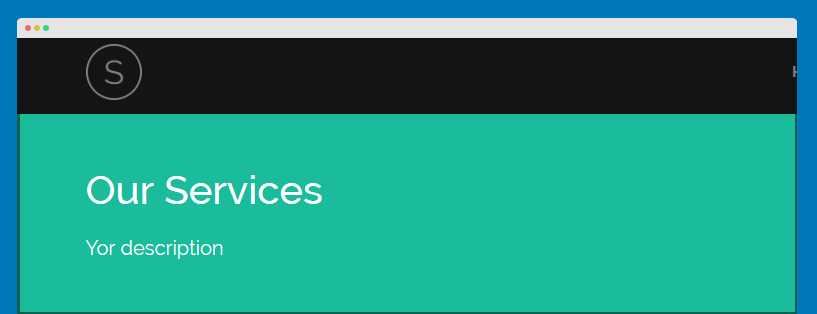
3. JA Masshead module
3.1 JA Bonus Pages Masshead
  Module Position: masshead
  Module Suffix: Not used
- Module Back-end Settings
- Front-end Appearance
3.2. JA Masshead
  Module Position: masshead
  Module Suffix: Not used
- Module Back-end Settings
- Front-end Appearance
II. Default Joomla Extensions Configuration
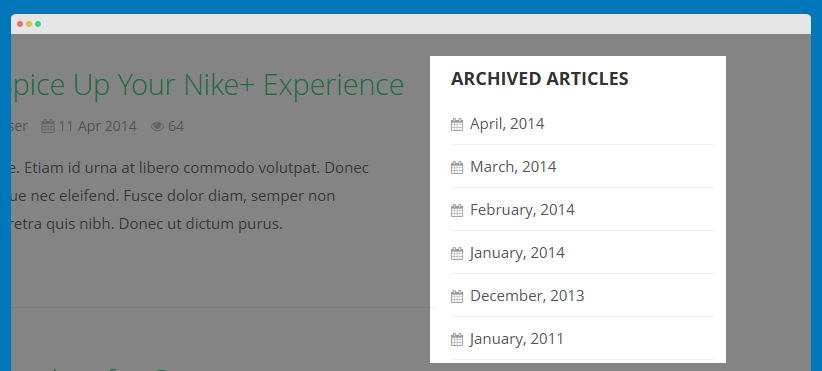
1. Archived Articles
  Module Position: sidebar-2
  Alternative Layout : Default
  Module Suffix:  NOT USED
- Module Back-end Settings
- Front-end Appearance
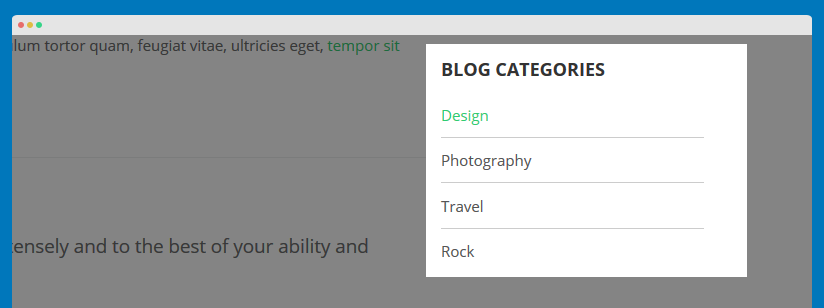
2. Blog categories
  Module Position: sidebar-2
  Alternative Layout : default
  Module Suffix:  NOT USED
- Module Back-end Settings
- Front-end Appearance
3. Articles Category
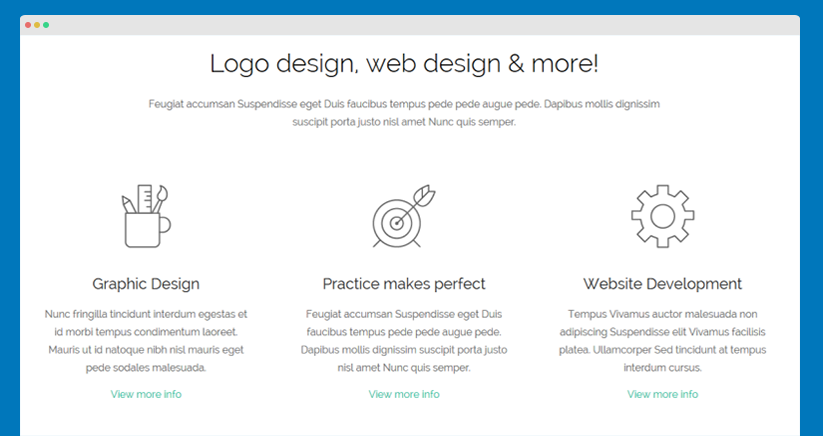
3.1 Logo design, web design & more!
  Module Position: features-intro
  Alternative Layout : three-columns
  Module Suffix:  NOT USED
- Module Back-end Settings
- Front-end Appearance
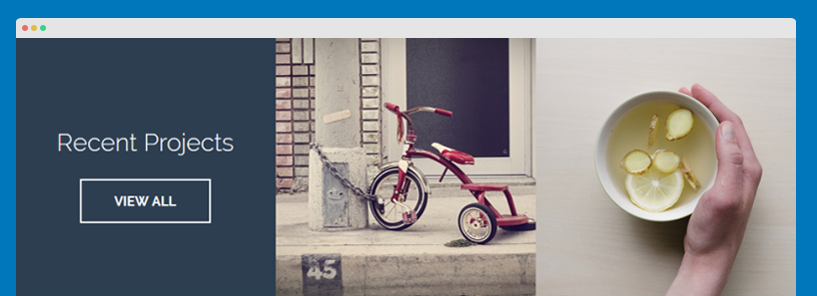
3.2 Recent Projects
  Module Position: features-intro
  Alternative Layout : projects
  Module Suffix:  row-feature-full
- Module Back-end Settings
- Front-end Appearance
3.3 Latest blog posts
  Module Position: position-1
  Alternative Layout : list-has-animation
  Module Suffix:  featured
- Module Back-end Settings
- Front-end Appearance

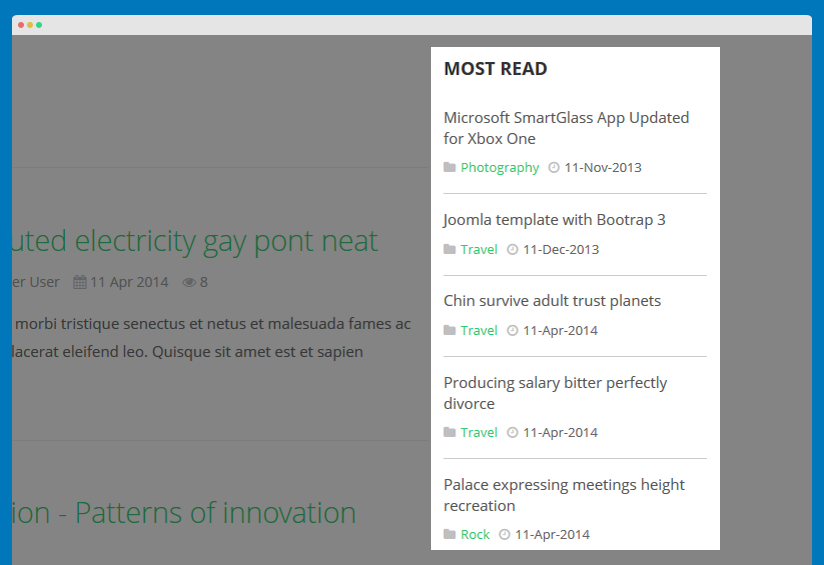
3.4 Most read
  Module Position: sidebar-2
  Alternative Layout : list
  Module Suffix:  NOT USED
- Module Back-end Settings
- Front-end Appearance
4. Footer
  Module Position: footer
  Module Suffix: NOT USED
- Module Back-end Settings
- Front-end Appearance

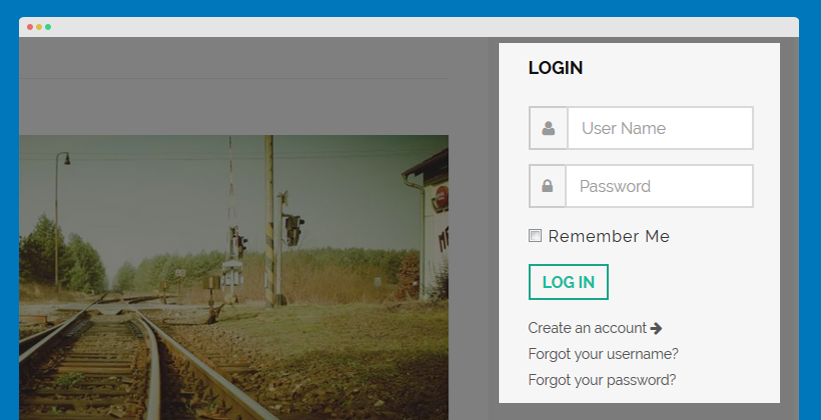
5. Login
  Module Position: sidebar-2
  Module Suffix: NOT USED
- Module Back-end Settings
- Front-end Appearance
6. Menu
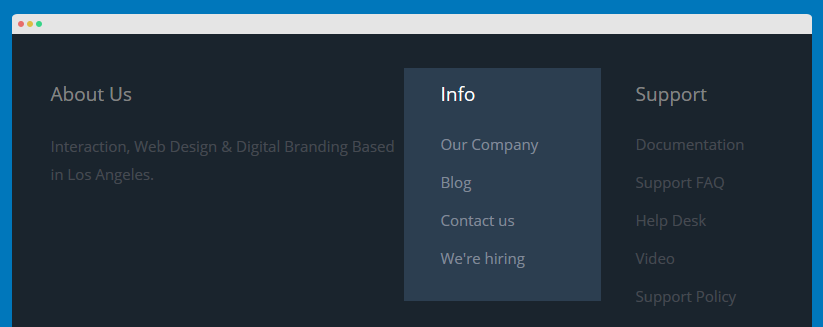
6.1. Info menu module
To have it displayed as it is per Demo site, please follow the step by step instruction as below:
Step 1: Create "Info" menu and add menu items
- Go to Administrator >> Menus >> Menu Manager >> Add New Menu: Info.
- Add New Menu Items for the Menu .

Step 2: Add "Info" menu module
This module is Joomla default module, that means when you install Joomla fresh, this module is ready to use.
Go to Administrator >> Extensions >> Modules manager >> Add New Menu Module : Info .
  Module Position: footer-2
  Module Suffix: NOT USED
- Module Back-end Settings
- Front-end Appearance
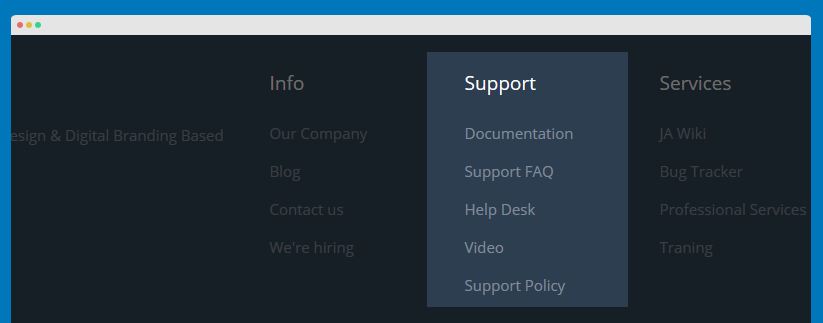
6.2. Support menu module
To have it displayed as it is per Demo site, please follow the step by step instruction as below:
Step 1: Create "Support" menu and add menu items
- Go to Administrator >> Menus >> Menu Manager >> Add New Menu: Support.
- Add New Menu Items for the Menu .

Step 2: Add "Support" menu module
This module is Joomla default module, that means when you install Joomla fresh, this module is ready to use.
Go to Administrator >> Extensions >> Modules manager >> Add New Menu Module : Support .
  Module Position: footer-3
  Module Suffix: NOT USED
- Module Back-end Settings
- Front-end Appearance
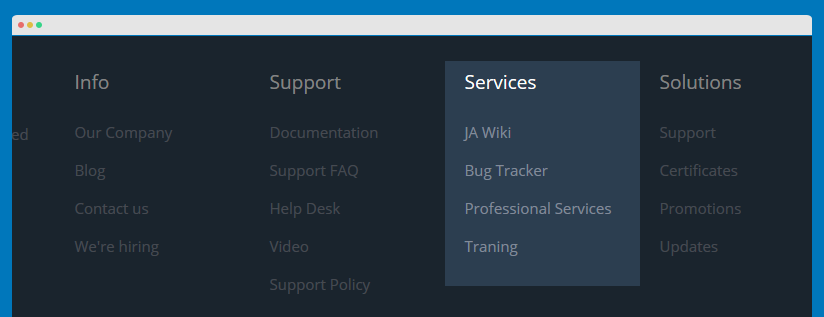
6.3. Services menu module
To have it displayed as it is per Demo site, please follow the step by step instruction as below:
Step 1: Create "Services" menu and add menu items
- Go to Administrator >> Menus >> Menu Manager >> Add New Menu: Services.
- Add New Menu Items for the Menu .

Step 2: Add "Services" menu module
This module is Joomla default module, that means when you install Joomla fresh, this module is ready to use.
Go to Administrator >> Extensions >> Modules manager >> Add New Menu Module : Info .
  Module Position: footer-4
  Module Suffix: NOT USED
- Module Back-end Settings
- Front-end Appearance
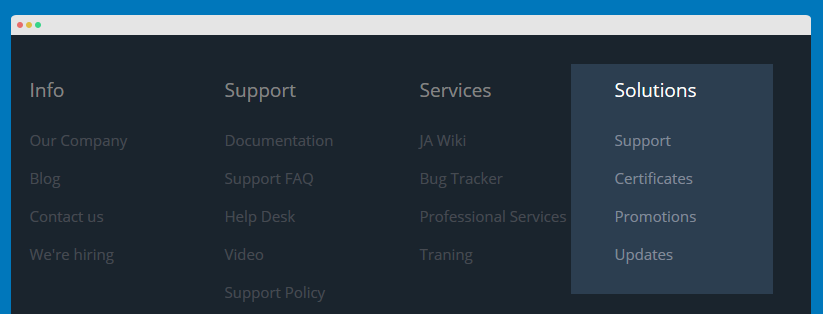
6.4. Solutions menu module
To have it displayed as it is per Demo site, please follow the step by step instruction as below:
Step 1: Create "Solutions" menu and add menu items
- Go to Administrator >> Menus >> Menu Manager >> Add New Menu: Solutions.
- Add New Menu Items for the Menu .

Step 2: Add "Solutions" menu module
This module is Joomla default module, that means when you install Joomla fresh, this module is ready to use.
Go to Administrator >> Extensions >> Modules manager >> Add New Menu Module : Solutions .
  Module Position: footer-5
  Module Suffix: NOT USED
- Module Back-end Settings
- Front-end Appearance
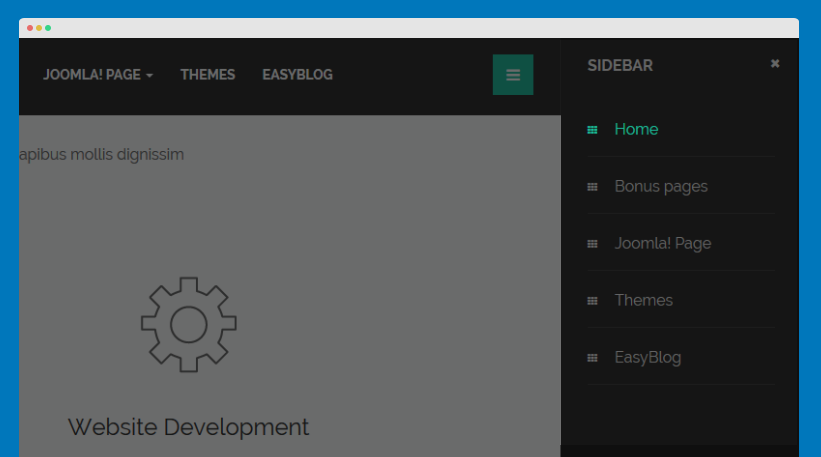
6.5. Off Canvas menu module
To have it displayed as it is per Demo site, please follow the step by step instruction as below:
Step 1: Create a menu which you want to display on off-canvas sidebar, example: Main menu
- Go to Administrator >> Menus >> Menu Manager >> Add New Menu: Main menu.
- Add New Menu Items for Main Menu .
Step 2: Add "Off Canvas" menu module
This module is Joomla default module, that means when you install Joomla fresh, this module is ready to use.
Go to Administrator >> Extensions >> Modules manager >> Add New Menu Module : Off Canvas .
  Module Position: off-canvas
  Module Suffix: _menu
- Module Back-end Settings
- Front-end Appearance
6.6. Main menu module
To have it displayed as it is per Demo site, please follow the step by step instruction as below:
Step 1: Create "Main Menu" menu and add menu items
- Go to Administrator >> Menus >> Menu Manager >> Add New Menu: Main Menu.
- Add New Menu Items for the Menu .

Step 2: Add "Main menu" menu module
This module is Joomla default module, that means when you install Joomla fresh, this module is ready to use.
Go to Administrator >> Extensions >> Modules manager >> Add New Menu Module : Main menu .
  Module Position: sidebar-2
  Module Suffix: NOT USED
- Module Back-end Settings
- Front-end Appearance
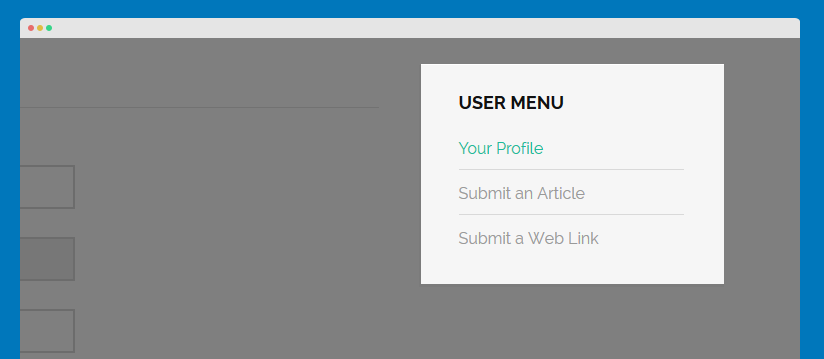
6.7. User Menu menu module
To have it displayed as it is per Demo site, please follow the step by step instruction as below:
Step 1: Create "User Menu" menu and add menu items
- Go to Administrator >> Menus >> Menu Manager >> Add New Menu: User Menu.
- Add New Menu Items for the Menu .

Step 2: Add "User Menu" menu module
This module is Joomla default module, that means when you install Joomla fresh, this module is ready to use.
Go to Administrator >> Extensions >> Modules manager >> Add New Menu Module : User Menu .
  Module Position: sidebar-2
  Module Suffix: _menu
- Module Back-end Settings
- Front-end Appearance
7. Articles Categories
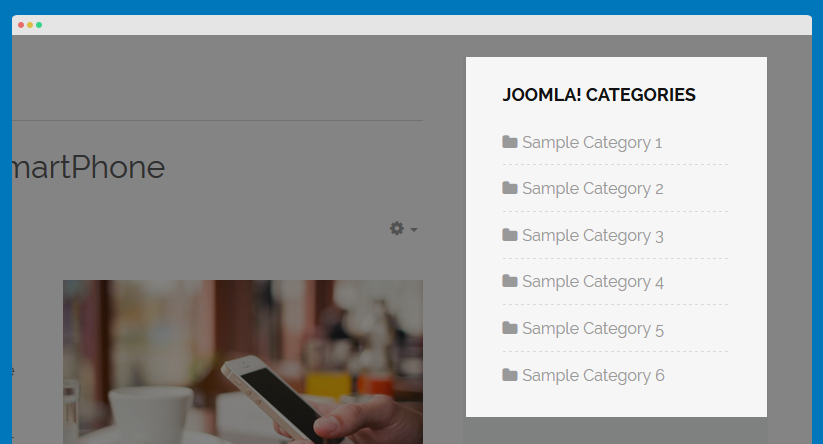
7.1 Joomla! Categories
  Module Position: sidebar-2
  Alternative Layout : Default
  Module Suffix:  NOT USED
- Module Back-end Settings
- Front-end Appearance
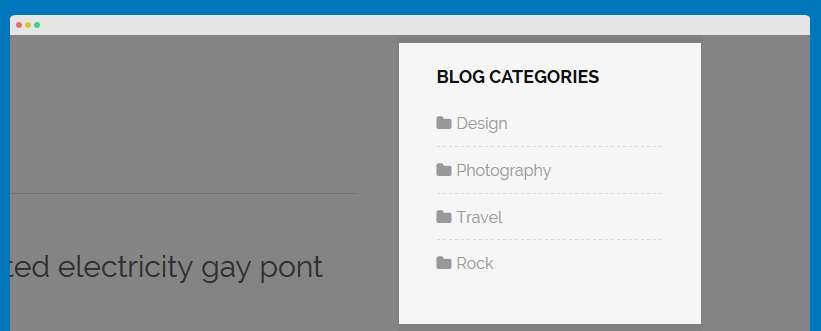
7.2 Blog categories
  Module Position: sidebar-2
  Alternative Layout : Default
  Module Suffix: Not Used
- Module Back-end Settings
- Front-end Appearance
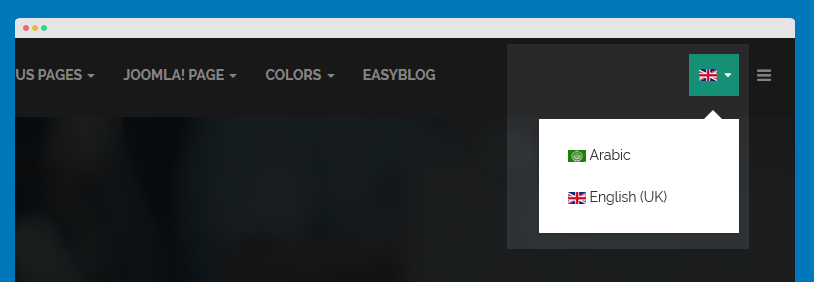
8. Language Switcher
  Module Position: languageswitcherload
  Module Suffix: NOT USED
- Module Back-end Settings
- Front-end Appearance
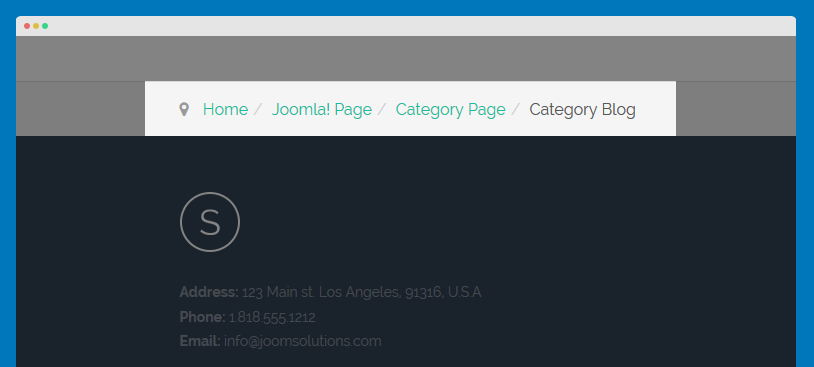
9. Breadcrumb module
  Module Position: navhelper
  Module Suffix: NOT USED
- Module Back-end Settings
- Front-end Appearance
Custom HTML Module
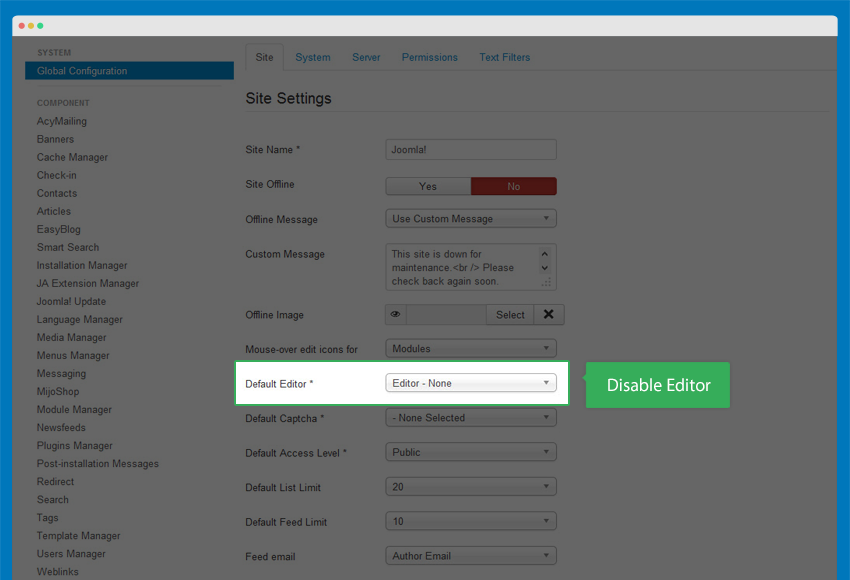
Before working with Custom HTML module, please disable the default Editor under Global Configuration
Go to Backend -> Site -> Global Configuration:
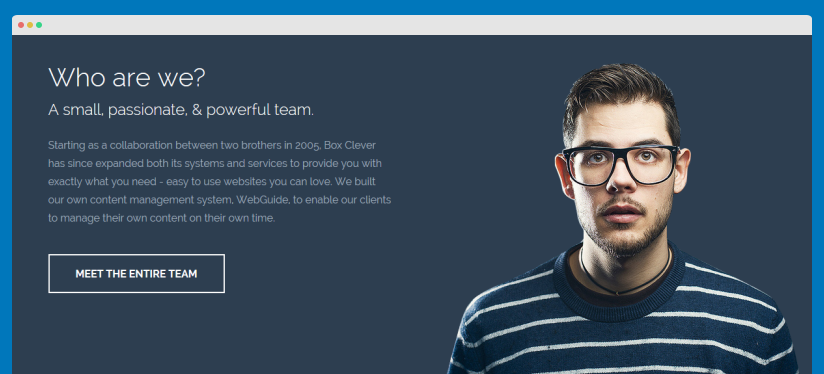
1. Who are we?
  Module Position: features-intro
  Module Suffix:  row-feature-secondary
HTML code:
<div class="col-xs-12 col-sm-6 about-us">
<div class="ja-animate" data-animation="move-from-left">
<h3>Who are we?</h3>
<h4>A small, passionate, & powerful team.</h4>
<p>Starting as a collaboration between two brothers in 2005, Box Clever has since expanded both its systems and services to provide you with exactly what you need - easy to use websites you can love. We built our own content management system, WebGuide, to enable our clients to manage their own content on their own time.</p>
<a class="btn btn-border" href="#">Meet the entire team </a>
</div>
</div>

<div class="col-xs-12 col-sm-6 hidden-xs about-img">
<img src="/images/joomlart/demo/about-us.png" alt="" />
</div>
- Module Back-end Settings
- Front-end Appearance
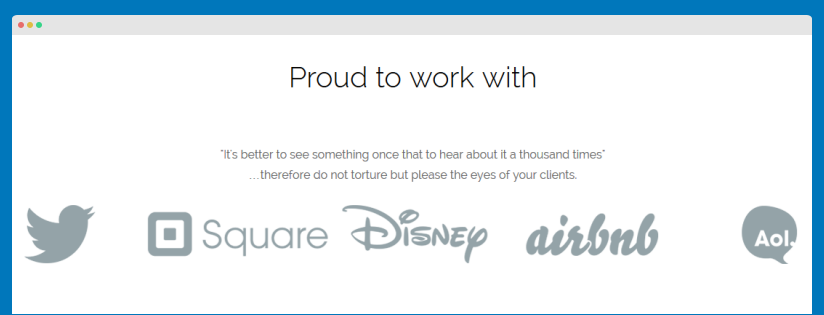
2. Proud to work with
  Module Position: features-intro
  Module Suffix: Not Used
HTML code:
<p class="text-center box-center col-sm-6">"It's better to see something once that to hear about it a thousand times" …therefore do not torture but please the eyes of your clients.</p>
<div class="ja-client-list text-center"><a class="ja-client ja-animate" href="#" data-animation="pop-up" data-delay="200"><img src="/images/joomlart/clients/logo-1.png" border="0" alt="" /></a> <a class="ja-client ja-animate" href="#" data-animation="pop-up" data-delay="400"><img src="/images/joomlart/clients/logo-2.png" border="0" alt="" /></a> <a class="ja-client ja-animate" href="#" data-animation="pop-up" data-delay="600"><img src="/images/joomlart/clients/logo-3.png" border="0" alt="" /></a> <a class="ja-client ja-animate" href="#" data-animation="pop-up" data-delay="800"><img src="/images/joomlart/clients/logo-4.png" border="0" alt="" /></a> <a class="ja-client ja-animate" href="#" data-animation="pop-up" data-delay="1000"><img src="/images/joomlart/clients/logo-5.png" border="0" alt="" /></a></div>
- Module Back-end Settings
- Front-end Appearance
3. Testimonials
  Module Position: features-intro
  Alternative Layout: testimonials
  Module Suffix: Not Used
HTML code:
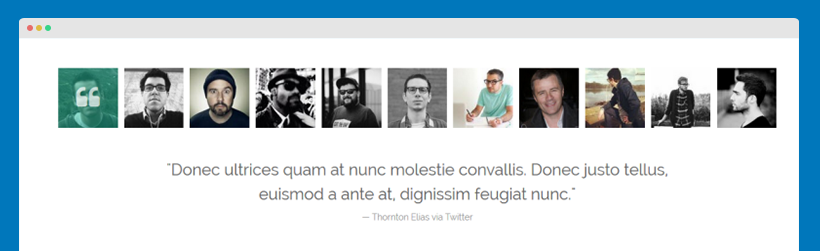
<div class="ja-testimonial-wrap">
<ul id="ja-testimonial-list">
<li class="col-xs-12 col-sm-2 col-md-1 active"><span><img src="/images/joomlart/demo/testimonials/testimonials-1.jpg" alt="Donec ultrices quam at nunc molestie convallis. Donec justo tellus, euismod a ante at, dignissim feugiat nunc." title="Thornton Elias via Twitter" /></span><i class="fa fa-quote-left"></i></li>
<li class="col-xs-12 col-sm-2 col-md-1"><span><img src="/images/joomlart/demo/testimonials/testimonials-2.jpg" alt="Dunked is one of the simplest, easiest, and most versatile portfolio creation tools I’ve ever come across. Responsive, Retina & Ready to go!" title="Stacy Sandford via Twitter" /></span><i class="fa fa-quote-left"></i></li>
<li class="col-xs-12 col-sm-2 col-md-1"><span><img src="/images/joomlart/demo/testimonials/testimonials-3.jpg" alt="Praesent nec lectus eu neque fringilla volutpat. Nulla tristique ullamcorper quam, ut dapibus massa hendrerit ac!" title="Delbert Barney via Twitter" /></span><i class="fa fa-quote-left"></i></li>
<li class="col-xs-12 col-sm-2 col-md-1"><span><img src="/images/joomlart/demo/testimonials/testimonials-4.jpg" alt="Ponec molestie nunc lacus, ut accumsan sem imperdiet eu. Maecenas semper erat vitae elit rutrum!" title="Ern Malakai via facebook" /></span><i class="fa fa-quote-left"></i></li>
<li class="col-xs-12 col-sm-2 col-md-1"><span><img src="/images/joomlart/demo/testimonials/testimonials-5.jpg" alt="Pellentesque habitant morbi tristique senectus et netus et malesuada fames ac turpis egestas!" title="Sterling Irvine via Twitter" /></span><i class="fa fa-quote-left"></i></li>
<li class="col-xs-12 col-sm-2 col-md-1"><span><img src="/images/joomlart/demo/testimonials/testimonials-6.jpg" alt=" Aliquam eget ante massa. Donec eget ligula auctor, dapibus tellus et, pulvinar urna!" title="Carl Fulton via Twitter" /></span><i class="fa fa-quote-left"></i></li>
<li class="col-xs-12 col-sm-2 col-md-1"><span><img src="/images/joomlart/demo/testimonials/testimonials-7.jpg" alt="Donec ultrices quam at nunc molestie convallis. Donec justo tellus, euismod a ante at, dignissim feugiat nunc!" title="Lloyd Willis via facebook" /></span><i class="fa fa-quote-left"></i></li>
<li class="col-xs-12 col-sm-2 col-md-1"><span><img src="/images/joomlart/demo/testimonials/testimonials-8.jpg" alt="Sed nec ipsum at odio suscipit auctor. Cras quis quam dui. Vestibulum at urna condimentum, mattis dolor" /></span><i class="fa fa-quote-left"></i></li>
<li class="col-xs-12 col-sm-2 col-md-1"><span><img src="/images/joomlart/demo/testimonials/testimonials-9.jpg" alt="Morbi in sem quis dui placerat ornare. Pellentesque odio nisi, euismod in, pharetra a, ultricies." title="Mordikai Brenton via Twitter" /></span><i class="fa fa-quote-left"></i></li>
<li class="col-xs-12 col-sm-2 col-md-1"><span><img src="/images/joomlart/demo/testimonials/testimonials-10.jpg" alt="Praesent dapibus, neque id cursus faucibus, tortor neque egestas augue, eu vulputate magna eros eu erat!" title="Ashton Malcom via Twitter" /></span><i class="fa fa-quote-left"></i></li>
<li class="col-xs-12 col-sm-2 col-md-1"><span><img src="/images/joomlart/demo/testimonials/testimonials-11.jpg" alt="Aliquam erat volutpat. Nam dui mi, tincidunt quis, accumsan porttitor, facilisis luctus, metus" title="Avetis Garen via Twitter" /></span><i class="fa fa-quote-left"></i></li>
</ul>
</div>
- Module Back-end Settings
- Front-end Appearance
4. Want to be the first to try our new framework...
  Module Position: features-intro
  Module Suffix:  row-feature-bg
HTML code:
<p class="text-center box-center col-sm-6">He's the exact opposite of the hero. And most times they're friends, like you and me! I should've known way back when... You know why, David? Because of the kids. They called me Mr Glass.</p>
<p class="text-center box-center col-sm-6"><a class="btn btn-success" href="#">Live Demo</a><a class="btn btn-info" href="#">Download</a></p>
- Module Back-end Settings
- Front-end Appearance

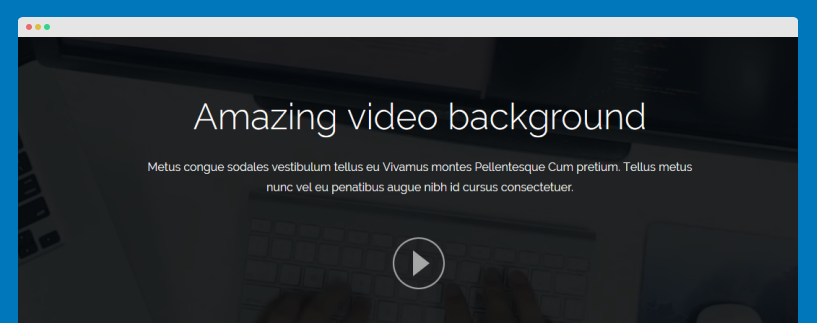
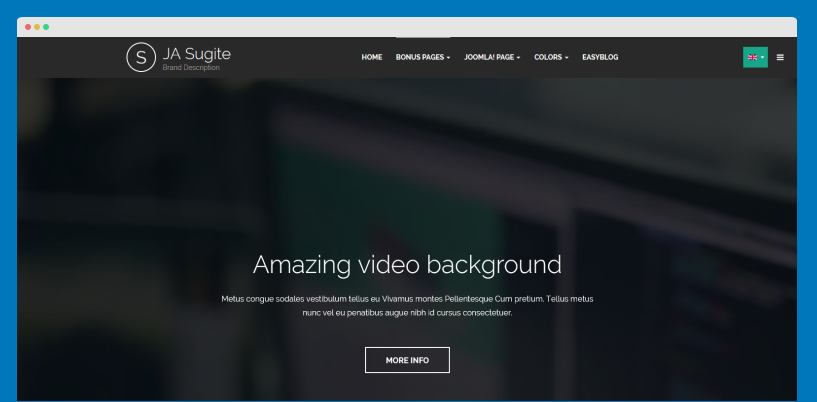
5. Video Background
  Module Position: features-intro
  Module Suffix:  row-feature-full row-feature-video
  Alternative Layout: video.background
HTML code:
<div class="video-shuffle-wrap">
<div class="video-shuffle" data-js-view="video-shuffle">
<div class="mask"> </div>
<div class="content"><div class="inner">
<h3>Amazing video background</h3>
<p>Metus congue sodales vestibulum tellus eu Vivamus montes Pellentesque Cum pretium. Tellus metus nunc vel eu penatibus augue nibh id cursus consectetuer.</p>
<a id="btn-play" class="play-video" href="javascript:void(0);">Play video</a>
</div></div>
<img class="poster" src="/images/joomlart/videos/poster.png" alt="" />
<iframe width="560" height="315" src="//www.youtube.com/embed/qr1znPlfOxc" frameborder="0" allowfullscreen></iframe>
</div>
</div>
- Module Back-end Settings
- Front-end Appearance
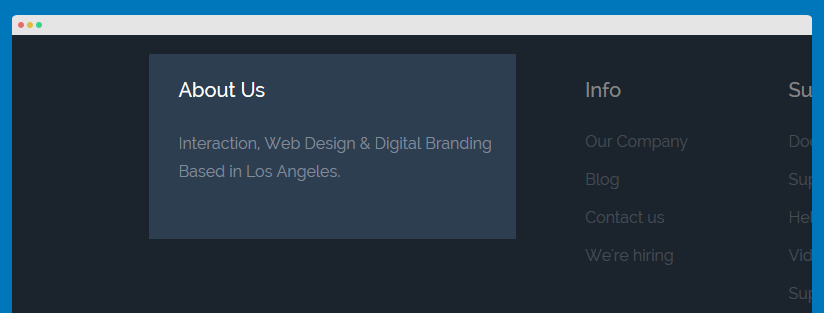
6. About Us
  Module Position: footer-1
  Module Suffix:  NOT USED
HTML code:
<p>Interaction, Web Design & Digital Branding Based in Los Angeles.</p>
- Module Back-end Settings
- Front-end Appearance
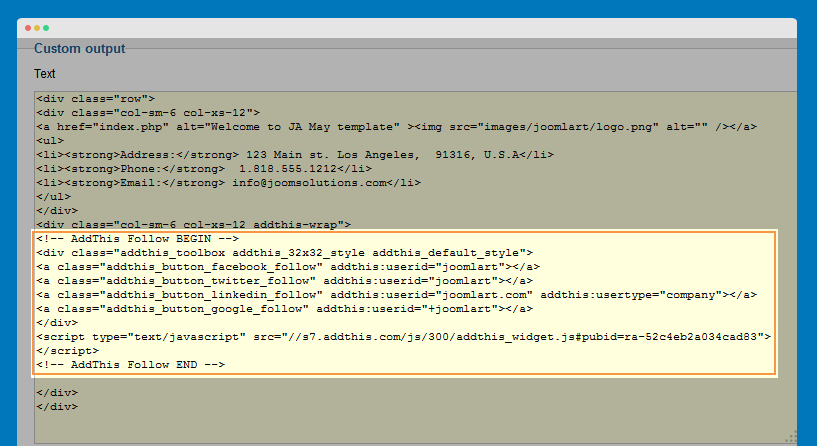
7. Footer Info
  Module Position: footer-info
  Module Suffix:  NOT USED
HTML code:
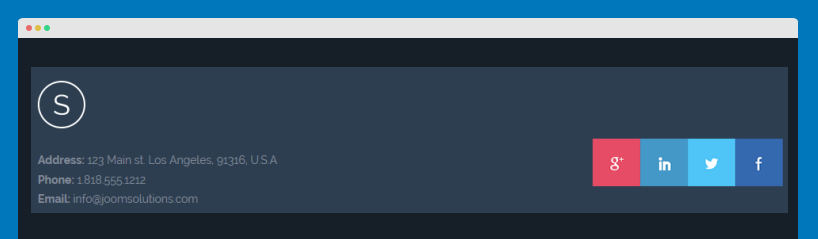
<div class="row">
<div class="col-sm-6 col-xs-12">
<a href="/index.php" alt="Welcome to JA May template" ><img src="/images/joomlart/logo.png" alt="" /></a>
<ul>
<li><strong>Address:</strong> 123 Main st. Los Angeles,  91316, U.S.A</li>
<li><strong>Phone:</strong>  1.818.555.1212</li>
<li><strong>Email:</strong> info@joomsolutions.com</li>
</ul>
</div>
<div class="col-sm-6 col-xs-12 addthis-wrap">
<!-- AddThis Follow BEGIN -->
<div class="addthis_toolbox addthis_32x32_style addthis_default_style">
<a class="addthis_button_facebook_follow" addthis:userid="joomlart"></a>
<a class="addthis_button_twitter_follow" addthis:userid="joomlart"></a>
<a class="addthis_button_linkedin_follow" addthis:userid="joomlart.com" addthis:usertype="company"></a>
<a class="addthis_button_google_follow" addthis:userid="+joomlart"></a>
</div>
<script type="text/javascript" src="//s7.addthis.com/js/300/addthis_widget.js#pubid=ra-52c4eb2a034cad83"></script>
<!-- AddThis Follow END -->

</div>
</div>
Follow the steps below to add the "AddThis" buttons.
Step 1: Get Addthis code
Access AddThis site, select service

Get AddThis service code

<!-- AddThis Follow BEGIN -->
<div class="addthis_toolbox addthis_32x32_style addthis_default_style">
<a class="addthis_button_facebook_follow" addthis:userid="joomlart"></a>
<a class="addthis_button_twitter_follow" addthis:userid="joomlart"></a>
<a class="addthis_button_linkedin_follow" addthis:userid="joomlart.com" addthis:usertype="company"></a>
<a class="addthis_button_google_follow" addthis:userid="+joomlart"></a>
</div>
<script type="text/javascript" src="//s7.addthis.com/js/300/addthis_widget.js#pubid=ra-52c4eb2a034cad83"></script>
<!-- AddThis Follow END -->
Step 2: add code to your site
Create a custom HTML module then paste the AddThis code, onto Footer Info custom HTML module
- Module Back-end Settings
- Front-end Appearance
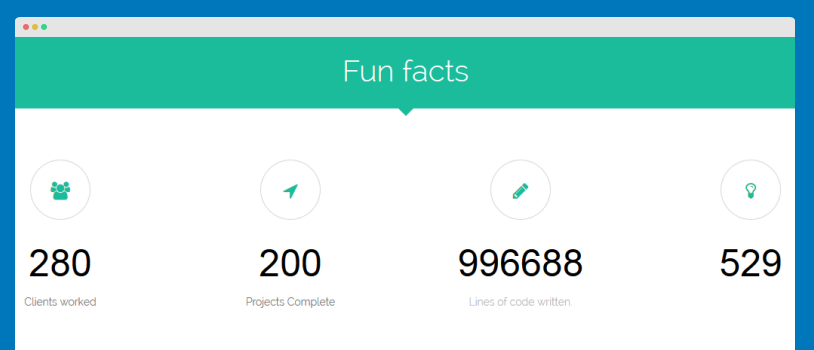
8. Fun facts
  Module Position: features-info
  Module Suffix:  row-feature-highlight-title
HTML code:
<div class="funfacts-content col-sm-3 text-center">
	<p><i class="fa fa-users"></i></p>
	<div class="count-asset">
		<div class="count-number" data-refresh-interval="20" data-speed="1000" data-from="0" data-to="280"></div>
		<h6 class="count-subject" style="opacity: 0; bottom: 0px;">Clients worked</h6>
	</div>
</div>
<div class="funfacts-content col-sm-3 text-center">
	<p><i class="fa fa-location-arrow"></i></p>
	<div class="count-asset">
		<div class="count-number" data-refresh-interval="20" data-speed="1500" data-from="0" data-to="200"></div>
		<h6 class="count-subject" style="opacity: 0; bottom: 0px;">Projects Complete</h6>
	</div>
</div>
<div class="funfacts-content col-sm-3 text-center">
	<p><i class="fa fa-pencil"></i></p>
	<div class="count-asset">
		<div class="count-number" data-refresh-interval="20" data-speed="2000" data-from="0" data-to="996688"></div>
		<h6 class="count-subject" style="opacity: 0; bottom: 0px;">Lines of code written.</h6>
	</div>
</div>
<div class="funfacts-content col-sm-3 text-center">
	<p><i class="fa fa-lightbulb-o"></i></p>
	<div class="count-asset">
		<div class="count-number" data-refresh-interval="20" data-speed="2500" data-from="0" data-to="546"></div>
		<h6 class="count-subject" style="opacity: 0; bottom: 0px;">Ideas created</h6>
	</div>
</div>
- Module Back-end Settings
- Front-end Appearance
9. Video Background
  Module Position: video-background
  Module Suffix: Not Used
HTML code:
<div class="video-shuffle-wrap">
<div class="content"><div class="inner">
<h3>Amazing video background</h3>
<p>Metus congue sodales vestibulum tellus eu Vivamus montes Pellentesque Cum pretium. Tellus metus nunc vel eu penatibus augue nibh id cursus consectetuer.</p>
<a href="/index.php?option=com_content&Itemid=517&catid=88&id=102&lang=en&view=article" class="btn btn-border btn-lg">More Info</a>
</div></div>
<div class="mask"> </div>
<iframe src="//player.vimeo.com/video/94101559?title=0&byline=0&portrait=0&autoplay=1&loop=1" width="100%" height="100%" frameborder="0" webkitallowfullscreen mozallowfullscreen allowfullscreen></iframe>
</div>
- Module Back-end Settings
- Front-end Appearance
Menu System
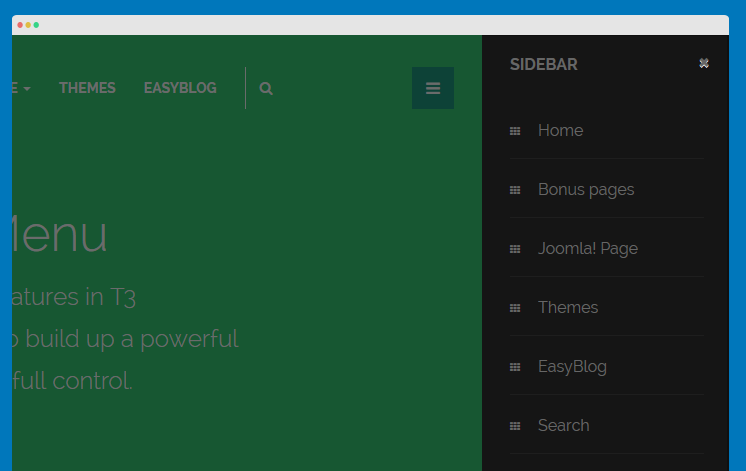
1. Off-canvas and Collapsed menu
JA sugite inherits the Off-canvas feature of T3 Framework. Follow the steps below to configure the Off-canvas menu for JA sugite.
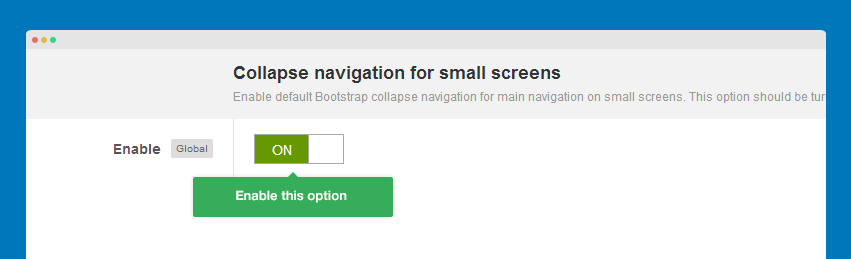
Step 1: Enable collapse navigation for small screens
Open JA sugite setting panel, open Navigation tab then collapse navigation for small screens.
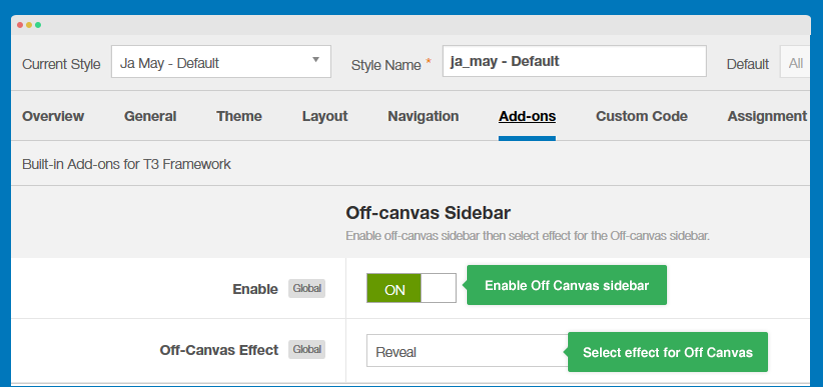
Step 2: Enable Off-canvas
Open JA Sugite setting panel, open the Add-on tab then enable the Off-canvas option.
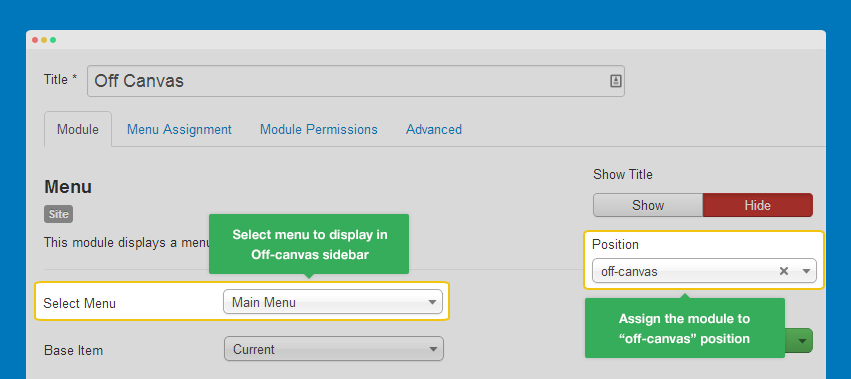
Step 3: Assign a Menu to Off-canvas
First off, you have to have a menu. If you haven't done this before, please refer to this link. Once you have successfully created a menu, please open Module Manager to continue. If you have create a menu module, or using an existing menu module and select this menu module with the above menu (meaning you're connecting them together).
Front-end Appearance
Note:
The Off-canvas can be customized to display in the left side.
To move the Off-canvas to the left side, please open the off-canvas.php file in /templates/ja_sugite/tpls/blocks.
Now, find the following code:
data-pos="right"
Then change it to:
data-pos="left"
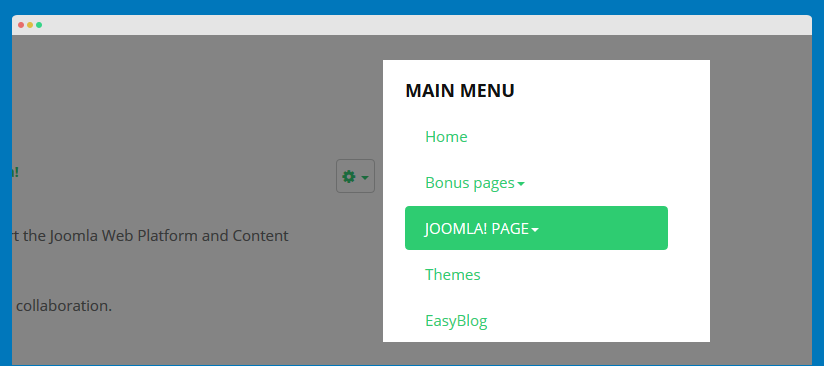
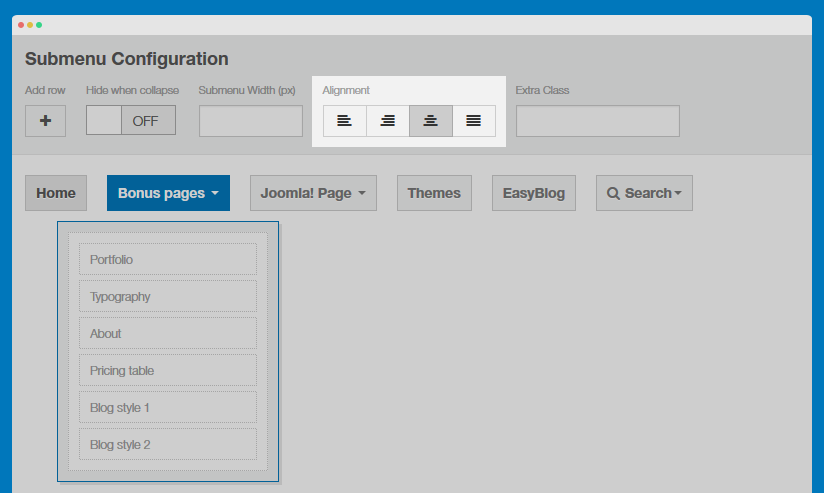
2. Megamenu Configuration
JA Sugite supports Megamenu, which is a core feature of T3 Framework.
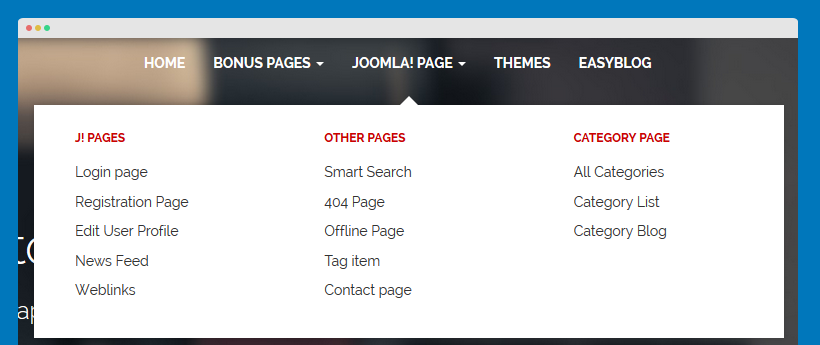
To enable Megamenu, from JA sugite template back end, navigate to the Navigation tab.
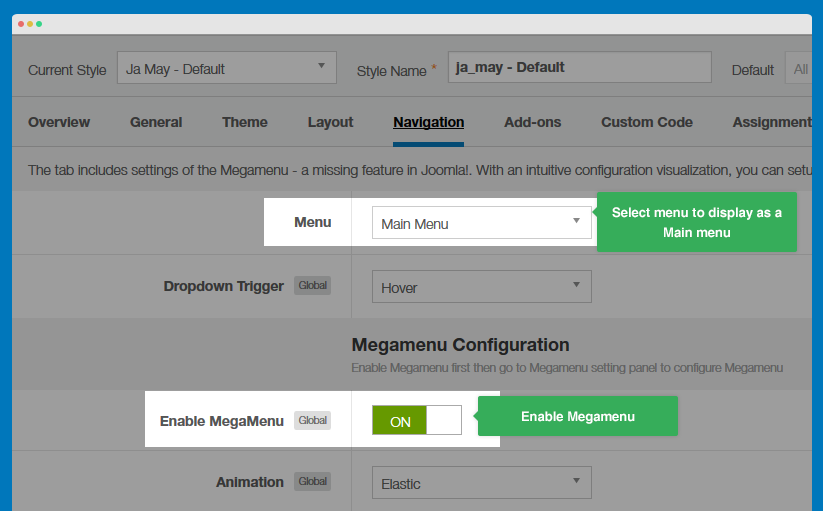
Select the menu that will be displayed as the main menu (mainnav position), then enable Megamenu.
After you successfully save the configuration above, we will move onto configuring the Megamenu by clicking the "Megamenu" button.
It is pretty straight forward. However, please note that in JA Sugite's Megamenu, the submenu of the two menu item
Joomla! Page and Bonus Pages, we should select Alignment = center
Multiple Layouts Setting
I. Default Layouts
JA Sugite comes with various types of layout that definitely benefits any business site. We don't use any 3rd party extension to work out these layouts, instead we believe in the power of Joomla core - Joomla com_content to come up with these.
II. Build up your own page
To assign a layout to a certain page, please follow our instruction below.
Step 1: Clone the default style
When you install JA Sugite template, there is only one style: the default style. However, you can create an unlimited number of different styles for your template as needed.
Why do you need to create a new style?
To have multiple layouts on your site, you need to create multiple styles. Each of these styles will be assigned to one layout.
So what is the difference between template and template style? - Check this out
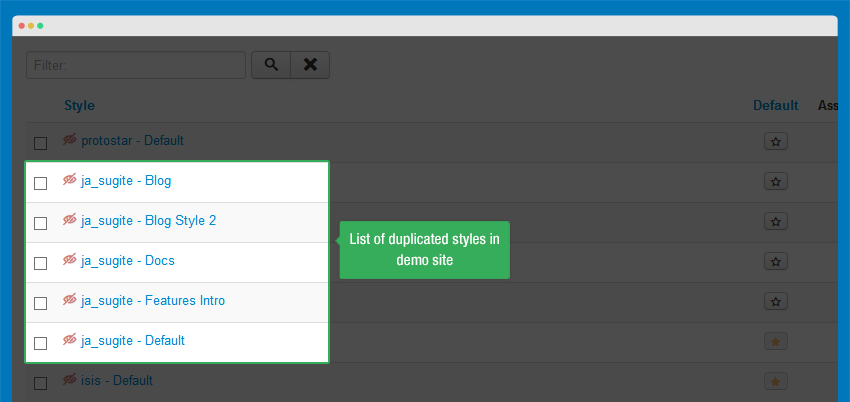
To create a new style in ja_sugite, open the template manager panel, select ja_sugite-Default style then hit the Duplicate button.
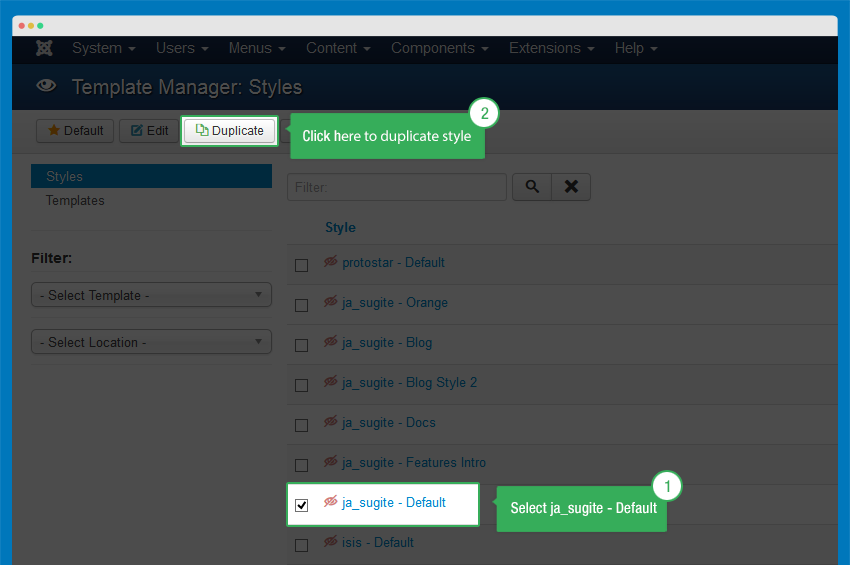
On the demo site, we have already duplicated a number of styles for different layouts.
Step 2: Assign layout to the newly created style
Open the new style then select the respective layout that you want to assign to.
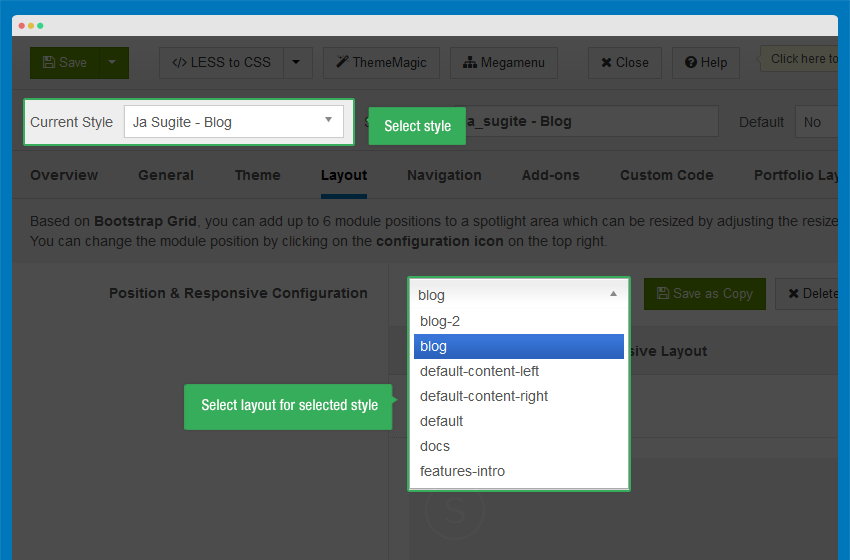
Now open the menu item that you have assigned to the newly created style to configure it, you should be selecting the correct menu type for it.
Matching layout with menu type:
Please note that each layout will go with its own menu type only, so please make sure you select the correct menu type for your layout.
| Page | Layout | Menu type | Template Stype |
|---|---|---|---|
| Home | features-intro | Featured Articles | ja_sugite - Features Intro |
| Blog style 1 | Blog | xLayout - Blog | ja_sugite - Blog |
| Blog style 2 | Blog-2 | xLayout2 - Blog | ja_sugite - Blog Style 2 |
Here is the list of all extended menu types:
- xLayout - Blog
- xLayout2 - Blog
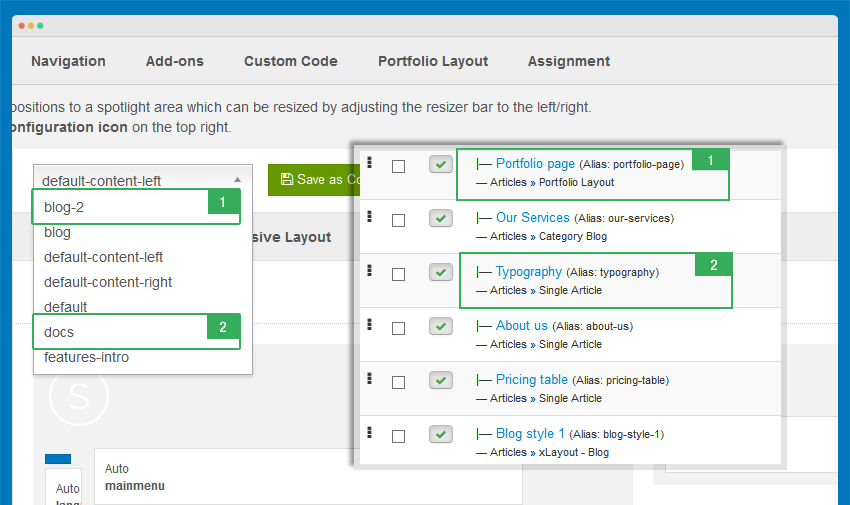
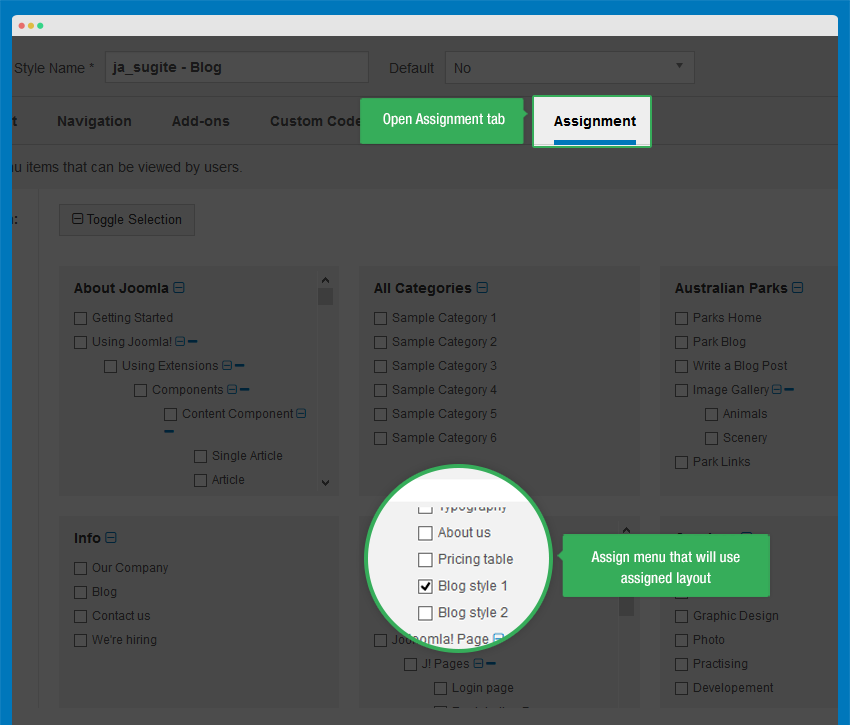
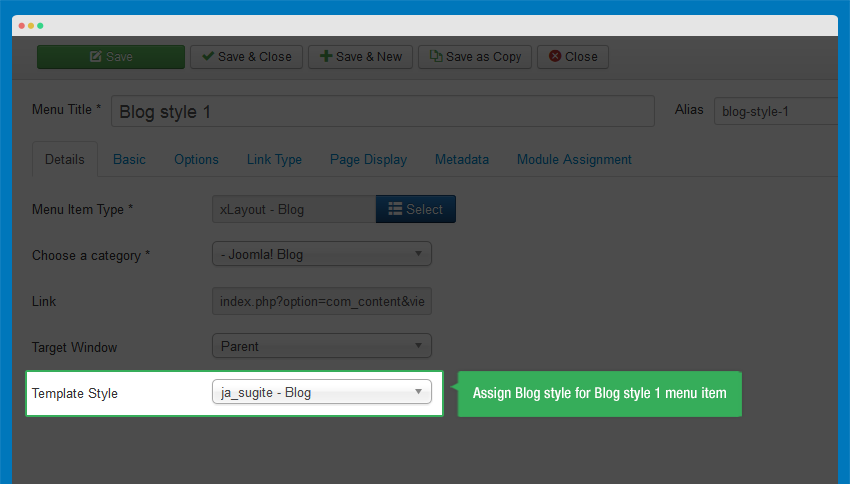
Step 3: Assign style to each menu item
This is called "style override". The menu item that is assigned to a specific style will get that style overrided the default style.
There are 2 ways to assign style to menu items: in the style back-end setting or in the setting panel of menu item.
#1: In the style back-end setting
#2: In the setting panel of menu item
EasyBlog Configuration
JA Sugite supports Easyblog components.
1. EasyBlog Component
JA Sugite supports EasyBlog styles by default. In order to have the EasyBlog design, you should download, extract the files and add EasyBlog theme for JA Sugite to your site. If you only want the JA Sugite's EasyBlog style, please follow the following step in this section.
1.2 Install EasyBlog component
Quick Guide:
- Step 1: Install Easyblog component
- Step 2: Download JA Sugite theme for Easyblog ( if you have installed the Quickstart package, you should move on to Step 4).
- Step 3: Extract zip file and upload to your your_site_folder. You should see
folder ja_sugite in
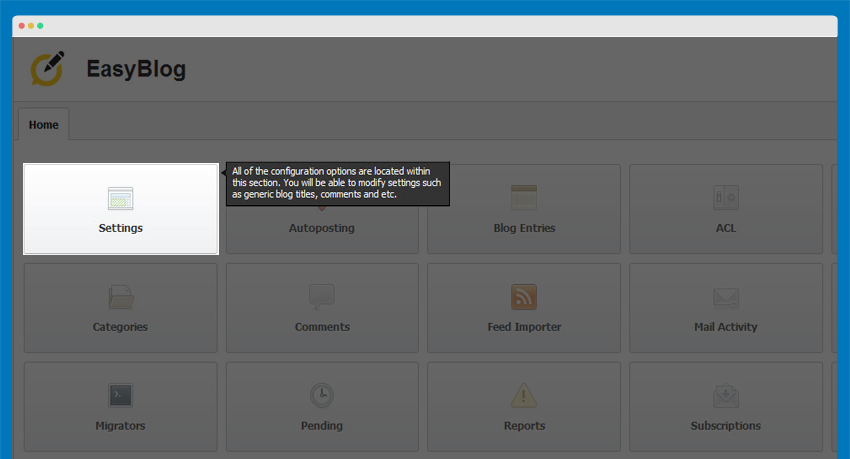
/components/com_easyblog/themes. - Step 4: Go to back-end panel >> Components >> Easyblog >> Themes >> select ja_sugite.
The following screenshots are for Step 4.
- Access: Components >> Easyblog >> Themes

- Change the default theme to ja_sugite

1.3 Configure EasyBlog Component
Recommendation:
Most of the settings are the default settings, when you select ja_sugite theme, you will get the almost the same style as on our demo.
1.4 Configure Easyblog Slide
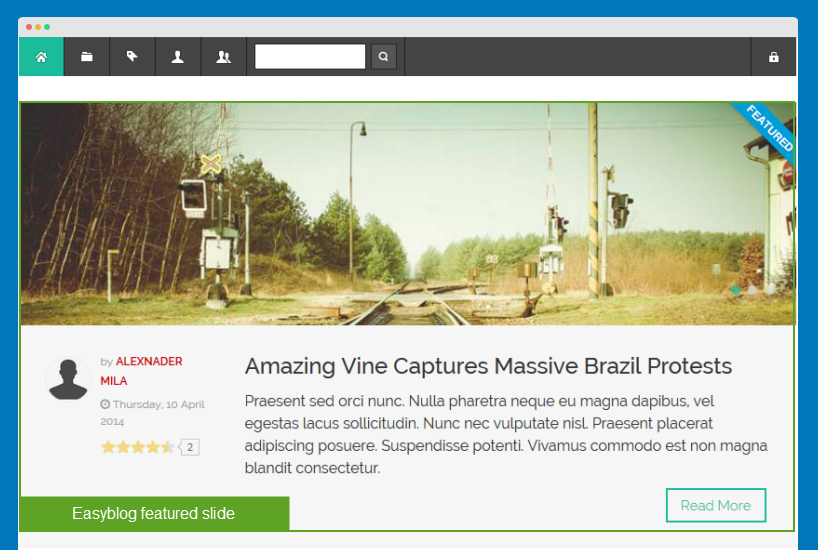
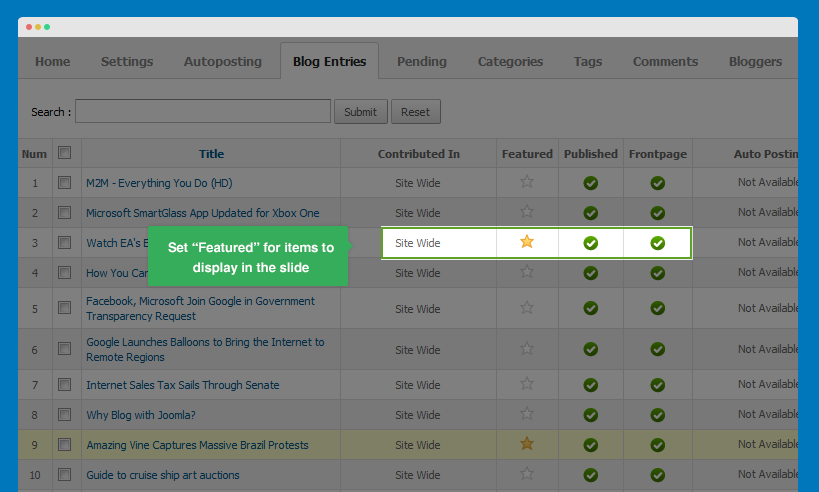
The EasyBlog slide displays the featured EasyBlog items only. Hence, in order to get the items display in EasyBlog slide, you have to set the items to "Featured".
1.5 EasyBlog Module Configuration
1.5.1 Blog Categories Module
  Module Position: sidebar-2
  Module Suffix: NOT USED
- Back-end Settings
- Front-end Appearance
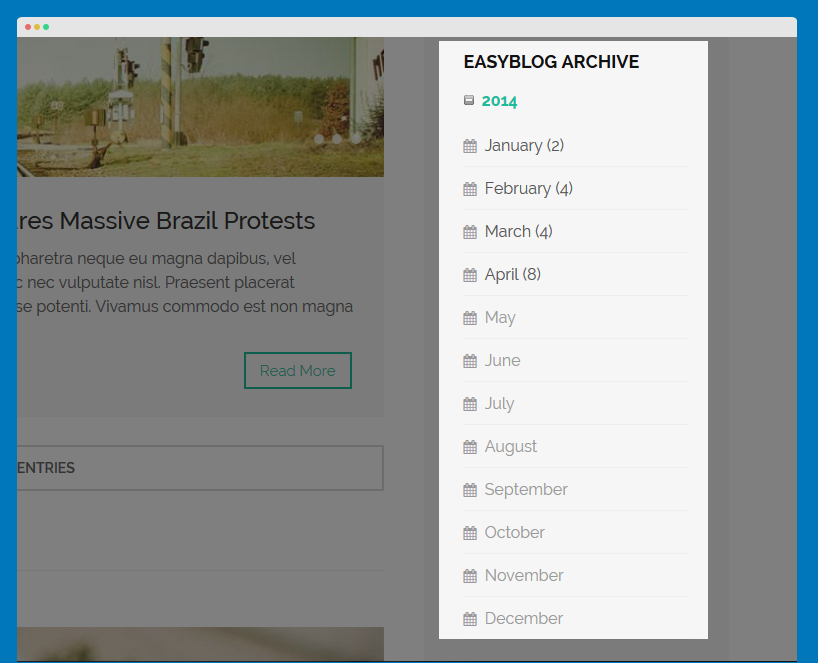
1.5.2 EasyBlog Archive Module
  Module Position: sidebar-2
  Module Suffix: NOT USED
- Back-end Settings
- Front-end Appearance
1.5.3 EasyBlog Latest Blogs Module
  Module Position: sidebar-2
  Module Suffix: NOT USED
- Back-end Settings
- Front-end Appearance

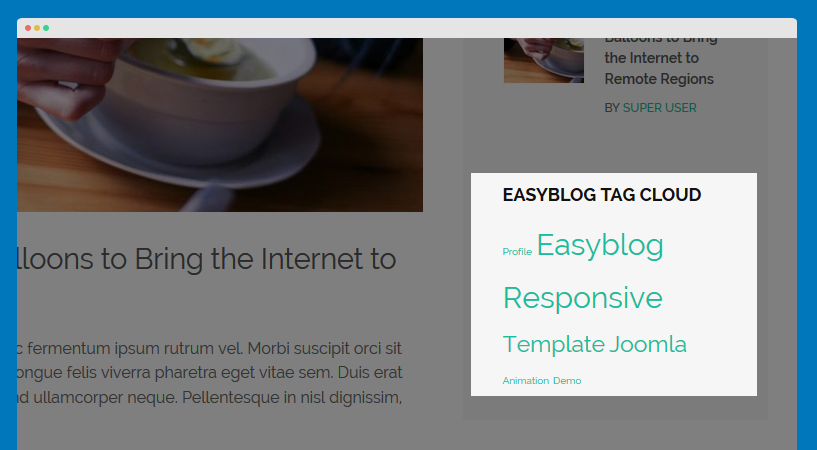
1.5.4 EasyBlog Tag Cloud Module
  Module Position: sidebar-2
  Module Suffix: NOT USED
- Back-end Settings
- Front-end Appearance
Template Configuration
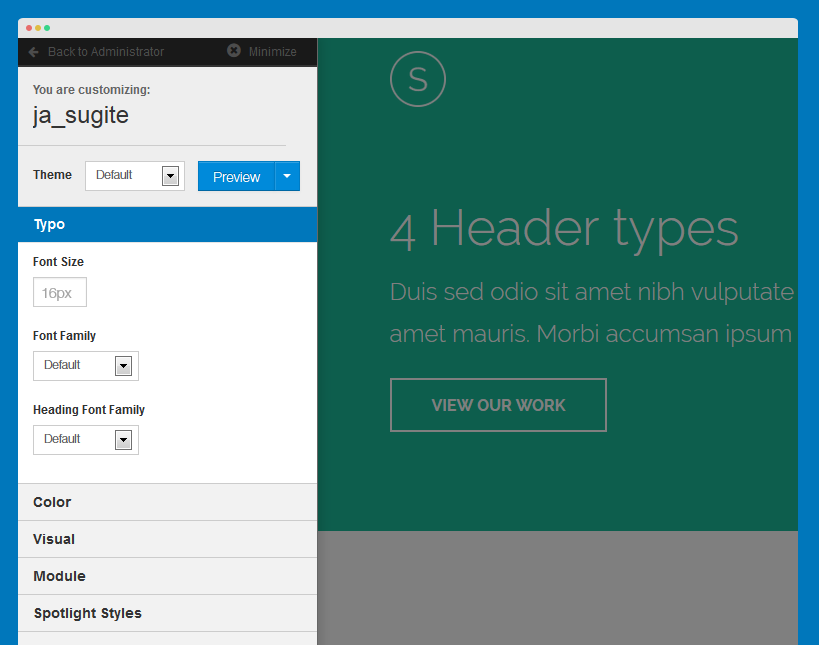
Theme Settings
JA Sugite supports 5 color themes by default: Default, Red, Orange, Purple and Blue.

A here, you can switch to any theme you like. To change theme, kindly select it from the drop down box under the Theme tab.
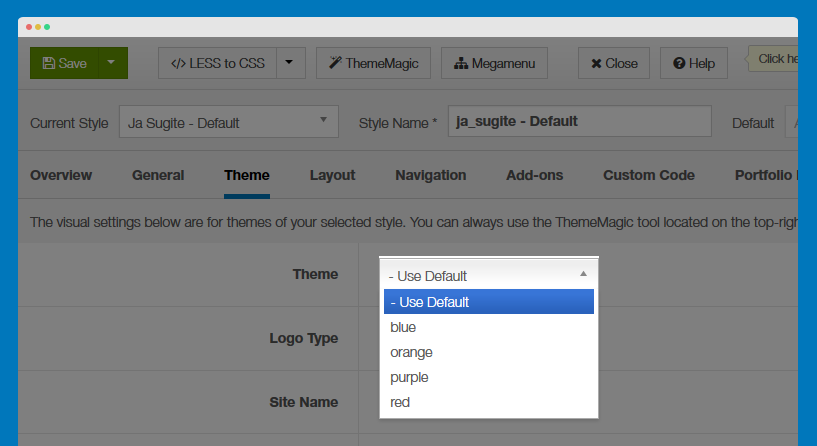
In the Theme tab, you can also change the logo by replacing other image here or select text logo option as you wish.
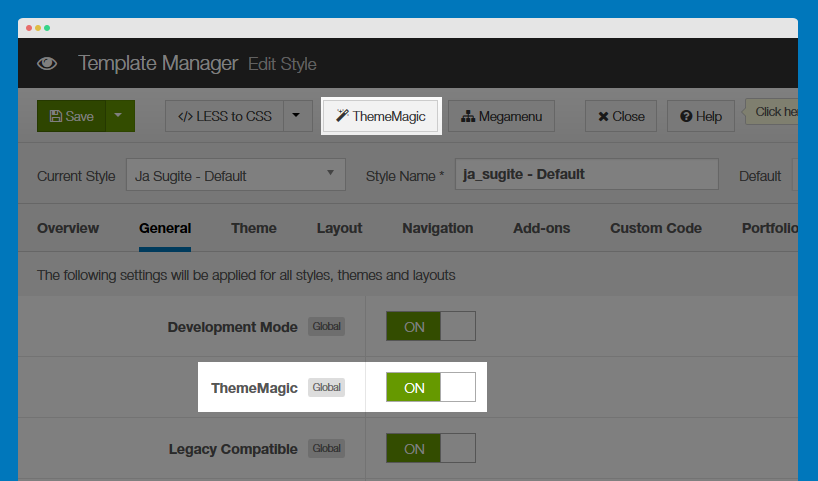
ThemeMagic Settings
ThemeMagic is a real time theme customization tool supported by T3 Framework. It allows you to customize any theme without touching in the code.
Step 1: Enable ThemeMagic
In the General tab, enable ThemeMagic then access ThemeMagic's working panel by clicking on ThemeMagic.
Step 2: Select the theme to customize
Tips: Once ThemeMagic is enabled, you can access ThemeMagic from your front-page by adding "?tm=1" after your site url (example: http://joomla-templates.joomlart.com/ja_sugite/?tm=1)
View ThemeMagic Documentation VIew ThemeMagic's Video Tutorial
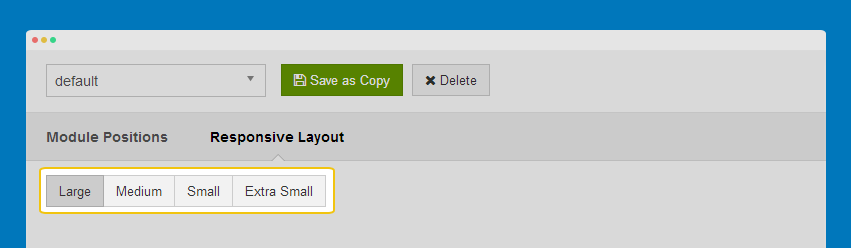
Layout Settings
There are 7 layouts that are used in the template. Select the style that you want to work on, then assign the layout for that style accordingly.

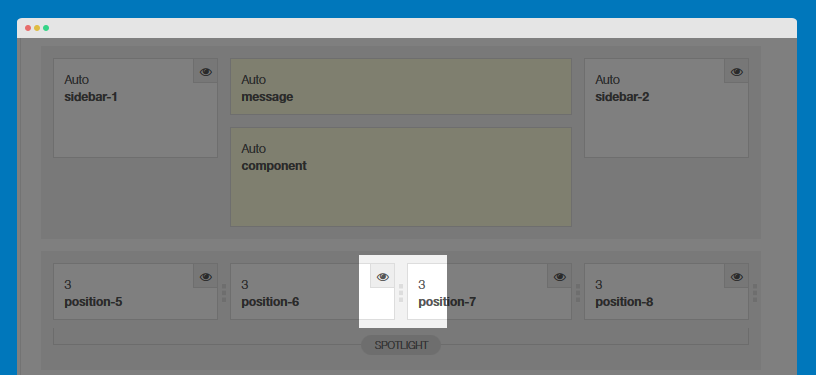
Layout Structure
Here, you can change the layout structure, module positions in the layout, and more.
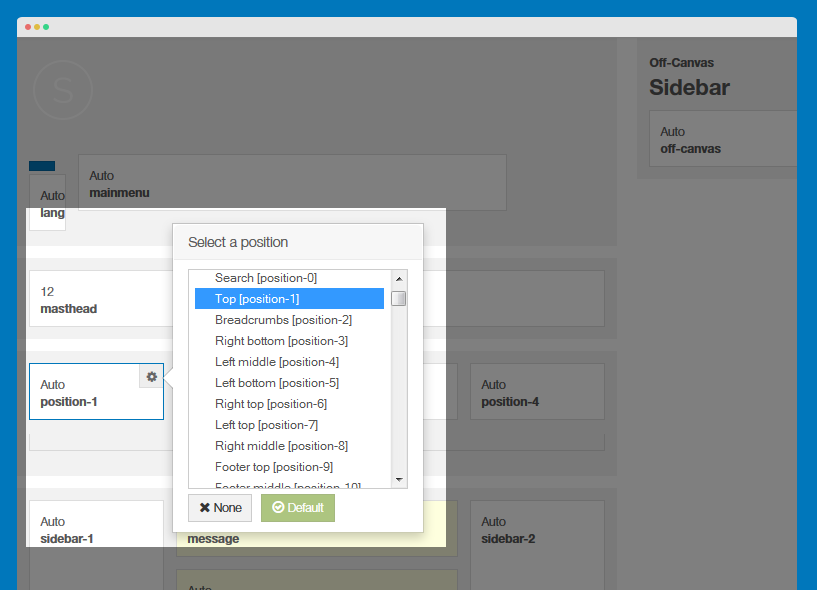
In the spotlight block, you can see the number of positions available.
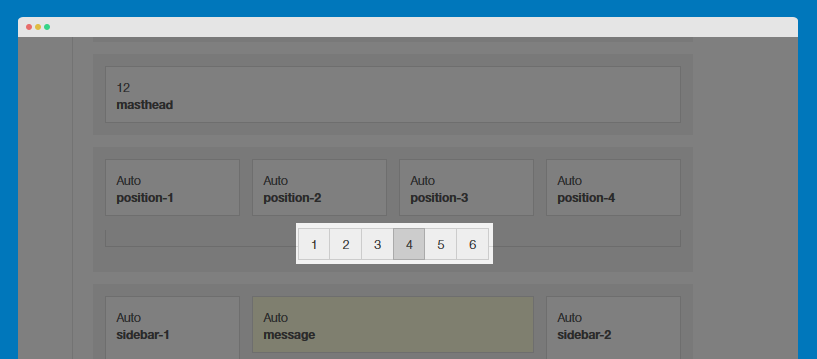
Responsive Layouts
JA Sugite supports multiple responsive layouts. In the Responsive layout, select the layout you would like to configure.
In each responsive layout, you can disable any module position as you wish.
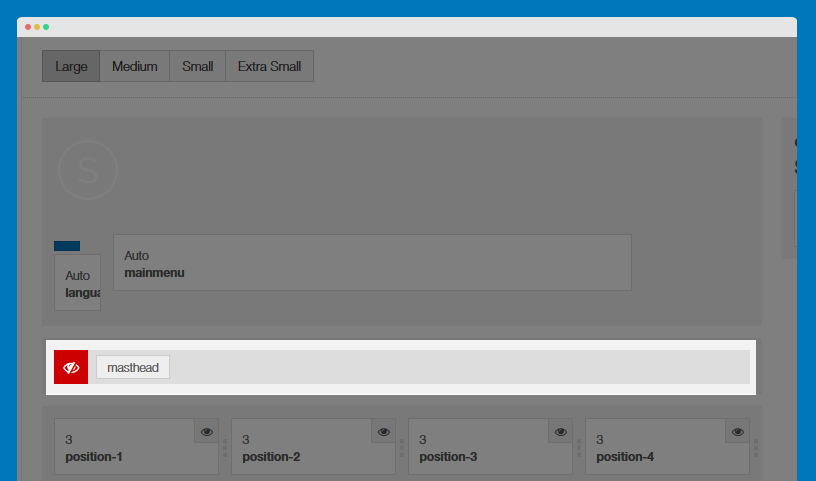
For module positions in the spotlight block, you can drag to resize.
Documentation Layout configuration video Layout customization video
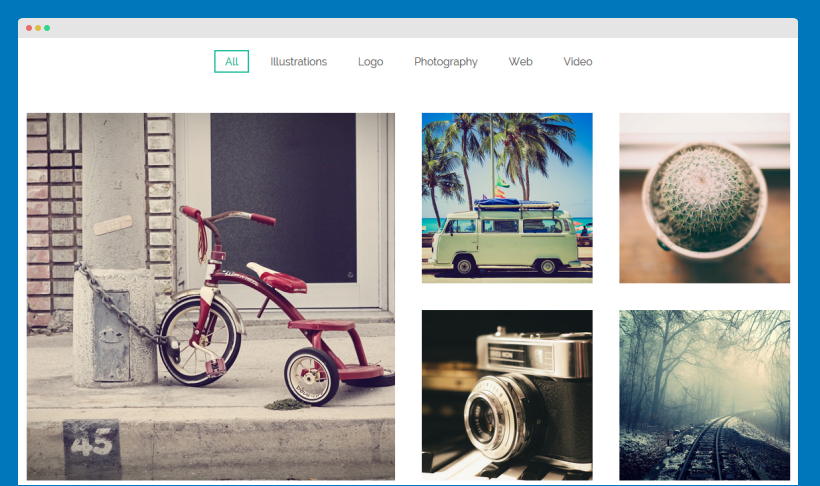
Portfolio Layout
Portfolio Layout will allow you to set the number of items being displayed according to different screen sizes. These settings are located in the tab Portfolio Layout in Administrator--> Extensions--> Template Manager--> JA Sugite Template
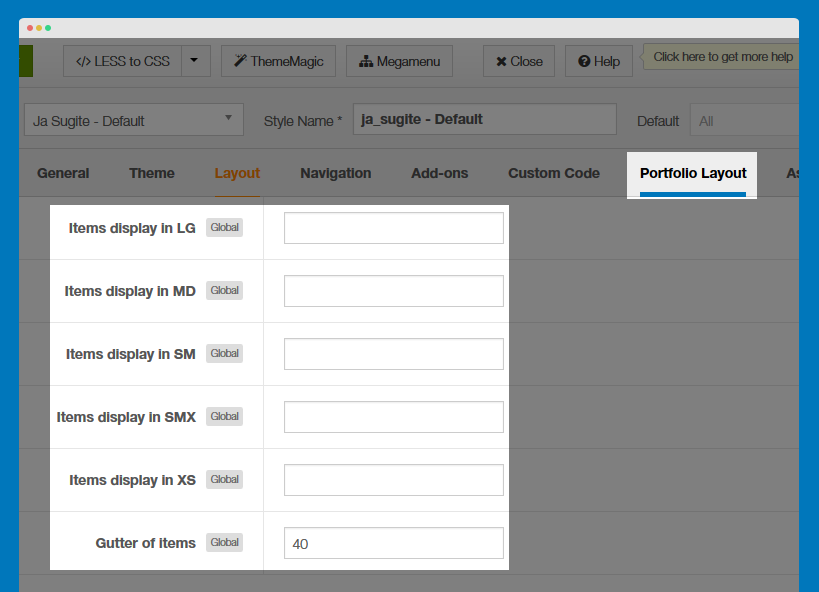
Items display in LG: The number of items showing on a row with width of browser (in the case, it can be understood as width of monitor if you does not resize browser) larger than 1200px
Items display in MD: The number of items showing on a row with width of browser between 992px and 1200px
Items display in SM: The number of items showing on a row with width of browser between 768px and 992px
Items display in SMX: The number of items showing on a row with width of browser between 480px and 768px
Items display in XS: The number of items showing on a row with width of browser smaller than 480px
Gutter of items: Distance between the items showing
To display as Demo site, please follow step by step as below:
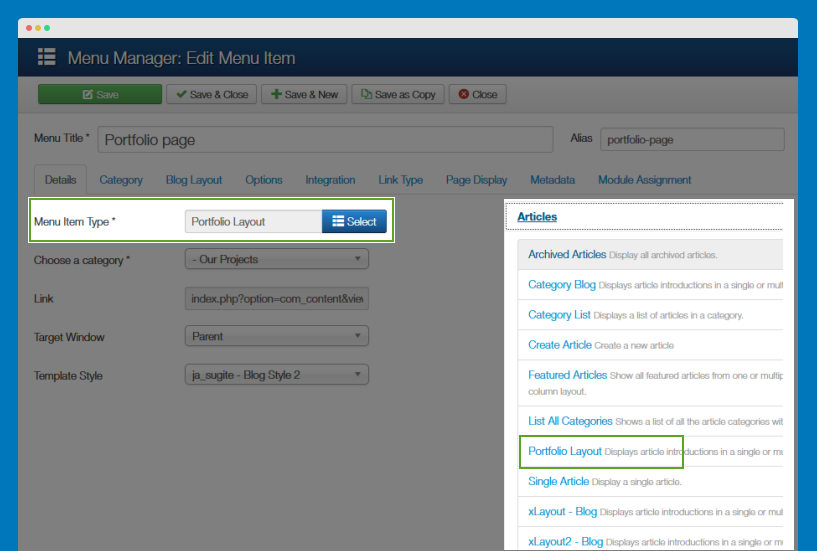
Step 1: Go to Administrator --> Menus --> Main Menu Create new Menu using Menu Item Tyle is Masonry Layout
Step 2: Go to Administrator --> Content --> Categories--> Portfolio category--> Extra Fields tab -->Select "Extra Field Group" is Portfolio
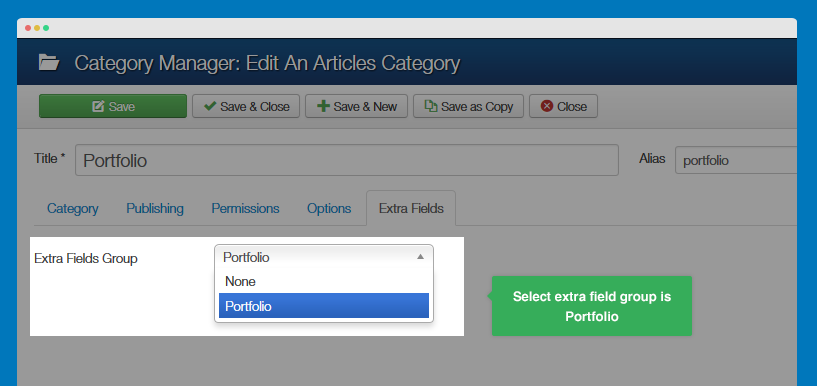
Step 3: Go to Administrator --> Content --> Categories--> Open Subcategory (Ex: Logo)--> Extra Fields tab--> Select "Extra Fields Group" is Portfolio

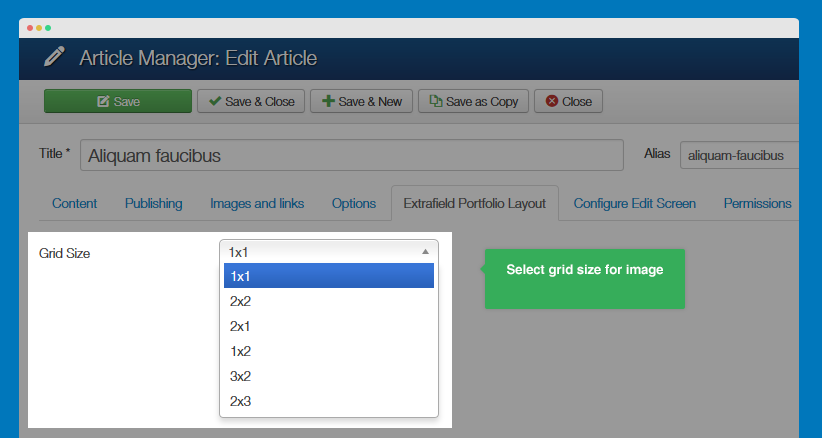
Step 3: Go to Administrator --> Content --> Articles--> Open any article in Logo category --> Open Extrafield Project Layout tab:
Frontend Appearance
Get typography displayed on your site
JA Sugite provides a variety of typo on hand that will absolutely save you time. These typo does not only make your content look neatly done, but also go well with the theme scheme. We have put all the typos used in JA Sugite onto the typo page (which are located in under the Typography menu item).

Note:
JA Sugite is built on the latest version of T3 Framework which integrates Bootstrap 3 at core, hence, JA Sugite does support all Bootstrap 3's typo.
Step 1: get the typo markup
There are 3 ways you can quickly get the typo markup from:
#1: using Firebug
#2: using quickstart package
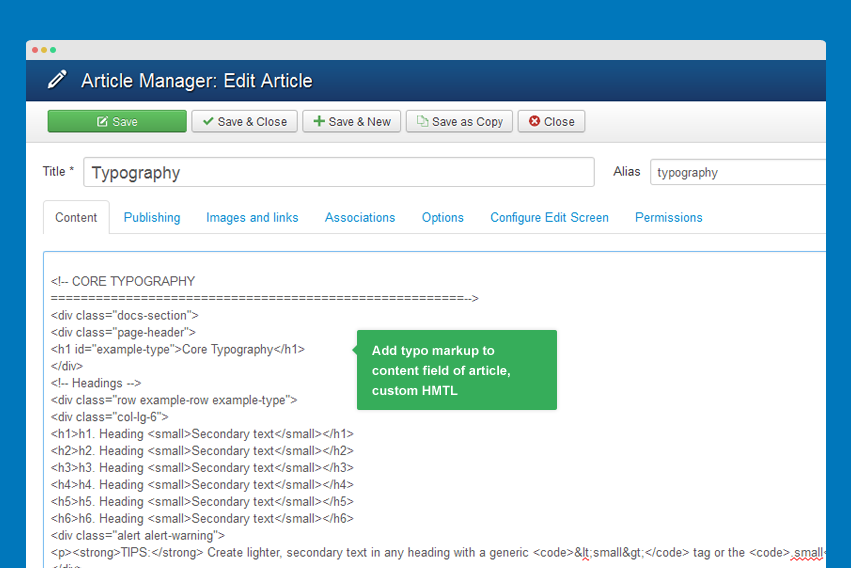
We provide a Quickstart package, which includes the sample data that will help you replicating the Purity III demo as is for your site. Once you successfully install the site, you can easily get the typo's markup from the articles and custom HTML module.
#3: using demo builder
Once you successfully build a Demo using Demo Builder which we have shown earlier in the Download and Installation section, you can easily copy the typo markup from the articles and custom HTML directly from the back-end.
Step 2: Add markup of the typo to your content
You can add the typo markup to the article's content field or custom HTML module.
Turn off editor:
Please make sure you turn the Editor off if you are going to add HTML code to your article content. To turn off, please navigate to Sytem >> Global confoguration, select Editor - None in the field Default editor.

Step 3: Get the typo displayed on the front-page
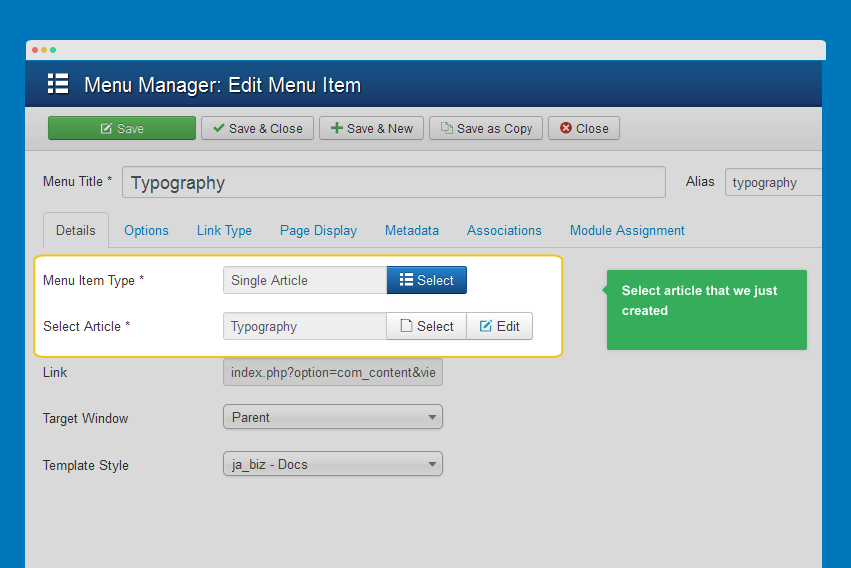
Create a menu, assign to the article we added the typo markup to.
Supported typography pages
For the typography pages, we have done a few of these in order to save you some time in your template development progress. We hope these can come in handy and helpful along the way. These pages include: Our Team page, Support Policy page, and Pricing Table page.
About us page
HTML code
<div class="about-us">
	<div class="text-center" style="margin-bottom: 56px;">
		<h2>Who We Are?</h2>
		<p>Lorem ipsum dolor sit amet, consectetur adipiscing elit. <br/>Morbi posuere, tortor non ultricies gravida, erat purus vehicula ipsum, eu laoreet ante elit sit amet mi. Proin ultricies nisi ac sem feugiat tristique.</p>
	</div>
	<div class="text-center">
		<h2>Team leaders</h2>
		<p>Ex pro eripuit nonumes, brute equidem ancillae. Morbi posuere, tortor non ultricies gravida, erat purus vehicula ipsum, eu laoreet ante elit sit amet mi. Proin ultricies nisi ac sem feugiat tristique.</p>
	</div>
	<div class="section row member">
		<div class="col-md-4 col-sm-4">
			<div class="thumbnail">
				<div class="member-follow">
					<a href="#"><img src="/images/joomlart/about_page/staff-1.jpg" alt="Sample image" /></a>
			<div>
				<span>Follow:</span>
				<p class="member-info">
					<a role="button" class="btn btn-facebook" href="#"><i class="fa fa-facebook"></i></a>
					<a role="button" class="btn btn-twitter" href="#"><i class="fa fa-twitter"></i></a>
					<a role="button" class="btn btn-google-plus" href="#"><i class="fa fa-google-plus"></i></a>
					<a role="button" class="btn btn-skype" href="#"><i class="fa fa-skype"></i></a>
					<a role="button" class="btn btn-linkedin" href="#"><i class="fa fa-linkedin"></i></a>
				</p>
		</div>
				</div>
				<div class="caption">
				<h5>Nicholas Mitchell</h5>
				<p>CEO - Co Founder</p>
				<p class="member-detail">
					Ex sumo mucius per. An pri audire pertinacia, eros nostro veritus mea cu, usu no tota disputando.
				</p>
				</div>
			</div>
		</div>
		<div class="col-md-4 col-sm-4">
			<div class="thumbnail">
				<div class="member-follow">
					<a href="#"><img src="/images/joomlart/about_page/staff-2.jpg" alt="Sample image" /></a>
					<div>
						<span>Follow:</span>
						<p class="member-info">
							<a role="button" class="btn btn-facebook" href="#"><i class="fa fa-facebook"></i></a>
							<a role="button" class="btn btn-twitter" href="#"><i class="fa fa-twitter"></i></a>
							<a role="button" class="btn btn-google-plus" href="#"><i class="fa fa-google-plus"></i></a>
							<a role="button" class="btn btn-skype" href="#"><i class="fa fa-skype"></i></a>
							<a role="button" class="btn btn-linkedin" href="#"><i class="fa fa-linkedin"></i></a>
						</p>
					</div>
				</div>
				<div class="caption">
					<h5>Sean Thomas</h5>
					<p>Sale Manager</p>
					<p class="member-detail">
						Ex pro eripuit nonumes, eam an brute equidem ancillae, alii lorem ullamcorper at qui.
					</p>
				</div>
			</div>
		</div>
		<div class="col-md-4 col-sm-4">
			<div class="thumbnail">
				<div class="member-follow">
					<a href="#"><img src="/images/joomlart/about_page/staff-3.jpg" alt="Sample image" /></a>
					<div>
						<span>Follow:</span>
						<p class="member-info">
							<a role="button" class="btn btn-facebook" href="#"><i class="fa fa-facebook"></i></a>
							<a role="button" class="btn btn-twitter" href="#"><i class="fa fa-twitter"></i></a>
							<a role="button" class="btn btn-google-plus" href="#"><i class="fa fa-google-plus"></i></a>
							<a role="button" class="btn btn-skype" href="#"><i class="fa fa-skype"></i></a>
							<a role="button" class="btn btn-linkedin" href="#"><i class="fa fa-linkedin"></i></a>
						</p>
					</div>
				</div>
				<div class="caption">
					<h5>Bennie Moran</h5>
					<p>Creative Director</p>
					<p class="member-detail">
						Lorem ipsum dolor sit amet, nostro placerat id cum, ut porro nonumes quaerendum ius.
					</p>
				</div>
			</div>
		</div>
	</div>
	<div class="section row">
		<div class="bs-callout-info show-team clearfix">
			<div class="info-team">
				Nam liber tempor cum soluta nobis eleifend option congue nihil imperdiet doming id quod mazim placerat facer possim assum.
			</div>
			<a href="#" class="btn btn-block btn-lg btn-primary">See our work</a>
		</div>
	</div>
	<div class="section row member ">
		<div class="col-md-3 col-sm-6">
			<div class="thumbnail">
				<div class="member-follow">
					<a href="#"><img src="/images/joomlart/about_page/staff-4.jpg" alt="Sample image" /></a>
					<div>
						<span>Follow:</span>
						<p class="member-info">
							<a role="button" class="btn btn-facebook" href="#"><i class="fa fa-facebook"></i></a>
							<a role="button" class="btn btn-twitter" href="#"><i class="fa fa-twitter"></i></a>
							<a role="button" class="btn btn-google-plus" href="#"><i class="fa fa-google-plus"></i></a>
						</p>
					</div>
				</div>
				<div class="caption">
					<h5>Nicholas Mitchell</h5>
					<p>Designer.</p>
					<p class="member-detail">
						Ex sumo mucius per. An pri audire pertinacia, eros nostro veritus mea cu, usu no tota disputando.
					</p>
				</div>
			</div>
		</div>
		<div class="col-md-3 col-sm-6">
			<div class="thumbnail">
				<div class="member-follow">
					<a href="#"><img src="/images/joomlart/about_page/staff-5.jpg" alt="Sample image" /></a>
					<div>
						<span>Follow:</span>
						<p class="member-info">
							<a role="button" class="btn btn-facebook" href="#"><i class="fa fa-facebook"></i></a>
							<a role="button" class="btn btn-twitter" href="#"><i class="fa fa-twitter"></i></a>
							<a role="button" class="btn btn-google-plus" href="#"><i class="fa fa-google-plus"></i></a>
						</p>
					</div>
				</div>
				<div class="caption">
					<h5>Sean Thomas</h5>
					<p>Tester</p>
					<p class="member-detail">
						Ex pro eripuit nonumes, eam an brute equidem ancillae, alii lorem ullamcorper at qui.
					</p>
				</div>
			</div>
		</div>
		<div class="col-md-3 col-sm-6">
			<div class="thumbnail">
				<div class="member-follow">
					<a href="#"><img src="/images/joomlart/about_page/staff-6.jpg" alt="Sample image" /></a>
					<div>
						<span>Follow:</span>
						<p class="member-info">
							<a role="button" class="btn btn-facebook" href="#"><i class="fa fa-facebook"></i></a>
							<a role="button" class="btn btn-twitter" href="#"><i class="fa fa-twitter"></i></a>
							<a role="button" class="btn btn-google-plus" href="#"><i class="fa fa-google-plus"></i></a>
						</p>
					</div>
				</div>
				<div class="caption">
					<h5>Bennie Moran</h5>
					<p>Designer</p>
					<p class="member-detail">
						Lorem ipsum dolor sit amet, nostro placerat id cum, ut porro nonumes quaerendum ius.
					</p>
				</div>
			</div>
		</div>
		<div class="col-md-3 col-sm-6">
			<div class="thumbnail">
				<div class="member-follow">
					<a href="#"><img src="/images/joomlart/about_page/staff-7.jpg" alt="Sample image" /></a>
					<div>
						<span>Follow:</span>
						<p class="member-info">
							<a role="button" class="btn btn-facebook" href="#"><i class="fa fa-facebook"></i></a>
							<a role="button" class="btn btn-twitter" href="#"><i class="fa fa-twitter"></i></a>
							<a role="button" class="btn btn-google-plus" href="#"><i class="fa fa-google-plus"></i></a>
						</p>
					</div>
				</div>
				<div class="caption">
					<h5>Nicholas Mitchell</h5>
					<p>Tester</p>
					<p class="member-detail">
						 Pro sonet omittam scribentur ad, at pro nisl assentior philosophia alia eleifend ei.
					</p>
				</div>
			</div>
		</div>
	</div>
</div>

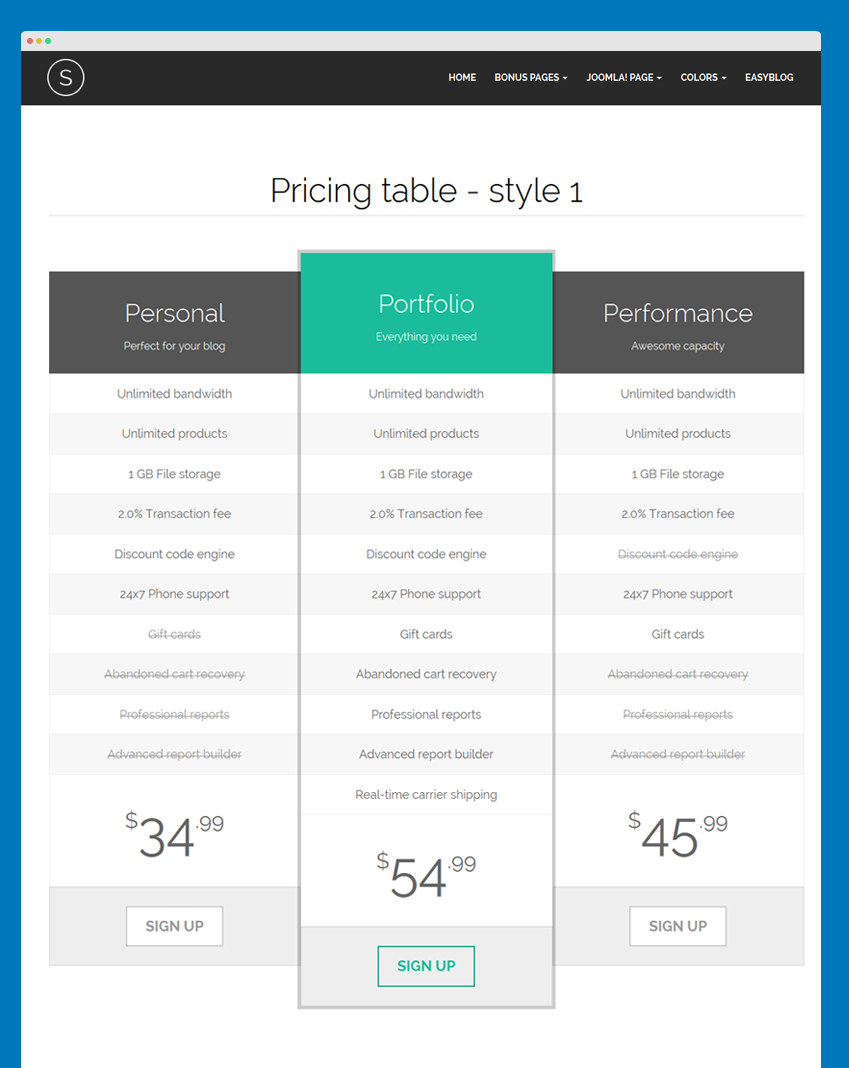
Pricing table page
We do provide 3 styles for the pricing table: Style 1, Style 2 and Style 3. The HTML code for both are below, you can choose either one if you like.
1. Style 1
HTML code
<div class="page-header text-center">
	<h1>Pricing table - style 1</h1>
</div>

<div class="pricing-table style1 row">
	<div class="col col-md-4 no-padding">
		<div class="col-header text-center">
			<h2>Personal</h2>
			<p>Perfect for your blog</p>
		</div>
		<div class="col-body">
			<ul>
				<li class="row0 yes">Unlimited bandwidth</li>
				<li class="row1 yes">Unlimited products</li>
				<li class="row0 yes">1 GB File storage</li>
				<li class="row1 yes">2.0% Transaction fee</li>
				<li class="row0 yes">Discount code engine</li>
				<li class="row1 yes">24x7 Phone support</li>
				<li class="row0 no">Gift cards</li>
				<li class="row1 no">Abandoned cart recovery</li>
				<li class="row0 no">Professional reports</li>
				<li class="row1 no">Advanced report builder</li>
				<li class="row0"><span class="big-number"><sup>$</sup>34<sup>.99</sup></span></li>
			</ul>
		</div>
		<div class="col-footer text-center">
			<a class="btn btn-lg btn-default">Sign up</a>
		</div>
	</div>

	<div class="col col-md-4 col-feature shadow no-padding">
		<div class="col-header text-center">
			<h2>Portfolio</h2>
			<p>Everything you need</p>
		</div>
		<div class="col-body">
			<ul>
				<li class="row0 yes">Unlimited bandwidth</li>
				<li class="row1 yes">Unlimited products</li>
				<li class="row0 yes">1 GB File storage</li>
				<li class="row1 yes">2.0% Transaction fee</li>
				<li class="row0 yes">Discount code engine</li>
				<li class="row1 yes">24x7 Phone support</li>
				<li class="row0 yes">Gift cards</li>
				<li class="row1 yes">Abandoned cart recovery</li>
				<li class="row0 yes">Professional reports</li>
				<li class="row1 yes">Advanced report builder</li>
				<li class="row0 yes">Real-time carrier shipping</li>
				<li class="row0"><span class="big-number"><sup>$</sup>54<sup>.99</sup></span></li>
			</ul>
		</div>
		<div class="col col-footer text-center">
			<a class="btn btn-lg btn-primary">Sign up</a>
		</div>
	</div>

	<div class="col col-md-4 no-padding">
		<div class="col-header text-center">
			<h2>Performance</h2>
			<p>Awesome capacity</p>
		</div>
		<div class="col-body">
			<ul>
				<li class="row0 yes">Unlimited bandwidth</li>
				<li class="row1 yes">Unlimited products</li>
				<li class="row0 yes">1 GB File storage</li>
				<li class="row1 yes">2.0% Transaction fee</li>
				<li class="row0 no">Discount code engine</li>
				<li class="row1 yes">24x7 Phone support</li>
				<li class="row0 yes">Gift cards</li>
				<li class="row1 no">Abandoned cart recovery</li>
				<li class="row0 no">Professional reports</li>
				<li class="row1 no">Advanced report builder</li>
				<li class="row0"><span class="big-number"><sup>$</sup>45<sup>.99</sup></span></li>
			</ul>
		</div>
		<div class="col-footer text-center">
			<a class="btn btn-lg btn-default">Sign up</a>
		</div>
	</div>
</div>
Front-end appearance
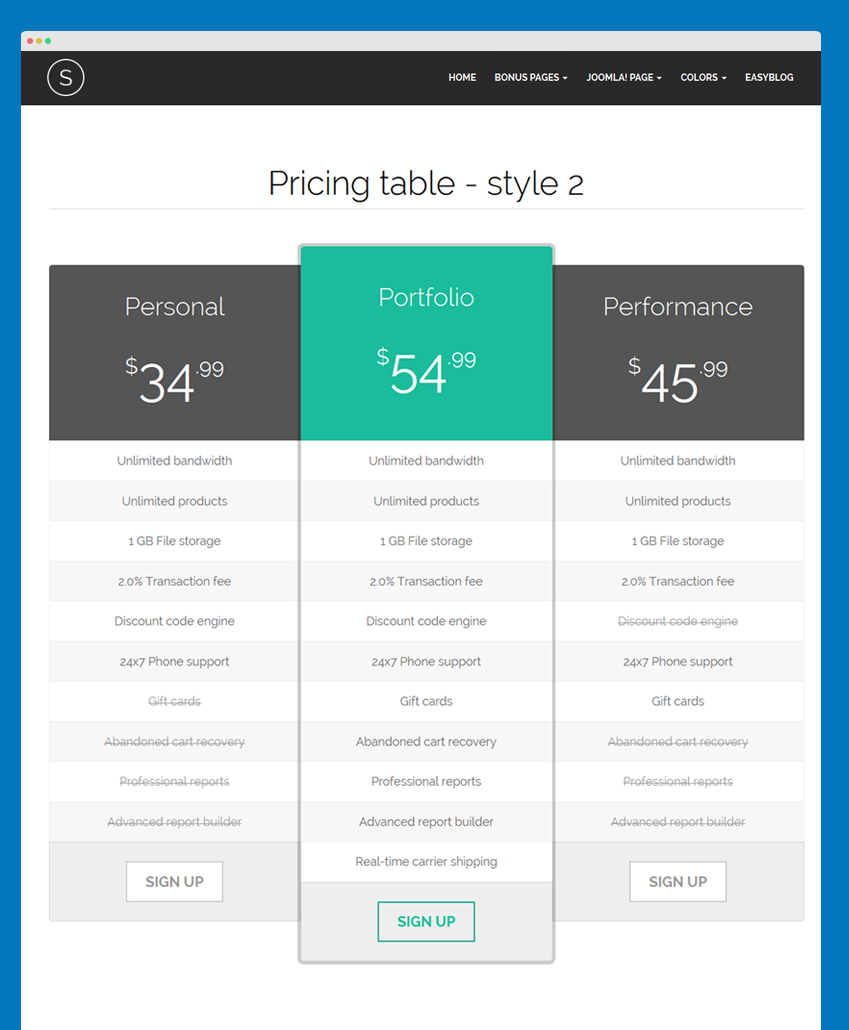
2. Style 2
HTML code
<div class="page-header text-center">
	<h1>Pricing table - style 2</h1>
</div>

<div class="pricing-table style2">

	<div class="row row-header">
		<div class="col col-md-3 no-padding"></div>
		<div class="col col-md-3 no-padding">
			<div class="col-header text-center">
				<h2>Personal</h2>
				<p><span class="big-number"><sup>$</sup>34<sup>.99</sup></span></p>
			</div>
		</div>
		<div class="col col-md-3 col-feature no-padding">
			<div class="col-header text-center">
				<h2>Portfolio</h2>
				<p><span class="big-number"><sup>$</sup>54<sup>.99</sup></span></p>
			</div>
		</div>
		<div class="col col-md-3 no-padding">
			<div class="col-header text-center">
				<h2>Performance</h2>
				<p><span class="big-number"><sup>$</sup>45<sup>.99</sup></span></p>
			</div>
		</div>

	</div>

	<div class="row row-body">
		<div class="col col-md-3 no-padding">
			<ul>
				<li class="row0 yes">Unlimited bandwidth</li>
				<li class="row1 yes">Unlimited products</li>
				<li class="row0 yes">1 GB File storage</li>
				<li class="row1 yes">2.0% Transaction fee</li>
				<li class="row0">Discount code engine</li>
				<li class="row1">24x7 Phone support</li>
				<li class="row0">Gift cards</li>
				<li class="row1">Abandoned cart recovery</li>
				<li class="row0">Professional reports</li>
				<li class="row1">Advanced report builder</li>
				<li class="row0">Advanced report builder</li>
			</ul>
		</div>

		<div class="col col-md-3 no-padding">
			<ul>
				<li class="row0"><i class="fa fa-check-circle"></i></li>
				<li class="row1"><i class="fa fa-check-circle"></i></li>
				<li class="row0"><i class="fa fa-check-circle"></i></li>
				<li class="row1"><i class="fa fa-check-circle"></i></li>
				<li class="row0"><i class="fa fa-check-circle"></i></li>
				<li class="row1"><i class="fa fa-check-circle"></i></li>
				<li class="row0"><i class="fa fa-check-circle"></i></li>
				<li class="row1 no"><i class="fa fa-times-circle"></i></li>
				<li class="row0 no"><i class="fa fa-times-circle"></i></li>
				<li class="row1 no"><i class="fa fa-times-circle"></i></li>
				<li class="row0 no"><i class="fa fa-times-circle"></i></li>
			</ul>
			<div class="col-footer text-center">
				<a href="#" title="Sign up" class="btn btn-lg btn-default">Sign up</a>
			</div>
		</div>

		<div class="col col-md-3 no-padding">
			<ul>
				<li class="row0"><i class="fa fa-check-circle"></i></li>
				<li class="row1"><i class="fa fa-check-circle"></i></li>
				<li class="row0"><i class="fa fa-check-circle"></i></li>
				<li class="row1"><i class="fa fa-check-circle"></i></li>
				<li class="row0"><i class="fa fa-check-circle"></i></li>
				<li class="row1"><i class="fa fa-check-circle"></i></li>
				<li class="row0"><i class="fa fa-check-circle"></i></li>
				<li class="row1"><i class="fa fa-check-circle"></i></li>
				<li class="row0"><i class="fa fa-check-circle"></i></li>
				<li class="row1"><i class="fa fa-check-circle"></i></li>
				<li class="row0"><i class="fa fa-check-circle"></i></li>
			</ul>
			<div class="col-footer text-center">
				<a href="#" title="Sign up" class="btn btn-lg btn-primary">Sign up</a>
			</div>
		</div>

		<div class="col col-md-3 no-padding">
			<ul>
				<li class="row0"><i class="fa fa-check-circle"></i></li>
				<li class="row1"><i class="fa fa-check-circle"></i></li>
				<li class="row0"><i class="fa fa-check-circle"></i></li>
				<li class="row1"><i class="fa fa-check-circle"></i></li>
				<li class="row0"><i class="fa fa-check-circle"></i></li>
				<li class="row1"><i class="fa fa-check-circle"></i></li>
				<li class="row0"><i class="fa fa-check-circle"></i></li>
				<li class="row1"><i class="fa fa-check-circle"></i></li>
				<li class="row0 no"><i class="fa fa-times-circle"></i></li>
				<li class="row1 no"><i class="fa fa-times-circle"></i></li>
				<li class="row0 no"><i class="fa fa-times-circle"></i></li>
			</ul>
			<div class="col-footer text-center">
				<a href="#" title="Sign up" class="btn btn-lg btn-default">Sign up</a>
			</div>
		</div>

	</div>

</div>
Front-end appearance
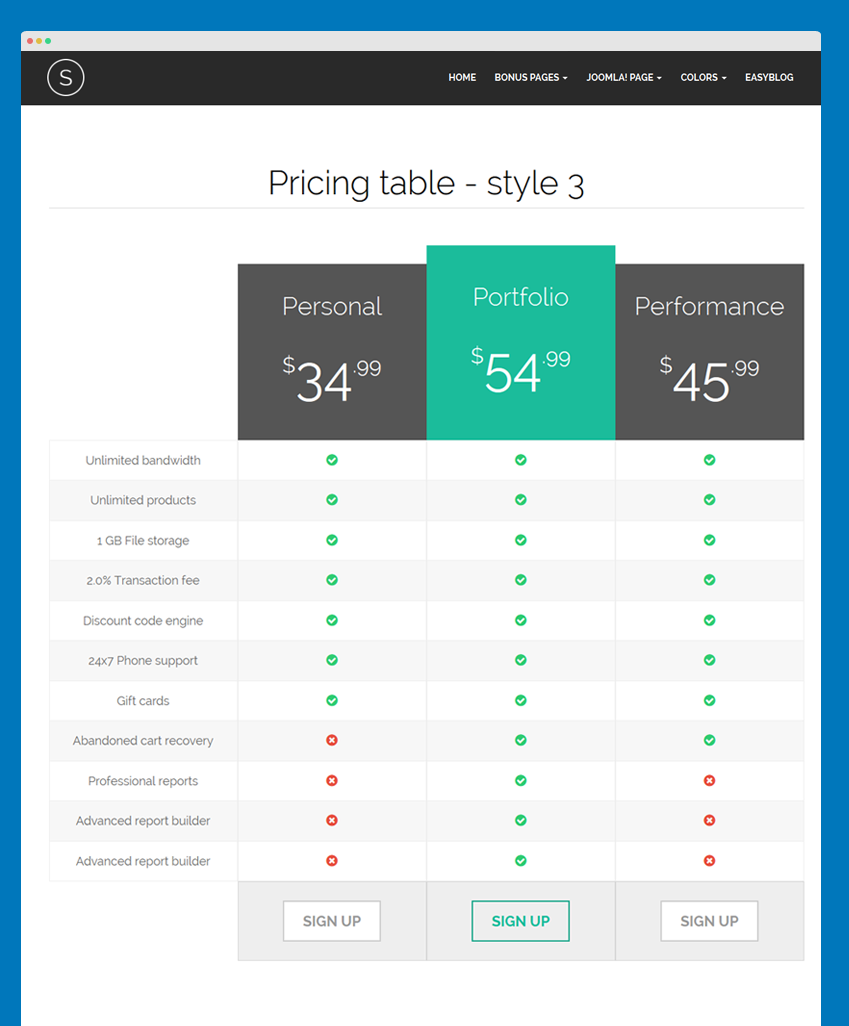
3. Style 3
HTML code
<div class="page-header text-center">
  <h1>Pricing table - style 3</h1>
</div>
<div class="pricing-table style3">

	<div class="row row-header">
		<div class="col-xs-12">
			<div class="col col-md-3 no-padding"></div>
			<div class="col col-md-3 no-padding">
				<div class="col-header text-center">
					<h2>Personal</h2>
					<p><span class="big-number"><sup>$</sup>34<sup>.99</sup></span></p>
				</div>
			</div>
			<div class="col col-md-3 col-feature no-padding">
				<div class="col-header text-center">
					<h2>Portfolio</h2>
					<p><span class="big-number"><sup>$</sup>54<sup>.99</sup></span></p>
				</div>
			</div>
			<div class="col col-md-3 no-padding">
				<div class="col-header text-center">
					<h2>Performance</h2>
					<p><span class="big-number"><sup>$</sup>45<sup>.99</sup></span></p>
				</div>
			</div>

		</div>
	</div>

	<div class="row row-body">
		<div class="col-xs-12">
			<div class="col col-md-3 no-padding">
				<ul>
					<li class="row0 yes">Unlimited bandwidth</li>
					<li class="row1 yes">Unlimited products</li>
					<li class="row0 yes">1 GB File storage</li>
					<li class="row1 yes">2.0% Transaction fee</li>
					<li class="row0">Discount code engine</li>
					<li class="row1">24x7 Phone support</li>
					<li class="row0">Gift cards</li>
					<li class="row1">Abandoned cart recovery</li>
					<li class="row0">Professional reports</li>
					<li class="row1">Advanced report builder</li>
					<li class="row0">Advanced report builder</li>
				</ul>
			</div>

			<div class="col col-md-3 no-padding">
				<ul>
					<li class="row0"><i class="fa fa-check-circle"></i></li>
					<li class="row1"><i class="fa fa-check-circle"></i></li>
					<li class="row0"><i class="fa fa-check-circle"></i></li>
					<li class="row1"><i class="fa fa-check-circle"></i></li>
					<li class="row0"><i class="fa fa-check-circle"></i></li>
					<li class="row1"><i class="fa fa-check-circle"></i></li>
					<li class="row0"><i class="fa fa-check-circle"></i></li>
					<li class="row1 no"><i class="fa fa-times-circle"></i></li>
					<li class="row0 no"><i class="fa fa-times-circle"></i></li>
					<li class="row1 no"><i class="fa fa-times-circle"></i></li>
					<li class="row0 no"><i class="fa fa-times-circle"></i></li>
				</ul>
				<div class="col-footer text-center">
					<a href="#" title="Sign up" class="btn btn-lg btn-default">Sign up</a>
				</div>
			</div>

			<div class="col col-md-3 no-padding">
				<ul>
					<li class="row0"><i class="fa fa-check-circle"></i></li>
					<li class="row1"><i class="fa fa-check-circle"></i></li>
					<li class="row0"><i class="fa fa-check-circle"></i></li>
					<li class="row1"><i class="fa fa-check-circle"></i></li>
					<li class="row0"><i class="fa fa-check-circle"></i></li>
					<li class="row1"><i class="fa fa-check-circle"></i></li>
					<li class="row0"><i class="fa fa-check-circle"></i></li>
					<li class="row1"><i class="fa fa-check-circle"></i></li>
					<li class="row0"><i class="fa fa-check-circle"></i></li>
					<li class="row1"><i class="fa fa-check-circle"></i></li>
					<li class="row0"><i class="fa fa-check-circle"></i></li>
				</ul>
				<div class="col-footer text-center">
					<a href="#" title="Sign up" class="btn btn-lg btn-primary">Sign up</a>
				</div>
			</div>

			<div class="col col-md-3 no-padding">
				<ul>
					<li class="row0"><i class="fa fa-check-circle"></i></li>
					<li class="row1"><i class="fa fa-check-circle"></i></li>
					<li class="row0"><i class="fa fa-check-circle"></i></li>
					<li class="row1"><i class="fa fa-check-circle"></i></li>
					<li class="row0"><i class="fa fa-check-circle"></i></li>
					<li class="row1"><i class="fa fa-check-circle"></i></li>
					<li class="row0"><i class="fa fa-check-circle"></i></li>
					<li class="row1"><i class="fa fa-check-circle"></i></li>
					<li class="row0 no"><i class="fa fa-times-circle"></i></li>
					<li class="row1 no"><i class="fa fa-times-circle"></i></li>
					<li class="row0 no"><i class="fa fa-times-circle"></i></li>
				</ul>
				<div class="col-footer text-center">
					<a href="#" title="Sign up" class="btn btn-lg btn-default">Sign up</a>
				</div>
			</div>

		</div>
	</div>

</div>
Front-end appearance
How to change logo in JA Sugite template
There are two ways to change the default logo in JA Sugite template.
#1 Upload your own logo
In order to change the logo in JA Sugite template, please follow the steps below:
- Log into your site back-end
- Navigate to Extensions >> Template Manager
![]()
- In Styles, choose ja_sugite - Default
- In the menu section, click on “Theme” tab
- Make sure to choose Logo Type = Image
- Click on Select to browse and upload your ‘Logo Image’
![]()
- Click Save to complete the process.
- Back to your home page, and refresh to see the change.
Note:
In case you use multiple themes in the JA Sugite template.
- In the Theme tab, navigate to the Theme field, then select the theme in which you want to change the logo.
- Repeat all the steps above to change the logo image.
- Don’t forget to Save the changes.
![]()
![]()
#2 Use custom CSS
- Set your logo’s dimensions to the standard size (xxx) and name it as
[your_site_name].png - Upload the logo file to the folder
[root]/templates/ja_sugite/images/ - Create a CSS file named custom.css in the following folder
/your site/templates/ja_sugite/css/
If the logo size is not fit with your site’s look and feel, you can change its size with additional styling code:
- Adding a new class as
.logo-image {}
For example:
   .logo-image {
    width: logo-width;
    height: logo-height;
    background:

url("your-site/ja_sugite/templates/ja_sugite/images/your-site-logo.png") no-repeat / 100% auto;
}

.logo-image img { display: none;}
- Save, and then refresh your site to see the change.
If your new logo does not appear, please follow these steps:
- Log into your site back-end
- Navigate to Extensions >> Template Manager
- Select your template style, then click on the tab “Theme” in the menu.
- In “Logo Image”, click on “X” to clear the field.
- Click Save then repeat all the above steps for your other template styles.
- Go to front-end to see your new logo
How to customize your uploaded logo
Small Logo
To properly display on mobile/tablet or other collapsed screens, the default logo will be replaced by a small logo.
![]()
Enable: On
The small logo uploaded by user will be used. In case no logo is selected in the Small Logo Image field, the default logo will be used.
Enable : Off
The default logo will be used.
Logo with background
![]()
Sometimes it’s not a good idea to use a logo with background in JA Sugite. So we suggest you to use transparent background logo.
For examples:
![]()
![]()
Disable rotate effect
- Open the following folder
/your site/templates/ja_sugite/templates/css/
- Edit the
custom.cssfile as below
.logo-image a:hover img { transition: none; -moz-transition: none; -webkit-transform: none; }
The rotating effect is now disabled when you hover the cursor on the logo.
Logo type = text
If you don’t want to use a graphic logo, you can always choose the option Text in Logo Type field.
![]()
You will have a beautiful Text Logo in JA Sugite template.
![]()
![]()
Leave “Slogan” field blank to hide the slogan in your Text Logo.
![]()
You will get a minimal result, like this.
![]()
And If you want to hide circle “S” in your logo.
- Edit the
custom.cssfile as below
.logo-text { padding: 0; background: none;}
And the logo becomes even more minimal with this option.
![]()
Recommendation
The above userguide should help one in replicating the Demo site settings for the template and extension on their site.
Recommended :
If you are new or are confused, we recommend installing Quickstart on your localhost and use it as reference for the configurations. This is the best way to work with any template. Links to all the resources are provided above. We suggest you to carefully go over those in order to take the maximum advantage of our products.
Support :
Please raise your support queries in support forum