I. Download and Installation
1. Get to Know Your Template
- Everyone should read the Template's Overview Article! This is a quick and complete overview of the template, from the colors included, to all of the powerful Joomlart complimentary extensions that come with it. You'll also find links to the LIVE Demo Site, the Download area, as well as the Forum where you can ask questions.
- Need Help Getting Around Joomlart.com? We've created a QUICK ACCESS GUIDE to help you become a Joomlart Power User. This is a wonderful reference, full of tips on how to quickly find the template info, demo sites, module position guides and more. We don't want you to miss a thing!
2. Download Template and Extensions
Check download folder for the Quickstart, Template zip and other complimentary extensions zip files.
Plan your website Development.
- Making a New Site? - If you are planning to make a new site, use our Quickstart package to clone the demo site and replace the demo content with yours. Check How to install Quickstart Package.
- Installing on your live site? - If you are planning to use this template on your already live site, you should follow How to make your site look like demo site guide first to learn about the steps involved. Then you can follow the userguide below.
The user guide covers the following aspects:
- Installing Template on your Joomla system
- Installing T3 Framework 2 Plugin
- Installing complimentary / included extensions
- Custom HTML Modules
- Using Template Typography
- K2 Configuration
- Mega Menu configs
4. Installing the Template
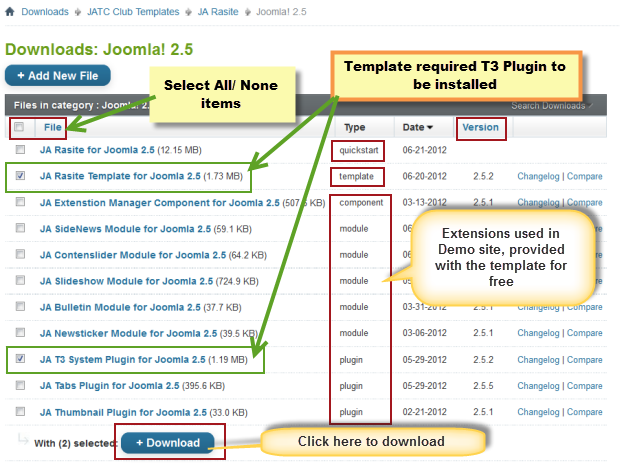
- Browse and Download: Go to the Download page of JA Rasite and download the Template zip file. Refer to this screenshot for the overview of the download folder.
- Install the Template: Now install the Template on your Joomla 2.5 system. Follow This Guide if you are not familiar with the installation procedure.
Template Configuration
JA Rasite template will install with Settings used on the demo website, so you can postpone the configuration until you complete the setup (install other modules / plugins used on the demo website).
Once, you have completed the setup, you can come back to the template back-end and check the various options for customizing your template. Refer to this Universal T3 V2 Back-end Config Guide for options on how to customize your installed template.
Please Note: T3 V2 template configurations are the same in Joomla 1.5, 1.7 and 2.5, so the above guide link is valid for all.
Links to resources on T3 V2 Framework templates and advanced configurations:
- Overview
- Developer Guides
- Customization FAQs
- Mega Menu - A missing menu system for Joomla!
- Video Tutorials (valid for Joomla 1.5, 1.7 and 2.5)
Error? - I see “Missing T3” error on the website front-end?
T3 framework 2 based templates need the T3 Framework Plugin to be installed and enabled.
5. Installing T3 Framework 2 Plugin
(T3 system plugin)
Download and install T3 Framework 2 Plugin (aka T3 System plugin). Follow this guide if you are not familiar with the installation procedure. After the plugin is installed, enable it as described in the same guide.
6. Installing complimentary
- Free Extensions: (aka complimentary / included extensions). We use many extensions on our demo site to provide greater flexibility and features. These are provided for free to our members.
- Custom HTML Module: To match the design of the template, we also style (CSS) for Custom HTML modules using different div classes. You will need to check the HTML codes and make sure to use the recommended HTML markup to get correct display. We provide the HTML code in this userguide.
- 3rd Party Extensions : This template uses JA Comment Component (with its plugins) that is also used for JA Rasite Joomla 2.5. You will need to download JA Comment package, it is available to Developer members and JAEC members only.
Know your Module Positions
- View Module Position Image (used positions only).
- Use Module Position Overlay in Template (used & empty module positions).
TIP : Read more about Checking and Finding Module Positions in T3 Templates.
View Detail DocumentationInstalling and Configuring Included Extensions :
If you are new to Joomla, check out our detail documentatation of How to Install Joomla Template
View Detail DocumentationIncluded Extensions
- JA Content Slider Module
- JA Slideshow Module
- JA Sidenews Module
- JA Contentslider Module
- JA Bulletin Module
- JA Newsticker Module
- JA Tabs Plugin
- JA Typo Plugin
- JA Typo Button Plugin
- JA Thumbnail Plugin
- JA T3 System Plugin
II. Modules Configuration
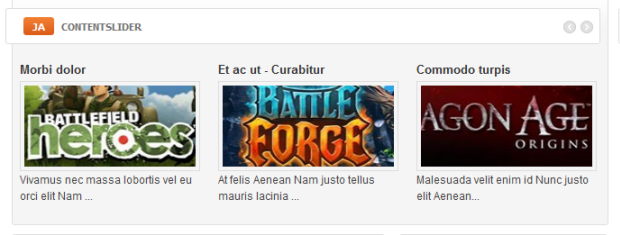
1. JA Content Slider Module
There're two Content Slider Modules used in the template
1.1. JA Content Slider Module
Code
Module Position: content-mass
Module Suffix: title-orange
Back-end Settings for this module as in Demo
And it should look like the screenshot below:
Front-end Appearance
1.2. Ads Module
Code:
Module Position: ja-cs
Module Suffix: no-round
Back-end Settings
Front-end appearance

2. JA Slideshow Module
Code
Module Position: top
Module Suffix: _blank
Front-end appearance
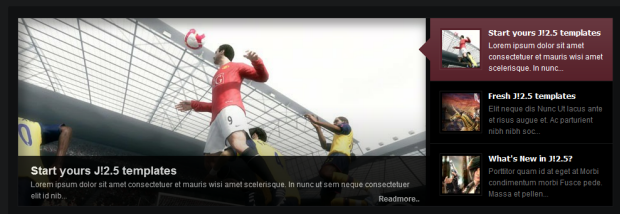
As you can see in the back-end setting, the slideshow's sources come From Article, in Demo category/Slideshow directory.
Sample article in demo site
Code
<p><img class="jaslideshow-main" src="/images/stories/slideshow/banner01.png" border="0" alt="Sample Image" title="Sample Image" /> <img class="jaslideshow-thumb" src="/images/stories/slideshow/banner01-thumb.png" border="0" style="display: none;" /></p>
<p>Lorem Ipsum is simply dummy text of the printing and typesetting industry. Lorem Ipsum has been the industry's standard dummy text ever since the 1500s, when an unknown printer took a galley of type and scrambled it to make a type specimen book.</p>
<hr id="system-readmore" />
<p>Contrary to popular belief, Lorem Ipsum is not simply random text. It has roots in a piece of classical Latin literature from 45 BC, making it over 2000 years old. Richard McClintock, a Latin professor at Hampden-Sydney College in Virginia, looked up one of the more obscure Latin words, consectetur, from a Lorem Ipsum passage, and going through the cites of the word in classical literature, discovered the undoubtable source. Lorem Ipsum comes from sections 1.10.32 and 1.10.33 of "de Finibus Bonorum et Malorum" (The Extremes of Good and Evil) by Cicero, written in 45 BC. This book is a treatise on the theory of ethics, very popular during the Renaissance. The first line of Lorem Ipsum, "Lorem ipsum dolor sit amet..", comes from a line in section 1.10.32.</p>
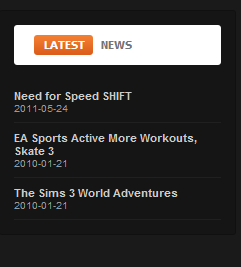
3. JA News Sticker Module
Code
Module Position: newsticker
Module Suffix:   NOT USED
Front-end Appearance

4. JA Bulletin Module
4.1 Latest News Module
Code:
Module Position:user6
Module Suffix:  title-orange
Back-end Settings
Front-end Appearance
4.2 Popular News Module
Code
Module Position: user7
Module Suffix: NOT USED
Back-end Settings
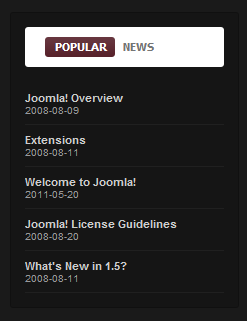
As you can see in the image above, the module will display 5 latest articles from all categories.
5. JA Side News
Code
Module Position: left
Module Suffix: _badge badge-pick title-green
Back-end Settings
6. JA Tabs plugin
Back-end SettingsFront-end Appearance

7. JA Thumbnail plugin
Backend Settings
JA Thumbnail plugin plays an important part in displaying the image sizes seen on the frontpage... leading article and so on. It auto-generates the thumbnails for your article viewed in category layout of frontpage.
8. JA Typo and JA Typo Button Plugin
These plugins allow you to add a variety of typo to your article. After you install and enable 2 plugins, open the article (in back-end) you want to enable the plugin then click on the JATypo button then select the typo type you want to add to the article.
Front-end Appearance
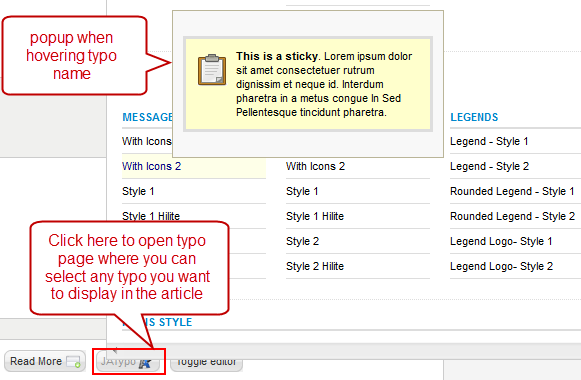
Note: Make sure that you install & enable both plugins to use this feature.
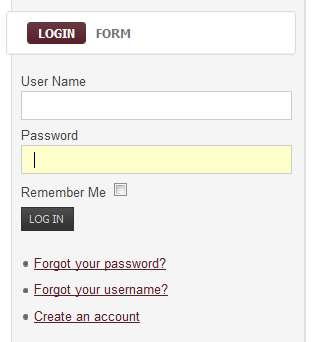
9. Login Form Module
Code
Module Position:right
Module Suffix: NOT USED
Back-end Settings
10. Search Module
Code
Module Position:search
Module Suffix: NOT USED
Back-end Settings
Front-end Appearance

11. Footer Module
Code
Module Position:footer
Module Suffix: NOT USED
Back-end Settings
Front-end Appearance

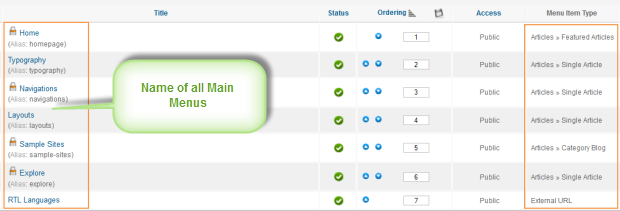
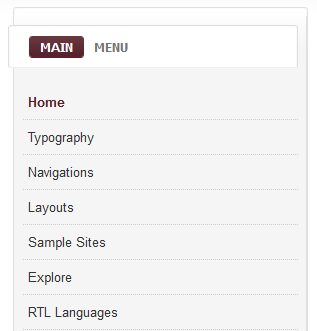
12. Main Menu Module
Step 1: Create all Main menu items
Go to Administrator >> Menus >> Main Menu >> Add New Menu Item
Step 2: Create new Menu module
Go to Administrator >> Module Manager >> Add new Menu Module
Code
Module Position: right
Module Suffix:  NOT USED
Back-end Settings
Front-end Appearance
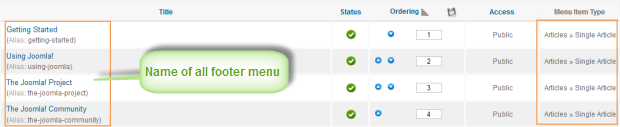
13. Footer Menu Module
To display as Demo site, please follow step by step as below:
Step 1: Create all Footer menu items
Go to Administrator >> Menus >> Main Menu >> Add New Menu Item Type = Single Articles
Step 2: Create new Menu module
Go to Administrator >> Module Manager >> Add new Menu ModuleCode
Module Position: footer
Module Suffix:  NOT USED
Back-end Settings
Front-end Appearance

III. Custom HTML Modules
If you are not sure how to use Custom HTML Modules or how to access HTML Editor view. Read this Guide.
We will provide you with the HTML Code (markup) for reference below, you will need to replicate exactly and then change your content. Remember HTML code has special div classes, which are required for demo alike display.
1. Photo Highlight Module
Code:
Module Position : item-tabs
Module Suffix : NOT USED
HTML Code
<p><img src="/images/stories/demo/sam-22.jpg" border="0" alt="sample image" align="left" /></p>
<div>You can <a href="#">automatically create</a> a block of tabs from different modules assigned to the position where the tabs chrome is enabled. Only activate this option when you have more than one module assigned to the position.</div>
<div>In id, mauris viverra asperiores, bibendum in id. Eu molestie. Ac sit eu. Id <a href="#">iaculis</a> id, pulvinar ut imperdiet. Vestibulum convallis. Gravida vivamus adipiscing, vitae ut ac, neque venenatis amet.</div>
Back-end Settings for this module as in Demo
Front-end Appearance

2. Photo Gallery Module
Code
Module Position: item-tabs
Module Suffix: NOT USED
HTML Code
<p>Libero a lacus semper ac neque Suspendisse a nec adipiscing nunc. Dis id porta vel volutpat ac interdum felis nonummy et orci. Eget id Pellentesque Aenean a ut quis dis nibh pretium Lorem. Quisque non lacus elit fringilla mauris libero urna a ut tempus. Urna orci volutpat diam elit eget sollicitudin wisi justo rhoncus tellus. Ipsum.</p>Back-end Settings for this module as in Demo
Front-end Appearance

3. JA Tabs Module
CodeModule Position: ja-tabs Module Suffix: NOT USEDHTML Code
<div class="ja-rs1-top">
<div class="ja-rs1-tl"> </div>
<div class="ja-rs1-tr"> </div>
</div>
<div class="ja-rs1-mid">
<div class="ja-rs1-ml">
<div class="ja-rs1-mr clearfix">{jatabs type="modules" animType="animNone" style="rasite" position="top" widthTabs="120" heightTabs="30" width="100%" height="auto" mouseType="click" duration="1000" colors="10" module="item-tabs" }{/jatabs}</div>
</div>
</div>
<div class="ja-rs1-bot">
<div class="ja-rs1-bl"> </div>
<div class="ja-rs1-br"> </div>
</div>
Back-end Settings for this module as in Demo
Front-end Appearance

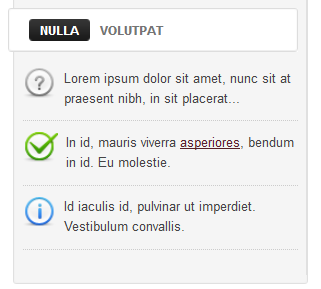
4. Nulla volutpat
CodeModule Position : right Module Suffix : title-blackHTML Code
<div class="ja-innerdiv clearfix"><img src="/images/stories/demo/other/icon01.png" border="0" alt="Sample Image" title="Sample Image" align="left" /> <span>Lorem ipsum dolor sit amet, nunc sit at praesent nibh, in sit placerat...</span></div>
<div class="ja-innerdiv clearfix"><img src="/images/stories/demo/other/icon02.png" border="0" alt="Sample Image" title="Sample Image" align="left" /> <span>In id, mauris viverra <a href="#">asperiores</a>, bendum in id. Eu molestie.</span></div>
<div class="ja-innerdiv clearfix" style="margin-bottom: 0;"><img src="/images/stories/demo/other/icon03.png" border="0" alt="Sample Image" title="Sample Image" align="left" /> <span>Id iaculis id, pulvinar ut imperdiet. Vestibulum convallis.</span></div>
Back-end Settings for this module as in Demo
Front-end Appearance
5. JA Rasite your Gaming Joomla 2.5 Template Module
CodeModule Position: user1 Module Suffix: _badge badge-topHTML Code
<p>Never get tired of this awesome special Gaming template that is designed for you, Gamers. Check out other <a href="#">Joomla 2.5 templates</a>, for amazing typography and unlimited built-in functionalities that will make you surprise every single time.</p>Back-end Settings for this module as in Demo
Front-end Appearance

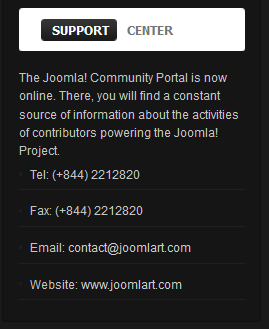
6. Support Center Module
CodeModule Position: user10 Module Suffix: title-blackHTML Code
<p>The Joomla! Community Portal is now online. There, you will find a constant source of information about the activities of contributors powering the Joomla! Project.</p>
<ul>
<li>Tel: (+844) 2212820</li>
<li>Fax: (+844) 2212820</li>
<li>Email: <a href="#">contact @joomlart.com</a></li>
<li>Website: <a href="http://www.joomlart.com">www.joomlart.com</a></li>
</ul>
<p>Orange, Blue, Cream, Gray, Teal, Red, Yellow, Green</p>
Back-end Settings for this module as in Demo
Front-end Appearance
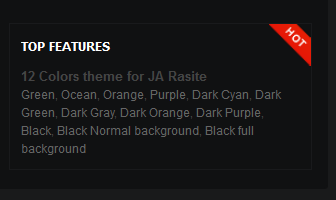
7. Top Features Module
CodeModule Position: user4 Module Suffix: _badge badge_newHTML Code
<p><strong>12 Colors theme for JA Rasite</strong></p>
<p class="small-links"><a href="/?profile=light_green" title="Green">Green</a>, <a href="/?profile=light_ocean" title="Ocean">Ocean</a>, <a href="/?profile=light_orange" title="Orange">Orange</a>, <a href="/?profile=light_purple" title="Purple">Purple</a>, <a href="/?profile=dark_cyan" title="Dark Cyan">Dark Cyan</a>, <a href="/?profile=dark_green" title="Dark Green">Dark Green</a>, <a href="/?profile=dark_gray" title="Dark Gray">Dark Gray</a>, <a href="/?profile=dark_orange" title="Dark Orange">Dark Orange</a>, <a href="/?profile=dark_purple" title="Dark Purple">Dark Purple</a>, <a href="/?profile=default" title="Default">Black</a>, <a href="/?profile=black_normal" title="Black Background normal">Black Normal background</a>, <a href="/?profile=black_full" title="Black full background">Black full background</a></p>
Back-end Settings for this module as in Demo
Front-end Appearance
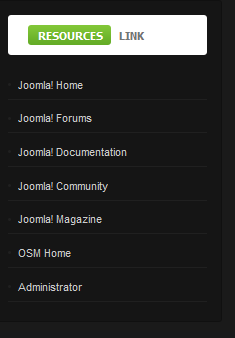
8. Resource Link Module
CodeModule Position: user8 Module Suffix: NOT USEDBack-end Settings for this module as in Demo
Front-end Appearance
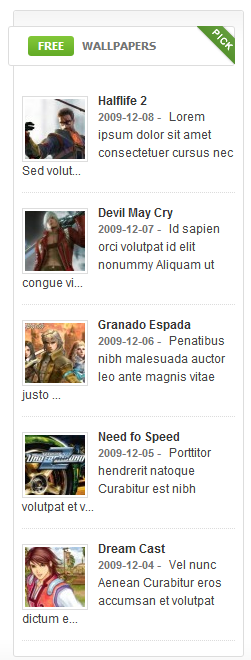
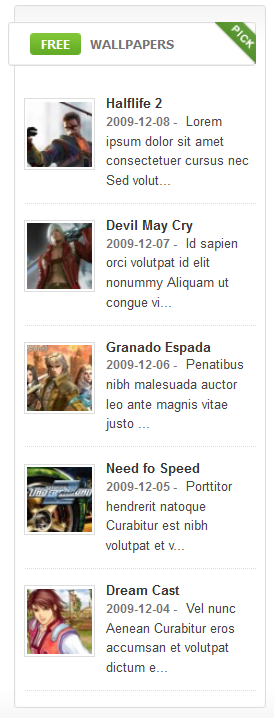
9. Free Wallpaper Module
CodeModule Position: left Module Suffix: _badge badge-pick title-greenBack-end Settings for this module as in Demo
Front-end Appearance
IV. Typography Styles - Supported in JA Rasite
JA Rasite comes with multiple typography styles for headings, content, tables, buttons, quotes, lists and so on...
You can view the Typography Pages on the Demo site Typography Page
And here is HTML code: Typography_Page_HTML_Code.txt
You can use the above HTML code for making similar page in your site and refer to the codes for using Typography.
IMPORTANT : These typography styles are specific to JA Rasite template and if you use them in your content and later decide to change the template, the styles will be broken, as these styles depend upon the template based css files (typo.css). We recommend using minimum typography, if you plan to change your template in the future.
V. Mega Menu Configurations
JA Rasite Demo site uses Mega Menu. Follow the guide below to create the 3 column dropdown menu.
1. Home Menu
Front-end Appearance :

Back-end Settings
Main Menu Items (parent & child)
- Item 1 – Home Menu -Menu Back-end Settings
2. Typography Menu
Front-end Appearance :

Back-end Settings
Main Menu Items (parent & child)
- Item 1 – Typography Menu - Menu Back-end Settings
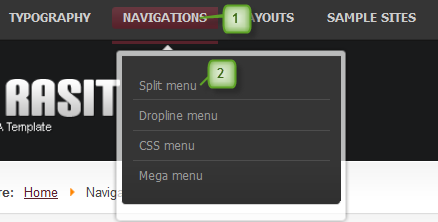
3. Navigation Menu
Front-end Appearance:
Back-end Settings
Main Menu Items (parent & child)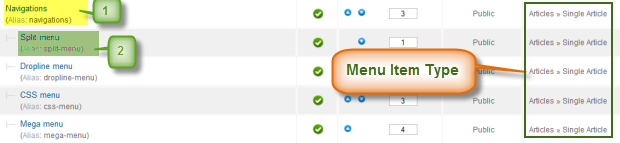
- Item 1 – Navigation Menu - Menu Back-end Settings
- Item 2 – Split Menu - Menu Back-end Settings
Note: Other sub-menus in All Categories are also configured similar to Split Menu menu.
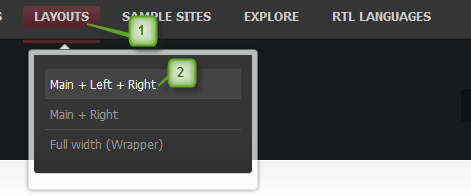
4. Layouts Menu
Front-end Appearance :
Back-end Settings
Main Menu Items (parent & child)
- Item 1 – Layouts Menu - Menu Back-end Settings
- Item 2 - Main + Left + Right Menu - Menu Back-end Settings
Note: Other sub-menus in All Categories are also configured similar to Main + Left + Right Menumenu.
5. Sample Sites Menu
Front-end Appearance:
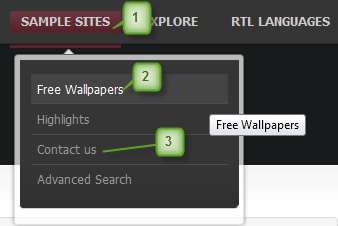
Back-end Settings
Main Menu Items (parent & child)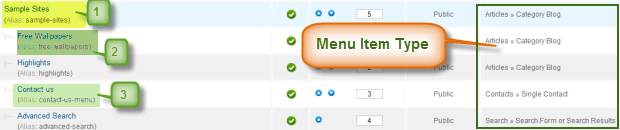
- Item 1 – Sample Sites Menu - Menu Back-end Settings
- Item 2 - Free Wallpapers Menu - Menu Back-end Settings
- Item 3 - Contact Us Menu - Menu Back-end Settings
Note: Other sub-menus in All Categories are also configured similar to Free Wallpapers.
6. Explore Menu
Front-end Appearance:
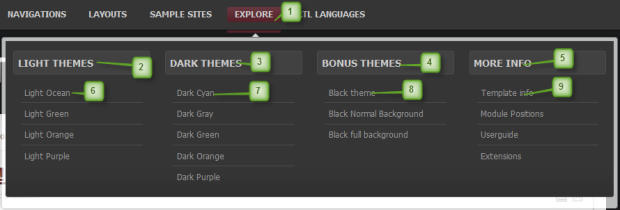
Back-end Settings
Main Menu Items (parent & child)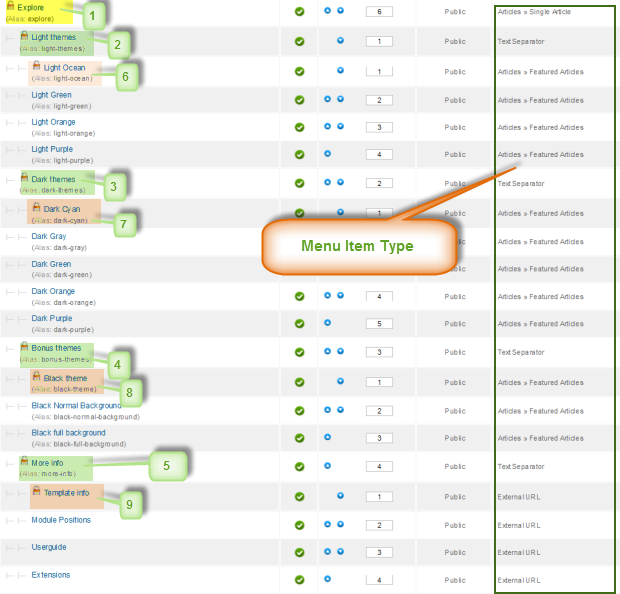
- Item 1 – Explore Menu - Menu Back-end Settings
- Item 2 - Light Themes Menu - Menu Back-end Settings
- Item 3 – Dark Themes Menu - Menu Back-end Settings
- Item 4 – Bonus Themes Menu - Menu Back-end Settings
- Item 5 – More Info Menu - Menu Back-end Settings
- Item 6 – Light Ocean Menu -Menu Backend Settings
- Item 7 – Dark Cyan Menu - Menu Back-end Settings
- Item 8 – Black Theme Menu - Menu Back-end Settings
- Item 9 – Template Info Menu -Menu Back-end Settings
Note: Other sub-menus in All Categories are also configured similar to list above.
Front-end Appearance :
Back-end Settings
Main Menu Items (parent & child)
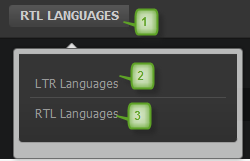
- RTL Languages Menu - Menu Back-end Settings
One can find more details on How to Use Megamenu in the Wiki Section.
Recommended
If you are new or confused, we recommend installing Quickstart on your localhost and use it as reference for configuration. This is the best way to work with any template.
Links to all the resources are provided as above, you should read them carefully to take the maximum advantage of our products.