Introduction
JA One Page template for Joomla 3. Simple, clean and modern are all about the design of JA One Page. With one page layout, the template makes it easy and controllable over the content, all the contents are just one click away. JA One Page is a solution for those who want to have a light and easy access website, suitable for both personal or company portfolio. The template is built upon JA's robust T3V3 Framework, it is responsive and fits all the web enabled devices and mobile browsers with ease.
- JA Onepage does not support RTL language, but it will come soon.
- Support both Joomla 2.5 and Joomla 3.0
1. Main Features
- Developed with JA T3V3 (new version of JA T3 framework)
- Responsive Template
- Native with Joomla 2.5 and Joomla 3.0
- Developed with Bootstrap
- 5 styles supported by default
- 4 layouts supported by default
2. JA Extensions Supported
- Joomla Extensions
- JA T3v3 Plugin
- JA Extension Manager
- JA Content Pop-up Module (This module is developed for this template only.)
3. Supported Joomla pages (by default)
- List all categories
- Category list
- Contact page
- Search page
- Web links page
- Login page
- Register page
- Newfeed page
- Reset page
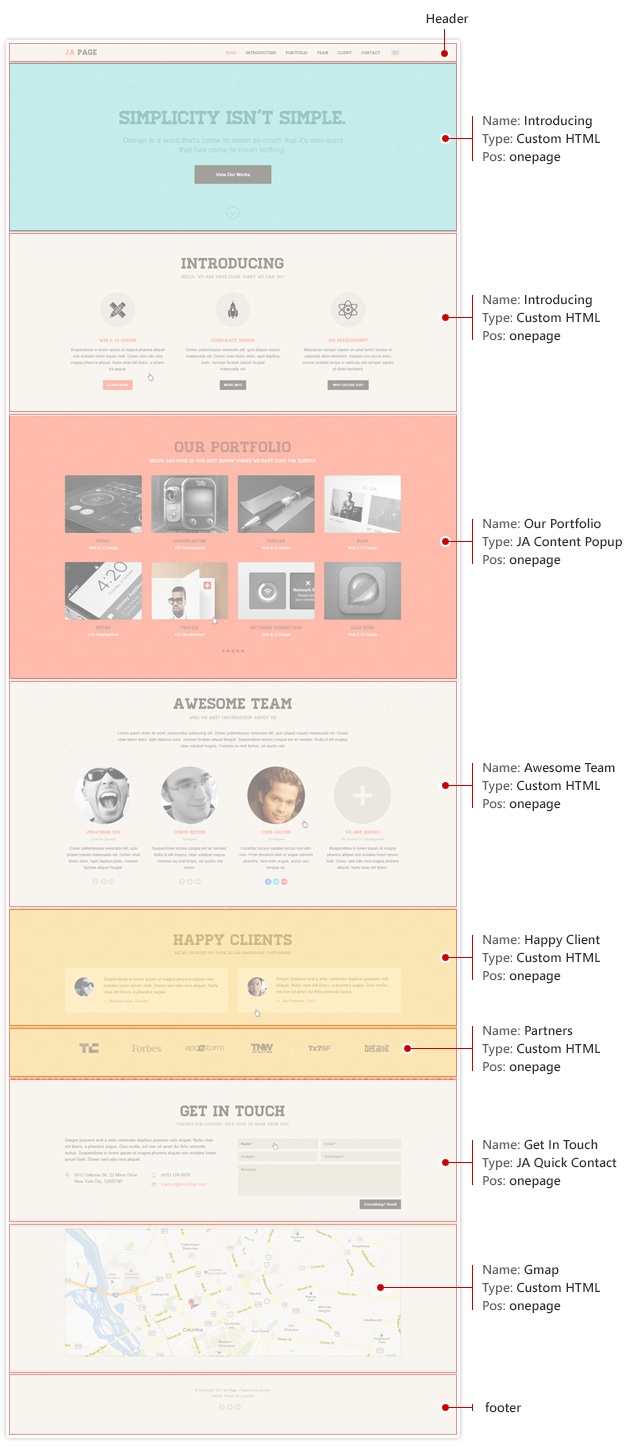
4. Layout and Module Positions
Please check the image below to know the structure, layout, module positions of JA Onepage.
System requirement
JA Onepage is compatible with Joomla 3 and Joomla 2.5. Please make sure your system meets the following requirements:
Joomla 3 System requirement
Software
- Software: PHP (Magic Quotes GPC off): 5.3.1 + (5.4+ recommended)
Databases
- MySQL(InnoDB support required): 5.1+
- MSSQL 10.50.1600.1+
- PostgreSQL 8.3.18+
Web Severs
- Apache 2.x+
- Microsoft IIS 7
- Nginx 1.0 (1.1 recommended)
Joomla 2.5+ system requirement
Software
- Software: PHP 5.2.4+ (5.4+ recommended)
- MySQL: 5.0.4+
Web Sever
- Apache: 2.x+
- Microsoft: IIS 7
- Nginx: 1.0 (1.1 recommended)
Browser requirement
The requirements are the same with both Joomla 2.5 and Joomla 3
- Firefox 4+
- IE (Internet Explorer) 8+
- Google Chrome 10+
- Opera 10+
- Safari 5+
Development Environment
The requirements are the same with both Joomla 2.5 and Joomla 3
During development process, Localhost is preferred. You can use the following servers on your PC to develop your site.
Windows
- WAMPSEVER
- XAMPP for Windows
Linux
- LAMP Bubdle
- XAMPP for Linux
Mac OS
- MAMP & MAMP Pro
- XAMPP for Mac OS
Download & Installation
1. Plan your site Development
- Making a New Site ? - If you are planning to make a new site, then use our Quickstart package to clone the demo site and replace the demo content with yours. Check How to install Quickstart Package.
- Installing on your live site ? - If you are planning to use this template on your already live site. Then you should follow How to make your site look like demo site guide first to know about the steps involved.
2. Download Template and Extensions
Browse and Download: Go to the Download page of JA Onepage and download the Template zip file.
3. Install Template and Extensions
- Install the template that you download in your Joomla 2.5 system.
- JA Hawkstore template will install with Settings used on the demo website, so you can postpone the configuration until you complete the setup (install other modules / plugins used in the demo website).
If you are new to Joomla installation procedure, please check the following documentation. This guide will show you step by step instructions to install Template and Extensions to your Joomla 2.5 and 3.x system.
View Detail DocumentationCustom HTML Module: To match the design of the template, we also style (CSS) for Custom HTML modules using different div classes. You will need to check the HTML codes and make sure to use the recommended HTML markup to get correct display. We provide the HTML code in this user-guide.
Create OnePage Site

In Onepage site, each menu will point to a section block when you click on it and all the sections are in one page. The sections are build up from modules.
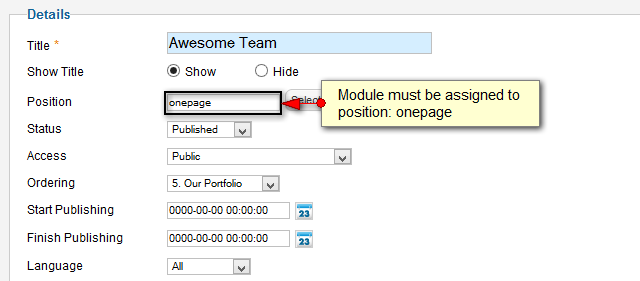
Step 1: Create module for section
Each section block contains a module, so to create a section, firstly create a module that has content displayed in the section.
You can use an existing module in your site or create a new module, it's up to your requirement. The modules (whatever existing module or new module) must be assigned to position: onepage.
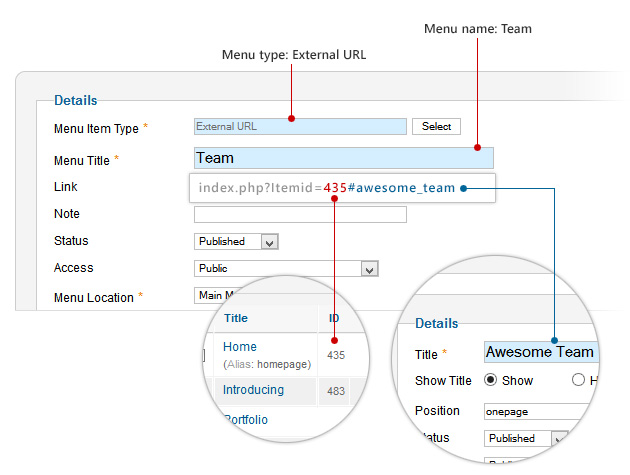
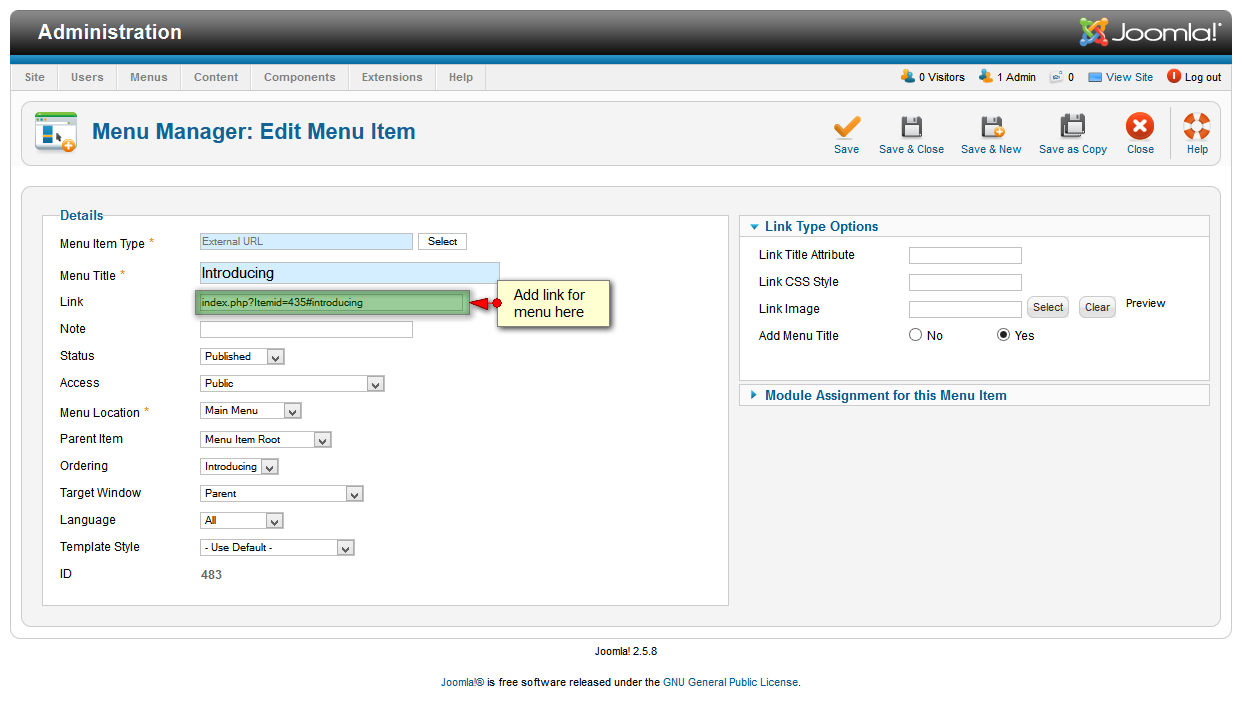
Step 2: Create a menu for a section block.
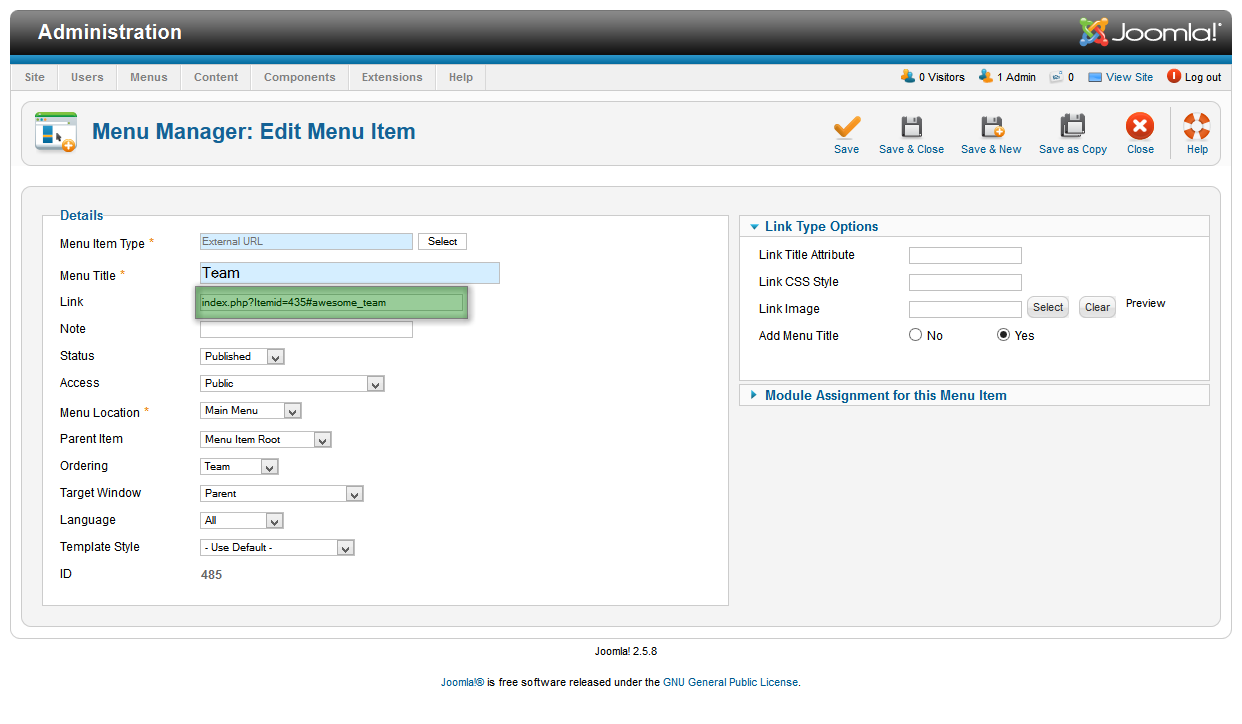
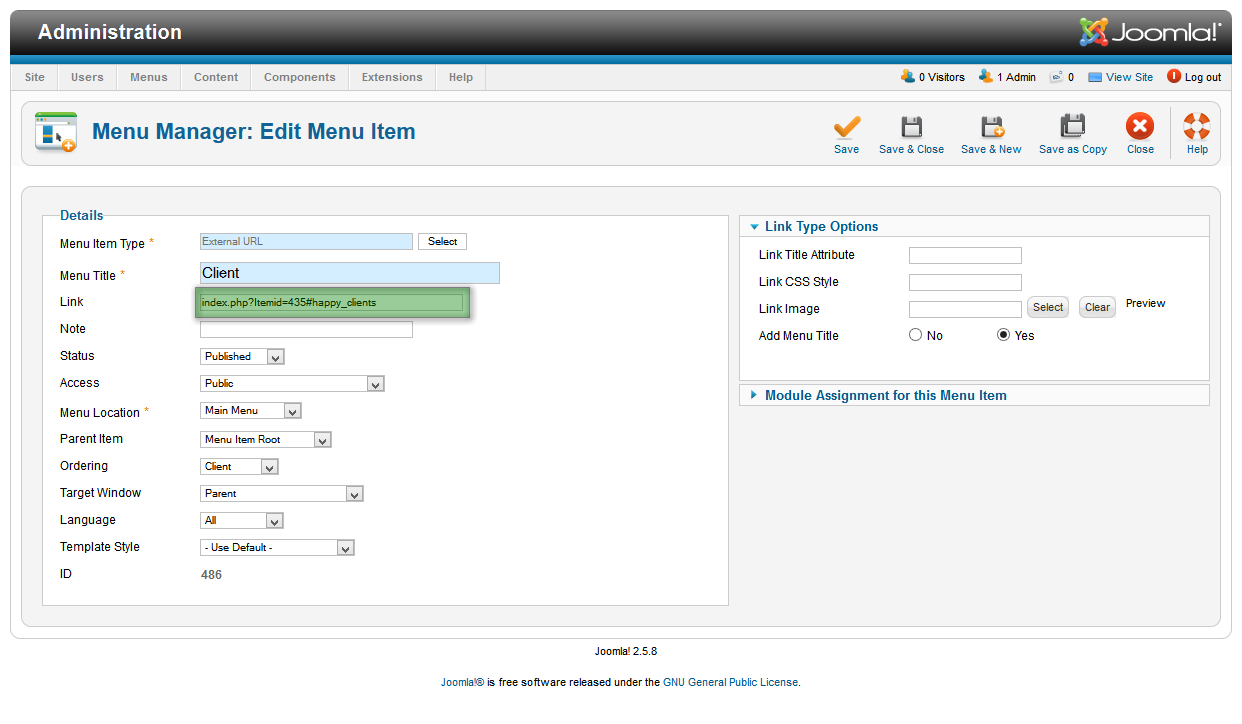
After step 1, we have now a section Awesome Team. Now we will create a menu for the section. There are 2 important notes that you have to keep in mind.
- Menu type = External URL
- The field: Link must has 2 parts as described below.
index.php?Itemid=435#our_portfolio
The link includes 2 parts, the first part is the link of Home (default menu) menu. And the second part is module name that menu navigates to when clicking on.
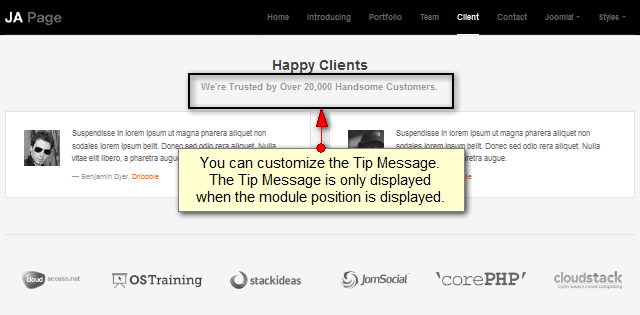
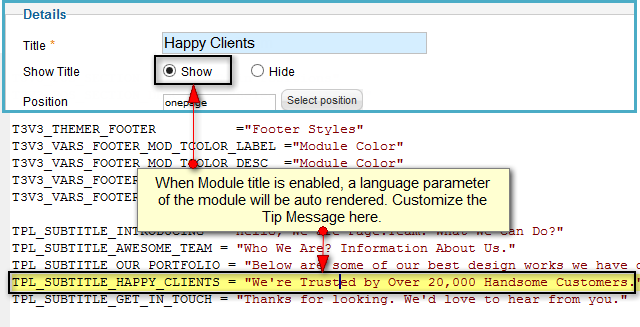
Step 3: Tips Message Customization
In the Onepage page, there are some blocks that has Tip Message enabled. The Tip Message is only displayed when the module title is displayed.
When the module title is enabled, a language parameter is auto rendered to file: en-GB.tpl_ja_onepage.ini located in: language/en-GB
Let's see an example.
OnePage content in demo site
1. Home
Module Position : onepage
Module Suffix : hero-unit
HTML
<span style="color:#000080"><div class="hero-unit"></span>
<span style="color:#000080"><h1></span>Simplicity Isn’t Simple.<span style="color:#000080"></h1></span>
<span style="color:#000080"><p></span>Design is a word that’s come to mean so much that it’s also word that has come to mean nothing.<span style="color:#000080"></p></span>
<span style="color:#000080"><p></span><span style="color:#008000"><a class="btn btn-primary btn-lg btn-tpl-1" href="/#our_portfolio"></span>View Our Works<span style="color:#008000"></a></span><span style="color:#000080"></p></span>
<span style="color:#000080"><p class="btn_unit"></span><span style="color:#008000"><a class="arrow-down img-circle" href="/#our_portfolio"></span>Arrow down<span style="color:#008000"></a></span><span style="color:#000080"></p></span>
<span style="color:#000080"></div></span>
- Module Back-end Settings
- Home Menu Settings
- Front-end Appearance

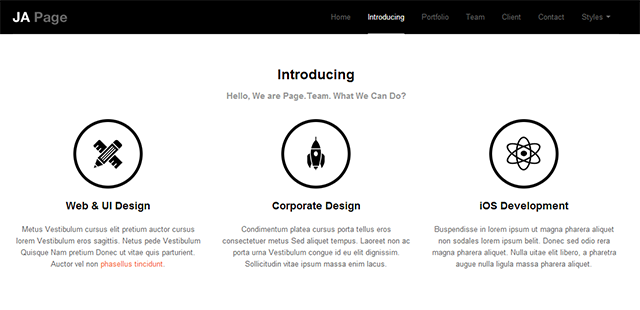
2. Introducing
Module Position : onepage
Module Suffix : introducing
HTML
<span style="color:#000080"><div class="introducing"></span>
<span style="color:#000080"><div class="span4 block"></span>
<span style="color:#000080"><div class="block-img"></span><span style="color:#000080"><em class="introducing-icon1"></span> <span style="color:#000080"></em></span><span style="color:#000080"></div></span>
<span style="color:#000080"><h3 class="block-title"></span>Web & UI Design<span style="color:#000080"></h3></span>
<span style="color:#000080"><div class="block-content"></span>
<span style="color:#000080"><p></span>Metus Vestibulum cursus elit pretium auctor cursus lorem Vestibulum eros sagittis. Netus pede Vestibulum Quisque Nam pretium Donec ut vitae quis parturient. Auctor vel non <span style="color:#008000"><a href="#" title="Sample link"></span>phasellus tincidunt<span style="color:#008000"></a></span>.<span style="color:#000080"></p></span>
<span style="color:#000080"></div></span>
<span style="color:#000080"></div></span>
<span style="color:#000080"><div class="span4 block"></span>
<span style="color:#000080"><div class="block-img"></span> <span style="color:#000080"></div></span>
<span style="color:#000080"><h3 class="block-title"></span>Corporate Design<span style="color:#000080"></h3></span>
<span style="color:#000080"><div class="block-content"></span>
<span style="color:#000080"><p></span>Condimentum platea cursus porta tellus eros consectetuer metus Sed aliquet tempus. Laoreet non ac porta urna Vestibulum congue id eu elit dignissim. Sollicitudin vitae ipsum massa enim lacus.<span style="color:#000080"></p></span>
<span style="color:#000080"></div></span>
<span style="color:#000080"></div></span>
<span style="color:#000080"><div class="span4 block"></span>
<span style="color:#000080"><div class="block-img"></span> <span style="color:#000080"></div></span>
<span style="color:#000080"><h3 class="block-title"></span>iOS Development<span style="color:#000080"></h3></span>
<span style="color:#000080"><div class="block-content"></span>
<span style="color:#000080"><p></span>Buspendisse in lorem ipsum ut magna pharera aliquet non sodales lorem ipsum belit. Donec sed odio rera magna pharera aliquet. Nulla uitae elit libero, a pharetra augue nulla ligula massa.<span style="color:#000080"></p></span>
<span style="color:#000080"></div></span>
<span style="color:#000080"></div></span>
<span style="color:#000080"></div></span>
- Module Back-end Settings
- Introducing Menu Settings
- Front-end Appearance
3. JA Content Popup Module
Module Position : onepage
Module Suffix : portfolio
- Module Back-end Settings
- Introducing Menu Settings
- Front-end Appearance

4. Awesome Team
Module Position : onepage
Module Suffix : team
HTML
<span style="color:#000080"><div class="introduction"></span>Consectetur adipiscing elit. Donec pellentesque venenatis elit, quis aliquet mauris malesuada vel. Donec vitae libero dolor, eget dapibus justo. Aenean facilisis aliquet feugiat. Suspendisse lacinia congue est ac semper. Nulla ut elit magna, vitae volutpat magna. Vivamus eu erat lectus.<span style="color:#000080"></div></span>
<span style="color:#000080"><ul class="thumbnails"></span>
<span style="color:#000080"><li class="span3"></span>
<span style="color:#000080"><div class="thumbnail"></span>
<span style="color:#000080"><div class="thumb-mask"></span>
<span style="color:#000080"><div class="mask-inner"></span><span style="color:#800080"><img class="img-grayscale" src="/images/joomlart/demo/sam-1.jpg" border="0" alt="Sample image" /></span><span style="color:#000080"></div></span>
<span style="color:#000080"></div></span>
<span style="color:#000080"><div class="caption"></span>
<span style="color:#000080"><h3></span>John Doe<span style="color:#000080"></h3></span>
<span style="color:#000080"><p class="meta"></span>Creative designer<span style="color:#000080"></p></span>
<span style="color:#000080"><p></span><span style="color:#000080"><strong></span>Laoreet vestibulum<span style="color:#000080"></strong></span> cursus elit fringilla pretium Sed ut sodales quis pretium. Lorem vestibulum orci in commodo vestibm.<span style="color:#000080"></p></span>
<span style="color:#000080"><ul class="social-list"></span>
<span style="color:#000080"><li></span><span style="color:#008000"><a class="facebook" href="#" title="Facebook"></span>Facebook<span style="color:#008000"></a></span><span style="color:#000080"></li></span>
<span style="color:#000080"><li></span><span style="color:#008000"><a class="twitter" href="#" title="Twitter"></span>Twitter<span style="color:#008000"></a></span><span style="color:#000080"></li></span>
<span style="color:#000080"><li></span><span style="color:#008000"><a class="flicker" href="#" title="Flicker"></span>Flicker<span style="color:#008000"></a></span><span style="color:#000080"></li></span>
<span style="color:#000080"></ul></span>
<span style="color:#000080"></div></span>
<span style="color:#000080"></div></span>
<span style="color:#000080"></li></span>
<span style="color:#000080"><li class="span3"></span>
<span style="color:#000080"><div class="thumbnail"></span>
<span style="color:#000080"><div class="thumb-mask"></span>
<span style="color:#000080"><div class="mask-inner"></span><span style="color:#800080"><img class="img-grayscale" src="/images/joomlart/demo/sam-2.jpg" border="0" alt="Sample image" /></span><span style="color:#000080"></div></span>
<span style="color:#000080"></div></span>
<span style="color:#000080"><div class="caption"></span>
<span style="color:#000080"><h3></span>Jonnathan Orgen<span style="color:#000080"></h3></span>
<span style="color:#000080"><p class="meta"></span>Video Specialist<span style="color:#000080"></p></span>
<span style="color:#000080"><p></span>Suspendisse et vivamus accumsan <span style="color:#008000"><a href="#" title="Sample link"></span>phasellus auctor<span style="color:#008000"></a></span> nisl mauris facilisi aliquam et. Justo enim justo curabitured senectus donec pretium.<span style="color:#000080"></p></span>
<span style="color:#000080"><ul class="social-list"></span>
<span style="color:#000080"><li></span><span style="color:#008000"><a class="facebook" href="#" title="Facebook"></span>Facebook<span style="color:#008000"></a></span><span style="color:#000080"></li></span>
<span style="color:#000080"><li></span><span style="color:#008000"><a class="twitter" href="#" title="Twitter"></span>Twitter<span style="color:#008000"></a></span><span style="color:#000080"></li></span>
<span style="color:#000080"><li></span><span style="color:#008000"><a class="flicker" href="#" title="Flicker"></span>Flicker<span style="color:#008000"></a></span><span style="color:#000080"></li></span>
<span style="color:#000080"></ul></span>
<span style="color:#000080"></div></span>
<span style="color:#000080"></div></span>
<span style="color:#000080"></li></span>
<span style="color:#000080"><li class="span3"></span>
<span style="color:#000080"><div class="thumbnail"></span>
<span style="color:#000080"><div class="thumb-mask"></span>
<span style="color:#000080"><div class="mask-inner"></span><span style="color:#800080"><img class="img-grayscale" src="/images/joomlart/demo/sam-3.jpg" border="0" alt="Sample image" /></span><span style="color:#000080"></div></span>
<span style="color:#000080"></div></span>
<span style="color:#000080"><div class="caption"></span>
<span style="color:#000080"><h3></span>Michael Smith<span style="color:#000080"></h3></span>
<span style="color:#000080"><p class="meta"></span>Graphic designer<span style="color:#000080"></p></span>
<span style="color:#000080"><p></span>Fringilla non adipiscing magna ligula quam Vestibulum Donec est Quisque tellus. Convallis enim ante eros eros In lorem ipsum purus tellus orci.<span style="color:#000080"></p></span>
<span style="color:#000080"><ul class="social-list"></span>
<span style="color:#000080"><li></span><span style="color:#008000"><a class="facebook" href="#" title="Facebook"></span>Facebook<span style="color:#008000"></a></span><span style="color:#000080"></li></span>
<span style="color:#000080"><li></span><span style="color:#008000"><a class="twitter" href="#" title="Twitter"></span>Twitter<span style="color:#008000"></a></span><span style="color:#000080"></li></span>
<span style="color:#000080"><li></span><span style="color:#008000"><a class="flicker" href="#" title="Flicker"></span>Flicker<span style="color:#008000"></a></span><span style="color:#000080"></li></span>
<span style="color:#000080"></ul></span>
<span style="color:#000080"></div></span>
<span style="color:#000080"></div></span>
<span style="color:#000080"></li></span>
<span style="color:#000080"><li class="span3"></span>
<span style="color:#000080"><div class="thumbnail"></span>
<span style="color:#000080"><div class="thumb-mask"></span>
<span style="color:#000080"><div class="mask-inner hiring"></span><span style="color:#800080"><img class="img-grayscale" src="/images/joomlart/demo/sam_blank.png" border="0" alt="Sample image" /></span><span style="color:#000080"></div></span>
<span style="color:#000080"></div></span>
<span style="color:#000080"><div class="caption"></span>
<span style="color:#000080"><h3></span>We are Hiring!<span style="color:#000080"></h3></span>
<span style="color:#000080"><p class="meta"></span>CSS guru<span style="color:#000080"></p></span>
<span style="color:#000080"><p></span>Cras justo odio, dapibus ac facilisis in, egestas eget quam. Donec elit non mi porta gravida at eget metus. Nullam nibh ultricies <span style="color:#008000"><a href="#" title="Sample link"></span>vehicula elit<span style="color:#008000"></a></span>.<span style="color:#000080"></p></span>
<span style="color:#000080"></div></span>
<span style="color:#000080"></div></span>
<span style="color:#000080"></li></span>
<span style="color:#000080"></ul></span>
- Module Back-end Settings
- Awesome Team Menu Settings
- Front-end Appearance

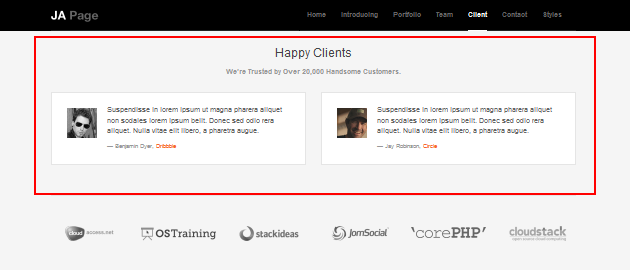
5. Client Menu
The menu displays content from 2 modules: Happy Client and Partners modules
5.1 Client Menu
Module Position : onepage
Module Suffix : clients
HTML
div class="span6 testimonial"><img class="img-grayscale" src="images/joomlart/demo/avartar-1.jpg" alt="Sample image" />
<blockquote>
<p>Suspendisse in lorem ipsum ut magna pharera aliquet non sodales lorem ipsum belit. Donec sed odio rera aliquet. Nulla vitae elit libero, a pharetra augue.</p>
<small>Benjamin Dyer, <cite title="Source Title">Dribbble</cite></small></blockquote>
</div>
<div class="span6 testimonial"><img class="img-grayscale" src="images/joomlart/demo/avartar-2.jpg" alt="Sample image" />
<blockquote>
<p>Suspendisse in lorem ipsum ut magna pharera aliquet non sodales lorem ipsum belit. Donec sed odio rera aliquet. Nulla vitae elit libero, a pharetra augue.</p>
<small>Jay Robinson, <cite title="Source Title">Circle</cite></small></blockquote>
</div>
- Module Back-end Settings
- Client Menu Settings
- Front-end Appearance
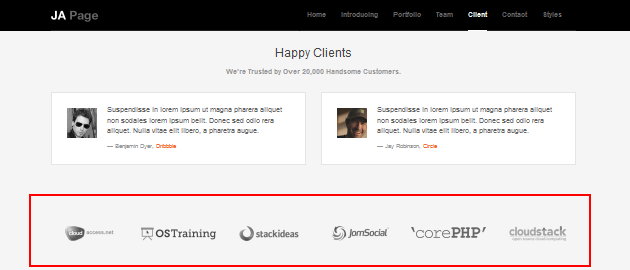
5.2 Partners
Module Position : onepage
Module Suffix : partners
HTML
<div class="span2"><a href="#" title="Sample link"><img class="img-grayscale" src="/images/joomlart/demo/logo-1.png" alt="Sample clients" /></a></div>
<div class="span2"><a href="#" title="Sample link"><img class="img-grayscale" src="/images/joomlart/demo/logo-2.png" alt="Sample clients" /></a></div>
<div class="span2"><a href="#" title="Sample link"><img class="img-grayscale" src="/images/joomlart/demo/logo-3.png" alt="Sample clients" /></a></div>
<div class="span2"><a href="#" title="Sample link"><img class="img-grayscale" src="/images/joomlart/demo/logo-4.png" alt="Sample clients" /></a></div>
<div class="span2"><a href="#" title="Sample link"><img class="img-grayscale" src="/images/joomlart/demo/logo-5.png" alt="Sample clients" /></a></div>
<div class="span2"><a href="#" title="Sample link"><img class="img-grayscale" src="/images/joomlart/demo/logo-6.png" alt="Sample clients" /></a></div>
- Module Back-end Settings
- Front-end Appearance
6. Contact Menu
The menu displays content from 2 modules: Quick Contact Module and Gmap modules.
6.1 Quick Contact Module
Module Position : onepage
Module Suffix : contact section6
- Module Back-end Settings
- Client Menu Settings
- Front-end Appearance
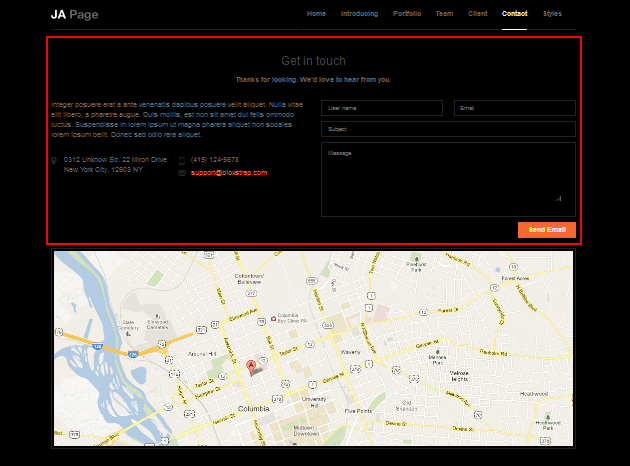
6.2 Gmap Module (custom module)
Module Position : onepage
Module Suffix : map
<span style="color:#000080"><div></span><span style="color:#800080"><img src="/images/joomlart/demo/map.jpg" border="0" alt="Sample Gmap" /></span><span style="color:#000080"></div></span>
- Module Back-end Settings
- Front-end Appearance

Template Settings | Customization
1. Theme Setting
JA Onepage supports 5 styles, you can select any style as default style for your site. The styles are: Base theme, Metro, Modern, Retro and Solid.
When you install the template, there is only one style: base theme, to have styles as listed above, you need to create new style (or clone a new style from the base theme style) then change to theme of the style.
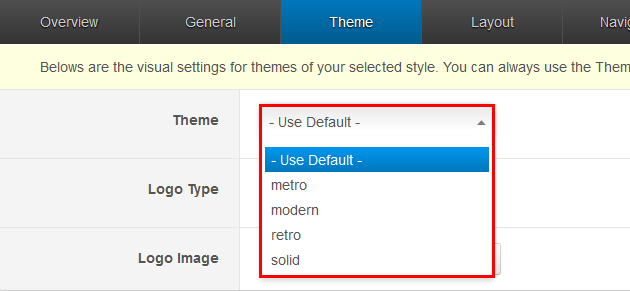
Let's view an image with 5 styles.

2. Layout Setting (We suggest you not to customize the home-1 layout)
Each JA template supports multiple layout that can give users more choices for displaying their site content. In JA Onepage, we define 4 layouts (home-1, default, default-content-right, default-content).
Actually, you can customize the layouts or create a new layout.
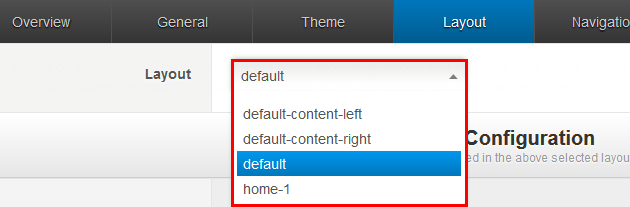
Each style will use one layout, but in one site, you can use multiple styles simultaneously.
2.1 Customize layout structure
In the tab: Layout Structure, you can change module positions. You can also set number of module positions in a spotlight block.

2.2 Customize responsive layout
The responisve layout allows to customize specific layout in specific devices (mobile, ipad, etc). The settings are only applied for current active layout, it is not affected to other layouts of devices.
Open the tab: Responsive Layouts, then select a responsive layout from the supported ones.
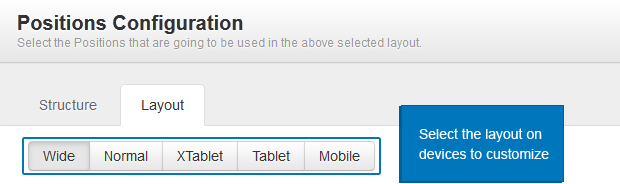
In each responsive layout, you can enable/disable any module positions.

The following video tutorials will show you how to work with Layouts: Configure and Customize
Layout Configuration
T3 comes with ease of layout customization. The visual layout configuration is easier than ever before.
Layout Customization
The video tutorial guides you on how to customize the layouts, add new layout, and customize blocks in a layout.
3. ThemeMagic Setting
JA Fubix is developed with T3 so you can customize themes with ThemeMagic.
To customize theme with the feature, firstly, you have to enable the option.
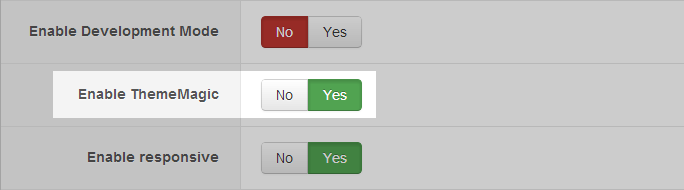
Then open the ThemeMagic panel.

In the setting panel, you can customize all the themes. The left panel is the setting area while the right panel is your site front-end. Each time you change setting, click on "Preview" button to view the change in front-end on the right panel.

The following video tutorials will show you how to customize theme and customize ThemeMagic.
ThemeMagic Customization
After watching the tutorial, you can be able to customize your theme quickly using ThemeMagic as well as know how to add new group and parameters to ThemeMagic.
Useful Tips used in the template
Logo Customization
To change size and path to the logo image, find the file: variables.less in foler:templates/ja_onepage/less.
There will be some codes like:
// T3 LOGO
  // --------------------------------------------------
  @T3logoWidth:     95px;
  @T3logoHeight:    25px;
  @T3LogoImage:     "../images/logo.png";
Note:
The style of logo is in file: style.less in folder: templates/ja_onepage/less. In this file, you will see the code to style for logo.
Example
// Logo Image
// ----------
.logo-image {
  overflow: hidden;
  a {
    background-image: url("@{T3LogoImage}");
    background-repeat: no-repeat;
    width: @T3logoWidth;
    height: @T3logoHeight;
  }
  //hide sitename and slogan
  span, small {
    display: none;
  }
}
// Logo Text
// ----------
.logo-text {
  h1 {
    color:       @gray Dark;
  }
  h1 a {
    color:       @gray Dark;
    text-decoration: none;
  }
  &:hover h1 a,
  h1 a:hover,
  h1 a:active,
  h1 a:focus {
    text-decoration: none;
  }
  // Taglines
  .site-slogan {
    display: block;
    font-size:       @Bas eFontSize;
    margin-top: 5px;
  }
How to make grayscale image ?
As you see in our demo site, in some blocks like: Awesome Team, Happy client ... ,the images are white black but when you hover them, the color changes to image's real color, to do that, please add a class: img-grayscale for the image.

Example
<div class="mask-inner"><img class="img-grayscale" src="/images/joomlart/demo/sam-1.jpg" border="0" alt="Sample image" /></div>
Joomla Content
Module Configuration
As we mentioned in the Introduction section, there are 3 Joomla default modules used in demo site. Now we will give you the configuration of the modules.
Login Module
Module Position : sidebar-2
Module Suffix : NOT USED
- Back-end Settings
- Front-end Appearance

Latest News Module
Module Position : sidebar-2
Module Suffix : NOT USED
- Back-end Settings
- Front-end Appearance

Who's online Module
Module Position : sidebar-2
Module Suffix : NOT USED
- Back-end Settings
- Front-end Appearance

Joomla Page Supported
Besides the content displayed in the Onepage, you can display content in other Joomla menu types as listed in the section 1. If you are new to Joomla, we will provide screenshot of menu configuration and how front-end comes with the configuration.

Front-page
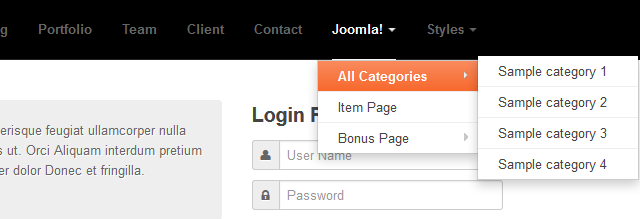
List all categories: All Categories menu
Note: In the back-end screenshot, we only provide settings that have been changed, the other settings use default setting (Use Global).
Item List from a category
Search page
Web links page
Login page
Register page
NewsFeed page
404 page
For each JA template, it has own style for 404 page (error page).
Recommendation
The above userguide should help one in replicating the Demo site settings for the template and extension on their site.
Recommended :
If you are new or are confused. We recommend installing Quickstart on your localhost and use it as reference for configs. This is the best way to work with any template. Links to all the resources are provided above, you should carefully read them to take the maximum advantage of our products.
Support :
Please raise your support queries in the forum and make sure you follow the support guidelines. We spend more time in getting the information from users in case the support guidelines are not followed.