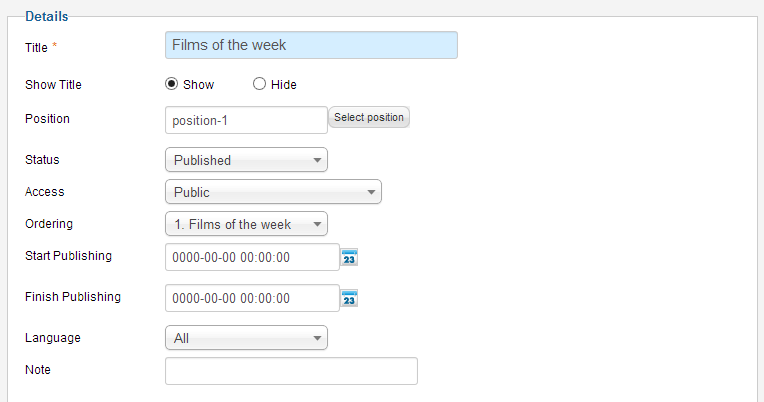
Introduction
JA Obelisk is a new responsive movie magazine for Joomla 2.5 and Joomla 3. Developed with T3 Framework, it supports Megamenu, RTL language layout. The template features Easy Blog and K2 component.
1. Main Features
- Developed with T3 Framework
- Supports Joomla 2.5 and Joomla 3
- Number of default Joomla pages supported
- Supports Megamenu
- Supports multiple themes and layouts
2. JA Extensions Supported
- JA Slideshow Module
- JA Slideshow Lite Module
- JA Accordion Module
- JA Bulletin Module
- JA Content Slider Module
- JA Login Module
- JA Masshead Module
- JA Disqus Debate Plugin
- JA T3 System Plugin
- JA Extension Manager Component
3. Third Party Extensions Supported
- K2 Component
- EasyBlog
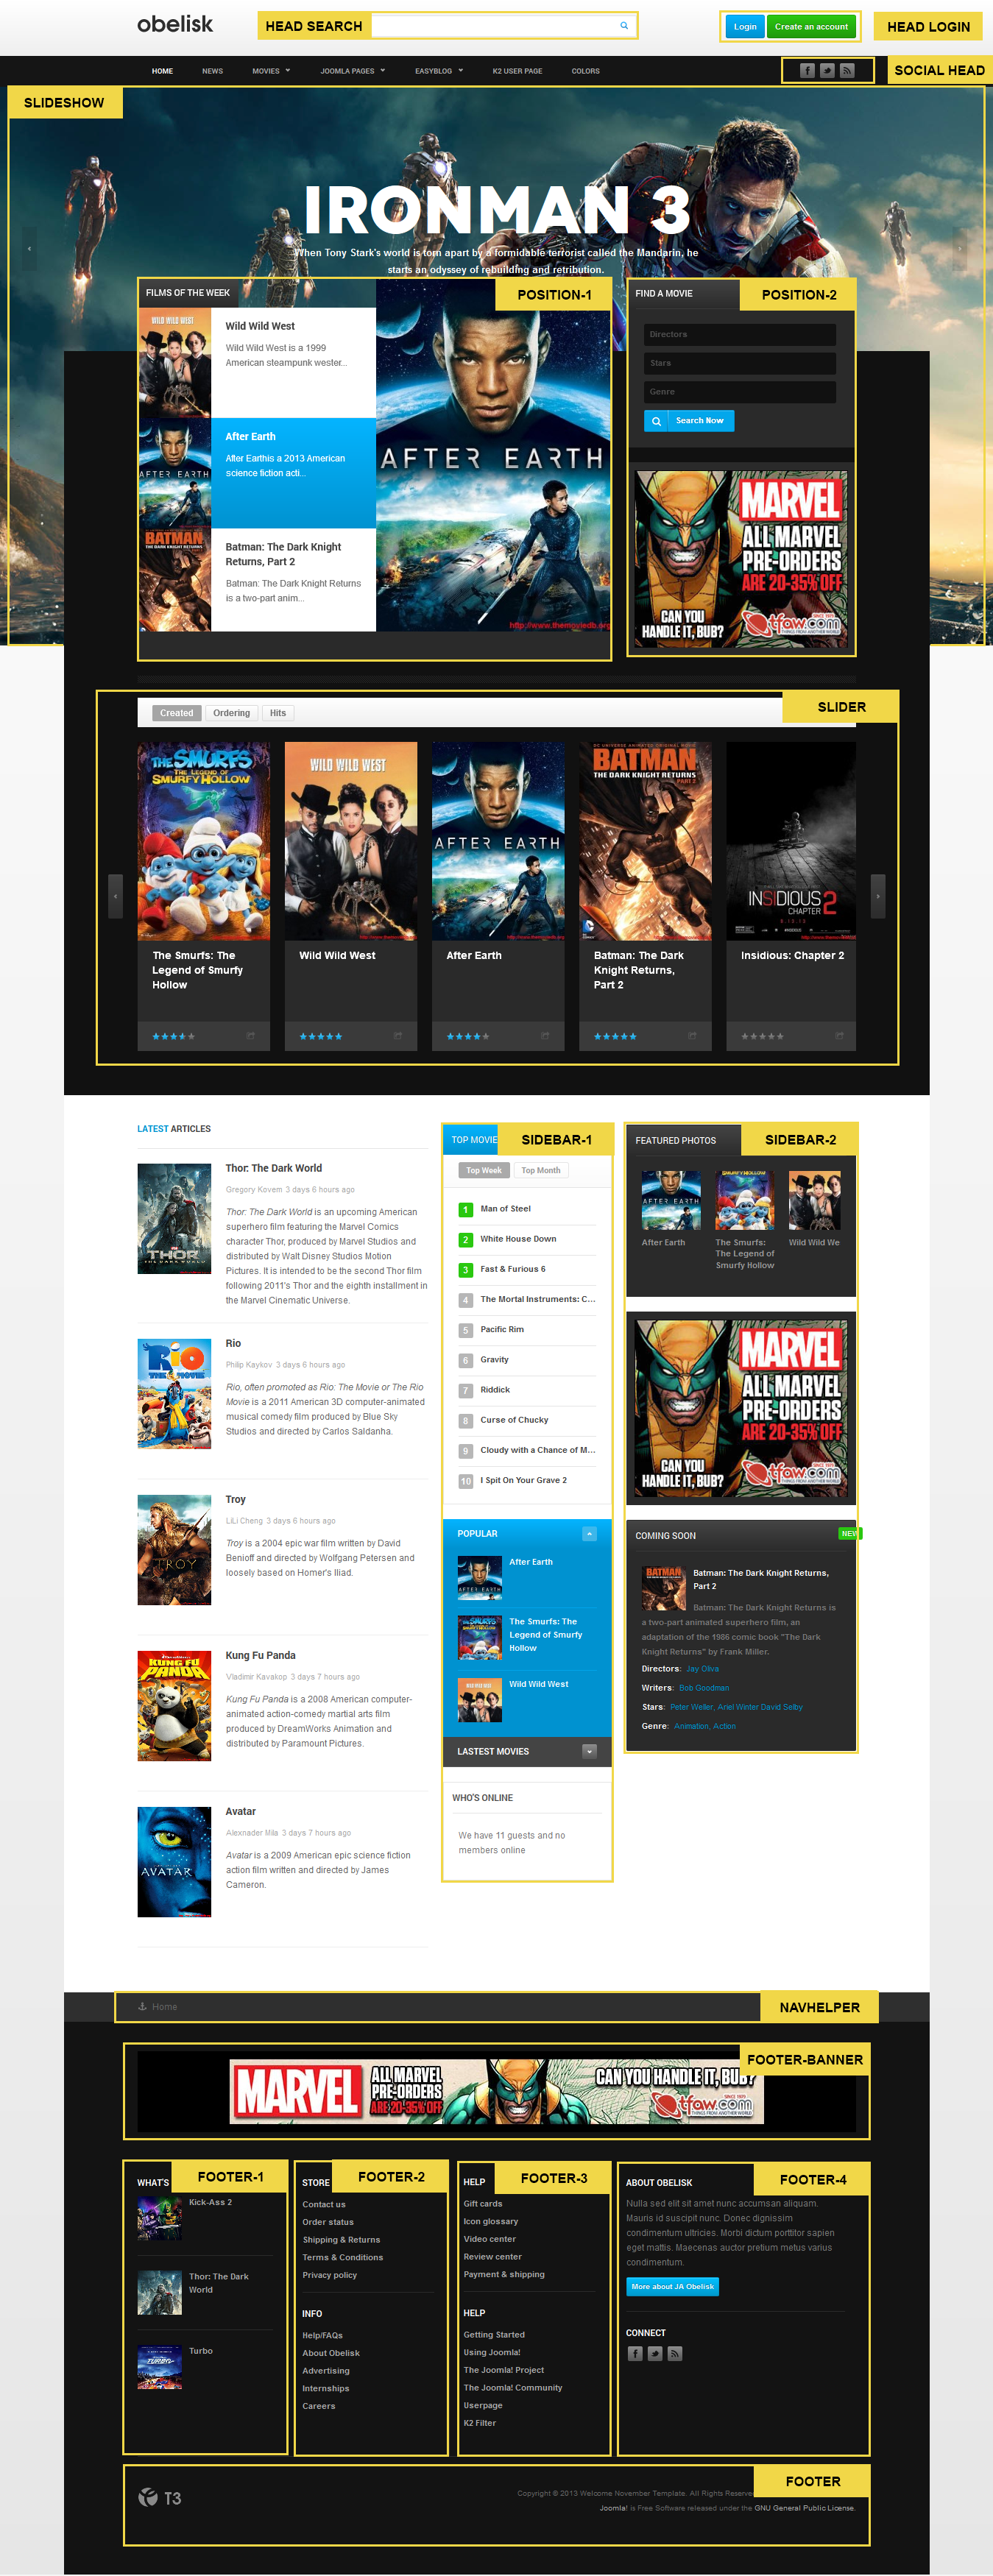
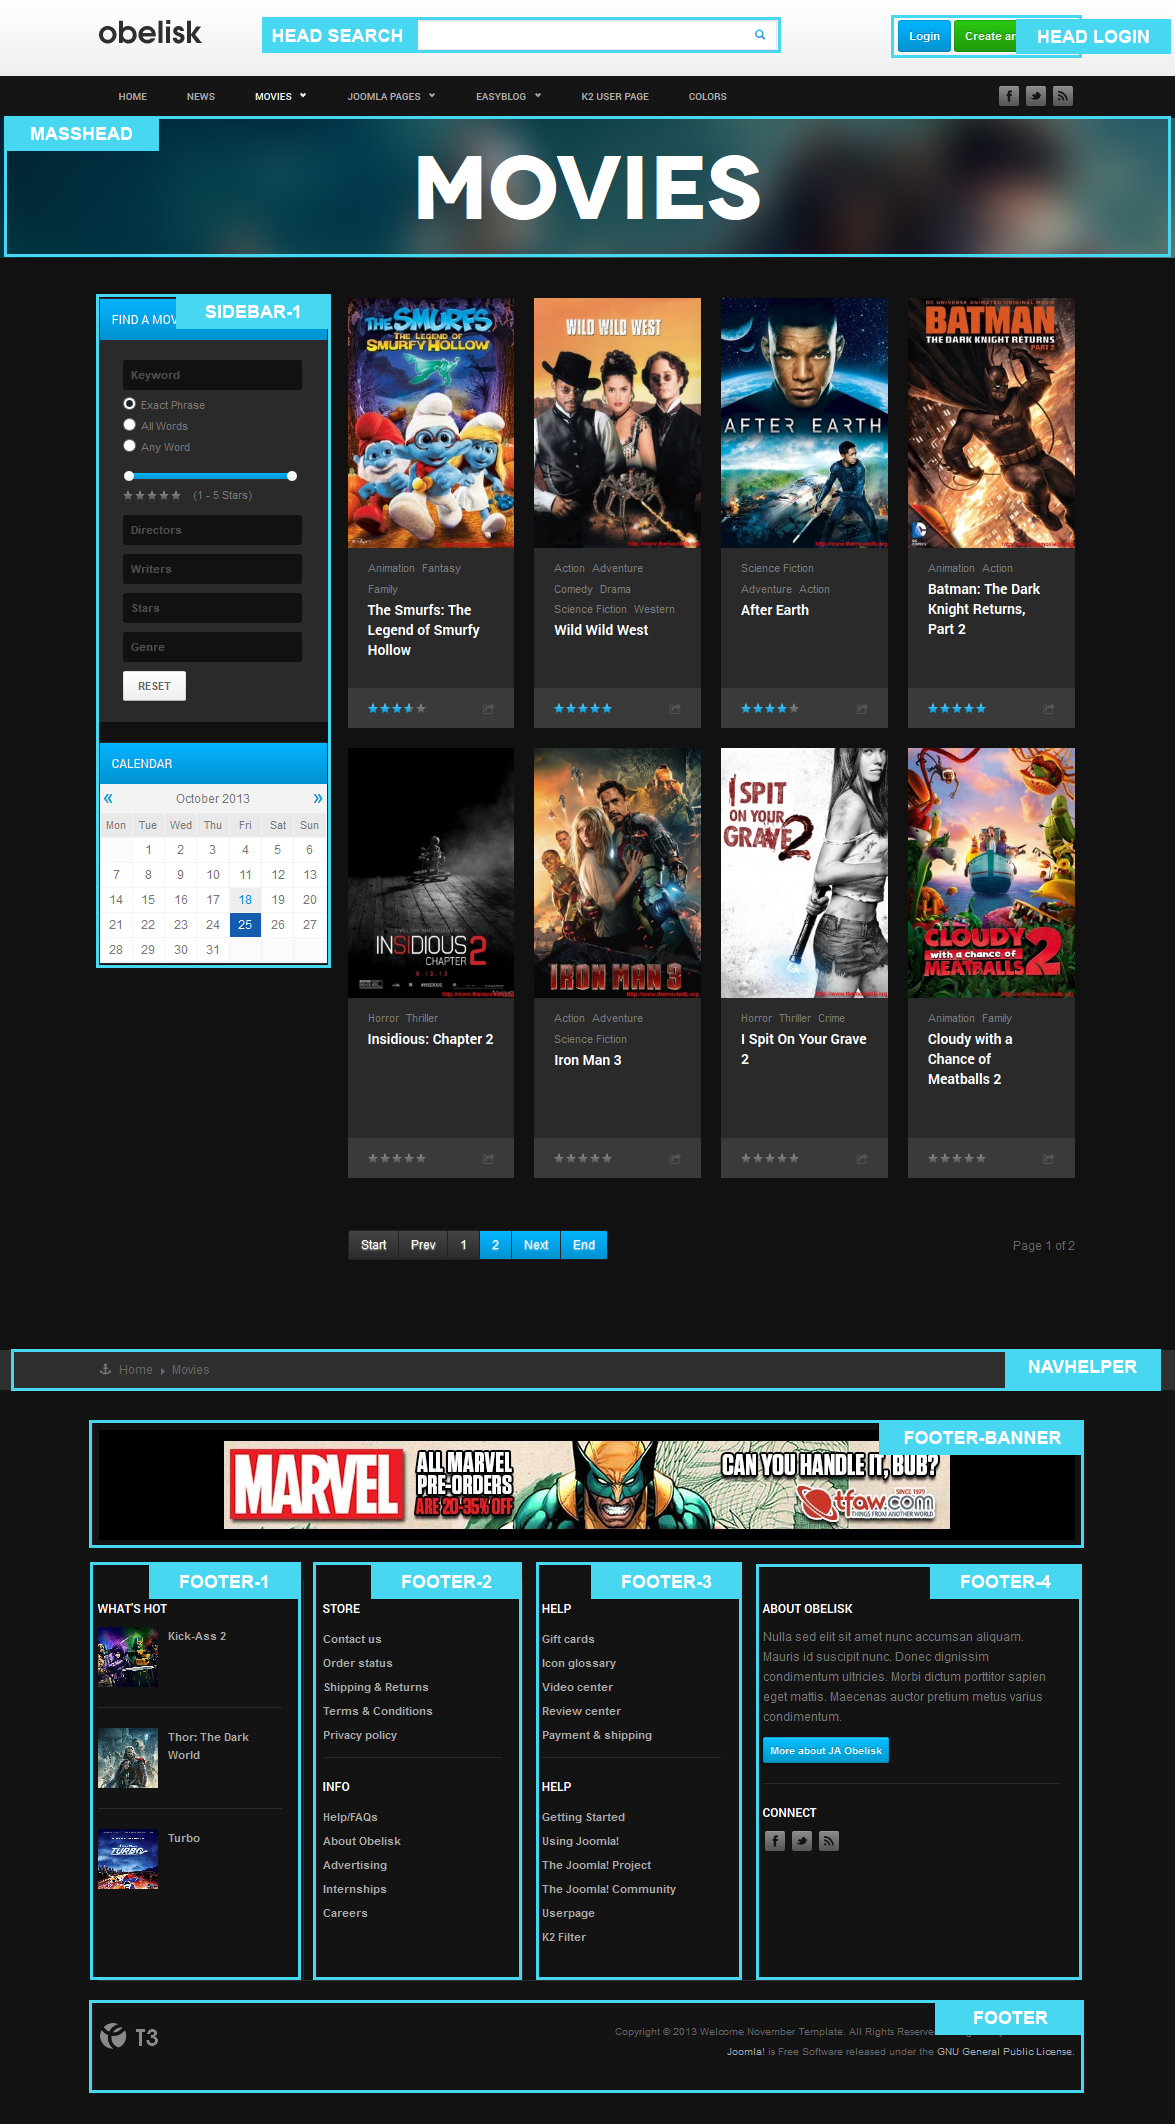
4. Layout and Module Positions
Please refer to the below image for all the structures, layouts as well as module positions in JA Obelisk for its homepage.
Module positions in default Layout: used in Homepage and other Joomla menu items
Module positions in default-dark layout: used in K2 menu items
System requirement
JA Obelisk is compatible with Joomla 3 and Joomla 2.5. Please make sure your system meets the following requirements:
Joomla 3 System requirement
Software
- Software: PHP (Magic Quotes GPC off): 5.3.1 + (5.4+ recommended)
Databases
- MySQL(InnoDB support required): 5.1+
- MSSQL 10.50.1600.1+
- PostgreSQL 8.3.18+
Web Severs
- Apache 2.x+
- Microsoft IIS 7
- Nginx 1.0 (1.1 recommended)
Joomla 2.5+ system requirement
Software
- Software: PHP 5.2.4+ (5.4+ recommended)
- MySQL: 5.0.4+
Web Sever
- Apache: 2.x+
- Microsoft: IIS 7
- Nginx: 1.0 (1.1 recommended)
Browser requirement
The requirements are the same with both Joomla 2.5 and Joomla 3
- Firefox 4+
- IE (Internet Explorer) 8+
- Google Chrome 10+
- Opera 10+
- Safari 5+
Development Environment
The requirements are the same with both Joomla 2.5 and Joomla 3
During development process, Localhost is preferred. You can use the following servers on your PC to develop your site.
Windows
- WAMPSEVER
- XAMPP for Windows
Linux
- LAMP Bubdle
- XAMPP for Linux
Mac OS
- MAMP & MAMP Pro
- XAMPP for Mac OS
Download & Installation
1. Plan your site Development
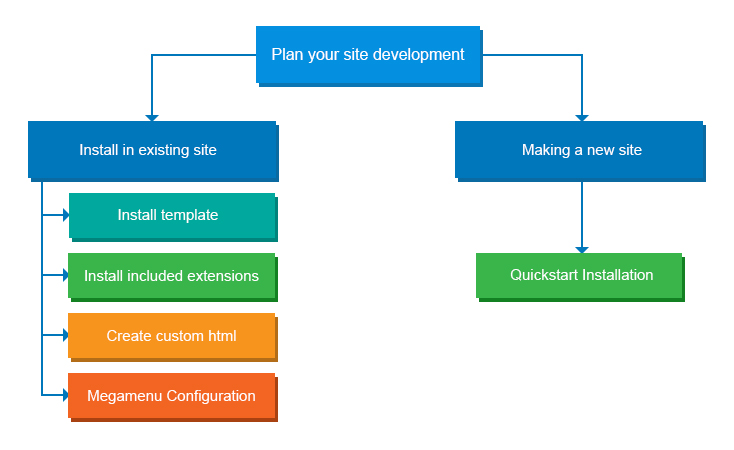
- Making a New Site? - If you are planning to make a new site, use our Quickstart package to clone the demo site and replace the demo content with yours. Check How to install Quickstart Package.
- Installing on your live site? - If you are planning to use this template on your existing live-site, read How to make your site look like demo site guide first to learn about the steps involved. Then you can follow the userguide below.
2. Installing on your live site
2.1 Download Template and Extensions
To download JA Obelisk for T3 Framework package, please head over to the Download page.
2.2 Install Template
If you are new to Joomla installation procedure, please check the following documentation.
2.3 Install Extensions
We'll be installing JA Obelisk template with the settings as is used on the demo website, other customization should be postponed until you complete the initial setup (including modules & plugins as is on the demo).
If you are new to Joomla installation procedure, please check the following documentation.
Note:
Custom HTML Module: These HTML modules are styled to match the template design. We style (CSS) those modules using different div classes. You should check the recommended HTML markup which we also provided in this user-guide if you wish to further customize this module and get them display correctly in the template.
Extensions Configuration
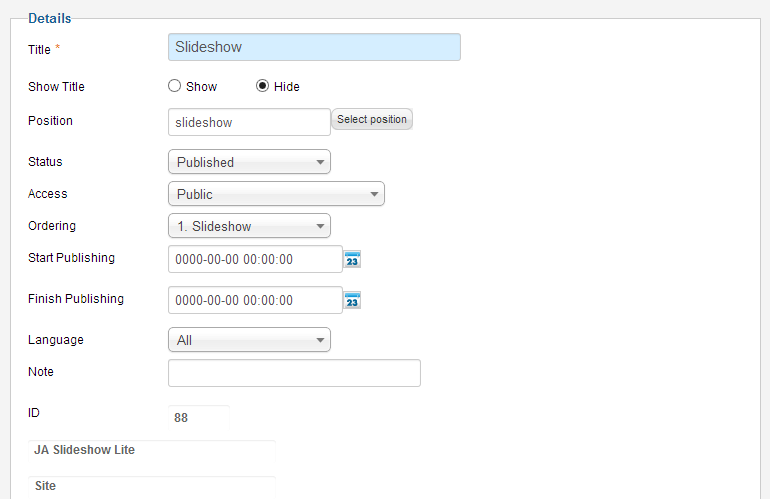
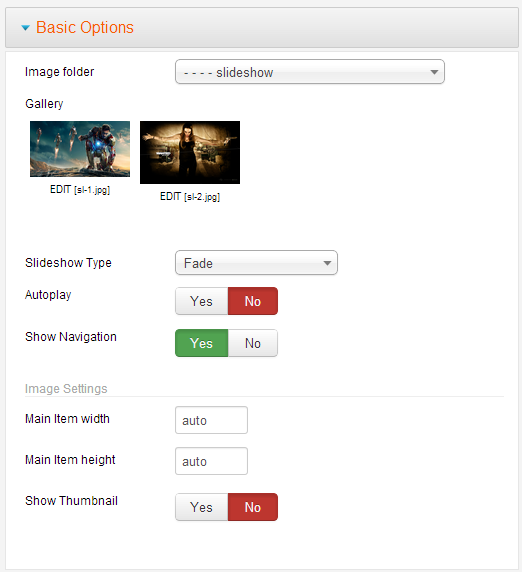
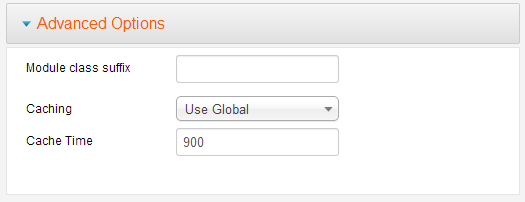
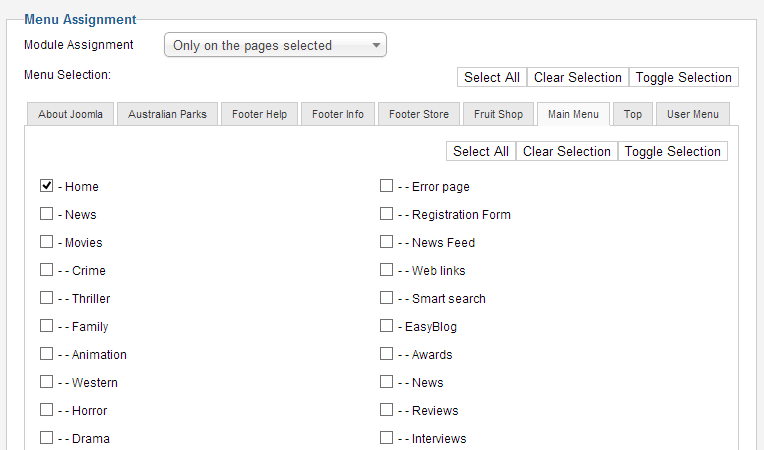
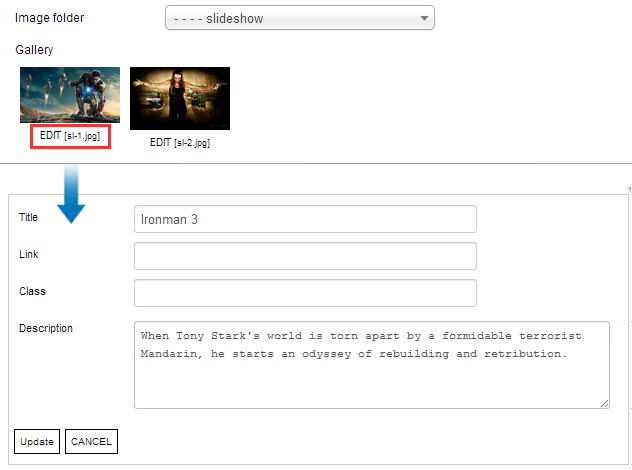
1. JA Slideshow Lite Module
Module Position : slideshow
Module Suffix : NOT USED
Add Description
To add description for each slideshow item, click on EDIT button to add Title, link, description and class.
The description field use HTML to format, so you can apply the HTML tags to style for the description.
Front-end appearance
For more detail, please check the documentation of the module.
Detail documentation2. JA Slideshow Module
Module Position : position-1
Module Suffix : slideshow
Front-end appearance
For more detail, please check the documentation of the module.
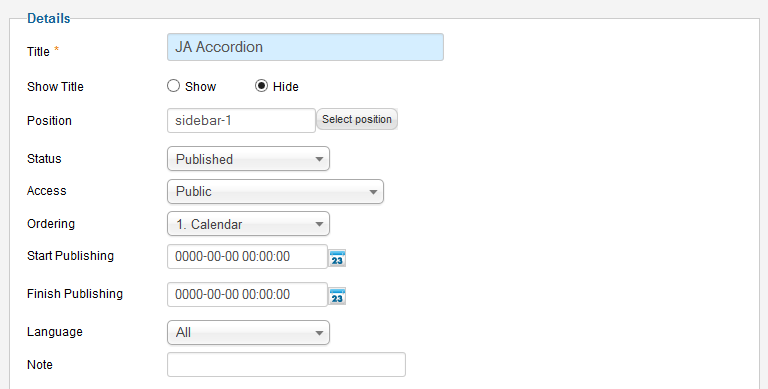
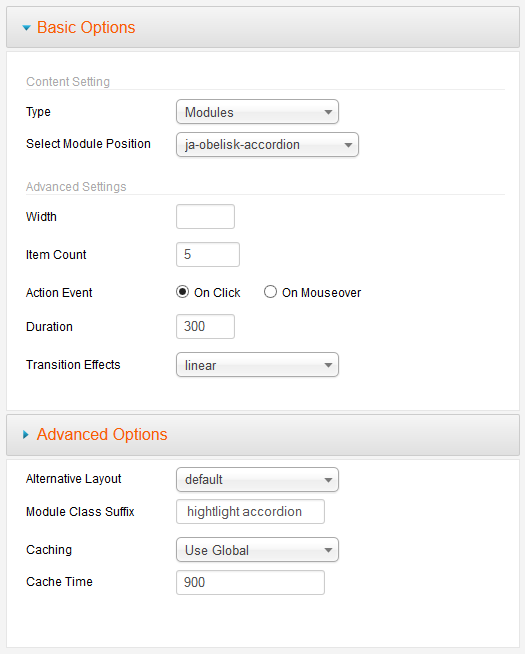
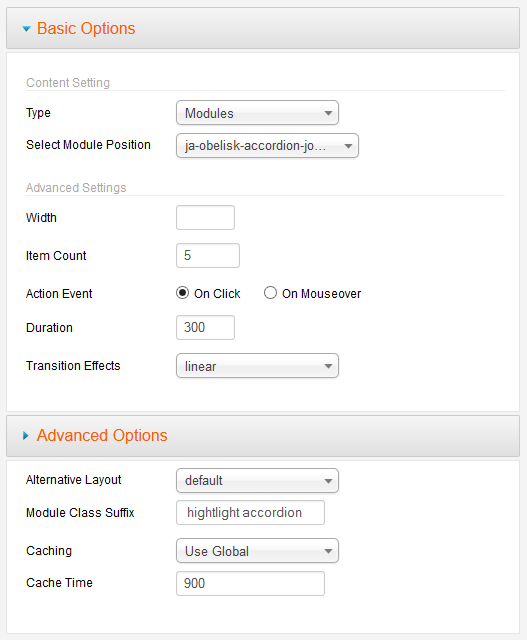
Detail documentation3. JA Accordion Module
3.1 JA Accordion Module displayed in "sidebar-1" position
Module Position : sidebar-1
Module Suffix : hightlight accordion
Front-end appearance
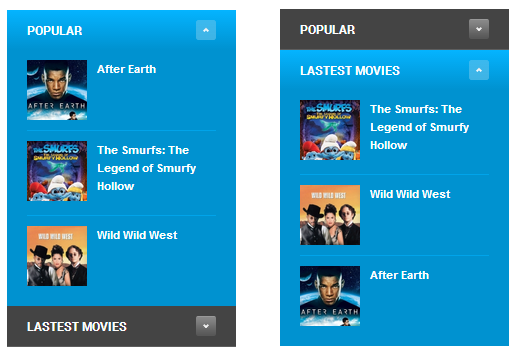
3.2 JA Accordion Module displayed in "sidebar-2" position
Module Position : sidebar-2
Module Suffix : hightlight accordion
Front-end appearance
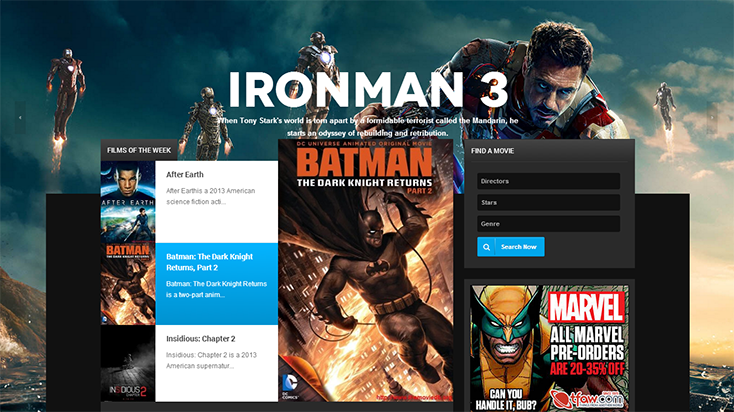
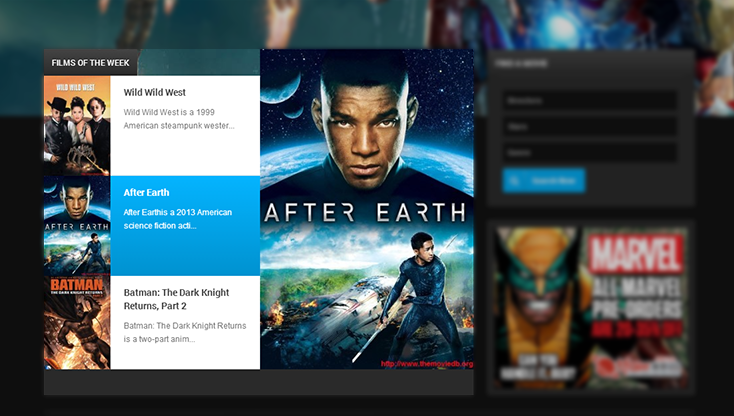
4. JA Bulletin Module
4.1 Top Week
Module Position : ja-obelisk-topmovie-joomla
Module Suffix : NOT USED
Front-end appearance
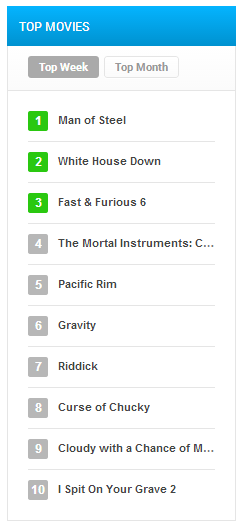
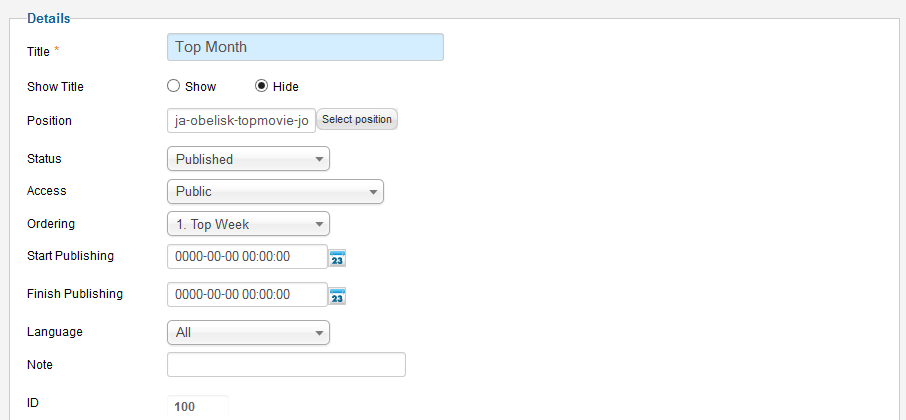
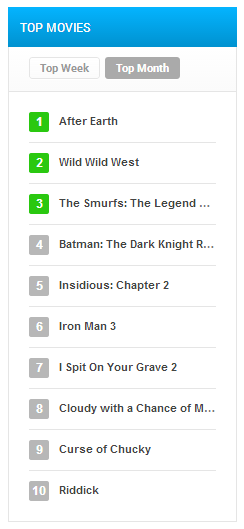
4.1 Top Month
Module Position : ja-obelisk-topmovie-joomla
Module Suffix : NOT USED
Front-end appearance
5. Top Month
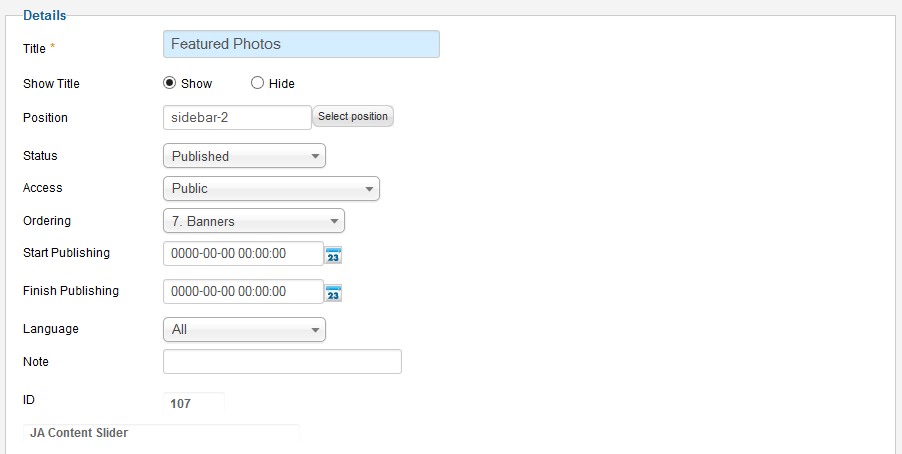
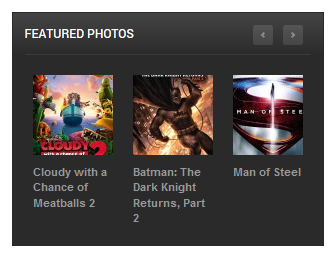
5.1 Featured Photos
Module Position : sidebar-2
Module Suffix : NOT USED
Front-end appearance
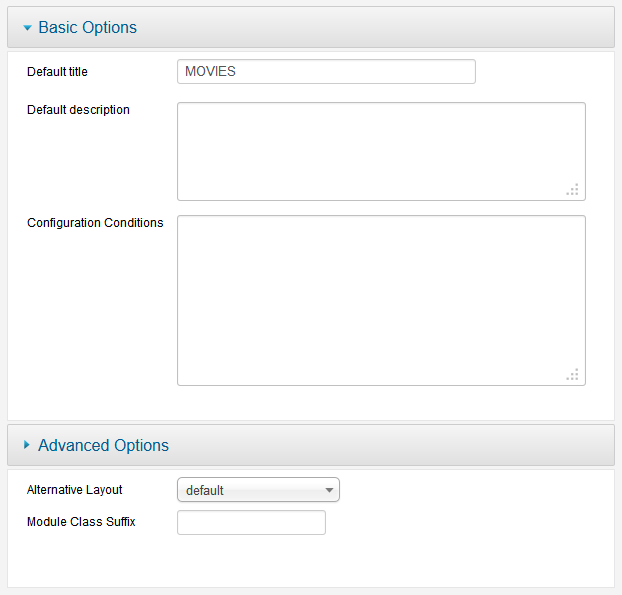
5.2 JA Content Slider
Module Position : slider
Module Suffix : NOT USED
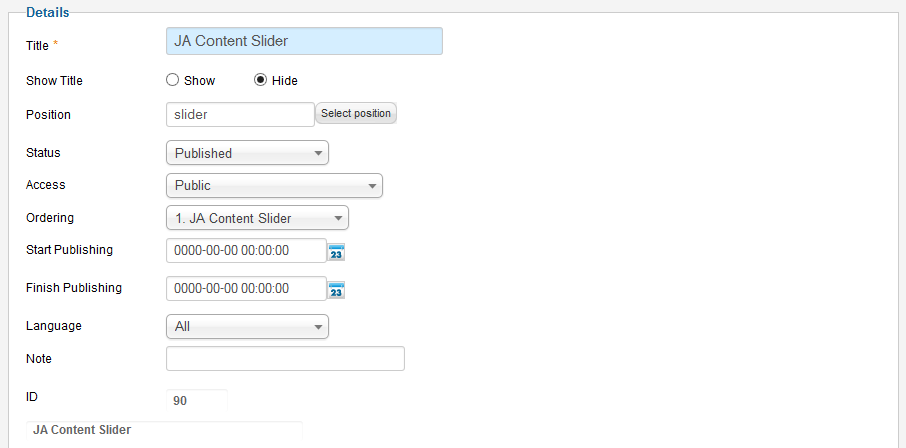
Front-end appearance
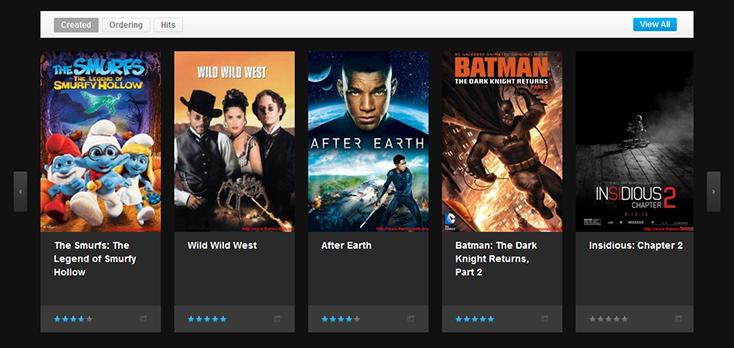
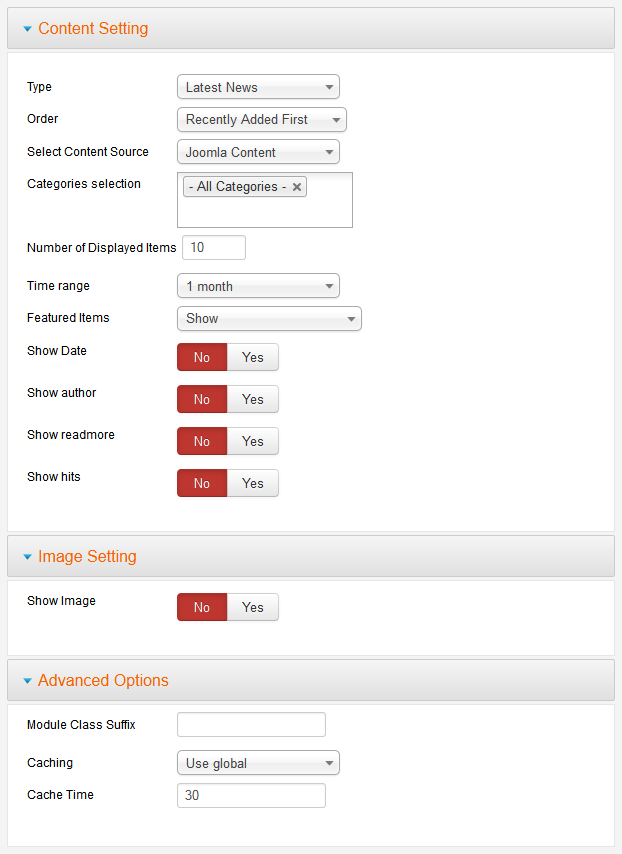
Enable Tabs and Customize tabs
As you can see in the front-page of the module, there are numbers of tabs enabled: Ordering, Hits, Created.
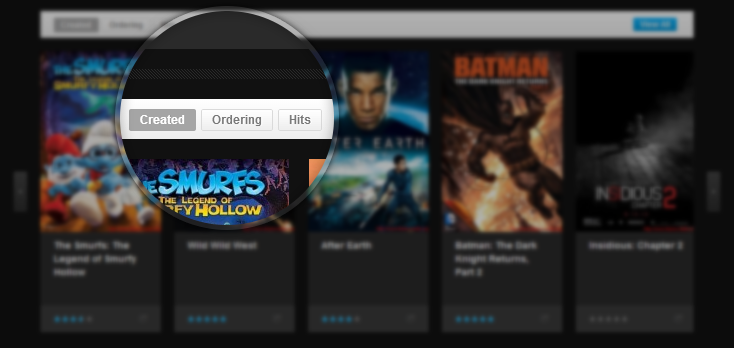
1. Enable Tabs
To enable these tabs, from back-end of JA Content Slider module, open tab Advanced Options the select default-home alternative layout.
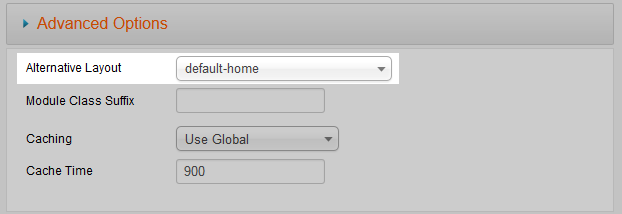
2. Customize Tabs
We customized the default layout of JA Content Slider module, the customized layout is default-home.php in: templates\ja_obelisk\html\mod_jacontentslider.
If you want to disable any tab, open default-home.php file, then file the following code.
$order_field = array("created","ordering","hits");
Delete the tab you don't want to enable it in front-page.
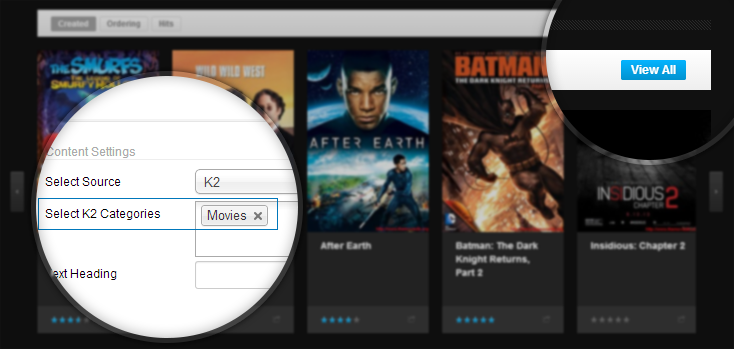
Enable "View All" button
On the top right panel of JA Content Slider module, you can see the "View All" button that allows you to display all items from a category. To enable this option, the only thing you have to do is select one category only for field Select Categories. If you select more than 1 category, the View All button will be auto disabled.
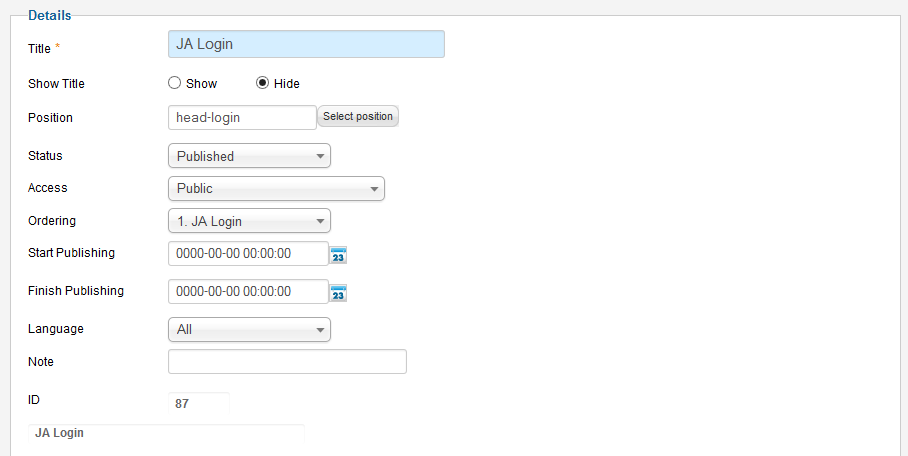
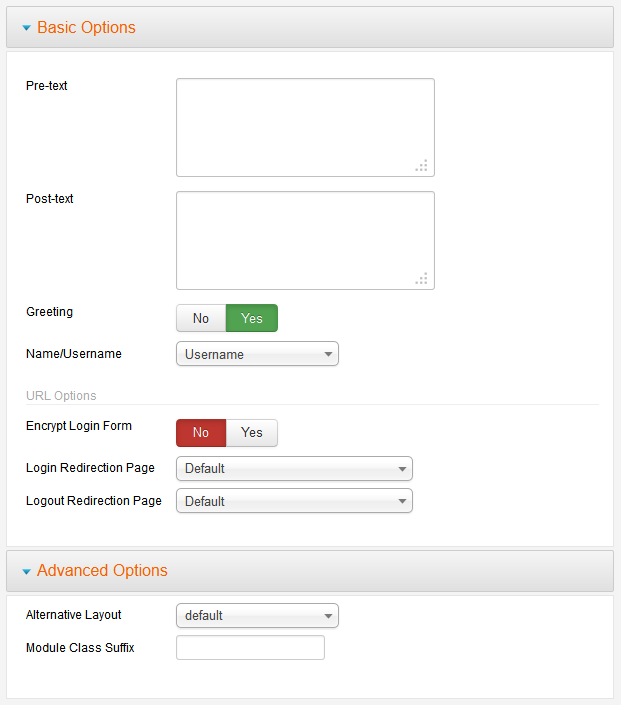
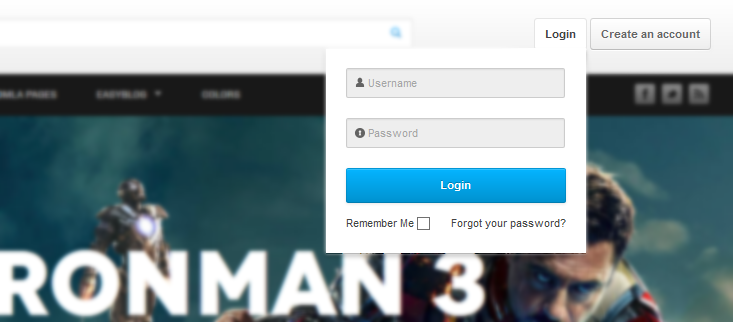
6. JA Login Module
Module Position : head-login
Module Suffix : NOT USED
Front-end appearance
7. JA Masshead Module
Module Position : masshead
Module Suffix : NOT USED
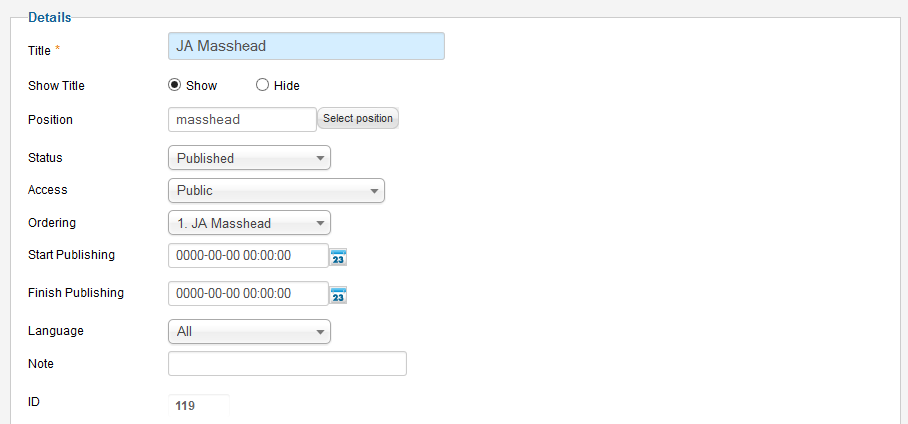
Front-end appearance
For more detail, please check the documentation of the module.
Detail documentation8. JA Diqus Debate Plugin
Install the plugin then enable it.
Back-end Settings
Front-end appearance
Joomla Default Modules
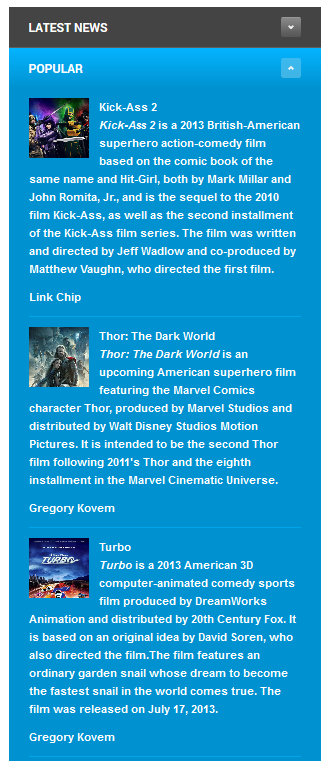
1. Most Read Content Module
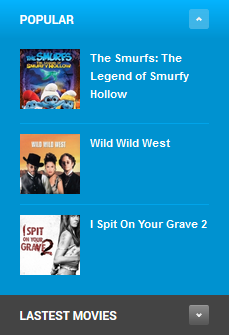
1.1 Popular
Module Position : ja-obelisk-accordion-joomla
Module Suffix : NOT USED
Front-end appearance
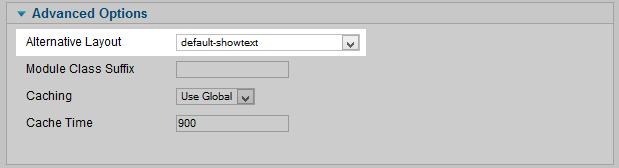
Customize layout
We customized the default layout of the module, the customized layout is default-showtext.php in templates\ja_obelisk\html\mod_articles_popular.
After that, please make sure you select the layout for the Alternative layout field.
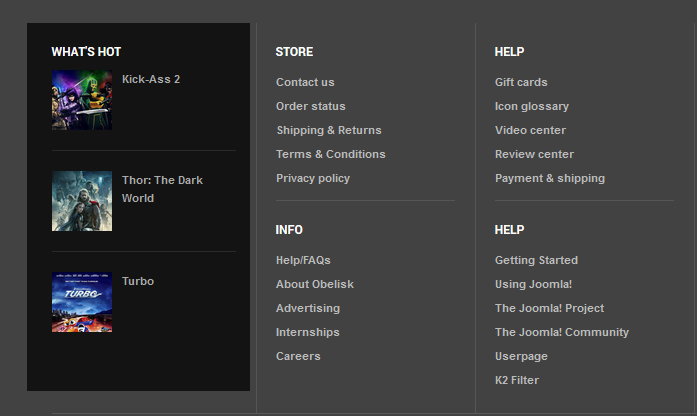
1.2 What's hot
Module Position : footer-1
Module Suffix : NOT USED
Front-end appearance
2. Who's online
Module Position : sidebar-1
Module Suffix : NOT USED
Front-end appearance

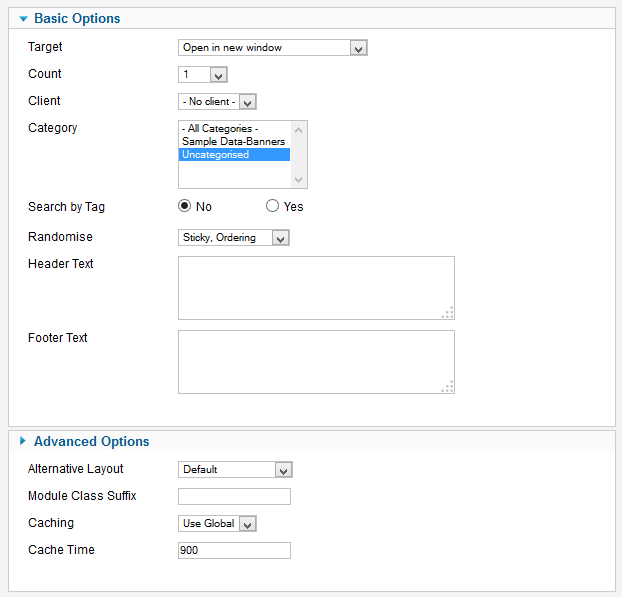
3. Banner Module
3.1 Banner Module in position "sidebar-2"
Front-end appearance

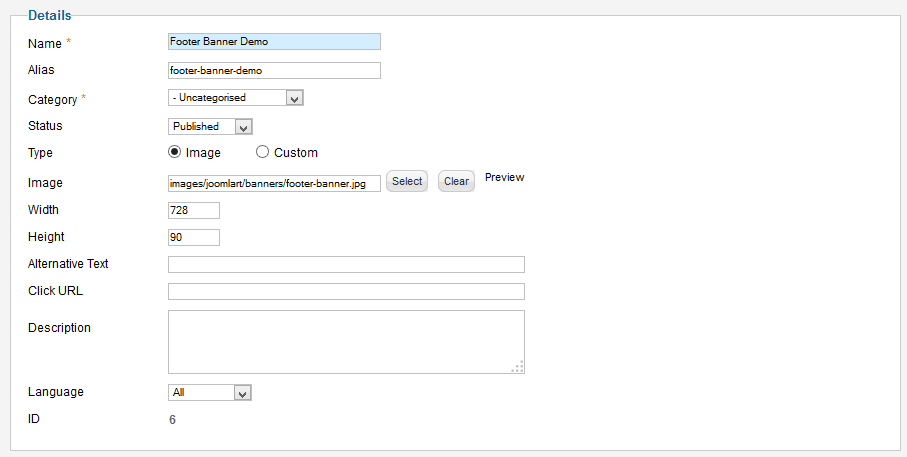
Step 1: Create new banner
From back-end of your site, go to Extensions >> Banner.

Then create new banner, check the setting of adding new banner form HERE.
Step 2: Create module Banner
Module Position : sidebar-2
Module Suffix : banner
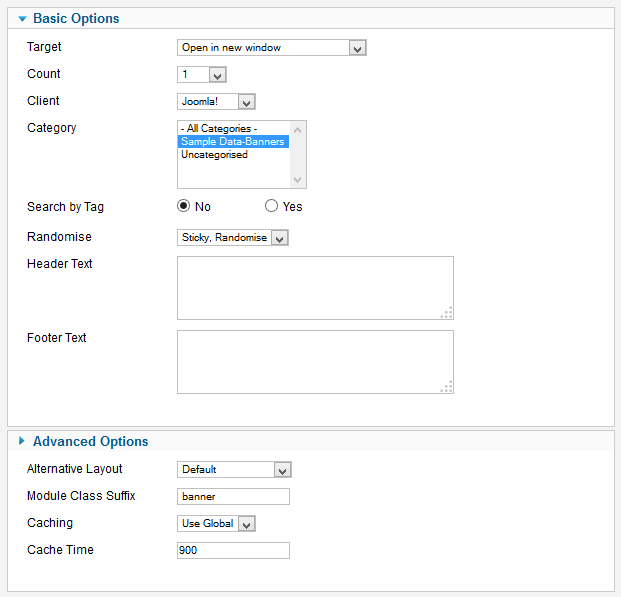
3.2 Banner Module in position "position-2"
Note:
The module is cloned from module 4.1 Banner Module in position "sidebar-2" the re-assigned to position position-2.
Front-end appearance
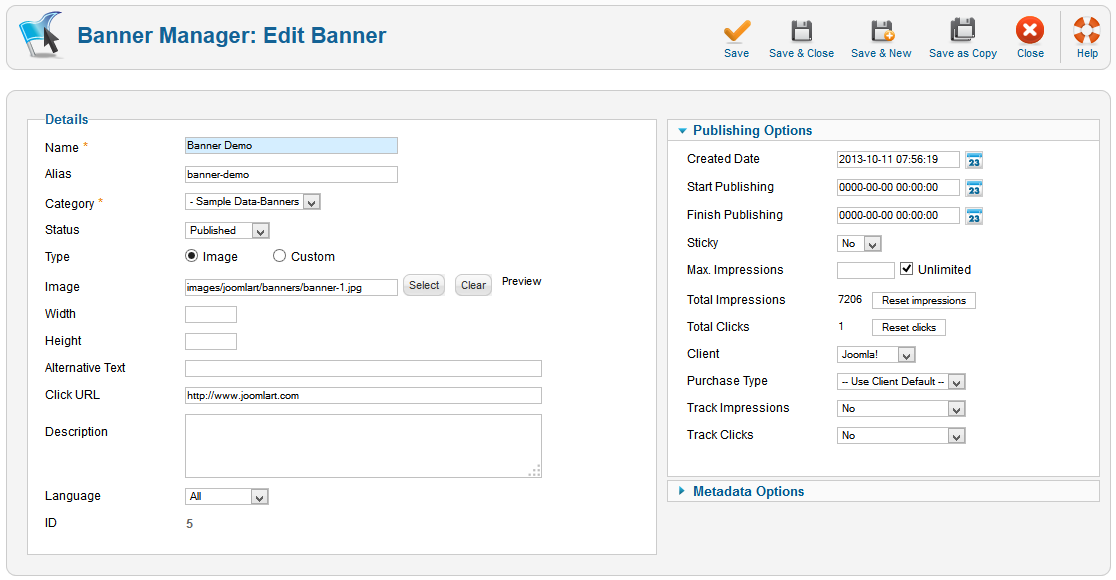
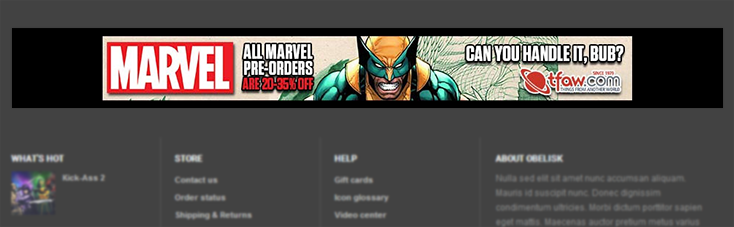
3.3 Banner Module in position "footer-banner"
Front-end appearance
Step 1: Create new banner
From back-end of your site, go to Extensions >> Banner.
Then create new banner, check the setting of adding new banner form HERE.
Step 2: Create module Banner
Module Position : footer-banner
Module Suffix : banner
Custom HTML Modules
Custom HTML modules are styled to match the template design. We style (CSS) those modules using different div classes. We provide HTML code used in the custom HTML module, please turn off default editor in order to prevent Editor to strip HTML
To turn off default editor, please go to "Global configuration" and disable editor by setting "Default Editor" to "None".

Connect

    Module position: footer-4
    Module Suffix: footer-social
Custom HTML
<!-- AddThis Follow BEGIN -->
<div class="addthis_toolbox addthis_32x32_style addthis_default_style">
<a class="addthis_button_facebook_follow" addthis:userid="joomlart"></a>
<a class="addthis_button_twitter_follow" addthis:userid="joomlart"></a>
<a class="addthis_button_rss_follow" addthis:userid="www.joomlart.com"></a>
</div>
<script type="text/javascript" src="//s7.addthis.com/js/300/addthis_widget.js#pubid=xa-525b746c4d879b01"></script>
<!-- AddThis Follow END -->
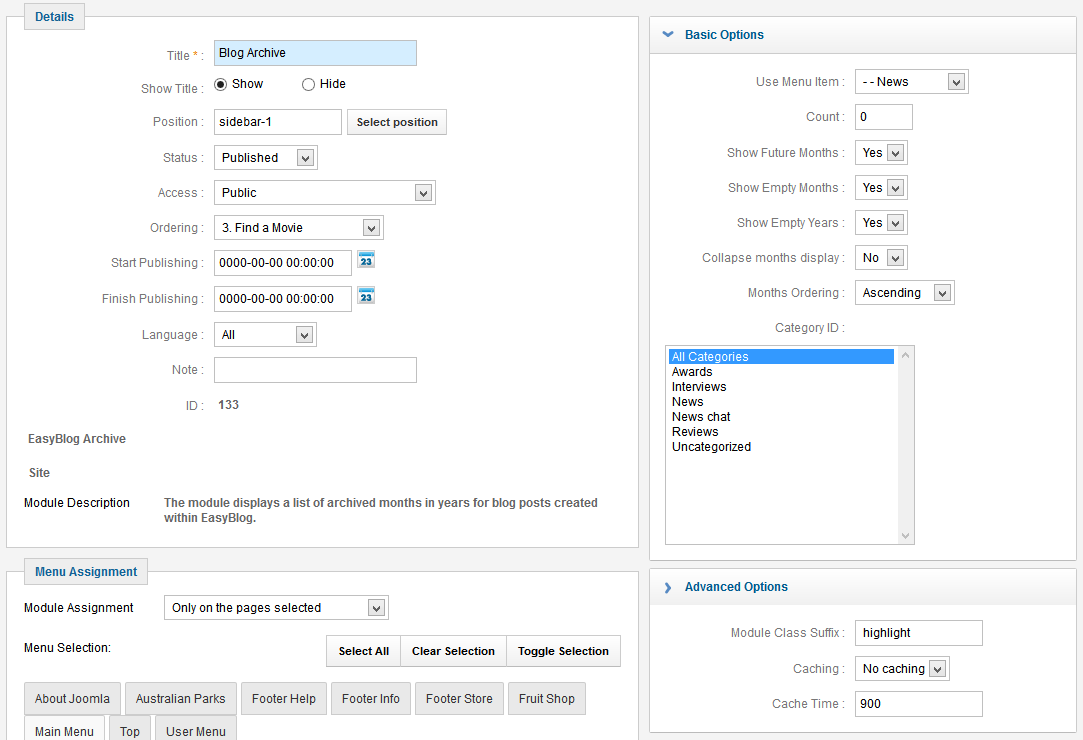
Find a Movie (in homepage)

    Module position: position-2
    Module Suffix: NOT USED
Custom HTML
<form action="#" method="POST" name="jak2filter" id="jak2filter">
<input type="hidden" value="search" name="task">
<!-- include sub category -->
<input type="hidden" value="1" name="isc">
<ul class="ja-k2filter vertical-layout" id="jak2filter115">
<input type="hidden" value="1" name="category_id">
	<li style=" clear:both;">
	<label class="group-label" style="display: none;">Directors</label>
	<input type="text" value="Directors" id="xf_115_1_txt" name="xf_1_txt" class="exfield exgroup1" autocomplete="off" onblur="if(this.value=='') this.value='Directors';" onfocus="if(this.value=='Directors') this.value='';">	</li>
	<li style=" clear:both;">

	<input type="text" value="Stars" id="xf_115_3_txt" name="xf_3_txt" class="exfield exgroup1" autocomplete="off" onblur="if(this.value=='') this.value='Stars';" onfocus="if(this.value=='Stars') this.value='';"></li>
		<li style=" clear:both;">

	<input type="text" value="Genre" id="xf_115_4_txt" name="xf_4_txt" class="exfield exgroup1" autocomplete="off" onblur="if(this.value=='') this.value='Genre';" onfocus="if(this.value=='Genre') this.value='';"></li>


	<li class="last-item" style=" clear:both;">
		<input type="button" value="Search Now" name="btnSubmit" class="btn btn-primary btn-search">
	</li>

</ul>
</form>
Find a Movie (in movie pages)

    Module position: sidebar-1
    Module Suffix: NOT USED
Custom HTML
<form action="#" method="POST" name="jak2filter-form-120" id="jak2filter">
<!-- include sub category -->
<ul class="ja-k2filter vertical-layout">
	<li class="keywork-view" style=" clear:both;">
		<label class="group-label" style="display: none;">Keyword</label>
		<input type="text" value="Keyword" class="inputbox" id="searchword" name="searchword" onblur="if(this.value=='') this.value='Keyword';" onfocus="if(this.value=='Keyword') this.value='';">
		<p class="keyword-options">
	<input type="radio" checked="checked" value="exact" id="stexact" name="st">
	<label class="radiobtn" id="stexact-lbl" for="stexact">Exact Phrase</label>
	<input type="radio" value="all" id="stall" name="st">
	<label class="radiobtn" id="stall-lbl" for="stall">All Words</label>
	<input type="radio" value="any" id="stany" name="st">
	<label class="radiobtn" id="stany-lbl" for="stany">Any Word</label>
		</p>
	</li>
	<li class="rating-view" style=" clear:both;">
		<div id="slider_120_rating" class="ui-slider ui-slider-horizontal ui-widget ui-widget-content ui-corner-all"><div class="ui-slider-range ui-widget-header" style="left: 0%; width: 100%;"></div><a href="#" class="ui-slider-handle ui-state-default ui-corner-all" style="left: 0%;"></a><a href="#" class="ui-slider-handle ui-state-default ui-corner-all" style="left: 100%;"></a></div>
		<input type="hidden" value="1|5" id="120_rating" name="rating">
		<input type="hidden" value="1|5" id="120_rating_jacheck" name="rating_jacheck">
				<ul id="rating_range_120" class="itemRatingList">
			<li class="itemCurrentRating" id="presenter_120_rating" style="width: 100%; left: 0%;"></li>
			<li><span href="#" rel="1-stars" title="" class="srange one-star">1</span></li>
			<li><span href="#" rel="2-stars" title="" class="srange two-stars">2</span></li>
			<li><span href="#" rel="3-stars" title="" class="srange three-stars">3</span></li>
			<li><span href="#" rel="4-stars" title="" class="srange four-stars">4</span></li>
			<li><span href="#" rel="5-stars" title="" class="srange five-stars">5</span></li>
		</ul>
		<span class="itemCurrentRatingNote" id="presenter_120_rating_note">(1 - 5 Stars)</span>
	</li>

						<li style=" clear:both;">

	<input type="text" value="Directors"  name="xf_1_txt" class="exfield exgroup1" autocomplete="off" onblur="if(this.value=='') this.value='Directors';" onfocus="if(this.value=='Directors') this.value='';"></li>
		<li style=" clear:both;">

	<input type="text" value="Writers" name="xf_2_txt" class="exfield exgroup1" autocomplete="off" onblur="if(this.value=='') this.value='Writers';" onfocus="if(this.value=='Writers') this.value='';"></li>
		<li style=" clear:both;">

	<input type="text" value="Stars" name="xf_3_txt" class="exfield exgroup1" autocomplete="off" onblur="if(this.value=='') this.value='Stars';" onfocus="if(this.value=='Stars') this.value='';"></li>
		<li style=" clear:both;">

	<input type="text" value="Genre" name="xf_4_txt" class="exfield exgroup1" autocomplete="off" onblur="if(this.value=='') this.value='Genre';" onfocus="if(this.value=='Genre') this.value='';"></li>

	<li class="last-item" style=" clear:both;">
				<input type="button" value="RESET" name="btnReset" class="btn btn-primary">
	</li>
</ul>
</form>
Social header

    Module position: socialheader
    Module Suffix: NOT USED
Custom HTML
<!-- AddThis Follow BEGIN -->
<div class="addthis_toolbox addthis_32x32_style addthis_default_style">
<a class="addthis_button_facebook_follow" addthis:userid="joomlart"></a>
<a class="addthis_button_twitter_follow" addthis:userid="joomlart"></a>
<a class="addthis_button_rss_follow" addthis:userid="http://www.joomlart.com"></a>
</div>
<script type="text/javascript" src="//s7.addthis.com/js/300/addthis_widget.js#pubid=xa-525b746c4d879b01"></script>
<!-- AddThis Follow END -->
Replace the Addthis Follow buttons with your own ones.
Article Configuration
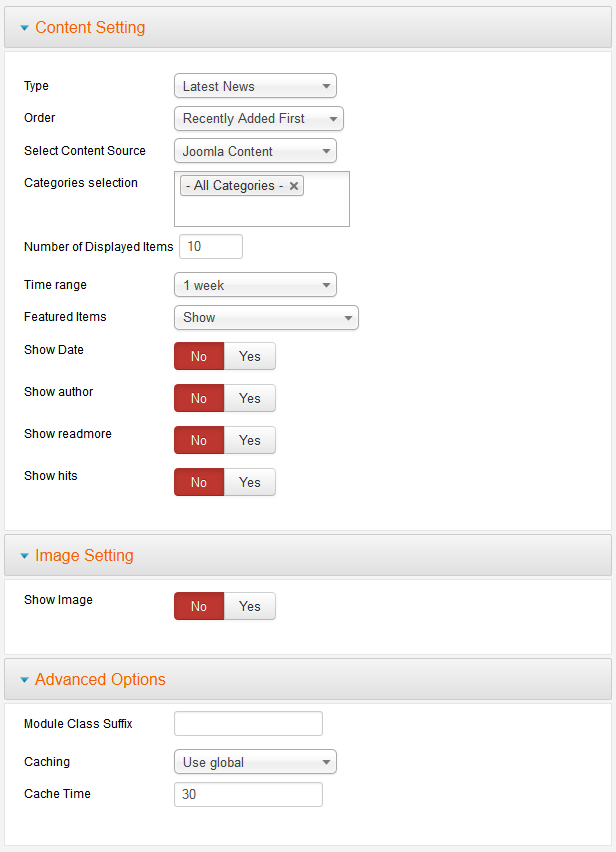
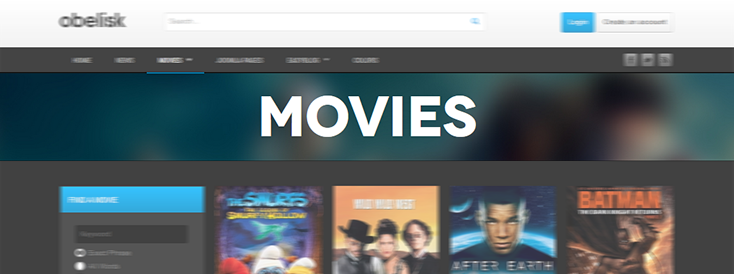
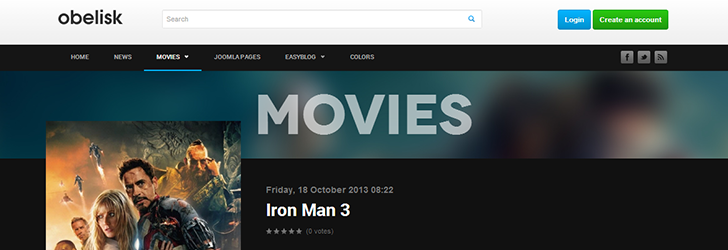
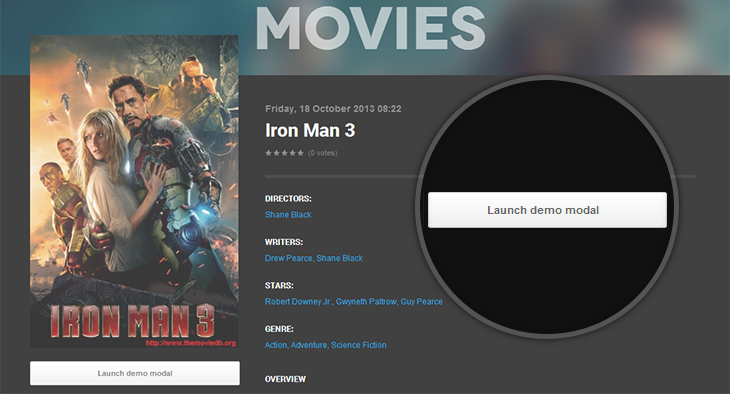
JA Obelisk template supports K2 Component, in each K2 Item detail page, it contains number of elements like: masshead, extra fields, video gallery, photo gallery ...
Front-end appearance
We will guide you how to create/enable the elements.
1. Masshead
Tips:
You can add text, background image for masshead for menu or article by adding to JA Masshead Module. Follow JA Masshead Module Documentation to know how to configure the module.
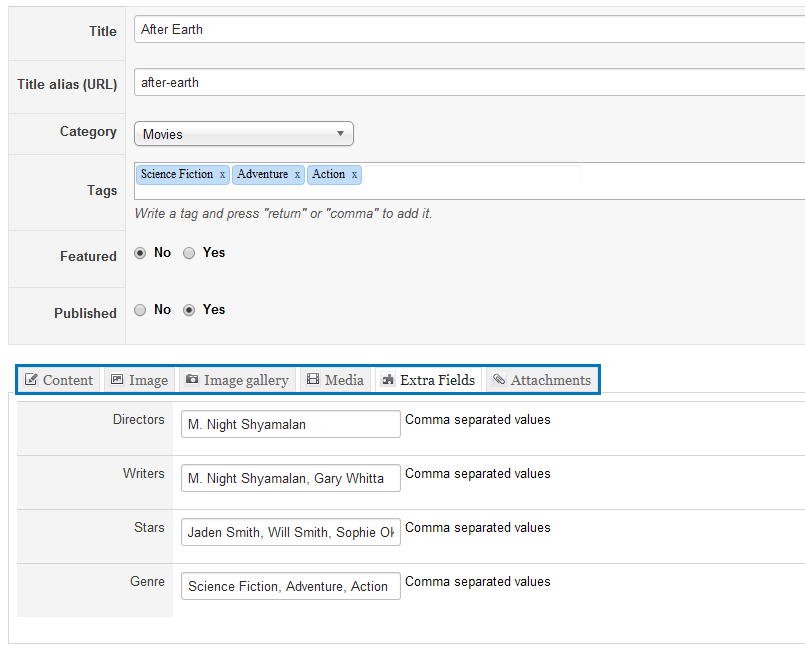
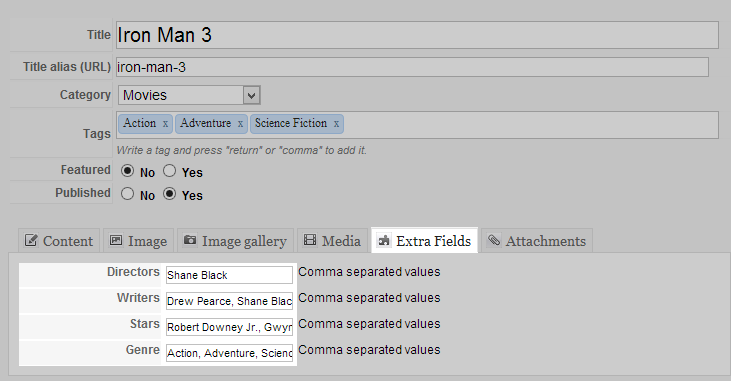
2. Extra Fields
The extra fields works like tags, when user click on any extra field, they will be navigated to a page that contains all items with the same extra field.
Step 1: Add Extra field groups
To add new extra field group, go to Components >> K2 >> Extra Field Groups then click on New button to add new extra field group.
Step 2: Add Extra fields
After creating new extra field group, go to Extra Fields tab to create new extra fields.
Step 3: Add extra fields for K2 items
Open the article edit form, find and open tab Extra Fields.
Note:
This feature requires the JA K2 Extra fields extensions installed and enabled.
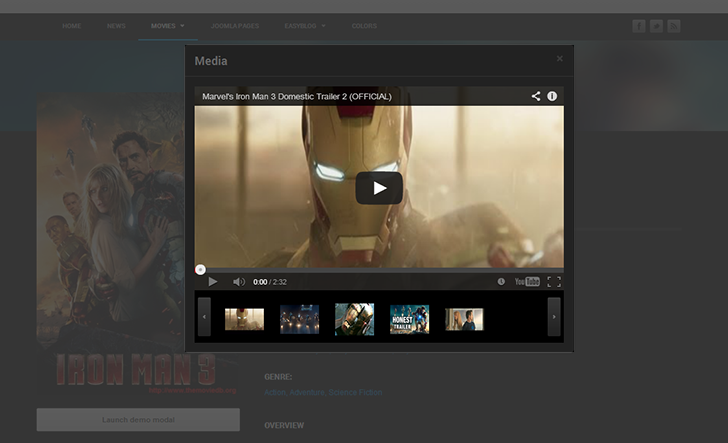
3. Video Gallery
When clicking on Launch Demo modal under the article main image, you will see a video gallery.
Video Gallery in popup view
To add the video gallery, from back-end of your site, open article you want to add video gallery, open Media tab and embed videos.
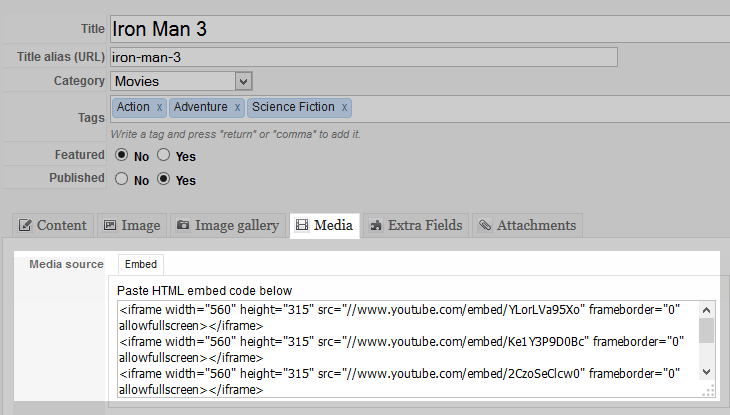
<iframe width="560" height="315" src="//www.youtube.com/embed/YLorLVa95Xo" frameborder="0" allowfullscreen></iframe>
<iframe width="560" height="315" src="//www.youtube.com/embed/Ke1Y3P9D0Bc" frameborder="0" allowfullscreen></iframe>
4. Photo Gallery
For each K2 Item, you can display a photo gallery.
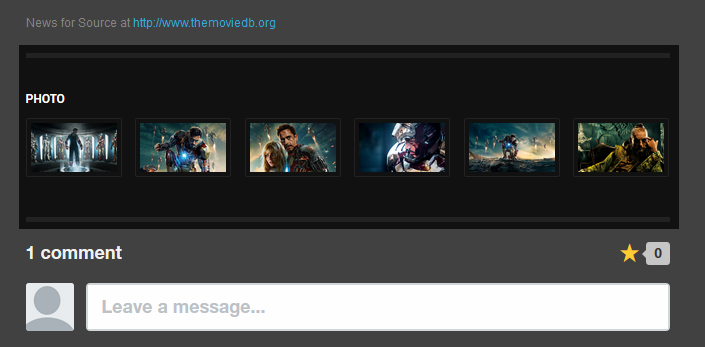
To add the photo gallery, from back-end of your site, open article you want to add photo gallery, add the images to the bottom of content field.
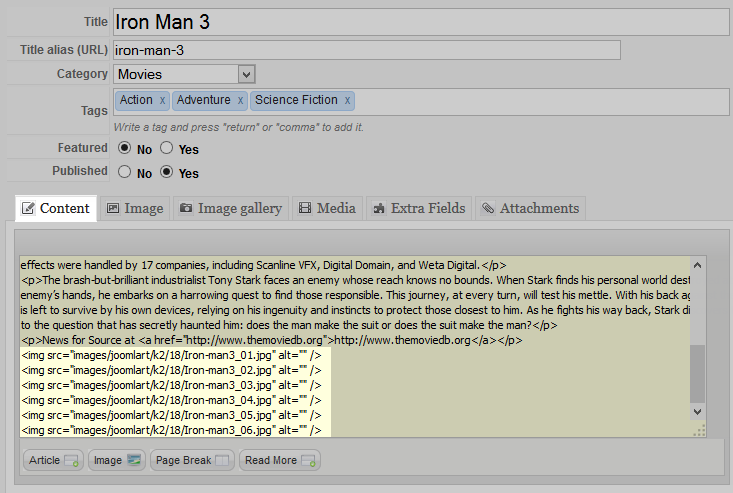
<img src="/images/joomlart/k2/18/Iron-man3_01.jpg" alt="" />
<img src="/images/joomlart/k2/18/Iron-man3_02.jpg" alt="" />
<img src="/images/joomlart/k2/18/Iron-man3_03.jpg" alt="" />
<img src="/images/joomlart/k2/18/Iron-man3_04.jpg" alt="" />
<img src="/images/joomlart/k2/18/Iron-man3_05.jpg" alt="" />
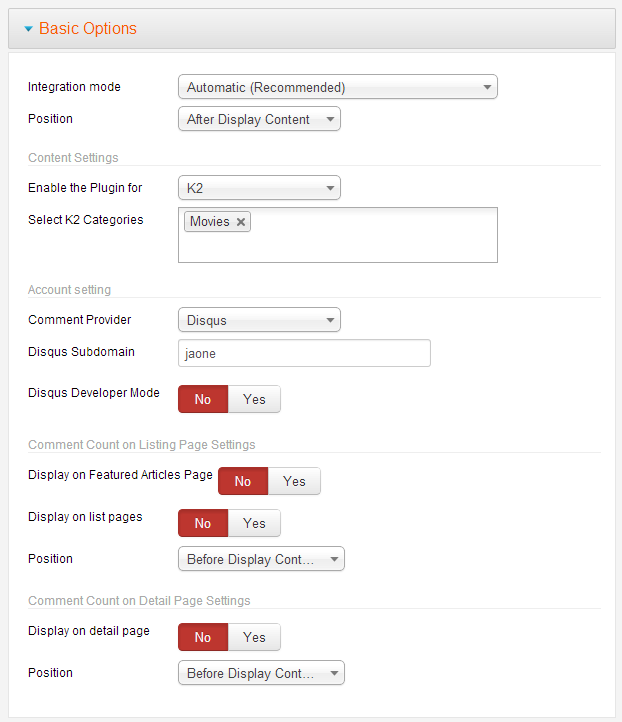
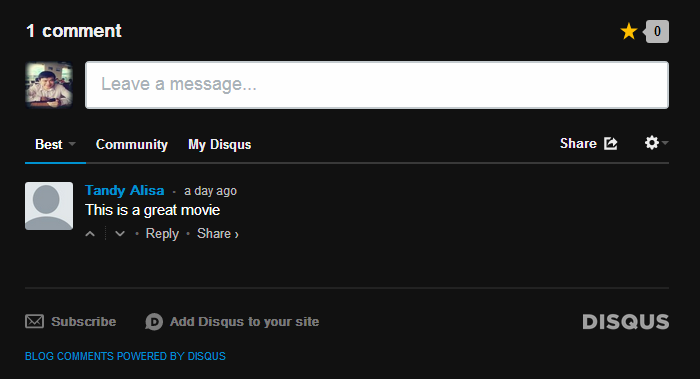
5. Disqus Comment
Tips:
To enable disqus comment, install and enable JA Disqus Debate plugin. You can check the detail configuration in the Extensions Configuration section.
Extended Settings
JA Obelisk template has some extended settings, they are Userpage menu itemsid and K2 filter menu itemsid.
Note:
The settings are global settings, and they will be applied to all styles.
1. Userpage menu itemsid
What is it for ?
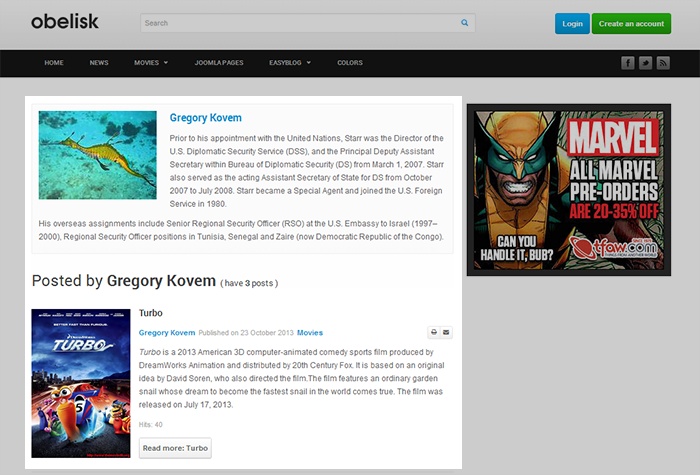
Because Joomla content component does not support Userpage, this setting will allow you to display Joomla user page when click on username on any Joomla listing page, like K2 user page.
Click on username on any listing page
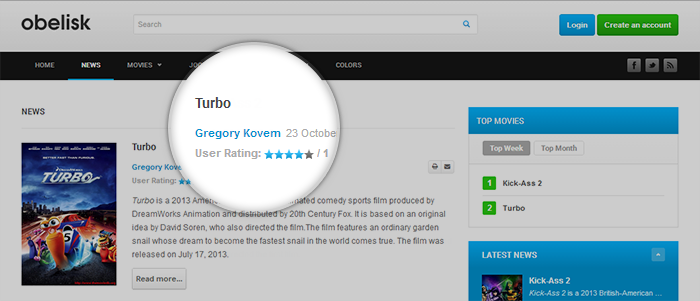
The Userpage includes user info and list of their articles.
To set up this page, follow the instructions
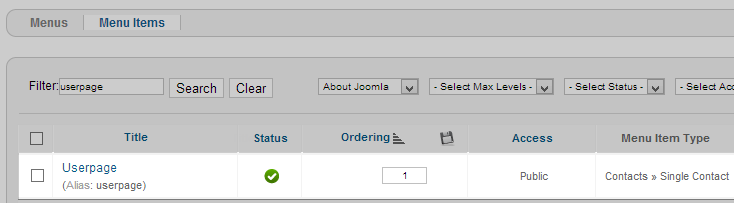
Step 1: create a userpage menu
Create userpage menu (menu type is Single Contact)
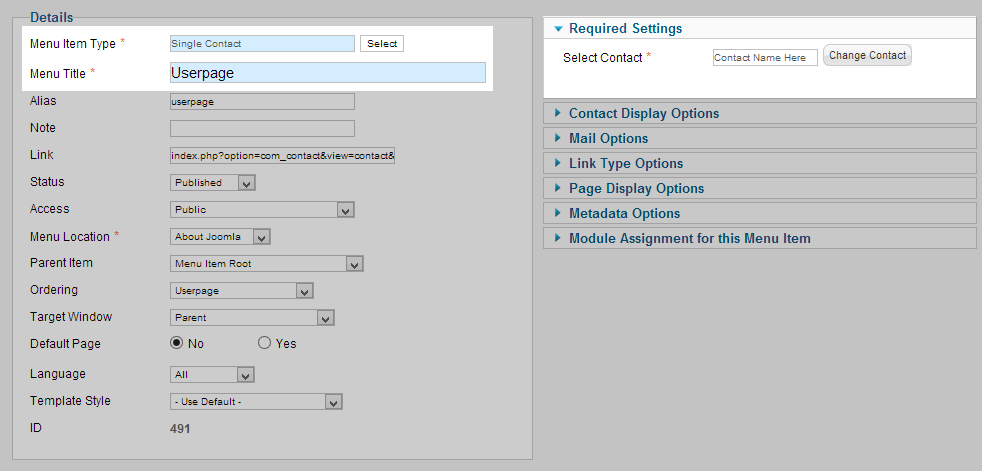
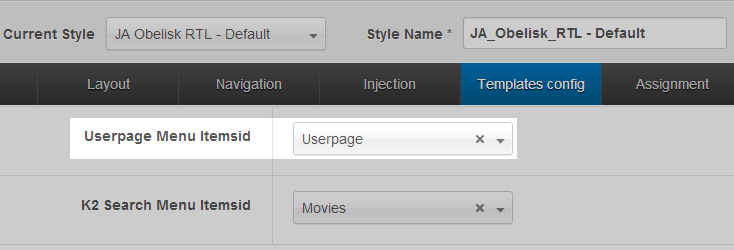
Step 2: Assign the Userpage menu to "Userpage menu itemsid" field
From back-end of JA Obelisk template style, open General tab then assign the created Userpage menu to Userpage menu itemsid field.
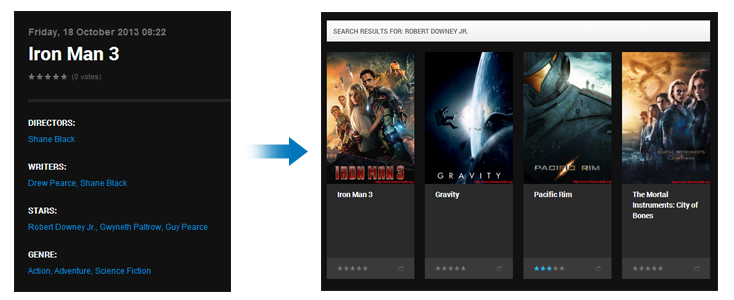
2. K2 filter menu itemsid
What is it for ?
The setting allows you to display K2 Search result page in any assigned menu so that the search result page will get setting of the assigned menu.
When you search by keywords, the search result page will be displayed in Movie menu (as in demo) and the page will have the same style as the Movie page.
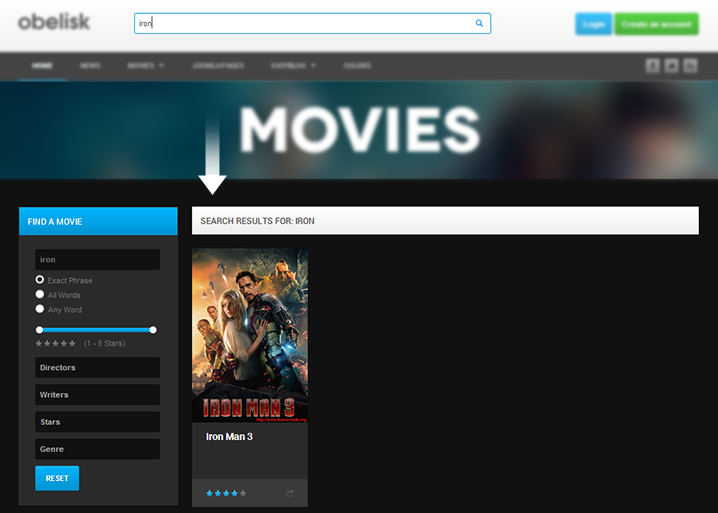
To set up this page, follow the instructions
Step 1: create K2 Search module
In demo site, we used K2 Tools module to create the K2 Search in the header.
Step 2: Assign menu to "K2 filter menu itemsid" field
From back-end of JA Obelisk style template, open General tab then assign the menu (the menu that you want to display the K2 Search result page in) to Userpage menu itemsid field.
Third Party Extensions Configuration
1. EasyBlog Component
JA Obelisk supports EasyBlog styles by default. In order to have the EasyBlog design, you should download the EasyBlok theme for JA Obelisk, extract the files and add them to your site.
1.2 Install EasyBlog component
Quick Guide:
- Step 1: Install Easyblog component
- Step 2: Download JA Obelisk theme for Easyblog
- Step 3: Extract zip file and upload to your your_site_folder. You should see folder ja_obelisk in your_site_folder/components/com_easyblog/themes.
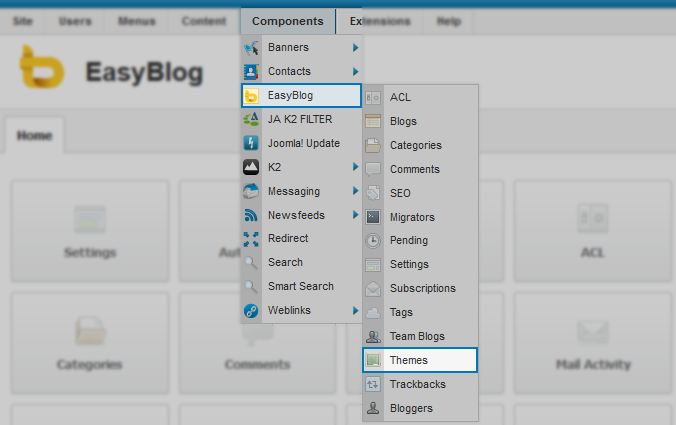
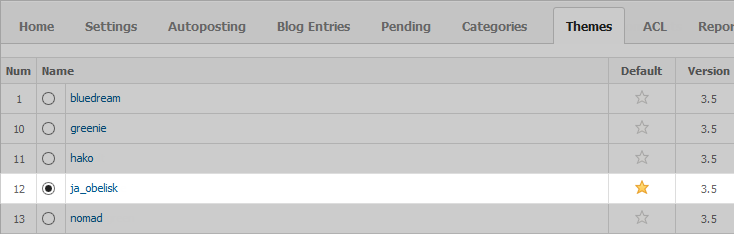
- Step 4: Go to back-end panel >> Components >> Easyblog >> Themes >> select ja_obelisk.
The following screenshots are for the Step 4.
- Access: Components >> Easyblog >> Themes
- Change the default theme to ja_obelisk
1.3 Configure EasyBlog Forum Component
Recommendation:
Most of settings are default settings, when you select ja-obelisk theme, you will get the almost same style as our demo.
1.4 EasyBlog Module Configuration
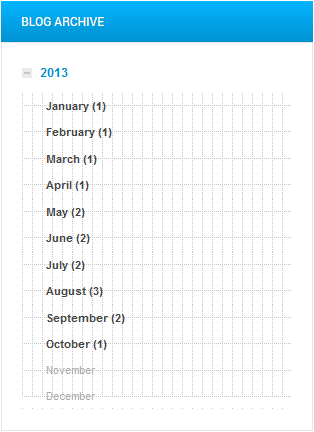
1.4.1 Blog Archive Module
Module Position : sidebar-1
Module Suffix : highlight
- Back-end Settings
- Front-end appearance
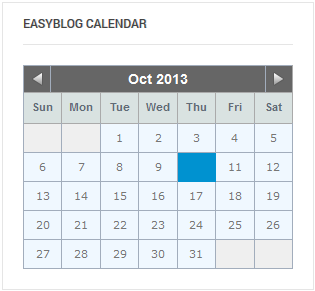
1.4.2 EasyBlog Calendar Module
Module Position : sidebar-1
Module Suffix : NOT USED
- Back-end Settings
- Front-end appearance
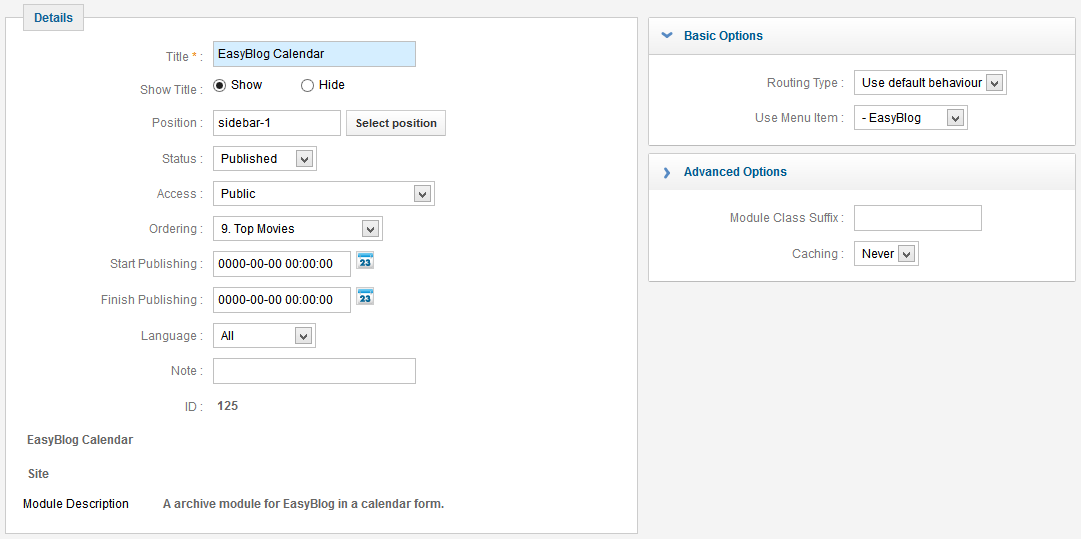
1.4.3 EasyBlog Latest Blogs Module
Module Position : sidebar-1
Module Suffix :  highlight
- Back-end Settings
- Front-end appearance
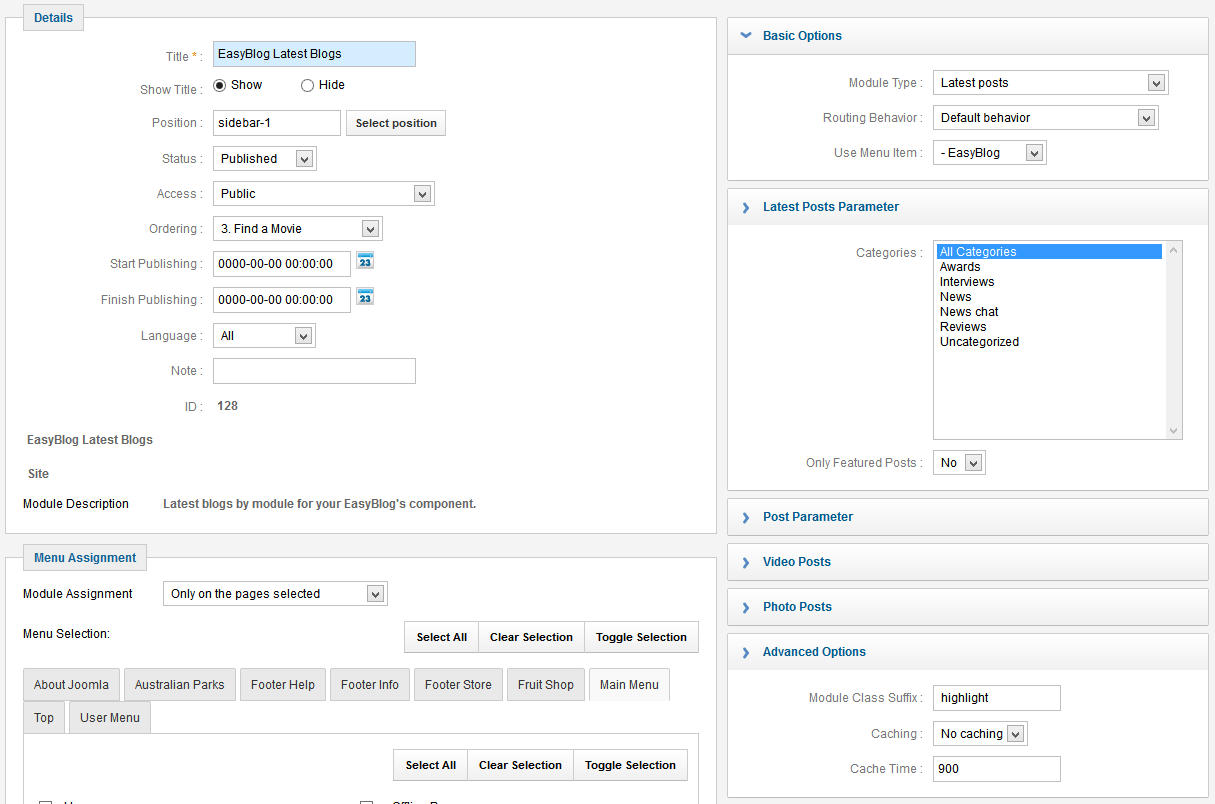

1.4.4 EasyBlog Tag Cloud Module
Module Position : sidebar-1
Module Suffix : NOT USED
- Back-end Settings
- Front-end appearance
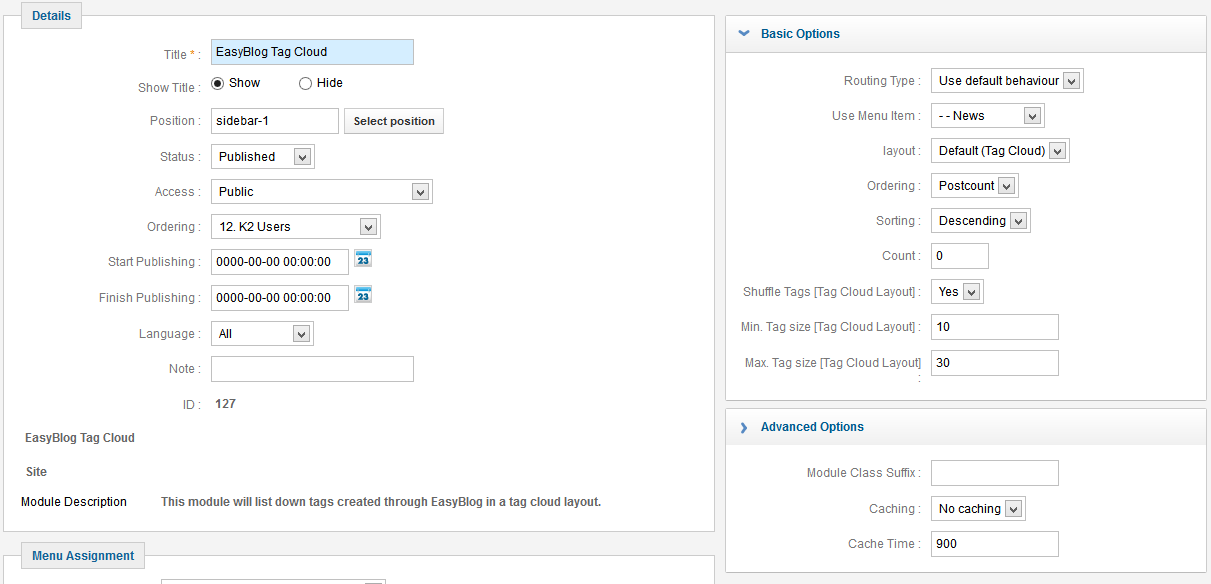

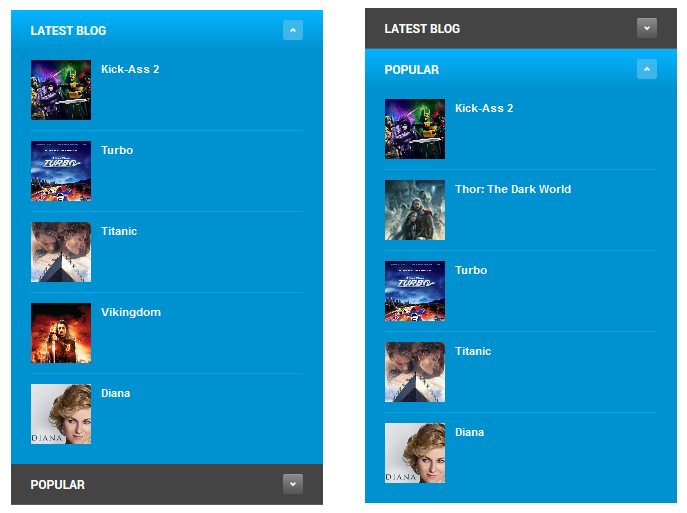
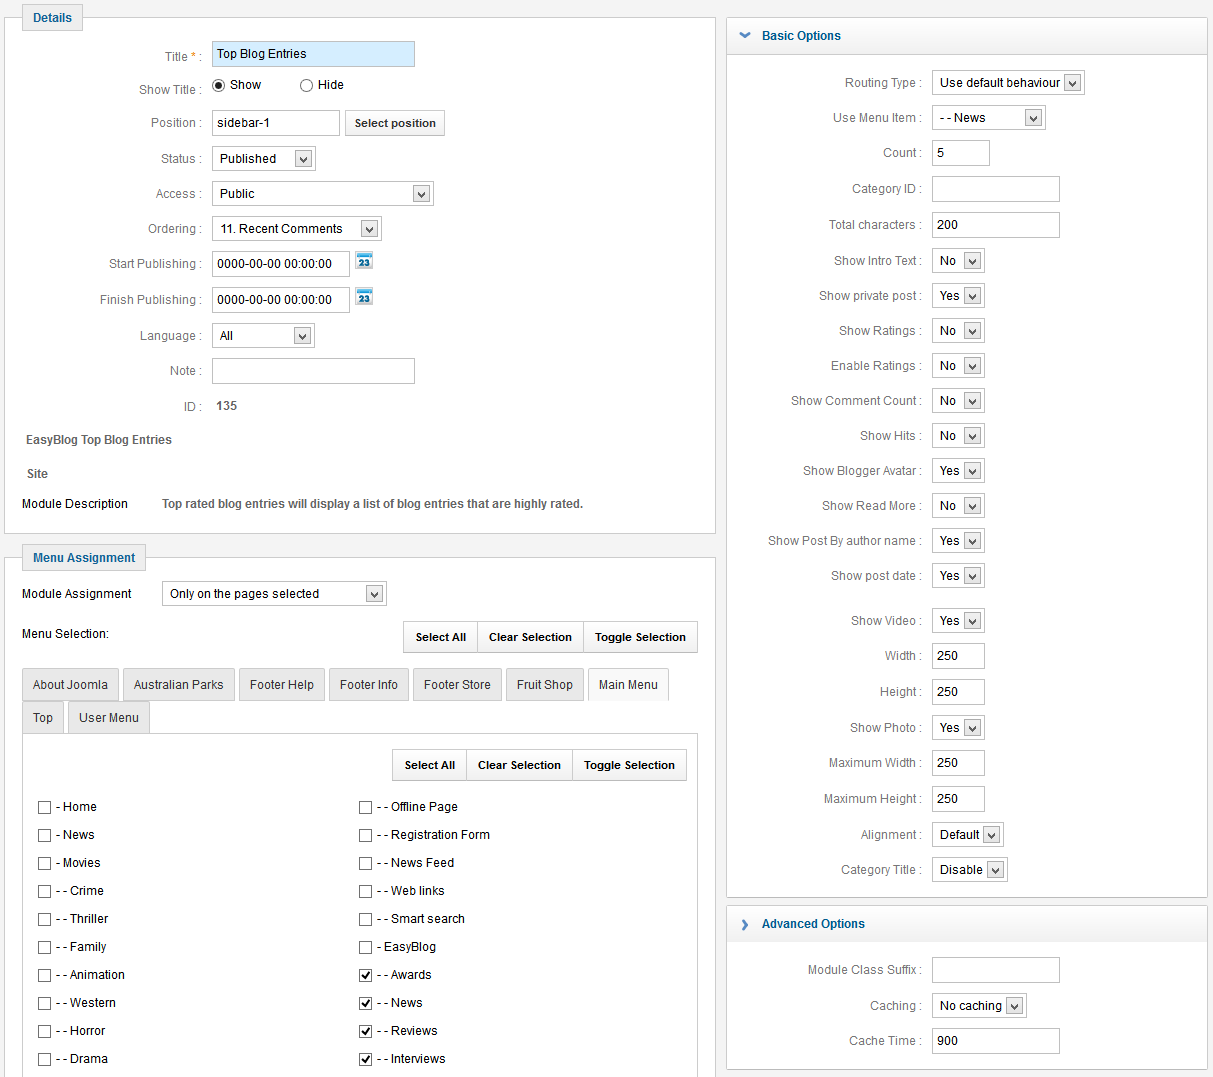
1.4.5 Top Blog Entries Module
Module Position : sidebar-1
Module Suffix : NOT USED
- Back-end Settings
- Front-end appearance

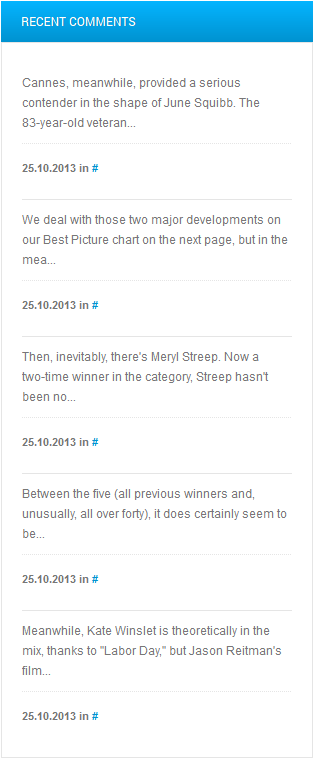
1.4.6 Easyblog Latest Comment Module
Module Position : sidebar-1
Module Suffix : highlight
- Back-end Settings
- Front-end appearance
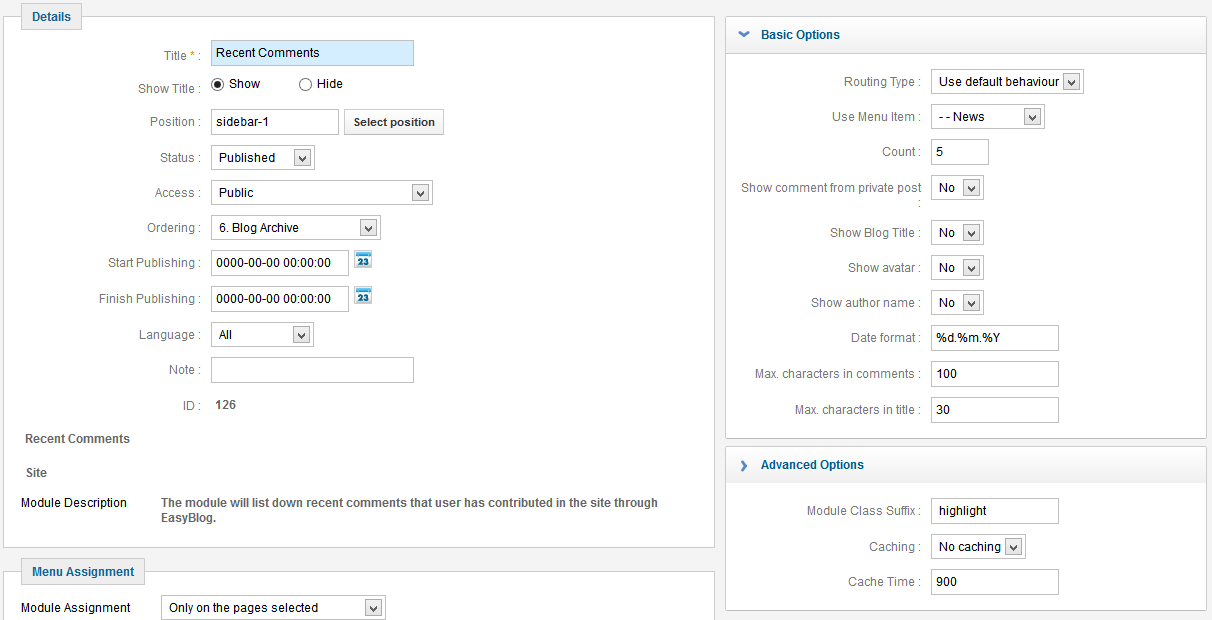
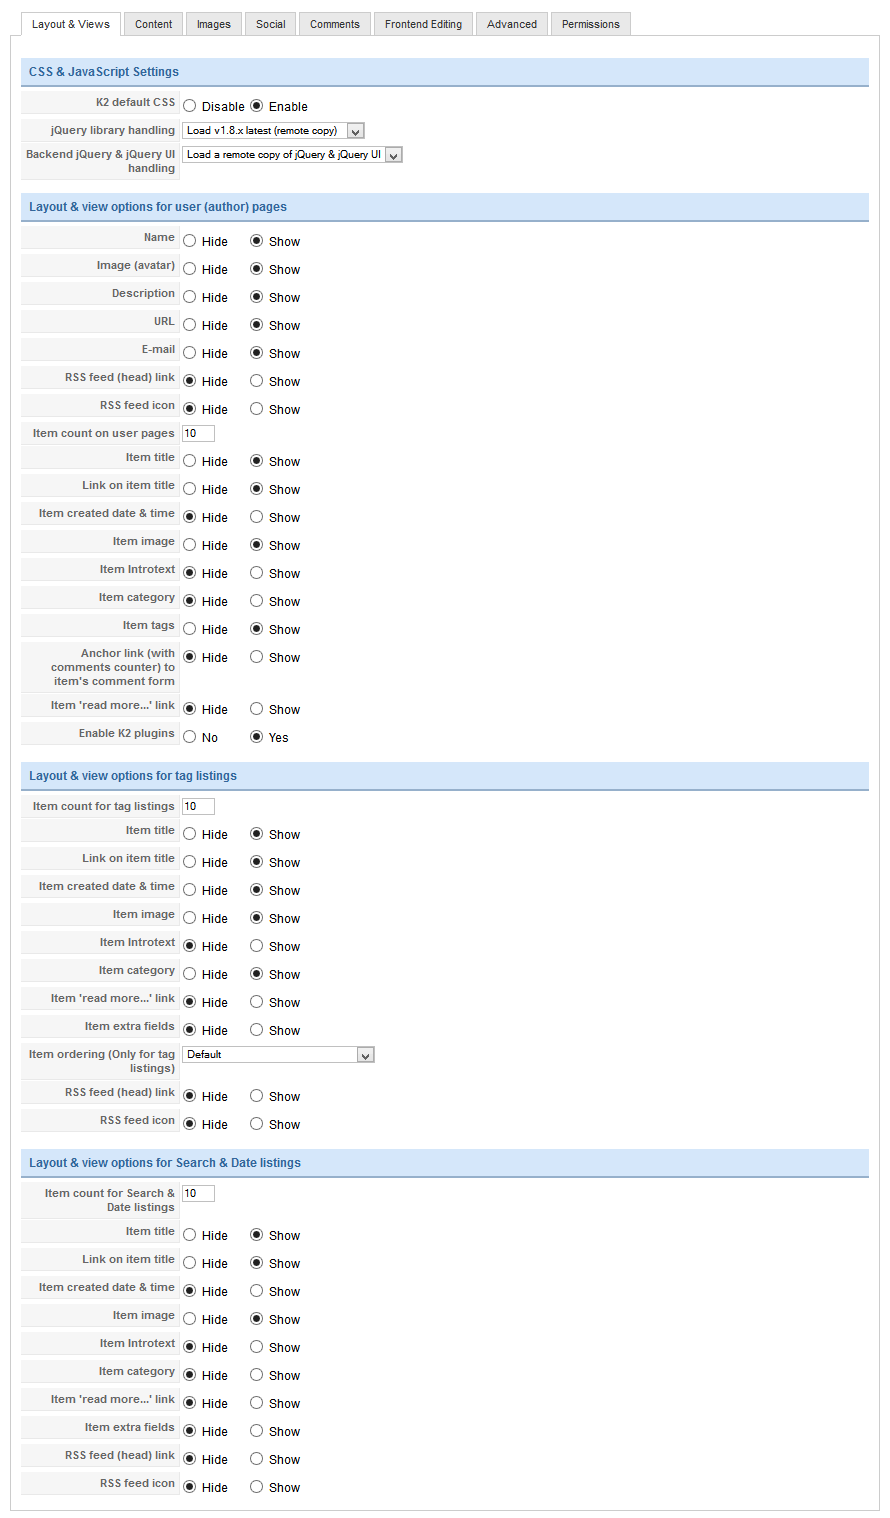
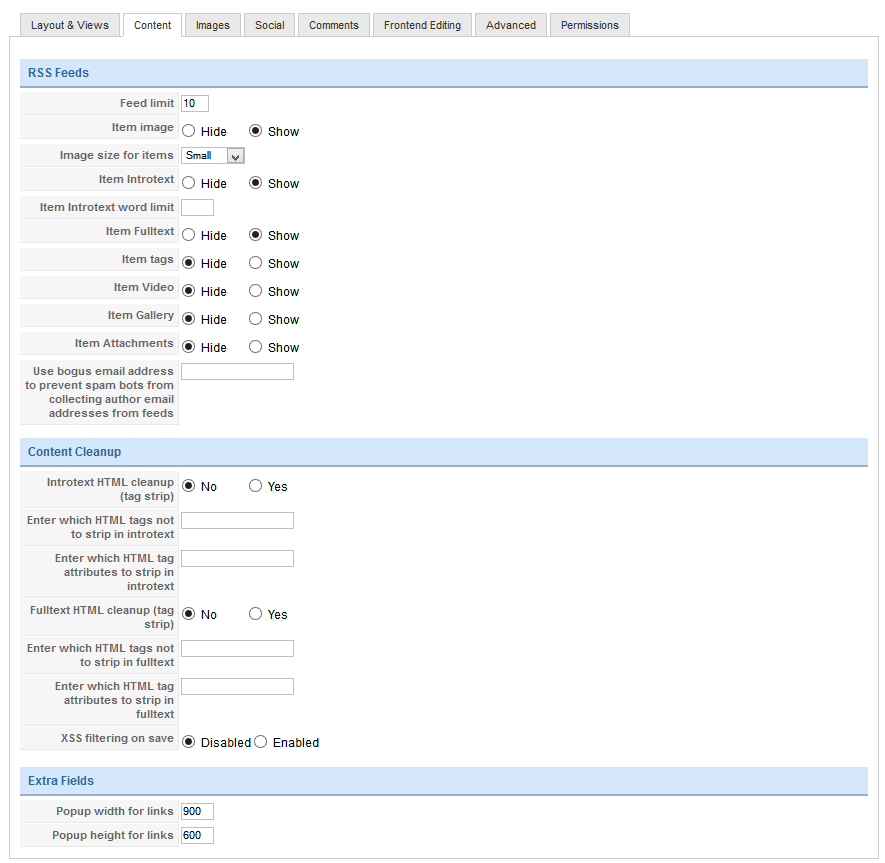
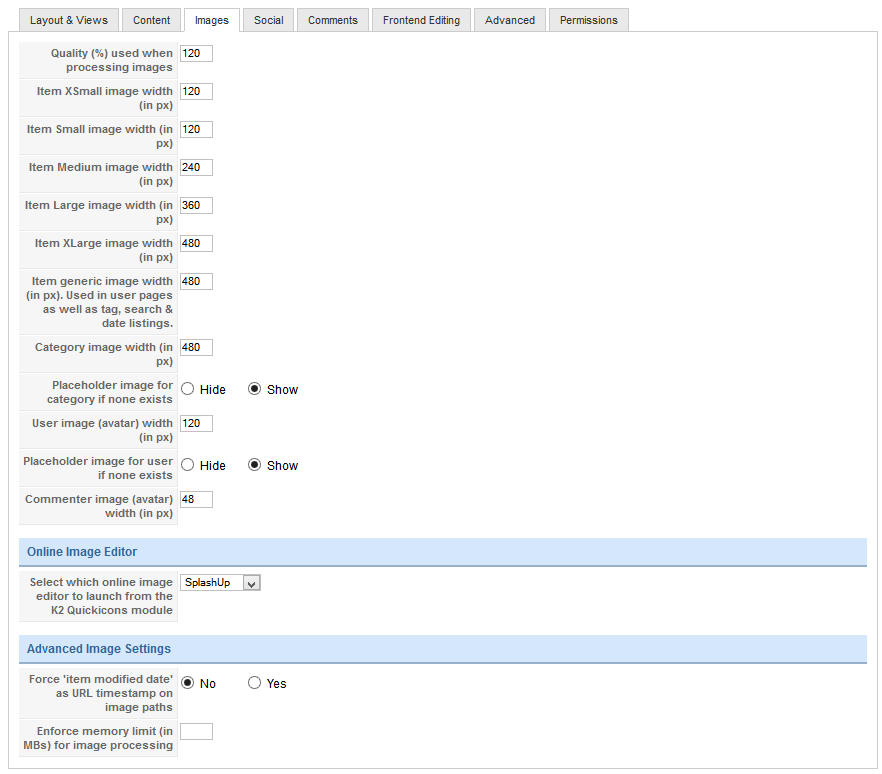
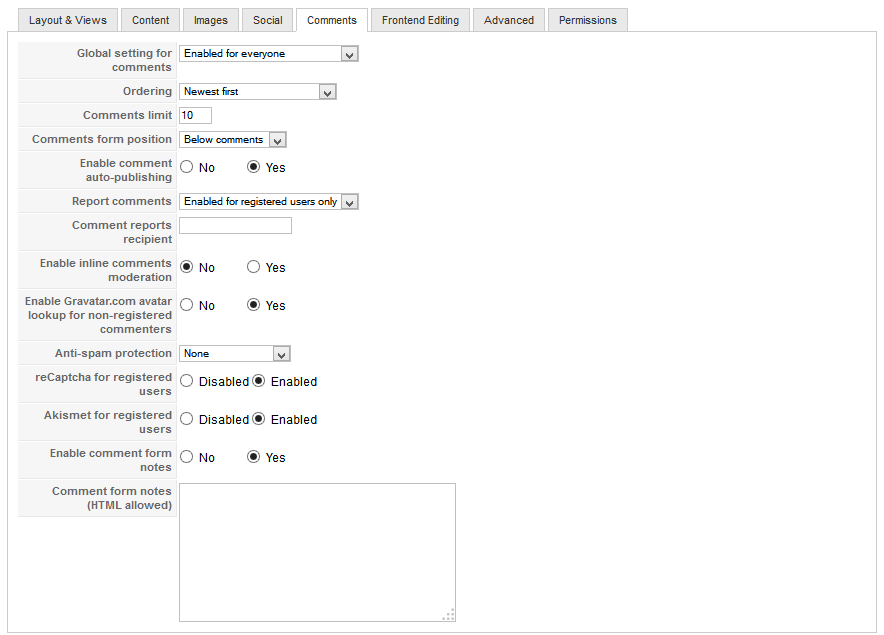
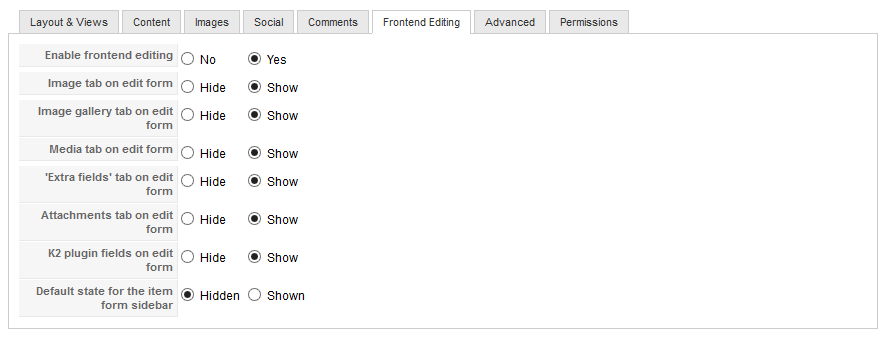
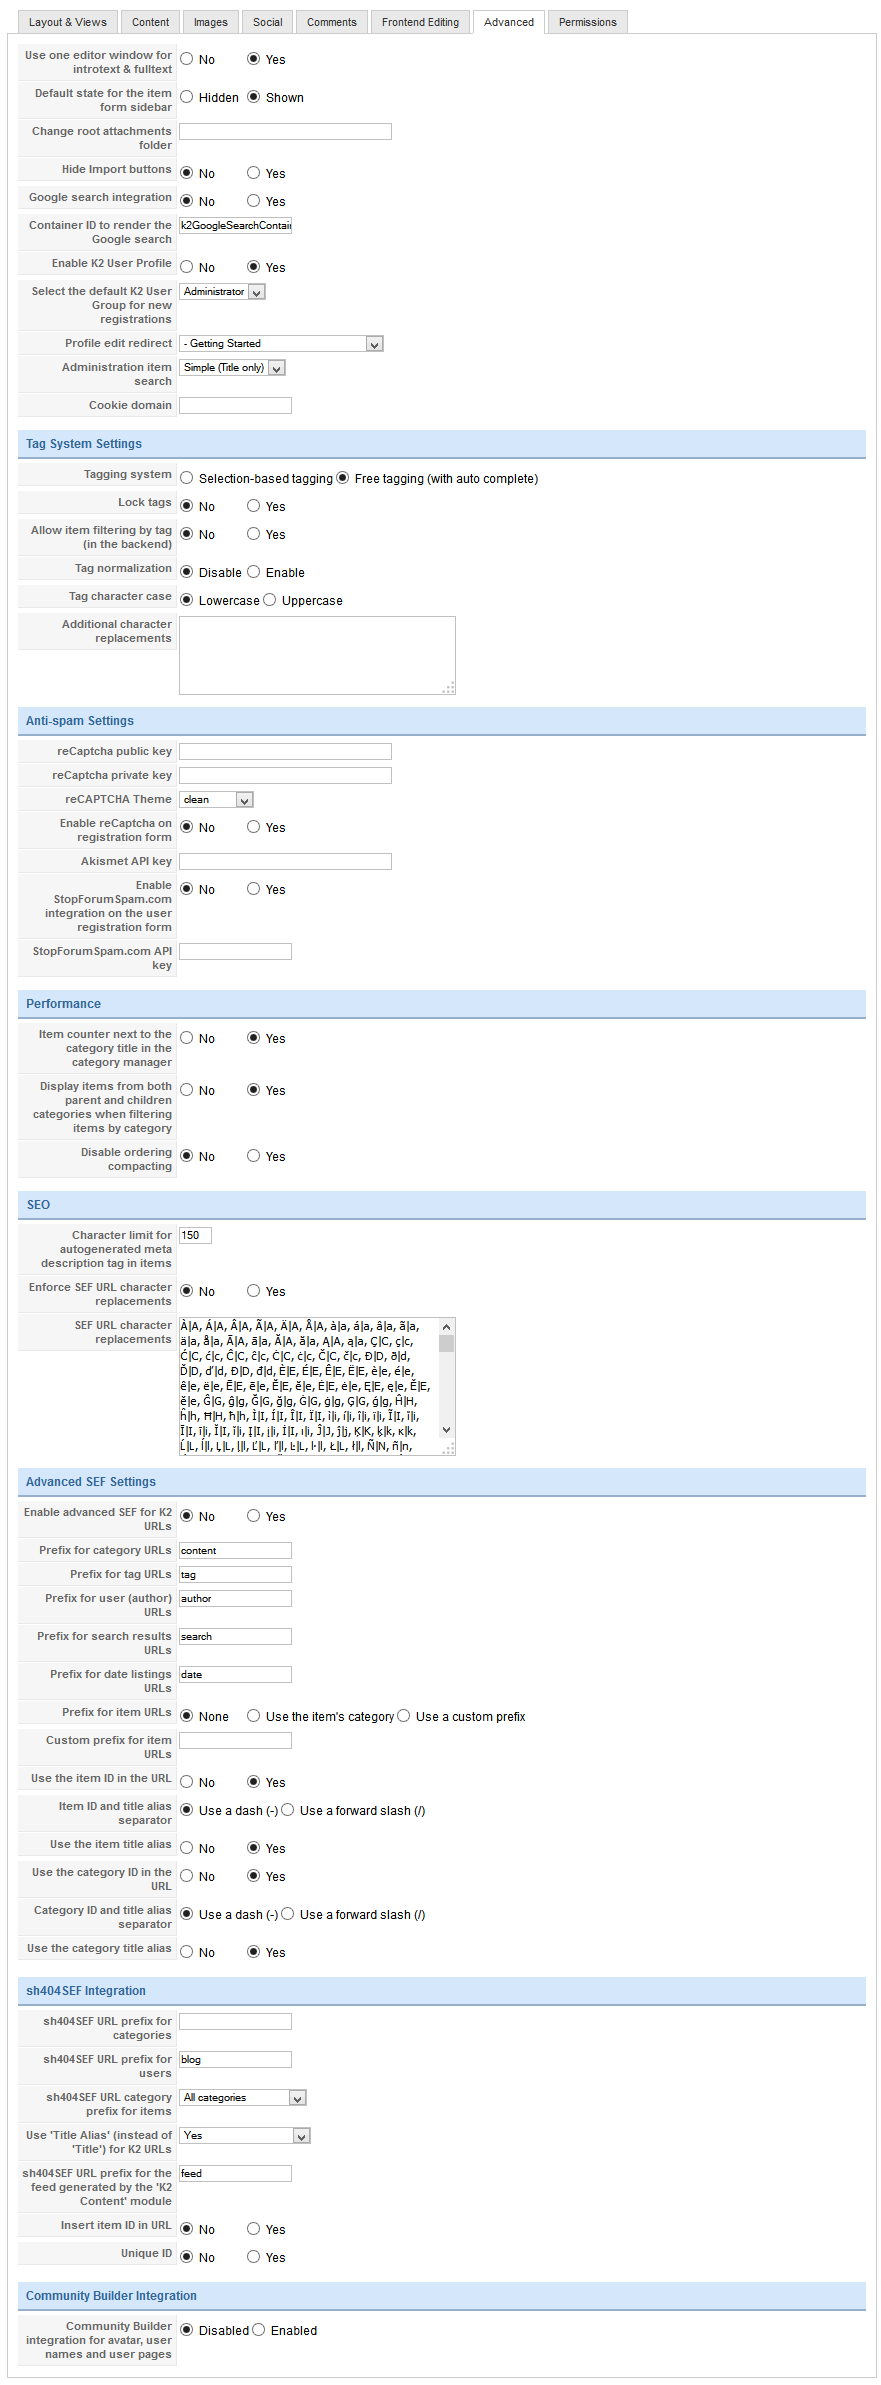
2. K2 Component
2.1 Configure K2 component
If you are new to this Joomla component, please read this guide.
K2 Installation Documentation2.2 Global Configuration: Click on the Parameter button on the right
Back-end Setting
Note:
Most of settings are default settings, so the provided back-end settings above should be useful only when you want to have the exact same layout like our demo.
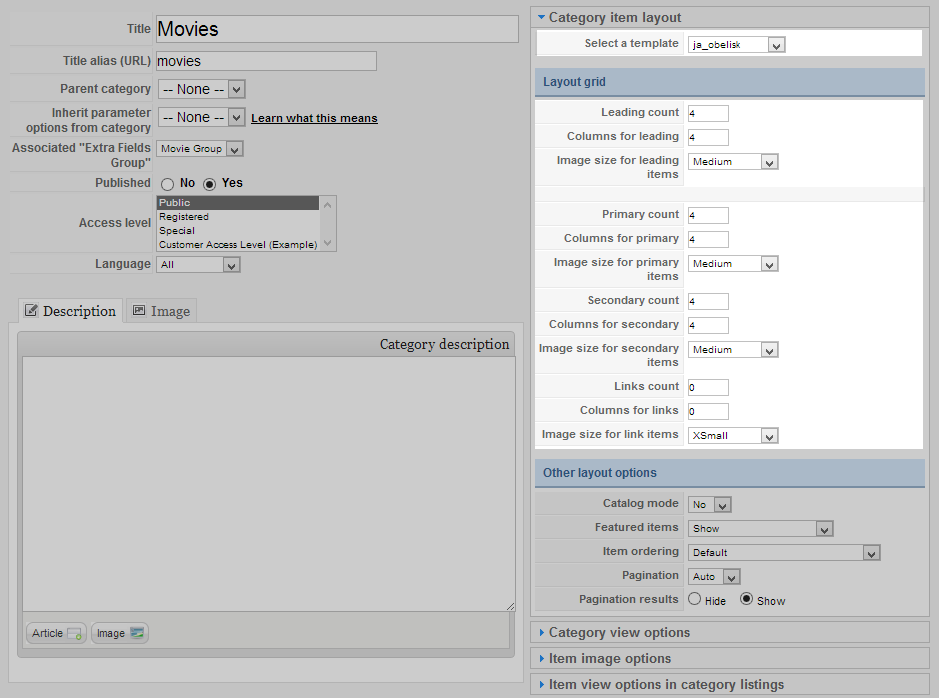
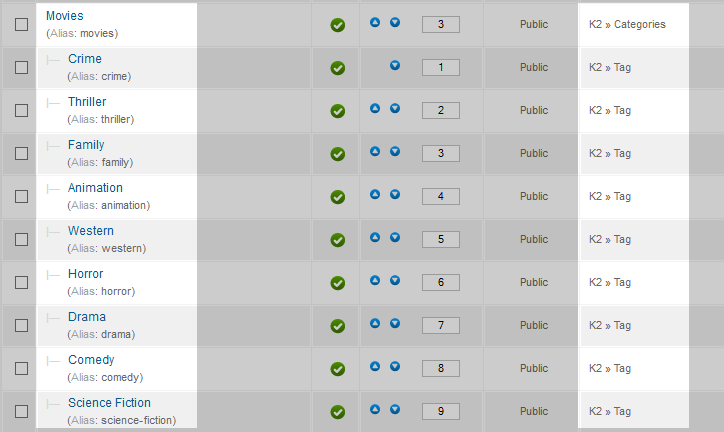
2.3 Category Configuration
Open the configuration panel by navigating to Components >> K2 >> Categories
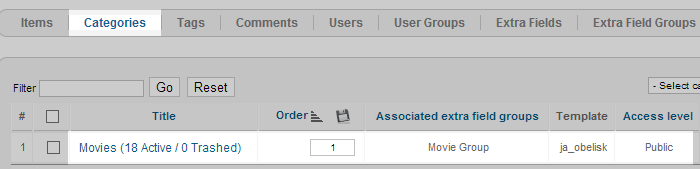
Category Settings
Movies category setting
Note:
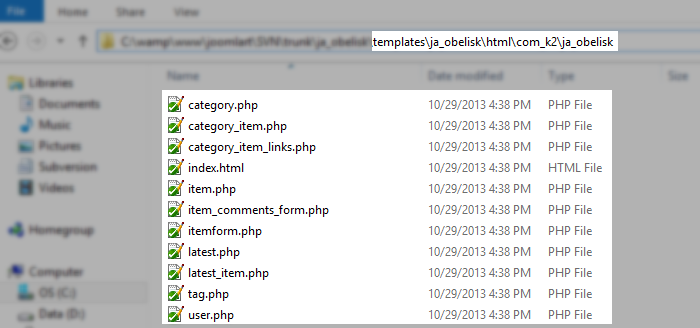
JA Obelisk supports K2 by default with specific style. We also customized and override the default K2 template, so please make sure you select the customized template for categories.
The overridden template folder should be located in: templates\ja_obelisk\html\com_k2.
2.4 K2 module configuration
2.4.1 K2 Content Module
2.4.1.1 Popular
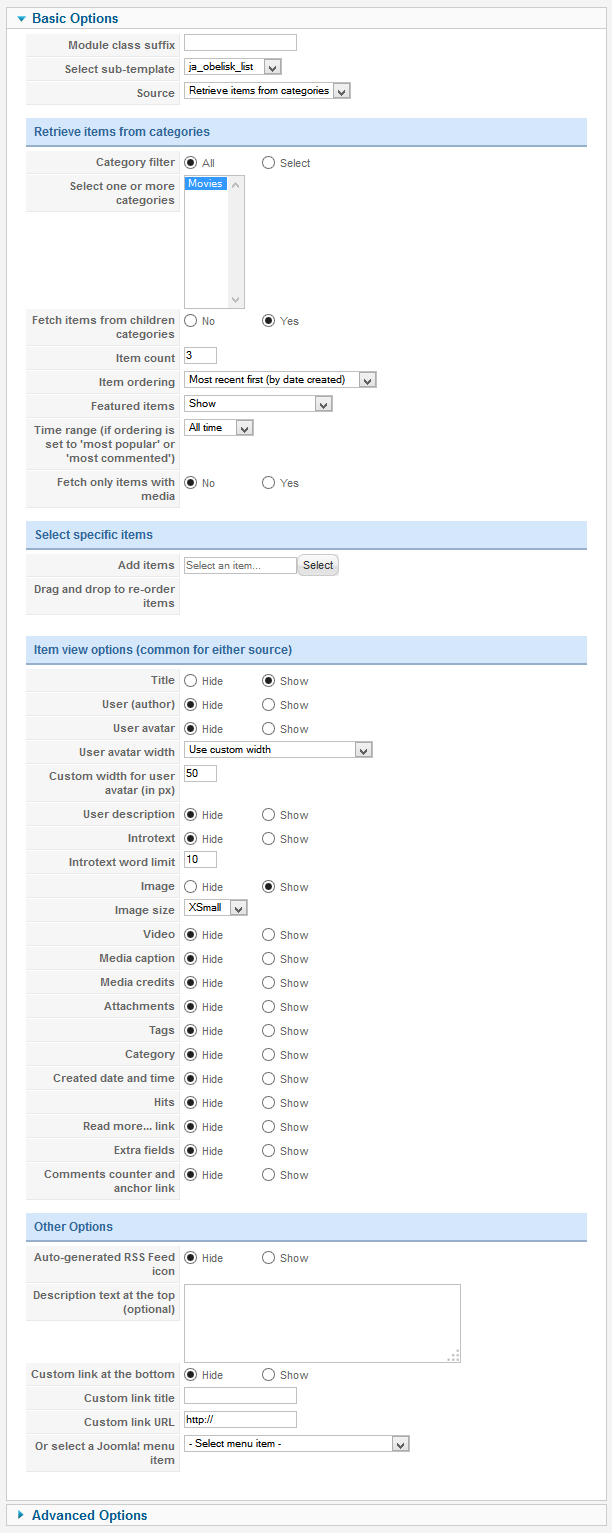
Module Position : ja-obelisk-accordion
Module Suffix : NOT USED
Select sub-template: ja_obelisk_list
- Back-end Settings
- Front-end appearance
2.4.1.2 Lastest Movies
Module Position : ja-obelisk-accordion
Module Suffix : NOT USED
Select sub-template: ja_obelisk_list
- Back-end Settings
- Front-end appearance

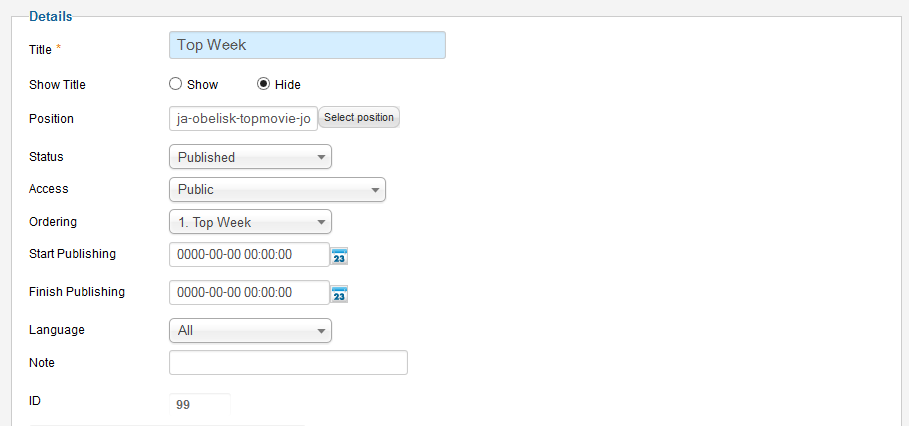
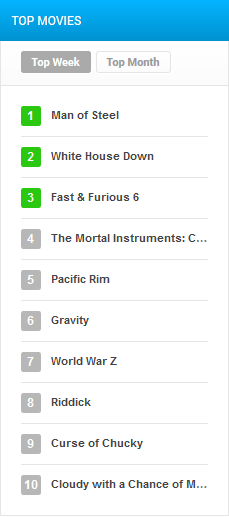
2.4.1.3 Top Week
Module Position : ja-obelisk-topmovie
Module Suffix : NOT USED
Select sub-template: ja_obelisk
- Back-end Settings
- Front-end appearance
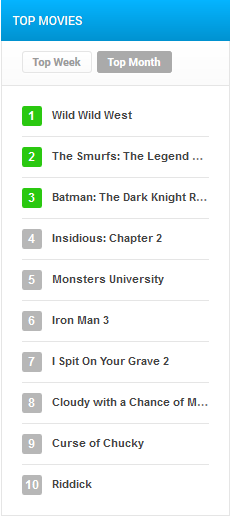
2.4.1.4 Top Month
Module Position : ja-obelisk-topmovie
Module Suffix : NOT USED
Select sub-template: ja_obelisk
- Back-end Settings
- Front-end appearance
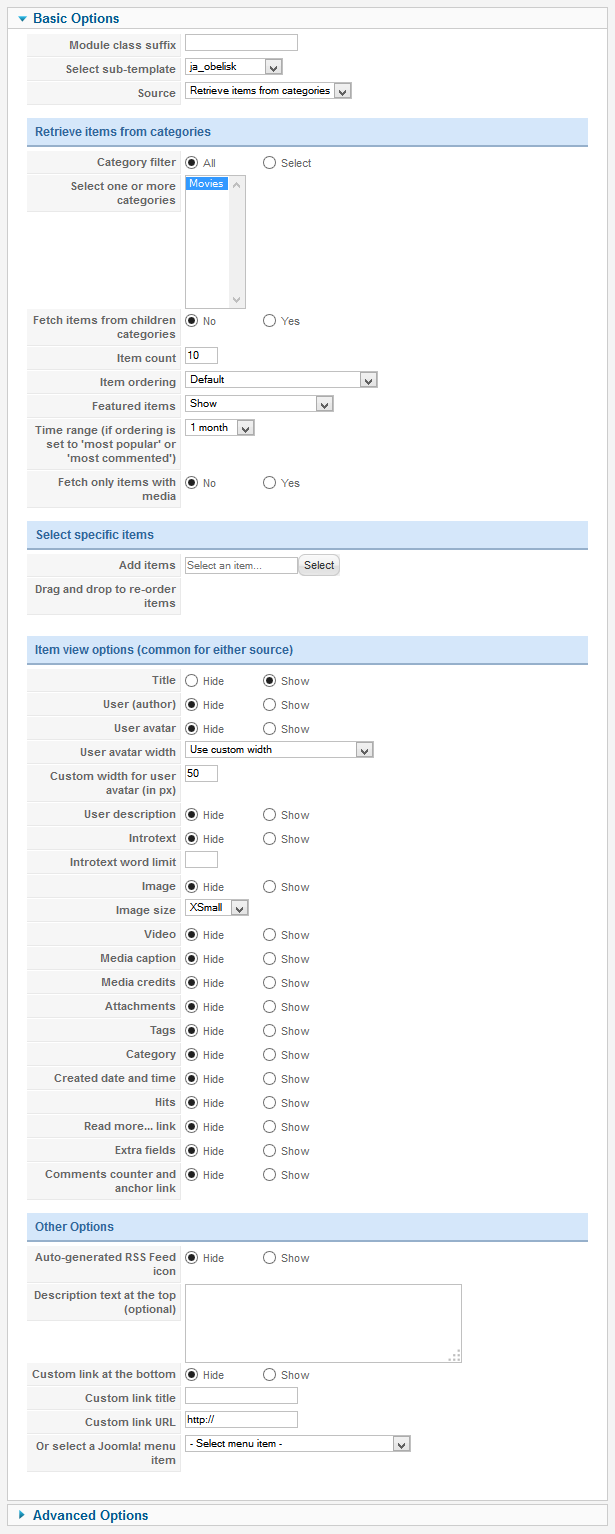
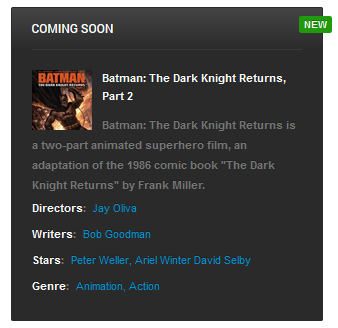
2.4.1.5 Coming Soon
Module Position : sidebar-2
Module Suffix : badge badge-new
Select sub-template: ja_obelisk_list
- Back-end Settings
- Front-end appearance
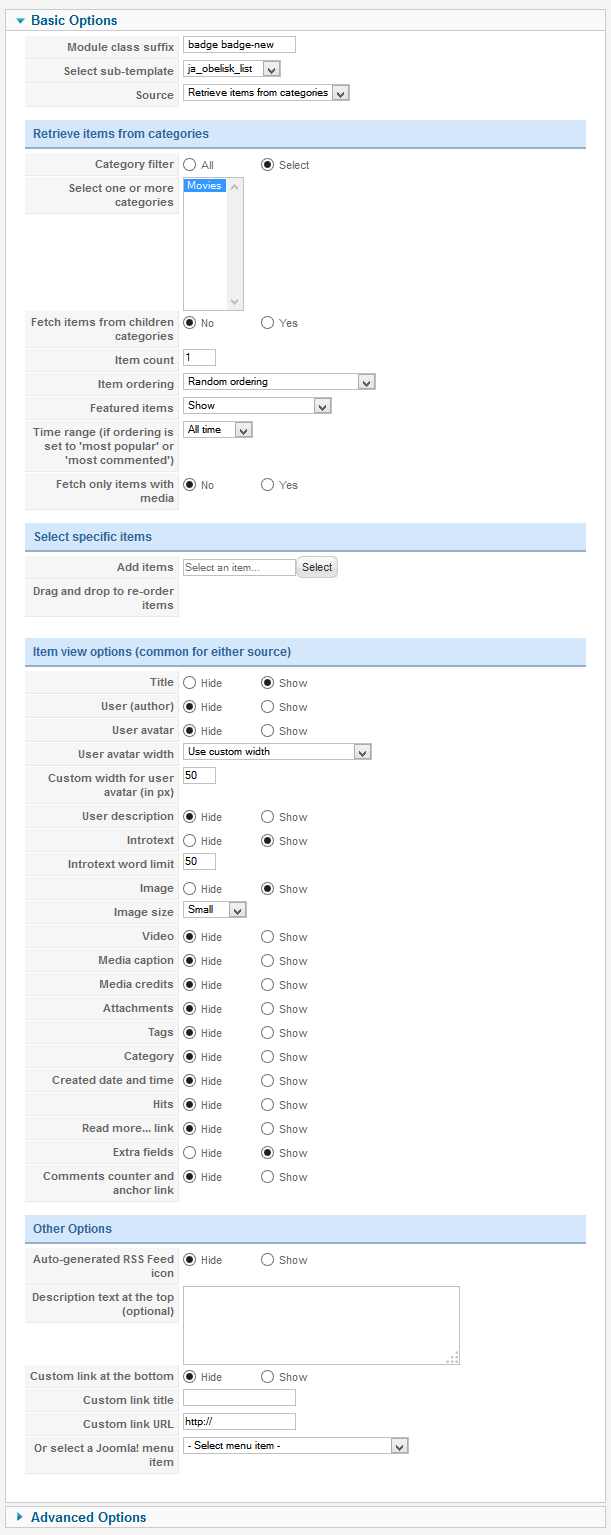
2.4.2 K2 Tools Module
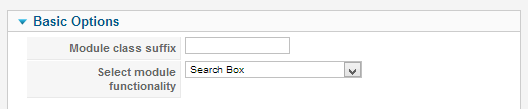
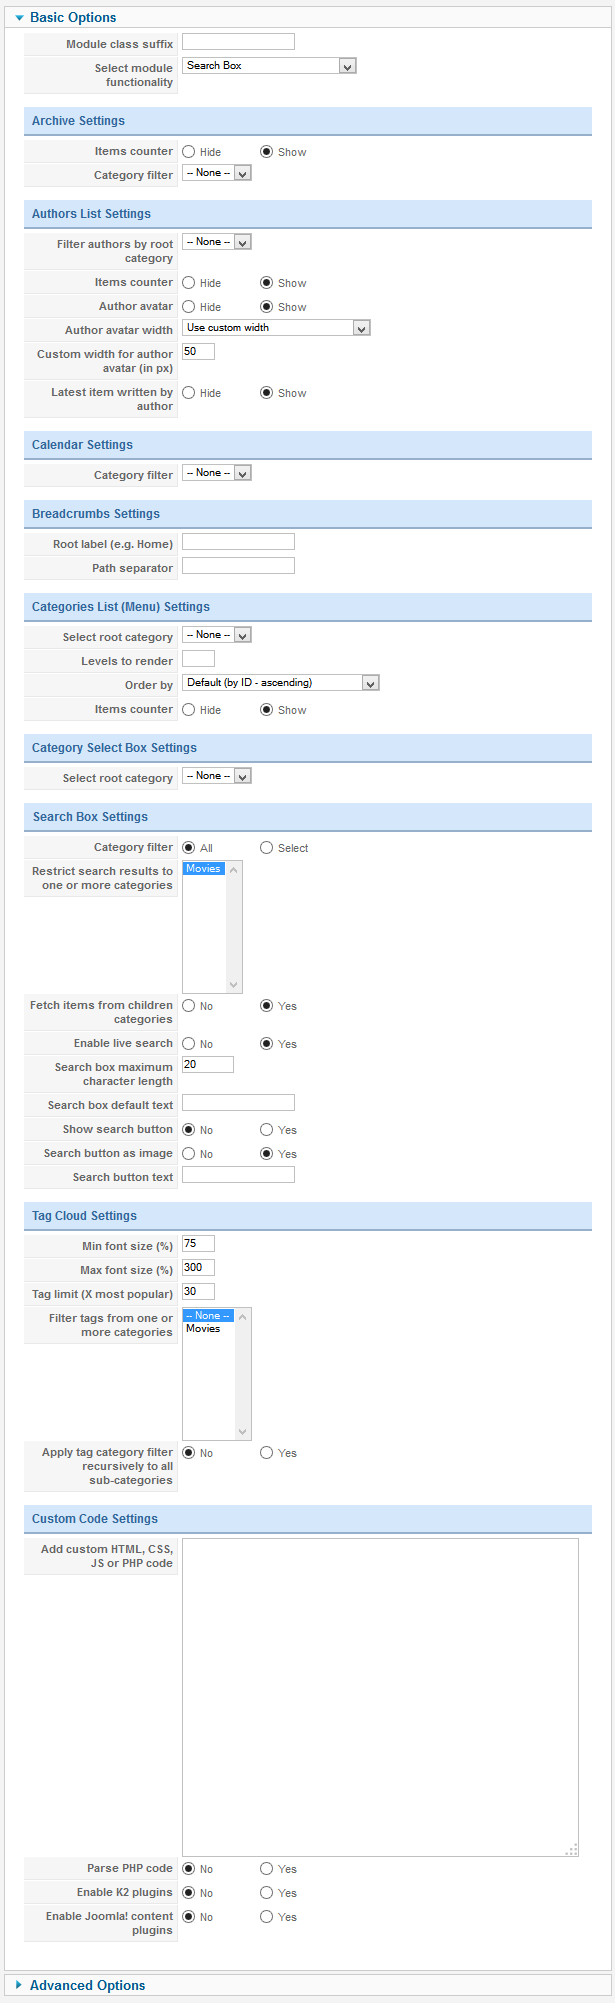
2.4.2.1 K2 Search Modules
Module Position : head-search
Module Suffix : NOT USED
- Back-end Settings
- Front-end appearance

2.4.2.2 Calendar
Module Position : sidebar-1
Module Suffix : no-padding
- Back-end Settings
- Front-end appearance
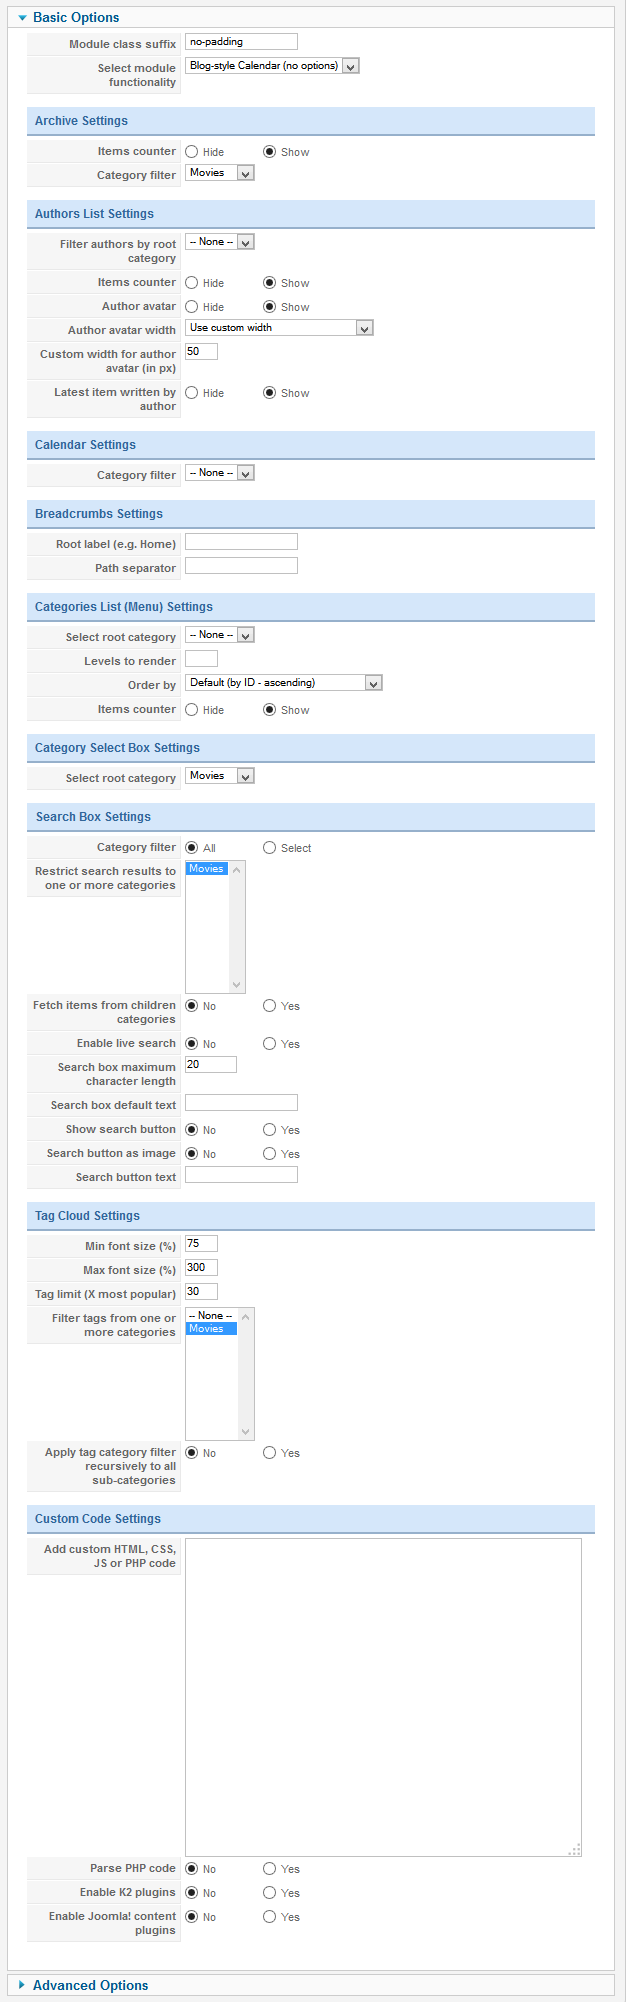

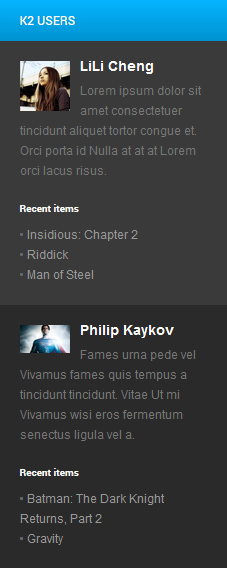
2.4.3 K2 Users Module
Module Position : sidebar-1
Module Suffix : NOT USED
Select sub-template: default
- Back-end Settings
- Front-end appearance
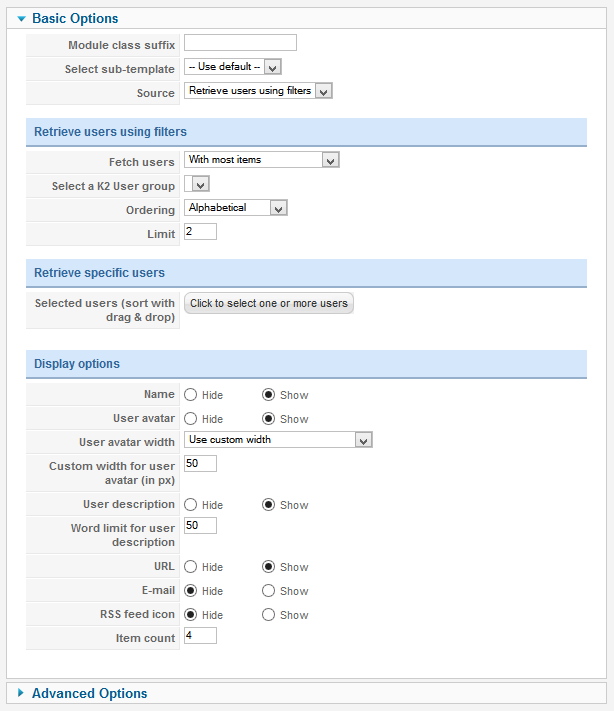
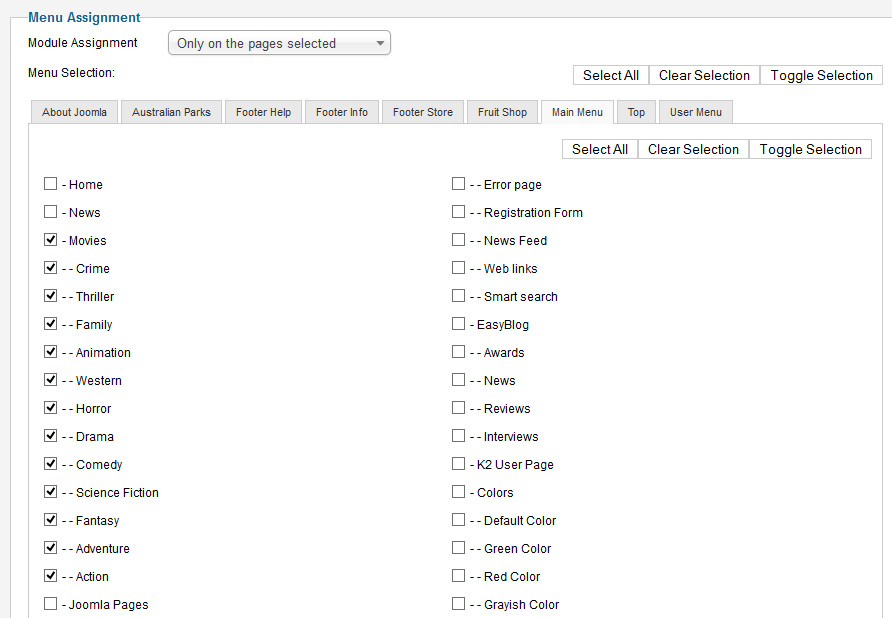
Menu Configuration
1. Megamenu Configuration
Go to Extensions >> Template manager >> JA Obelisk template style, in the Navigation setting to configure Mega Menu.
Step 1: Enable Mega Menu
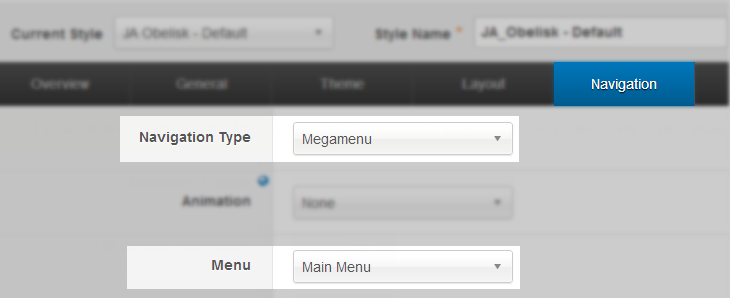
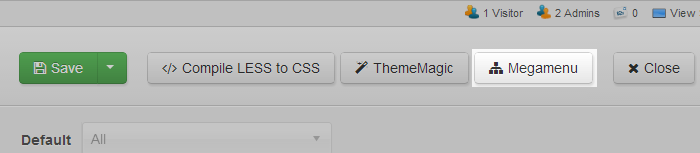
Step 2: Click on the Megamenu button
Step 3: Configure Megamenu
Select the menu that will have Mega Menu enabled then select menu items to configure.
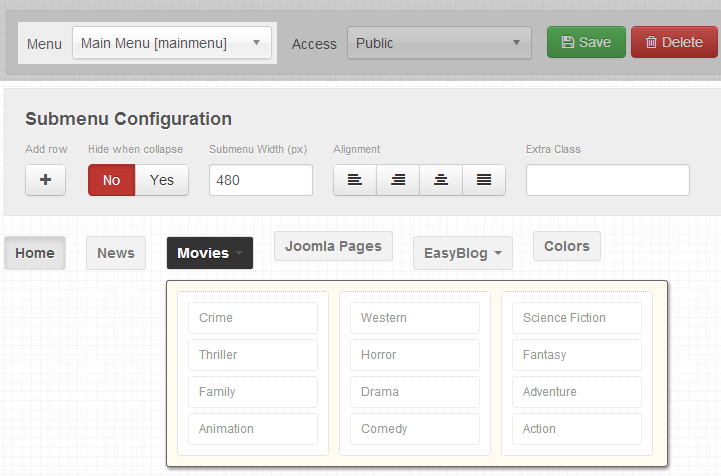
Note:
Megamenu is a good solution for a well organized menu system. In JA Obelisk, we display menu items in column, but Megamenu can do many other things, you can check the video tutorial to see the more detailed features of Megamenu.
Mega Menu Configuration
This is the video tutorial for Mega Menu configuration, you will learn how to build up a Mega Menu, how to use Mega Menu settings effectively, how to add icons, how to style menu items with our T3 Framework.
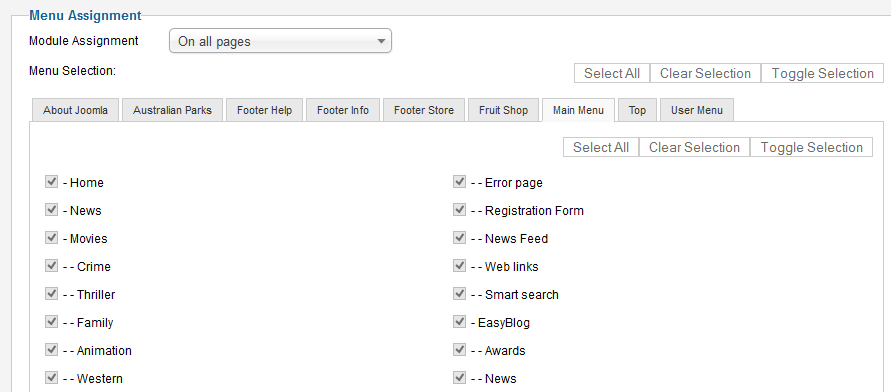
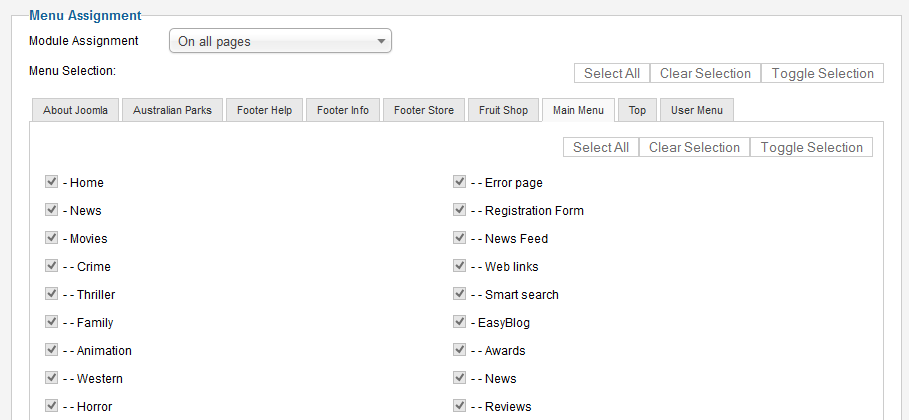
2. Menu Configuration
Note:
- Main Menu is a very important part in your site, it's the navigation that user most uses and it shows your site structure. A well organized menu sytem will help user travel around your site easily.
- The back-end setting creenshots of menu focus on main settings, the default settings could be ignored.
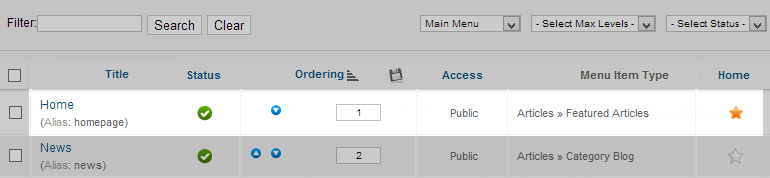
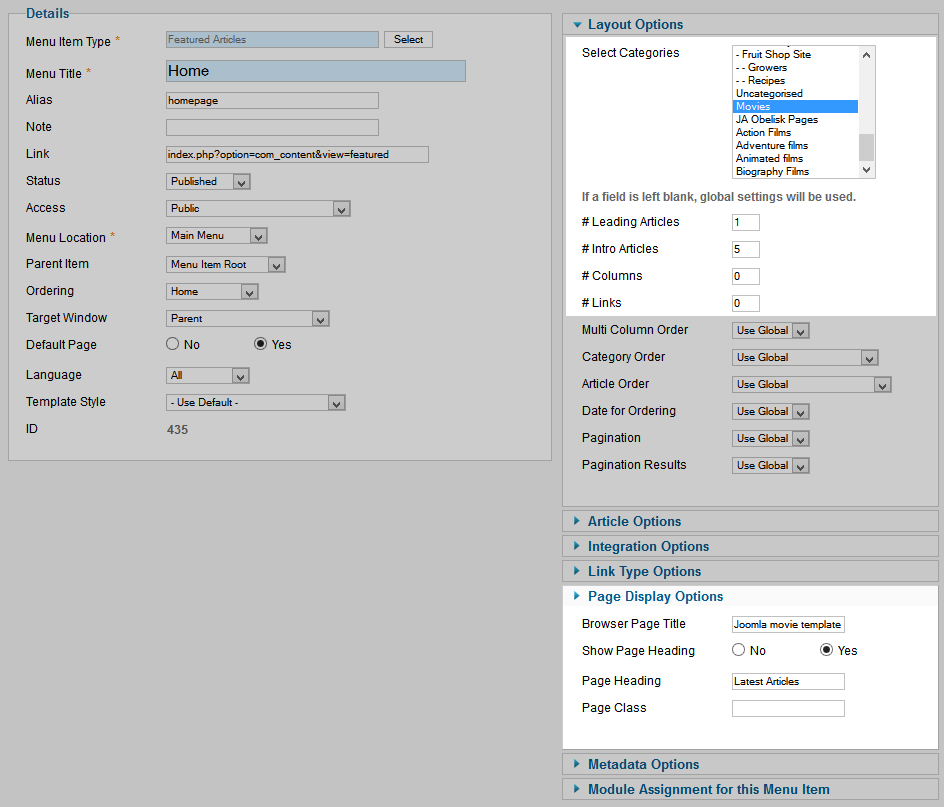
2.1 Home Menu
Front-end appearance
Backend Settings : Main Menu Items (parent & child)
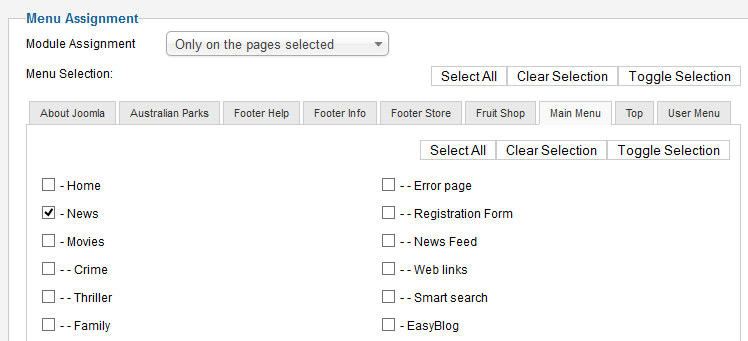
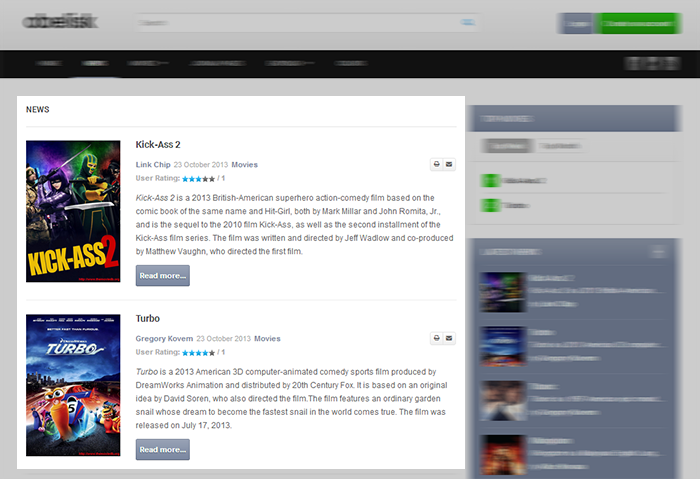
2.2 News Menu
Front-end appearance
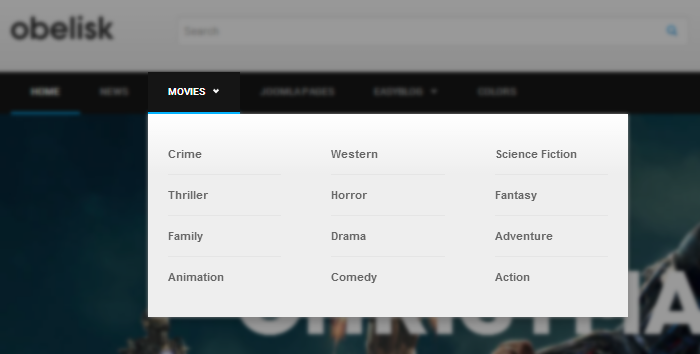
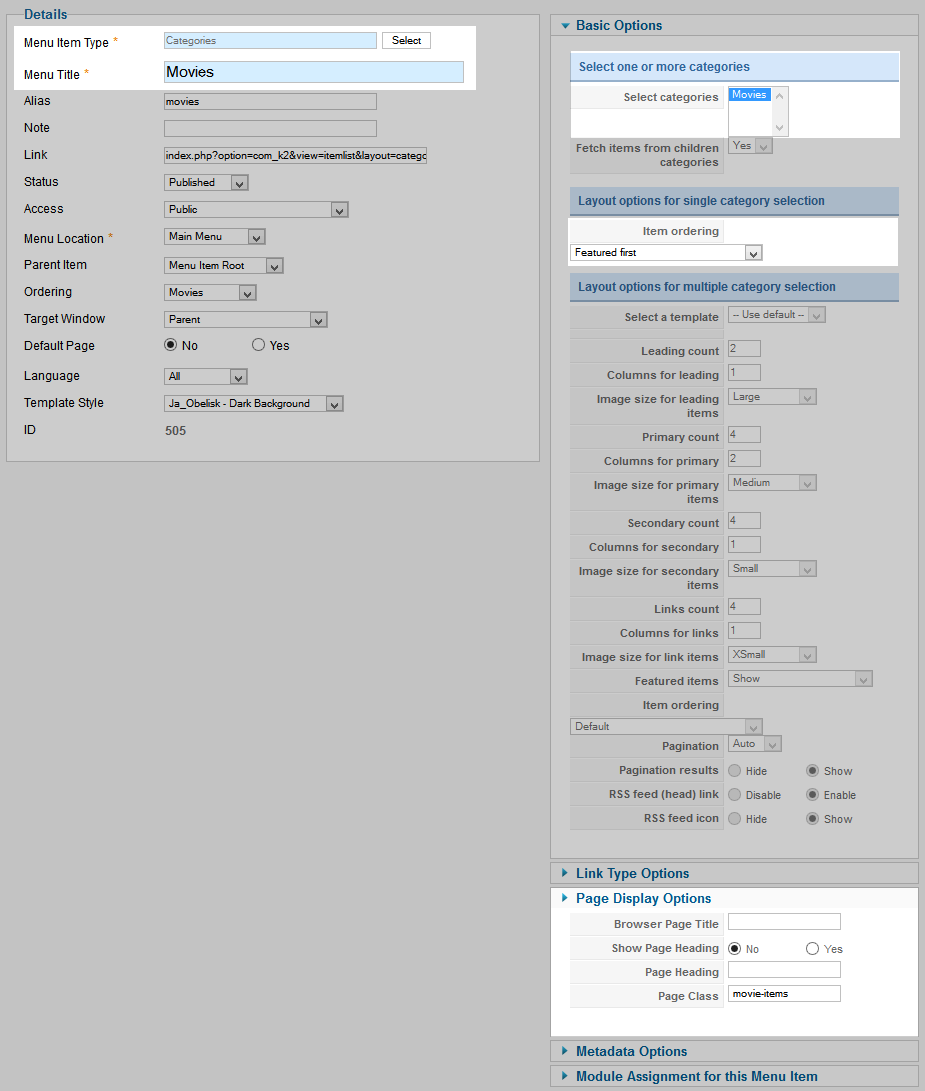
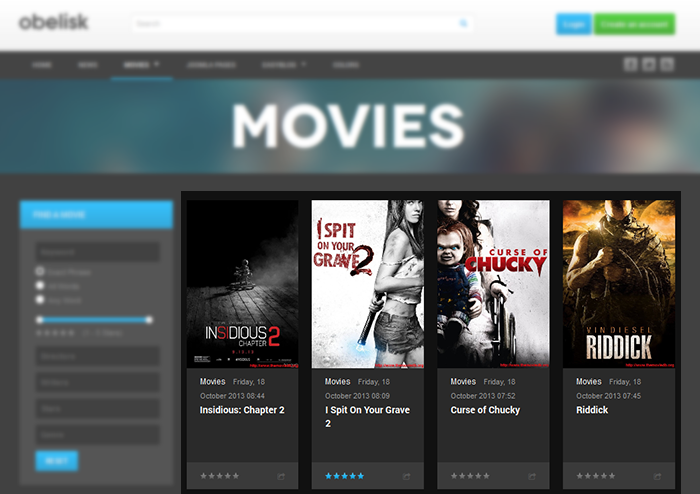
2.3 Movie Menu
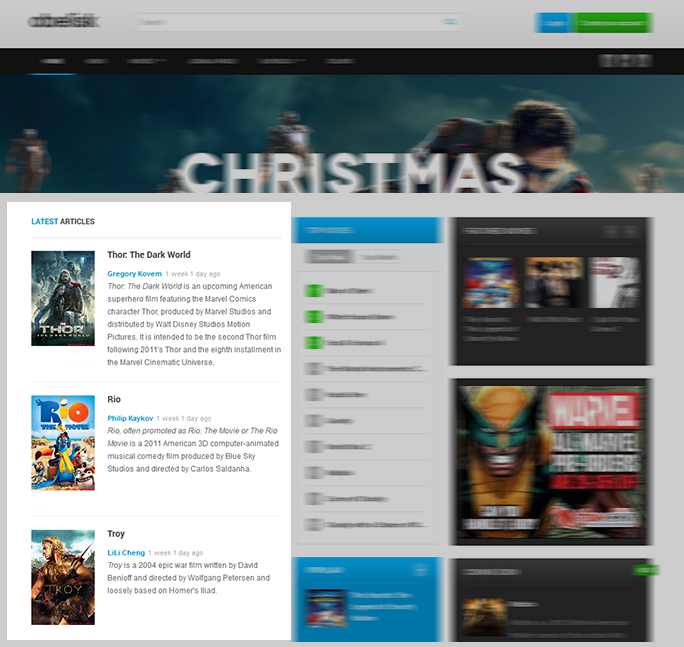
2.3.1 Movie Menu
Front-end appearance
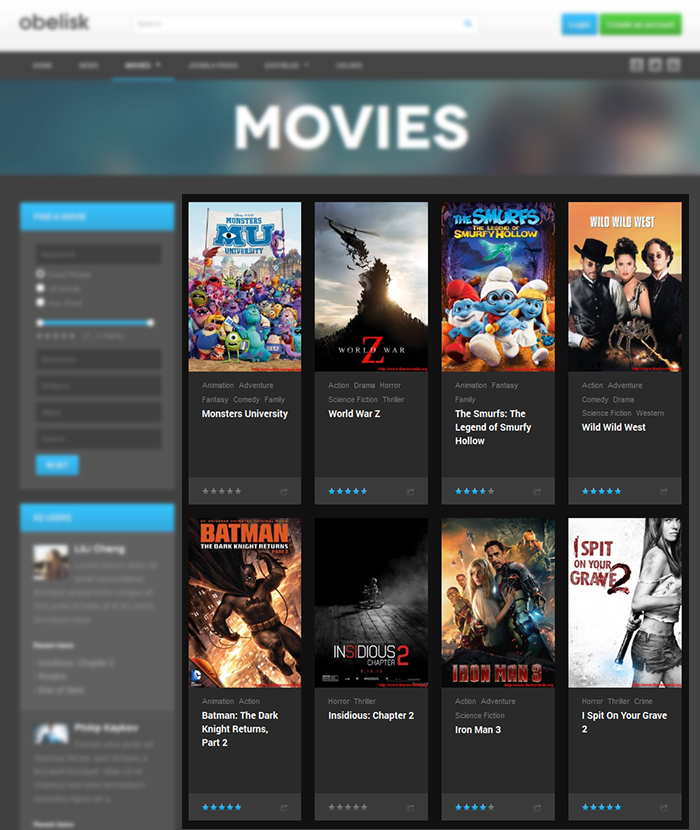
Backend Settings : Main Menu Items (parent & child)
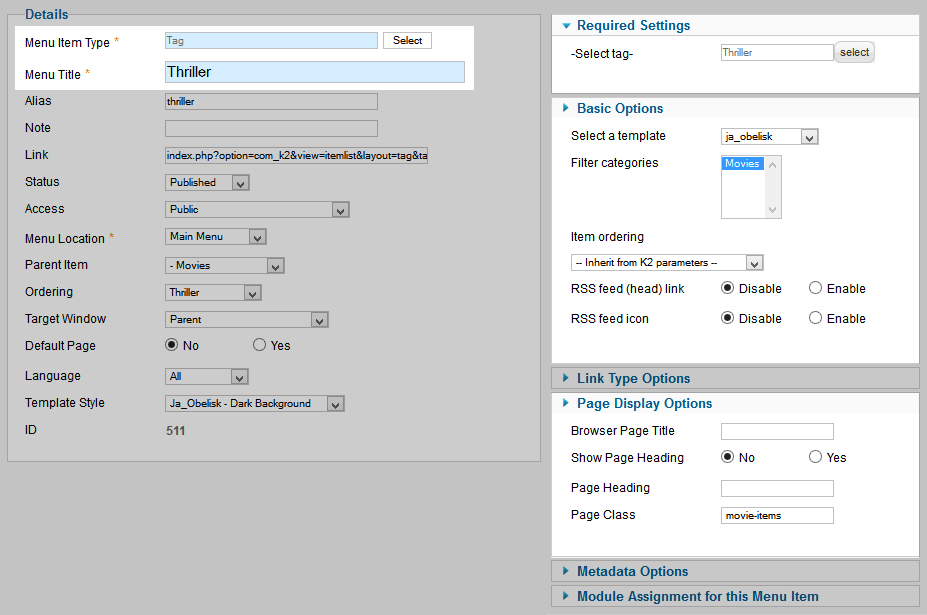
2.3.2 Thriller Menu
Tips:
The page displays items that have selected tag. It's layout and style is the same as Movie menu.
Front-end appearance
Backend Settings : Main Menu Items (parent & child)
Note:
Other menu items in the Movie menu have same settings as the Thriller menu, the difference is the Select tag field.
2.4 Joomla Pages
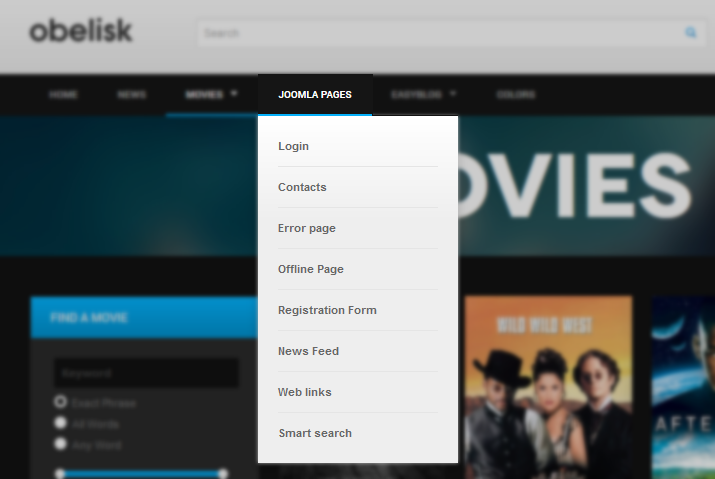
Backend Settings : Main Menu Items (parent & child)
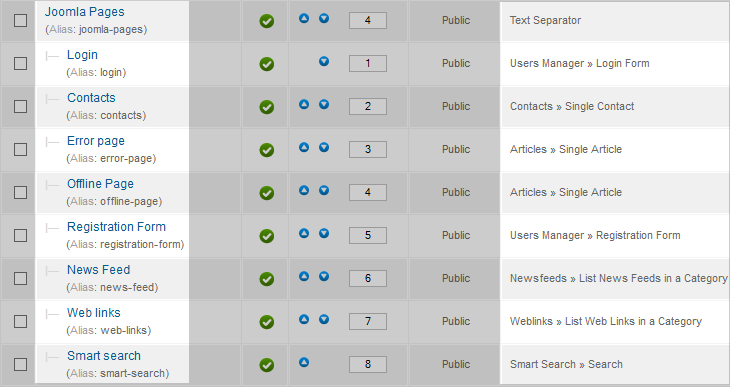
Those default Joomla pages are supported by default with customized style in the comparision with its default style.
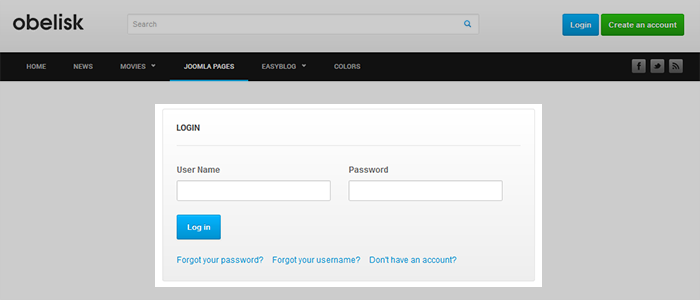
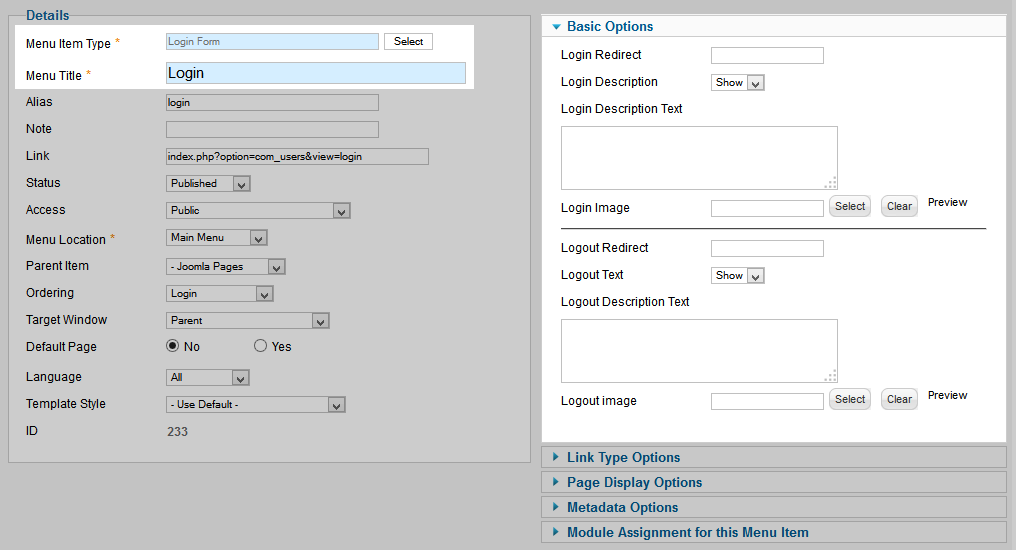
2.4.1 Login Menu
Front-end appearance
2.4.2 Contact Menu
Front-end appearance
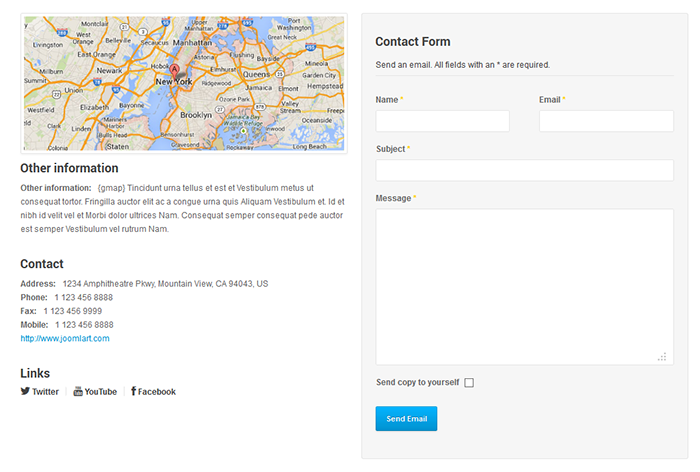
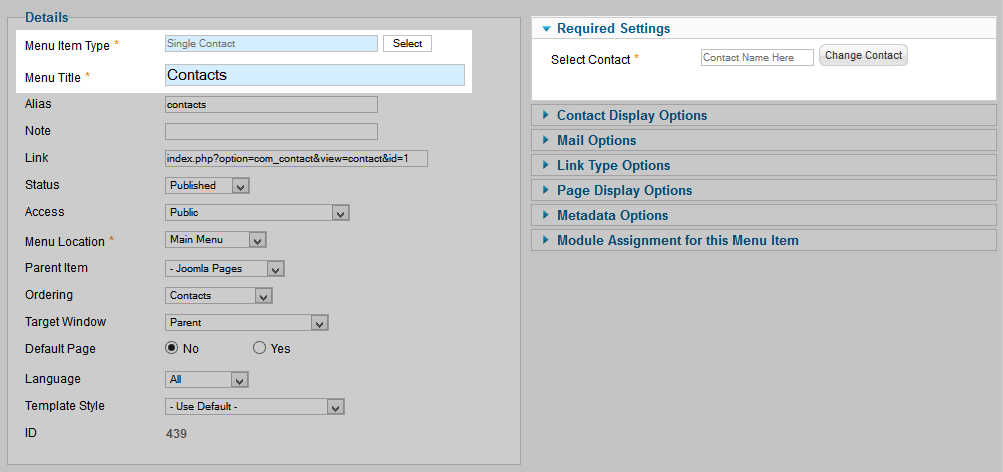
Create Contact Form
The following instruction will guide you how to create contact form as our demo site.
Step 1: go to Components >> Contacts >> Contacts then click on "New" button to create new contact.

Step 2: add content and configure the contact
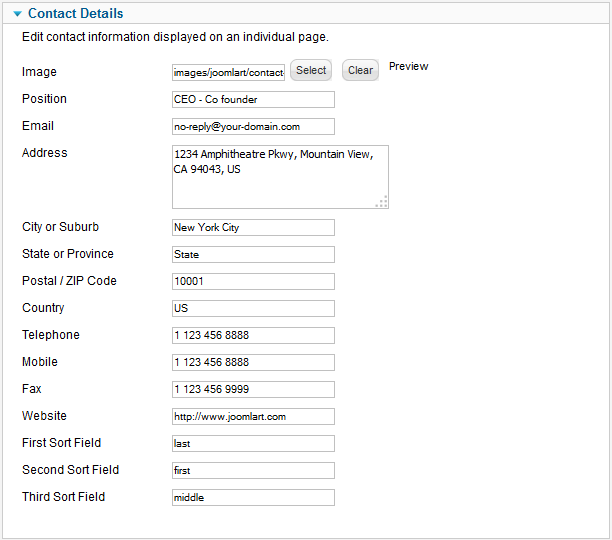
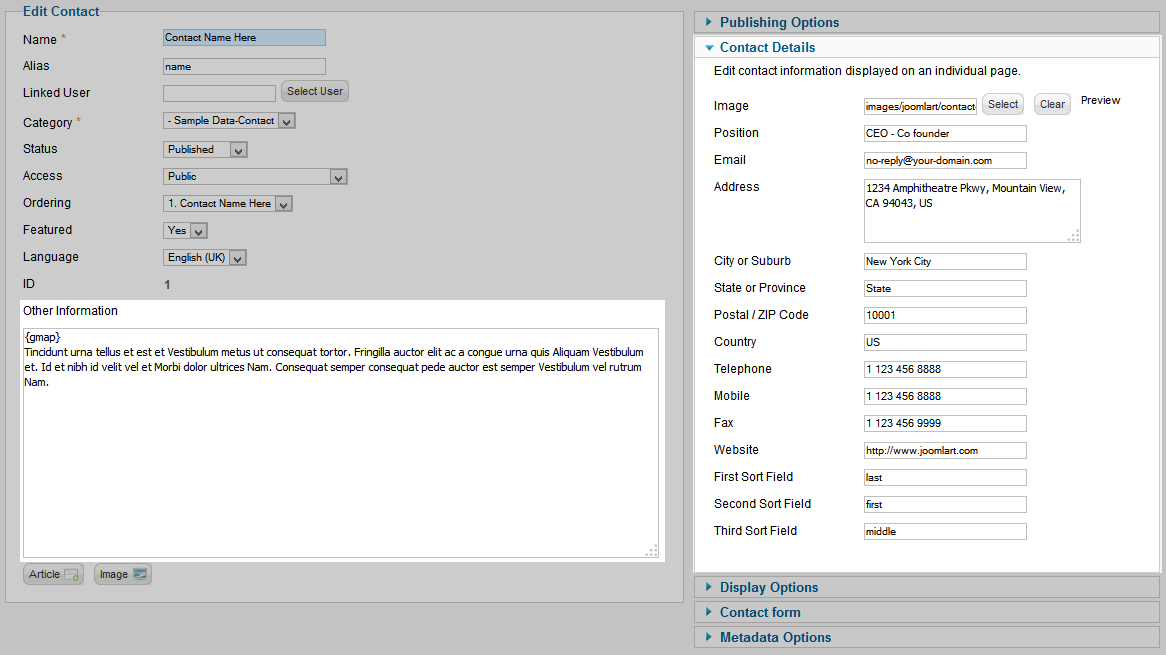
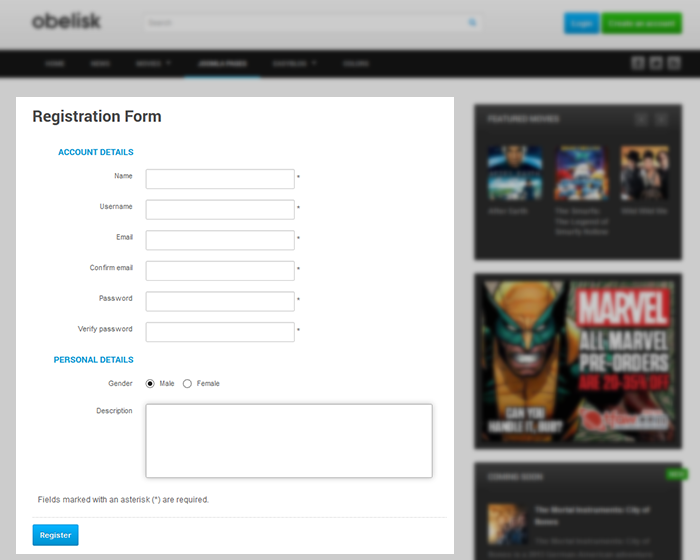
2.4.3 Registration Form Menu
Front-end appearance
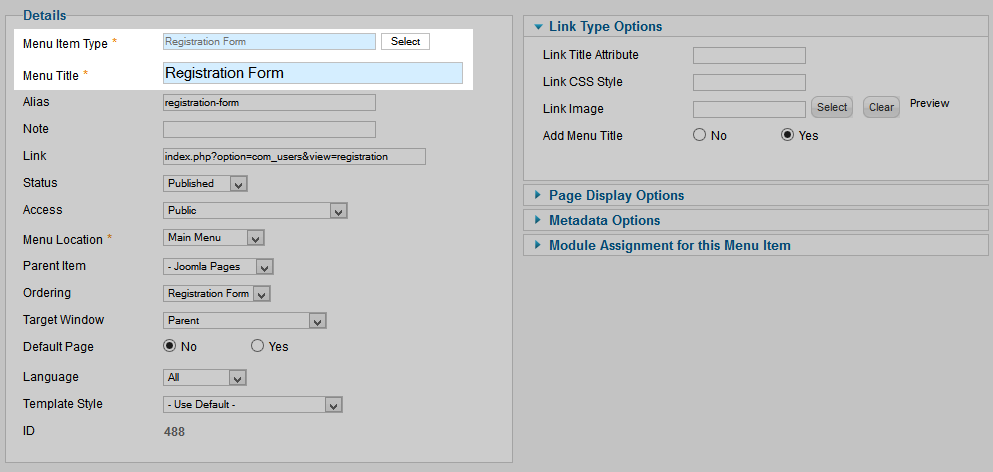
Template Customization
1. Template Override
In short, to override the template, you should clone the template style then edit as you wish. After you're done with developing and styling, assign the cloned style to the specific menus. The assigned menus will then override them in the default style.
Each style can be configured to use one theme and one layout. Thus, you can have menus with different themes and layouts in a single template.
Tips:
By default, when you install JA Obelisk template, you will have default template style. Clone the default style, change its settings and assign to menu to override the default style.
2. Themes Settings
JA Obelisk supports up to 5 themes, the themes are available when you install the JA Obelisk template.
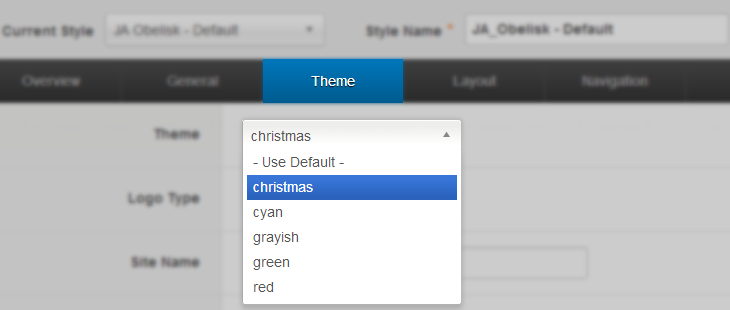
You can switch any theme you want, it will change your site color, and style as well.
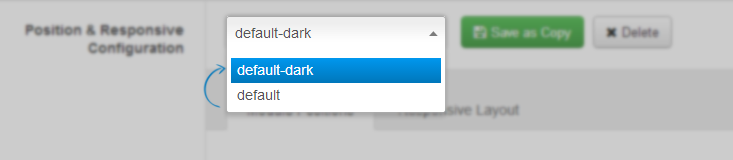
3. Layout Settings
JA Oblelisk supports 2 layouts:
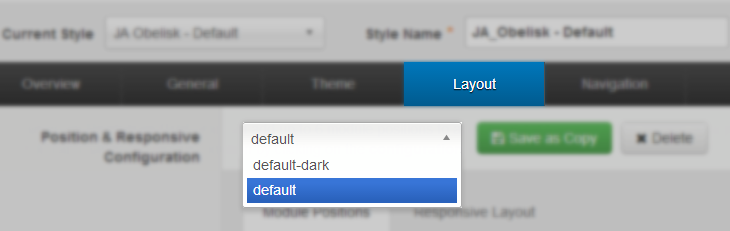
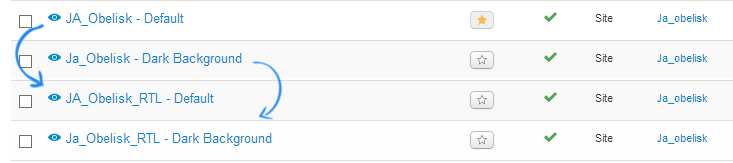
In demo site, we have 2 template styles, the JA_Obleisk-Default style used default layout while the JA_Obelisk-Dark Background style used default-dark.
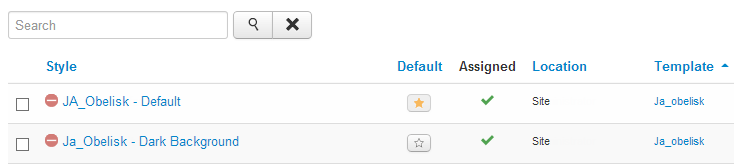
When you install JA Obelisk template, you will have JA_Obelisk-Default template style. This style will use default layout by default. To create the JA_Obelisk-Dark Background style, clone the JA_Obelisk-Default, rename and change layout to default-dark.
The following video tutorials will show you how to work with layouts, configure and customize.
Layout Configuration
T3 comes with ease of layout customization. The visual layout configuration is easier than ever before.
Layout Customization
The video tutorial guides you on how to customize the layouts, add new layout, and customize blocks in a layout.
4. ThemeMagic Settings
JA Obelisk is developed with T3 so you can customize themes with ThemeMagic. To customize themes with this feature, you have to enable this option first.
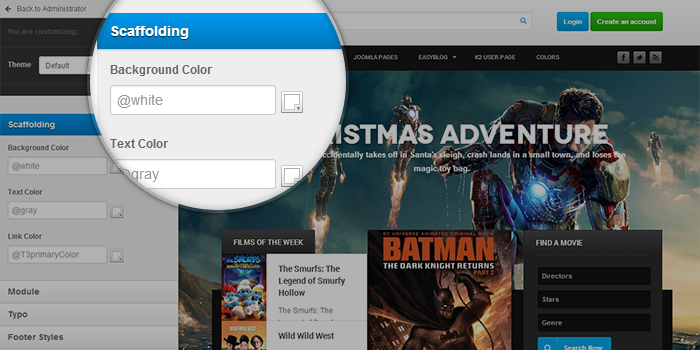
In the setting panel, you can customize all the themes. The left panel is the setting area while the right panel is your site's front-end. Each time you change settings, click on "Preview" button to view the change in front-end on the right panel.
The following video tutorials will show you how to customize themes and customize ThemeMagic.
ThemeMagic Customization
After watching the tutorial, you can be able to customize your theme quickly using ThemeMagic as well as know how to add new group and parameters to ThemeMagic.
Multilingual Site Setup
1. Right To Left language
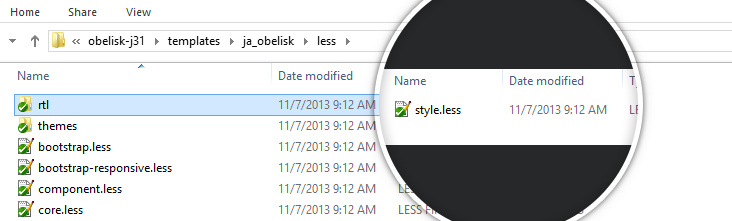
JA Obelisk supports RTL language in core, that means when you install the template, the style of RTL language is already in use.
The style of RTL language is in style.less file that is located in templates\ja_obelisk\less\rtl.
2. Setup multilingual site
JA Obelisk is a Joomla multilingual template
To setup multilingual site, please follow the steps below (JA Obelisk demo has 2 languages: English and Arabic).
Step 1: translate your site & setup
The very first step to build up a multilingual site is content translation, the translation could include: Menus, Categories, Modules, Articles ...
Auto Translation and Setup Manual Translation and Setup
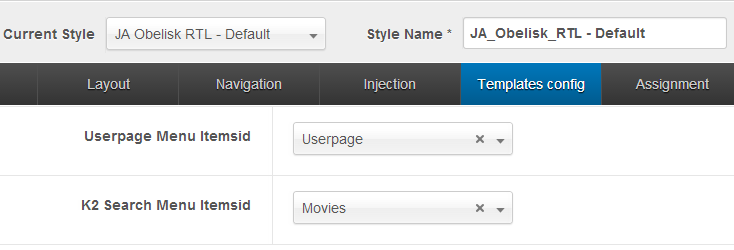
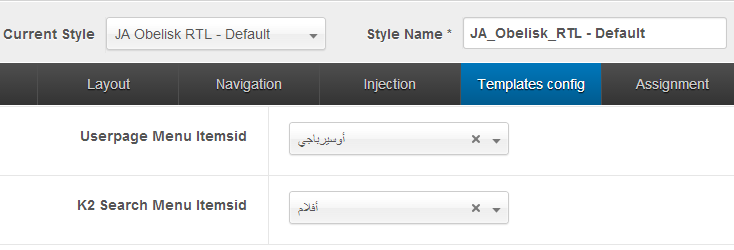
Step 2: Clone styles
For each style of default language, clone the style for other languages.
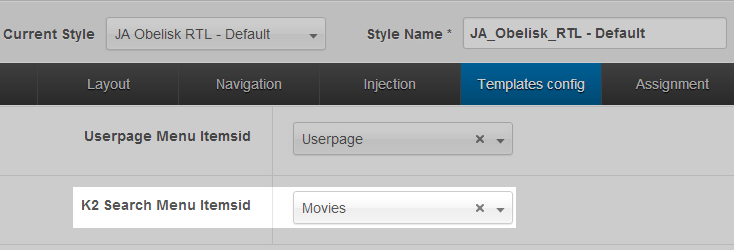
Step 3: assign menu to extended settings
Open the cloned styles one by one, open the tab Templates config then assign menus to Userpage Menu Itemsid and K2 Search Menu Itemsid.
Note:
To know why we need to do the steps or the meaning of Userpage Menu Itemsid and K2 Search Menu Itemsid settings, please view the Extended Settings section.
Recommendation
The above userguide should help one in replicating the Demo site settings for the template and extension on their site.
Recommended:
If you are new or confused, we recommend installing Quickstart on your localhost and use it as reference for configs. This is the best way to work with any template. Links to all the resources are provided as above, you should read them carefully to take the maximum advantage of our products.
Support:
Please raise your support queries in the forum and make sure you follow the support guidelines. We spend more time on getting the information from user in case the support guidelines are not followed.