Customize template guideline
Here is the steps when you customize template style.
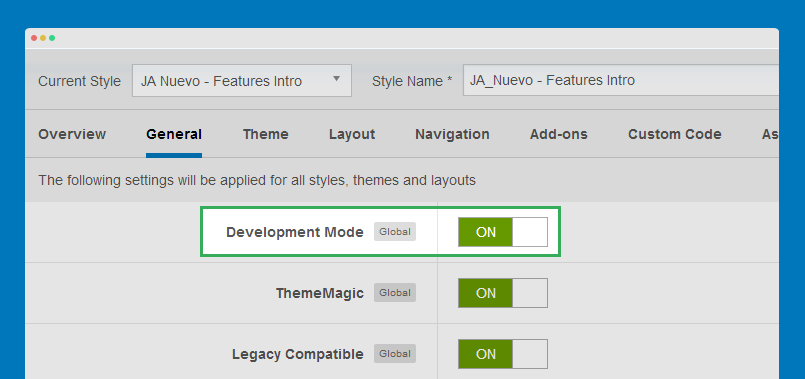
Enable Development mode
JA Nuevo is developed with LESS. When customizing template style, it's recommended to use .less files in templates/ja_nuevo/less. When you enable development mode, your site is running on LESS so that it's easy to debug to customize template style.
Customize your template style
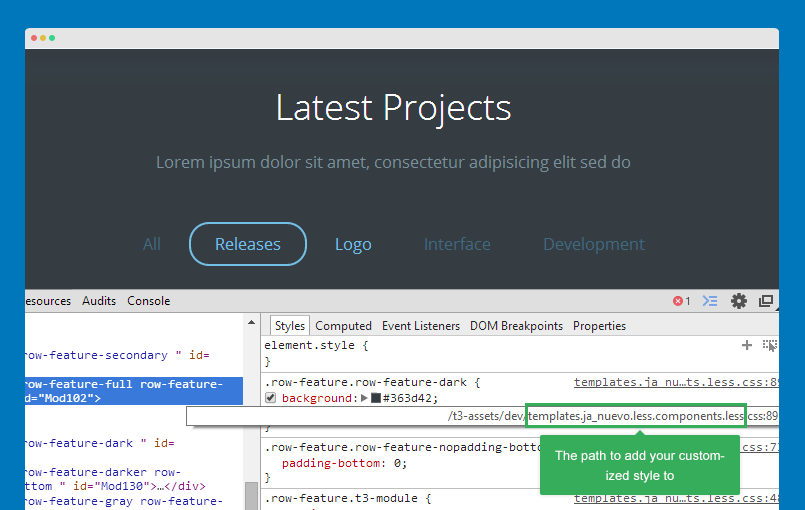
When debug, Firebug is a good tool. You can customize style of template, track file to add the style to.
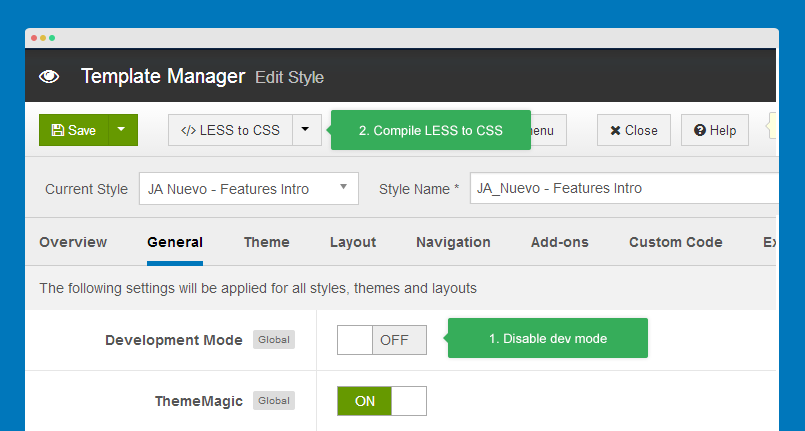
Disable Development mode and compile LESS to CSS
After customizing your template, please disable Development mode, save the settings and compile LESS to CSS so that your customization will be compiled to CSS.
You should optimize JS and CSS to improve performance of your site. The optimization is only applied for non-development mode >> Detail documentation
Customize template with CSS
If you are not familiar with LESS, you can customize your template with CSS. Add the customization style to the templates/ja_nuevo/css/custom.css. The file is not overridden when compiling LESS to CSS and it works on both Development mode status: enabled and disabled.
Logo configuration and customization
Change logo image
JA Nuevo uses 1 logo for all responsive layouts: large, medium, small and extra small layout.
![]()
To change logo, please open the template style. In the "Theme" setting, select the "Image" logo type, browse logo for large and medium layout then logo in small layout.
![]()
Please note that the changes are only applied for CURRENT template style only. If you want to change for all, you have to change for all template styles.
An other way to change logos globally is replacing the logo images: templates/ja_nuevo/images/logo.png
Logo customization
1. Changing logo image path
To change logo image path, please open the file: templates/ja_nuevo/less/variables.less, find the following code:
// T3 LOGO
// --------------------------------------------------
@t3-logo-image:               "@{t3-image-path}/logo/logo.png";
2. Changing logo style: alignment, padding, etc
The style of logo is in the file: templates/ja_nuevo/less/style.less, find the code and customize as you expect.
// Logo
// ----
.logo {
  padding-bottom: 22px;
  padding-top: 22px;
  text-align: left;

  @media (min-width: @screen-lg-min) {
    padding-bottom: 0;
  }

  a {
    display: inline-block;
    line-height: 1;
    margin: 0;
  }
}
3. Customize image logo style
Open the file: style.less again, find the code and customize as you expect.
// Logo Image
// ----------
.logo-image {
  // Hide sitename and slogan
  span, small {
    display: none;
  }
}
4. Customize text logo style
Open the file: style.less again, find the code and customize as you expect.
// Logo Text
// ----------
.logo-text {
  white-space: nowrap;
  a {
    text-decoration: none;
    font-size: @font-size-h4;
    font-weight: bold;
  }

  &:hover a,
  a:hover,
  a:active,
  a:focus {
    text-decoration: none;
  }

  // Taglines
  .site-slogan {
    display: block;
    font-size: @t3-font-size-smaller - 3;
    margin-top: 5px;
  }

}
5. Change logo position size
Open the file: templates/ja_nuevo/tpls/blocks/header.less, find the code and customize as you expect.
$logosize = 'col-lg-2 col-xs-6';
When changing size of the logo position, you should change the size of other positions in header block to fit header block size.
Footer info customization
The footer info of JA Nuevo includes T3 logo and JA Nuevo copyrights. The info can be customized.
1. Enable/disable T3 logo
The T3 logo in footer block can be enabled or disabled with one click. Open the JA Nuevo template style manager, in the "General" tab, find the option "Show T3 Logo".
![]()
If you want to change the T3 logo, open the templates/ja_nuevo/tpls/blocks/footer.php file, find the code below:
<?php if ($this->getParam('t3-rmvlogo', 1)): ?>

  <div class="col-md-4 poweredby text-hide">

    <a class="t3-logo-small t3-logo-light" href="http://t3-framework.org" title="<?php echo JText::_('T3_POWER_BY_TEXT') ?>"

       target="_blank" <?php echo method_exists('T3', 'isHome') && T3::isHome() ? '' : 'rel="nofollow"' ?>><?php echo JText::_('T3_POWER_BY_HTML') ?></a>

  </div>

<?php endif; ?>
Now change the class t3-logo-small t3-logo-light using the supported T3 Footer logo styles >> check out now.
You can change T3 footer logos with your own logo. Open the plugins/system/t3/base-bs3/less/style.less file then find the CSS rules.
// Styles
.t3-logo,
.t3-logo-color {
  background-image: url("//static.joomlart.com/images/jat3v3-documents/logo-complete/t3logo-big-color.png");
}

.t3-logo-small,
.t3-logo-small.t3-logo-color {
  background-image: url("//static.joomlart.com/images/jat3v3-documents/logo-complete/t3logo-small-color.png");
}

.t3-logo-dark {
  background-image: url("//static.joomlart.com/images/jat3v3-documents/logo-complete/t3logo-big-dark.png");
}

.t3-logo-small.t3-logo-dark {
  background-image: url("//static.joomlart.com/images/jat3v3-documents/logo-complete/t3logo-small-dark.png");
}

.t3-logo-light {
  background-image: url("//static.joomlart.com/images/jat3v3-documents/logo-complete/t3logo-big-light.png");
}

.t3-logo-small.t3-logo-light {
  background-image: url("//static.joomlart.com/images/jat3v3-documents/logo-complete/t3logo-small-light.png");
}
Now change the T3 footer logo image path with your own logo image path, save the file then compile LESS to CSS.
2. Change JA Nuevo copyrights
The copyrights of JA Nuevo is located in the file: templates\ja_nuevo\html\mod_footer\default.php, open the file and change the info below:
<div class="module">

	<small><?php echo $lineone; ?> Designed by <a href="http://www.joomlart.com/joomla/templates/ja-nuevo" <?php echo method_exists('T3', 'isHome') && T3::isHome() ? '' : 'rel="nofollow"' ?>>JoomlArt.com</a>.</small>

	<small><?php echo JText::_( 'MOD_FOOTER_LINE2' ); ?></small>

</div>
Sticky Main Menu
Sticky main menu, also known as fixed menu is basically a website menu that is locked into place so that it does not disappear when user scrolls down the page.
To sticky main menu, please open the templates/ja_nuevo/tpls/blocks/header.php file then find the following code:
<header id="t3-header" class="wrap t3-header">
Replace the code with:
<header id="t3-header" class="wrap t3-header" data-spy="affix" data-offset-top="70">
Check the front-page
Customize "back-to-top" button
The "Back to top" button allows you to quickly navigate to the top of your site. In JA Nuevo, it's supported by default and you can customize its style like changing icon, etc.
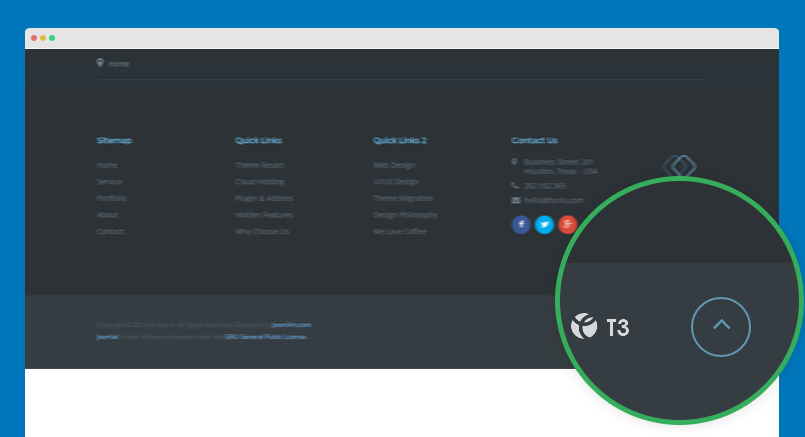
To customize the Back To Top button, please open the templates/ja_nuevo/tpls/blocks/footer.php and find the following code:
<!-- BACK TOP TOP BUTTON -->

<div id="back-to-top" data-spy="affix" data-offset-top="300" class="back-to-top hidden-xs hidden-sm affix-top">

  <button class="btn btn-primary" title="Back to Top"><i class="fa fa-angle-up"></i></button>

</div>


<script type="text/javascript">

(function($) {

	// Back to top

	$('#back-to-top').on('click', function(){

		$("html, body").animate({scrollTop: 0}, 500);

		return false;

	});

})(jQuery);

</script>

<!-- BACK TO TOP BUTTON -->
Remove the code above to delete the Back To Top button in your site. You can change the Back To Top icon with any icon class of Font Awesome 4, just replace the icon class with fa fa-angle-up.
To customize style of the Back To Top button, please open the templates/ja_nuevo/less/style.less file and find the style rule:
// Back to Top
// -----------
#back-to-top {
  position: fixed;
  right: @t3-global-margin;
  top: auto;
  z-index: 999;
  display: none;

  @media (min-width: @screen-sm-min) {
    display: block;
  }

  .btn {
    background: @gray-dark;
    border-color: @brand-primary;
    color: @brand-primary;
    height: 60px;
    width: 60px;
    border-radius: 50%;
    line-height: 60px;
    opacity: 0.7;
    padding: 0;
    text-align: center;
    transition: 0.2s;

    &:hover, &:active, &:focus {
      background: @gray-darker;
      opacity: 1;
    }
  }

  &.affix {
    bottom: @t3-global-margin * 2;
  }

  a {
    outline: none;
  }

  i {
    font-size: @font-size-large + 10;
  }
}
Now customize the style as you wish then save the file and compile LESS to CSS.