Supported menu systems
JA Jason template supports 3 menu systems: Megamenu, Off-canvas sidebar and default Bootstrap menu on small screens - Mobile.
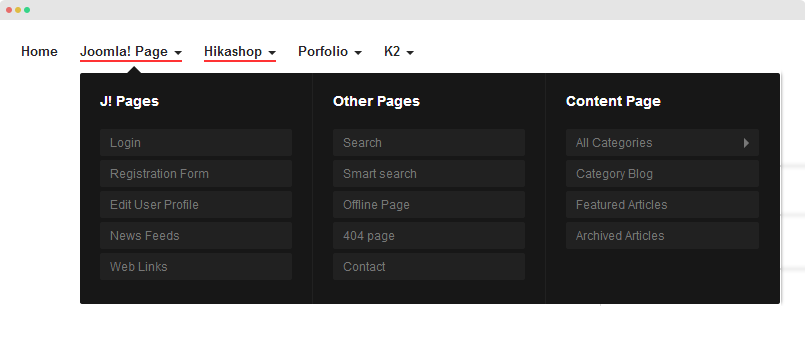
Megamenu
Off-canvas sidebar
Default Bootstrap menu
It's easy to configure all the 3 menu systems. Please check how-to configure and customize menu system guide in the sections below:
Megamenu configuration and customization
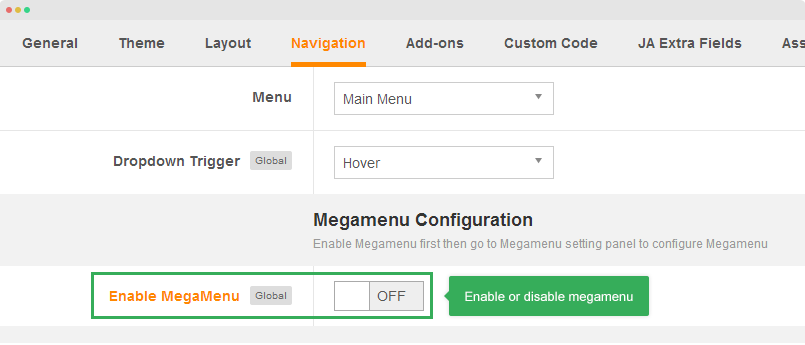
When disabling Megamenu
When Megamenu is disabled, the template will use Joomla drop down menu.
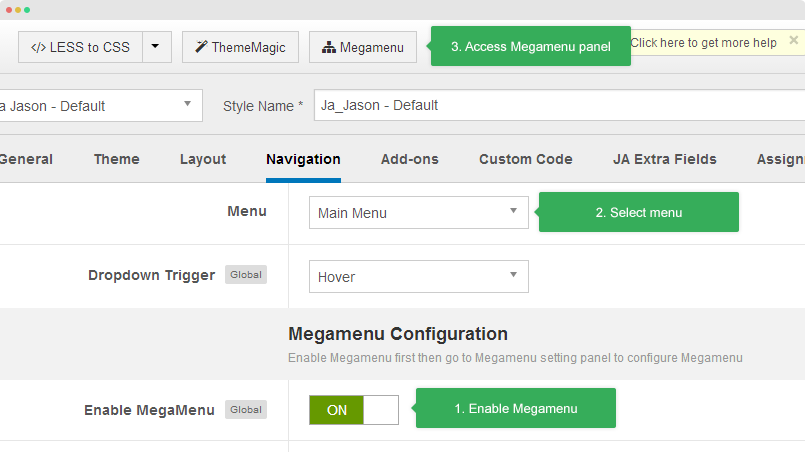
To disable Megamenu, open template style manager, in the "Navigation" tab, disable "Megamenu" option
When enabling Megamenu
Megamenu allows you to display your main menu in different ways and flexibly. You can display menu items in columns, add icon and style for menu item, load module for a module menu item, etc.
Firstly, enable Megamenu , select the menu that you want to display as main menu then hit the "Megamenu" button on the top bar to open Megamenu configuration panel.
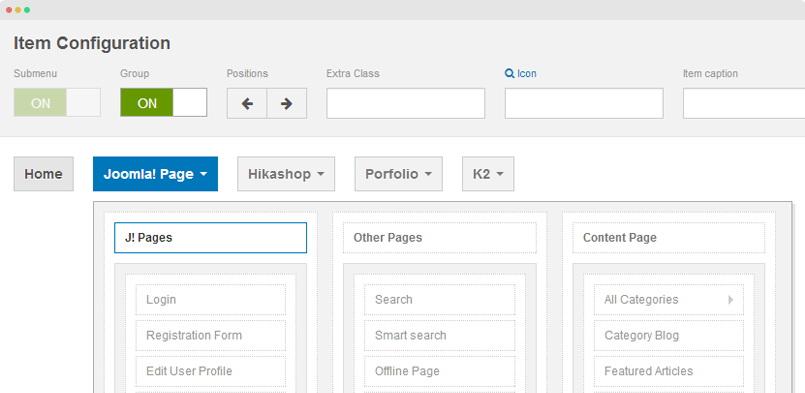
In the configuration panel of Megamenu, select menu item/submenu/column or row to configure.
For more detail of how to work with Megamenu, please check out the references below:
- Megamenu options: how to use options in the Megamenu configuration panel like: how to enable sub-menu, how to assign module, how to add new column/row, etc >> detail documentation
- Style Megamenu: how to add style for a menu item, sub-menu, column or row in Megamenu >> detail documentation.
- Add icon for menu item in Megamenu: how to add icon for menu item in Megamenu: Font awesome icons and Bootstrap icons >> detail documentation
- Animation configuration: multiple animation types for Megamenu: Fading, slide, elastic, room >> detail documentation
- Video tutorials: how to work with Megamenu configuration panel >> view video now
Please note that, Megamenu only works on extra large, large and medium layouts. In small and extra small layout, it uses Off-canvas or Default Bootstrap collapsed navigation.
Off-canvas sidebar
Off-canvas sidebar is a position that you can load any module to, not only menu. In JA Jason, there are 2 off canvas sidebars: Off Canvas 1 - loads off-canvas-1 position and Off Canvas 2 - loads off-canvas-2 position.
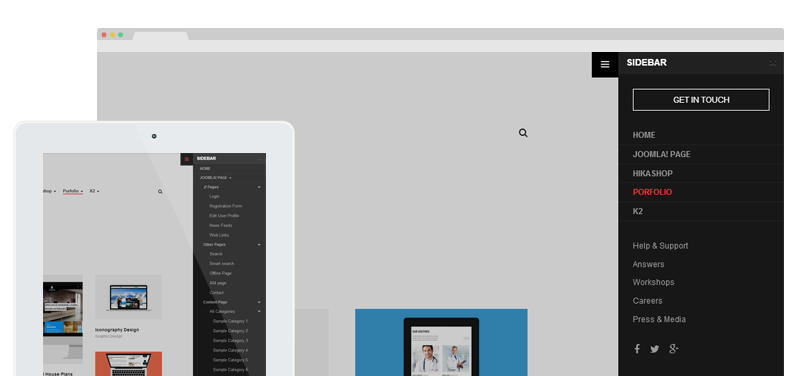
The Off Canvas 1 is to display main menu, resources, follow buttons and it is configured to be displayed in extra large and large layouts. The Off Canvas 2 is the menu system on mobile.
Follow the steps below to configure Off Canvas sidebar.
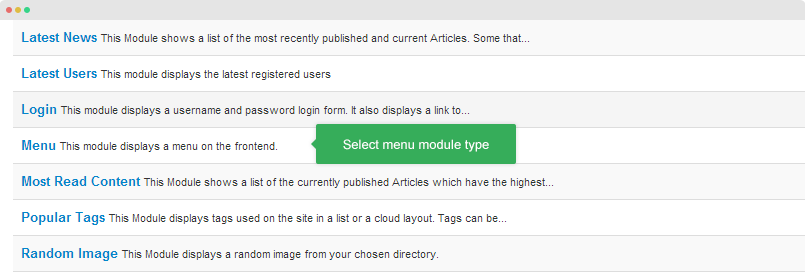
Step 1: create menu module
From your back-end, go to: Extensions → Module Manager and hit the "New" button to create new module. Next, please select "Menu" module type.
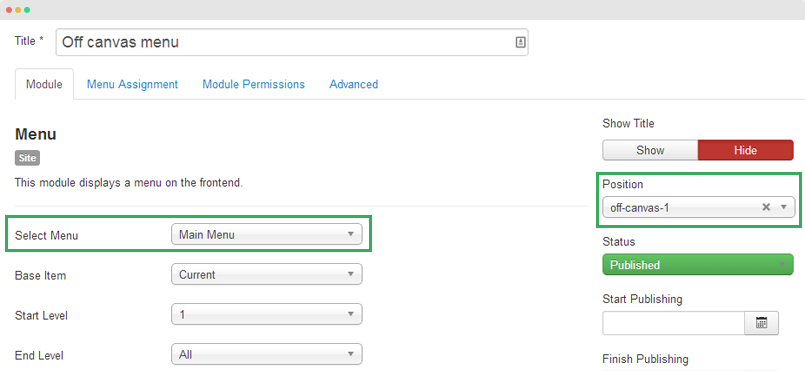
Next, configure the module, assign it to position "off-canvas-1" or "off-canvas-2".
Module position: off-canvas-1
Module Suffix: NOT USED
or:
Module position: off-canvas-2
Module Suffix: NOT USED
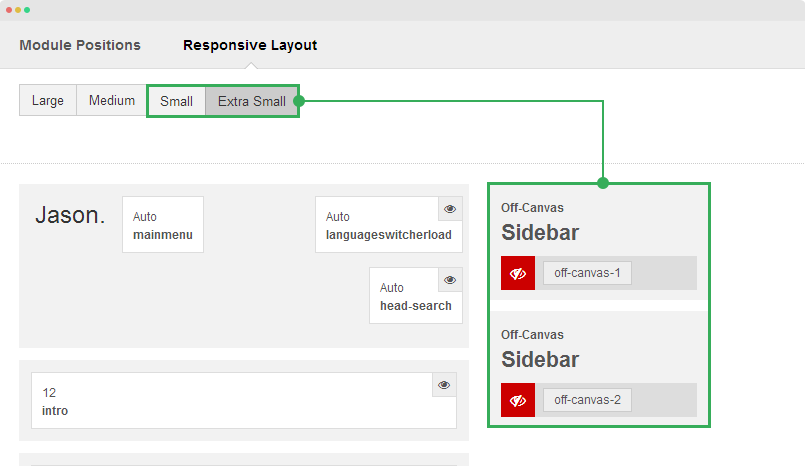
Step 2: configure Off-canvas in responsive layouts
Open template style setting panel you want to configure off-canvas. In the "Layout" tab, select "Responsive layout", you will see the supported responsive layouts, in each layout, you can enable or disable Off Canvas 1 and Off Canvas 2.
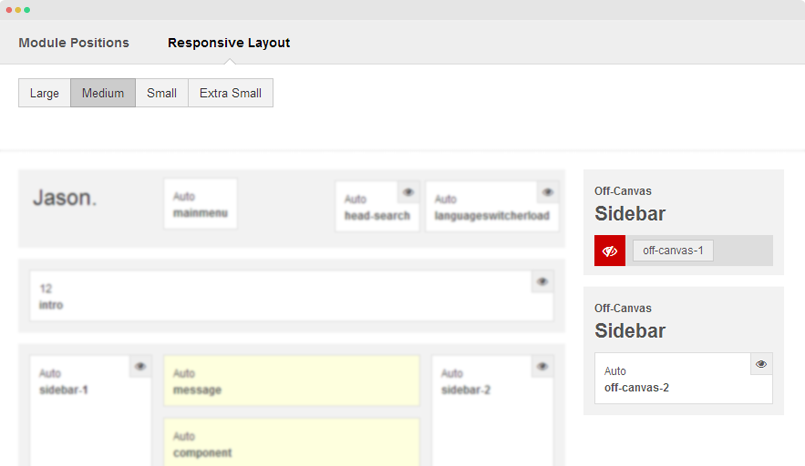
In demo site, Off Canvas 1 is enabled in small and extra small layouts, disabled in Large and Medium layout. Off Canvas 2 is enabled in Large, Medium layout and disabled in Extra small, Small layout.
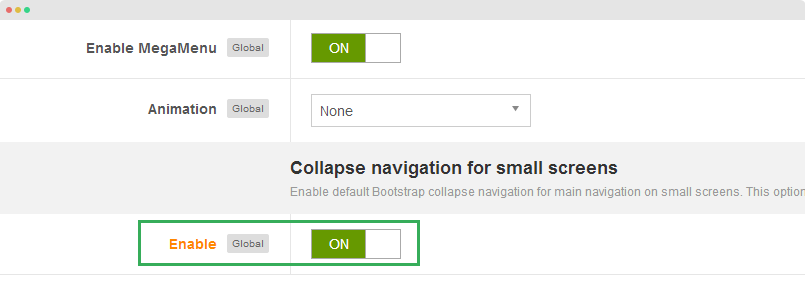
Step 3: disable Collapse navigation for small screens
The Collapse navigation for small screens is the menu system on Small and Extra small layout, it's drop down menu based on Bootstrap menu style. If you don't disable the Collapse navigation for small screens, you will have 2 menu systems on mobile.
To disable the option, in the "Navigation tab", find and disable "Collapse navigation for small screens" option.

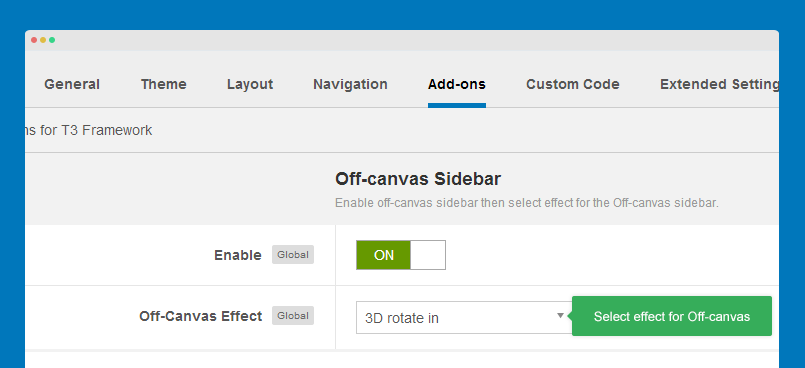
Configure Off-canvas effect
T3 supports multiple effects for Off-canvas sidebar. Open the "Add-ons" tab, enable Off-canvas then select the effect you want for Off-canvas sidebar.
Customize Off-canvas sidebar
The style of off-canvas sidebar is in the templates/ja_jason/less/off-canvas.less file. You can also change icon for Off-canvas sidebar, change its position (from right to left) or change size of the off-canvas block.
Change sidebar icon
Open the file: templates/ja_jason/tpls/blocks/off-canvas.php then find the following code:
<button class="btn off-canvas-toggle btn-left <?php $this->_c('off-canvas-1') ?>" type="button" data-pos="right" data-nav="#t3-off-canvas-1" data-effect="<?php echo $this->getParam('addon_offcanvas_effect', 'off-canvas-effect-4') ?>">
  <i class="fa fa-bars"></i>
</button>
Now, to change icon of the sidebar, just change the icon class <i class="fa fa-bars"></i> to any icon you want. JA Jason template supports Font awesome 4 so you can use any Font awesome 4 icon class.
<button class="btn btn-primary off-canvas-toggle <?php $this->_c('off-canvas') ?>" type="button" data-pos="right" data-nav="#t3-off-canvas" data-effect="<?php echo $this->getParam('addon_offcanvas_effect', 'off-canvas-effect-4') ?>">
  <i class="fa fa-home"></i>
</button>
Changing off-canvas size
By default, the width size of Off-canvas block is 250px, you can make it wider or smaller. To change the size, open the templates/ja_jason/less/variables.less file, find the following rule and change the size.
// Off-Canvas Width
@t3-off-canvas-width:                 250px;
Collapse navigation for small screens
If you don't want to use Off-canvas sidebar as menu system on mobile, you can use default bootstrap navigation on small screens instead of.
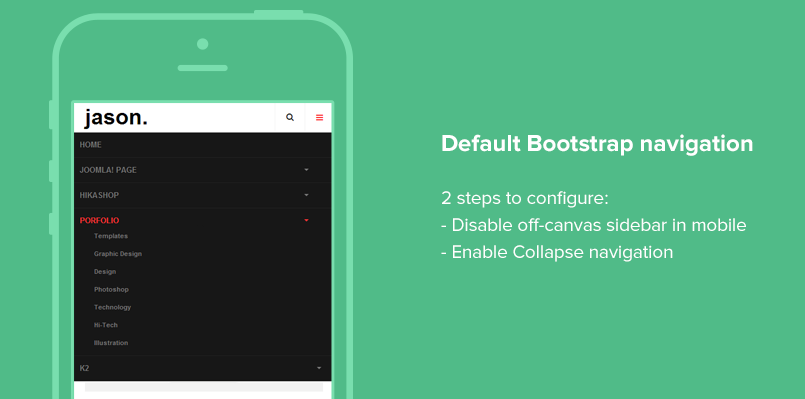
Step 1: disable Off-canvas sidebar in mobile
We should disable Off-canvas sidebar in small screens so that menu system on small screen is not duplicated. Open the Layout tab → Responsive layout → disable Off Canvas sidebar in Small and Extra Small layout.
Step 2: enable Collapse navigation for small screens
Open the "Navigation" setting panel then enable Collapse navigation for small screens option.
Building Homepage instruction
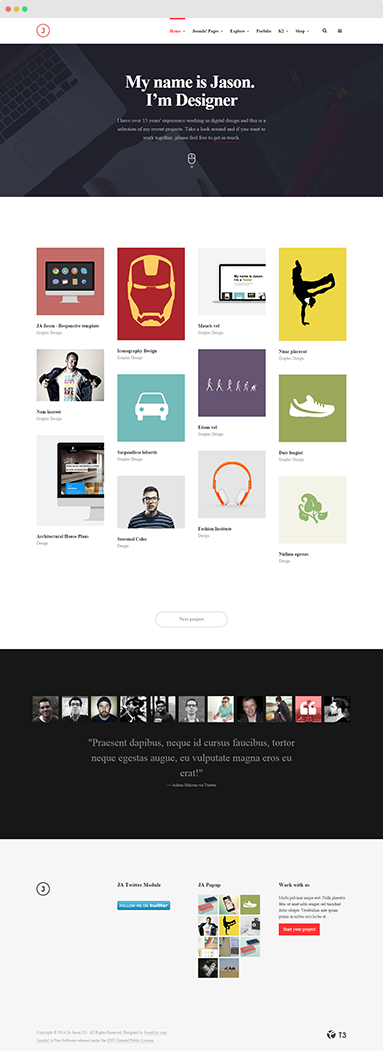
JA Jason template supports up to 6 homepage styles. Each style uses independent layout and comes with different configuration. Here is the steps to build those homepage style as JA Jason demo.
Steps to create a Home page style
- Step 1: create template style, assign to home layout you want: home-1, hom-2, etc.
- Step 2: create Home menu item, assign to created template style
- Step 3: add content for the menu item
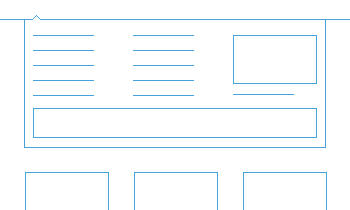
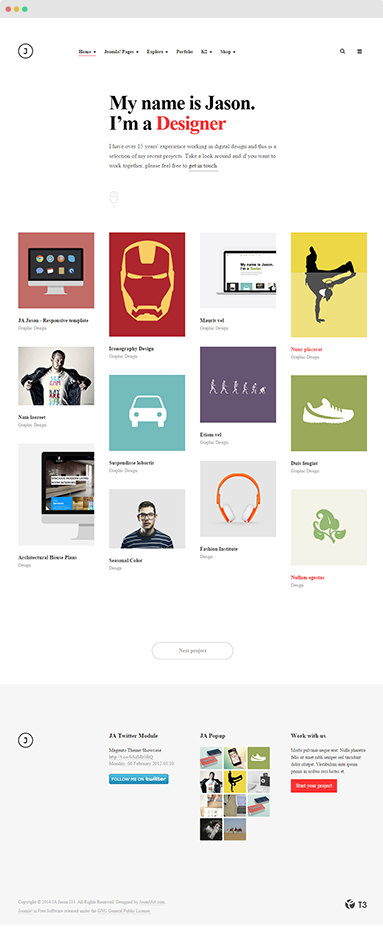
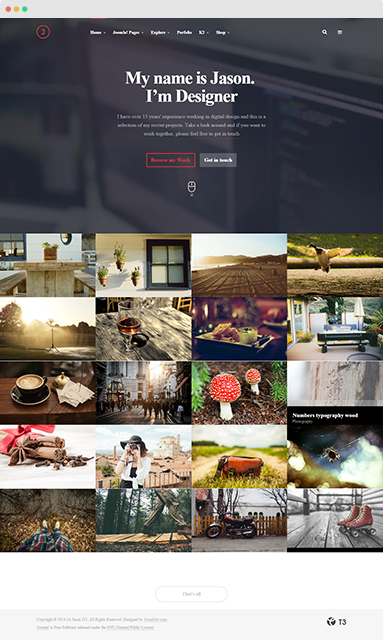
Homepage style 1 | Live demo →
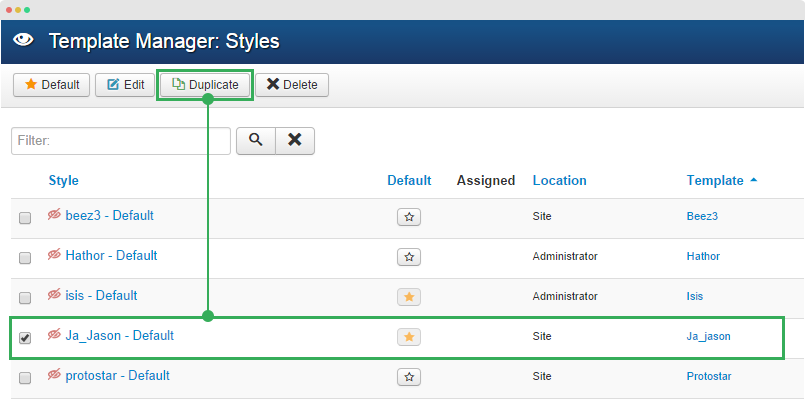
Step 1: create template style
When you install JA Jason template, there is only one template style: Ja_Jason - Default. To create new template, the best way is duplicating the default template style.
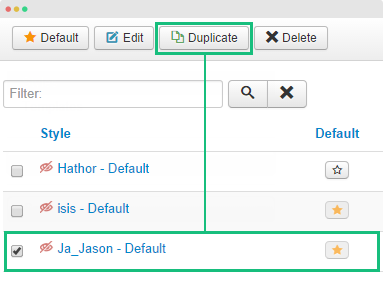
Rename the template style and assign "home-1" layout in the "Layout" tab.
Step 2: create menu item
- 1. Create Home menu item in Main Menu, select Featured Articles menu type, assign "Template Style" that we created in Step 1 menu type and set it as default menu item. View Screenshot →
- 2. Assign content to display in the menu. Open the Layout tab, select categories that the menu loads articles from. View Screenshot →
- 3. Configure columns and pagination. The column settings is to configure responsive display of the page View Screenshot →
Step 3: mark articles as Featured
Next, please mark articles as featured that you want to display in homepage. Go to Content → Article manager, select articles by checking them then hit the "Featured".
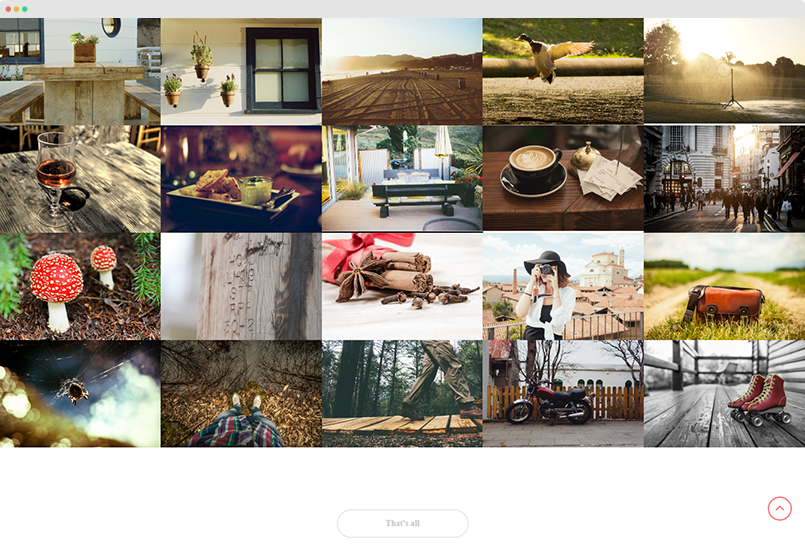
Here is the front-page of the Featured Article block.
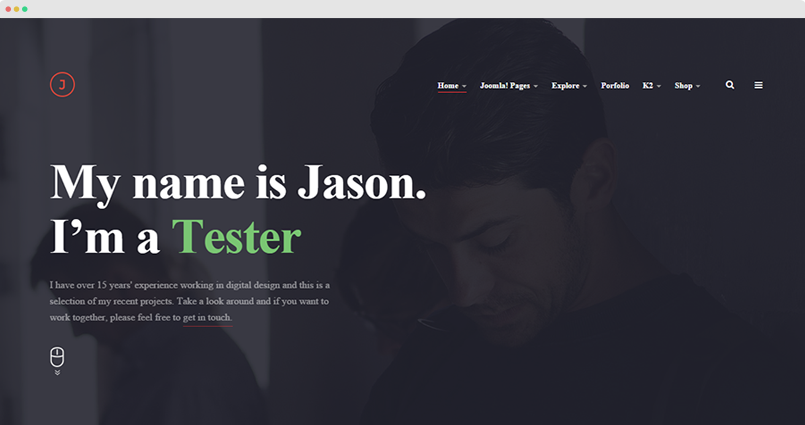
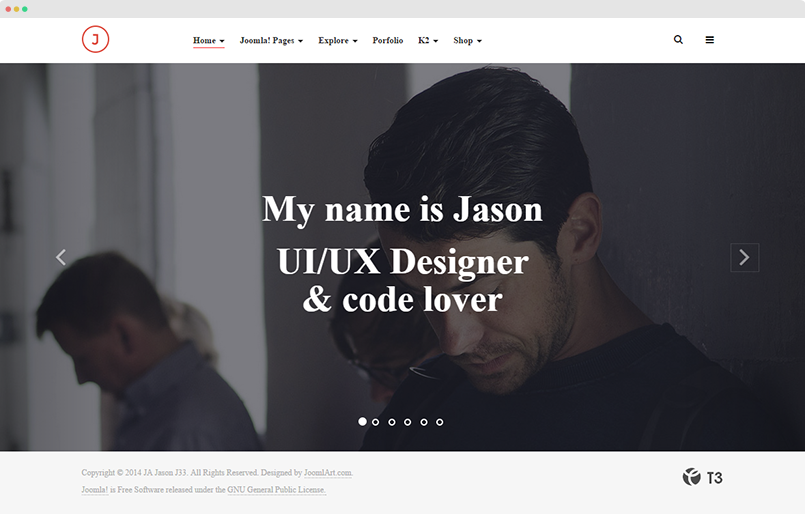
Step 4: My info module configuration
The content in the "intro-1" position is from a custom HTML module.
Module settings
Module position: intro-1
Module Suffix: NOT USED
Custom HTML
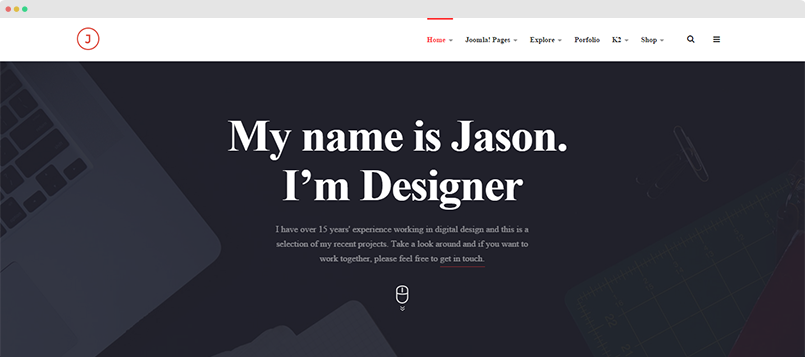
<div class="intro-content col-md-9 col-md-offset-3">
<div class="intro-text">
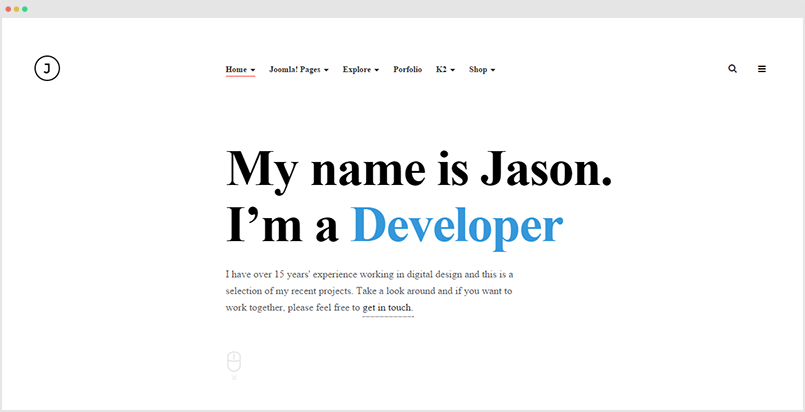
<div class="info">My name is Jason. <br />I’m a
<div id="carousel-home" class="carousel slide" data-ride="carousel">
<div class="carousel-inner">
<div class="item active">
<p class="red">Designer</p>
</div>
<div class="item">
<p class="blue">Developer</p>
</div>
<div class="item">
<p class="green">Tester</p>
</div>
</div>
</div>
</div>
<p class="sub">I have over 15 years' experience working in digital design and this is a selection of my recent projects. Take a look around and if you want to work together, please feel free to <a href="/Custom-Work">get in touch.</a></p>
</div>
</div>
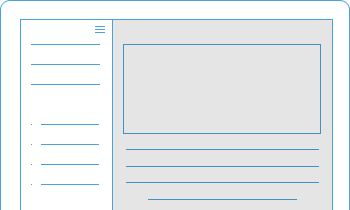
Homepage style 2 | Live demo →
Step 1: create template style
- To create new template, the best way is duplicating the default template style.
View Screenshot → - Rename the template style and assign "home-2" layout in the "Layout" tab.
View Screenshot → - Add background for the header theme. Open the "Theme" setting panel, in the "Header Theme Style", select image Header theme type then browse an image to display as the header background. View Screenshot →
Step 2: create menu item
- 1. Create Home menu item in Main Menu, select Featured Articles menu type, assign "Template Style" that we created in Step 1 menu type and set it as default menu item.
View Screenshot → - 2. Assign content to display in the menu. Open the Layout tab, select categories that the menu loads articles from.
View Screenshot → - 3. Configure columns and pagination. The column settings is to configure the display of the page in responsive layouts: Large, Medium, Small, Extra Small.
View Screenshot →
Step 3: mark articles in the selected categories as Featured
Next, please mark articles as featured that you want to display in homepage. Go to Content → Article manager, select articles by checking them then hit the "Featured".
Here is the front-page of the Featured Article block.
Step 4: Modules used in the page
All the modules used in the Home Style 2 are custom HTML module. Follow the instructions below to create the same modules.
1. My Info - Home page 2
Module settings
Module position: intro-1
Module Suffix: NOT USED
Custom HTML
<div class="intro-content">
<div class="intro-text">
<div class="info">My name is Jason. <br />I’m a
<div id="carousel-home" class="carousel slide" data-ride="carousel">
<div class="carousel-inner">
<div class="item active">
<p class="red">Designer</p>
</div>
<div class="item">
<p class="blue">Developer</p>
</div>
<div class="item">
<p class="green">Tester</p>
</div>
</div>
</div>
</div>
<p class="sub">I have over 15 years' experience working in digital design and this is a selection of my recent projects. Take a look around and if you want to work together, please feel free to <a href="/Custom-Work">get in touch.</a></p>
</div>
</div>
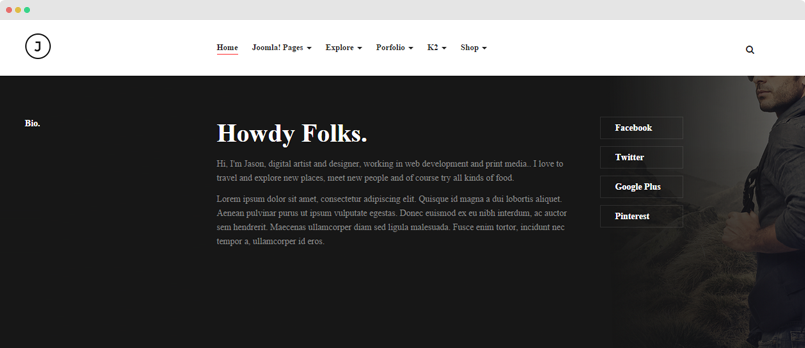
2. Bio.
Module position: intro-2
Module Suffix: row-darker
Custom HTML
<div class="bio-content row">

 <div class="col-md-8">

 <h3>Howdy Folks.</h3>

 <p>Hi, I'm Jason, digital artist and designer, working in web development and print media.. I love to travel and explore new places, meet new people and of course try all kinds of food.</p>

 <p>Lorem ipsum dolor sit amet, consectetur adipiscing elit. Quisque id magna a dui lobortis aliquet. Aenean pulvinar purus ut ipsum vulputate egestas. Donec euismod ex eu nibh interdum, ac auctor sem hendrerit. Maecenas ullamcorper diam sed ligula malesuada. Fusce enim tortor, incidunt nec tempor a, ullamcorper id eros.</p>

 </div>

 <div class="col-md-4">

   <!-- AddThis Follow BEGIN -->

   <div class="addthis_toolbox addthis_32x32_style addthis_default_style">

   <a class="addthis_button_facebook_follow" addthis:userid="joomlart">Facebook</a>

   <a class="addthis_button_twitter_follow" addthis:userid="joomlart">Twitter</a>

   <a class="addthis_button_google_follow" addthis:userid="joomlart">Google Plus</a>

   <a class="addthis_button_pinterest_follow" addthis:userid="joomlart">Pinterest</a>

   </div>

   <script type="text/javascript" src="//s7.addthis.com/js/300/addthis_widget.js#pubid=xa-525b746c4d879b01"></script>

   <!-- AddThis Follow END -->

 </div>

</div>
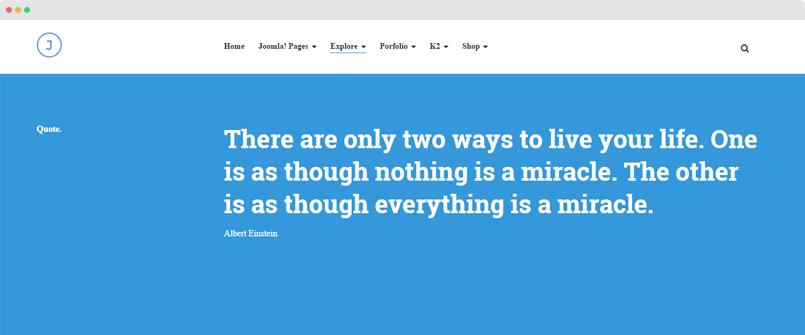
3. Quote.
Module position: intro-2
Module Suffix: row-primary
Custom HTML
<div class="quote-content">
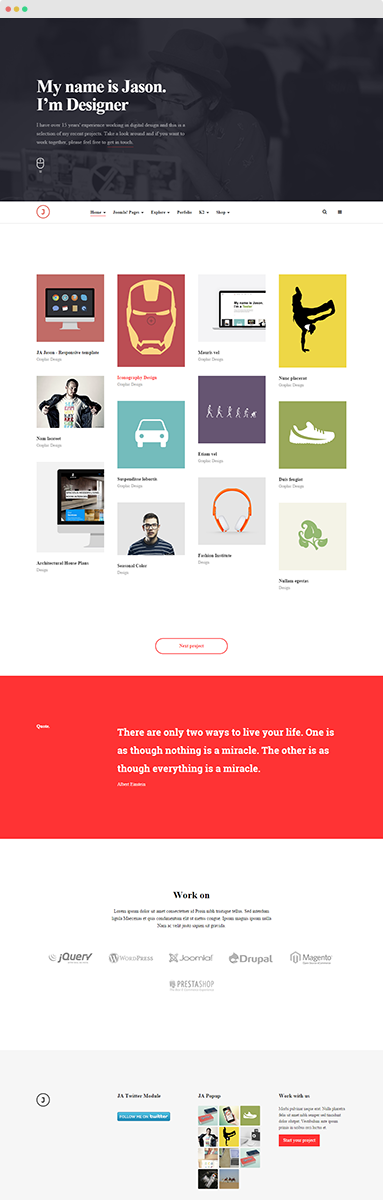
<h3>There are only two ways to live your life. One is as though nothing is a miracle. The other is as though everything is a miracle.</h3>
<cite title="Author">Albert Einstein</cite>
</div>
Homepage style 3 | Live demo →
Step 1: create template style
- 1. To create new template, the best way is duplicating the default template style.
View Screenshot → - 2. Rename the template style and assign "home-3" layout in the "Layout" tab.
View Screenshot → - 3. Add background for the header theme. Open the "Theme" setting panel, in the "Header Theme Style", select image Header theme type then browse an image to display as the header background. View Screenshot →
Step 2: create menu item
- 1. Create Home menu item in Main Menu, select Featured Articles menu type, assign "Template Style" that we created in Step 1 menu type and set it as default menu item.
View Screenshot → - 2. Assign content to display in the menu. Open the Layout tab, select categories that the menu loads articles from.
View Screenshot → - 3. Configure columns and pagination. The column settings is to configure the display of the page in responsive layouts: Large, Medium, Small, Extra Small.
View Screenshot →
Step 3: mark articles in the selected categories as Featured
Next, please mark articles as featured that you want to display in homepage. Go to Content → Article manager, select articles by checking them then hit the "Featured".
Here is the front-page of the Featured Article block.
Step 4: Modules used in the page
All the modules used in the Home Style 2 are custom HTML module. Follow the instructions below to create the same modules.
1. My Info - Home page 3
Module settings
Module position: intro-1
Module Suffix: NOT USED
Custom HTML
<div class="intro-content">

      <div class="intro-text">

        <div class="info">My name is Jason. <br />I’m Designer

        </div>

        <p class="sub">I have over 15 years' experience working in digital design and this is a selection of my recent projects. Take a look around and if you want to work together, please feel free to <a href="/Custom-Work">get in touch.</a></p>

      </div>

</div>
2. Testimonials
Module settings
Module position: intro-2
Module Suffix:  row-darker
Custom HTML
<div class="ja-testimonial-wrap row">
<ul id="ja-testimonial-list">
<li class="col-xs-12 col-sm-2 col-md-1 active"><span><img src="/images/joomlart/testimonials/testimonials-1.jpg" alt="Donec ultrices quam at nunc molestie convallis. Donec justo tellus, euismod a ante at, dignissim feugiat nunc." title="Thornton Elias via Twitter" /></span><i class="fa fa-quote-left"></i></li>
<li class="col-xs-12 col-sm-2 col-md-1"><span><img src="/images/joomlart/testimonials/testimonials-2.jpg" alt="Dunked is one of the simplest, easiest, and most versatile portfolio creation tools I’ve ever come across. Responsive, Retina & Ready to go!" title="Stacy Sandford via Twitter" /></span><i class="fa fa-quote-left"></i></li>
<li class="col-xs-12 col-sm-2 col-md-1"><span><img src="/images/joomlart/testimonials/testimonials-3.jpg" alt="Praesent nec lectus eu neque fringilla volutpat. Nulla tristique ullamcorper quam, ut dapibus massa hendrerit ac!" title="Delbert Barney via Twitter" /></span><i class="fa fa-quote-left"></i></li>
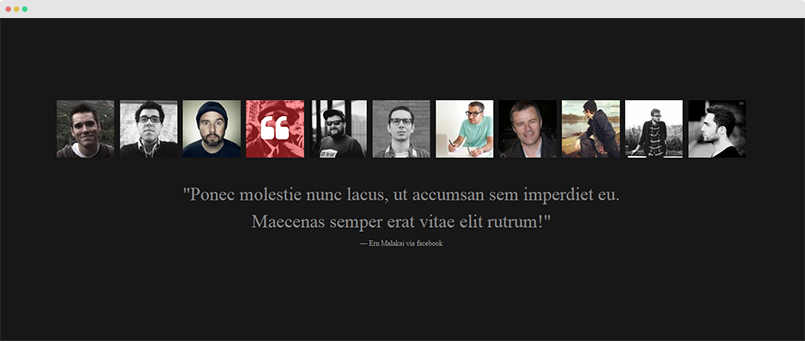
<li class="col-xs-12 col-sm-2 col-md-1"><span><img src="/images/joomlart/testimonials/testimonials-4.jpg" alt="Ponec molestie nunc lacus, ut accumsan sem imperdiet eu. Maecenas semper erat vitae elit rutrum!" title="Ern Malakai via facebook" /></span><i class="fa fa-quote-left"></i></li>
<li class="col-xs-12 col-sm-2 col-md-1"><span><img src="/images/joomlart/testimonials/testimonials-5.jpg" alt="Pellentesque habitant morbi tristique senectus et netus et malesuada fames ac turpis egestas!" title="Sterling Irvine via Twitter" /></span><i class="fa fa-quote-left"></i></li>
<li class="col-xs-12 col-sm-2 col-md-1"><span><img src="/images/joomlart/testimonials/testimonials-6.jpg" alt=" Aliquam eget ante massa. Donec eget ligula auctor, dapibus tellus et, pulvinar urna!" title="Carl Fulton via Twitter" /></span><i class="fa fa-quote-left"></i></li>
<li class="col-xs-12 col-sm-2 col-md-1"><span><img src="/images/joomlart/testimonials/testimonials-7.jpg" alt="Donec ultrices quam at nunc molestie convallis. Donec justo tellus, euismod a ante at, dignissim feugiat nunc!" title="Lloyd Willis via facebook" /></span><i class="fa fa-quote-left"></i></li>
<li class="col-xs-12 col-sm-2 col-md-1"><span><img src="/images/joomlart/testimonials/testimonials-8.jpg" alt="Sed nec ipsum at odio suscipit auctor. Cras quis quam dui. Vestibulum at urna condimentum, mattis dolor" /></span><i class="fa fa-quote-left"></i></li>
<li class="col-xs-12 col-sm-2 col-md-1"><span><img src="/images/joomlart/testimonials/testimonials-9.jpg" alt="Morbi in sem quis dui placerat ornare. Pellentesque odio nisi, euismod in, pharetra a, ultricies." title="Mordikai Brenton via Twitter" /></span><i class="fa fa-quote-left"></i></li>
<li class="col-xs-12 col-sm-2 col-md-1"><span><img src="/images/joomlart/testimonials/testimonials-10.jpg" alt="Praesent dapibus, neque id cursus faucibus, tortor neque egestas augue, eu vulputate magna eros eu erat!" title="Ashton Malcom via Twitter" /></span><i class="fa fa-quote-left"></i></li>
<li class="col-xs-12 col-sm-2 col-md-1"><span><img src="/images/joomlart/testimonials/testimonials-11.jpg" alt="Aliquam erat volutpat. Nam dui mi, tincidunt quis, accumsan porttitor, facilisis luctus, metus" title="Avetis Garen via Twitter" /></span><i class="fa fa-quote-left"></i></li>
</ul>
</div>
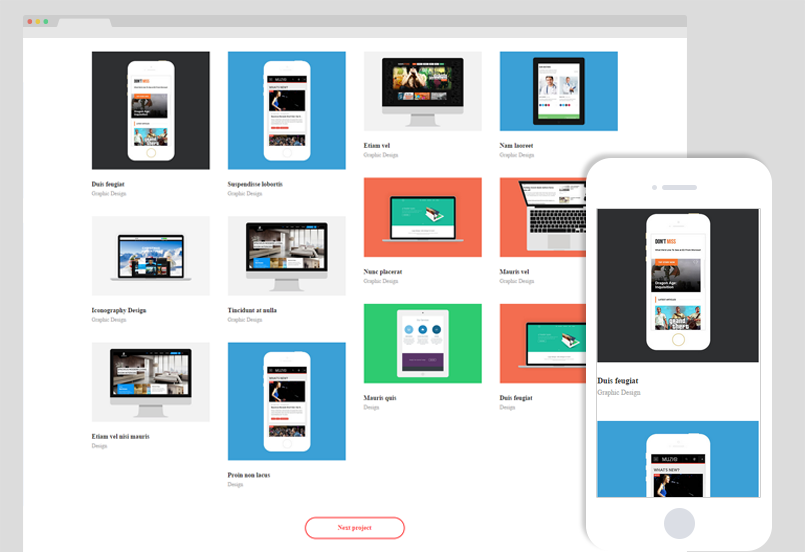
Homepage style 4 | Live demo →
Step 1: create template style
- 1. To create new template, the best way is duplicating the default template style.
View Screenshot → - 2. Rename the template style and assign "home-4" layout in the "Layout" tab.
View Screenshot → - 3. Add video background for the header. Open the "Theme" setting panel, in the "Header Theme Style", select "Vimeo or Youtube video" Header theme type then add vimeo or youtube video. View Screenshot →
Step 2: create menu item
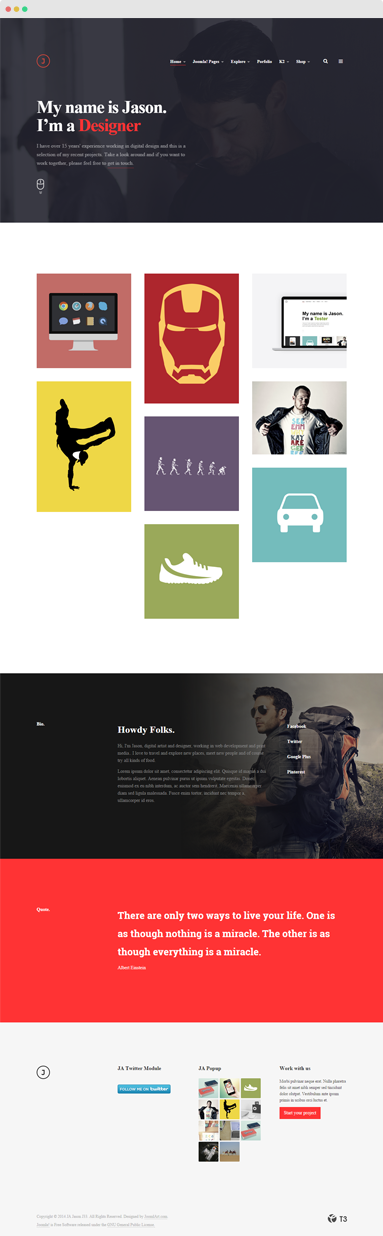
- 1. Create Home menu item in Main Menu, select Isotope menu type, assign "Template Style" that we created in Step 1 menu type and set it as default menu item.
View Screenshot → - 2. Configure number of items to display: open the Layout tab, select categories that the menu loads articles from.
View Screenshot → - 3. Configure columns and pagination. The column settings is to configure the display of the page in responsive layouts: Large, Medium, Small, Extra Small.
View Screenshot →
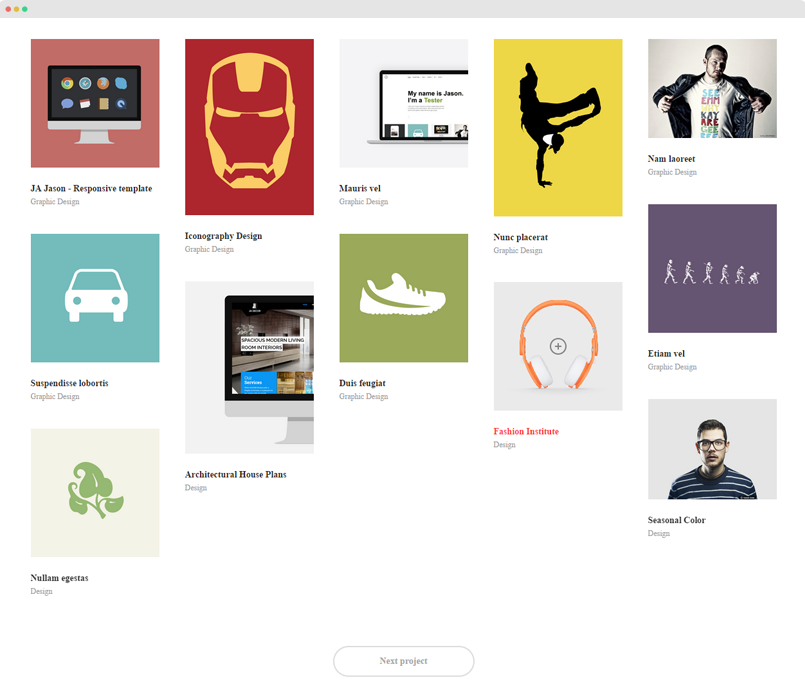
Here is the front-page of the Isotope items block.
Homepage style 5 | Live demo →
Step 1: create template style
- 1. To create new template, the best way is duplicating the default template style.
View Screenshot → - 2. Rename the template style and assign "home-5" layout in the "Layout" tab.
View Screenshot → - 3. Add background for the header theme. Open the "Theme" setting panel, in the "Header Theme Style", select image Header theme type then browse an image to display as the header background. View Screenshot →
Step 2: create menu item
- 1. Create Home menu item in Main Menu, select Isotope menu type, assign "Template Style" that we created in Step 1 menu type and set it as default menu item.
View Screenshot → - 2. Configure number of items to display: open the Blog Layout tab, configure number of items to display in the menu
View Screenshot → - 3. Configure columns and pagination. The column settings is to configure the display of the page in responsive layouts: Large, Medium, Small, Extra Small.
View Screenshot →
Step 3: mark articles in the selected categories as Featured
Next, please mark articles as featured that you want to display in homepage. Go to Content → Article manager, select articles by checking them then hit the "Featured".
Here is the front-page of the Featured Article block.
Step 4: Modules used in the page
All the modules used in the Home Style 2 are custom HTML module. Follow the instructions below to create the same modules.
1. Framework
The content in the "intro-2" position is from a custom HTML module.
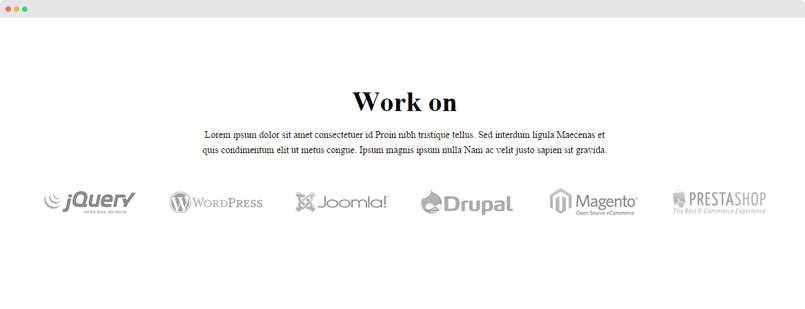
Module settings
Module position: intro-2
Module Suffix: NOT USED
Custom HTML
<div class="frameworks-content">

<h3>Work on</h3>

<p>Lorem ipsum dolor sit amet consectetuer id Proin nibh tristique tellus. Sed interdum ligula Maecenas et quis condimentum elit ut metus congue. Ipsum magnis ipsum nulla Nam ac velit justo sapien sit gravida.</p>

<ul class="frameworks">

<li><a href="#"><img src="/images/joomlart/partners/partner-1.png" border="0" alt="" /></a></li>

<li><a href="#"><img src="/images/joomlart/partners/partner-2.png" border="0" alt="" /></a></li>

<li><a href="#"><img src="/images/joomlart/partners/partner-3.png" border="0" alt="" /></a></li>

<li><a href="#"><img src="/images/joomlart/partners/partner-4.png" border="0" alt="" /></a></li>

<li><a href="#"><img src="/images/joomlart/partners/partner-5.png" border="0" alt="" /></a></li>

<li><a href="#"><img src="/images/joomlart/partners/partner-6.png" border="0" alt="" /></a></li>

</ul>

</div>
2. Bio.
Module position: intro-2
Module Suffix: row-darker
Custom HTML
<div class="bio-content row">

 <div class="col-md-8">

 <h3>Howdy Folks.</h3>

 <p>Hi, I'm Jason, digital artist and designer, working in web development and print media.. I love to travel and explore new places, meet new people and of course try all kinds of food.</p>

 <p>Lorem ipsum dolor sit amet, consectetur adipiscing elit. Quisque id magna a dui lobortis aliquet. Aenean pulvinar purus ut ipsum vulputate egestas. Donec euismod ex eu nibh interdum, ac auctor sem hendrerit. Maecenas ullamcorper diam sed ligula malesuada. Fusce enim tortor, incidunt nec tempor a, ullamcorper id eros.</p>

 </div>

 <div class="col-md-4">

   <!-- AddThis Follow BEGIN -->

   <div class="addthis_toolbox addthis_32x32_style addthis_default_style">

   <a class="addthis_button_facebook_follow" addthis:userid="joomlart">Facebook</a>

   <a class="addthis_button_twitter_follow" addthis:userid="joomlart">Twitter</a>

   <a class="addthis_button_google_follow" addthis:userid="joomlart">Google Plus</a>

   <a class="addthis_button_pinterest_follow" addthis:userid="joomlart">Pinterest</a>

   </div>

   <script type="text/javascript" src="//s7.addthis.com/js/300/addthis_widget.js#pubid=xa-525b746c4d879b01"></script>

   <!-- AddThis Follow END -->

 </div>

</div>
Homepage style 6 | Live demo →
Step 1: create template style
- 1. To create new template, the best way is duplicating the default template style.
View Screenshot → - 2. Rename the template style and assign "home-6" layout in the "Layout" tab.
View Screenshot → - 3. Add background for the header theme. Open the "Theme" setting panel, in the "Header Theme Style", select image Header theme type then browse an image to display as the header background. View Screenshot →
Step 2: create menu item
- 1. Create Home menu item in Main Menu, select Carousel Layout menu type, assign "Template Style" that we created in Step 1 menu type and set it as default menu item.
View Screenshot → - 2. Configure number of items to display: open the Blog Layout tab, select number of items to display.
View Screenshot → - 3. You DON'T need to configure the settings in JA Extra Fields tab as the settings are only applied for Featured Article and Isotope menu type.
In each slide, it loads an article from selected categories. Each slide has title, description and "View Projects" button. The Slide title is Article title, Slide description is Article intro text and "View Projects" button is the Article read more button. In one article, if you don't use <hr id="system-readmore" />, the "View Projects" button will not be displayed.

You can change the text "View Projects", open file: language\en-GB\en-GB.tpl_ja_jason.ini, find and change the following language string.
TLP_VIEW_PROJECT = "View Project"
Portfolio page
This is bonus page in JA Jason template.
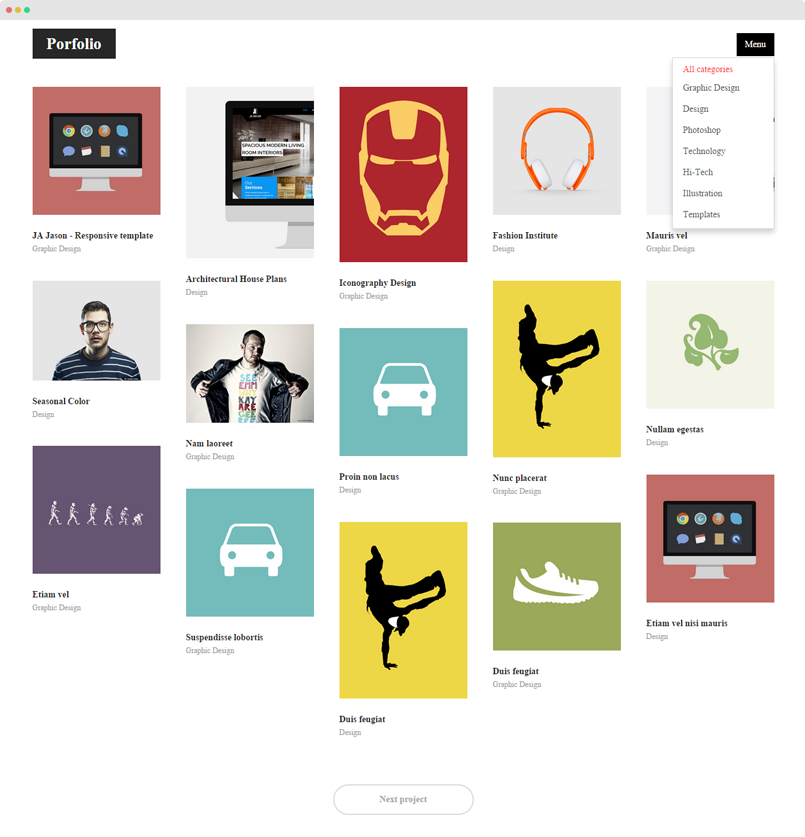
Follow the instructions to create same Portfolio page as JA Jason portfolio page demo site.
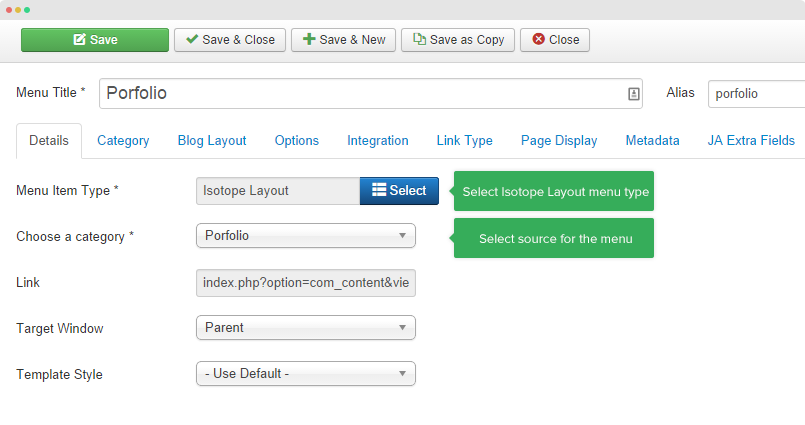
Step 1: Create Portfolio menu item
From the back-end of your site, go to: Menu → Main Menu → Add new menu item.
1. Select menu type
The portfolio page in JA Jason uses overridden layout: Isotope Layout so please select Isotope Layout menu type and source for the menu item.
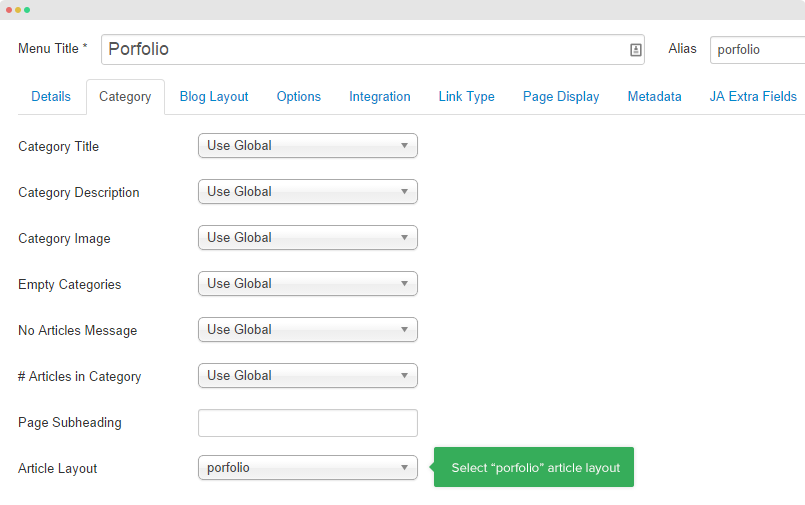
2. Configure Article layout
Open the "Category" setting tab and assign "porfolio" for "Article layout" field.
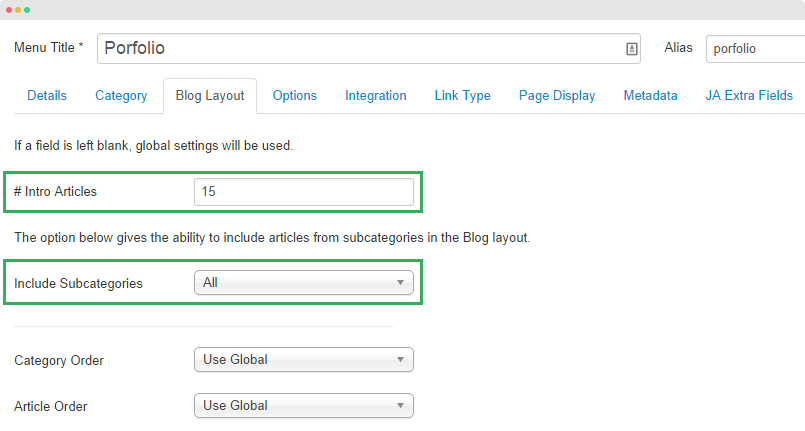
3. Configure number of items to display
In the Blog Layout setting panel, set number of items to be displayed in front-page
4. Configure columns and pagination
The column setting setting is to configure the responsive display of the page by setting columns in responsive layouts (large, medium, small and extra small) in the "JA Extra Fields" tab.
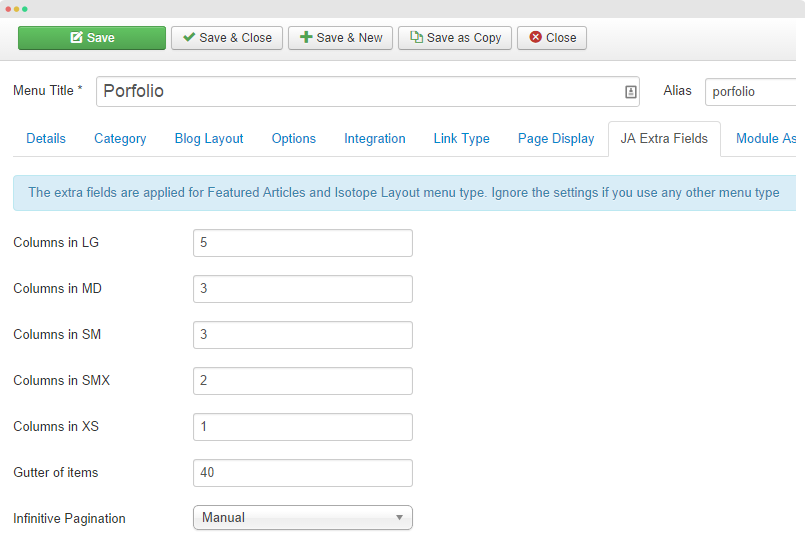
The settings in "JA Extra Fields" tab is only applied for Featured articles and Isotope Layout menu type.
Other settings
Step 2: add Article Categories module
The default Joomla module is to display list of categories in the Portfolio category.
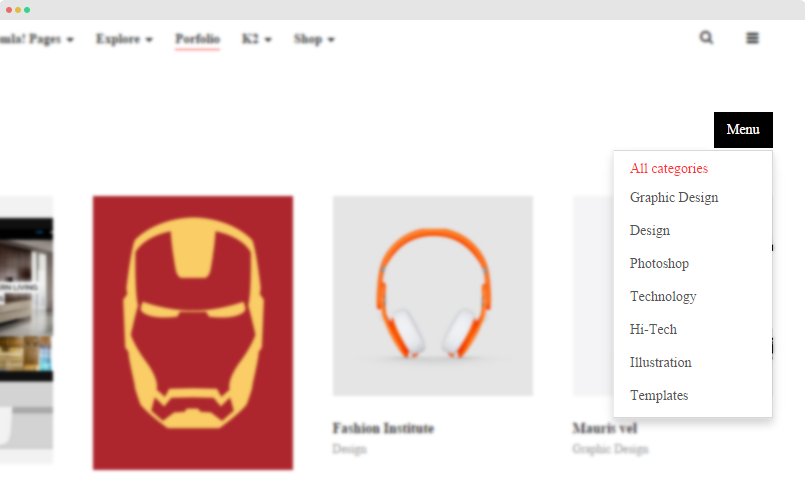
Back-end setting
Module position: portfolio-menu
Module Suffix: NOT USED
Change "Menu" and "All categories" text
The "Menu" and "All categories" text are defined in the language/en-GB/en-GB.tpl_ja_jason.ini file. Open the file, find and edit the following text:
TPL_ARTICLES_CATEGORIES_MENU			= "Menu"
TPL_ARTICLES_CATEGORIES_ALL			= "All categories"
Customize "Isotope Layout" layout
The "Isotope Layout" layout files are stored in the folder: templates\ja_jason\html\com_content\category. There are 5 files to work on to customize the layout:
- isotope.php
- isotope.xml
- isotope_item.php
- isotopelayout.php
- isotope_item.php
The "porfolio" Article layout file - porfolio.php is stored in the folder: templates\ja_jason\html\com_content\article.
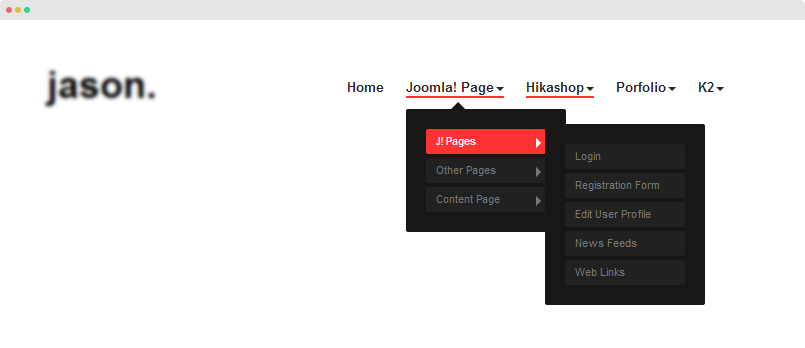
Joomla Pages configuration
working in progress, please comeback later