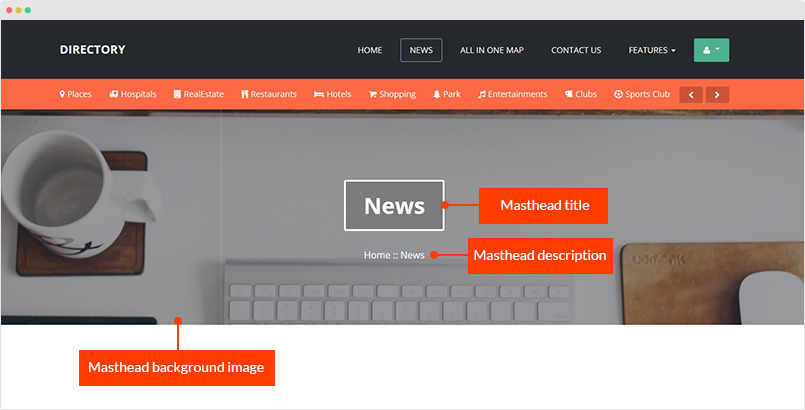
JA Masthead Module
JA Masshead Module displays masshead title like the JoomlArt masshead. Title and description can be specifically configured for any pages.
Module Setting
Module position: masthead
Module Suffix: NOT USED
Sample configuration condition
[Masshead Itemid="127" title="About Us" background="images/joomlart/bg-masthead.jpg"]Home :: About Us[/Masshead]
Itemid is the menu item ID, title is the masthead title, background is the masthead background image.
JA Twitter Module
This module provides API integration with the Twitter microblogging service to drive more traffic to your site. Tweets from your Twitter account and Friends are displayed neatly.

Module position: section-2
Module Suffix: NOT USED
JA Google Map plugin
In JA Directory, Google map is integrated to show location of directory with the help of JA Google Map plugin, please install the plugin and enabled it then add your Google map API to the setting panel.
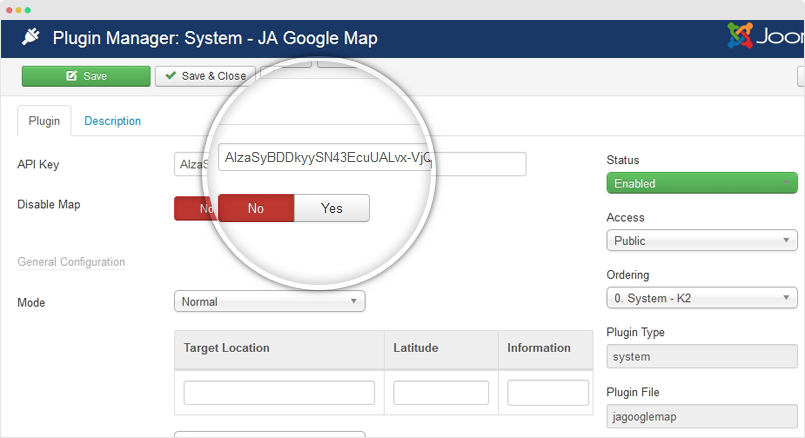
To display the Google map in the page you want, normally, we add {gmap} to article or CUSTOM HTML module in the page. Check out the documentation of the plugin.
K2 Component
JA Directory uses K2 as main content, it's used for Directory content.
Global configuration
To configure the global settings of K2, go to: Components > K2 then hit the "Parameters" button on the top right corner. In JA Directory template, we use default settings so we will not provide the setting screenshot.
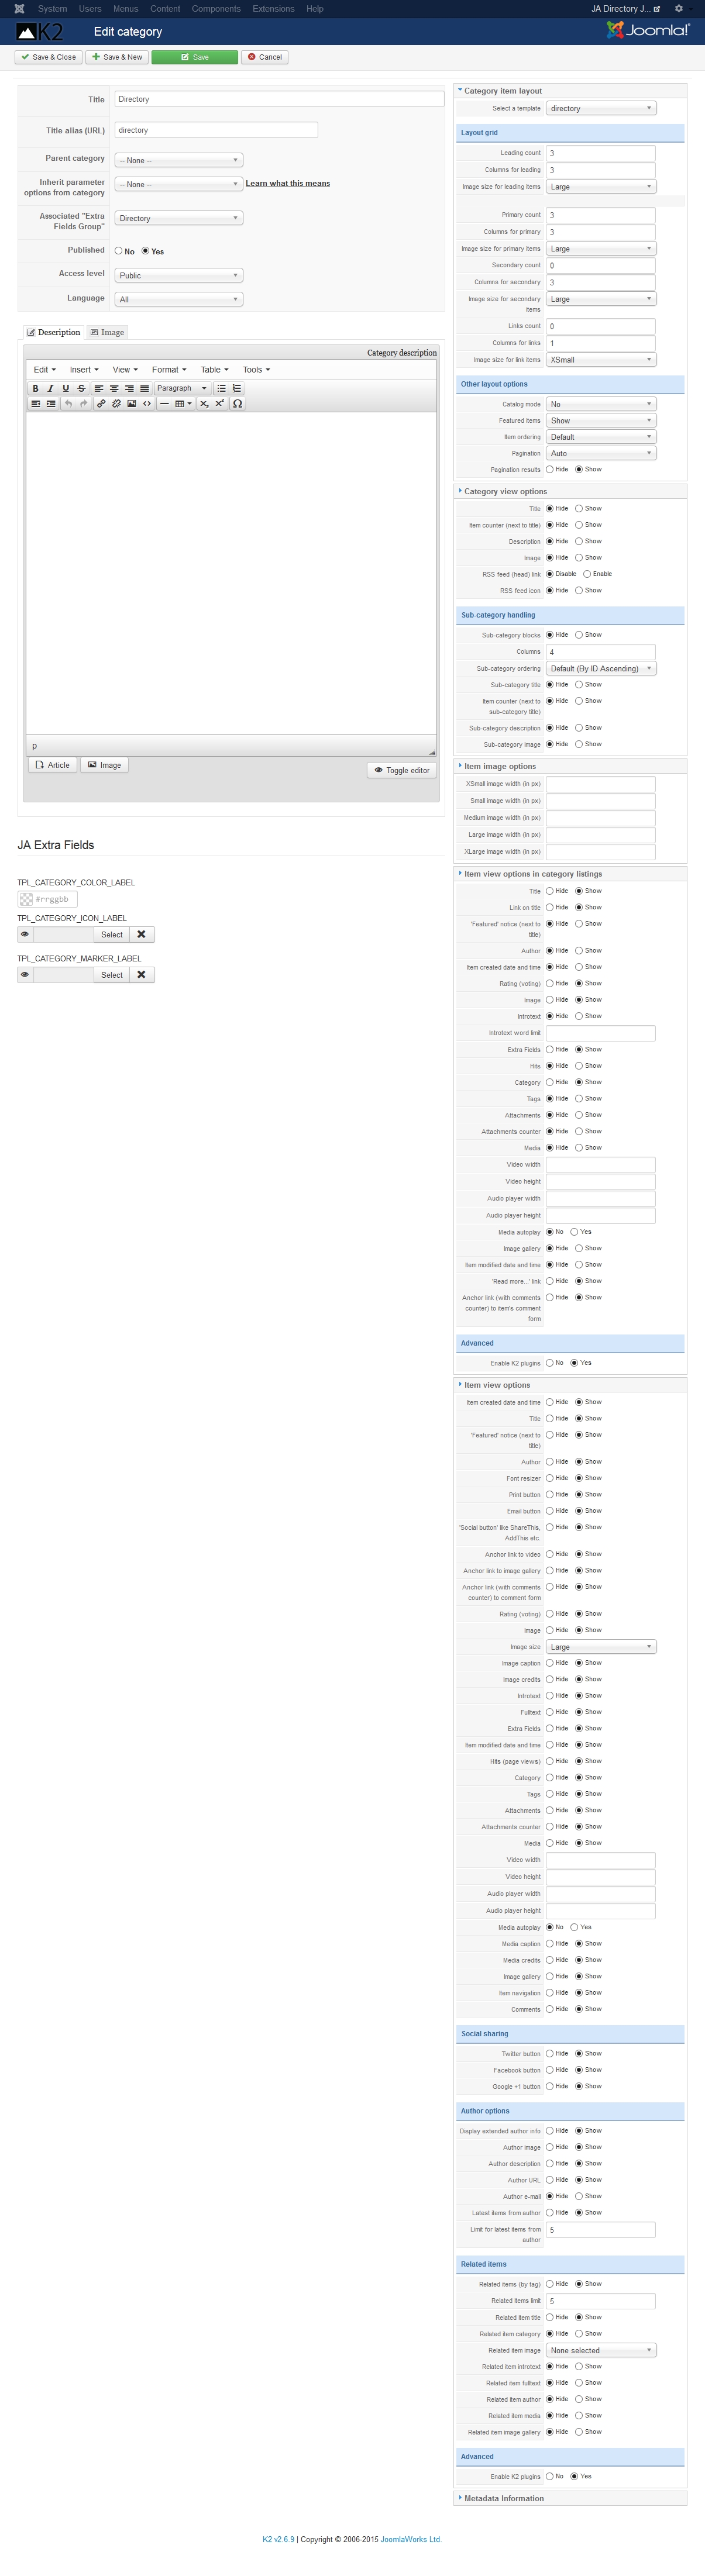
Category Settings
To have a Directory page and Directory detail page as JA Directory, please make sure your K2 Categories have same settings.
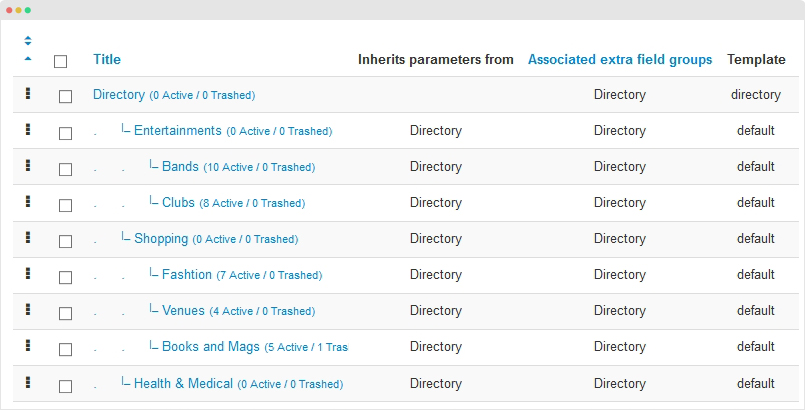
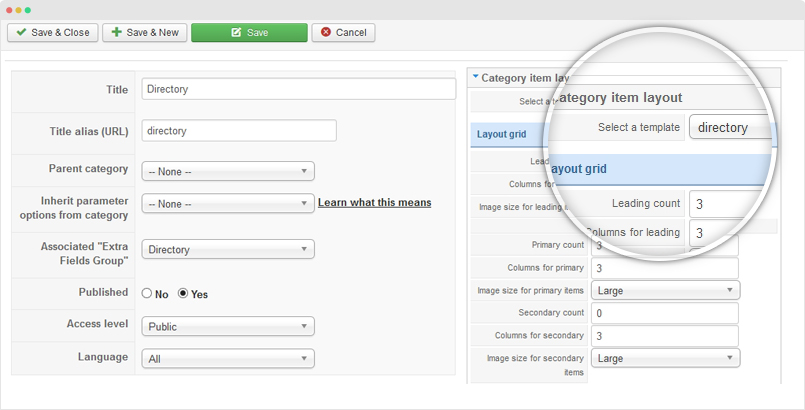
All categories settings are inherited from "Directory" category, here is the detail configuration of the "Directory" category.
Please make sure you select "directory" template for the category.
For other categories, you can inherit settings from the "Directory" setting or you can configure it the same way we did for Directory category.
Extra Fields
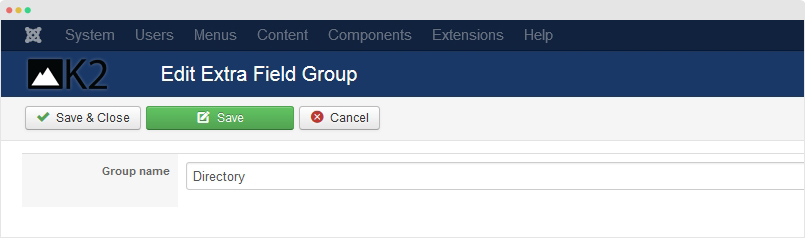
JA Directory uses Extra fields for filter so it is important part when building content. Firstly, you should create extra field group for directory, go to: Components > K2 > Extra field group then add new extra field group.
Next, go to "Extra Fields" tab to create new extra fields, here is list of extra fields we created for the JA Directory demo site.
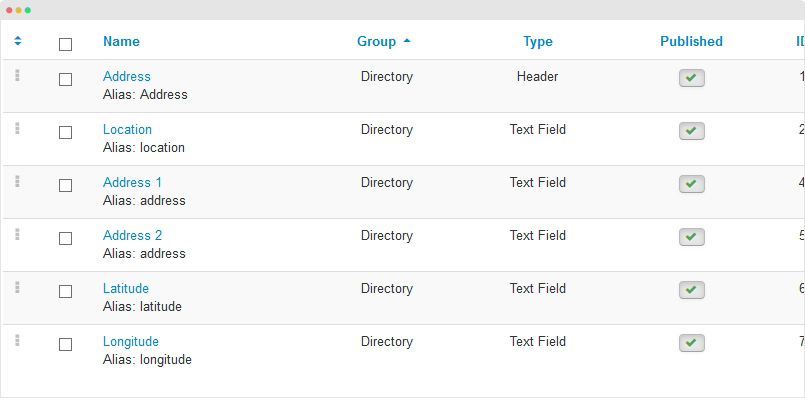
The most important extra field is location.
"Location" extra field
The "location" extra field will list all locations added in JA K2 Filter Multi level fields data.
Step 1 - create "location" extra field

The "alias" is the key to match the extra field with JA K2 Filter Multi level fields data that we are going to create in the step 2.
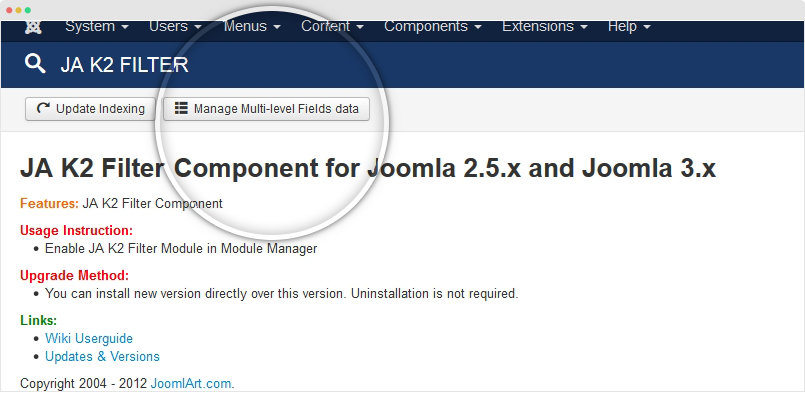
Step 2 - Create JA K2 Filter Multi level fields data
Go to: Components > K2 Filter then hit the "Manage Mutli-level Fields data" button.
In the panel, we are going to create new multi-level fields. The parent field should has alias location, the same as the alias of "location" extra fields to they can be matched.
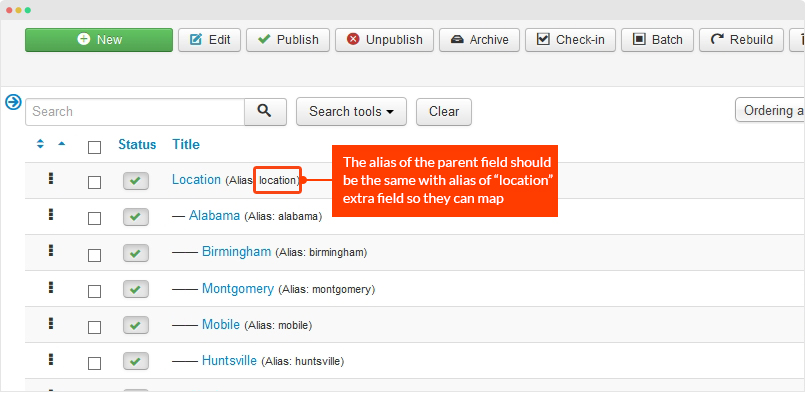
Once done, go to K2 Item editing page, in the "Extra Fields" tab, you can see the extra field "location" and you will see list of locations from K2 Filter Multi level fields data, select location for the item (Directory).
JA K2 Filter
JA K2 extra field filter and search component gives the functionality to filter or search K2 articles based on their extra field values.
1. Download and install JA K2 Filter
JA K2 Filter includes component, module and plugin, the best way to get it work in your site is using the package, download the package and install it to your Joomla system.
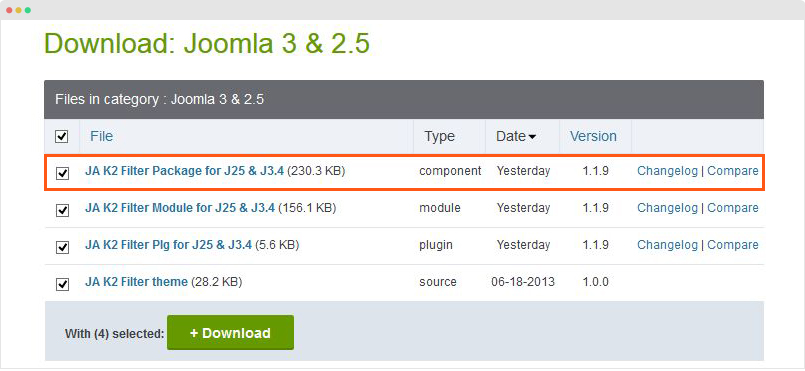
Install the package - go to: Extensions > Extension Manager > browse the package and hit the "Upload and Install" button.
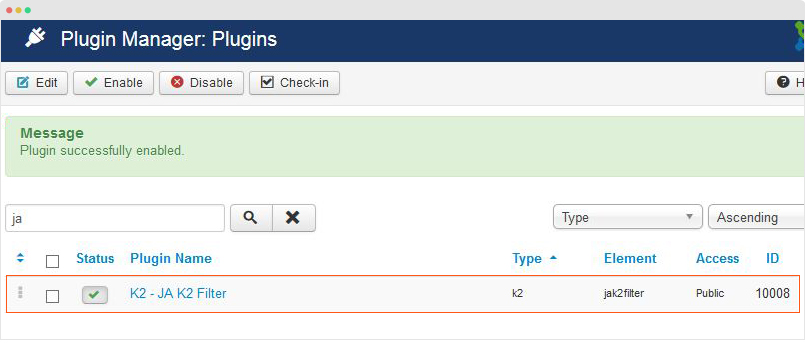
Once the installation is done, please enable the JA K2 Filter Plugin, go to: Extensions > Plugin Manager, filter the JA K2 Filter plugin and enable it.
2. Manage Multi-level Fields Data
This is new feature of K2 Filter to implement the location filter in JA Directory.
The Multi-level Fields data will be mapped with extra field you created in K2, the alias of the Multi level field is the same with K2 extra field.
3. Create JA K2 Filter module
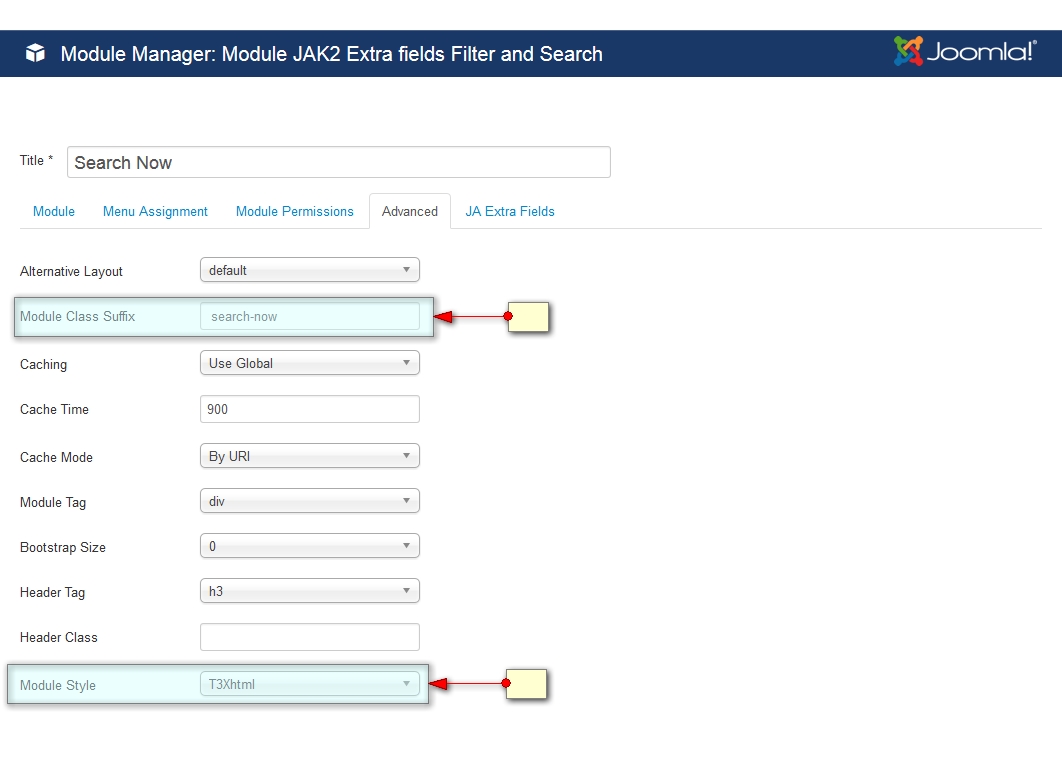
The module allows you to search k2 items with keywords or filter items with extra fields.
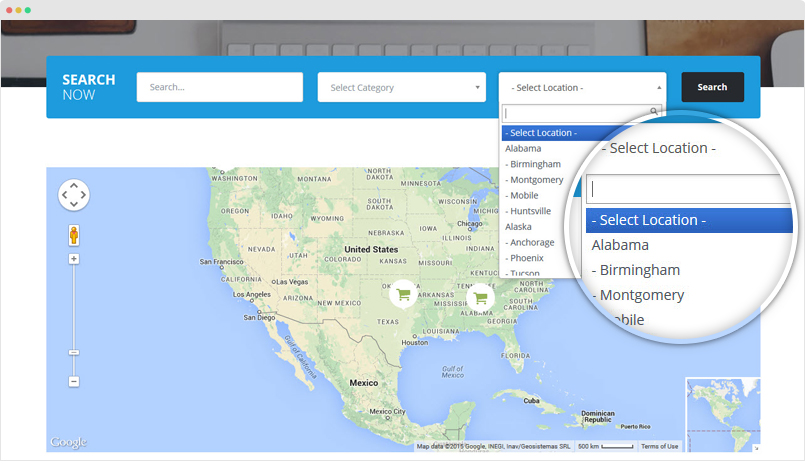
Module position: section-1
Module Suffix: search-now
JA ACM Module
Create new JA ACM instances
We built a lot of content blocks in Uber template based on JA ACM module. Here is the step to create a content block with JA ACM Module.
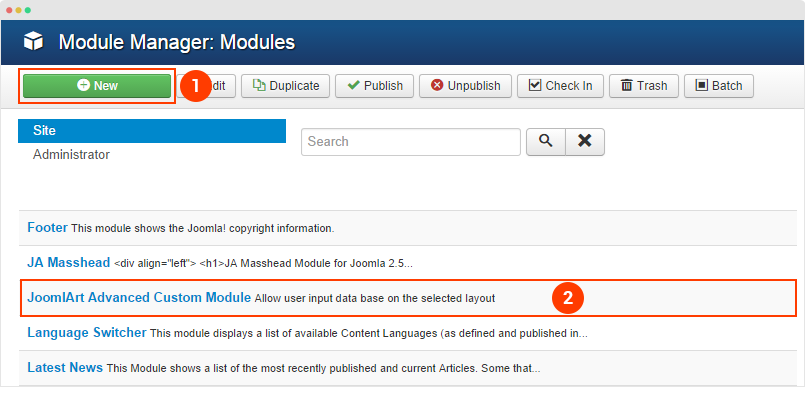
Step 1 - Create JA ACM module
From your site back-end, go to: Extensions > Module Manager, hit the "New" button to create module then select JoomlArt Advanced Custom Module
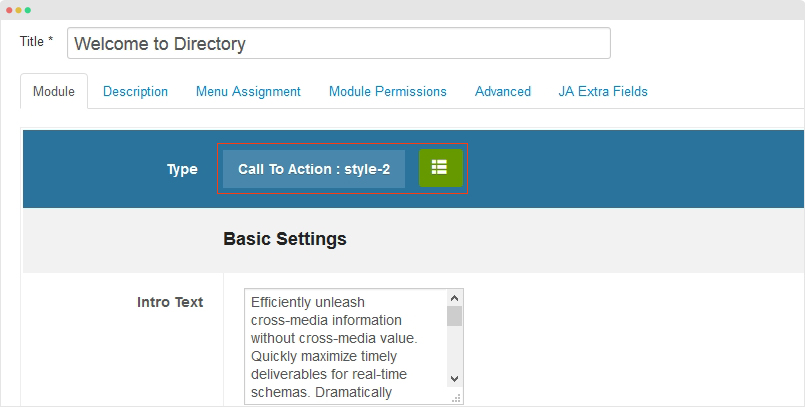
Step 2 - Select type
The module supports many types, each type has multiple styles. Once you select type, the corresponding setting fields are loaded. For each type, it includes sample data by default that help you understand the structure of content block. Now you can change setting of the fields, add content, etc.
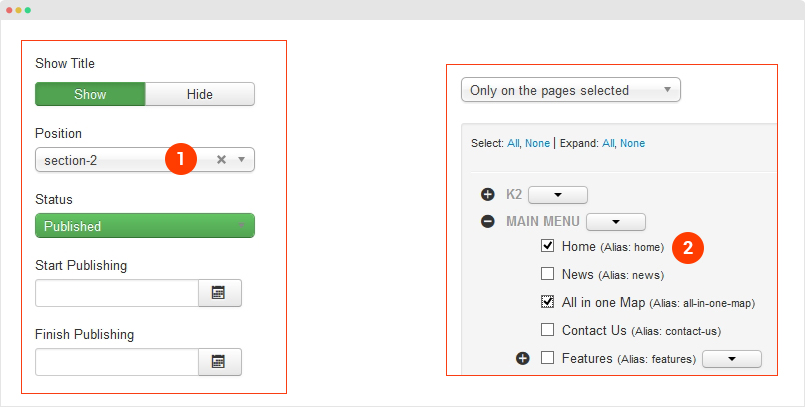
Step 3 - Select position, pages to display the module
We use ACM to build views for content used in the JA Directory, check out the list of ACM Types supported in the template.
- Slideshow
- Teams
- Statistics
- Pricing
- Follow
- Features-intro
- Call to action (cta)
- Clients
- Testimonials
JA ACM module content type structure
Each content type of JA ACM module is a folder stored in templates\ja_directory\acm\.
templates/ja_directory/acm/
+--slideshow/
¦    +-- config.xml				/*define fields for the content type*/
¦    +-- tmpl/
¦    ¦  +-- style-owl.xml
¦    ¦  +-- style-owl.php
¦    +-- less/
¦    ¦  +-- style.less
¦    ¦  +-- style-owl.less
¦    +-- css/
¦    ¦  +-- style.css
¦    +-- js/
¦    +-- images/
+--testimonials/
+--features-intro/
+--clients/
+--cta/
+--follow/
+--team/
+--pricing/
In each folder, it includes:
config.xmlfile: define title and description about the content type- tmpl folder: include all style files that the content type support. Each style has one
.xmlfile (define fields in the style) and a.phpfile (define how the fields defined in the.xmlfile displayed in front-page). - less folder: include
.lessfiles to style for the content type and each style. - css folder: the compiled CSS file from the .less files, all files are joined so you just have
style.cssin this folder. - .js folder (if necessary): include JavaSripts files for the content type.
Customization
You can customize style for any content block and style that the content block supports. Open .less file in the less folder of the content type, for example: acm/slideshow/less/style-owl.less then go ahead with your customization. Once done, please save the file and compile LESS to CSS via template style admin panel.
Please do not use .css files to customize as the file is overridden any time you compile LESS to CSS.
Create new fields for a style
You can add new fields for any type, open the .xml file of the style (example: acm/slideshow/tmpl/style-owl.xml)then define new fields using the format below:
<field name="button" type="text" default="" label="FIELD_LABEL" description="FIELD_DESC" required="1" />
2. Create new style for a type
For example, I want to create a new style (style 1) for the news-featured so I have to create the following files:
- Create .xml file - acm/slideshow/tmpl/style-1.xml
- Create .php file - acm/slideshow/tmpl/style-1.php
- Create .less file - acm/slideshow/less/style-1.less
The best way to create new style for a type is cloning files of an existing style.
3. Create new type
You can create new content type to build content for your site. For example, I want to create media content type, then I will follow the steps below:
- Step 1 - create folder
acm/media/folder - Step 2 - create
acm/media/tmplfolder, add style files for the content type (style-1.php, style-1.xml) then add fields and call the fields, define layout, class for fields in each style - Step 3 - create
acm/media/lessfolder, add.lessfiles (style.less, style-1.less) and add style for the content block, styles. - Step 4 (if required) -
acm/media/jsfolder, addscript.jsfile and add JavaScripts that is used for the content block.