JA Decor Introduction
Responsive Joomla template for Decor, Interior Design and Corporate Portfolio for both Joomla 2.5 and Joomla 3. We have written this the documentation based on Joomla 2.5, please do consider this factor if you are using it for Joomla 3. No worry, there aren't any big differences between the two.
1. Joomla template for Decor and Interior design
JA Decor is unique with its dynamic block layout design, eCommerce solution ready with Mijoshop component and is blogging friendly thanks to EasyBlog component.
Built on the robust T3 Framework with Bootstrap 3 at core, JA Decor is fully responsive. With no exception, JA Decor supports Right-to-Left (RTL) language layout and Off-Canvas menu navigation system for both mobile and tablet devices.
View Demo for responsive Joomla template - JA Decor
2. Main Features
- Dynamic Joomla template with eCommerce
- Fully Responsive Template
- Joomla 2.5 and Joomla 3 native
- Bootstrap 3 integration
3. JA Extensions Supported
- JA Content Slider module
- JA Masshead module
- JA Slideshowlite module
- System - JA Google Map plugin
- JA Extension Manager
- T3 Framework
4. Supported Third party extensions
- Acymailing
- Easyblog
- Mijoshop
5. Supported Joomla pages (by default)
- Login
- Registration Page
- Edit User Profile
- Web Links
- News Feeds
- Contact Us
- Smart Search
- Offline Page
- Tag Item Page
- 404 Page
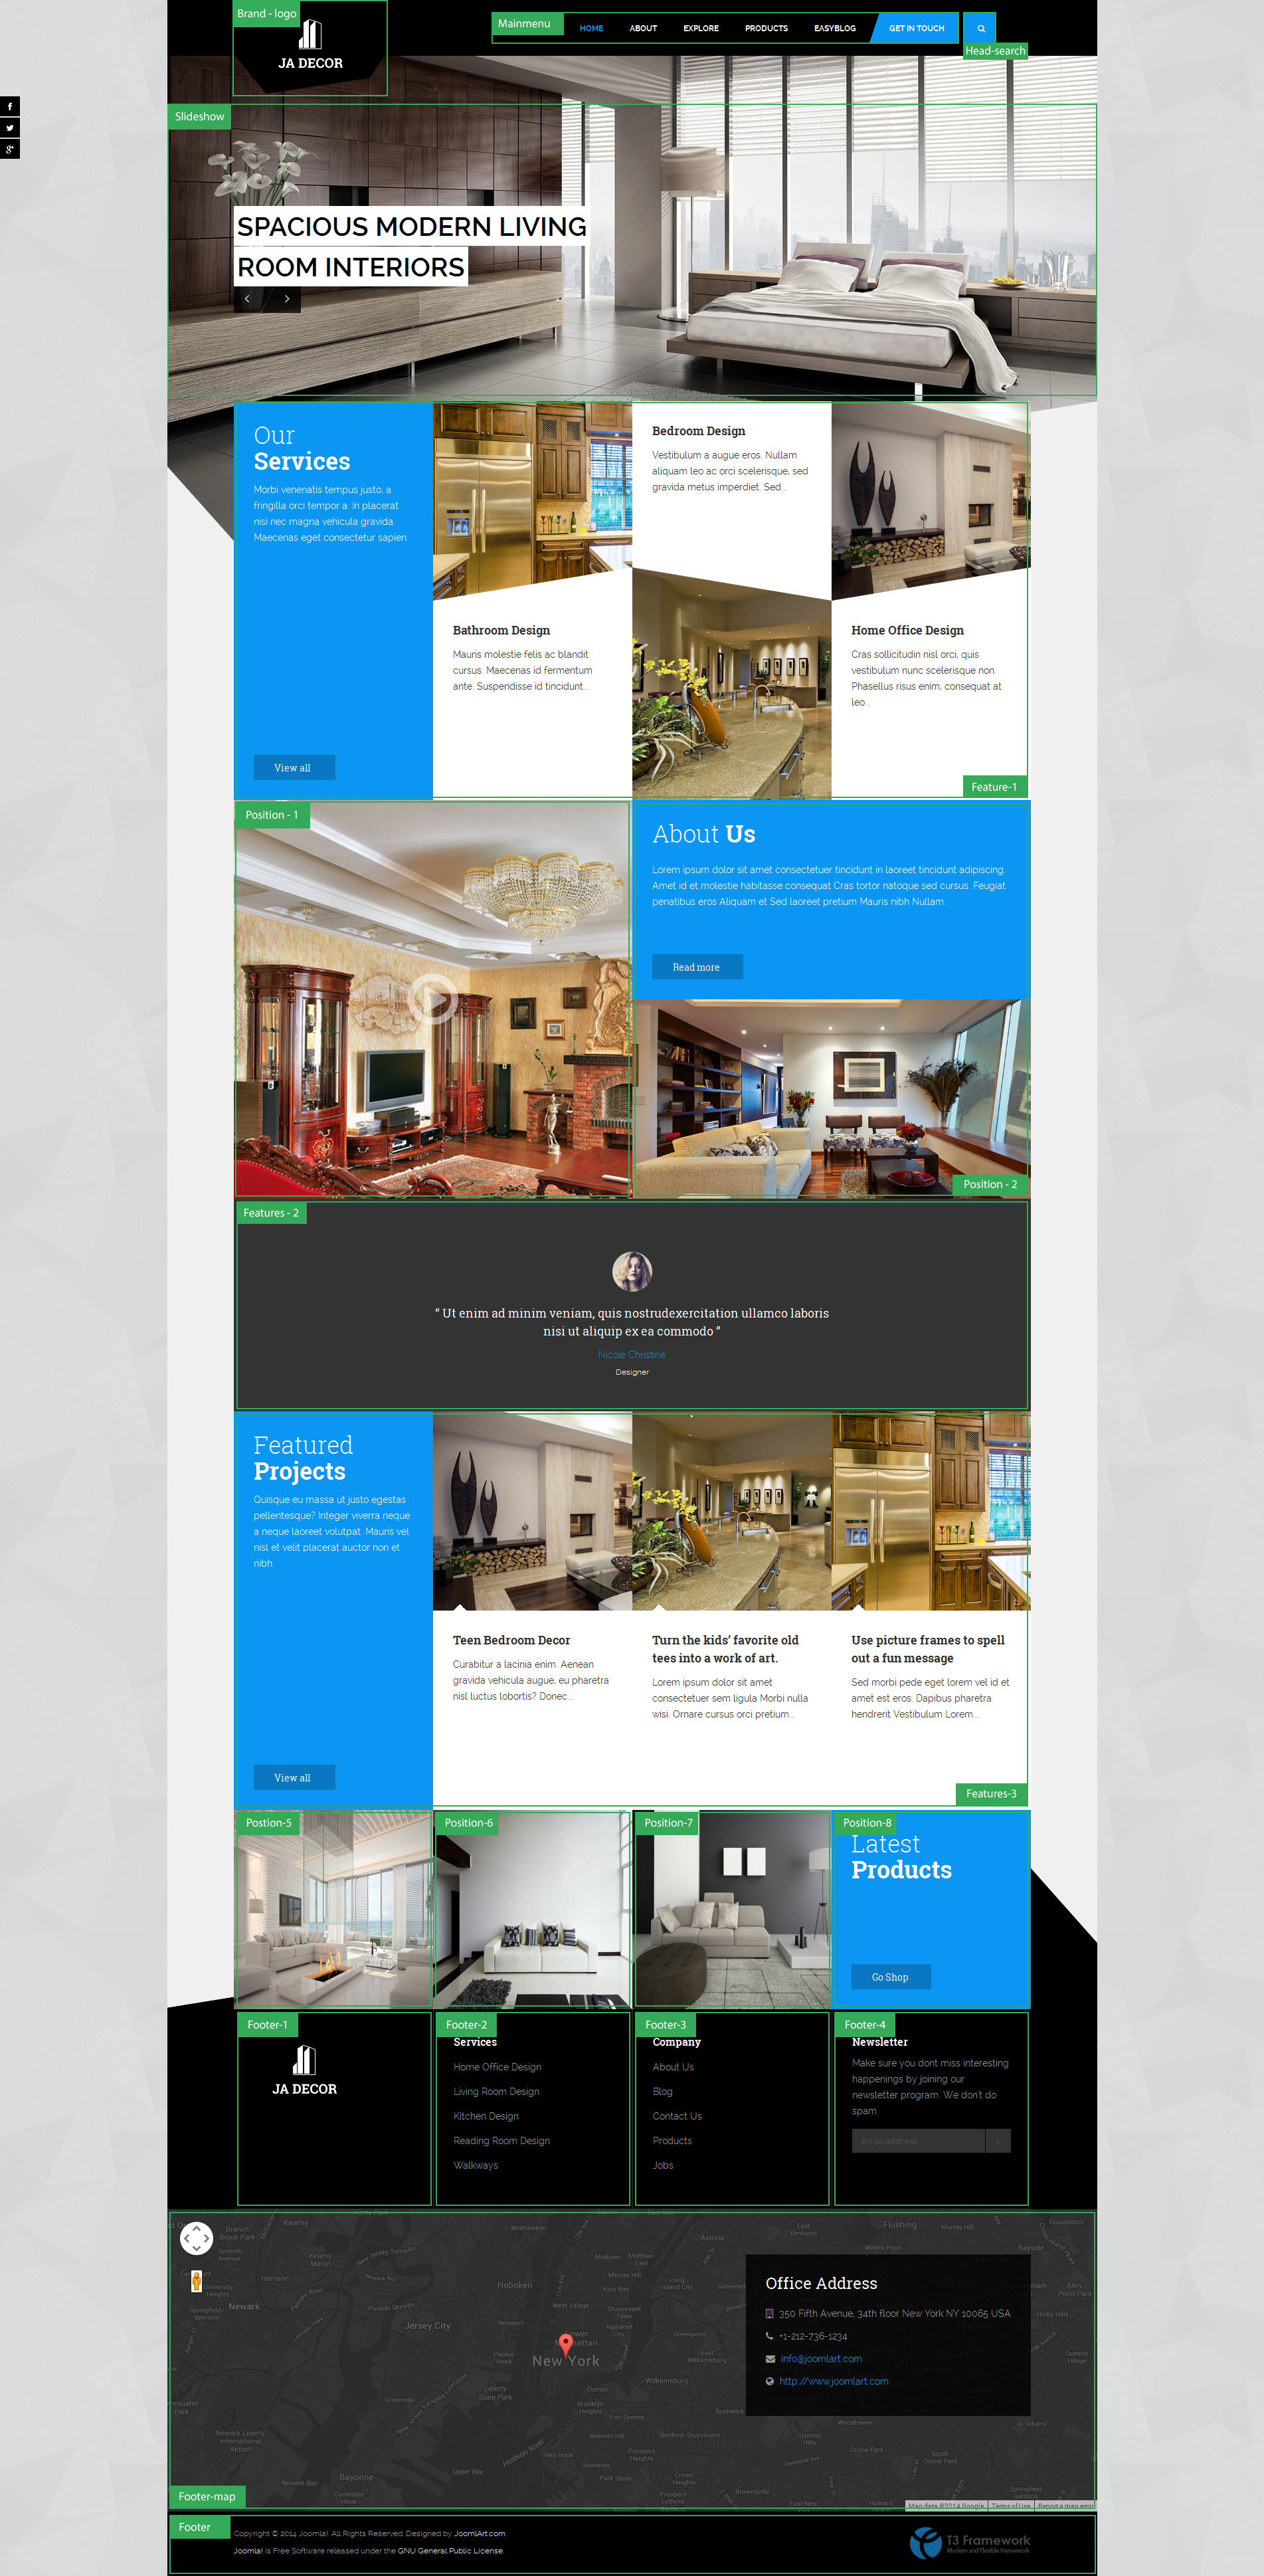
6. Site structure and Module position
System requirement
JA Decor is compatible with Joomla 3 and Joomla 2.5. Please make sure your system meets the following requirements:
Joomla 3 System requirement
Software
- Software: PHP (Magic Quotes GPC off): 5.3.1 + (5.4+ recommended)
Databases
- MySQL(InnoDB support required): 5.1+
- MSSQL 10.50.1600.1+
- PostgreSQL 8.3.18+
Web Severs
- Apache 2.x+
- Microsoft IIS 7
- Nginx 1.0 (1.1 recommended)
Joomla 2.5+ system requirement
Software
- Software: PHP 5.2.4+ (5.4+ recommended)
- MySQL: 5.0.4+
Web Sever
- Apache: 2.x+
- Microsoft: IIS 7
- Nginx: 1.0 (1.1 recommended)
Browser requirement
The requirements are the same with both Joomla 2.5 and Joomla 3
- Firefox 4+
- IE (Internet Explorer) 8+
- Google Chrome 10+
- Opera 10+
- Safari 5+
Development Environment
The requirements are the same with both Joomla 2.5 and Joomla 3
During development process, Localhost is preferred. You can use the following servers on your PC to develop your site.
Windows
- WAMPSEVER
- XAMPP for Windows
Linux
- LAMP Bubdle
- XAMPP for Linux
Mac OS
- MAMP & MAMP Pro
- XAMPP for Mac OS
Download and Installation
1. Plan your site Development
- Kick-start a New Joomla Site? - If you are planning to start fresh with a new Joomla site, then use our Quickstart package to quickly clone the demo site, then replace the demo content with yours. Check the How to install Quickstart Package documentation for the in-depth how-to guide for Quickstart Installation.
- Installing on your existing live site ? - If you are planning to use this template for your existing Joomla site, then you should follow the How to make your site look like demo site guide first to dig in the steps involved.
2. Download Template and Extensions
Please proceed to JA Decor's Download page, where it holds all the related files and template zip file that you need.
3. Install Template and Extensions
Once you successfully Download the files you need, You'll have to:
- Install the template file onto your Joomla system.
- At default, during the installation process, JA Decor template will be installed with the settings we're used as on the demo website. Therefore, if you would like to make any changes in configuration, it's recommended that you should complete the setup (including installing all the modules and plugins along with the templates as on demo) then carry out any customization afterwards.
View how to install extensions guide
4. Build demo with our Demo Builder
If you are not yet familiar with JoomlArt Demo Builder, more information on this can be read here. To be short, the demo builder service allows you to quickly clone demo for any JoomlArt's Joomla template and test-drive it. As we have recently improved and re-developed the Demo Builder system, you can now play around and experiment with it up to 3 days.

Note:
Custom HTML Module: We have styled (CSS) for several Custom HTML modules using different div classes. You should check out the HTML codes in these module and follow the same format in order to get it displayed correctly. We do also provide the HTML code in this user-guide down below for your references.
How to build MijoShop 3 sample data
Note: This guide is applied for fresh Quickstart installation, Joomla 3.4 and Mijoshop 3 only. If your site undergoes any change to configuration, you might foresee unexpected conflicts.
If you installed JA Decor using our Quickstart installation package and made no changes to default configuration. Then follow instructions below to integrate Mijoshop component with pre-defined configuration as per our demo:
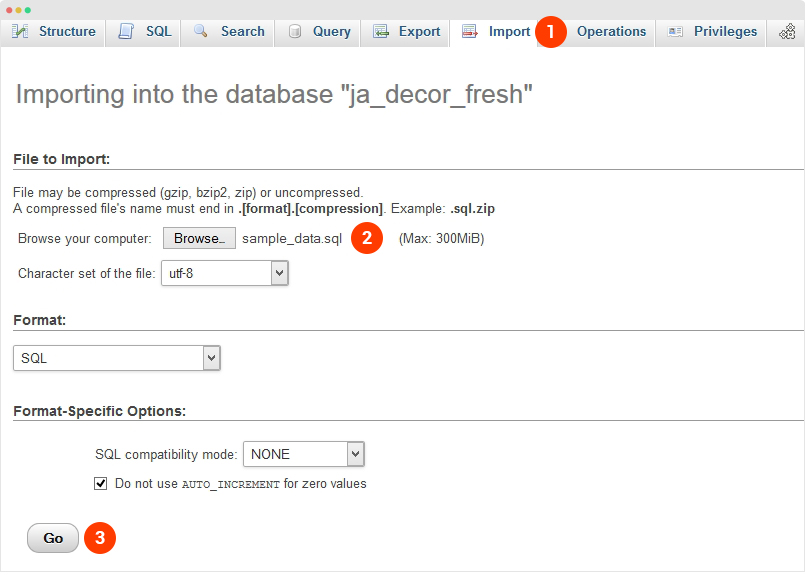
Step 1: Download and install component MijoShop as normal
Step 2: Install SQL
Download SQL file: SQL for Joomla 3.x - ja_decor_sample_data.zip
Open *.sql file you just download, then replace #__ with [database Tables Prefix]
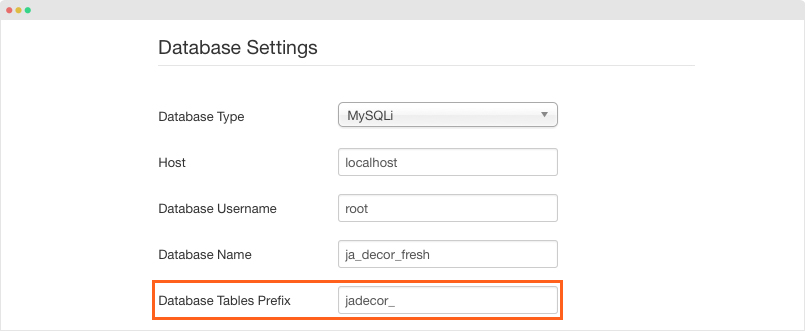
How to get the [database Tables Prefix]:
Navigate to Administrator > site > global configuration > server, you will see your [database Tables Prefix] as per screenshort below:
Then, login your PHPMyadmin, select your Database Name (see screen short for reference).
Step 3: Download Mijoshop Theme that we built in JA Decor:
JA Decor Theme for Mijoshop: http://www.joomlart.com/forums/downloads.php?do=file&id=4094 then unzip and copy to your site's root folder.
Step 4: Download package images at ja_decor_sample_demo_images.zip then unzip and copy to your site's root folder. Once done, you should see the images path: components\com_mijoshop\opencart\
If there is any information in this guide that needs further clarification, feel free to leave comments in the forum, we would be happy to answer all questions you might have.
Extensions Configuration
I. JA Extension Configuration
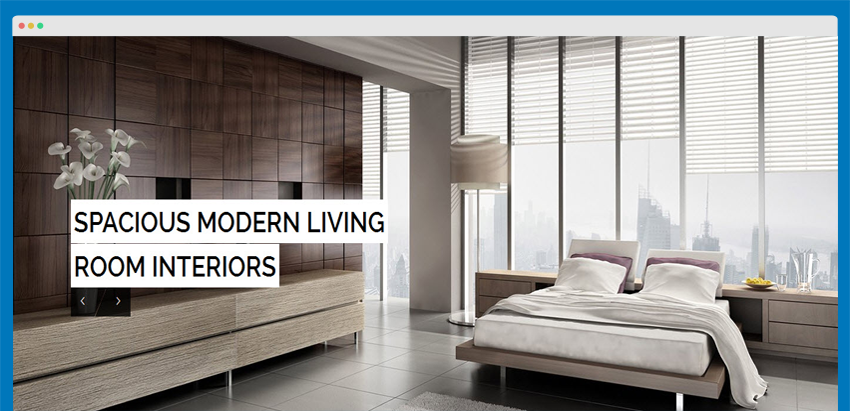
1. JA Slideshow Lite module
  Module Position: slideshow
  Module Suffix: NOT USED
- Module Back-end Settings
- Front-end Appearance
2. JA Content Slider module
  Module title: Testimonial Slider
  Module Position: home-2
  Module Suffix:  background-gray about-box  testimonial-box
- Module Back-end Settings
- Front-end Appearance

3. JA Masshead module
  Module Position: masthead
  Module Suffix: NOT USED
- Module Back-end Settings
- Front-end Appearance
Configuration Conditions :
[Masshead Itemid="455" title="About Us" ][/Masshead]
[Masshead Itemid="512" title="Products" ][/Masshead]
[Masshead Itemid="517" title="Our Services" ][/Masshead]
[Masshead Itemid="519" title="Featured Projects" ][/Masshead]
[Masshead Itemid="296" title="Jobs" ][/Masshead]
[Masshead Itemid="560" title="Featured Articles" ][/Masshead]
[Masshead Itemid="260" title="Featured Articles" ][/Masshead]
[Masshead Itemid="521" title="Register Account" ][/Masshead]
[Masshead Itemid="524" title="My Account" ][/Masshead]
[Masshead Itemid="525" title="Admin Panel" ][/Masshead]
[Masshead Itemid="526" title="Affiliates" ][/Masshead]
[Masshead Itemid="527" title="Bestsellers" ][/Masshead]
[Masshead Itemid="528" title="Shopping Cart" ][/Masshead]
[Masshead Itemid="529" title="Category" ][/Masshead]
[Masshead Itemid="530" title="Checkout" ][/Masshead]
[Masshead Itemid="531" title="Compare" ][/Masshead]
[Masshead Itemid="532" title="Contact" ][/Masshead]
[Masshead Itemid="533" title="Downloads" ][/Masshead]
[Masshead Itemid="534" title="Mijoshop" ][/Masshead]
[Masshead Itemid="535" title="Information" ][/Masshead]
[Masshead Itemid="536" title="Latest Products" ][/Masshead]
[Masshead Itemid="537" title="Manufacturer" ][/Masshead]
[Masshead Itemid="538" title="Manufacturers" ][/Masshead]
[Masshead Itemid="539" title="Newsletter" ][/Masshead]
[Masshead Itemid="511" title="Easyblog" ][/Masshead]
[Masshead Itemid="540" title="Oders" ][/Masshead]
[Masshead Itemid="541" title="Popular Products" ][/Masshead]
[Masshead Itemid="542" title="Product" ][/Masshead]
[Masshead Itemid="543" title="Returns" ][/Masshead]
[Masshead Itemid="544" title="Search" ][/Masshead]
[Masshead Itemid="545" title="Site Map" ][/Masshead]
[Masshead Itemid="546" title="Special Offers" ][/Masshead]
[Masshead Itemid="547" title="Gift Vouchers" ][/Masshead]
[Masshead Itemid="548" title="Wish List" ][/Masshead]
4. JA Google Map Plugin
- Plugin Back-end Settings
- Front-end Appearance
How to change google map style?
Step 1: Go to http://snazzymaps.com/ , choice a google map style that you want to add to your map , click More info.
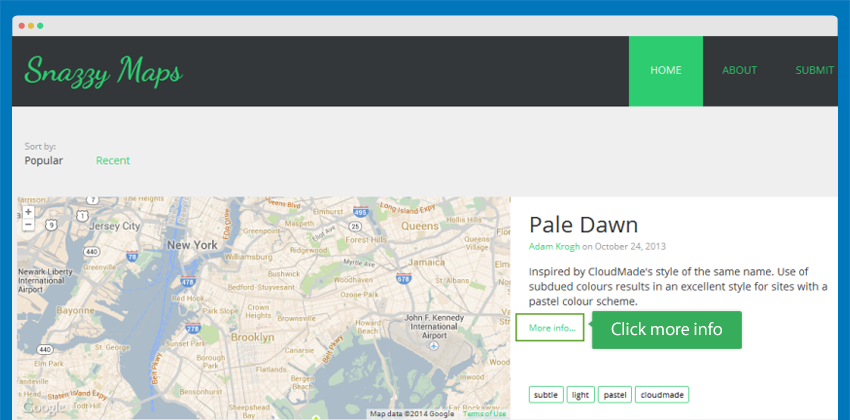
Step 2: In Javascript style array, click Copy to clipboard.
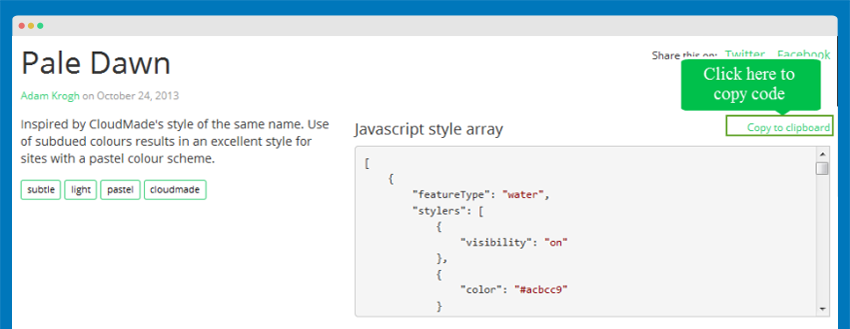
Step 3: Go to your backend -> Extensions -> Plugins Manager -> Google Map plugin -> enable Map Styles and paste to params Map Styles.
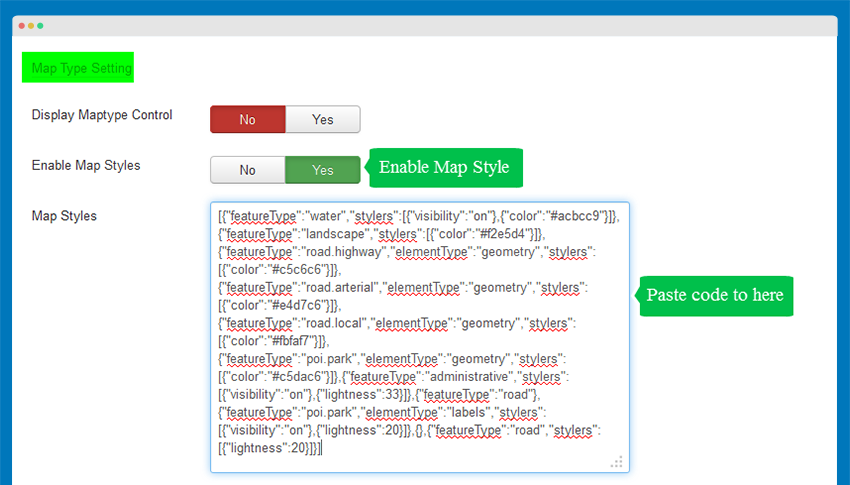
- Front-end Appearance
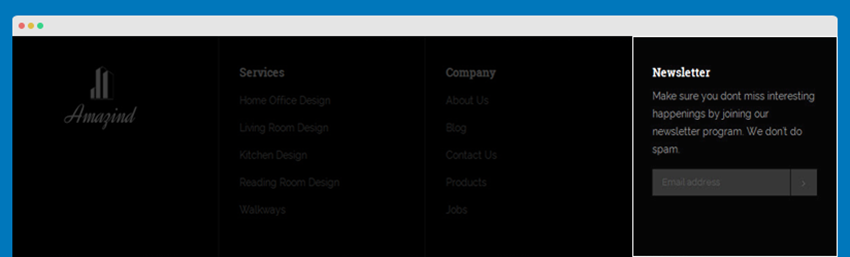
II. Acymailing Module Configuration
  Module title : Newsletter
  Module Position: footer-4
  Module Suffix: NOT USED
- Module Back-end Settings
- Front-end Appearance
III. Default Joomla Extensions Configuration
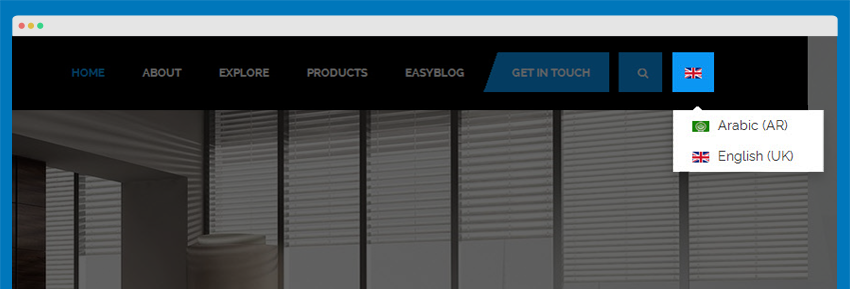
1. Language Switcher
  Module Position: languageswitcherload
  Module Suffix:  NOT USED
- Module Back-end Settings
- Front-end Appearance
2. Articles Category
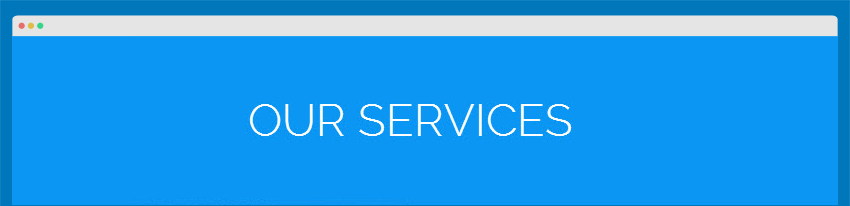
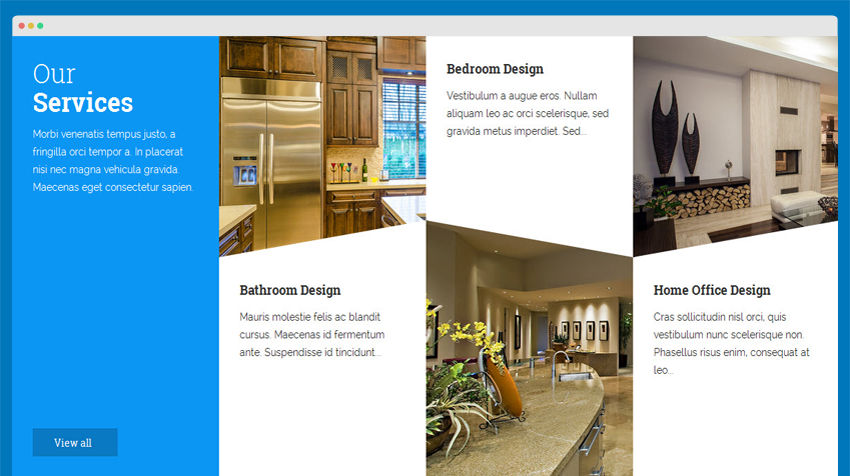
2.1. Our Services
  Module Position: features-1
  Alternative Layout : triangle
  Module Suffix:  NOT USED
- Module Back-end Settings
- Front-end Appearance
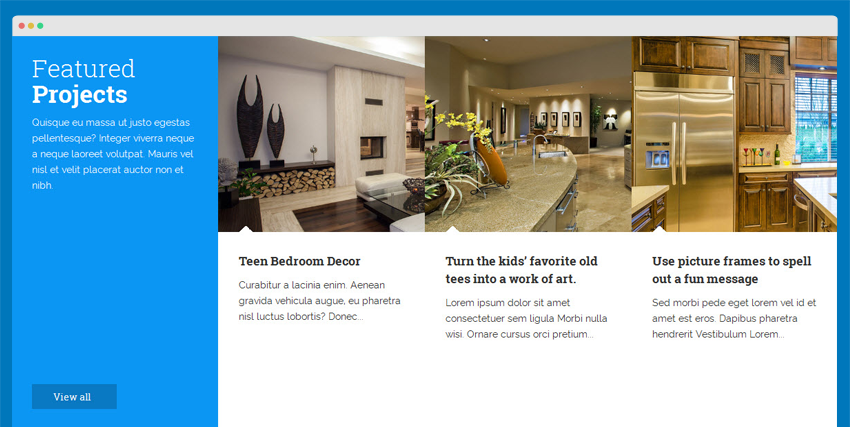
2.2. Features Projects
  Module Position: after-content
  Alternative Layout : normal
  Module Suffix:  NOT USED
- Module Back-end Settings
- Front-end Appearance
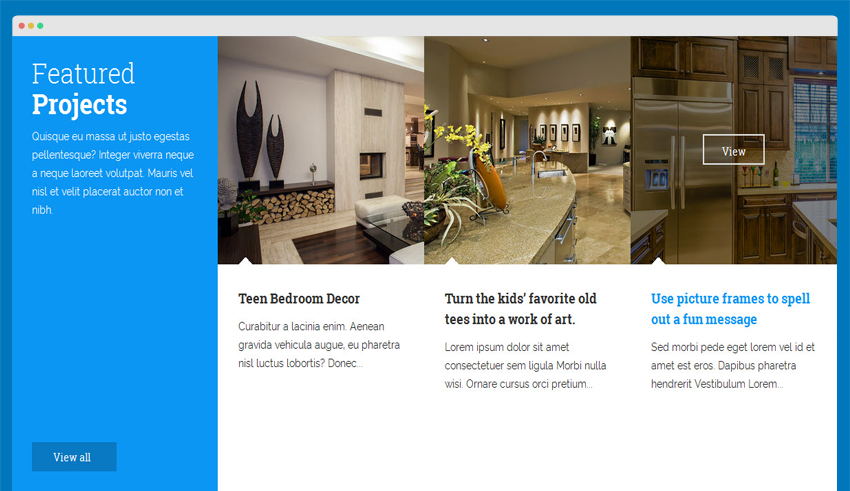
2.3. Features Projects
  Module Position: features-3
  Alternative Layout : normal
  Module Suffix:  NOT USED
- Module Back-end Settings
- Front-end Appearance
3. Banner
To create a banner in the Easyblog as in demo, please follow the following steps:
Go to Backend -> Components -> Banners
Step 1: Create Category
Create a Category's name is Easyblog , the back-end settings are as below.
Step 2: Create banner
Create a banner's name is Easyblog Banner and assign to Easyblog category, the back-end settings are as below.
Step 3: Add the module Banner.
Go to Backend -> Extensions -> Modules manager: Create new module with type is banners
  Module title: Easblog Banner
  Module Position: sidebar-2
  Module Suffix: NOT USED
- Module Back-end Settings
- Front-end Appearance
4. Footer
  Module Position: footer
  Module Suffix: NOT USED
- Module Back-end Settings
- Front-end Appearance

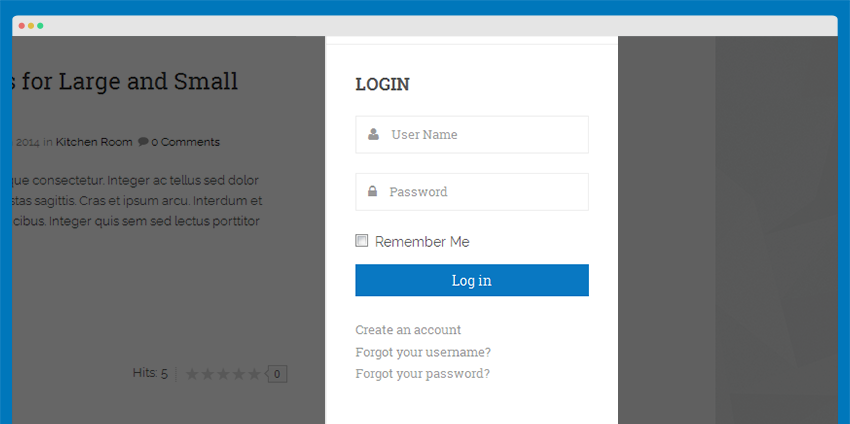
5. Login Form
  Module Position: sidebar-2
  Module Suffix: NOT USED
- Module Back-end Settings
- Front-end Appearance
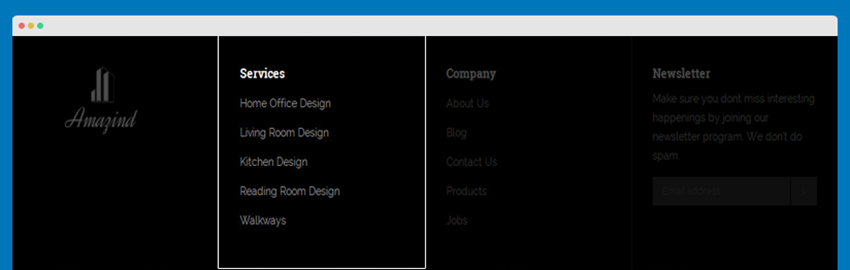
6. Menu
6.1. Services menu module
To have it displayed as it is per Demo site, please follow the step by step instruction as below:
Step 1: Create "Services" menu and add menu items
- Go to Administrator >> Menus >> Menu Manager >> Add New Menu: Services.
- Add New Menu Items for the Menu .
Step 2: Add "Services" menu module
Go to Administrator >> Extensions >> Modules manager >> Add New Menu Module : Services .
  Module Position: footer-2
  Module Suffix: NOT USED
- Module Back-end Settings
- Front-end Appearance
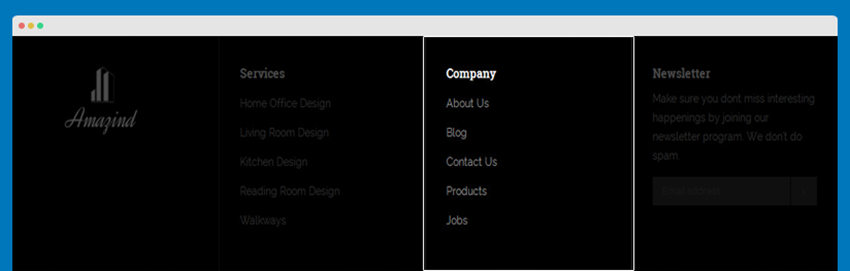
6.2. Company menu module
To have it displayed as it is per Demo site, please follow the step by step instruction as below:
Step 1: Create "Company" menu and add menu items
- Go to Administrator >> Menus >> Menu Manager >> Add New Menu: Company
- Add New Menu Items for the Menu.
Step 2: Add "Company" menu module
Go to Administrator >> Extensions >> Modules manager >> Add New Menu Module: Company
  Module Position: footer-3
  Module Suffix: NOT USED
- Module Back-end Settings
- Front-end Appearance
6.3. Main Menu module
This menu will be used if Megamenu is Turned off
  Module Position: mainnav
  Module Suffix: _menu
- Module Back-end Settings
- Front-end Appearance

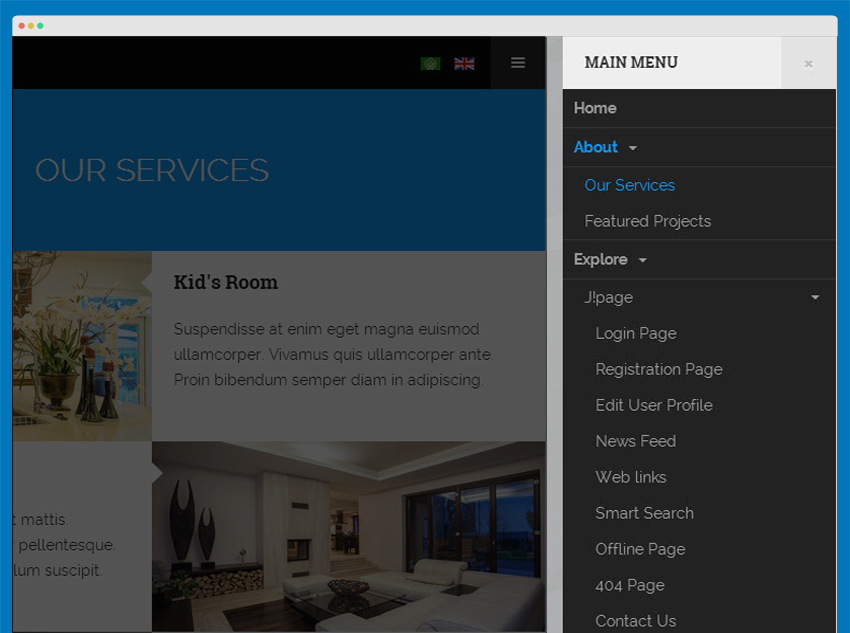
6.4. Off Canvas menu module
This menu used on devices
  Module Position: mainnav
  Module Suffix: _menu
- Module Back-end Settings
- Front-end Appearance
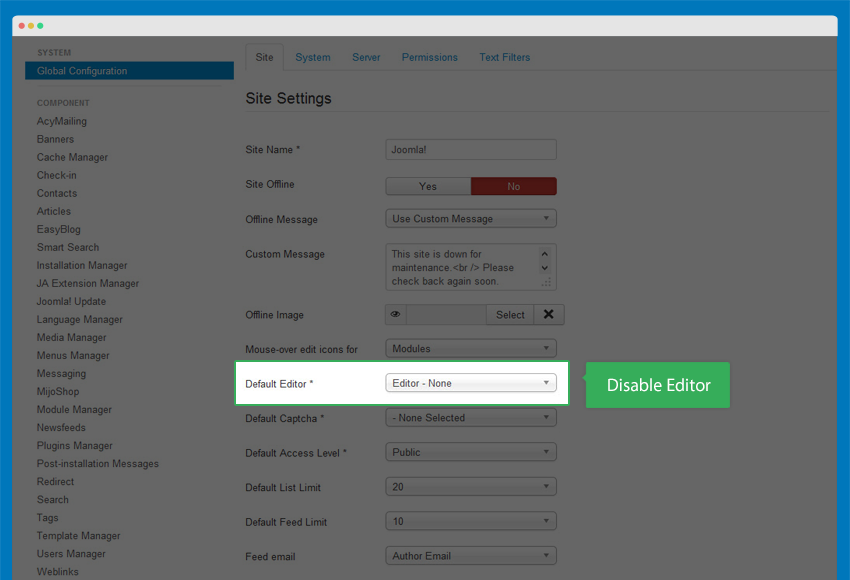
Custom HTML Module
Before working with Custom HTML module, please disable the default Editor under Global Configuration
Go to Backend -> Site -> Global Configuration:
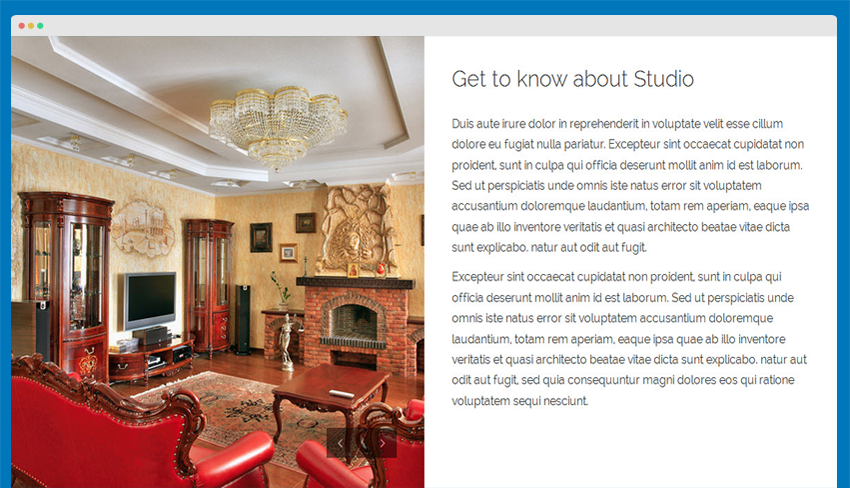
1. About Us
  Module Position: features-1
  Module Suffix: NOT USED
HTML code:
<div class="about-wrap">
  <div class="about-box about-intro clearfix">
  <div class="col-md-6 col-sm-12">
    <div id="about-slideshow" class="carousel slide" data-ride="carousel">
      <div class="carousel-inner">
        <div class="item active">
          <img src="/images/joomlart/demo/about-img.jpg" border="0" alt="" />
        </div>
        <div class="item">
          <img src="/images/joomlart/demo/about-img.jpg" border="0" alt="" />
        </div>
      </div>

      <a class="left carousel-control" href="#about-slideshow" data-slide="prev">
        <i class="fa fa-angle-left"></i>
      </a>
      <a class="right carousel-control" href="#about-slideshow" data-slide="next">
        <i class="fa fa-angle-right"></i>
      </a>
    </div>
  </div>
  <div class="col-md-6 col-sm-12">
    <div class="about-box-ct">

      <h2 class="title-sanserif">Get to know about Studio</h2>
      <p>Duis aute irure dolor in reprehenderit in voluptate velit esse cillum dolore eu fugiat nulla pariatur. Excepteur sint occaecat cupidatat non proident, sunt in culpa qui officia deserunt mollit anim id est laborum. Sed ut perspiciatis unde omnis iste natus error sit voluptatem accusantium doloremque laudantium, totam rem aperiam, eaque ipsa quae ab illo inventore veritatis et quasi architecto beatae vitae dicta sunt explicabo. natur aut odit aut fugit.</p>
      <p>Excepteur sint occaecat cupidatat non proident, sunt in culpa qui officia deserunt mollit anim id est laborum. Sed ut perspiciatis unde omnis iste natus error sit voluptatem accusantium doloremque laudantium, totam rem aperiam, eaque ipsa quae ab illo inventore veritatis et quasi architecto beatae vitae dicta sunt explicabo. natur aut odit aut fugit, sed quia consequuntur magni dolores eos qui ratione voluptatem sequi nesciunt. </p>
    </div>
  </div>
</div>

</div>
- Module Back-end Settings
- Front-end Appearance
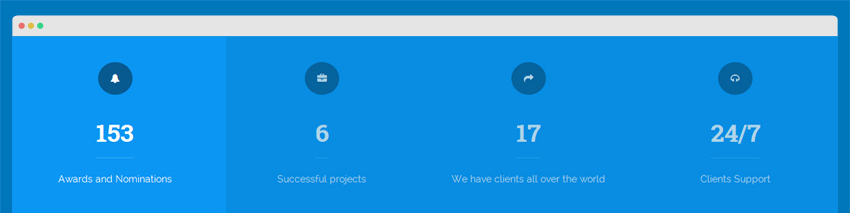
2. About Troppies
  Module Position: features-3
  Module Suffix:  background-primary about-box
HTML code:
<div class="about-troppies clearfix">
  <div class="col-xs-6 col-sm-3 troppy-item">
    <div class="troppy-badge">
      <i class="fa fa-bell"></i>
    </div>
    <div class="troppy-number">153</div>
    <div class="troppy-text">Awards and Nominations</div>
  </div>
   <div class="col-xs-6 col-sm-3 troppy-item">
    <div class="troppy-badge">
      <i class="fa fa-briefcase"></i>
    </div>
    <div class="troppy-number">6</div>
    <div class="troppy-text">Successful projects</div>
  </div>
   <div class="col-xs-6 col-sm-3 troppy-item">
    <div class="troppy-badge">
      <i class="fa fa-share"></i>
    </div>
    <div class="troppy-number">17</div>
    <div class="troppy-text">We have clients all over the world </div>
  </div>
   <div class="col-xs-6 col-sm-3 troppy-item">
    <div class="troppy-badge">
      <i class="fa fa-headphones"></i>
    </div>
    <div class="troppy-number">24/7</div>
    <div class="troppy-text">Clients Support</div>
  </div>
</div>
- Module Back-end Settings
- Front-end Appearance
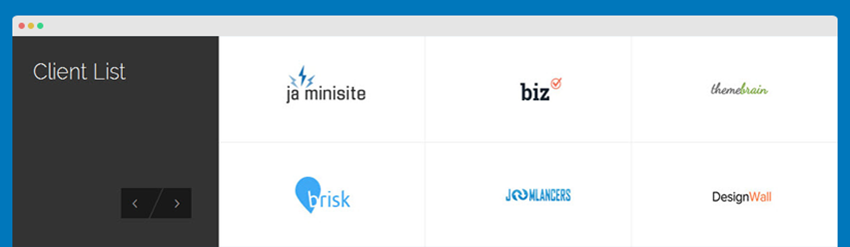
3. Client List
  Module Position: features-4
  Module Suffix:   about-box background-gray
HTML code:
<div class="about-client clearfix">
  <div class="col-sm-3 client-list-header">
  <h2 class="title-sanserif">Client List</h2>
  </div>
  <div class="col-sm-9 client-list-slide">
    <div id="client-slider" class="carousel slide" data-ride="carousel">
      <div class="carousel-inner">
        <div class="row item active">
          <div class="col-sm-4">
            <div class="client-logo">
              <img src="/images/joomlart/demo/client-1.jpg" border="0" alt="" />
            </div>
            <div class="client-logo">
              <img src="/images/joomlart/demo/client-2.jpg" border="0" alt="" />
            </div>
          </div>
          <div class="col-sm-4">
            <div class="client-logo">
              <img src="/images/joomlart/demo/client-3.jpg" border="0" alt="" />
            </div>
            <div class="client-logo">
              <img src="/images/joomlart/demo/client-4.jpg" border="0" alt="" />
            </div>
          </div>
          <div class="col-sm-4">
            <div class="client-logo">
              <img src="/images/joomlart/demo/client-5.jpg" border="0" alt="" />
            </div>
            <div class="client-logo">
              <img src="/images/joomlart/demo/client-6.jpg" border="0" alt="" />
            </div>
          </div>
        </div>
         <div class="row item">
          <div class="col-sm-4">
            <div class="client-logo">
              <img src="/images/joomlart/demo/client-1.jpg" border="0" alt="" />
            </div>
            <div class="client-logo">
              <img src="/images/joomlart/demo/client-2.jpg" border="0" alt="" />
            </div>
          </div>
          <div class="col-sm-4">
            <div class="client-logo">
              <img src="/images/joomlart/demo/client-3.jpg" border="0" alt="" />
            </div>
            <div class="client-logo">
              <img src="/images/joomlart/demo/client-4.jpg" border="0" alt="" />
            </div>
          </div>
          <div class="col-sm-4">
            <div class="client-logo">
              <img src="/images/joomlart/demo/client-5.jpg" border="0" alt="" />
            </div>
            <div class="client-logo">
              <img src="/images/joomlart/demo/client-6.jpg" border="0" alt="" />
            </div>
          </div>
        </div>
      </div>
      <div class="client-slider-control">
        <a class="left carousel-control" href="#client-slider" data-slide="prev">
          <i class="fa fa-angle-left"></i>
        </a>
        <a class="right carousel-control" href="#client-slider" data-slide="next">
          <i class="fa fa-angle-right"></i>
        </a>
      </div>
    </div>
  </div>
</div>
- Module Back-end Settings
- Front-end Appearance
4. Footer Logo
  Module Position: footer-1
  Module Suffix:  footer-logo
HTML code:
<p><img src="/images/logo-white.png" border="0" alt="" /></p>
- Module Back-end Settings
- Front-end Appearance
![]()
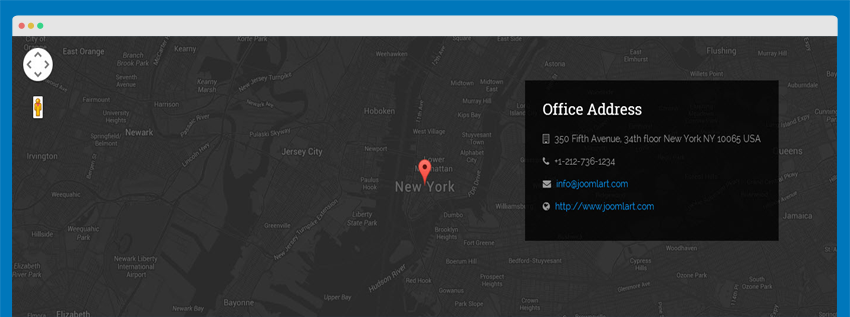
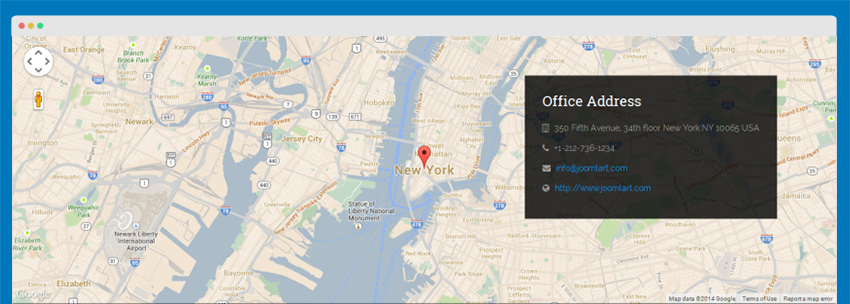
5. Maps
  Module Position: footer-map
  Module Suffix:  NOT USED
HTML code:
{jamap}
<div class="office-info">
<div class="inner">
<h3>Office Address</h3>
<ul>
<li><i class="fa fa-building-o"></i> 350 Fifth Avenue, 34th floor New York NY 10065 USA</li>
<li><i class="fa fa-phone"></i> +1-212-736-1234</li>
<li><i class="fa fa-envelope"></i> <a href="mailto:info@joomlart.com" title="info@joomlart.com">info@joomlart.com</a></li>
<li><i class="fa fa-globe"></i> <a href="http://www.joomlart.com" title="Joomlart">http://www.joomlart.com </a></li>
</ul>
</div>
</div>
- Module Back-end Settings
- Front-end Appearance
6. Video - Welcome
  Module Position: position-1
  Module Suffix:  NOT USED
HTML code:
<div class="video-wrapper grid-2x2">
<img class="video-cover" src="/images/joomlart/demo/video-cover.jpg" alt="" />
<a class="video-play-icon" href="#"><i class="fa fa-play-circle-o"></i></a>
<iframe width="560" height="315" src="//www.youtube.com/embed/nz7sxt9xeJE" frameborder="0" allowfullscreen></iframe>
</div>
- Module Back-end Settings
- Front-end Appearance
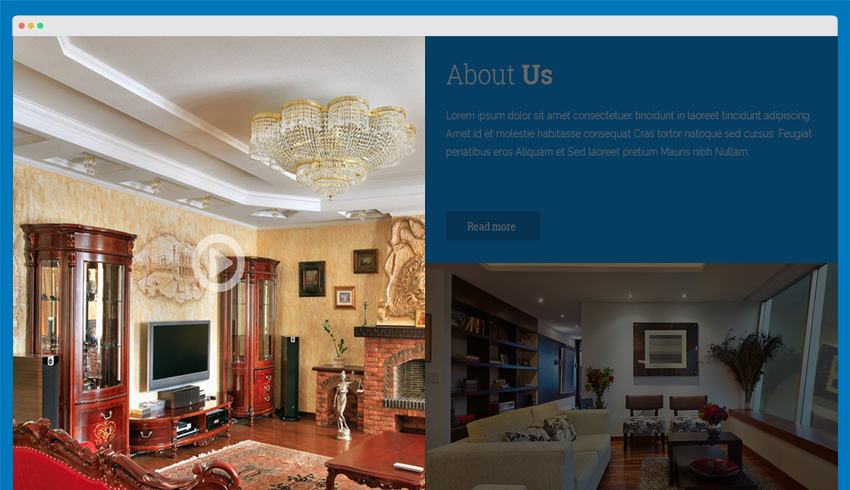
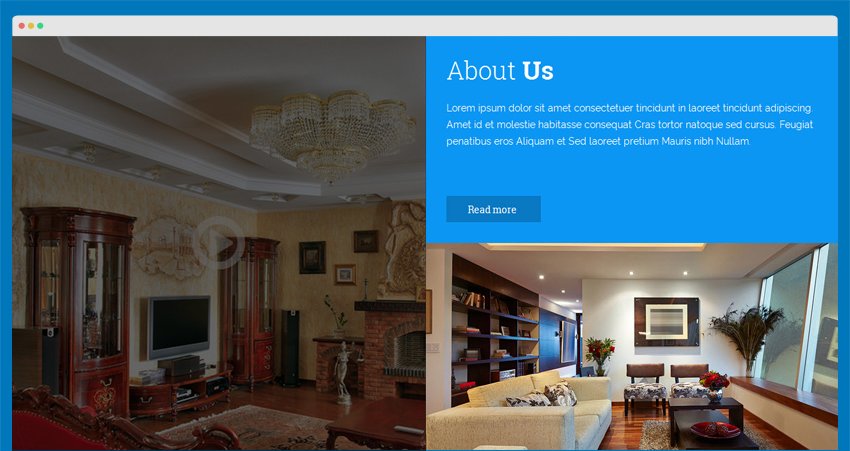
7. About Us
  Module Position: position-2
  Module Suffix:  NOT USED
HTML code:
<div class="single-article background-primary">
  <div class="article-intro grid-2x1">
    <h3 class="article-title"><span class="first-letter">About</span> Us</h3>
    <p>Lorem ipsum dolor sit amet consectetuer tincidunt in laoreet tincidunt adipiscing. Amet id et molestie habitasse consequat Cras tortor natoque sed cursus. Feugiat penatibus eros Aliquam et Sed laoreet pretium Mauris nibh Nullam.</p>
    <a class="btn btn-primary" href="/">Read more</a>
  </div>
  <div class="article-image grid-2x1">
    <img src="/images/joomlart/demo/sam-2.jpg" alt="" />
  </div>
</div>
- Module Back-end Settings
- Front-end Appearance
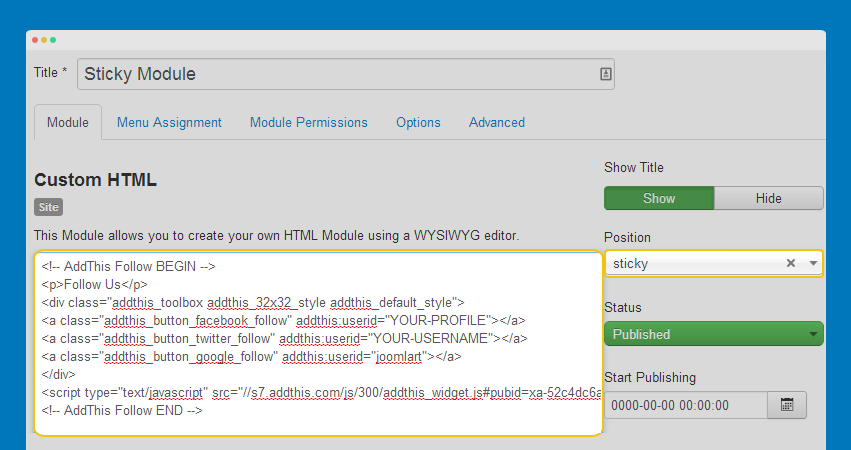
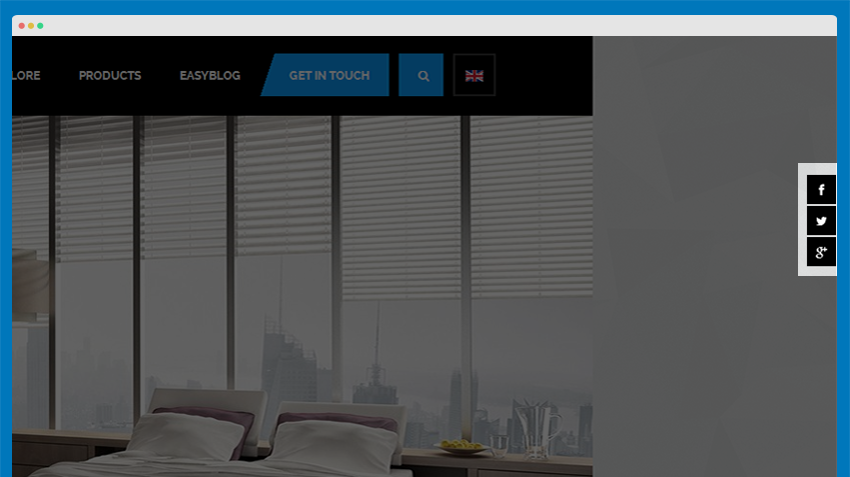
8. Sticky Module
  Module Position: sticky
  Module Suffix:  NOT USED
HTML code:
<!-- AddThis Follow BEGIN -->
<div class="addthis_toolbox addthis_32x32_style addthis_default_style">
<a class="addthis_button_facebook_follow" addthis:userid="joomlart"></a>
<a class="addthis_button_twitter_follow" addthis:userid="joomlart"></a>
<a class="addthis_button_google_follow" addthis:userid="joomlart"></a>
</div>
<script type="text/javascript" src="//s7.addthis.com/js/300/addthis_widget.js#pubid=xa-525b746c4d879b01"></script>
<!-- AddThis Follow END -->
- Module Back-end Settings
- Front-end Appearance
Follow the steps below to add the "AddThis" buttons.
Step 1: Get Addthis code
Access AddThis site, select service
Get AddThis service code
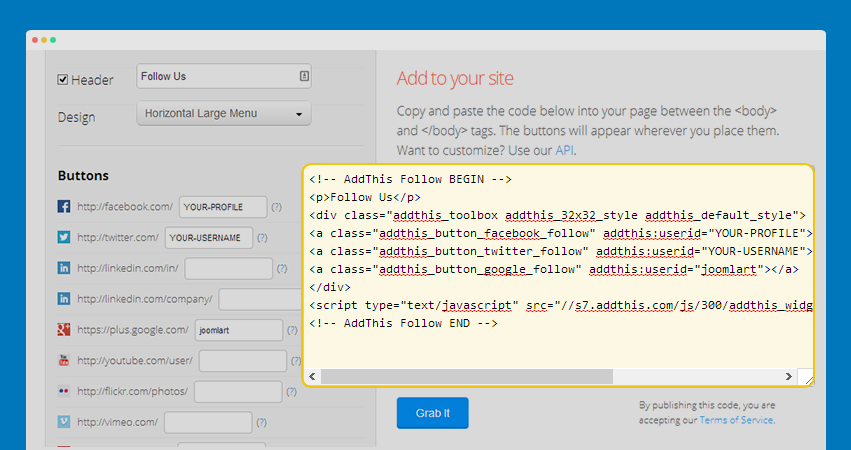
<!-- AddThis Follow BEGIN -->
<p>Follow Us</p>
<div class="addthis_toolbox addthis_32x32_style addthis_default_style">
<a class="addthis_button_facebook_follow" addthis:userid="YOUR-PROFILE"></a>
<a class="addthis_button_twitter_follow" addthis:userid="YOUR-USERNAME"></a>
<a class="addthis_button_google_follow" addthis:userid="joomlart"></a>
</div>
<script type="text/javascript" src="//s7.addthis.com/js/300/addthis_widget.js#pubid=xa-52c4dc6a6f54bdd9"></script>
<!-- AddThis Follow END -->
Step 2: add code to your site
Create a custom HTML module then paste the AddThis code, assign the custom HTML module to sticky position.
Step 3: change position and customize style
The class to style for the module is defined in the file: mainbody.php in templates/ja_decor/tpls/blocks
<?php if ($this->countModules('sticky')) : ?>
<!-- STICKY MODULE -->
<div class="sticky-module sticky-module-left <?php $this->_c('sticky') ?>">
  <jdoc:include type="modules" name="<?php $this->_p('sticky') ?>" style="raw" />
</div>
<!-- //STICKY MODULE -->
<?php endif ?>
The styles are in module.less in templates/ja_decor/less.
// Sticky Module
// ---------------
.sticky-module {
  position: fixed;
  left: 0;
  top: 145px;
  width: 30px;
  display: none;

  &.sticky-module-right {
  left: auto;
  right: 0;
  }

  @media (min-width: @screen-md) {
  display: block;
  }

  .addthis_32x32_style .at15nc.at300bs,
  .addthis_32x32_style .at15nc.at15t {
  background-image: url("@{t3-image-path}/ico/social.png") !important;
  height: 30px !important;
  line-height: 30px !important;
  width: 30px !important;
  }

  .addthis_32x32_style .at15nc.at15t_twitter {
  background-position: 0px -30px !important;

  &:hover {
    background-position: -30px -30px !important;
  }
  }

  .addthis_32x32_style .at15nc.at15t_facebook {
  background-position: 0px 0px !important;

  &:hover {
    background-position: -30px 0px !important;
  }
  }

  .addthis_32x32_style .at15nc.at15t_google_follow  {
  background-position: 0px -60px !important;
  &:hover {
    background-position: -30px -60px !important;
  }
  }

  .addthis_toolbox {
  width: 30px;
  padding: 0;
  text-align: right;
  }

  .addthis_default_style .addthis_separator,
  .addthis_default_style .at300b,
  .addthis_default_style .at300bo,
  .addthis_default_style .at300m,
  .addthis_default_style .at300bs {
  float: none;
  display: block;
  padding: 0 0 2px;
  }
}
You can change the position of Addthis button
Replace the class
sticky-module-left
with:
sticky-module-right
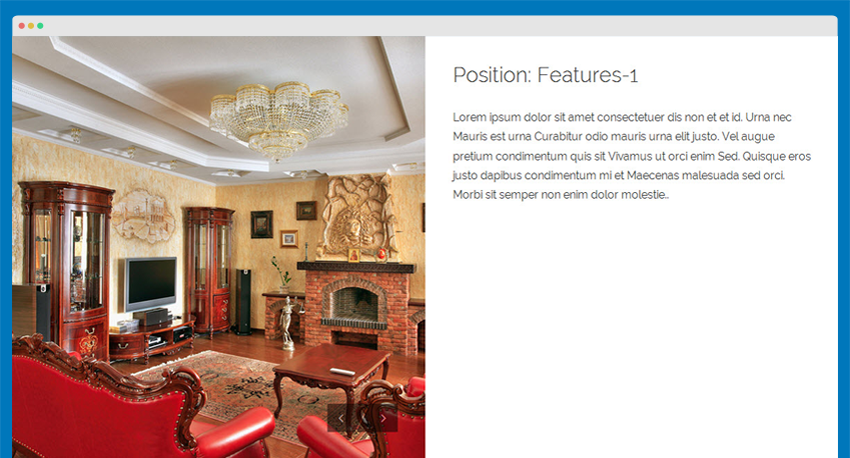
9. Position: Features-1
  Module Position: features-1
  Module Suffix:  NOT USED
HTML code:
<div class="about-wrap">
  <div class="about-box about-intro clearfix">
  <div class="col-sm-6">
    <div id="about-slideshow" class="carousel slide" data-ride="carousel">
      <div class="carousel-inner">
        <div class="item active">
          <img src="/images/joomlart/demo/about-img.jpg" border="0" alt="" />
        </div>
        <div class="item">
          <img src="/images/joomlart/demo/about-img.jpg" border="0" alt="" />
        </div>
      </div>
      <a class="left carousel-control" href="#about-slideshow" data-slide="prev">
        <i class="fa fa-angle-left"></i>
      </a>
      <a class="right carousel-control" href="#about-slideshow" data-slide="next">
        <i class="fa fa-angle-right"></i>
      </a>
    </div>
  </div>
  <div class="col-sm-6">
    <div class="about-box-ct">
      <h2 class="title-sanserif">Position: Features-1</h2>
      <p>Lorem ipsum dolor sit amet consectetuer dis non et et id. Urna nec Mauris est urna Curabitur odio mauris urna elit justo. Vel augue pretium condimentum quis sit Vivamus ut orci enim Sed. Quisque eros justo dapibus condimentum mi et Maecenas malesuada sed orci. Morbi sit semper non enim dolor molestie..</p>
    </div>
  </div>
</div>
</div>
- Module Back-end Settings
- Front-end Appearance
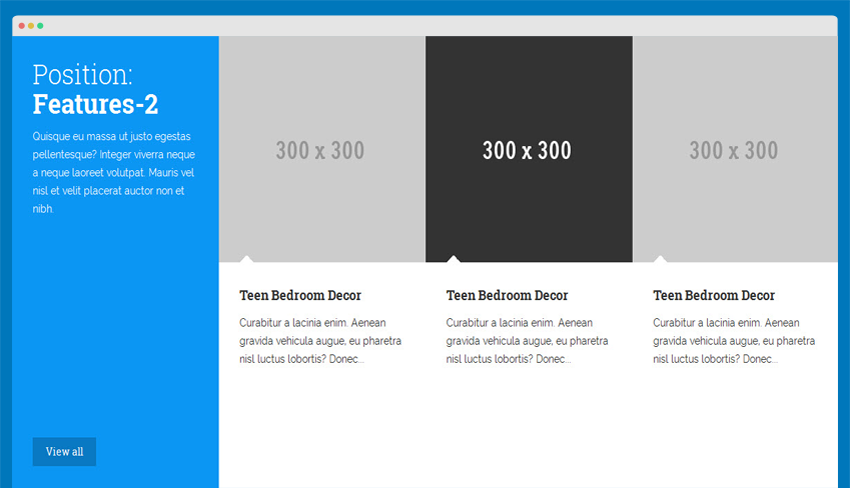
10. Position: Features-2
  Module Position: features-2
  Module Suffix:  NOT USED
HTML code:
<div class="col-xs-12 ">
<div class="normal-style category-module">
<div class="col-xs-12 col-sm-6 col-md-3 col-cmd-12 category-info background-primary ">
<div class="grid-inner grid-1x2">
<h3 class="category-title">
<span class="first-letter">Position:</span> Features-2</h3>
<p class="category-des">Quisque eu massa ut justo egestas pellentesque? Integer viverra neque a neque laoreet volutpat. Mauris vel nisl et velit placerat auctor non et nibh. </p>
<a href="#" class="btn btn-primary">View all</a>
</div>
</div>
<div class="col-xs-12 col-sm-6 col-md-3 col-cmd-4">
<div class="grid-1x2">
<div class="article-img grid-1x1">
<div class="img-intro">
<img src="/images/joomlart/demo/300x300.gif" alt="" />
</div>
<a href="#" class="btn btn-default ">View</a>
</div>
<div class="article-content grid-1x1">
 <h4><a href="#" class="mod-articles-category-title ">Teen Bedroom Decor</a></h4>
<p class="mod-articles-category-introtext">Curabitur a lacinia enim. Aenean gravida vehicula augue, eu pharetra nisl luctus lobortis? Donec...</p>
</div>
</div>
</div>
<div class="col-xs-12 col-sm-6 col-md-3 col-cmd-4">
<div class="grid-1x2">
<div class="article-img grid-1x1">
<div class="img-intro">
<img src="/images/joomlart/demo/300x300-gray.gif" alt="" />
</div>
<a href="#" class="btn btn-default ">View</a>
</div>
<div class="article-content grid-1x1">
 <h4><a href="#" class="mod-articles-category-title ">Teen Bedroom Decor</a></h4>
<p class="mod-articles-category-introtext">Curabitur a lacinia enim. Aenean gravida vehicula augue, eu pharetra nisl luctus lobortis? Donec...</p>
</div>
</div>
</div>
<div class="col-xs-12 col-sm-6 col-md-3 col-cmd-4">
<div class="grid-1x2">
<div class="article-img grid-1x1">
<div class="img-intro">
<img src="/images/joomlart/demo/300x300.gif" alt="" />
</div>
<a href="#" class="btn btn-default ">View</a>
</div>
<div class="article-content grid-1x1">
 <h4><a href="#">Teen Bedroom Decor</a></h4>
<p class="mod-articles-category-introtext">Curabitur a lacinia enim. Aenean gravida vehicula augue, eu pharetra nisl luctus lobortis? Donec...</p>
</div>
</div>
</div>
</div>
</div>
- Module Back-end Settings
- Front-end Appearance
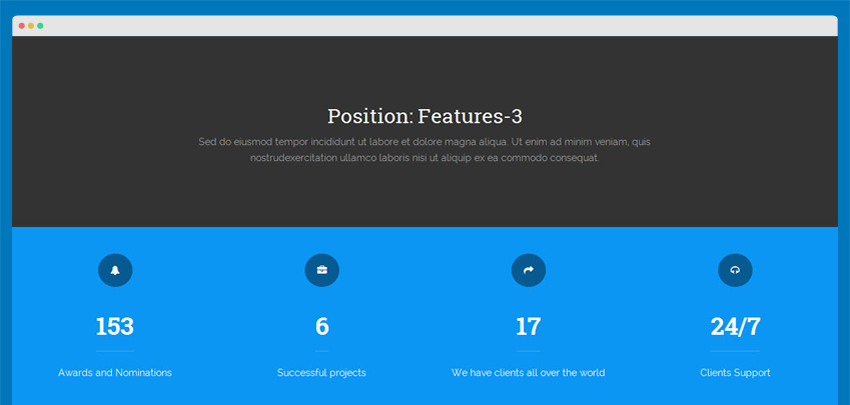
11. Position: Features-3
  Module Position: features-3
  Module Suffix:  NOT USED
HTML code:
<div class="layout-about about-box about-team">
<div class="team-header text-center background-gray">
<h2>Position: Features-3</h2>
<div class="category-desc">
<p>Sed do eiusmod tempor incididunt ut labore et dolore magna aliqua. Ut enim ad minim veniam, quis <br>nostrudexercitation ullamco laboris nisi ut aliquip ex ea commodo consequat. </p>
<div class="clr"></div>
</div>
</div>
</div>
<div class="about-troppies clearfix">
  <div class="col-xs-6 col-sm-3 troppy-item">
    <div class="troppy-badge">
      <i class="fa fa-bell"></i>
    </div>
    <div class="troppy-number">153</div>
    <div class="troppy-text">Awards and Nominations</div>
  </div>
  <div class="col-xs-6 col-sm-3 troppy-item">
    <div class="troppy-badge">
      <i class="fa fa-briefcase"></i>
    </div>
    <div class="troppy-number">6</div>
    <div class="troppy-text">Successful projects</div>
  </div>
  <div class="col-xs-6 col-sm-3 troppy-item">
    <div class="troppy-badge">
      <i class="fa fa-share"></i>
    </div>
    <div class="troppy-number">17</div>
    <div class="troppy-text">We have clients all over the world </div>
  </div>
  <div class="col-xs-6 col-sm-3 troppy-item">
    <div class="troppy-badge">
      <i class="fa fa-headphones"></i>
    </div>
    <div class="troppy-number">24/7</div>
    <div class="troppy-text">Clients Support</div>
  </div>
</div>
- Module Back-end Settings
- Front-end Appearance
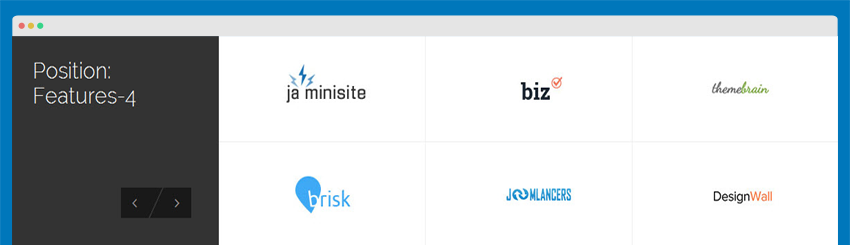
12. Position: Features-4
  Module Position: features-4
  Module Suffix:  NOT USED
HTML code:
<div class="about-client clearfix">
  <div class="col-sm-3 client-list-header">
  <h2 class="title-sanserif">Position: Features-4</h2>
  </div>
  <div class="col-sm-9 client-list-slide">
    <div id="client-slider" class="carousel slide" data-ride="carousel">
      <div class="carousel-inner">
        <div class="row item active">
          <div class="col-sm-4">
            <div class="client-logo">
              <img src="/images/joomlart/demo/client-1.jpg" border="0" alt="" />
            </div>
            <div class="client-logo">
              <img src="/images/joomlart/demo/client-2.jpg" border="0" alt="" />
            </div>
          </div>
          <div class="col-sm-4">
            <div class="client-logo">
              <img src="/images/joomlart/demo/client-3.jpg" border="0" alt="" />
            </div>
            <div class="client-logo">
              <img src="/images/joomlart/demo/client-4.jpg" border="0" alt="" />
            </div>
          </div>
          <div class="col-sm-4">
            <div class="client-logo">
              <img src="/images/joomlart/demo/client-5.jpg" border="0" alt="" />
            </div>
            <div class="client-logo">
              <img src="/images/joomlart/demo/client-6.jpg" border="0" alt="" />
            </div>
          </div>
        </div>
         <div class="row item">
          <div class="col-sm-4">
            <div class="client-logo">
              <img src="/images/joomlart/demo/client-1.jpg" border="0" alt="" />
            </div>
            <div class="client-logo">
              <img src="/images/joomlart/demo/client-2.jpg" border="0" alt="" />
            </div>
          </div>
          <div class="col-sm-4">
            <div class="client-logo">
              <img src="/images/joomlart/demo/client-3.jpg" border="0" alt="" />
            </div>
            <div class="client-logo">
              <img src="/images/joomlart/demo/client-4.jpg" border="0" alt="" />
            </div>
          </div>
          <div class="col-sm-4">
            <div class="client-logo">
              <img src="/images/joomlart/demo/client-5.jpg" border="0" alt="" />
            </div>
            <div class="client-logo">
              <img src="/images/joomlart/demo/client-6.jpg" border="0" alt="" />
            </div>
          </div>
        </div>
      </div>
      <div class="client-slider-control">
        <a class="left carousel-control" href="#client-slider" data-slide="prev">
          <i class="fa fa-angle-left"></i>
        </a>
        <a class="right carousel-control" href="#client-slider" data-slide="next">
          <i class="fa fa-angle-right"></i>
        </a>
      </div>
    </div>
  </div>
</div>
- Module Back-end Settings
- Front-end Appearance
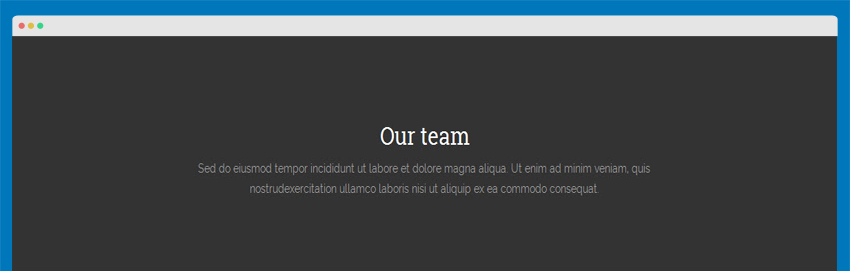
13. Our team box style
  Module Position: position-2
  Module Suffix:  NOT USED
HTML code:
<div class="layout-about about-box about-team">
<div class="team-header text-center background-gray">
<h2>Our team box style</h2>
<div class="category-desc">
<p>Sed do eiusmod tempor incididunt ut labore et dolore magna aliqua. Ut enim ad minim veniam, quis <br>nostrudexercitation ullamco laboris nisi ut aliquip ex ea commodo consequat. </p>
<div class="clr"></div>
</div>
</div>
</div>
- Module Back-end Settings
- Front-end Appearance
Menu System
1. Off-canvas and Collapsed menu
JA Decor inherits the Off-canvas feature of T3 Framework. Follow the steps below to configure the Off-canvas menu for JA Decor.
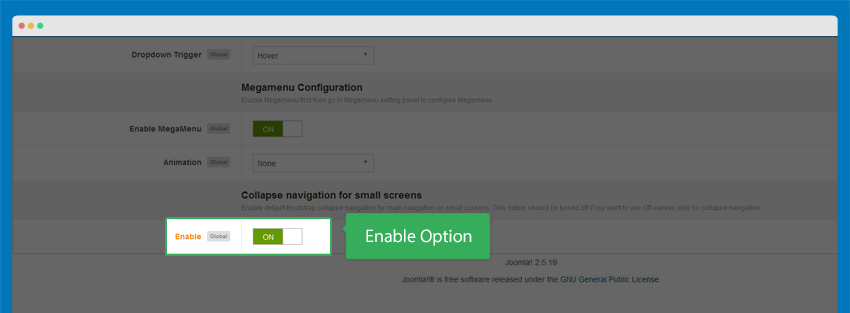
Step 1: Enable collapse navigation for small screens
Open JA Decor setting panel, open Navigation tab then collapse navigation for small screens.
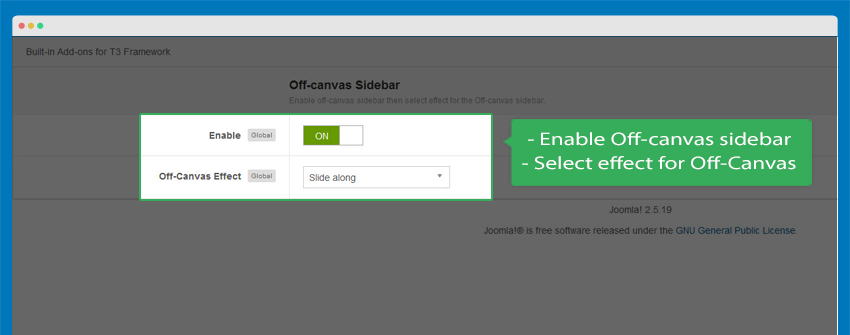
Step 2: Enable Off-canvas
Open JA Decor setting panel, open the Add-on tab then enable the Off-canvas option.
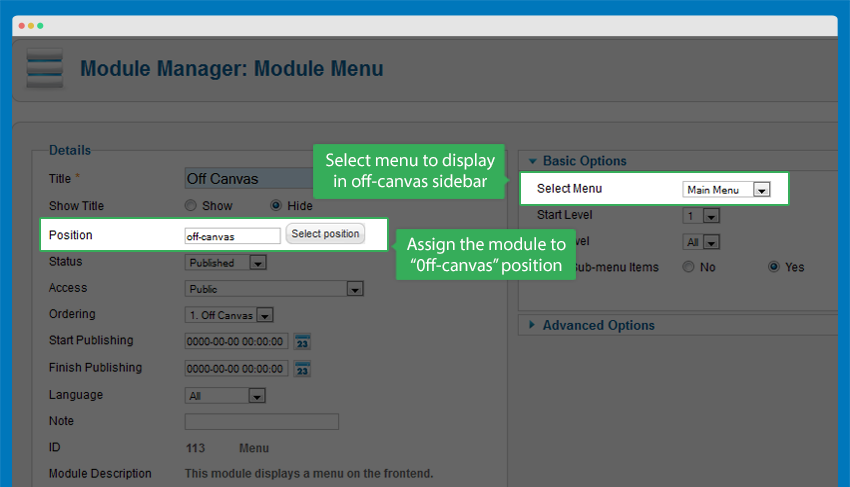
Step 3: Assign a Menu to Off-canvas
First off, you have to have a menu. If you haven't done this before, please refer to this link. Once you have successfully created a menu, please open Module Manager to continue. If you have create a menu module, or using an existing menu module and select this menu module with the above menu (meaning you're connecting them together).
Front-end Appearance
Note:
The Off-canvas can be customized to display in the left side.
To move the Off-canvas to the left side, please open the off-canvas.php file in /templates/ja_decor/tpls/blocks.
Now, find the following code:
data-pos="right"
Then change it to:
data-pos="left"
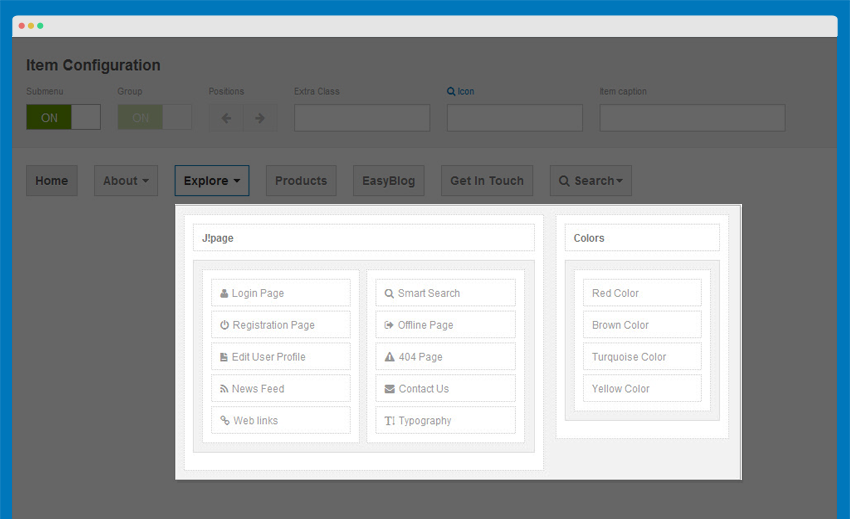
2. Megamenu Configuration
JA Decor supports Megamenu, which is a core feature of T3 Framework.
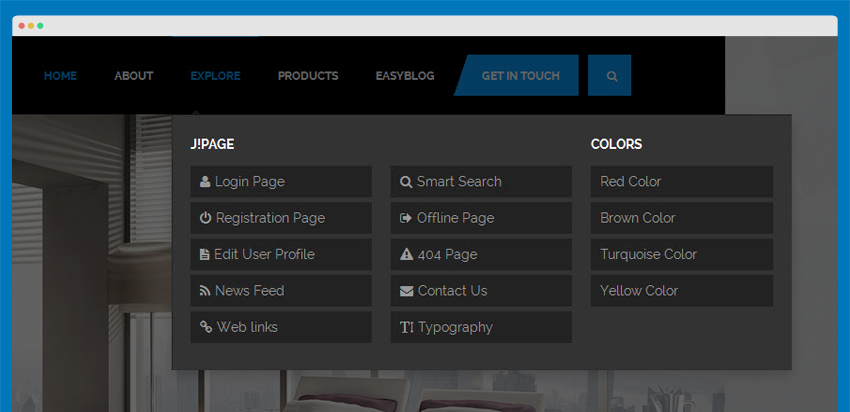
To enable Megamenu, from JA Decor template back end, navigate to the Navigation tab.
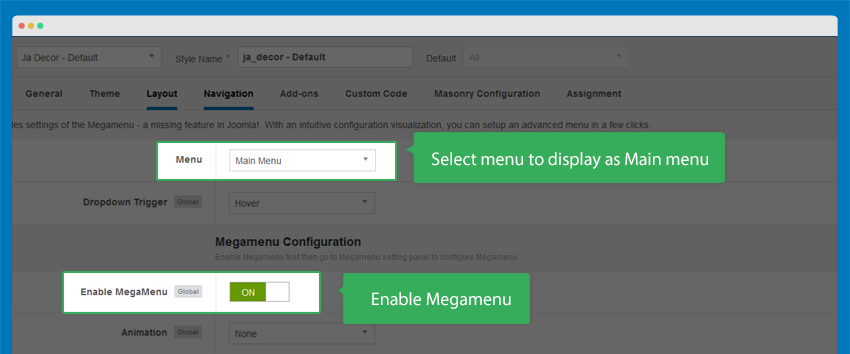
Select the menu that will be displayed as the main menu (mainnav position), then enable Megamenu.
After you successfully save the configuration above, we will move onto configuring the Megamenu by clicking the "Megamenu" button.
It is pretty straight forward. However, please note that in JA Decor's Megamenu, the submenu of the two menu item
Explore and Products, we should select Alignment = left
EasyBlog Configuration
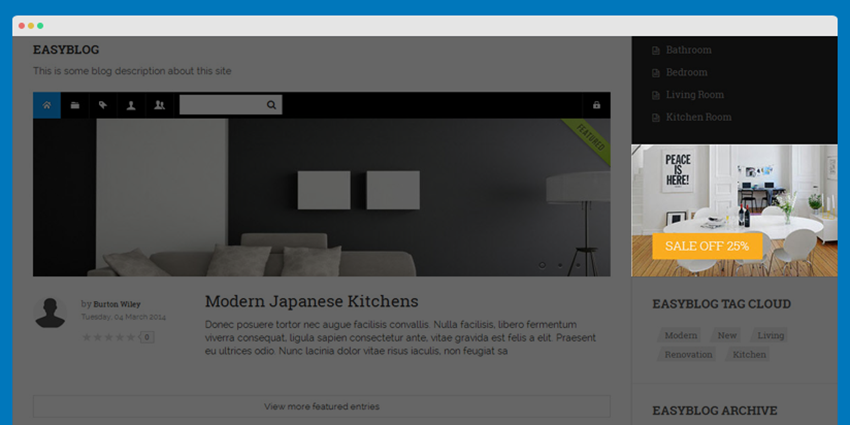
JA Decor supports Easyblog components.
1. EasyBlog Component
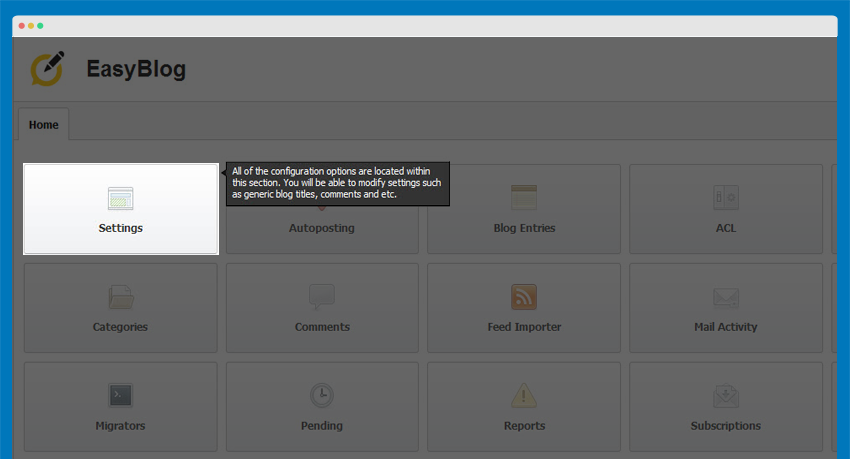
JA Decor supports EasyBlog styles by default. In order to have the EasyBlog design, you should download, extract the files and add EasyBlog theme for JA Decor to your site. If you only want the JA Decor's EasyBlog style, please follow the following step in this section.
1.2 Install EasyBlog component
Quick Guide:
- Step 1: Install Easyblog component
- Step 2: Download JA Decor theme for Easyblog ( if you have installed the Quickstart package, you should move on to Step 4).
- Step 3: Extract zip file and upload to your your_site_folder. You should see
folder ja_decor in
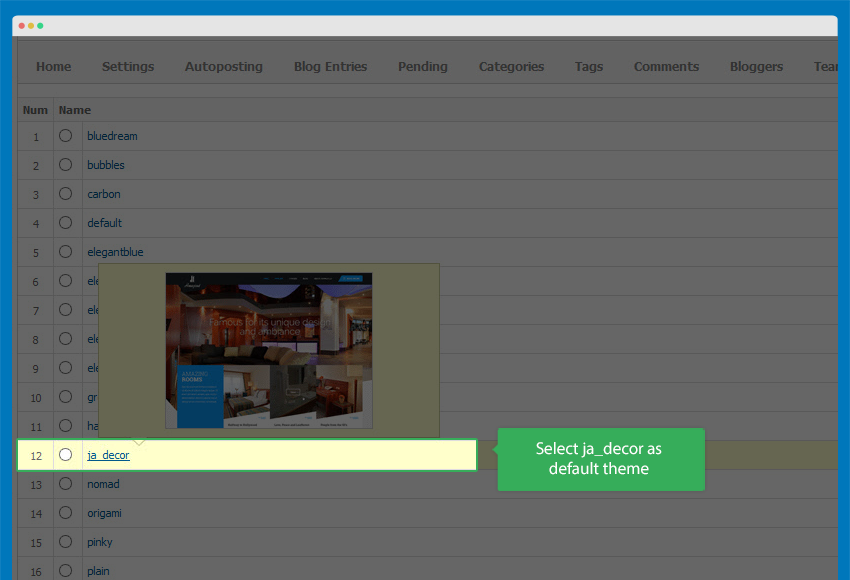
/components/com_easyblog/themes. - Step 4: Go to back-end panel >> Components >> Easyblog >> Themes >> select ja_decor.
The following screenshots are for Step 4.
- Access: Components >> Easyblog >> Themes
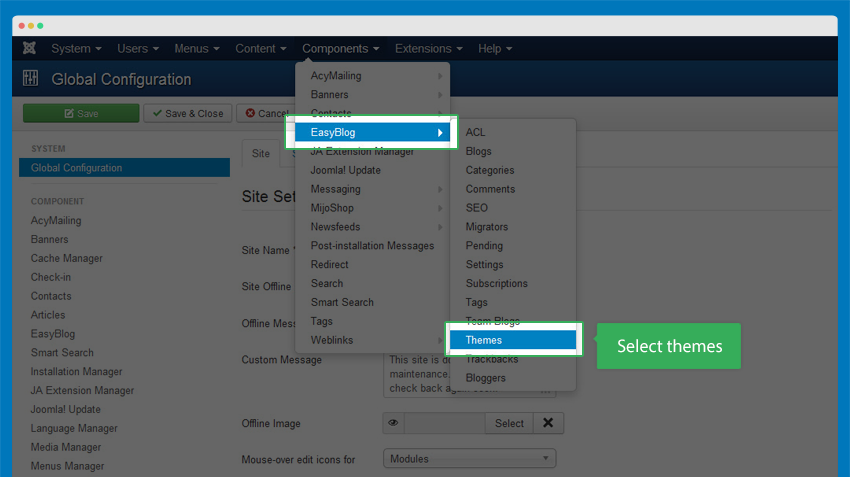
- Change the default theme to ja_decor
1.3 Configure EasyBlog Component
Recommendation:
Most of the settings are the default settings, when you select ja_decor theme, you will get the almost the same style as on our demo.
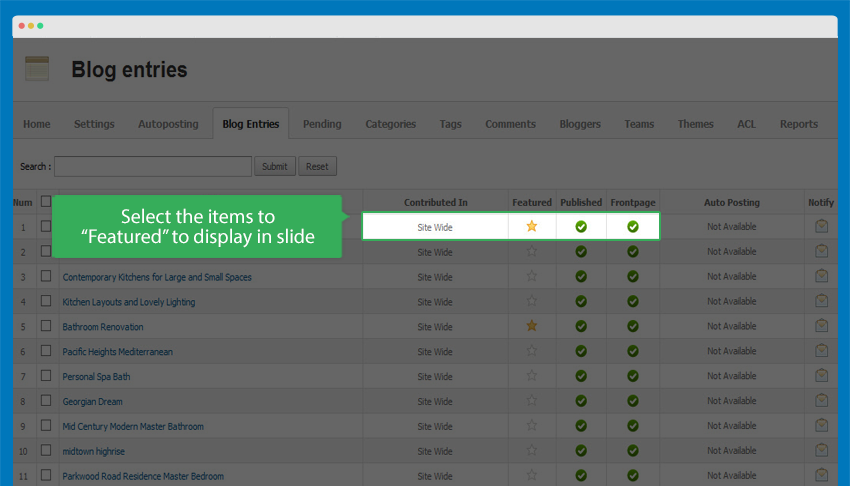
1.4 Configure Easyblog Slide
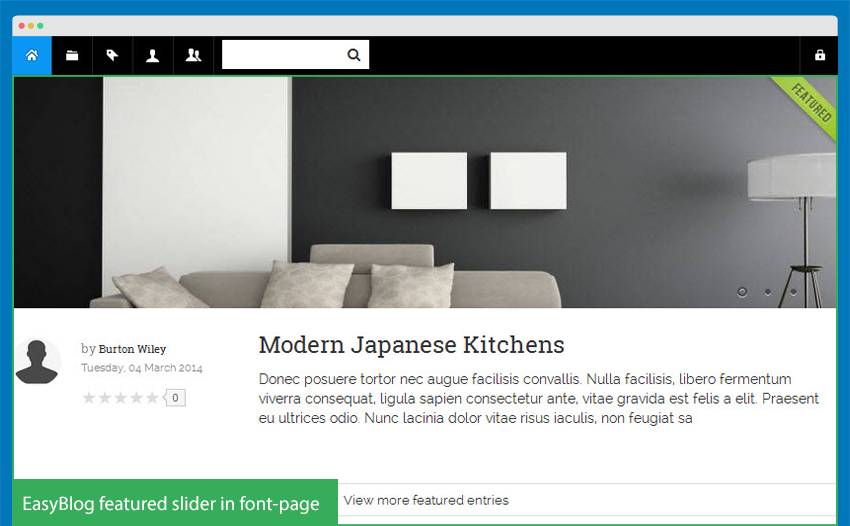
The EasyBlog slide displays the featured EasyBlog items only. Hence, in order to get the items display in EasyBlog slide, you have to set the items to "Featured".
1.5 EasyBlog Module Configuration
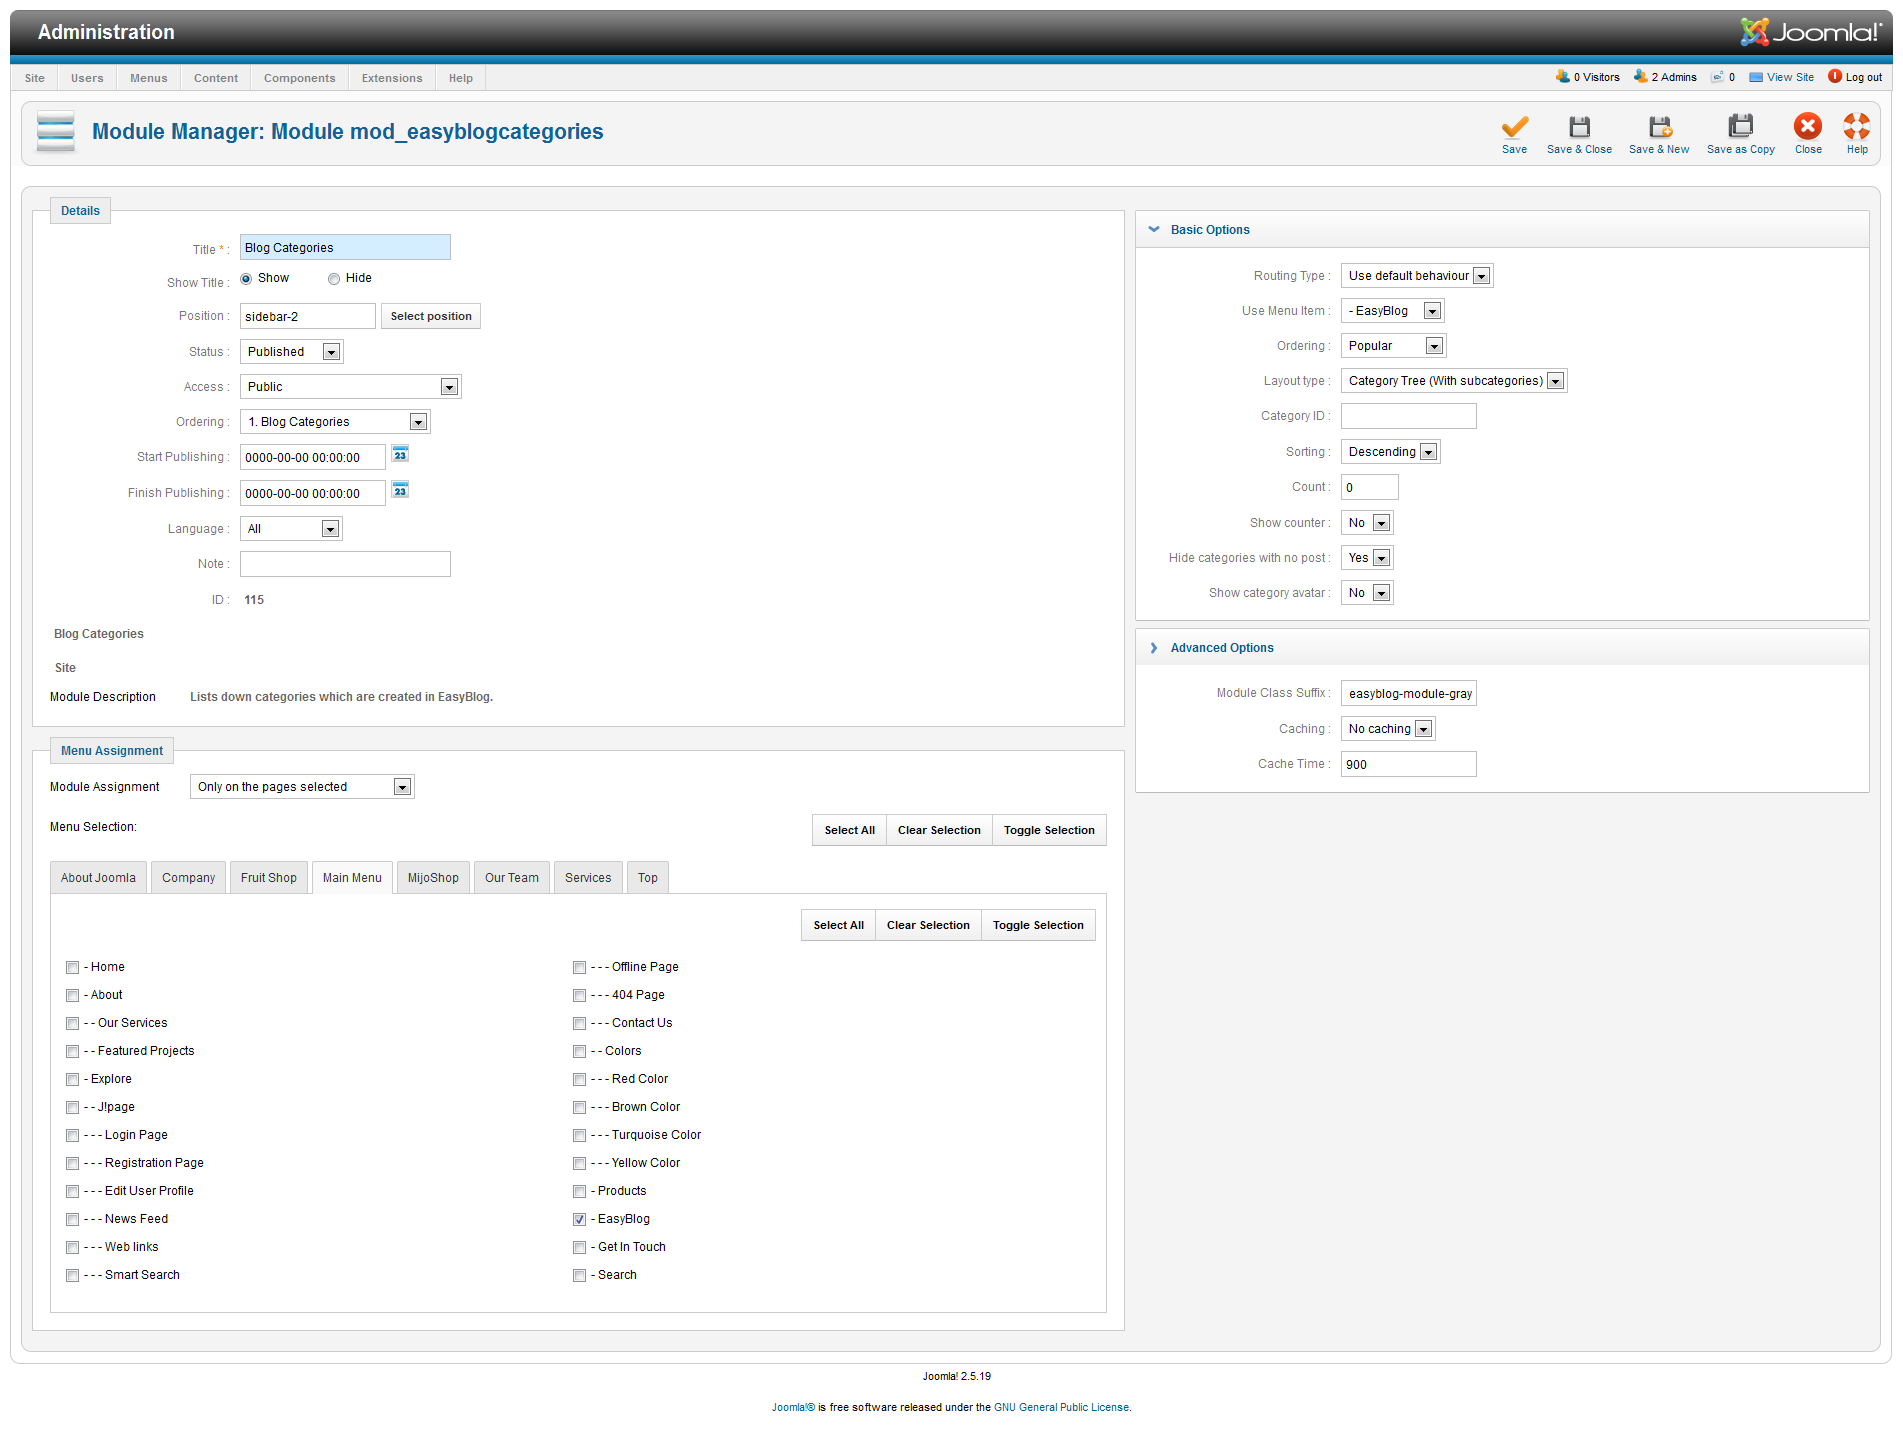
1.5.1 Blog Categories Module
  Module Position: sidebar-2
  Module Suffix:  easyblog-module-gray
- Back-end Settings
- Front-end Appearance

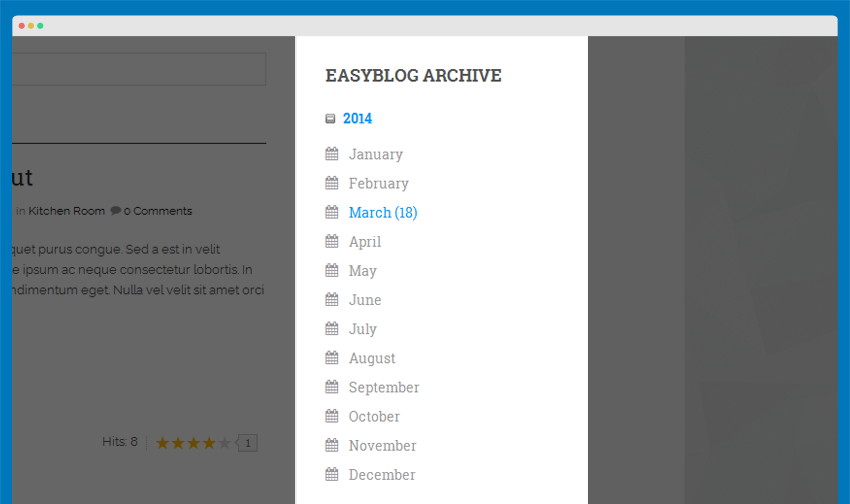
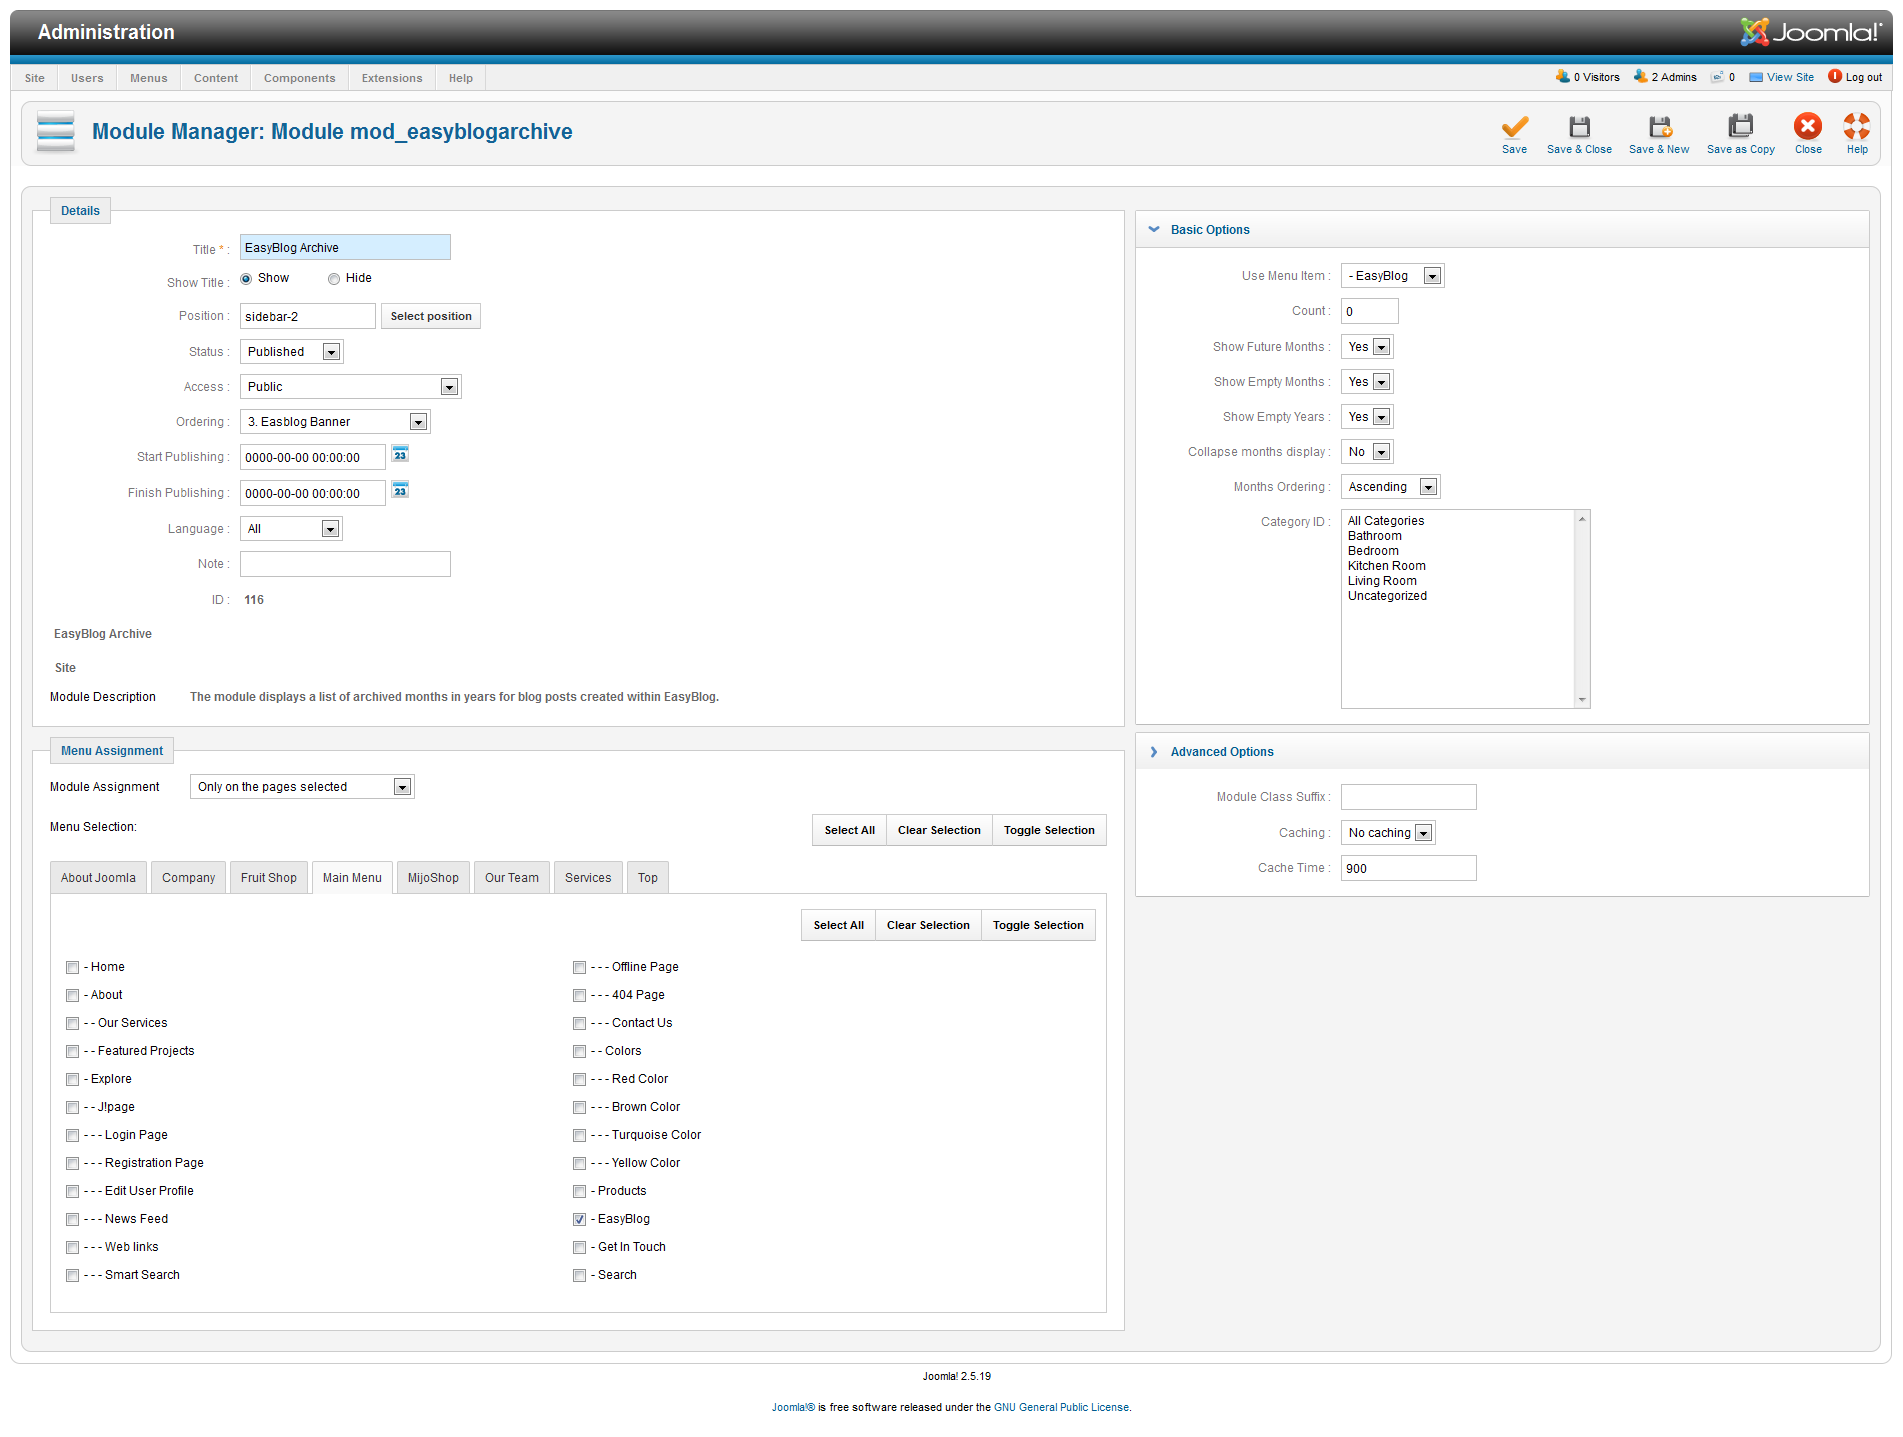
1.5.2 EasyBlog Archive Module
  Module Position: sidebar-2
  Module Suffix: NOT USED
- Back-end Settings
- Front-end Appearance
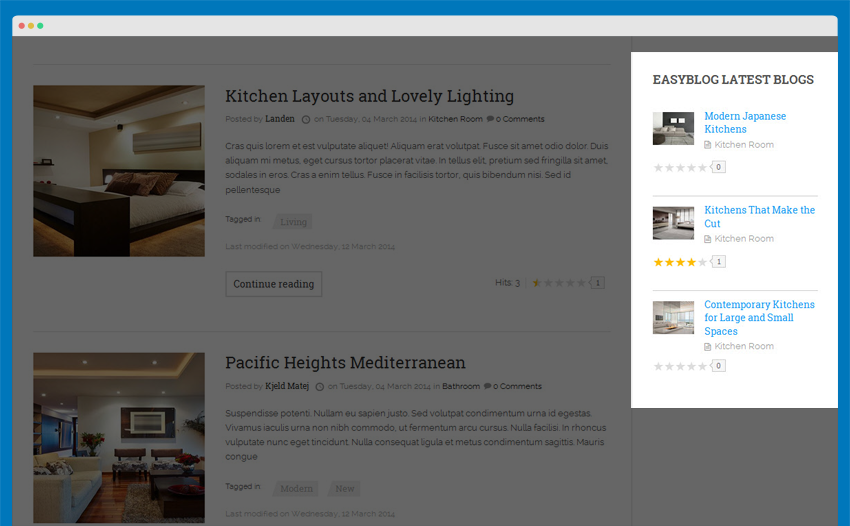
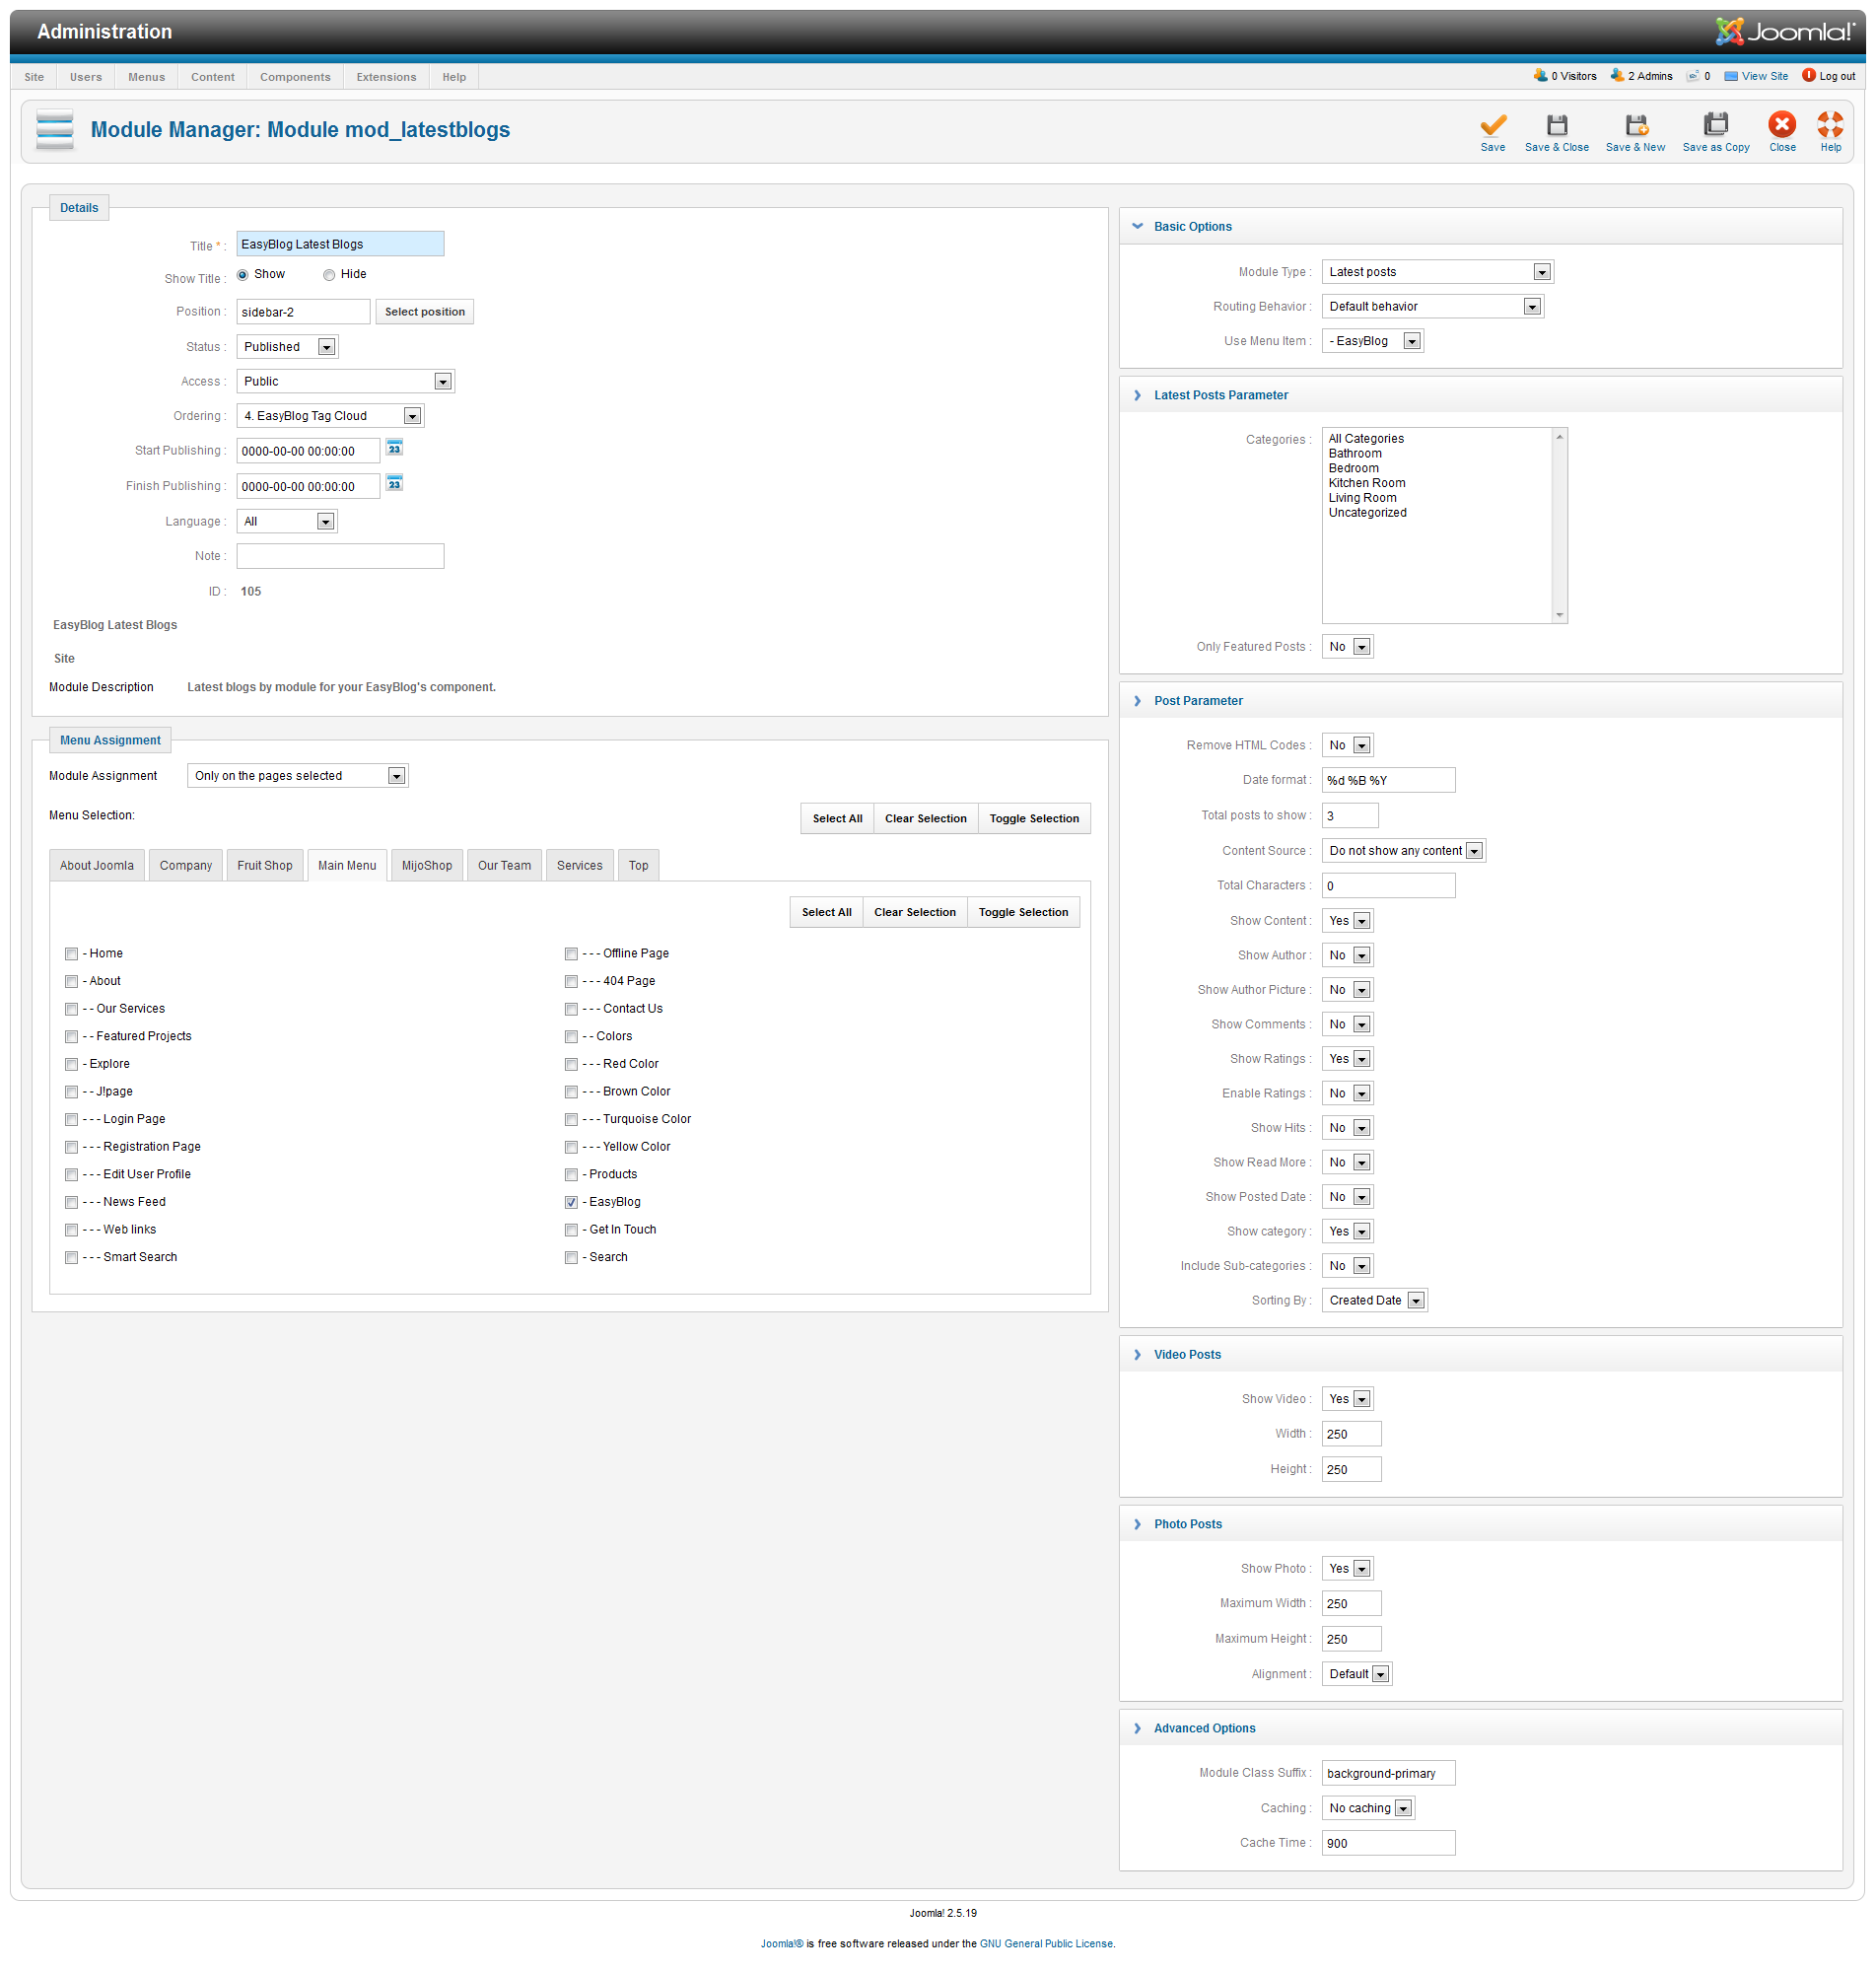
1.5.3 EasyBlog Latest Blogs Module
  Module Position: sidebar-2
  Module Suffix: background-primary
- Back-end Settings
- Front-end Appearance
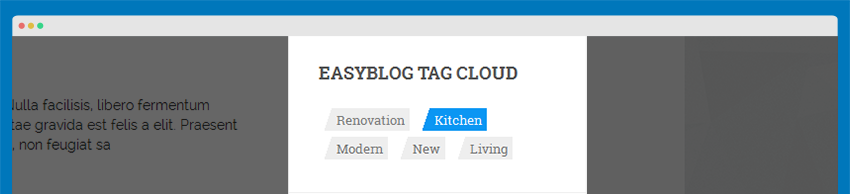
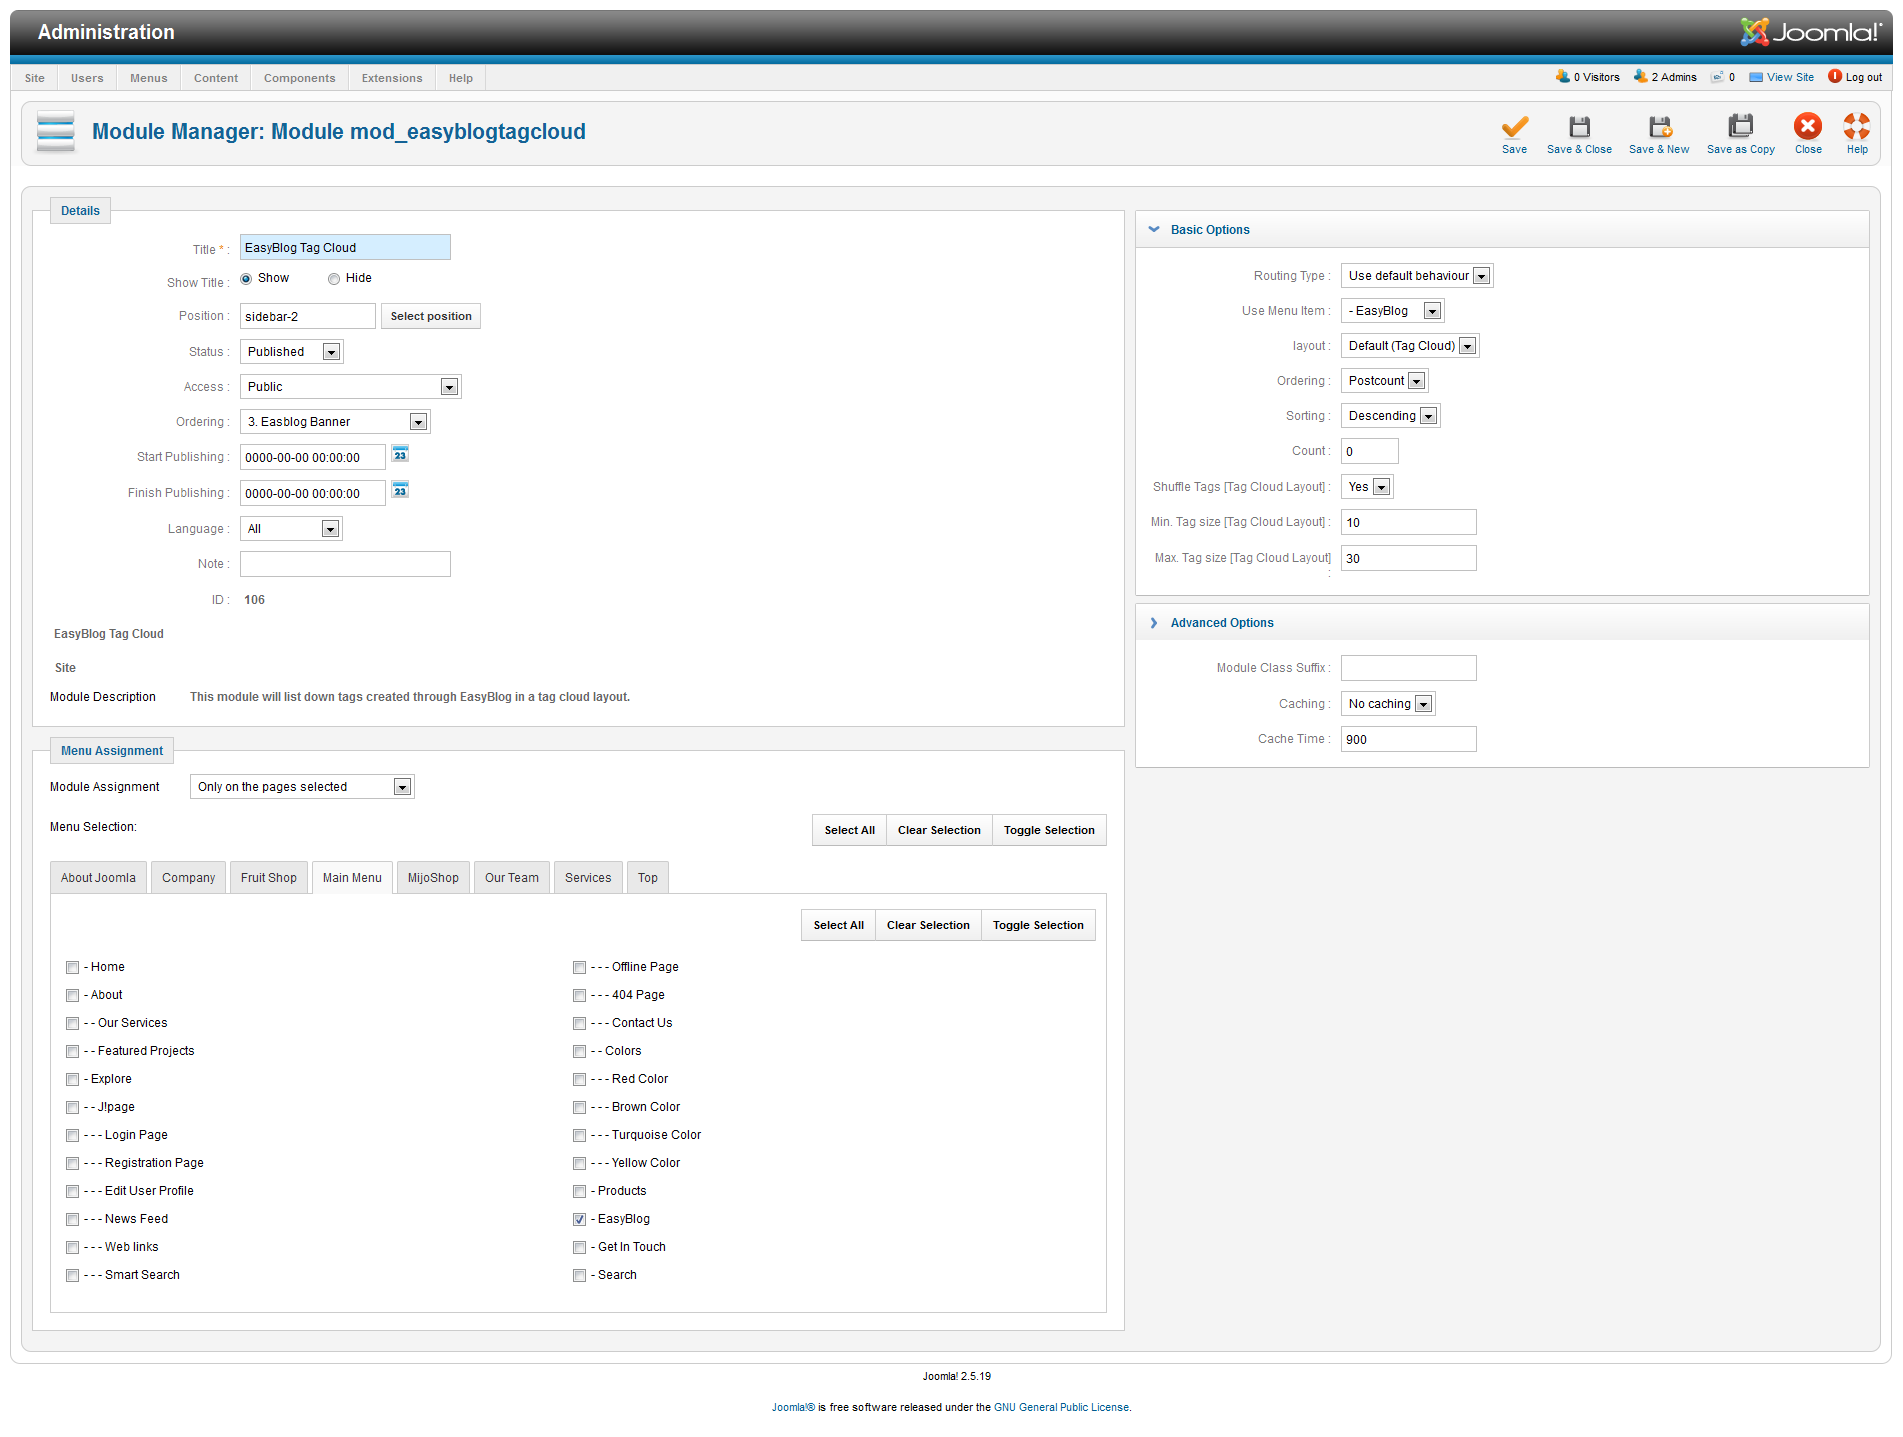
1.5.4 EasyBlog Tag Cloud Module
  Module Position: sidebar-2
  Module Suffix: NOT USED
- Back-end Settings
- Front-end Appearance
Mijoshop 3 Configuration
JA Decor now supports Mijoshop 3, if you want to use the new version, there are 2 ways:
- For the site using Mijoshop 2: migrate to Mijoshop 3
- For new installation: install it as normal
1. Migrate Mijoshop 2 to Mijoshop 3
Here are steps to migrate Mijoshop 2 to Mijoshop 3.
Step 1: take back-up for your site
To make sure the migration has no risk, please take backup for your site.
- Take full back-up of your site with Akeeba
- Backup your theme in [root]/components/com_mijoshop/opencart/catalog/view/theme
Step 2: Migrate Mijoshop 2 to Mijoshop 3 database
Check out more info about Migration of Mishop 2 to Mijoshop 3.
Beware that this a database migration process and won't keep your templates, extensions, modifications etc.
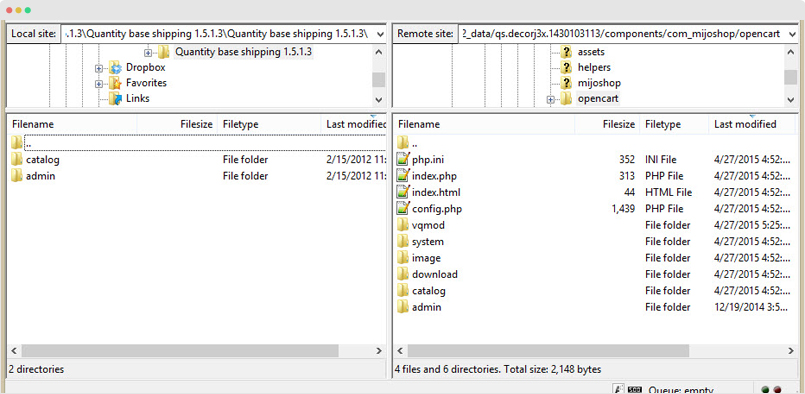
1. Download the Database Migration extension, extract it and upload to the folder: [root]/components/com_mijoshop/opencart/
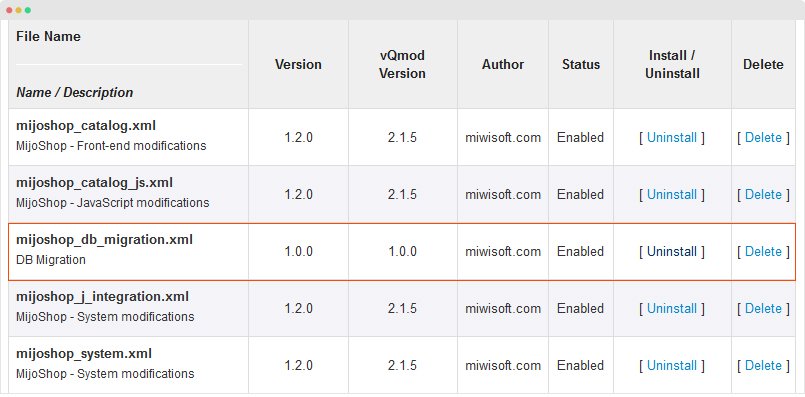
2. Go to "MijoShop => System => VQMod Manager" uninstall an install DB Migration
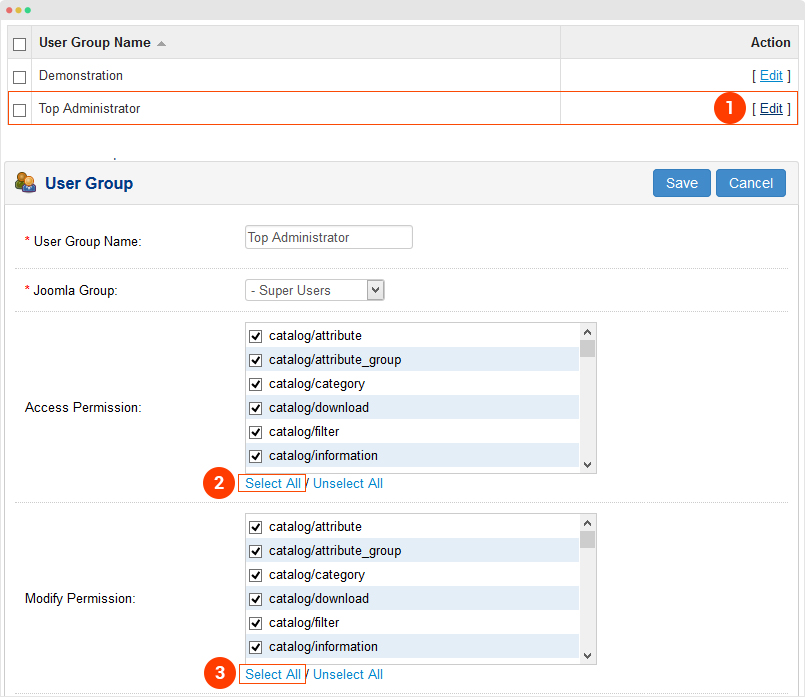
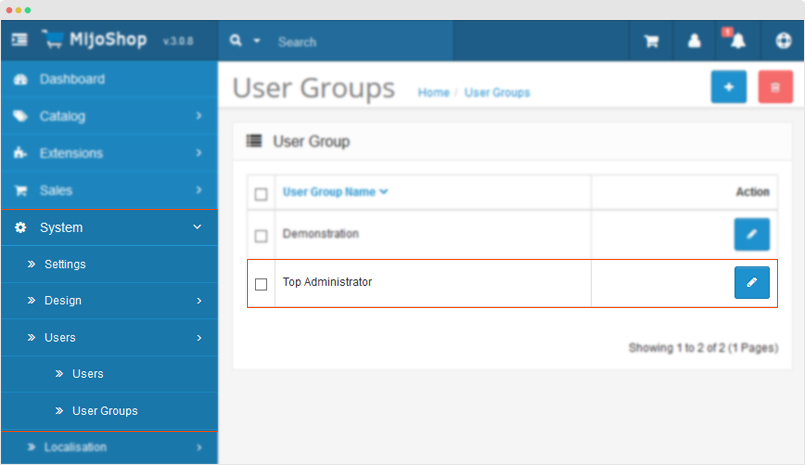
3. Go to "MijoShop => System => Users => User Groups => Top Administrator" and click both "Select All" links
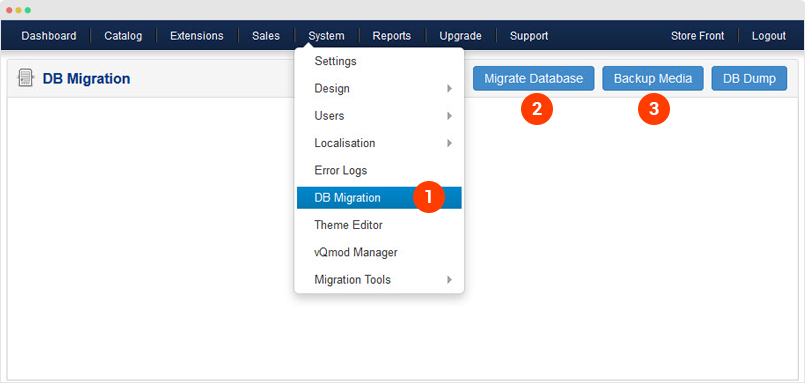
4. Go to to "MijoShop => System => DB Migration", click on the "Migrate Database" button, once the database is migrated, click on the "Backup Media" if you want to keep current images and downloads
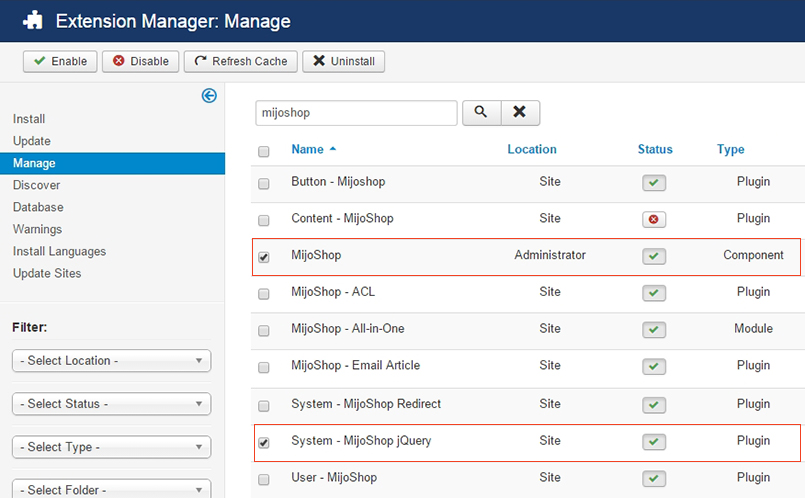
5. Uninstall "MijoShop" component and "System - MijoShop jQuery" plugin from Joomla Extension Manager page
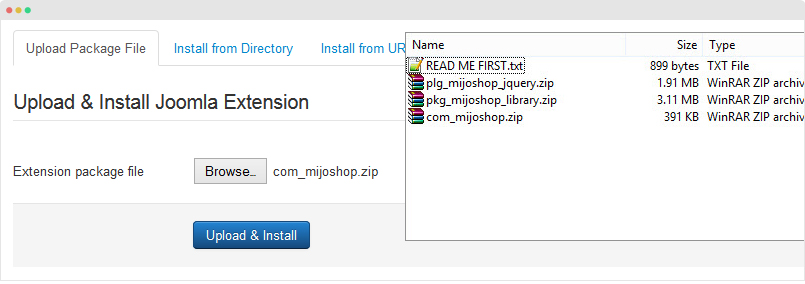
6. Download MijoShop 3 and install it 3 packages: component, jquery plugin and mijoshop library
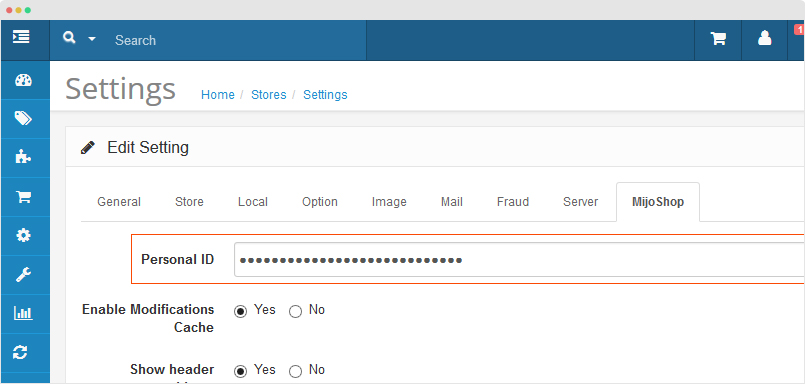
7. Go to "MijoShop => Settings" and enter your Personal ID from the MijoShop tab
8. Go to "MijoShop => System => Users => User Groups => Top Administrator" and click both "Select All" links
Step 3: Configure Mijoshop 3 component and module setting
As we mentioned above, the database migration process won't keep your templates, extensions, modifications etc so you have to do it manually.
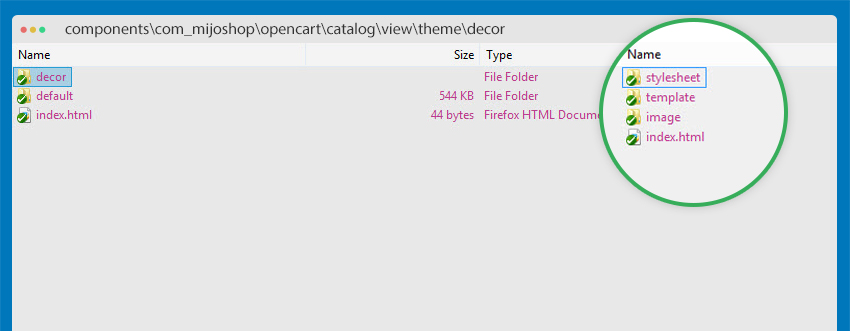
1. Download Decor custom theme for Mijoshop, extract and upload it to the folder: components\com_mijoshop\opencart\catalog\view\theme
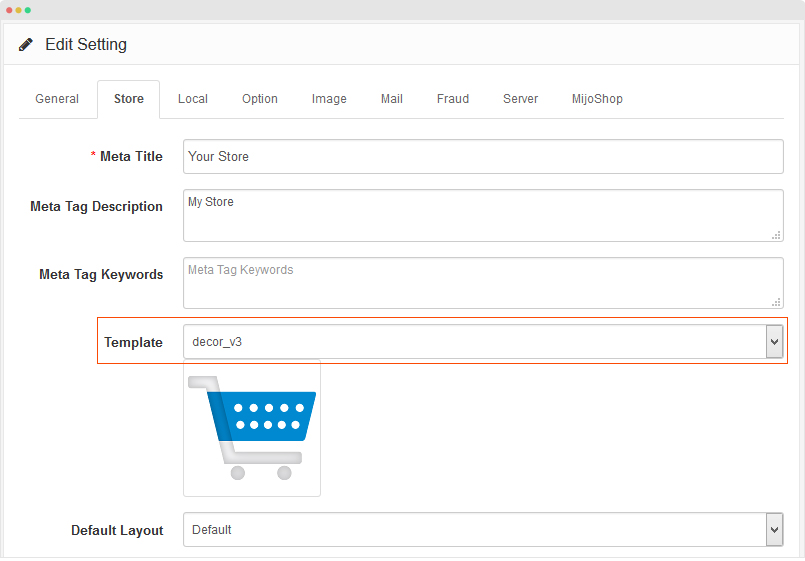
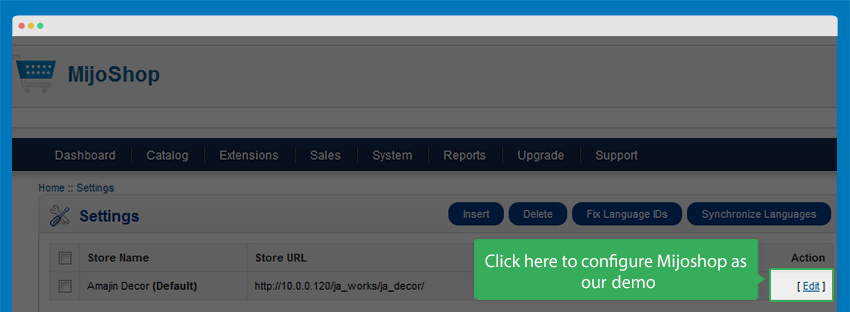
2. Assign the decor theme as default: go to System > Setting, hit the Edit button of the default template, in the Store tab, assign "decor_v3" as default theme then save it.
3. Go to "MijoShop => System => Settings" compare and change all config width the Mijoshop 2 in your site
4. Create all modules as you used in Mijoshop 2 version
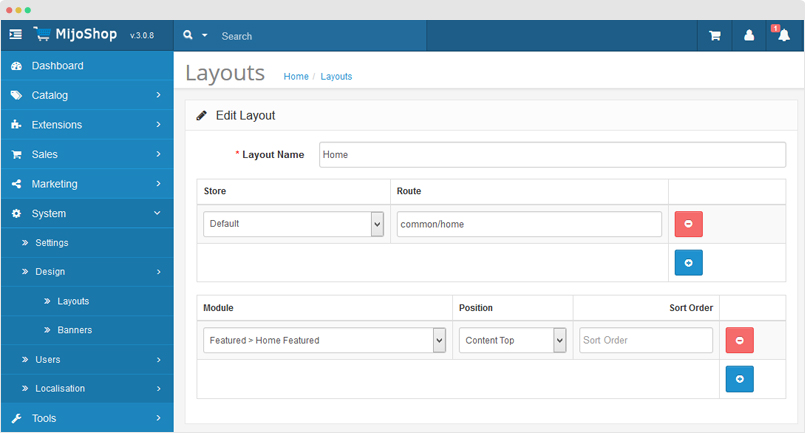
5. Assign modules to corresponding layout as you did in Mijoshop 2: go to System > Design > Layouts, open the layout you want to assign module to, add new module, select module, assign position then save.
Mijoshop 2 Configuration
Mijoshop Component is a commercial extension and is not included in the Quickstart package. The following instruction will help you to install and add Mijoshop JA Decor's style to your site.
Add style for Mijoshop
- Download then install Mijoshop component to your site
- Download style package for Mijoshop from Download page of JA Decor template
- Extract the downloaded Mijoshop style package then add to your site
Mijoshop Configuration
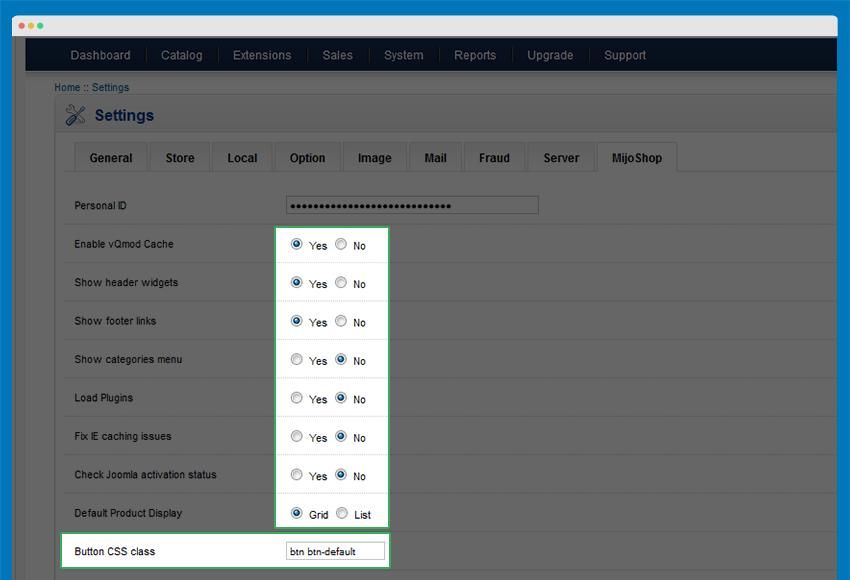
Go to: Components >> Mijoshop >> Settings.
To have style like our demo, please make sure you have same settings as the image below.
Other settings are default settings.
Mijoshop Module Configuration
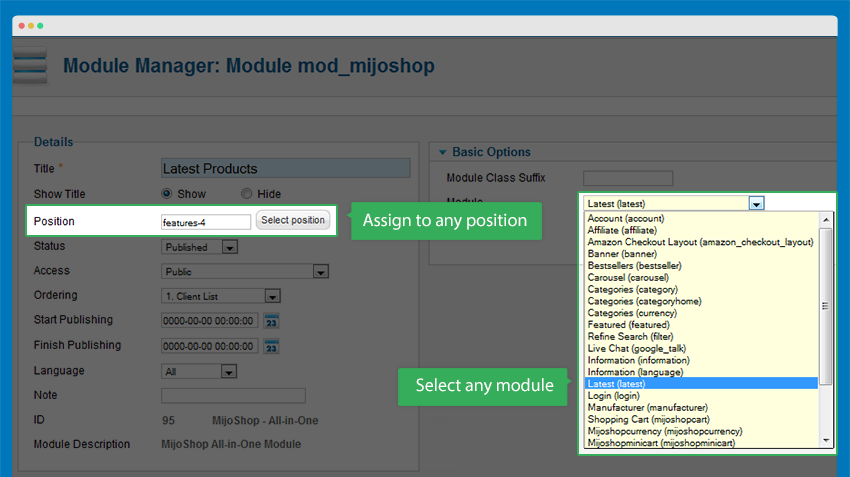
When you install Mijoshop component, all extensions are installed as well. But the modules are not managed in Extensions >> Module Manager. In Extensions >> Modules, you will find only one module: Mijoshop - All-in-One. The module will load any module and assign to any position in your site. To display different modules in different positions, duplicate the Mijoshop - All-in-One module, assign Mijoshop module you want to the duplicated Mijoshop - All-in-one module.
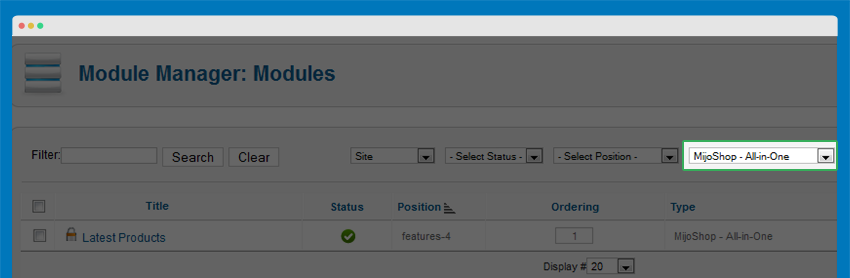
Load any module and assign to any position
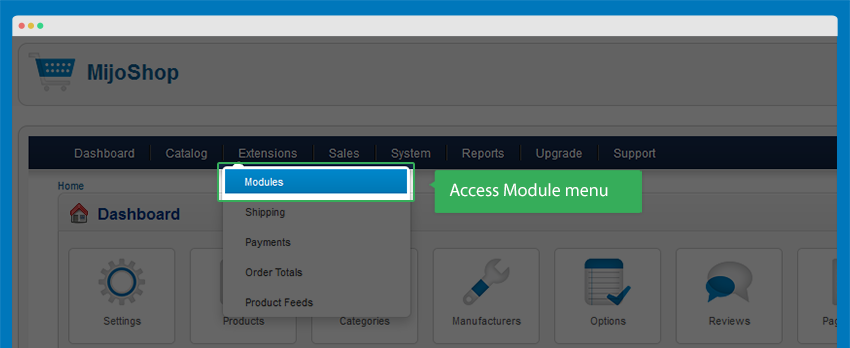
To manage Mijoshop modules, from Dasboard of Mijoshop, go to: Extensions >> Modules to configure modules.
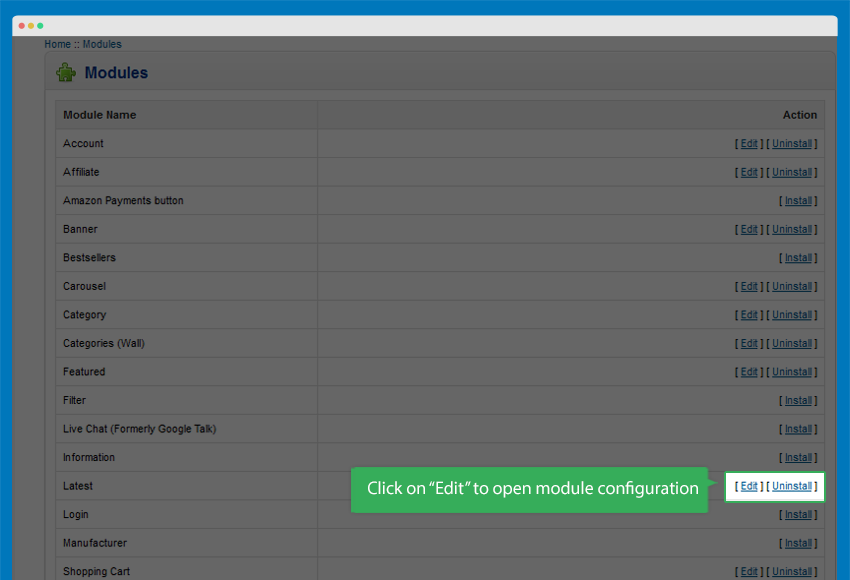
In the list of Mijoshop module, click on Edit button to configure the module.
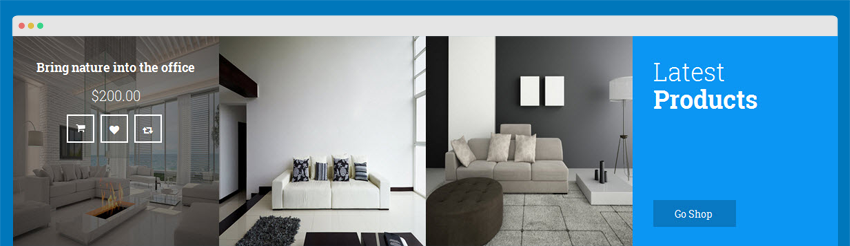
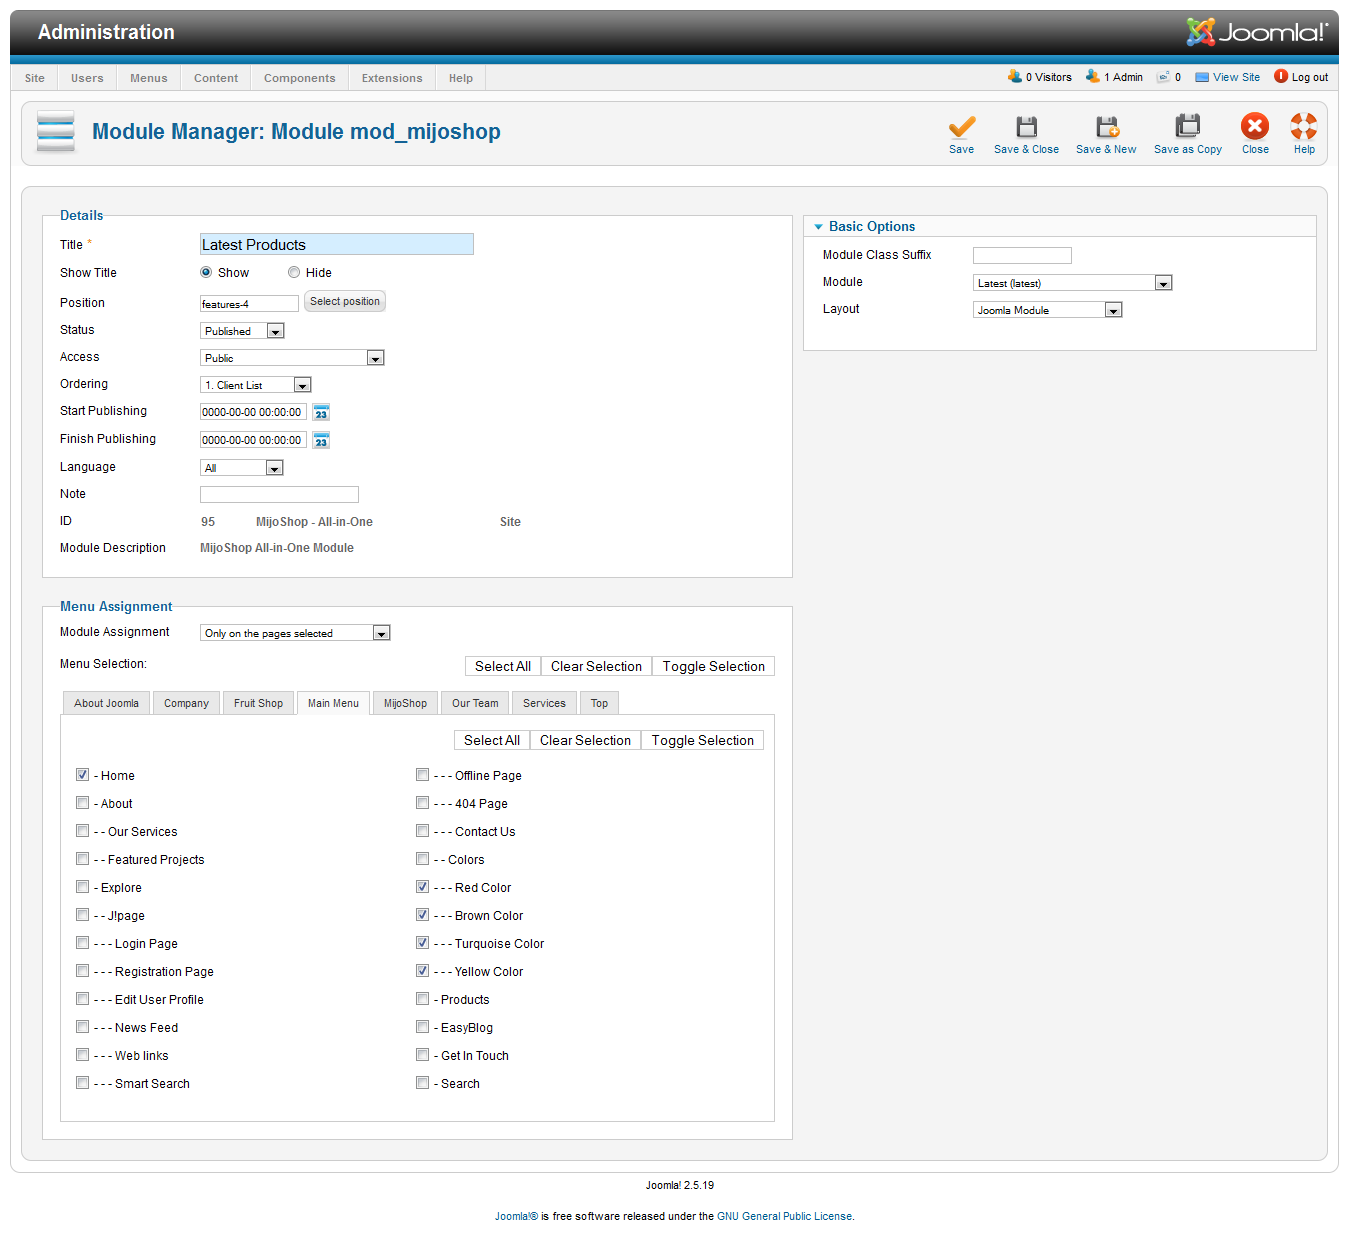
There is one module supported in our site: Latest Products
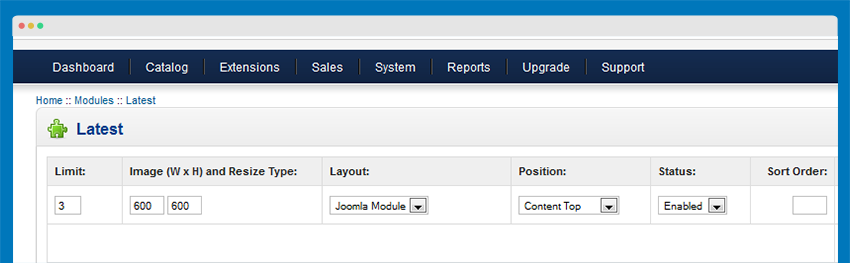
Module Position: features-4
Module Suffix: NOT USED
Mijoshop information module configuration
- Back-end Settings
- Front-end Appearance
Template Configuration
Theme Settings
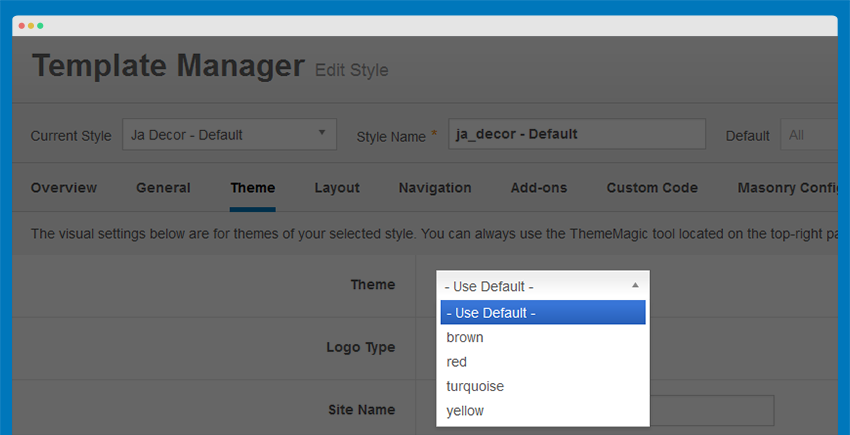
JA Decor supports 5 color themes by default: Default, Red, Brown, Yellow and Turquoise.
A here, you can switch to any theme you like. To change theme, kindly select it from the drop down box under the Theme tab.
In the Theme tab, you can also change the logo by replacing other image here or select text logo option as you wish.
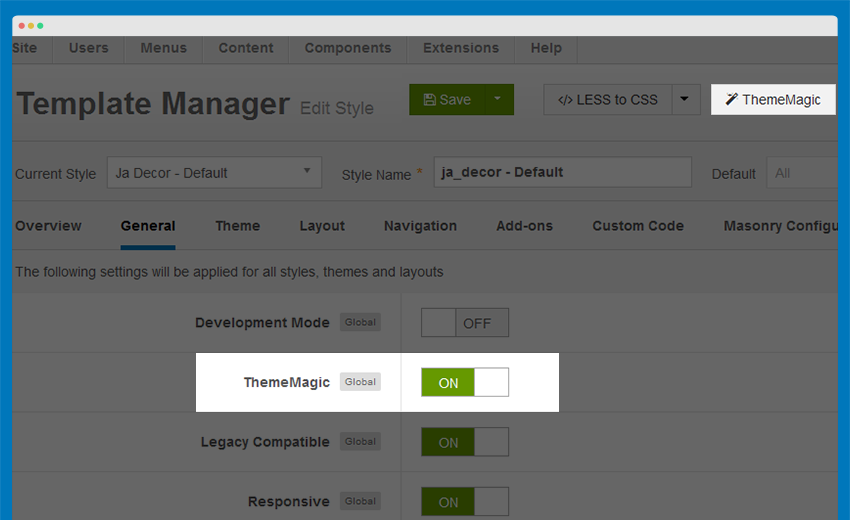
ThemeMagic Settings
ThemeMagic is a real time theme customization tool supported by T3 Framework. It allows you to customize any theme without touching in the code.
Step 1: Enable ThemeMagic
In the General tab, enable ThemeMagic then access ThemeMagic's working panel by clicking on ThemeMagic.
Step 2: Select the theme to customize

Tips: Once ThemeMagic is enabled, you can access ThemeMagic from your front-page by adding "?tm=1" after your site url (example: http://joomla-templates.joomlart.com/ja_decor/?tm=1)
View ThemeMagic Documentation VIew ThemeMagic's Video Tutorial
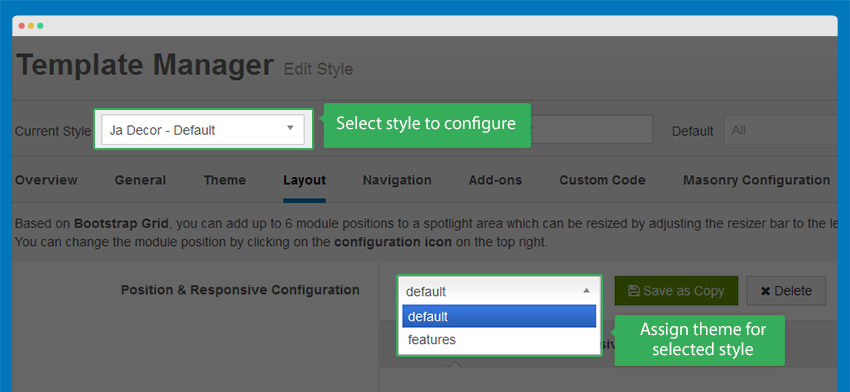
Layout Settings
There are 2 layouts that are used in the template. Select the style that you want to work on, then assign the layout for that style accordingly.
Layout Structure
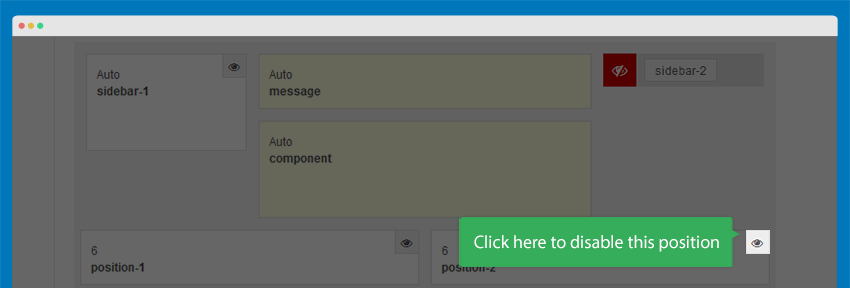
Here, you can change the layout structure, module positions in the layout, and more.
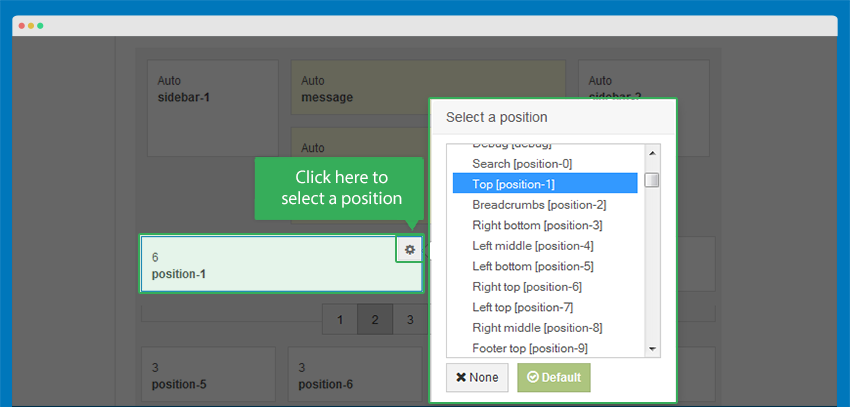
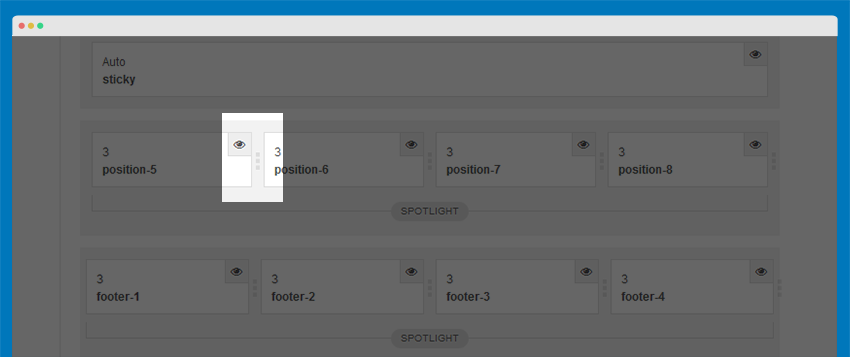
In the spotlight block, you can see the number of positions available.
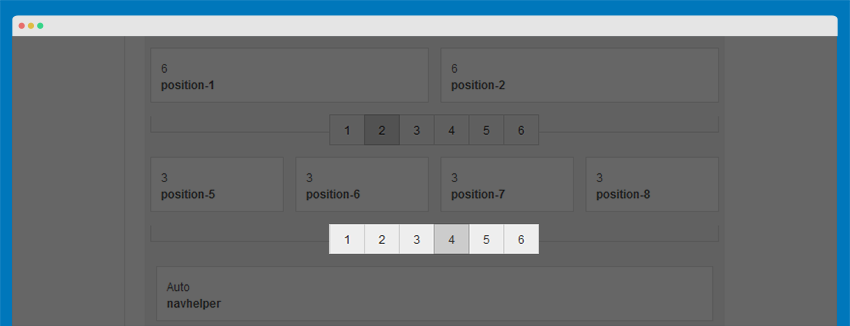
Responsive Layouts
JA Decor supports multiple responsive layouts. In the Responsive layout, select the layout you would like to configure.
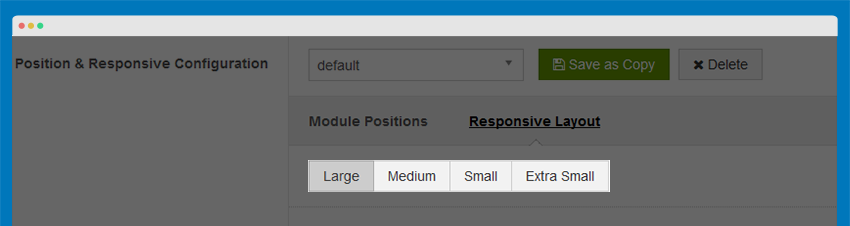
In each responsive layout, you can disable any module position as you wish.
For module positions in the spotlight block, you can drag to resize.
Documentation Layout configuration video Layout customization video
Masonry Configuration
Mansory Configuration will allow you to set the number of items being displayed according to different screen sizes. These settings are located in the tab Masonry Configuration in Administrator--> Extensions--> Template Manager--> JA Decor Template
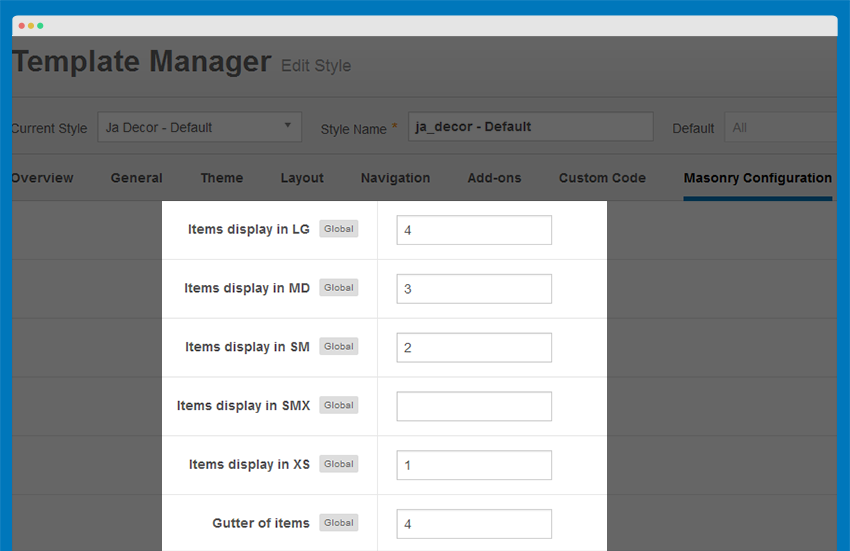
Items display in LG: The number of items showing on a row with width of browser (in the case, it can be understood as width of monitor if you does not resize browser) larger than 1200px
Items display in MD: The number of items showing on a row with width of browser between 992px and 1200px
Items display in SM: The number of items showing on a row with width of browser between 768px and 992px
Items display in SMX: The number of items showing on a row with width of browser between 480px and 768px
Items display in XS: The number of items showing on a row with width of browser smaller than 480px
Gutter of items: Distance between the items showing
To display as Demo site, please follow step by step as below:
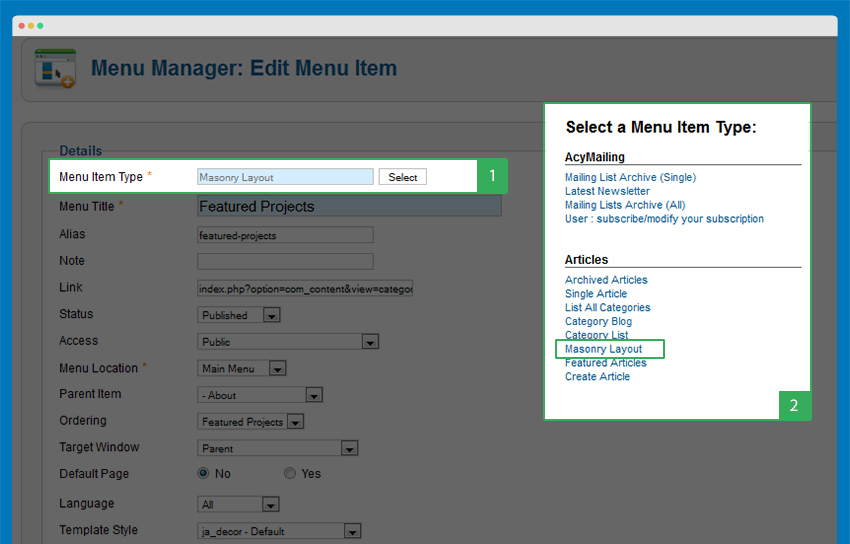
Step 1: Go to Administrator --> Menus --> Main Menu Create new Menu using Menu Item Tyle is Masonry Layout
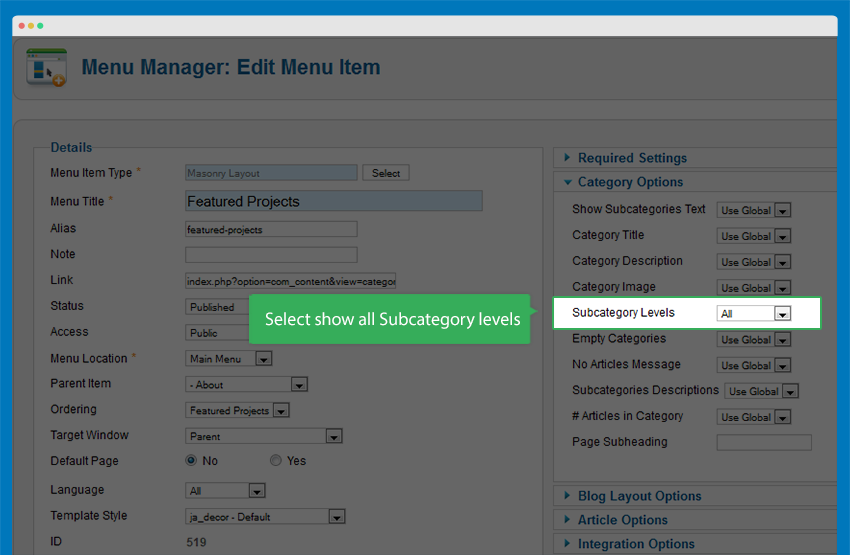
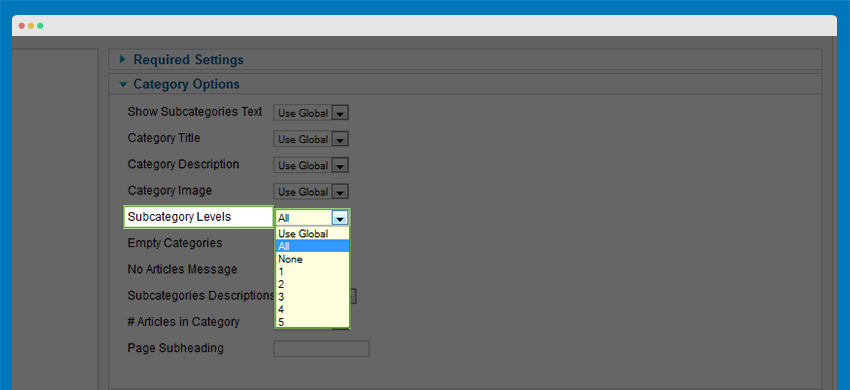
In Category Options tab: Select to show all Subcategory levels
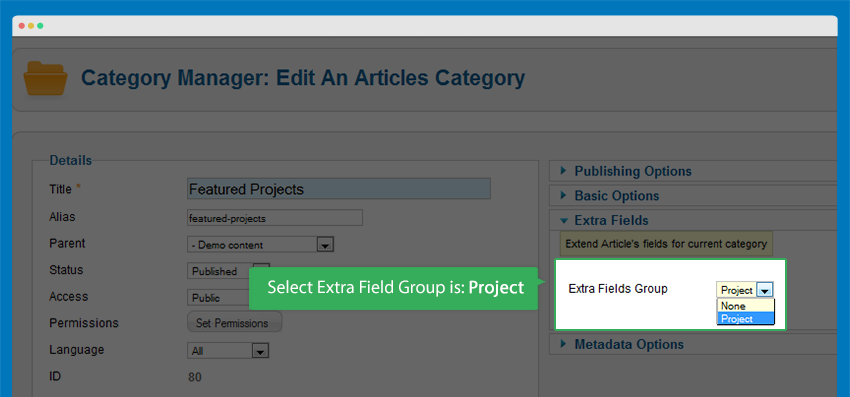
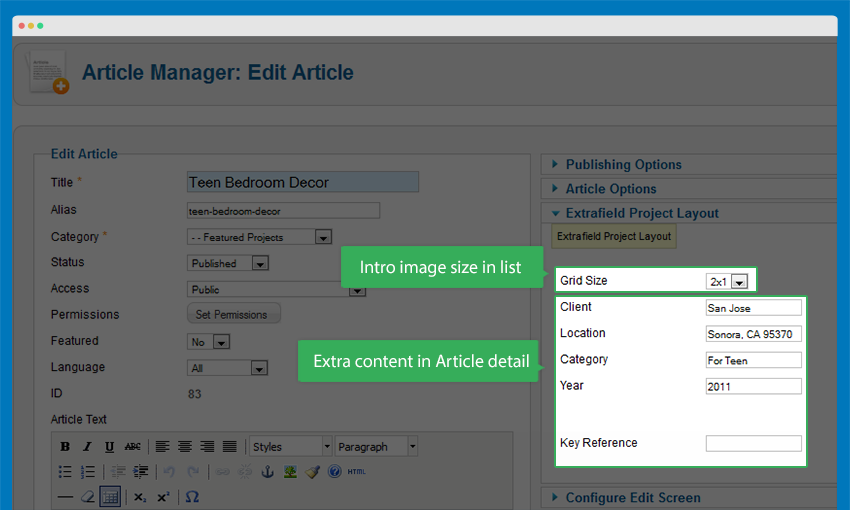
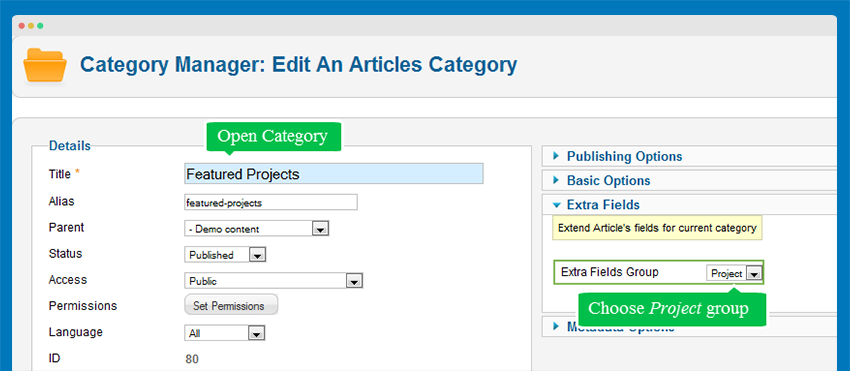
Step 2: Go to Administrator --> Content --> Categories--> Featured Projects category--> Extra Fields tab -->Select "Extra Field Group" is Project
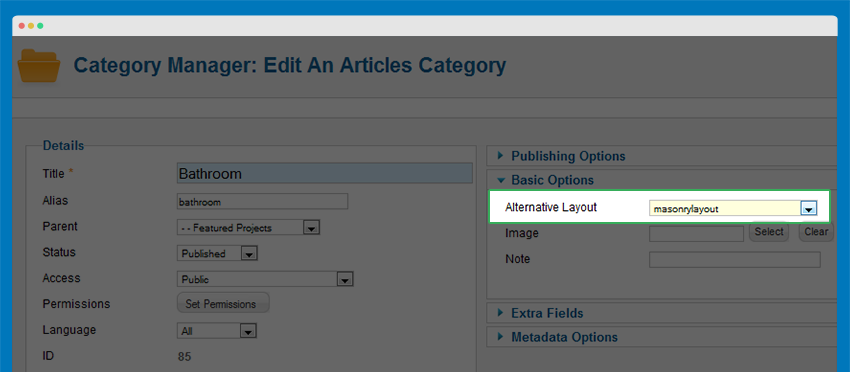
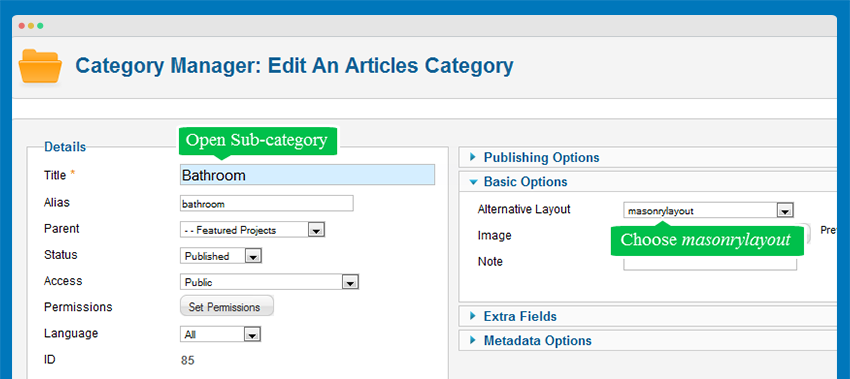
Step 3: Go to Administrator --> Content --> Categories--> Open Subcategory (Ex: Bathroom)--> Basic Options tab--> Select "Alternative Layout" is Masonrylayout
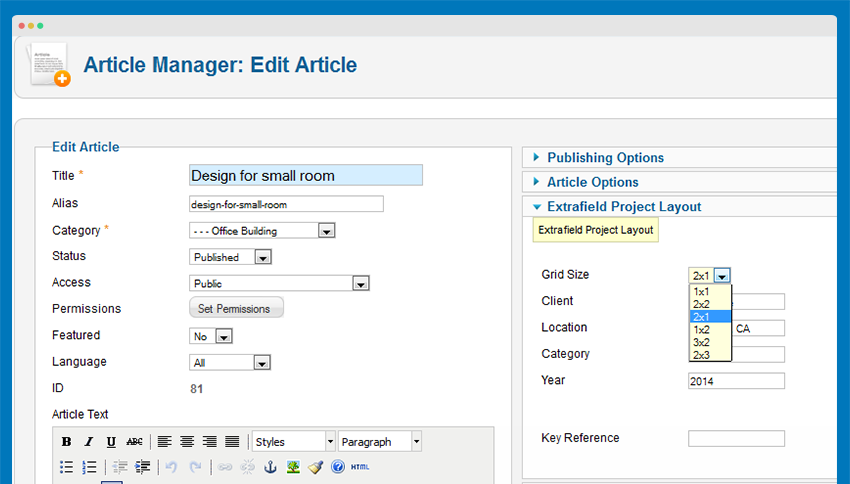
Step 3: Go to Administrator --> Content --> Articles--> Open Extrafield Project Layout tab:
Frontend Appearance
Get typography displayed on your site
JA Decor comes with multiple typography styles for Headings, Content, Color, Buttons, Quotes, Forms and so on ...

Note:
JA Decor is built on the latest version of T3 Framework which integrates Bootstrap 3 at core, hence, JA Decor does support all Bootstrap 3's typo.
Step 1: Get the typo markup
There are 3 ways you can quickly get the typo markup from:
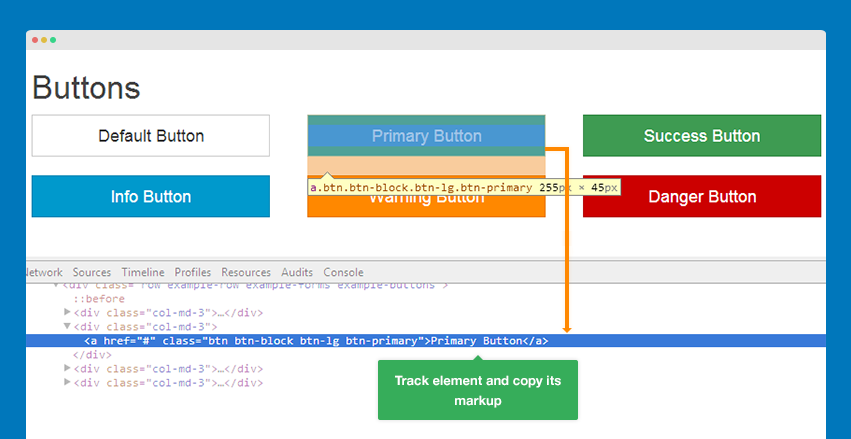
#1: Using Firebug
#2: Using quickstart package
We provide a Quickstart package, which includes the sample data that will help you replicating the Purity III demo as is for your site. Once you successfully install the site, you can easily get the typo's markup from the articles and custom HTML module.
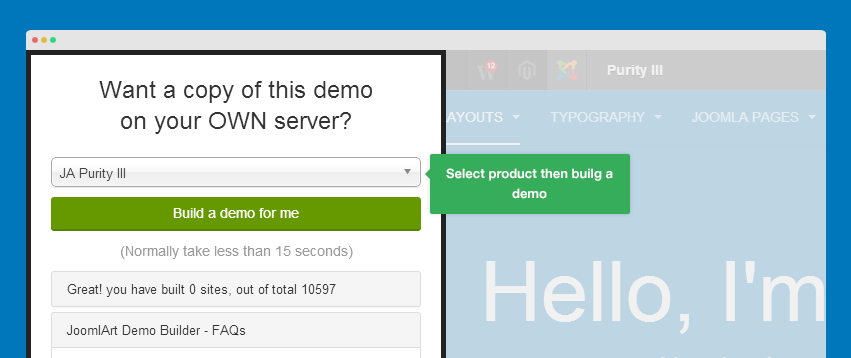
#3: Using demo builder
Once you successfully build a Demo using Demo Builder which we have shown earlier in the Download and Installation section, you can easily copy the typo markup from the articles and custom HTML directly from the back-end.
Step 2: Add markup of the typo to your content
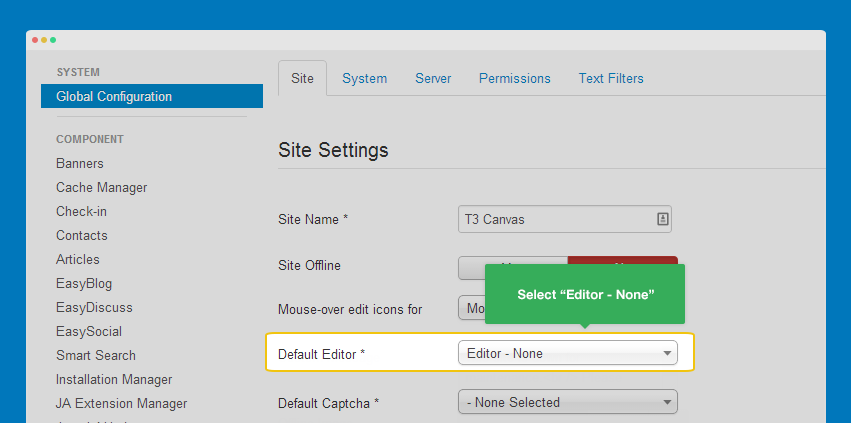
Turn off editor:
Please make sure you turn the Editor off if you are going to add HTML code to your article content. To turn off, please navigate to Sytem >> Global confoguration, select Editor - None in the field Default editor.
You can add the typo markup to the article's content field or custom HTML module.
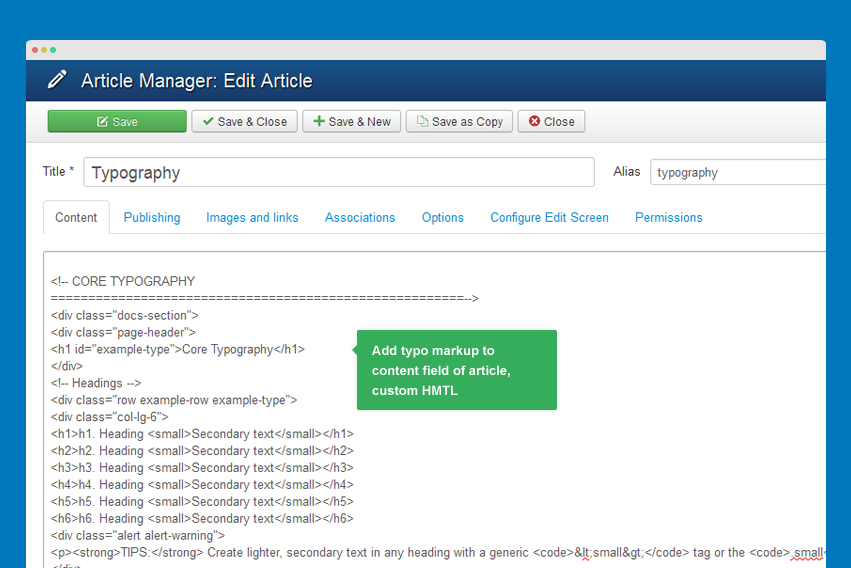
Here is HTML code: Typography_Page_HTML_Code.txt.
You can use the above HTML code for making similar page in your site and refer to the codes for using Typography.
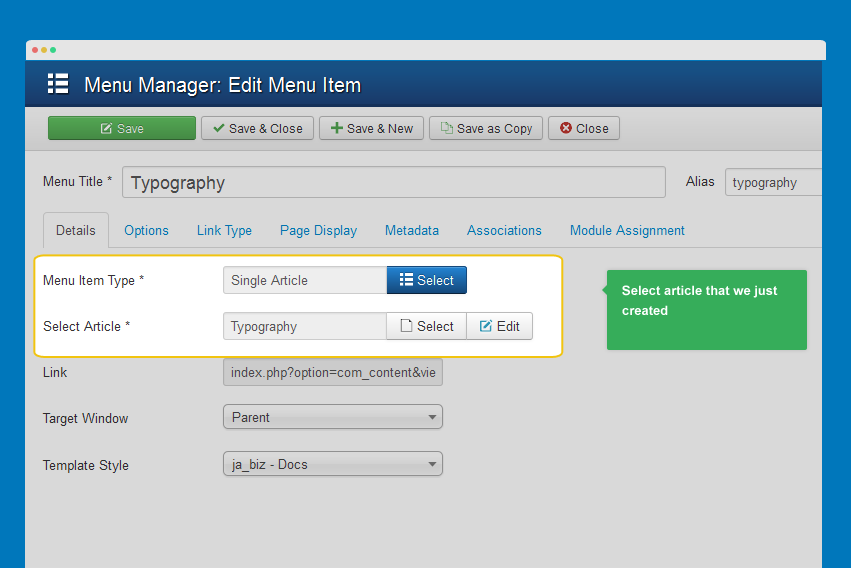
Step 3: Get the typo displayed on the front-page
Create a menu, assign to the article we added the typo markup to.
FAQ
- How to have a search button like in our demo?
- How to have a button like Get In Touch in our demo?
- How to create or change the copyright?
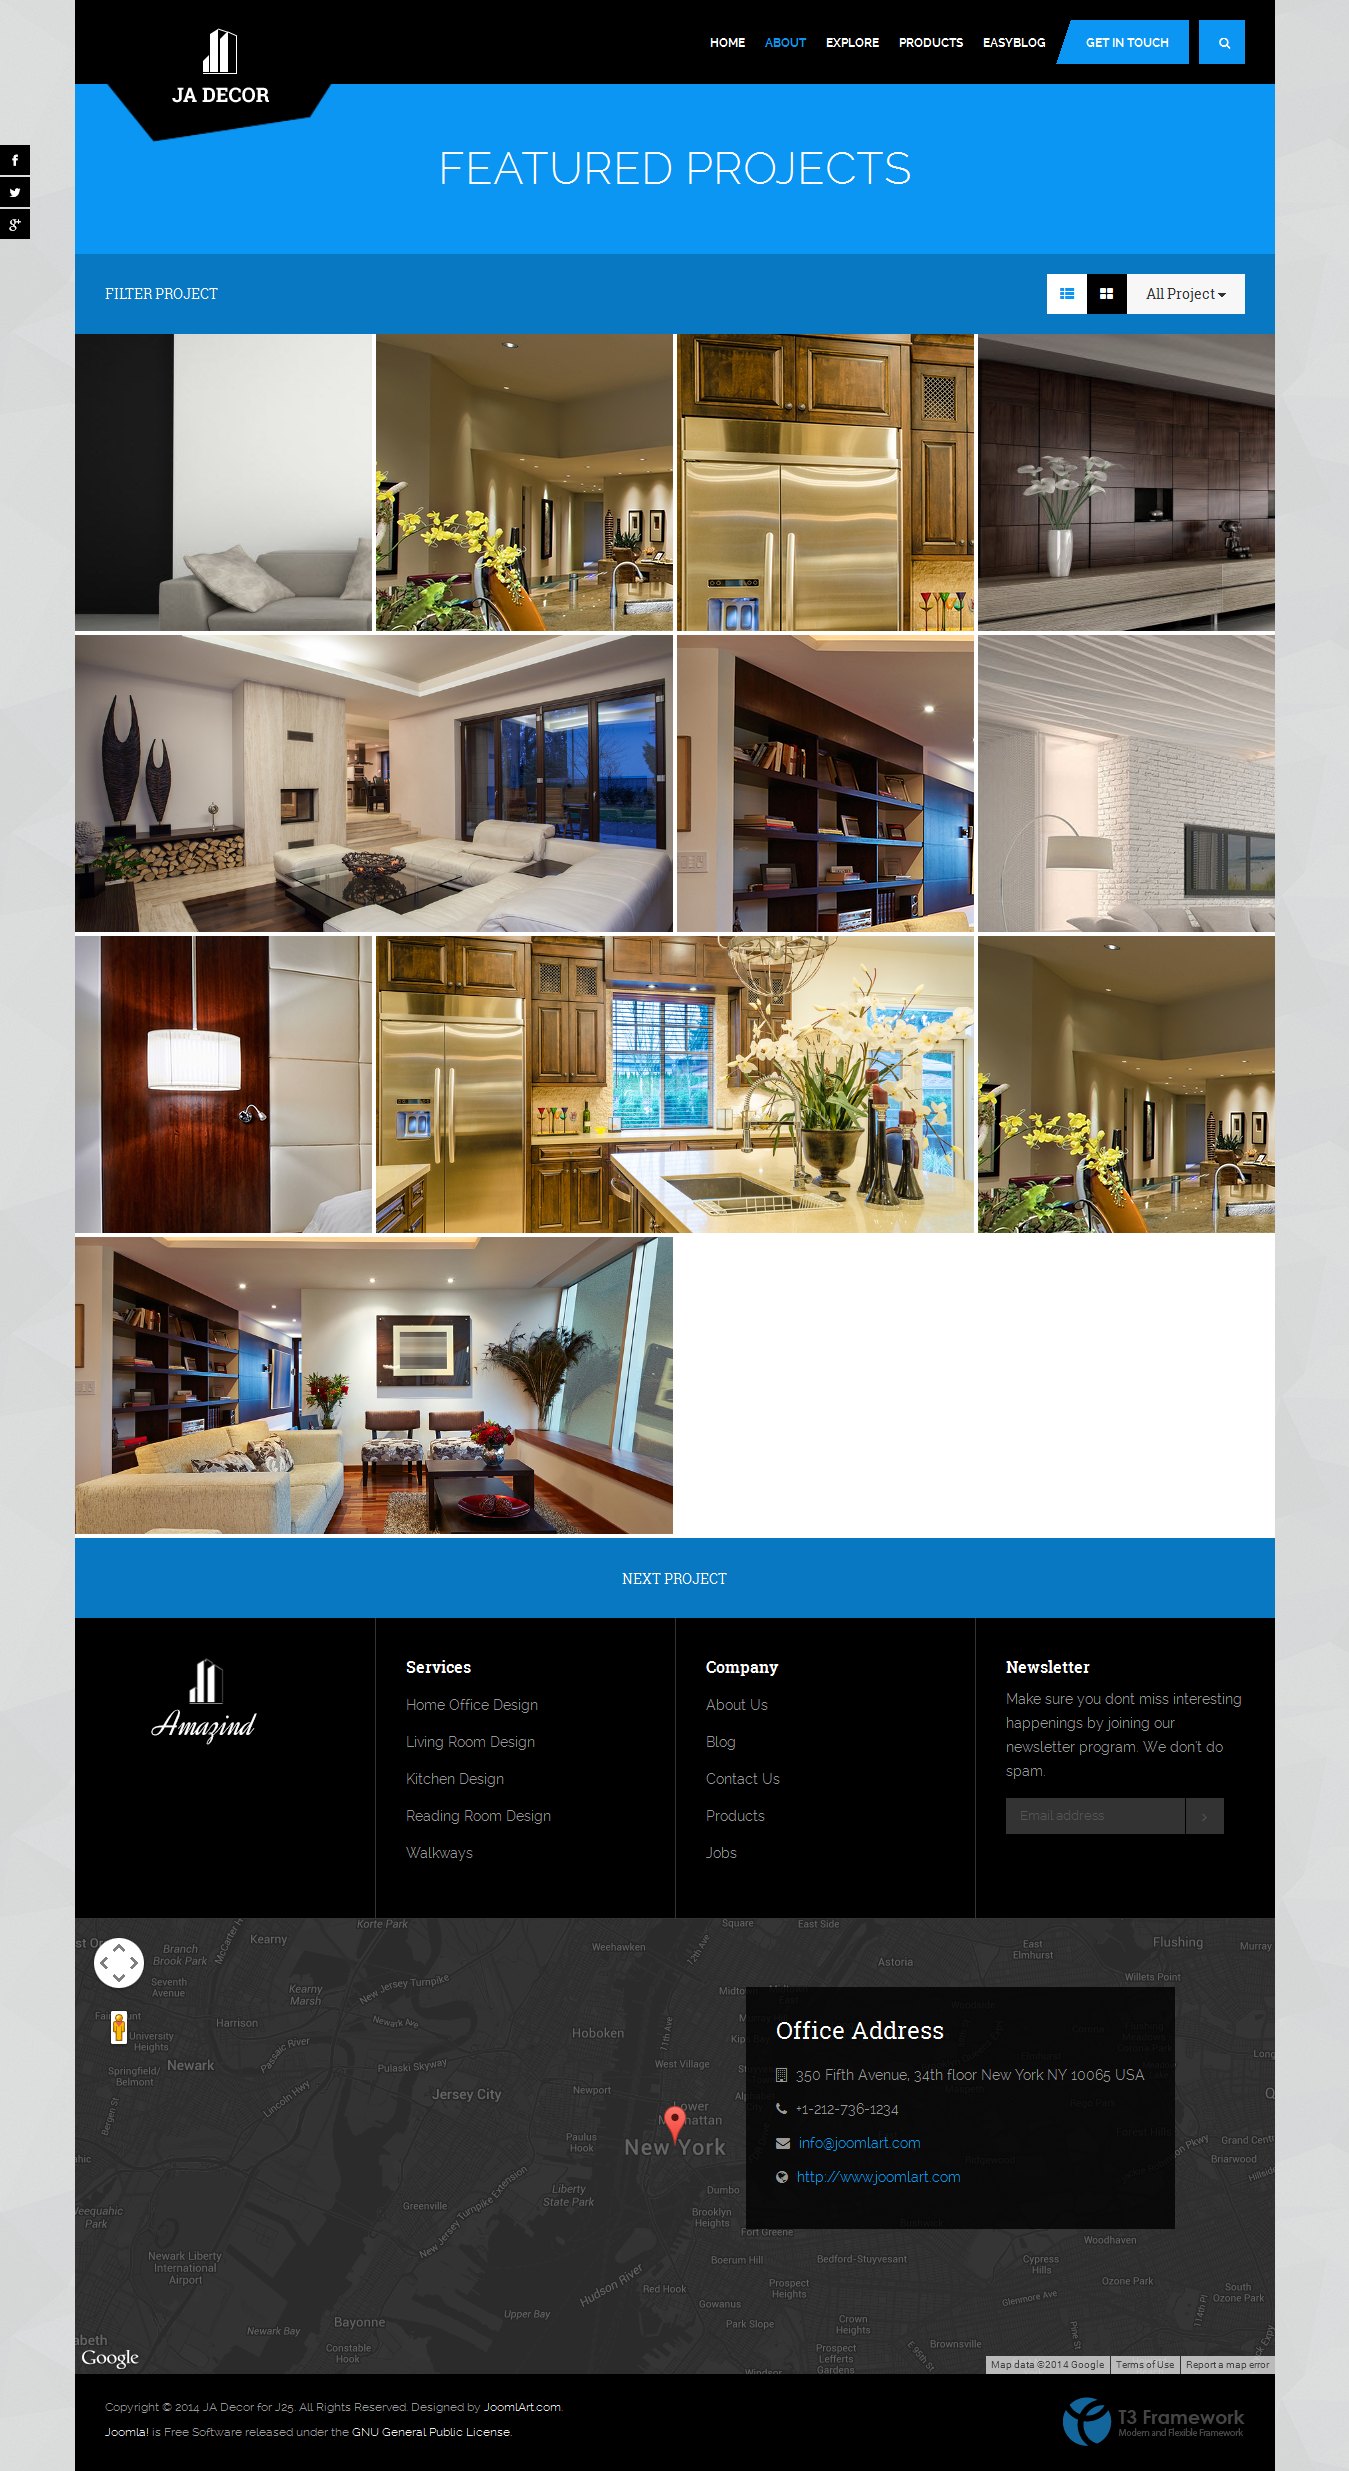
- How to create the grid layout as “Featured Projects” page in demo?
- How to make use of the parameters in "Masonry Configuration" tab?
- How to change the width or height of each item on “Featured Projects” page?
- How can I hide the column Our Services with its category name and description in the [features-1] position?
- How can I hide the column Featured Projects with its category name and description in the [features-3] position?
- Where is the Breadcrumbs module?
- Can I have featured articles in Home Page?
- How to change logo in JA Decor template?
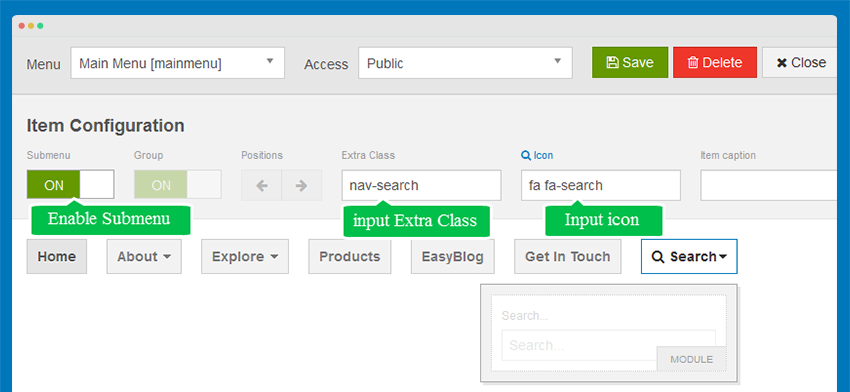
1. How to have a search button like  in our demo?
In order to have a search button as in our demo, you should follow 4 steps below:
Step 1: Create a menu named as Search in the mainmenu with its order as last.
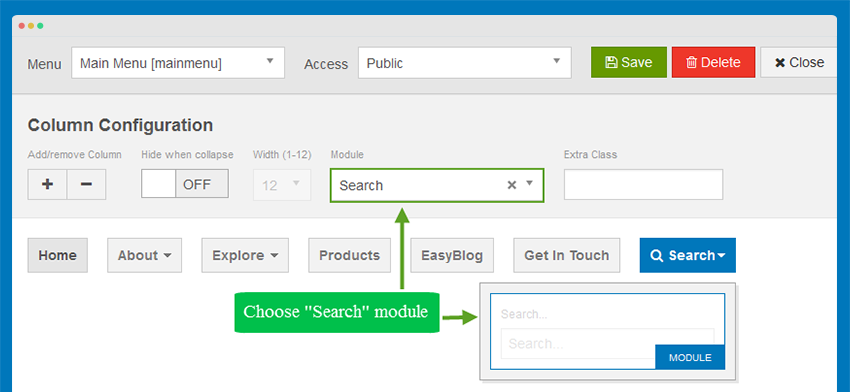
Step 2: Enable Search module (Show title is No and assign to all pages)
Step 3: Navigate to Backend ->> Templates Manager ->> Megamenu Config ->> Search menu item then add nav-search into Extra Class box and fa fa-search in Icon box.
Step 4: Enable submenu then choose the Search menu as in our screenshot below:
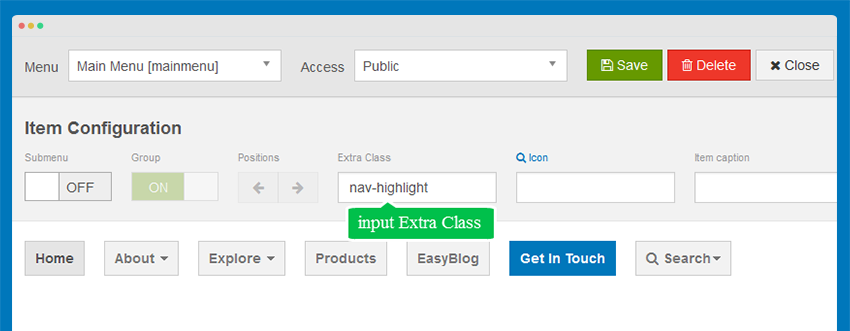
2. How to have a button like Get In Touch in our demo?
In order to have a button like Get In Touch in our demo, you should follow 2 steps below:
Step 1: Create a menu named as Get In Touch in the mainmenu. Its order should be placed before the Search button  (if you already have one) or placed as last (if you have no Search button yet).
Step 2: Navigate to Backend ->> Templates Manager ->> Megamenu Config ->> Get In Touch menu item then add nav-highlight into Extra Class box.
3. How to create or change the copyright?
In order to create or change the copyright in the template
Go to templates\ja_decor\html\mod_footer\default.php and change the copyright in the file. Please note that you must follow our regulation for copyright removal at https://www.joomlart.com/member/signup.php
4. How to create the grid layout as “Featured Projects” page in demo?
In order to create the grid layout as “Featured Projects” page in demo, you should follow 3 steps below:
Step 1: Create a menu with the Menu Items Type as Masonry Layout
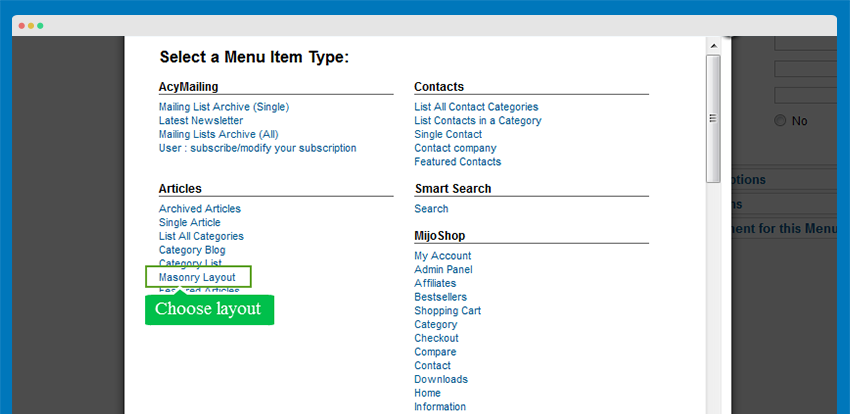
In Masonry Layout, we can change the parameters to fit for different layouts:
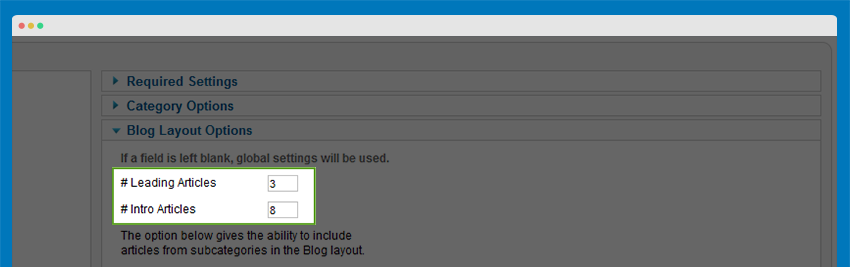
The total number of items shown in masonry layout equals the total params for # Leading Articles and # Intro Articles.
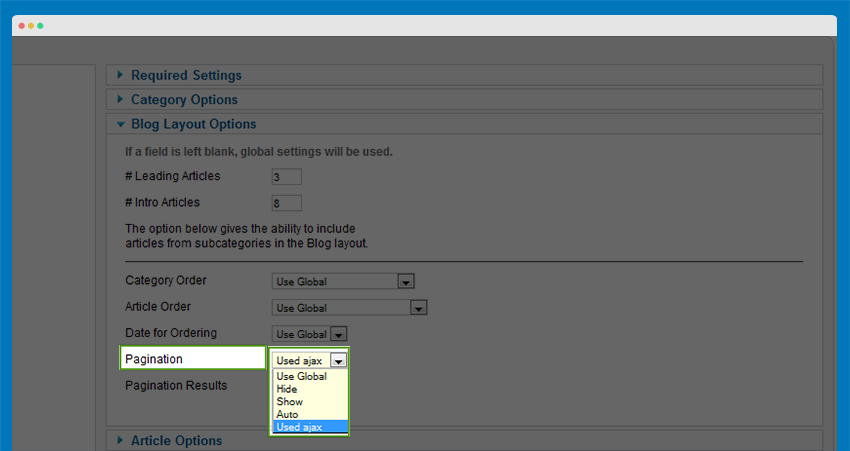
In the “Pagination” setting, you can choose the params as ajax load or normal
The “All Project” select is shown when you set params “Subcategory Levels” to anything other than “None” and the category you choose have sub categories.
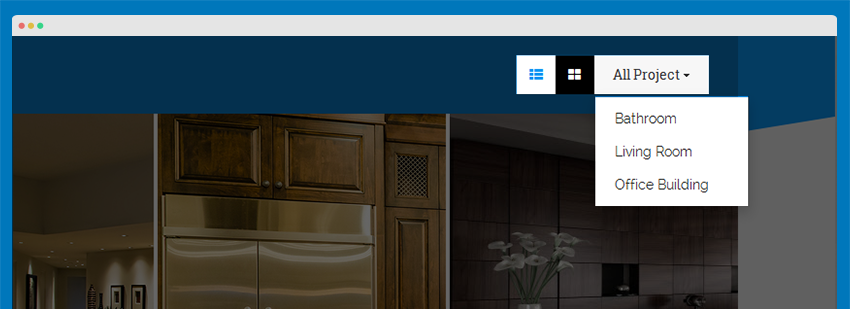
The subcategories in the select All Project use the default layout. In case you need to set an alternative layout as masonry layout for it, navigate to Administrator >> Content >> Categorys Manager then choose the subcategory you need to change. In the “Basic Options” tab, set the params Alternative Layout to masonrylayout.
Step 2: In the chosen category, go to Extrafields setting and set the Extra Fields Group to Project
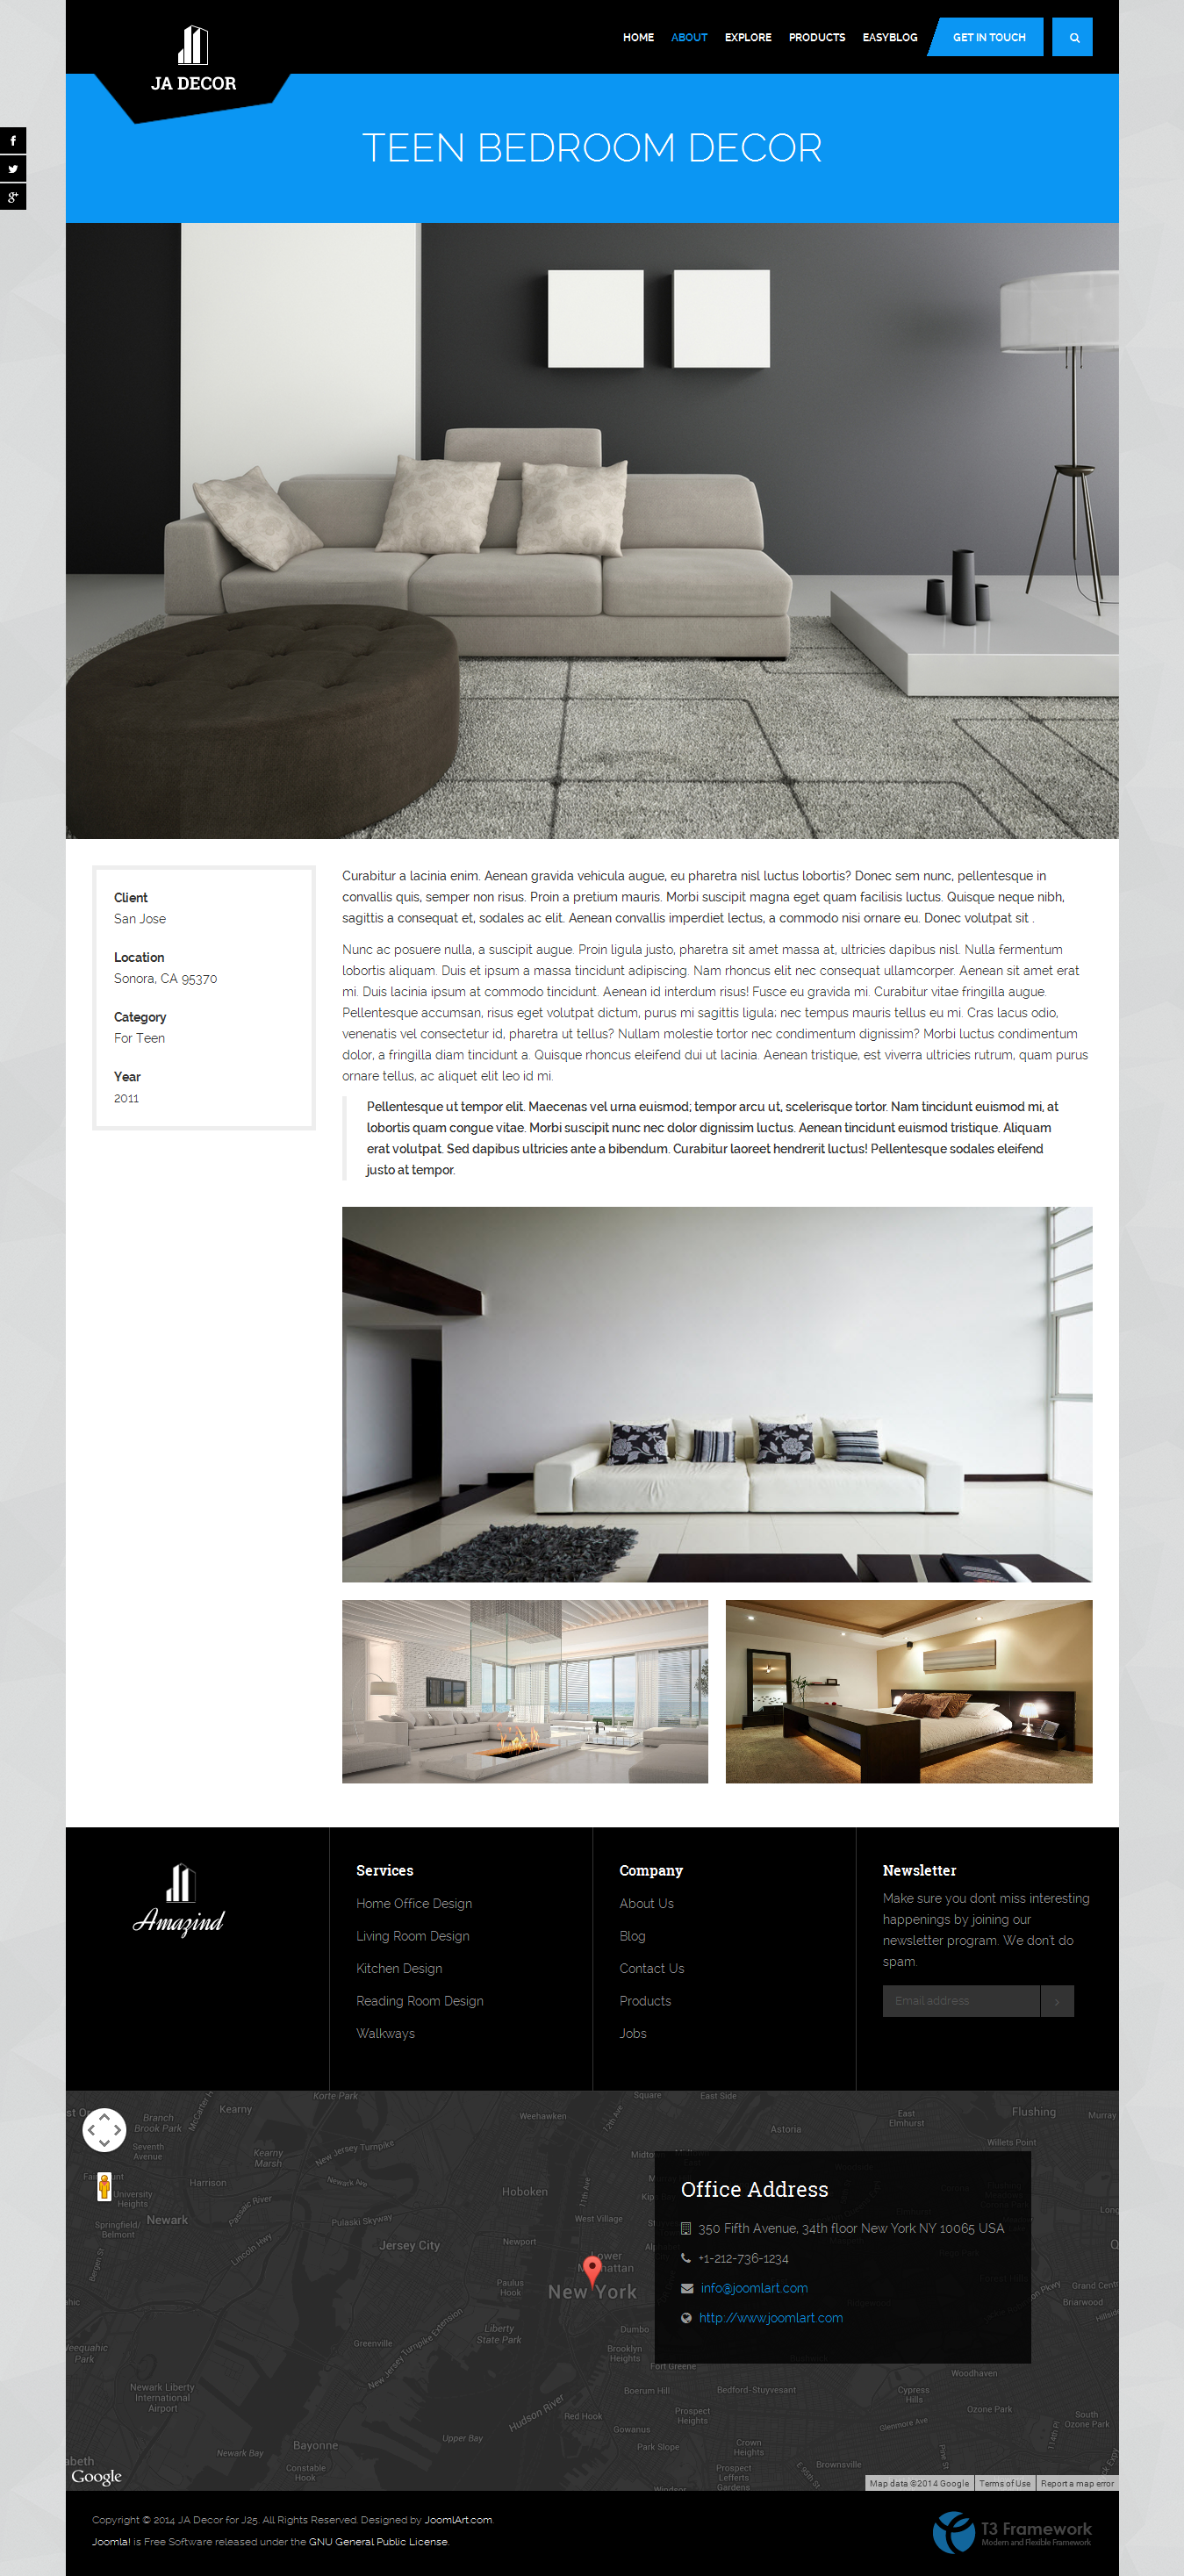
Step 3: When you set <>bExtra Fields group as Project, you can set grid size for each article apart from the 1x1 ratio as default.
5. How to make use of the parameters in "Masonry Configuration" tab?
Those are all settings for the Featured Projects page in demo.
Items display in LG: defines the number of items shown on a row for screen width or browser width (in case you resize your browser) larger than 1200px.
Items display in MD: defines the number of items shown on a row for browser width between 992px and 1200px.
Items display in SM: defines the number of items shown on a row for browser width between 768px and 992px.
Items display in SMX: defines the number of items shown on a row for browser width between 480px and 768px.
Items display in XS: defines the number of items shown on a row for browser width smaller than 480px.
Gutter of items: defines the distance between the each item.
6. How to change the width or height of each item on “Featured Projects” page?
Here is how you do it.
- Width of items is equal with width of browser (or width of screen) defined in the Masonry Configuration setting.
- Height of items is equal with width of items by default. If you want change this setting, you need to custom the code.
First, open the file “templates/ja_decor/js/scripts.js”, find this code line:
height = multiplier_h ? columnWidth*multiplier_h[1] : columnWidth;
Next, change “columnWidth” with the number you want.
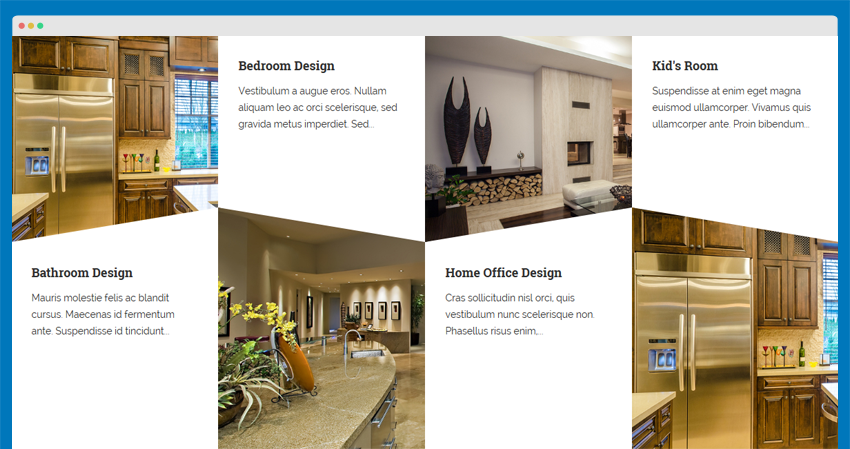
7. How can I hide the column Our Services with its category name and description in the [features-1] position?
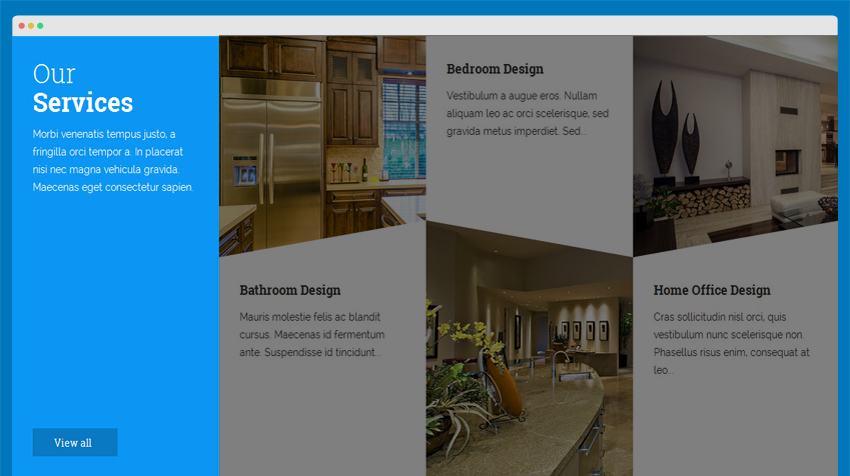
In order to hide the column Our Services in the [features-1] position, you should follow 2 steps below:
Step 1: Open the
      <?php
	  //Get category info
	  if(isset($jacategory)) : ?>
	  <div class="col-xs-12 col-sm-6 col-md-3 col-cmd-12 category-info background-primary">
	  <div class="grid-1x2 grid-inner">
	  <h3 class="category-title">
	  <?php
	  $cat_title = $jacategory->title;
	  $cat_titles = explode(" ",$cat_title);
	  echo '<span class="first-letter">'.$cat_titles[0].'</span>';
	  unset($cat_titles[0]);
	  echo ' '.implode(" ",$cat_titles);
	  ?>
	  </h3>
	  <div class="category-des">
	  <?php echo $jacategory->description;?>
	  </div>
	  <a class="btn btn-primary btn-icon" href="/<?php echo JRoute::_(ContentHelperRoute::getCategoryRoute($jacategory->id));?>"><?php echo JText::_('VIEW_ALL'); ?> <i class="fa fa fa-long-arrow-right"></i></a>
	  </div>
	  </div>
	  <?php endif;
	  //End add
	  ?>
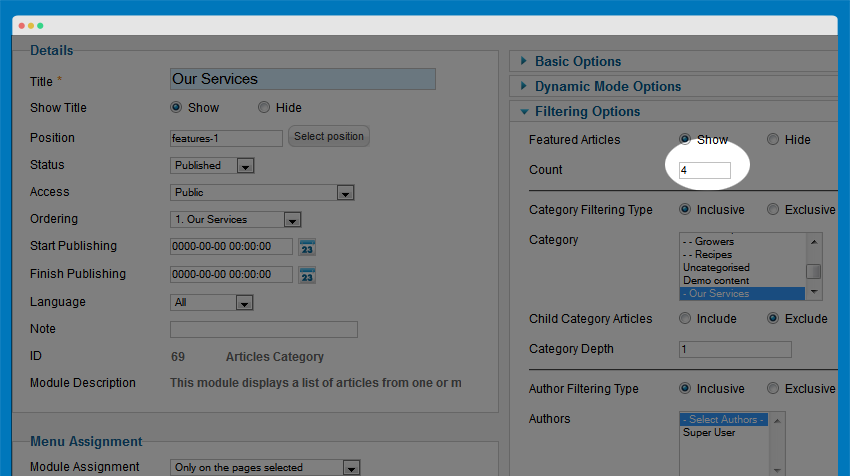
Step 2: Go to “Our Services” module manager. In the Filtering Options setting, set Count from 3 to 4
Here is the result in front-end:
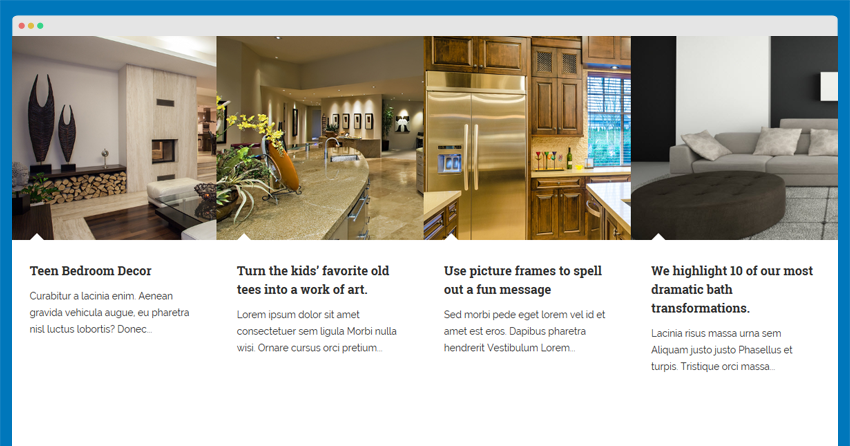
8. How can I hide the column Featured Projects with its category name and description in the [features-3] position?
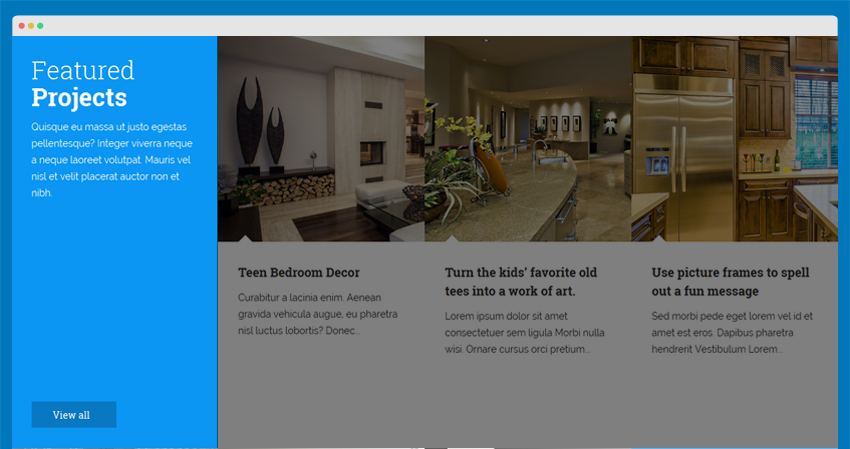
In order to hide the column Featured Projects in the [features-3] position, you should follow 2 steps below:
Step 1: Open the \templates\ja_decor\html\mod_articles_category\normal.php file and remove these code lines:
  <?php
  //Get category info
  if(isset($jacategory)) : ?>
  <div class="col-xs-12 col-sm-6 col-md-3 col-cmd-12 category-info background-primary ">
  <div class="grid-inner grid-1x2">
  <h3 class="category-title">
  <?php
  $cat_title = $jacategory->title;
  $cat_titles = explode(" ",$cat_title);
  echo '<span class="first-letter">'.$cat_titles[0].'</span>';
  unset($cat_titles[0]);
  echo ' '.implode(" ",$cat_titles);
  ?>
  </h3>
  <div class="category-des">
  <?php echo $jacategory->description;?>
  </div>
  <a class="btn btn-primary btn-icon" href="/<?php echo JRoute::_(ContentHelperRoute::getCategoryRoute($jacategory->id));?>"><?php echo JText::_('VIEW_ALL'); ?> <i class="fa fa fa-long-arrow-right"></i></a>
  </div>
  </div>
  <?php endif;
  //End add
  ?>
Step 2: Go to “Featured Projects” module manager. In the Filtering Options setting, set Count from 3 to 4
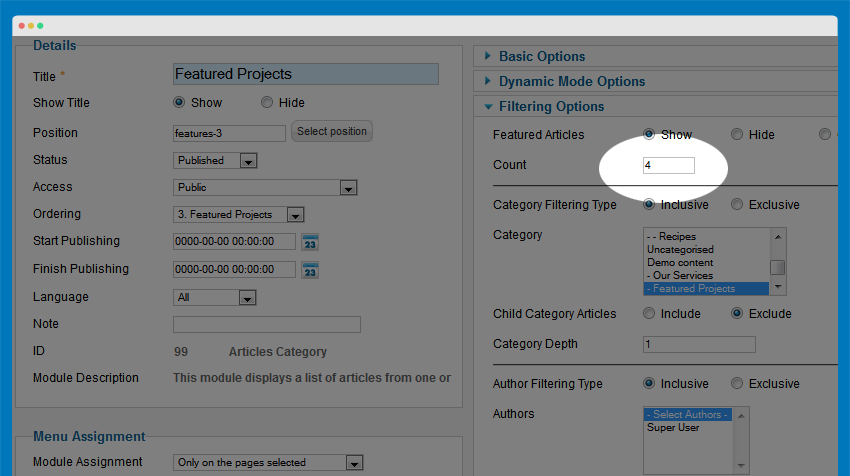
Here is the result in front-end:
9. Where is the Breadcrumbs module?
We disable this module in the back-end so it is not shown in demo. If you want to display Breadcrumbs module, go to admin setting then public Breadcrumbs module with its module position as navhelper and assign it to all pages.
10. Can I have featured articles in Home Page?
Yes, you can. Log into your site back-end then navigate to Mainmenu manager ->> edit Home menu item and change the number in these fields:
Leading Articles
Intro Articles
Columns
Note:
The value in Columns should be set as 1, value in Leading Articles should be odd number.
11. How to change logo in JA Decor template?
There are two ways to change the default logo in JA Decor template.
11.1 Upload your own logo in the template back-end
Navigate to Backend >> Extensions >> Templates Manager >> ja_decor - Default >> Theme tab Browse and upload yout logo in the field Logo Image
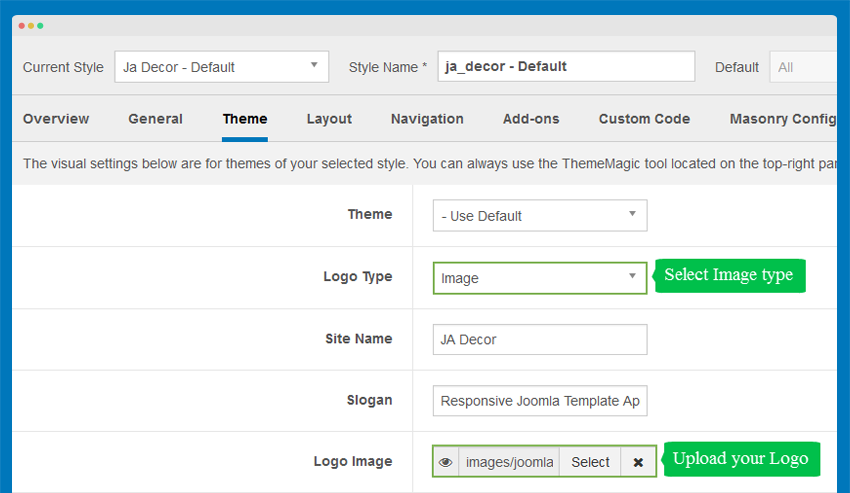
Click Save to complete the whole process. Refresh your site in the front-end to see the immediate change.
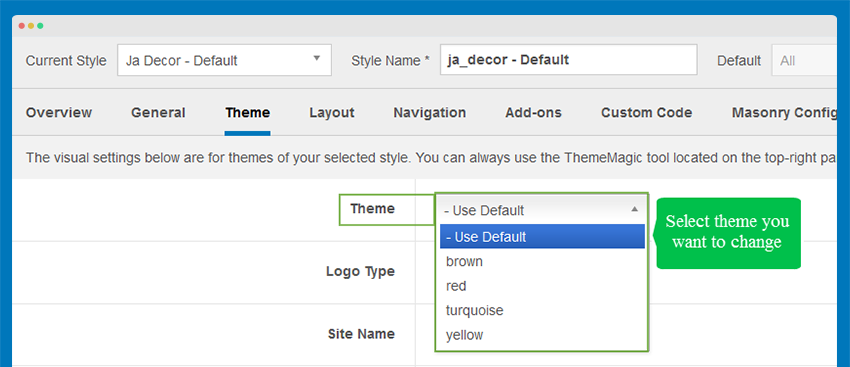
Note:
In case you use more than one theme: In the Theme tab, navigate to the Theme field then select the theme you want to change.
Finish all the steps above and you are done.
11.2 Use custom CSS
Set your logo to the standard size (xxx) and name it as [your_site_name].png
Copy that logo file to the folder [root]/templates/ja_decor/images/
Create a css file named custom.css in the folder: /your site/templates/ja_decor/css/
If the new logo size is not going well with your site’s look and feel, just change its size with additional styling as below:
- Adding a new class as .logo-image {}
For Example
   .logo-image {
     width: logo-width;
     height: logo-height;
     background: url("your-site/ja_decor/templates/ja_decor/images/your-site-logo.png") no-repeat / 100% auto;
 }

 .logo-image img { display: none;}
- Click save then refresh your site in the front-end to see the change.
If the new logo does not appear, follow these steps:
- Navigate to Backend >> Extensions >> Template Manager >> Select your template style then click on the Theme tab
- In the field Logo Image, click on X to clear
- Click Save then repeat all the above steps for your other template styles.
- Go to the front-end to check your result.
How to customize your uploaded logo?
Small Logo
To specially display on mobile/tablet or other collapsed screens, the default logo will then be replaced by the small logo.
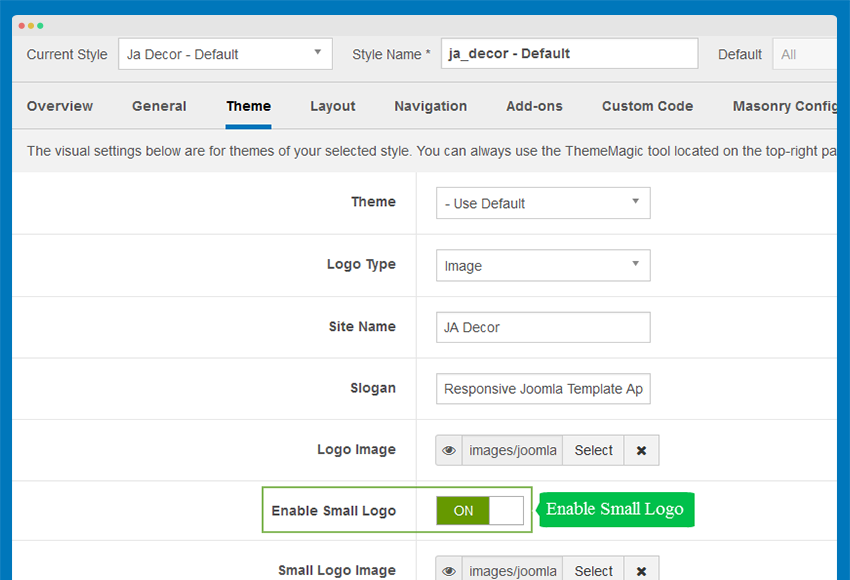
Enable On: The logo uploaded by user will be used. In case no logo is selected in the Small Logo Image field, the default logo will be used.
Enable Off: The default logo will be used.
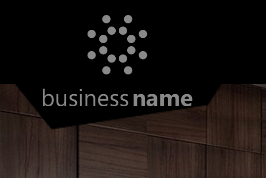
Long width logo

Logo with width too long will not go well with the background shape below. To dismiss this default background, follow these steps:
- Open the folder /your site/templates/ja_decor/templates/css/
- Edit the custom.css file as below: .logo-image { background: none; }
Here is the result in the front-end

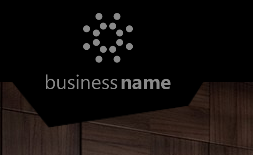
Short width logo
When your logo overlaps the background shape like this, you can change its height by following these steps:
- Open the folder /your site/templates/ja_decor/templates/css/
- Edit the custom.css file as below: .logo-image { max-height: 70px; }
Here is the result in the front-end
Recommendation
The above userguide should help one in replicating the Demo site settings for the template and extension on their site.
Recommended :
If you are new or are confused, we recommend installing Quickstart on your localhost and use it as reference for the configurations. This is the best way to work with any template. Links to all the resources are provided above. We suggest you to carefully go over those in order to take the maximum advantage of our products.
Support :
Please raise your support queries in the forum and make sure you follow the support guidelines. We would need to spend more time to get back to you, in case the support guidelines are not followed.