JA Joomla Page Builder - Docs
Frequently asked questions
Installation instruction
The section will help you with steps to install JA Builder to your Joomla site.
System requirement
JA Site Builder is native with Joomla 3. Please make sure your system meets the following requirements:
Software
- Software: PHP (Magic Quotes GPC off): 5.3.1 + (5.4+ recommended)
Databases
- MySQL(InnoDB support required): 5.1+
- MSSQL 10.50.1600.1+
- PostgreSQL 8.3.18+
Web Severs
- Apache 2.x+
- Microsoft IIS 7
- Nginx 1.0 (1.1 recommended)
Browser requirement
- Firefox 4+
- IE (Internet Explorer) 8+
- Google Chrome 10+
- Opera 10+
- Safari 5+
Development Environment
During development process, Localhost is preferred. You can use the following servers on your PC to develop your site.
Windows
- WAMPSEVER
- XAMPP for Windows
Linux
- LAMP Bubdle
- XAMPP for Linux
Mac OS
- MAMP & MAMP Pro
- XAMPP for Mac OS
Installation Guide
Download packages
Access the download page of the builder then download the package or download all the files.
- Full package
Install JA Site builder to your Joomla site
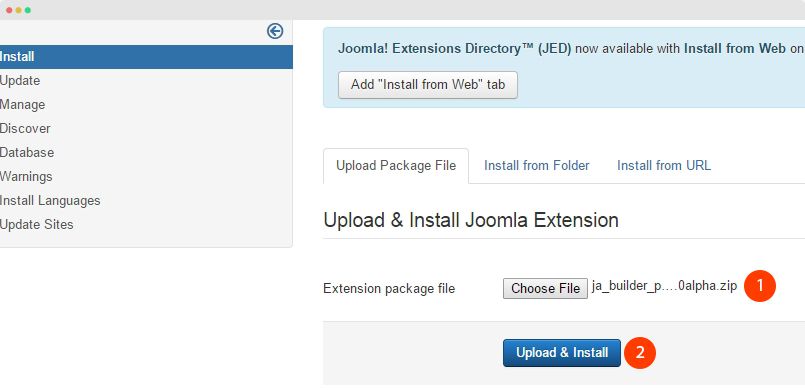
From your back-end setting panel, go to: "Extensions → Extension Manager", browse the JA Site builder installation package then hit the "Upload and Install"
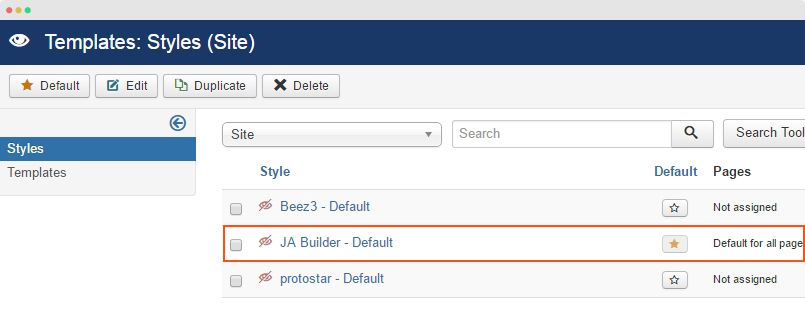
Set JA Builder template as default template style (optional: in case you want to use the template for your whole site - all menu items). Go to: "Extensions → Template Manager", set JA Builder template style as your default template style.
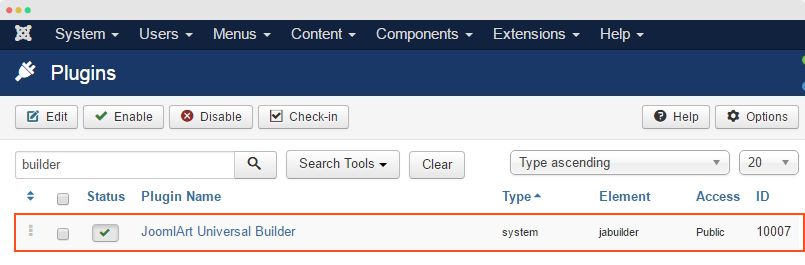
Enable JA Builder plugin. Go to: "Extensions → Plugin", find and enable the plugin JA builder.
Create Page
Video tutorial
This video is a quick guide to use JA Builder to create a Joomla site,
In this section, we will help you how to work with the builder, how to create pages, sections, work with Joomla pages and 3rd extensions.
Create JA Builder page
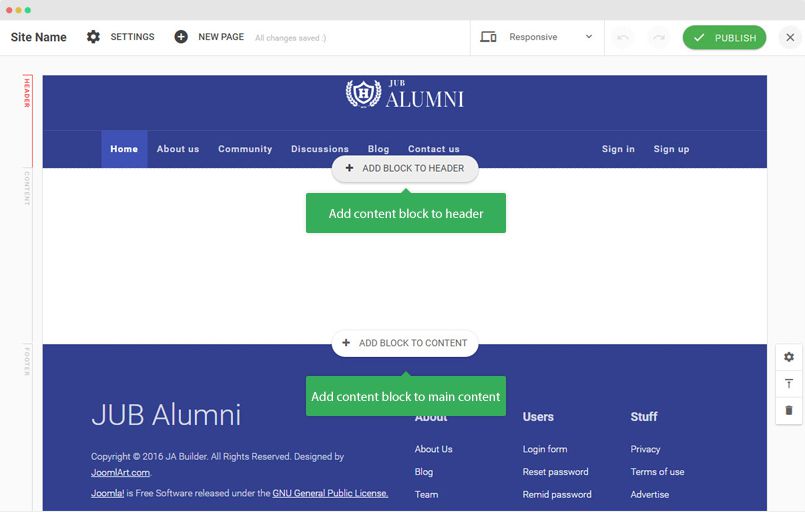
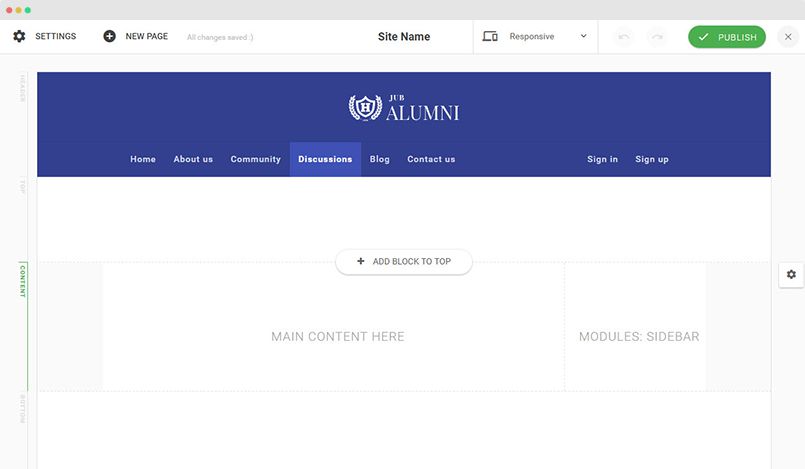
Firstly, you need to understand the structure of a builder page layout. The layout includes 3 main sections, for each section, you can add as many content blocks as you want.
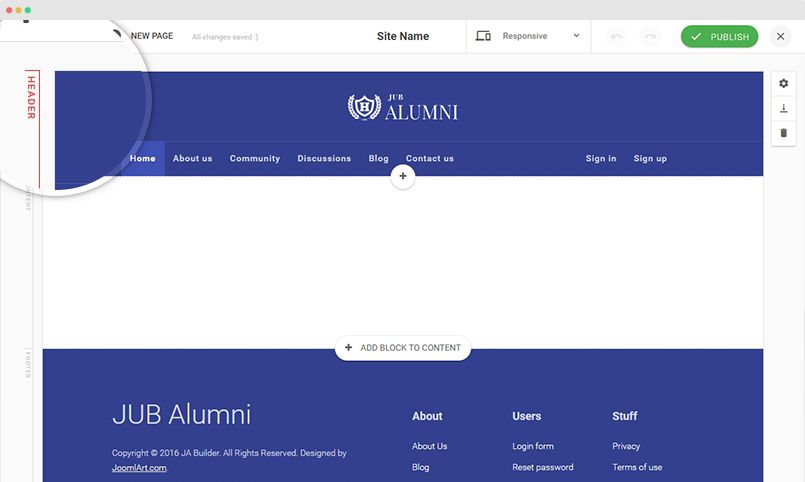
- Header - Content blocks added to the header section are displayed in pages that is assigned to same template style
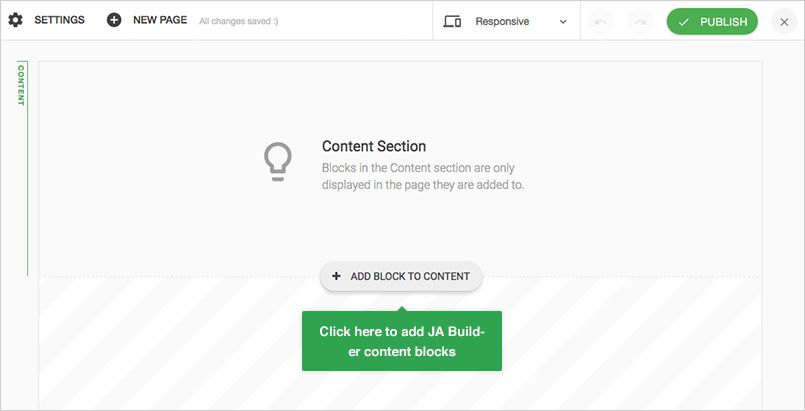
- Content - Content blocks added to the "content" section are displayed in the page only.
- Footer - Content blocks added to the "footer" section are displayed in pages that is assigned to same template style.
1. Create new page
Create new page from back-end
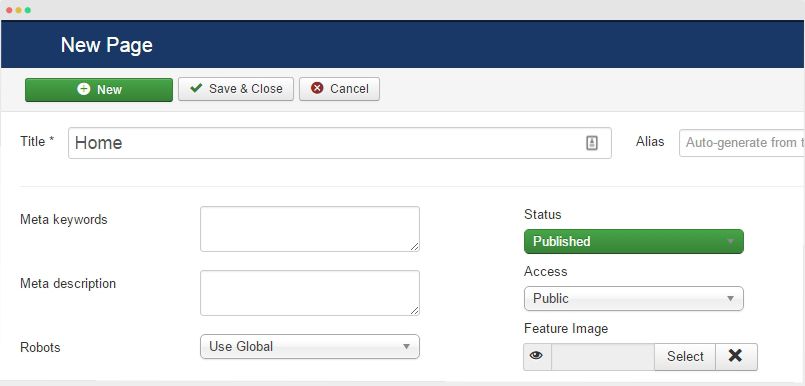
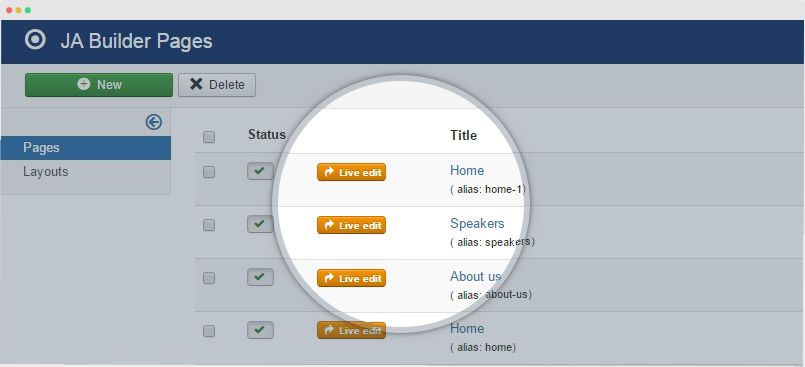
Access the "Pages" menu, the panel lists all created pages. Hit the "New" button to create new page.
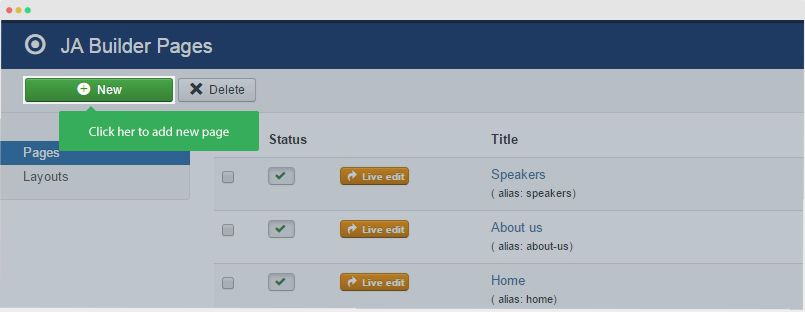
In the creating new page, add page title and additional info for the menu.
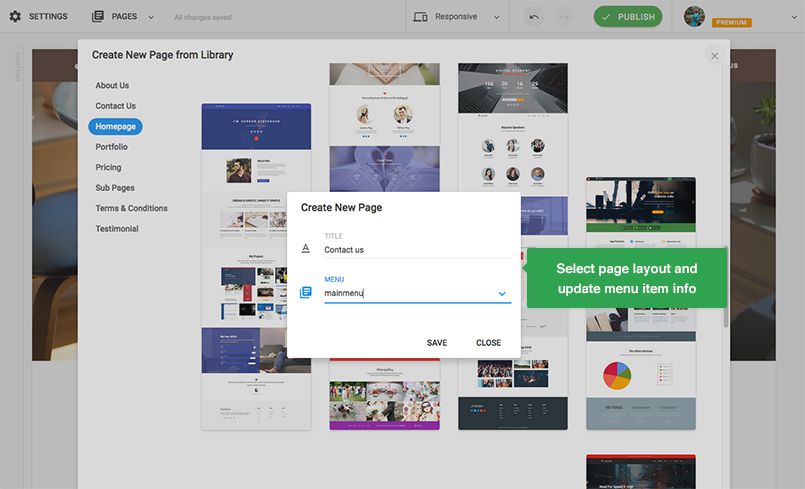
Create page from front-end
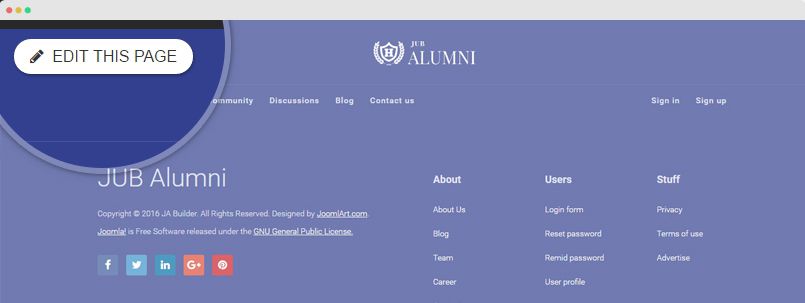
There is an other way to create new JA Builder page. On front-end, when you edit a page, you will see a "Create Page" button on topbar, you can create new page from there.
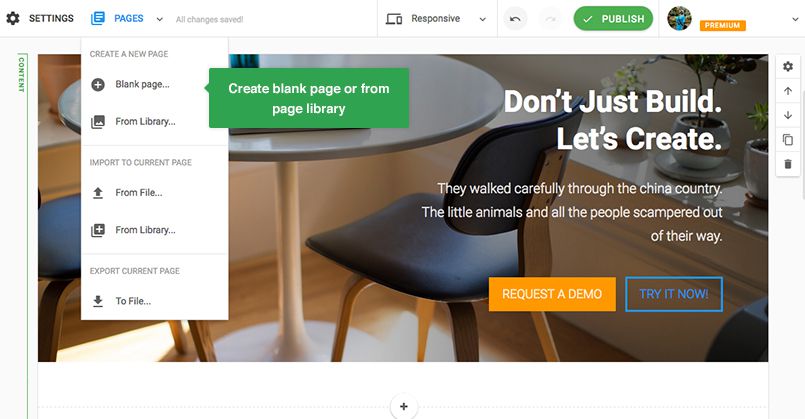
There are 2 options, create blank page or from page library. In case you create from page library, select page type and layout then update page info (title, menu it belongs to).
2. Edit page
After create new page, hit the "Live Edit" to edit the page on front-end.
Click the Edit Page button to start editing the page.
Now, add content block to header, main content or footer. As mentioned, the content block added to header and footer section will be displayed in all pages that use same layout.
Next, select block type then layout and style.
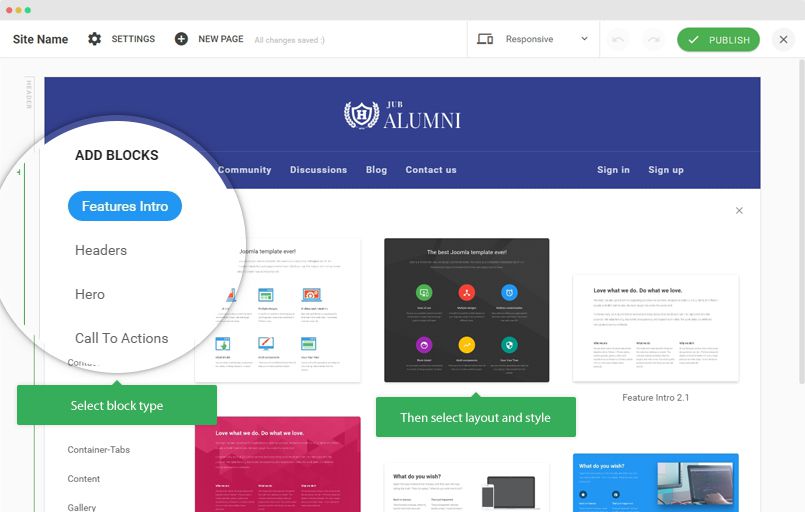
Once done, you can edit the block and elements in the content block.
Depend on the added content block and content in the block, the settings can be different to help you customize it with ease.
Do the same to add other content block. Once done, publish the page so user can see the page.
Now, create menu item then select meny type: JA Builder » JA Builder Page then select the created page.

Create Joomla default page
The Joomla default page structure layout includes

- Header - Content blocks added to the header section are displayed in pages that is assigned to same template style.
- Top - Content blocks added to the Top section are displayed in pages that use same layout
- Content - This is the page main content that is loaded from meny type.
- Bottom - Content blocks added to the "content" section are displayed in the page only.
- Footer - Content blocks added to the "footer" section are displayed in pages that is assigned to same template style.
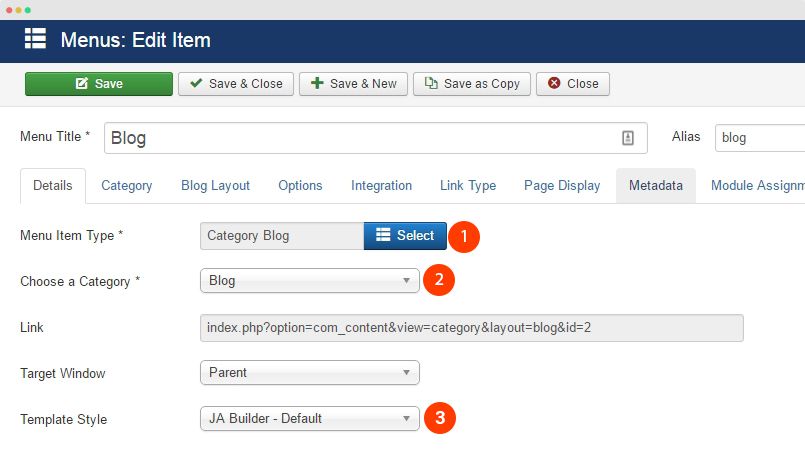
1. Create new menu item
You can create new Joomla menu item as normal, access Menu » Main Menu » and create new menu item. For example we create Articles » Category Blog menu item named "Blog". Here is the menu setting.
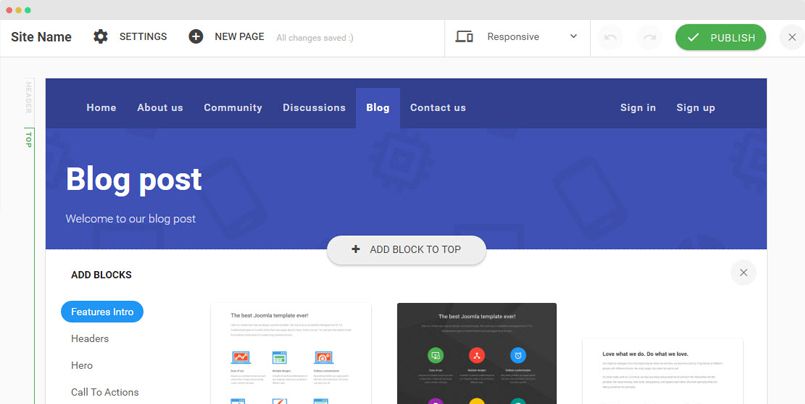
2. Edit the Joomla page
In front-end, open the Blog page we just created in step 1 and hit the Edit button.

You can add content block to the following sections:
- Header
- Top
- Bottom
- Footer
Remember that, the content blocks added to the Header and Footer sections are displayed in all pages that use same template style while the content blocks added to the "Top" and "Bottom" are only displayed in the entire page.
Hit the "Add block" for specific section then select layout and style do content update, customization for the content block based on supported configurations.
In the "Content section", it has 2 inside block: "Main Content" that loads content from the menu type and the "Sidebar" that load modules from a defined position.
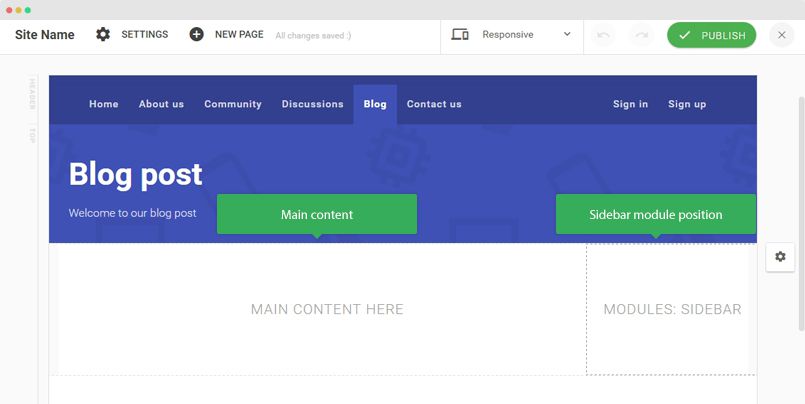
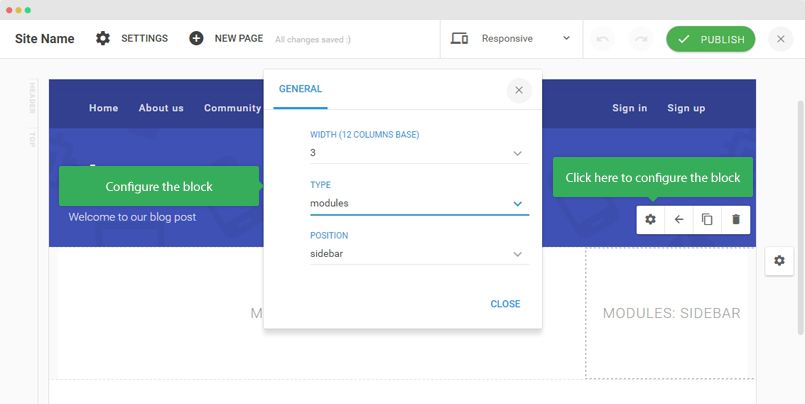
You can configure the Main Content and Sidebar block, hover the block and hit the configuration icon. You can change width or the block (based on Bootstrap 12 grid system), select content type: content (to load content from menu type) and module (load modules from defined module position).
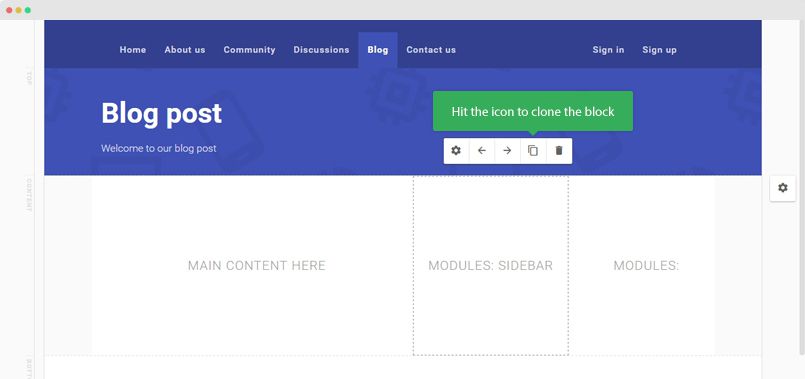
In case you want to create 3 column layout, you clone a block then configure the width of the 3 blocks, can be: 6-3-3, 2-8-2.
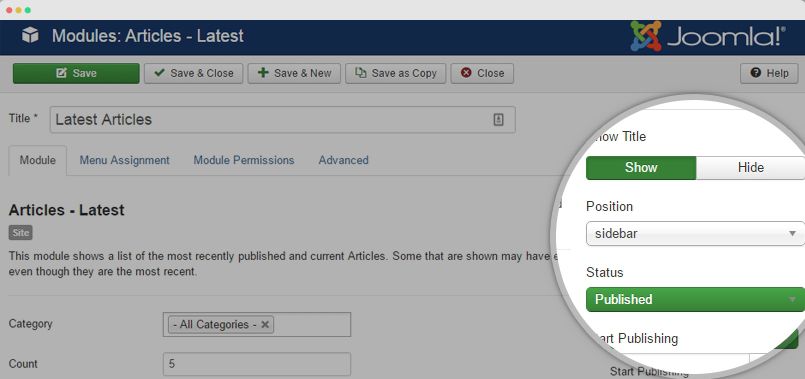
Now, you can create modules in your site back-end and assign to the module position that you configured for the block and select to display in the menu item.
Do the same to create other Joomla default pages like: Contact, Single Article, Banner, etc.
Integration
Integration to Framework templates
JA Builder is compatible with popular Joomla frameworks to help you build stunning landing pages for your website using the framework templates.
- T3 Framework
- Gantry 5 Framework
- Helix 3 Framework
- Expose Framework
You can check demos of landing pages created with JA Builder on T3 Framework templates.
JA Oslo JA Brickstore JA Restaurant
Create landing pages
From your site back-end, go to: Components >> JA Builder and hit the button "New" to create new JA Builder page.
Add page title and other info then save. Once it's saved, you will see "Live Edit" button, hit that to start adding content block for the page.
The page will use header and footer section of your entire site to make your whole site consistent.
Custom CSS to make JA Builder work fine with the framework templates
For each framework template, you may need to add some custom CSS rules as JA Builder content block has full-width style while some framework templates use boxed style.
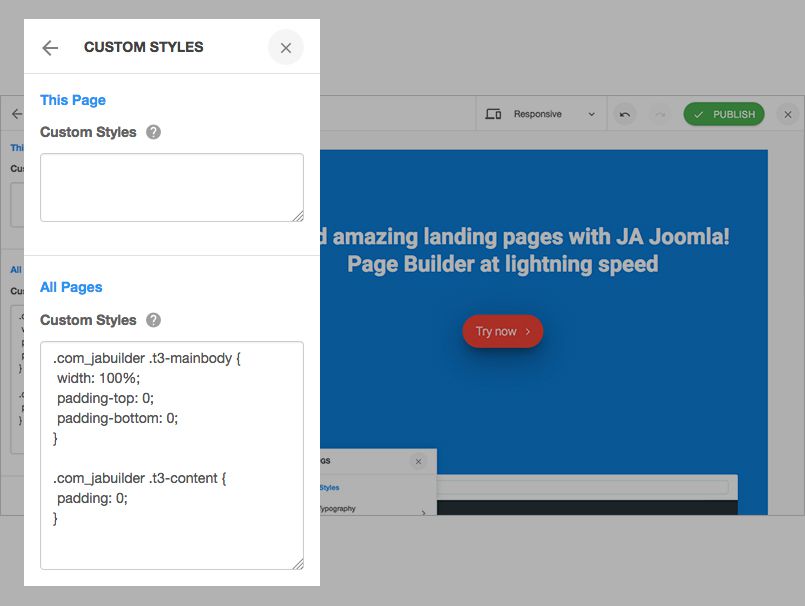
To do that, in edit mode of the landing page created, go to: Settings » Custom Styles.
There are 2 fields, custom style for current page and custom style for all pages, you should add to the "Custom style for all pages" so next time, if you create more landing pages, the custom style will be applied for all the pages..
Suggested CSS rules for tested Frameworks. You can ask for help if you have any difficulty in our Support Forum.
T3 Framework templates
.com_jabuilder .t3-mainbody {
 width: 100%;
 padding-top: 0;
 padding-bottom: 0;
}

.com_jabuilder .t3-content {
 padding: 0;
}
Gantry 5 Framework template
1. In Gantry 5 Template -> Global Page Settings -> Sections Layout -> Remove Container
2. Add following CSS rules to the "Custom CSS" fields in JA Builder setting panel.
.com_jabuilder #g-main {
  padding: 0;
}

.com_jabuilder #g-main .g-content {
  margin: 0;
  padding: 0;
}
Helix 3 Framework templates
.com-jabuilder #sp-main-body {
  padding: 0;
}

.com-jabuilder #sp-main-body > .container {
  width: 100%;
  padding-left: 0;
  padding-right: 0;
}
Expose Framework templates
.com-jabuilder-page #main > .container {
  width: 100%;
}

.com-jabuilder-page #mainbody.grid12 {
  width: 100%;
}

.com-jabuilder-page #component > .block {
  padding: 0;
  margin: 0;
}

.com-jabuilder-page .row {
  padding-top: 0;
  padding-bottom: 0;
}

.com-jabuilder-page #footer-wrap #copyright {
  padding-top: 40px;
  padding-bottom: 40px;
}
Feel free to ask for support on JA Builder forum if you have any question or you have any difficulty in integrate JA Builder to your website.
3rd Extension Compatibility
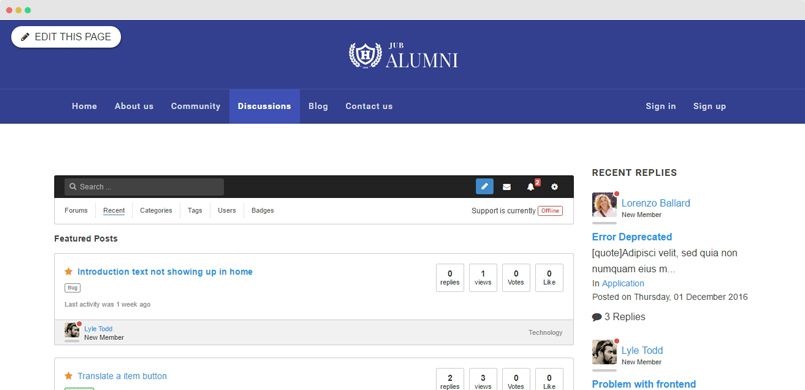
The builder can work with all 3rd extensions like EasySocial EasyDiscuss, EasyBlog, Virtuemart, Mijoshop, etc.
In this documentation, we will use EasyDiscuss as sample and you can do the same for other 3rd extensions.
1. Install 3rd extension
Download the extension and install to your Joomla site as normal.
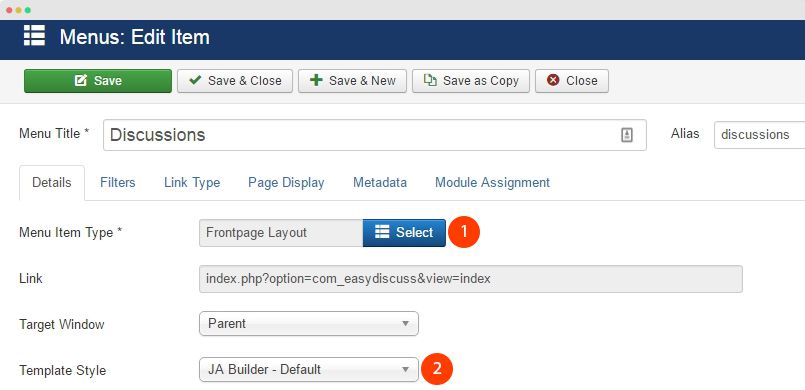
2. Create pages for the 3rd extension
This step depends on specific extension but normally, you will create menu item and select menu type to load content from the 3rd extension. In this case, we will create a menu: EasyDiscuss » Frontpage Layout » Frontpage Layout named: Discussion to load content from EasyDiscuss component.
3. Edit the page
On front-end, open the page and hit the "Edit page" button to edit the page.
The page layout is the same as the Joomla default page layout that also has 5 sections:
- Header - Content blocks added to the header section are displayed in pages that is assigned to same template style.
- Top - Content blocks added to the Top section are displayed in pages that use same layout
- Content - This is the page main content that is loaded from meny type.
- Bottom - Content blocks added to the "content" section are displayed in the page only.
- Footer - Content blocks added to the "footer" section are displayed in pages that is assigned to same template style.
You can add content blocks to the header, top, bottom and footer sections. For the content section, configure the same as the Joomla default page main content section that you can:
- Change width of each block
- Change type to module or content, if module, can set the module position to load modules from the position
- Duplicate a block to build multi column main content section.
- Change position for blocks with move left and right function in each block.
Restore pages with revisions
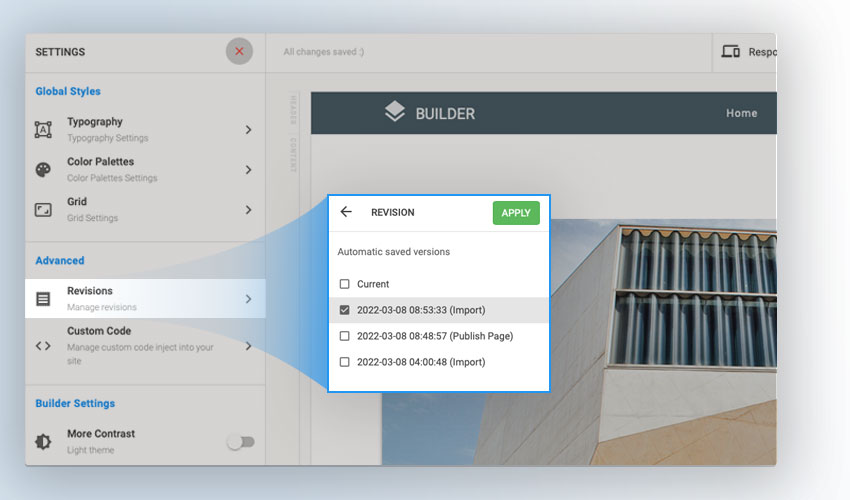
The new feature will auto save the changes you did when editing the page (for now, each revision includes 10 changes). Meaning, after you do 10 changes, it will be saved as a revision. You can revert to previous revision to revert the content, pretty handy feature.
How to revert the content
In edit mode of the page, simply open the "Settings" tab, access Revision menu and you will see list of all revisions then select the revision, the changes will be reverted.
Simply select a version to revert content
How to restore your page after the lost data - pages created before October 8th
JA Page Builder server got issue with the upgrade, during the server update, the system admin accidentally deleted the JA Page Builder database without backup. And users could not edit pages created before October 8th with the editor, instead of that, you can edit the pages with the inbuilt html editor
You can also restore your pages in case your pages have revisions. Here are the steps:
Check if your pages have revisions or not. Go to JA Page Builder page manager and open the page edit page, hit the Revisions, you can see list of revisions for the page in the popup.
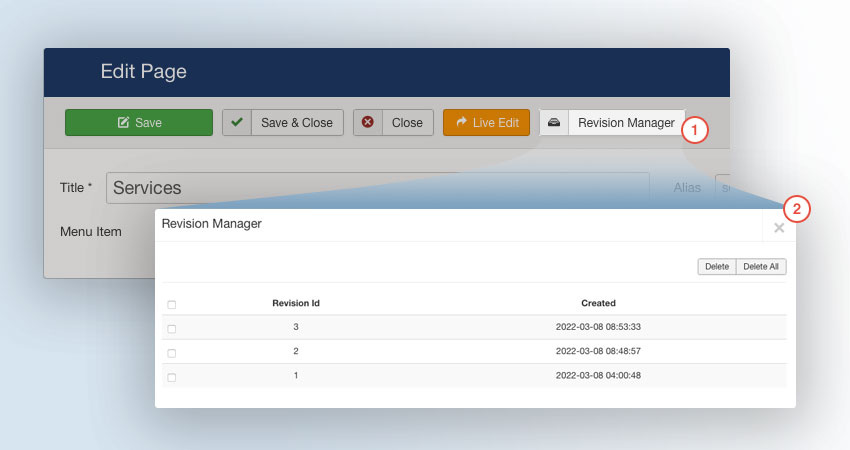
If the page has revisions, follow the next steps:
- Install FF Explorer Joomla component for free
- Open the components > Database
- In the popup, find the table
suffix_jabuilder_pages, you will see all created pages. Change the value of thecheckedcolumn to 1, then save. - Go back to the JA Page Builder and edit the page.
- Open the Revisions and you can restore the page.
Check the video tutorials
In case your pages does not have revisions
Please submit your page rebuild in our forum.
How to
Customize style
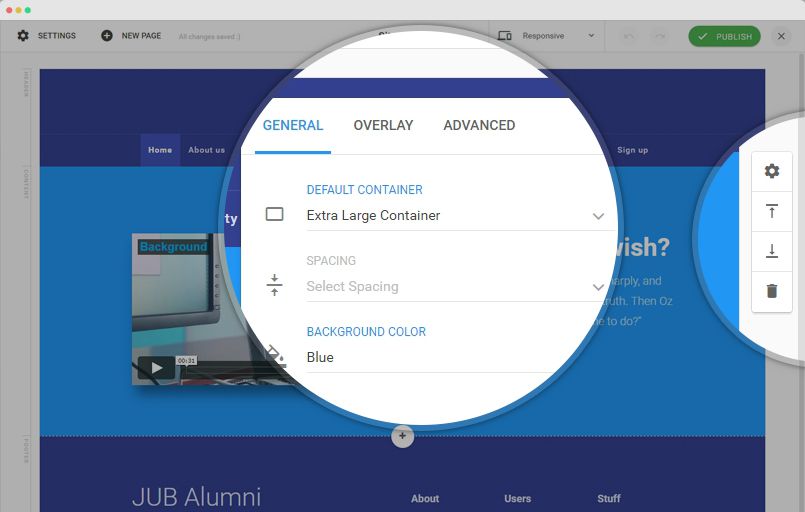
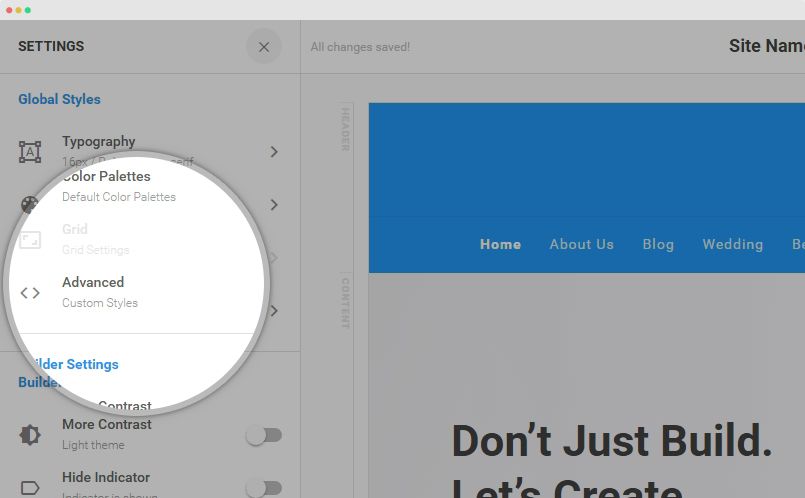
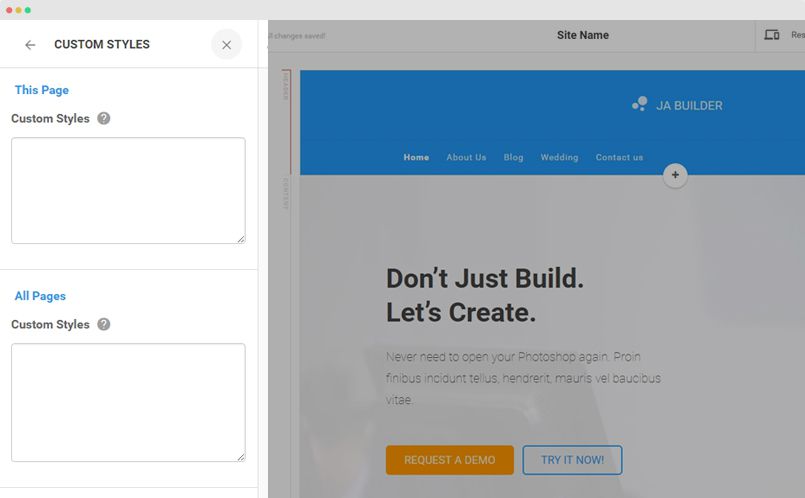
You can customize style for a page or all pages by using Advanced field that allows you to add CSS rules to override styles.
To do that, open the edit mode of a page then open the SETTINGS sidebar.
Next, select Advanced configuration. There are 2 fields:
- This Page Custom Styles: Add CSS rules to the field if you want to customize style for the current page only.
- All Pages Custom Styles: Add CSS rules to the field if you want to customize style for all pages.
You could see the changes when active mouse in other place.
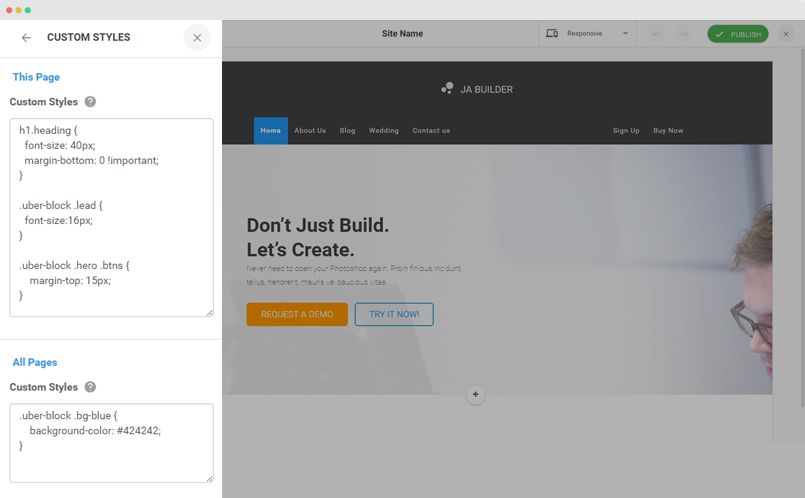
The CSS rules are auto saved, if you feel its okay, hit Publish button so user can see the update.
Please note that, the CSS rules added to the fields will override style from builder style files.
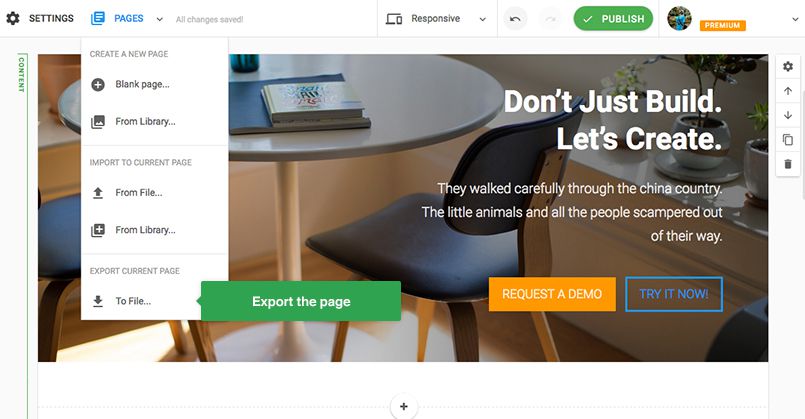
Page import and export
1. Export page
You can export the pages you created for backup or move to other sites. To do that, in the edit mode of a page, go to: Pages and export the page.
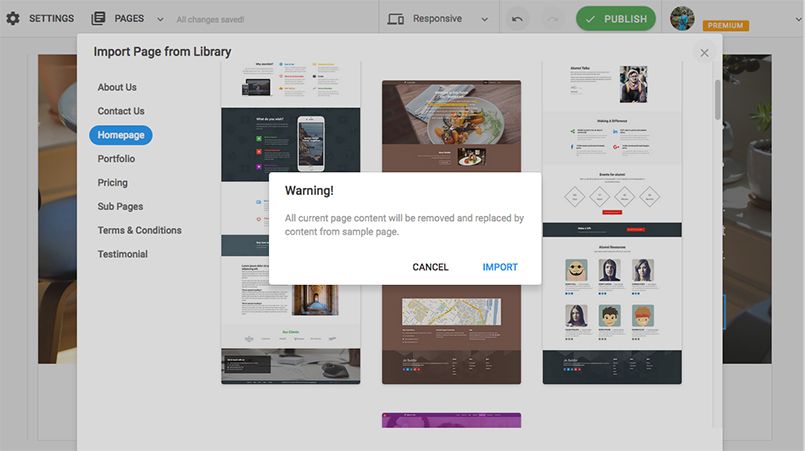
2. Import page
You can import page that you exported or from JA Builder page library. Hit the "Pages" menu and select import page options.
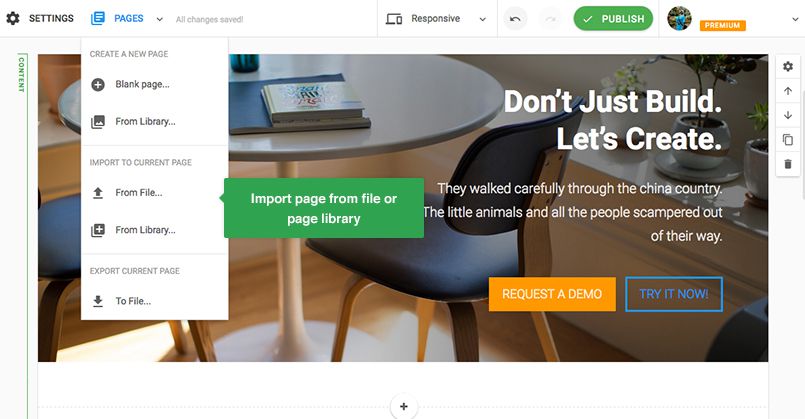
If you select to import from library, select page type and select layout to import.
Integrate Mailchimp subcriber form
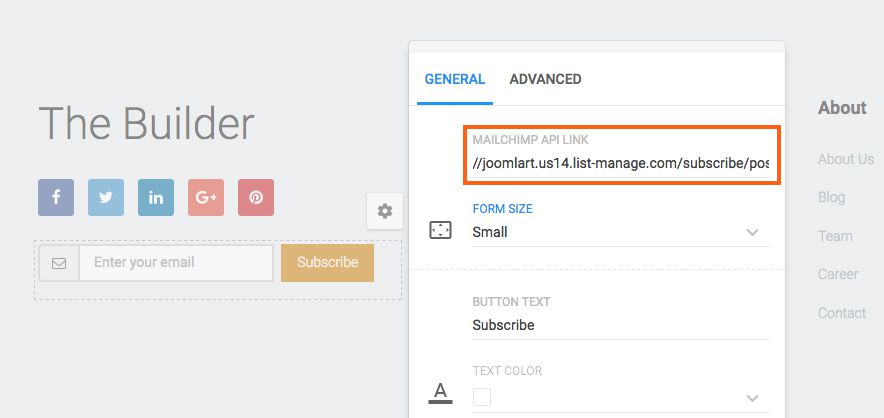
In JA Builder, you can create content block that has subcriber form that is integrated with mailchimp like Footer or Countdown content block.

Edit the form and you will see Mailchimp API Link, insert the mailchimp form action link. Follow the instructions below to get the link.
Step 1: register mailchimp (if you don't have yet)
Go to https://mailchimp.com/ and sign up new account with your email.
Follow Mailchimp signup instructions to complete your signup.
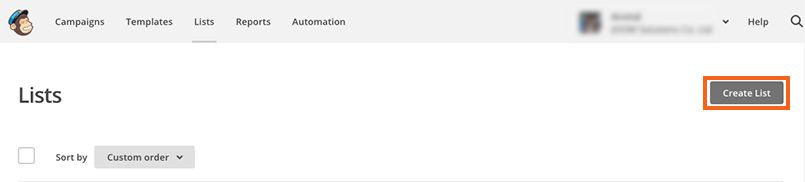
Step 2: Create user list (if you don't have yet)
Go to the "List" menu item on main menu and create new list.
Step 3: Create Signup Form
Once done, access "Signup Forms" of the list and select "Embedded forms".
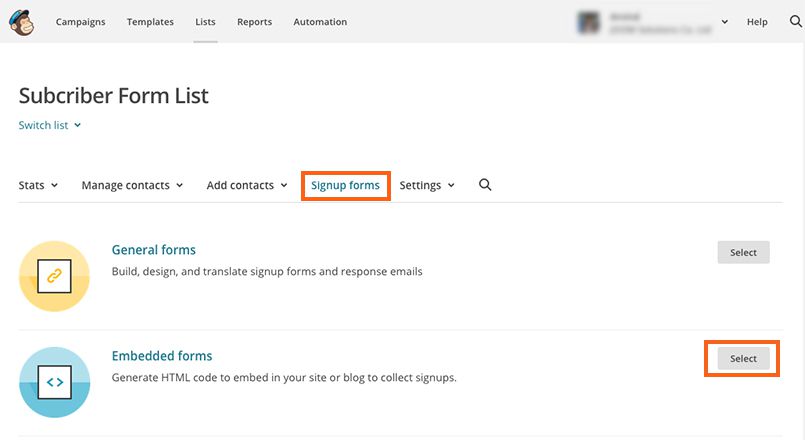
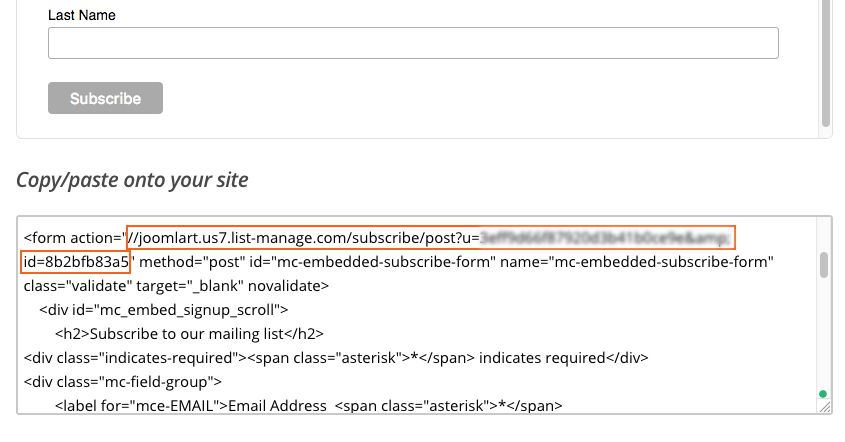
Step 4: Get signup form embed code
Now, find the form action link and copy it then paste to the subcriber form setting of JA Builder content block.
Metric data collection
JA Builder collects anonymous data comprising of server environment and Joomla versions for improvements and optimization purpose only. No personal data or site url is collected or stored anywhere on our system.
Here is list of data to be collected:
- Extension name
- Extension version
- Joomla version
- php version
- Database type, version
- Server type
Upgrade Instruction
Download latest package of JA Builder download page and go to your site backend >> Extensions >> Manage and install the new package, the new version will override old version. The upgrade does not affect data or settings you made.
Documentation is a WIP. If you have any specific request or feedback as well as suggestions, feel free to drop us a line in JA Site builder forum. We'll try to cover them all.