Developing and get the payment plugins installed for your JobBoard(JB) component to vary the payment methods without the need of digging into the core codes. In quickstart package, JB has “Paypal payment plugin” as default payment method. You can download more payment plugin for JB from our forum at: FORUM LINK. We have recently integrated the popular payment gateways such as Paypal, MoneyBooker, Authorize and offline payment named Wirebank. In case, all those payment plugins do not seem to work out with your own preferable payment gateways, this guide is aiming to show you How-to develop the Payment plugins that fit you best.
Note: In this guide, we'll be using the payment plugin "Authorize" as an example for better understanding on the guide. When you are ready to develop your own, you only need to replace the "authorize" name with your own plugin's name, and this should be kept consistent in all the files.
File/Folder structure
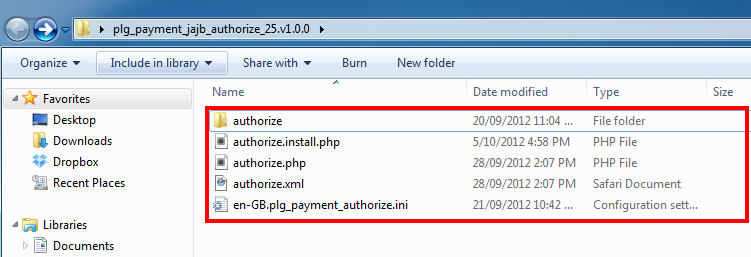
This How-to provides you the basic understanding of what you should carry out to develop your own plugin. Most plugins consist a single code file, however in order to install the plugin correctly, its code must be packed as a zip format file which can be processed/installed by the JB Payment installer.
Creating the "manifest" file
The manifest file is served to define all the available information about your plugin, such as, your plugin's name, author, version, description (user guide, tutorial), etc...
File: authorize.xml
<?xml version="1.0" encoding="utf-8"?>

<extension version="2.5" type="plugin" group="payment" method="upgrade">

   <name>Authorize.Net</name>


   <author>JoomlArt.com</author>


   <creationDate>Oct 2012</creationDate>


   <authorEmail>webmaster@joomlart.com</authorEmail>


   <license>license GNU/GPLv3 http://www.gnu.org/licenses/gpl-3.0.html</license>


   <copyright>http://www.joomsolutions.com</copyright>


   <authorUrl>www.joomlart.com</authorUrl>


   <version>1.0.0</version>


   <description>


    <![CDATA[


        Description on your plugin goes here.


        These texts will be displayed in the plugin's configuration form, hence you can also put your plugin's user guide in here as well.


    ]]>


   </description>


</extension>
Creating Plugin
Each plugin has to have one php file and a respective file name format in xml file. In the php file, you need to define a class with the required methods to handle the payment events.
Below is a sample code of a payment class and a list of required methods for each.
File: authorize.php
class authorize extends JObject {
   /** for any initialization **/
   function __construct($config) {  … }
/**
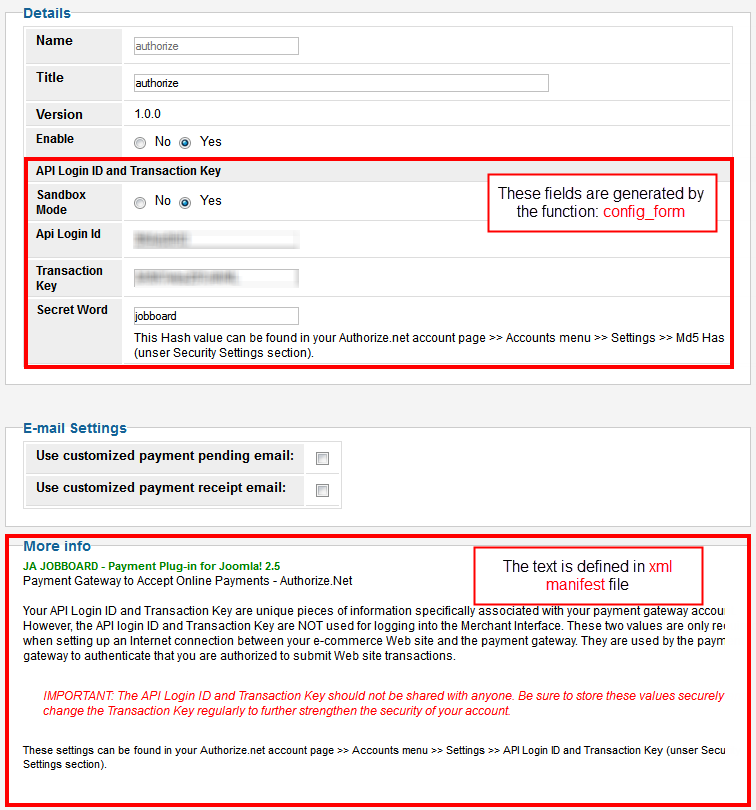
* Generate HTML code that will insert the payment configuration form in the back-end.
* In addition, you can also configure your plugins' settings
* such as your API key and merchant ID.
**/
function config_form() { … }
   /**
    * data preparation for checkout page
    *
    * @param array $transaction - transaction info
    */
   function go_checkout($transaction)  { … }
   /**
    * Assign params for checkout form
    *
    * @param array $transaction
          **/
   function assign_params($transaction)  { ...    }
   /**
    * validate post back from payment gateway
    **/
   function check_payment() { ...    }
   /**
    * handle in succeeded case
    **/
   function payment_return() { … }
   /**
    * handle in cancelled/failed case
    **/
   function payment_cancel() { … }
          /**
    * you can declare more methods for your class, if necessary.
    **/
}
If your plugin has more files or use 3rd party library, you need to create a folder name "authorize" and put all your files under this particular folder. Then, you can include these files into your plugin with the following code snippet:</div> authorize/
require_once dirname(__FILE__) . '/authorize/lib/shared/AuthorizeNetRequest.php';
require_once dirname(__FILE__) . '/authorize/lib/shared/AuthorizeNetTypes.php';
require_once dirname(__FILE__) . '/authorize/lib/shared/AuthorizeNetXMLResponse.php';
require_once dirname(__FILE__) . '/authorize/lib/shared/AuthorizeNetResponse.php';
require_once dirname(__FILE__) . '/authorize/lib/AuthorizeNetSIM.php';
Creating the installation file
The installation file aims to support you install the plugins, or your plugins with the sample data, or just about anything else you wish to define along with the installation. The installation file must be named as:
authorize.install.php
Creating the language file
The language file is to define your plugin's language texts and is named as: en-GB.plg_payment_authorize.ini
Summary
To sum up, your payment plugin should include those below elements:
| Element | Effect |
|---|---|
| authorize.xml | Required |
| authorize.php | Required |
| en-GB.plg_payment_authorize.ini | |
| authorize.install.php | |
| authorize |
Installation
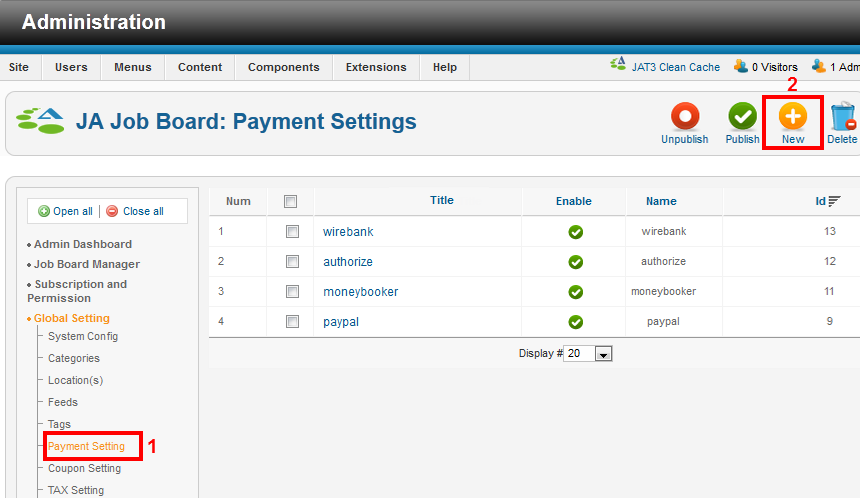
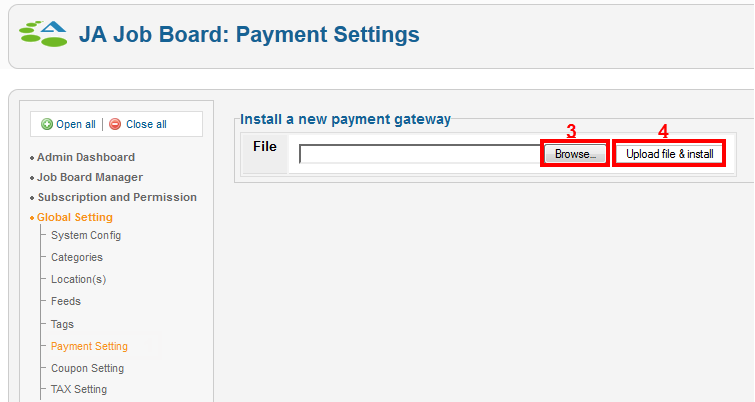
Installation
To install your new created plugin, go to your: JB Back-end >> Payment Setting. Then click on the new icon on the toolbar to install the new payment plugin
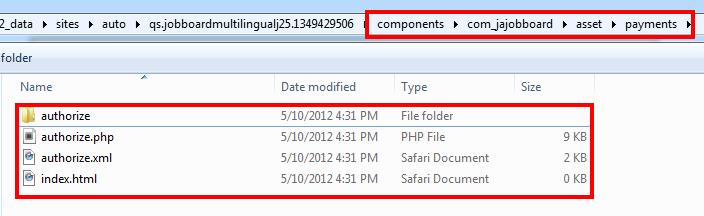
When you have successfully installed your plugin, all the plugin's files are located at: your_site/components/com_jajobboard/asset/payments
Configuration
In your JB Back-end, you will find the list of the installed Payment plugins under Payment setting:
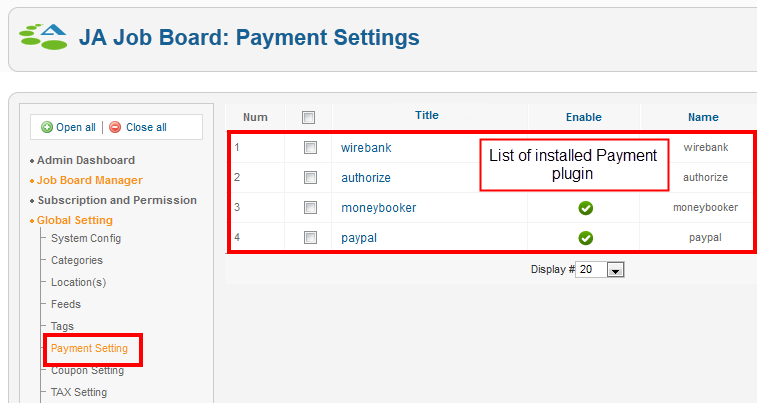
From here, choose whichever payment plugin to go on configuring the Plugin setting form as below: