Administration
Create Job Board Administrator
Any Joomla's Administrator/super Administrator can be Job Board administrator. After installing Job Board, Joomla's super Admin will become Job Board super administrator by default. Job Board super administrator has the highest privileges of Job Board administration & management, including the whole rights to assign certain permissions to secondary admin to effectively co-administrator/co-manage the Job board. As a Super administrator, you can add & assign associated permissions to a new Job Board administrator/super administrator by following the below steps:
Create Joomla administrator
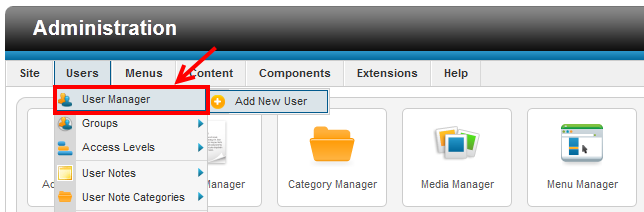
First log in Joomla! backend as super administrator, then browse to User Management:
 Now create a new Joomla! administrator/super administrator and make sure that user is not blocked. You can also
change an existing user's permissions to become an administrator/super administrator. Let's say we want to change
permissions for an existing user to make him an administrator, this is how to do that:
Now create a new Joomla! administrator/super administrator and make sure that user is not blocked. You can also
change an existing user's permissions to become an administrator/super administrator. Let's say we want to change
permissions for an existing user to make him an administrator, this is how to do that:
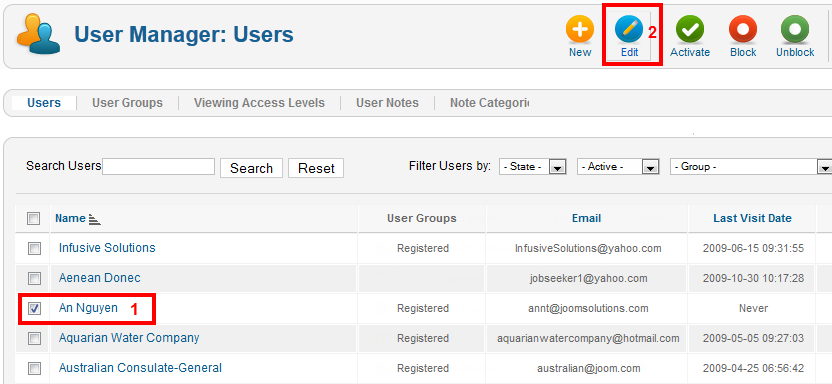
- Step 1 - select the user you want to change his permissions;
- Step 2 - click the Edit button;
Loading...
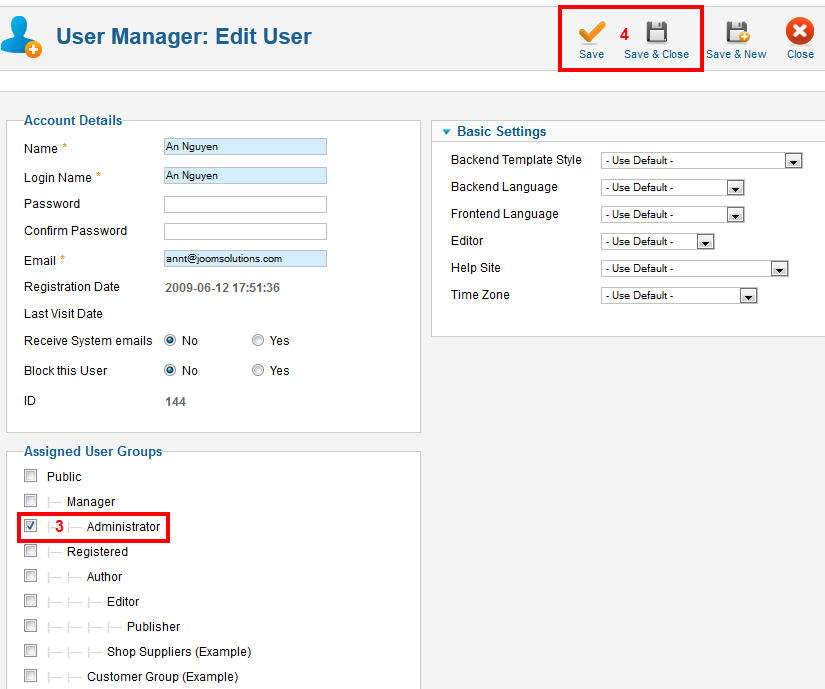
- Step 3 - click the Administrator user group;
- Step 4 - click the Save button.
Grant Job Board Permissions
To manage Job Board administration permissions, first you have to navigate to User Permissions panel:
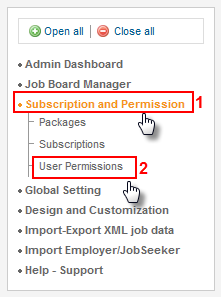
- Step 1 - click the Subscription and Permissions menu item;
- Step 2 - click the User Permissions submenu.
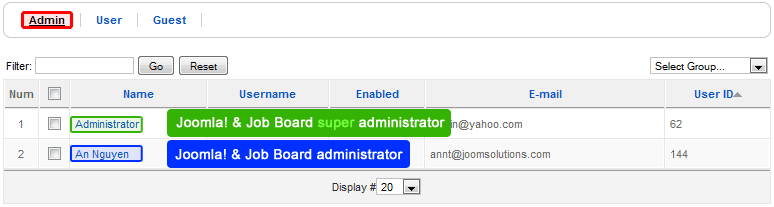
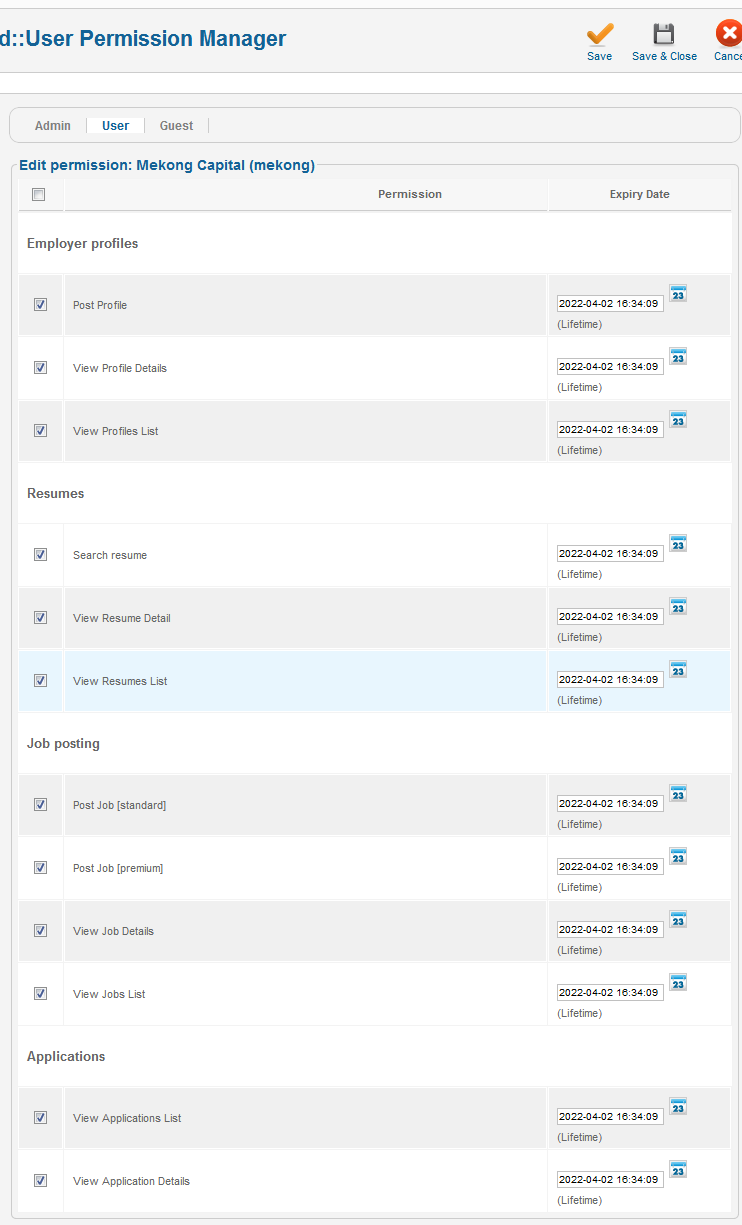
To edit a user's permissions, click on the name of the user that you want to be Job Board administrator/super administrator. Usually a Job Board administrator is given specific permissions, but super administrators are given all permissions.
Below you can see the Job Board User Permissions panel. This is the list of Joomla! administrators and super administrators that the Job Board component recognize them as having administration rights. See the new administrator we have setup earlier?
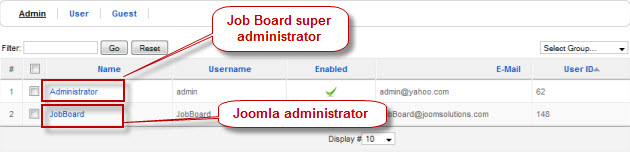
 Please note: that a new Joomla! administrator has no administration rights in Job
Board component but Joomla! super-administrators have full permissions. In the image below you can see back-end
permissions list for the Job Board administration.
Please note: that a new Joomla! administrator has no administration rights in Job
Board component but Joomla! super-administrators have full permissions. In the image below you can see back-end
permissions list for the Job Board administration.
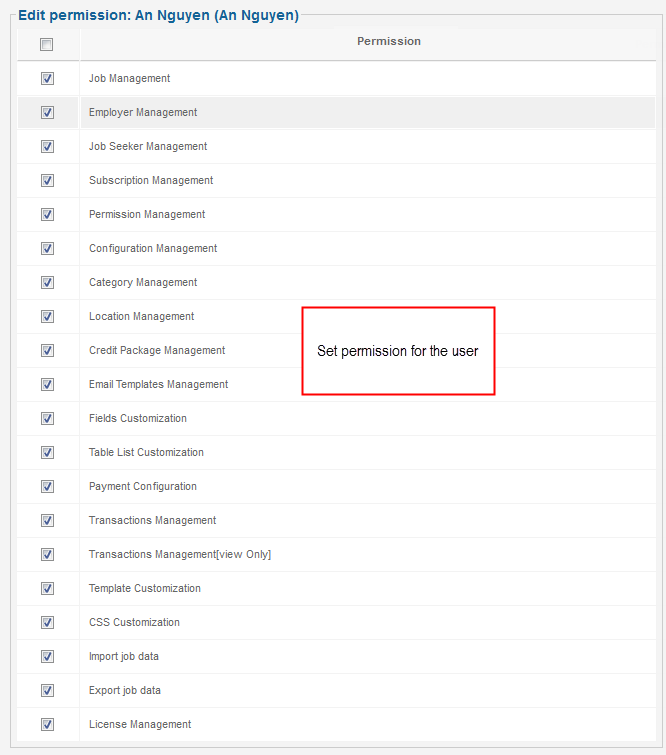
To add permissions to the new Job Board administrator we have setup earlier, select the administration sections according to his/her expertise or qualification.
TIP For instance you would grant administration rights to a Human Resources specialist for the following administration sections:
- Job Management;
- Employer Management;
- Category Management;
- Job Seeker Management.
Sections with access rights for an Economist:
- Subscription Management;
- Location Management;
- Credit Package Management;
- Transaction Management.
Webmaster/database administrator:
- E-mail Templates Management;
- Fields Customization;
- Import data job;
- Export data job.
Web designer:
- Template Customization;
- CSS Customization.
Customize displaying forms
Displaying forms are used to collect data, Job Board uses four forms to collect data:
- Jobs form: Used to collect job information.
- Profile: Used to collect front-end user information.
- Resumes: Used to collect job seeker resume info.
- Applications: Used to collect job seeker's applications information.
Forms are composed by many fields. Thus, any modification to fields will affect the above mentioned 4 forms. If you have enough permissions to customize fields, it is quite easy to edit these fields up to your expectation by changing HTML control that displays form's fields. By following the below steps and screenshot, you can easily change the field value type, validate fields input, add a new field, remove one field/select to display a certain field or not in a few minute.
Filter the form that you want to customize
After login back-end, go to JA Job Board component. Please navigate to Fields Form Management:
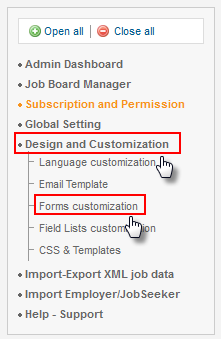
- Step 1 - click the Design and Customization menu item;
- Step 2 - click the Form Customization submenu.
Next we can use the Drop down box right above the list to select the form you want to edit it's fields. See the image below how to:

Customize form
Customizing forms & their corresponding fields is a task preferably for the development stage. On a production website, changing field types will produce loss of data and will require website administrators to request employers to update their active jobs according to the new job related field structure. Moreover, this task will be very difficult for large websites, so it is a reason just enough to consider building the right field structure from the start. All forms hold both system fields & non-system fields. The non-system fields are form specific, but the system fields are hold in almost all of the forms as the primary keys which connect database tables. It is recommended to back-up your website's database before changing anything in the Job Board field structure.
Editing a field
Except for system fields, you can edit any of the non-system fields properties for all forms. However, for system fields you cannot change field name, field type and table name.
Each form holds specific fields & each field has specific properties. For instance, you want to edit the Job code field from the Job form. In the left side of the image below you can see the field highlighted in red background.
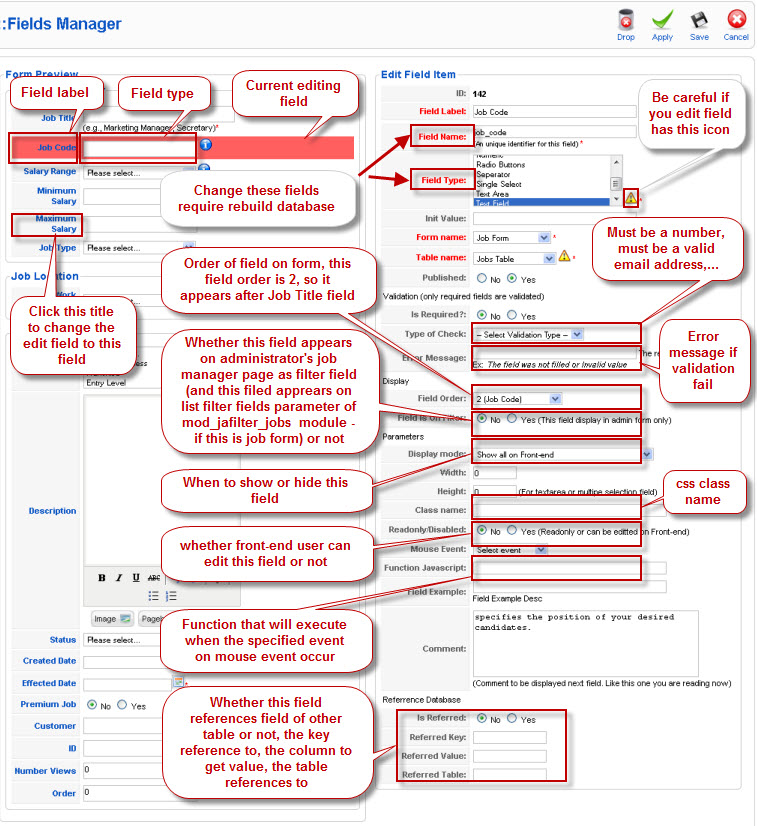
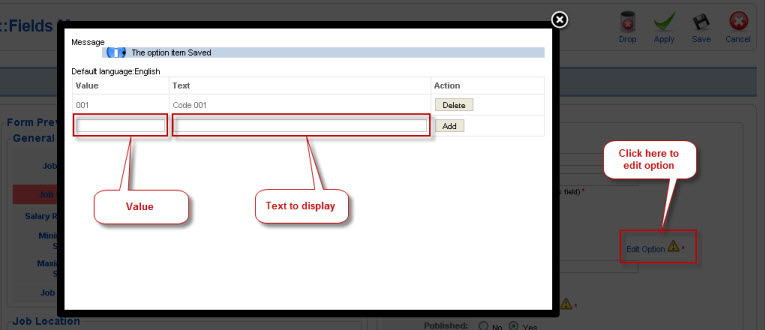
If you change field type to single select, radio or multiple select, then you should click the Apply button to save the new property, then you will see an Edit option link next to this property. Click that link to add options for the new field type if it does not have any select option. If you change form name of one field, then that field will disappear on the field lists of old form and appear on fields list of new form. Hence, you have to filter fields of new form to rebuild database.
Please note that if you change field name, field type or table name, then you have to rebuild database. To rollback changes that require rebuild database, click undo link of the field that you want to reverse.
As we said above, the new field type single select, radio or multiple select will need the select options, so click "Edit option"" and follow instructions in the image bellow:
Adding a new field
To add a new field, click the New button in the Fields Form Manager panel. See image below:

In this section we will go deeper into the Job Board field properties and explain each property's functions. While editing a new field, the form preview in the left side will show no for preview. But after finalizing edit of the new field by clicking the Save button and come back to edit the same field, the form preview will show the new field at the bottom, highlighted in red background. Please note that the new field will not show in front-end or back-end forms until the database is rebuilt. Also note that you can undo adding the field to the associated form by using the Undo link of each newly-added field. We will explain below just how to do that.
Let's explore the field properties. They are grouped in several sections so you can easily follow:
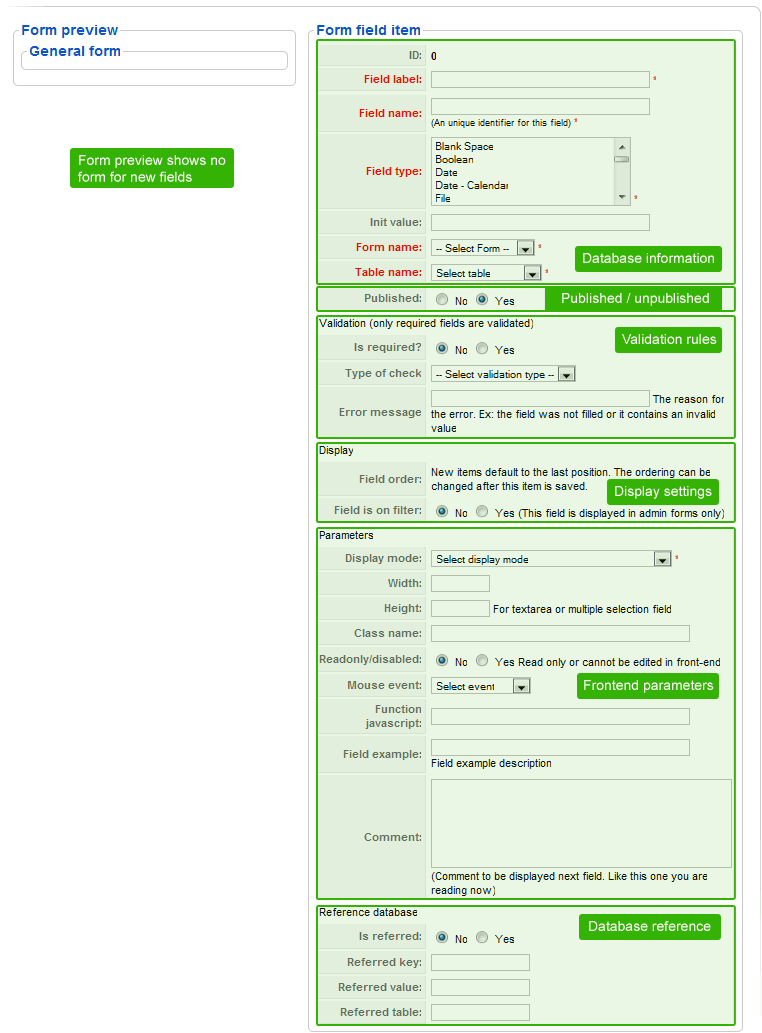
Field properties explanation: Database Information
- ID - is a read-only system field property, an integer number associated to the field;
- Field Label - is the label shown in the form, this property cannot be empty;
- Field Name - is the text shown in the header of the table in the database, this property cannot be empty;
- Field Type - describes the behavior of the field, please refer to Field types reference section for more information;
- Init Value - is a default value you can set for the field;
- Form Name - connects the field to a specific form to become one of the form's field set. The options are:
- Job Form;
- Profile Form;
- Resume form;
- Application Form;
- Table Name - makes the field to show up in a specific table, and this property is related to the Form
Name property. The options are:
- Jobs Table;
- Profiles Table;
- Resumes Table;
- Applications Table.
Published - describes the state of the field, with other words show or not show the field in the front-end tables or forms:
- Yes - the field will be displayed in front-end;
- No - the field will not be displayed in front-end, but the field will always be visible in back-end.
Validation rules
- Is required? - select whether the field is required or not:
- Yes - the field is required, will need a validation rule (configuration just below) and will display an error message if the user inputs incorrect information;
- No - the field is not required, will not need a validation rule and will not display an error message;
- Type of check - describes how the field must be validated for the user input:
- Must not be empty - a simple condition so the user is forced to fill the field;
- Must be number - limits the input values to numeric values;
- Must be a valid e-mail - checks if the user input is a valid e-mail address;
- Must be date format - checks if the user input is a valid date format, this is related to back-end general settings and the error message should inform the date format;
- Must be time format - checks if the user input is a valid time format;
- Must be date time format - checks if the user input is a valid date and time format;
- Error message - is shown in a pop-up window to instruct the user with examples on how to input a valid value into the field: "ERROR: You should type a number!", "TIP: the date is not valid, please try YYYY-MM-DD HH:II:SS" (according to your general settings for date and time), etc.
Display settings
- Field order - sets the order of the field in forms and frontend tables, property can be changed after saving the field;
- Field is on filter - marks the field as a part of the back-end filter:
- Yes - the field is displayed in admin filters;
- No - the field is not a filter.
Frontend Parameters
- Display mode - describes the display behavior of the field. Options are:
- Show all in frontend;
- Hide on new form and view only on edit form;
- Show on new form and hide on view;
- Show on new form and view only on edit form;
- Hide all on Front-end;
- Admin only;
- Width - set a specific width for the field;
- Height - set a specific height for the field, useful for text-areas and multiselect boxes;
- Class name - used to highlight a field by calling a styling class;
- Readonly/disabled - marks the field is read only or can be modified;
- Yes - the field cannot be modified in front-end;
- No - the field is writable in frontend;
- Mouse event - can be used to declare a mouse event for a specific action. Options are:
- onClick;
- onChange;
- onBlur;
- onFocus;
- Function JavaScript - is used with Mouse event to show a small pop-up message on a specific mouse event;
- Field example - is the pop-up message shown by the JavaScript, on a specific mouse event, to instruct front-end users on how to fill the field;
- Comment - a simple description added next to the field to instruct the user how to fill up the field.
Database Reference
- Is referred?
- Yes - enables referencing the field to another field, database table or value;
- No - means that the field is not referred;
- Referred key - links the field to a specific key field, usually ID;
- Referred value - links the field to a specific value in the database;
- Referred table - links the field to a specific table, according to the key referrence.
Removing a field
On the fields list page, select the fields that you want to remove, then click the Delete button, click ok button on the confirmation dialog box. Be careful when you decide to remove a certain field, you cannot rollback to the fields that had been deleted.
Rebuild database
On the fields list page, you could easily recognize all newly added/edited fields that are highlighted in red background. That means these modifications have not been applied to the site yet, until database has been rebuilt.
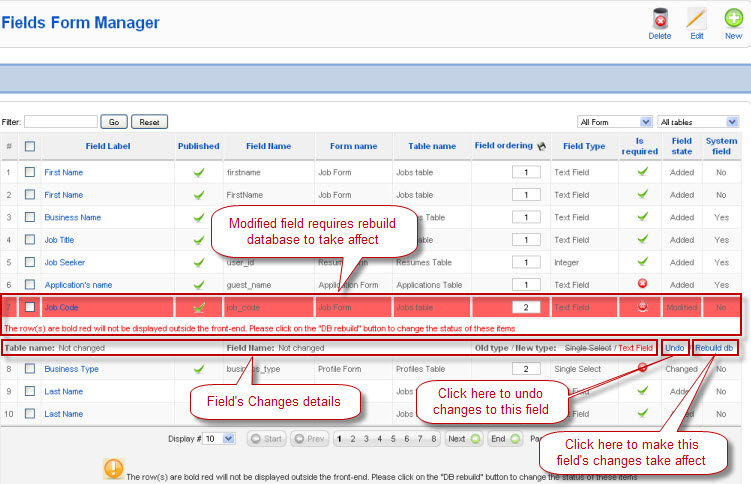
In order to make changes affect one field, click on click rebuild DB link of that field. A review changes screen will appear, after review field's change, click continue button and click ok button on the confirmation dialogbox. The modified field will be now available at the front-end as you wish.
Review modified field require rebuild database.

Field types reference
- Blank Space = this field type creates a blank space to separate groups of fields;
- Boolean = this field type can describe a database entry as having one of two values: Yes or No, True or False, Male or Female, Married or Not married, etc;
- Date = used to reference an event (create date, expiry date) at a certain moment in time;
- Date - Calendar = same as the one, but using all date and time information;
- File = used in Review form for job seekers' attached CVs;
- Image = used for job seeker photos and company logos;
- Integer = an integer number related to an entry, for instance: views, age, years of experience, etc;
- HTML Editor = used to call an editor you have set as default in Joomla! configuration: TinyMCE, JCE or any other editor you have installed and set as default;
- Multiple Select - selectbox used in all forms for Location of Employers and Job Seekers. This field allows multiple select just like a company would have open centers in multiple locations;
- Numeric = any kind of number related to an entry;
- Radio Buttons = similar to Single Select field type below, but this uses rounded check boxes for selecting one option/value;
- Separator = used to set a title for a group of fields, for instance: "Job Information", "Education Information", etc;
- Single Select = selectbox with a single selection, used for "Business Type", "Salary Type", etc;
- Text Area = a simple text area for Job Seekers/Employers to add notes or other information to their jobs/reviews;
- Text Field = a simple text field for users to type in several types of information: name, surname, zip code, phone number, etc;
- Password = a simple password in case you want your employers to protect their job postings with a password;
- URL = a URL field type can be used for company website link or job seeker portfolio/blog.
Customize displaying tables
There are 4 displaying tables used on JA Jobboard for showing summary of a user peer'info collected from displaying forms as mentioned above. They are Jobs, Profile, Resumes, Applications table.
- Jobs table: used to display list of jobs. This table appears on front-end pages and on the administrator's job manager page.
- Profiles table: used to display employer info for job seeker or all other user's view depending on admin's configuration.
- Resumes table: used to display resumes info for employer or all other users'view depending on admin's config.
- Applications table: used to display information of applications for employer's review.
Filter the displaying table that you want to customize.
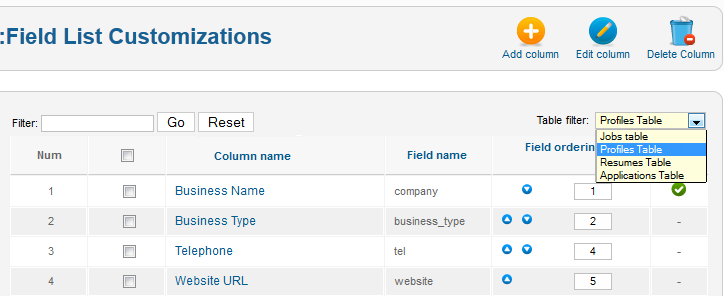
You can customize these tables by adding new column, removing column or changing column properties.
Each column has settings like the following:
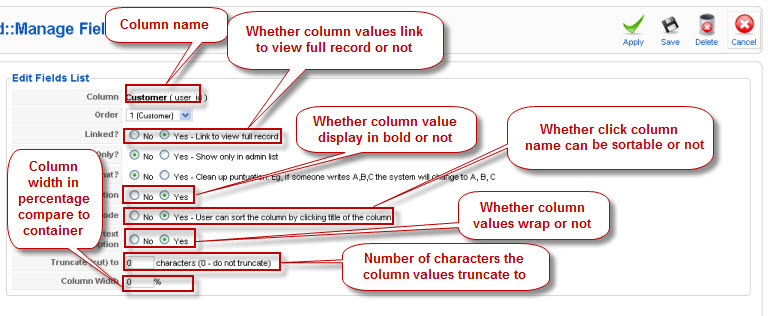
Customize interface
It is more difficult and requires web designing excellence to customize the look & feel of your Job Board site. Thus, this section is recommended to administrator who is an expert in web design.
Customize page layout
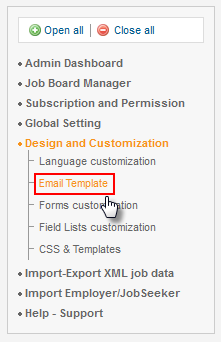
To customize the look and feel of the Job Board is very easy by using the built in code editor. The procedures are very similar to language customization. First you have to navigate to layout customization panel:
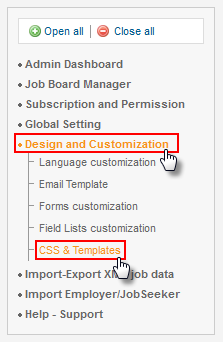
- Step 1 - click the Design and Customization menu;
- Step 2 - click the CSS & Templates submenu.
This is the Layout customization panel:

As you can see these are the layout files, grouped in folders:
- Applications;
- Employers;
- Jobalerts;
- Jobs;
- Payment;
- Posts;
- Profiles;
- Resumes;
- Usergroup;
- Userregister.
For instance we would like to customize the application list in the employer's page:
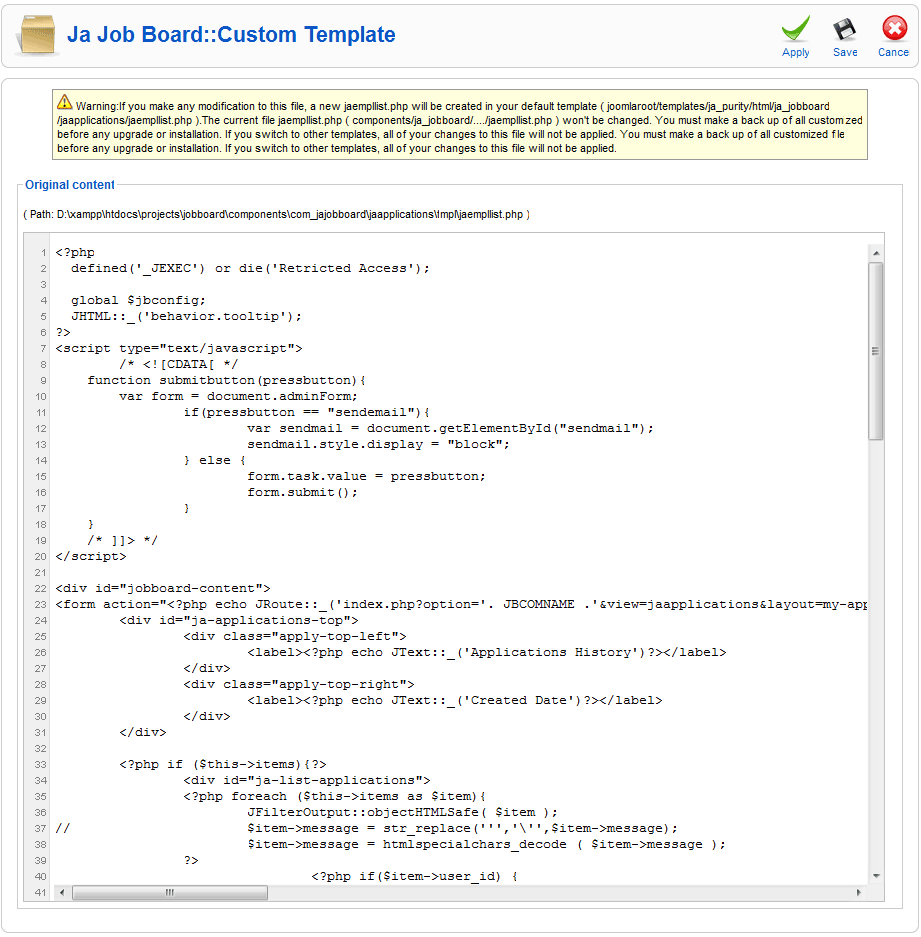
As you can see the message above the editor, it informs that changing the file will automatically create a template override for the view, but won't affect to the original code. To learn more about template overrides, please visit our designated documentation section. What is important to remember here is that you can change the class names, div IDs, or arrangement as you like. As well as use the new class names into your default Joomla! template, and style these classes and IDs both in Job Board CSS and the default Joomla! template CSS file.
Customizing CSS
To customize the stylesheets for Job Board, you can click the CSS link in the same panel. See images below:

Clicking the Edit link will open the code editor:
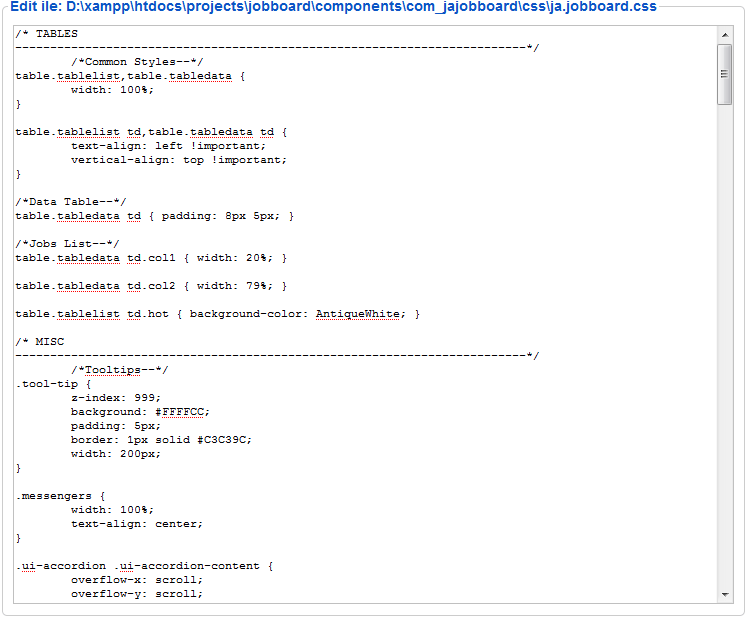
Here you can customize default Job Board HTML tags or your own tags. When you update Job Board, remember to back-up this file.
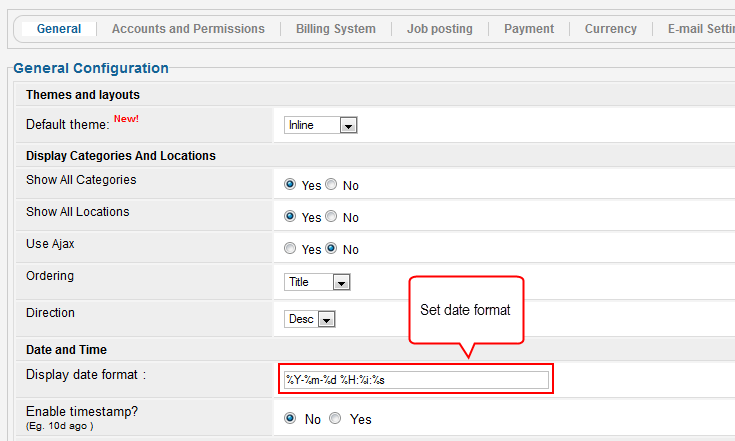
Customize date format
To customize date format, go to general section of system config category, enter the format that you want to display on the display date format textbox. Job board will translate the format as the following: %y to year's four digits, %m to month in number, %d to day in number, %h to hour in 24, %i to minute, %s to second.
Customize email templates
Visit manage email templates for more information.
Customize Job List Themes
JA Job Board supports multiple themes for jobs listing. There are 4 standard themes:
- default - displays the jobs list in a table format;
- inline - displays the jobs listings using li (list items) and AJAX implementations and provides sorting options;
- inline-light - similar to the second but this theme uses less coloring.
- Summary - display the jobs list in table with summary information.
The default theme
We are going to insist on inline themes and explain how to modify the look for normal job posting, featured, hover state and rows, but also show you how to style, move, hide specific parts of the job posting. The inline theme
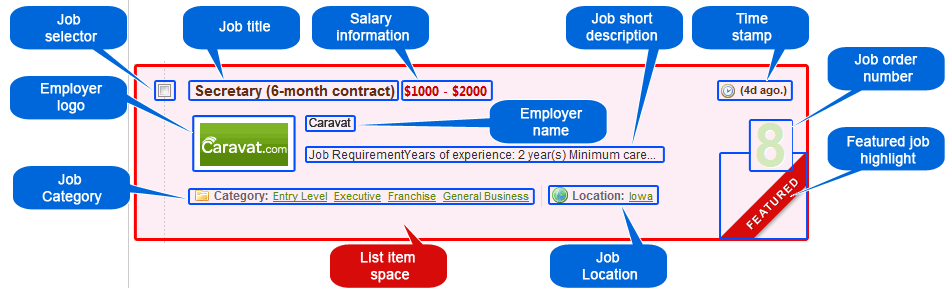
List item space is the wrapper of all job posting information, and uses several colors and styles:
- normal styling is used for non-premium jobs, and makes use of these code pieces:
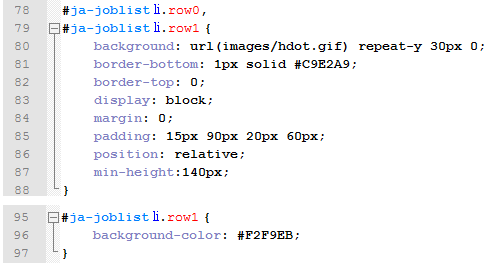 Noticed the row1 background color? You can change it with your desired color to match
your website design.
Noticed the row1 background color? You can change it with your desired color to match
your website design.
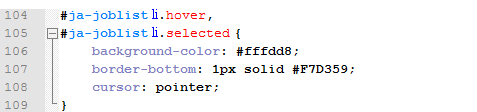
- hover styling applies to all jobs, no matter if they are premium or not;
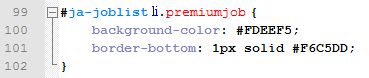
- premium styling applies to jobs that are marked as premium, and use this code:
Job selector is a checkbox connected to the scripts of the theme. This element can be styled in code:
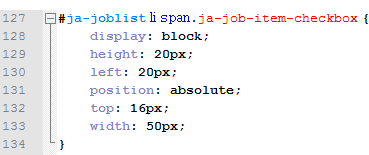
TIPYou can change the position from left to right for RTL websites.
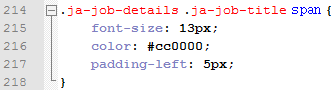
Job title styling uses this code:

You may want to delete the color line, to make it use your template color for a items.
Salary information styling uses this code:
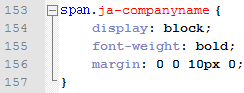
Employer name can be customized in this code:
Employer logo uses this styling:
![]()
Job short description uses no specific styling, as it is a simple text that inherits styling from the template for paragraph.
Job Category uses this styling:
 You can delete the color styling for links to match your template styling.
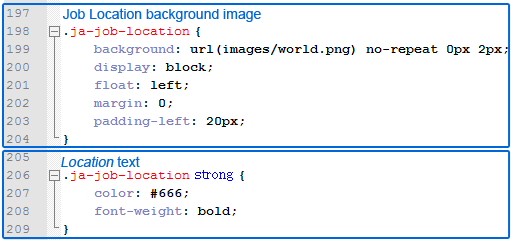
Job Location uses some common styling like Job Category for links, and also specific styling such as:
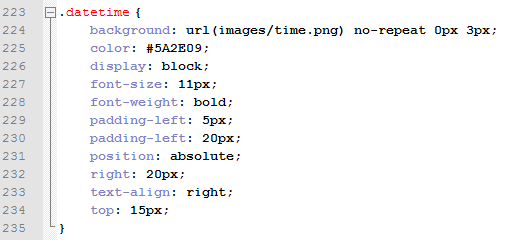
Time stamp or Creation date uses this styling:
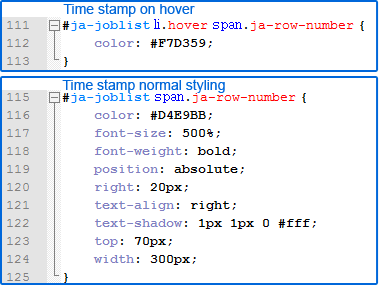
Job order number uses this styling:
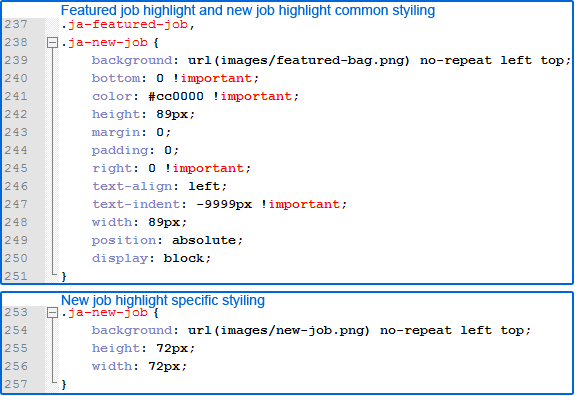
Featured job Highlight and New job Highlight styling uses this code:
Add a new language
For older versions of JA Job Board component, you have to create the language files for your new language by using the original ones:
- en-GB.com_jajobboard.ini site language file located in your_site_root\languages\en-GB\
- en-GB.com_jajobboard.ini admin language file located in your_site_root\administrator\languages\en-GB\
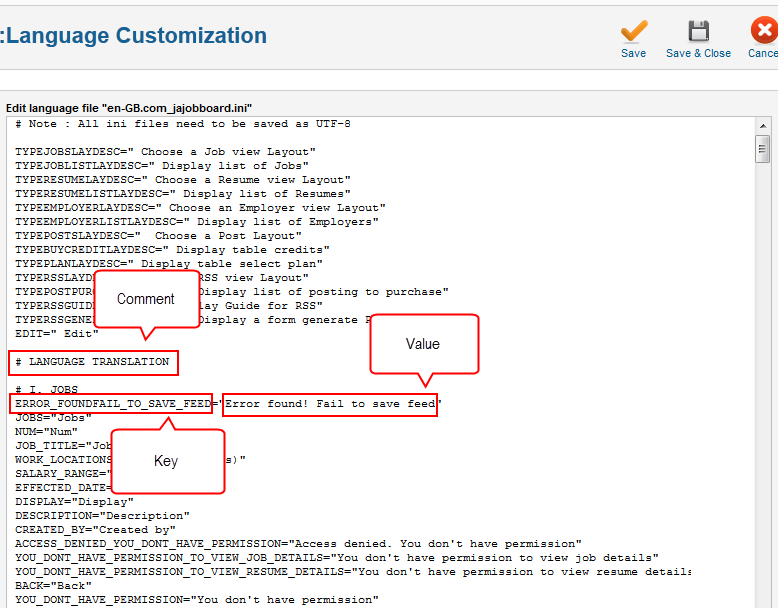
To add a new language to JA Job Board, first you have to check if your language pack for Joomla! CMS is installed, if not, please do so. Then check the language customization menu, and you will notice JA Job Board automatically created the language files for your language in the Languages Manager page. If you have your own translations, please overwrite these files. If not, please select whether you want to edit site/admin language file. Then click on language name of your new language to proceed with editing. The language file editor will help you easily to edit your language but please note that this file contains key-value pairs. The strings from the left side of the equal mark " = " are the keys that must not be modified AND the strings from the right side of the equal mark are the English language strings you have to edit and translate to your new language.
Language manager screen.
Edit language file.
Add another payment method
For now, Job Board has only one payment method, that is Paypal. If you want to implement another payment method, then you have to write it. To write it, your file should be similar to Paypal.php under components\com_jajobbord\asset\payments folder.
Configure file uploading
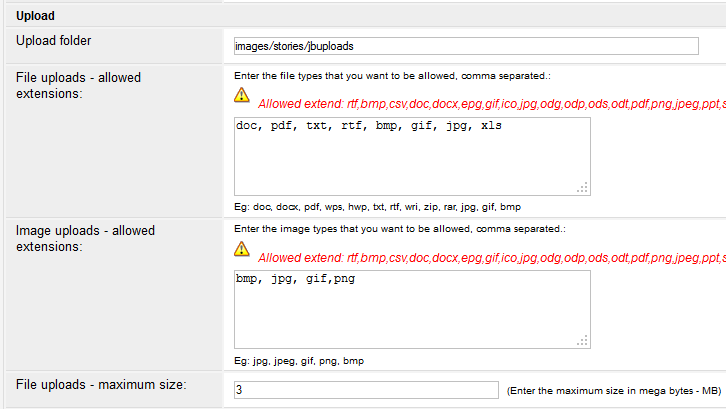
On Job Board, front-end user can upload CV, profile image, you can configure which file type is allowed to upload, and limit file's size uploading from general section of system config category.
Manage email templates
Configure email settings
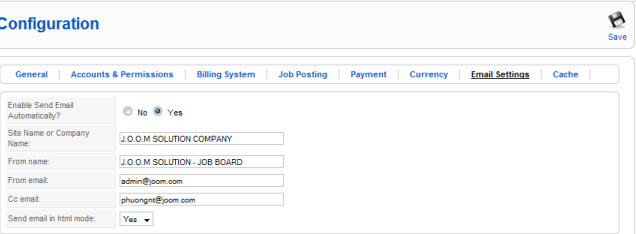
Email settings section of system config category determines whether Job Board can send email to front-end user automatically after some events occur or not, this section also sets email information on sent emails.
Email settings.
Manage email templates
Email templates are used for: - Sending mails to users/admin to notify of an event - To confirm a payment/an action on the site by users or admin. Currently, a list of English email templates for general & major events on a Jobboard site has been included on JA Jobboard by default. Webmaster can find it very easily and conveniently to duplicate these email templates into the language he wants at anytime. Moreover, the system itself will do the rest when the content has been changed into associated language while variables/params are kept unchanged.
List of email templates.

Jobboard maps the event that need to send email with the template name. If Jobboard is enabled to send email automatically, but it cannot find out email template in the language that it has to send. Jobboard will use the template in English as the default language. If the template in English does not exist OR is not published then a notification will display on user screen.
Each template has properties like the following:
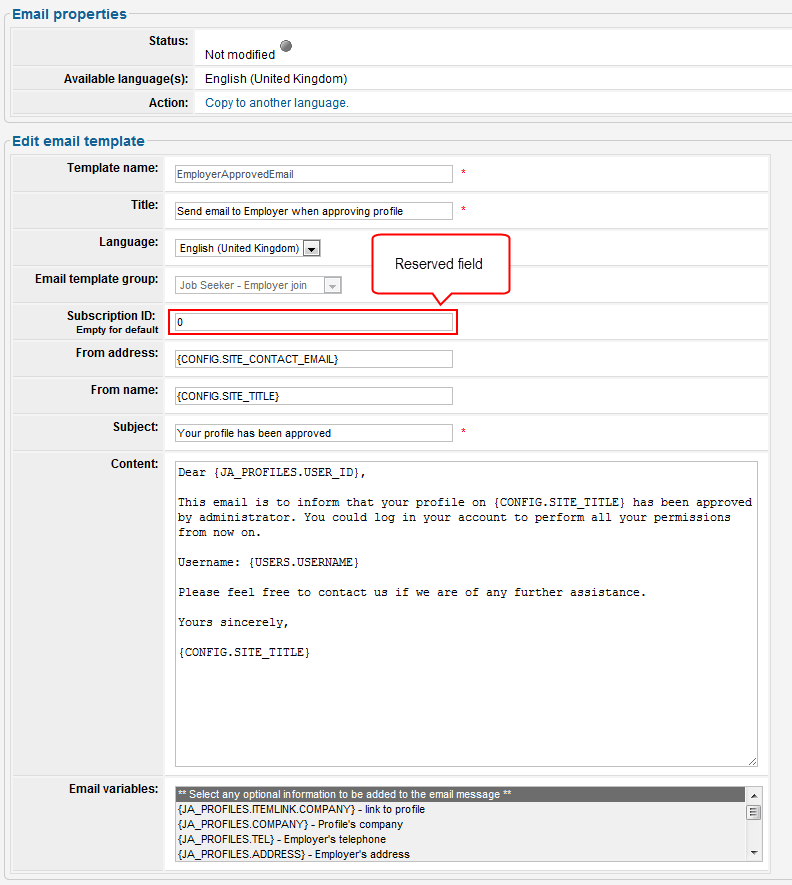
You can do the following steps to customize email templates:
- Copy templates from your existing language to another language:
- Edit template: You can edit any email properties except the template name. Note you cannot edit the event that the template attach to, because Job Board maps the event with template name.
- Create new template: You can create a new template, but you can not set its name with one of system templates' name. Job Board allows to create template here so developer does not have to create it in database.
- Export templates: You can export your template into text file, edit it, then import to Job Board.
- Import template: You can import template into Job Board from ini file.
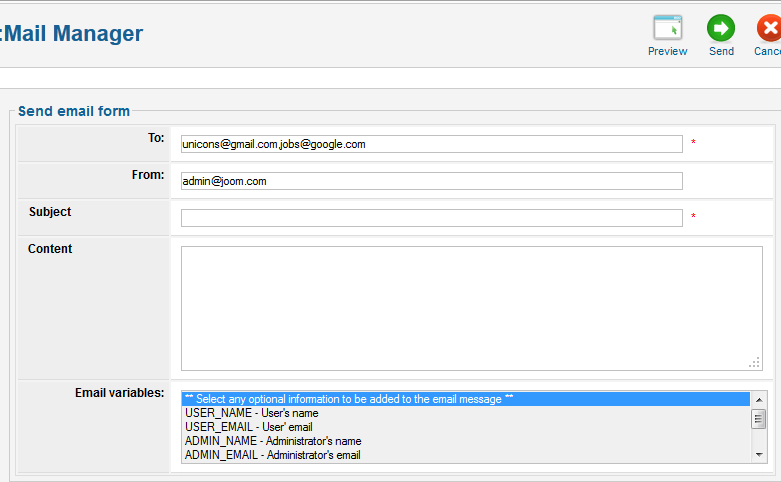
Send email manually
To send email to employers/ job seekers manually, on the employers manager/ job seekers manager page, select employers/ job seeker that you want to send email to, then click send mail button, a compose screen will appear, compose your email then click send button to send.

Site Management
Effectively managing and monitoring all user registration, permission and performances on Job Board is of great importance to the success of your Job Board. As a webmaster, you will find hereof detailed guidelines how to set system configuration, how to manage transactions, users of different types on the site as well as how to charge them for performing a certain kind of activities in an appropriate manner and purpose.
Manage transactions
On JA Job Board, only employers will be charged for a certain activities/permissions should these are configured payable by admin. Thus, all associated transactions by employers will be displayed on transactions manager page for day-to-day monitoring. Webmaster can edit transactions, reverse completed transactions, view customer invoice, view customer details, delete transactions. Each transaction is displayed on administrator page, and on employer page. You can use transactions manager or go to employer's transactions section to manage transactions.
Transactions manager.
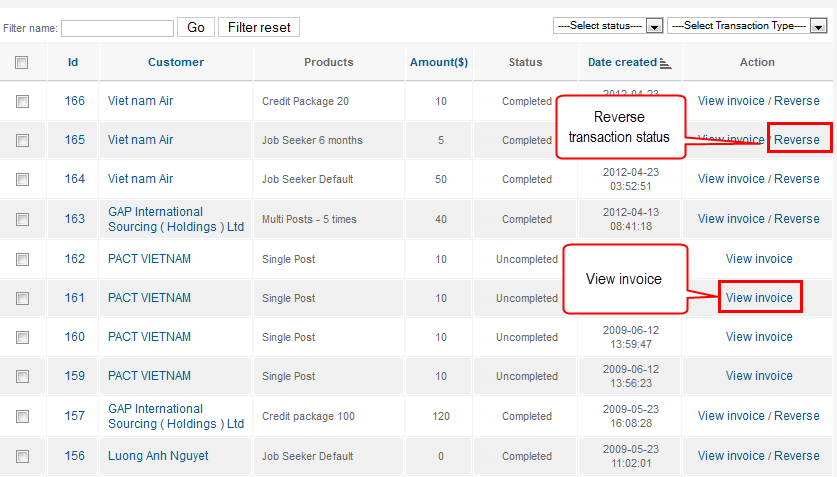
Each transaction invoice has information like the following.

Charge employers
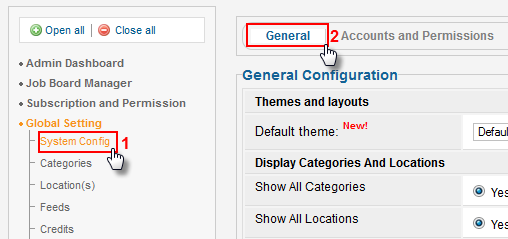
The typical performances of employers on Job Board are inclusive of posting jobs and browsing resumes. Should you want to charge employers a certain fee for performing one of the above mentioned activies, kindly go to Global config section and select system config.
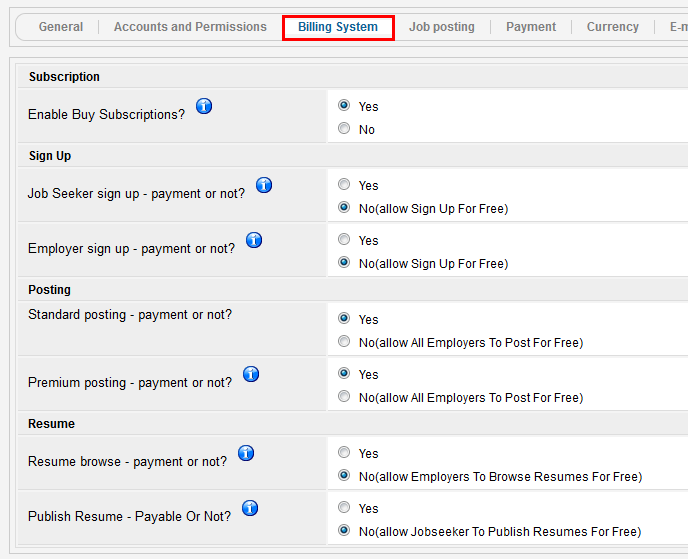
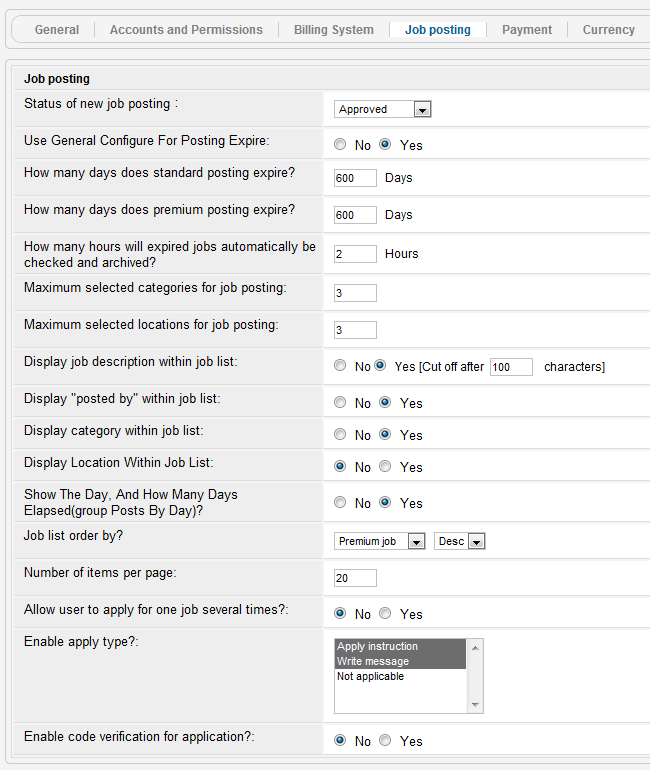
Billing System settings
At system configuration window, you could configure the billing settings to determine whether employer is charged on resumes browsing and jobs posting jobs or not. Billing system settings.
Accounts & Permissions settings
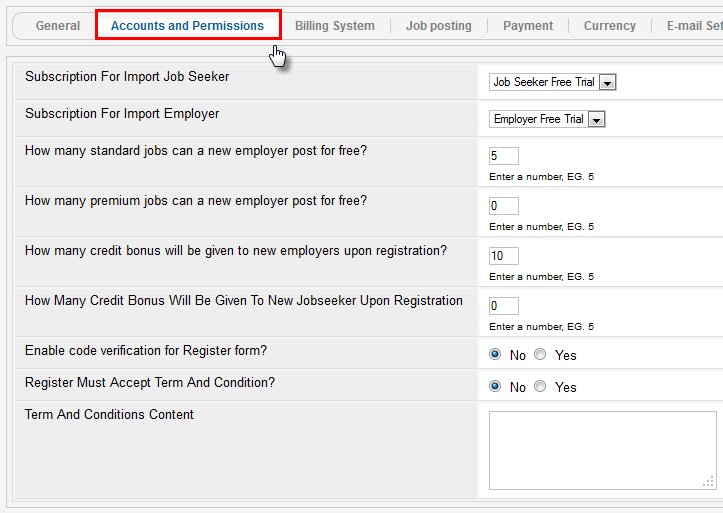
If employers are set to be not charged on posting job, then employers can post a number of jobs as specified on accounts & permissions section of system config category for free.
Accounts & Permissions settings.
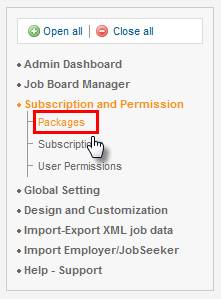
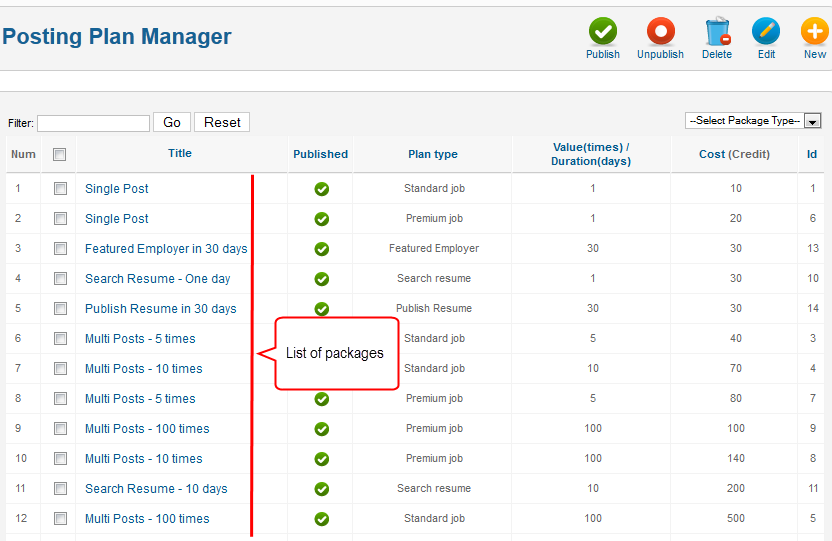
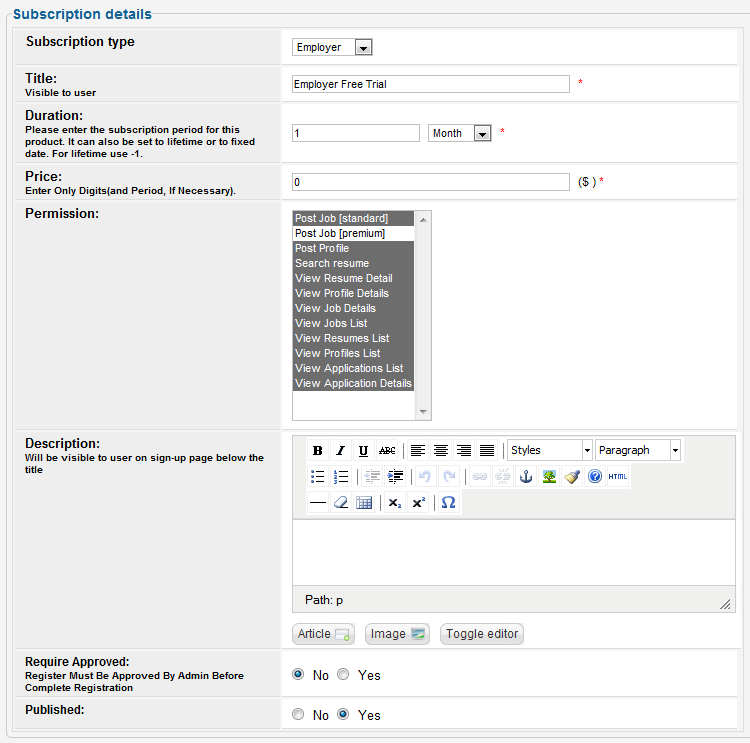
Packages
Packages offer various options of price & associated privileges for employer to post jobs or search resumes database. There are three types of posting plan: standard job, premium job, and search resumes. The standard job and premium job allow the employer post more a number of jobs as specified on posting plan, the difference between these plans are that the premium job will be highlighted on jobs list screens. The search resume plan allows employer to search resumes more a number of days as specified on the posting plan. As a Webmaster, you can easily create, edit, delete posting plans as you want.
Packages manager.
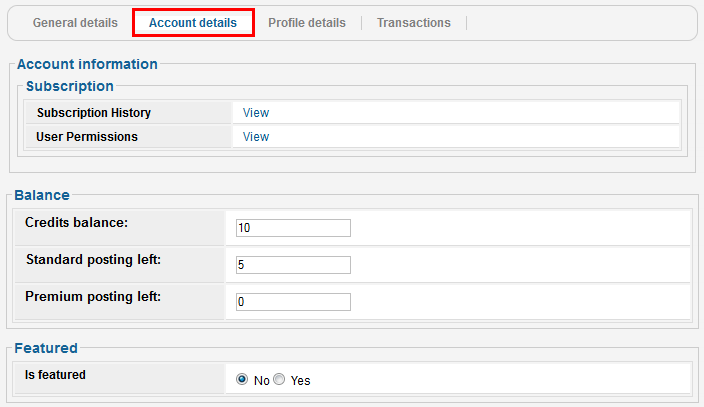
Account details
You can view the number of remaining jobs that employer can post and the time that employer can browse resumes from employer account details.
Payment
There are two types of currency on Job Board, real currency and special currency. Job Board can use one type of currency at a time, this setting is on currency section of system config category. If this setting is set to real currency, then when employer buy somethings employer will pay the money directly through paypal, if this setting is set to special currency, employer has to buy credit package, and Job Board uses the money available of the employer credit package for payment, if the remaining money of employer is insufficient to post job, then that employer can not post job. Employer can now buy credit package by using paypal.
Curency settings.

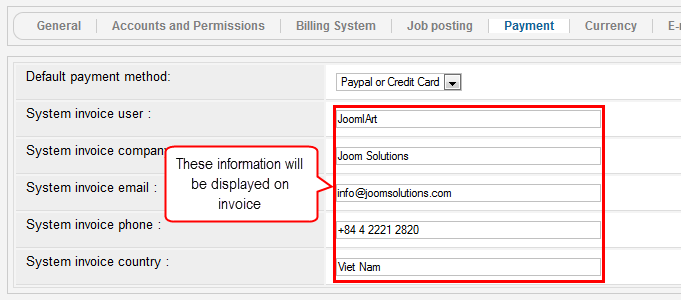
Set up payment information
To use paypal you have to set up payment information, this payment contact information will be display on the "Ship to" section in the transactions invoice. For now there is only one payment method, but you can install a new payment method, please visit add another payment method for more information about install new payment method.
Payment information.
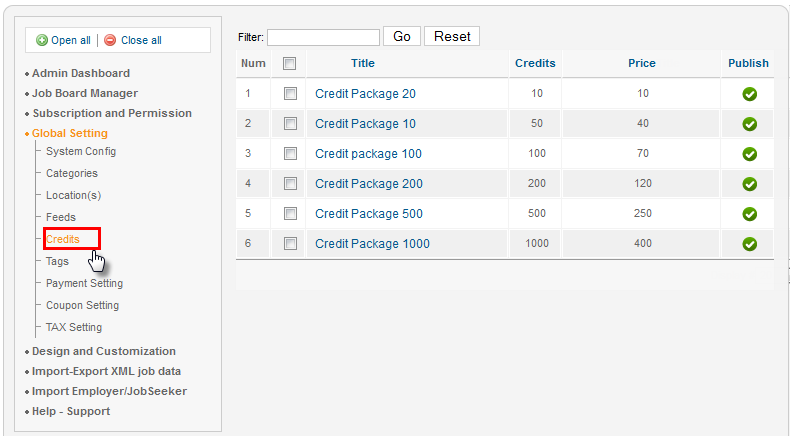
Create credit packages
If currency settings set Job Board uses special currency, then employers have to buy credit package to buy posting plan. The credit manager allows you to create, edit, delete, publish, unpublish credit packages.
Credit packages manager.
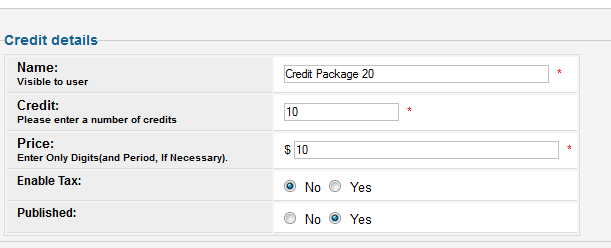
Each credit has information like the following.
View employer account
You can view the number of premium and the number of standard jobs that employer remains, the amount of Job Board currency that employer remains on employer account section. On this section you also can view the time that employer can search resumes.
Manage jobs
One of important administrative task is jobs management, on Job Board you can do it easily, just go to job manager page, and you can do what you want.
Jobs manager.
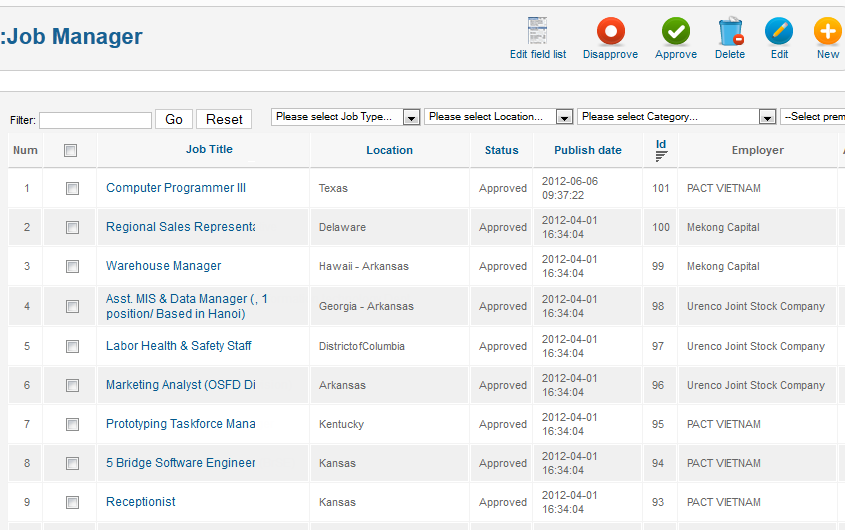
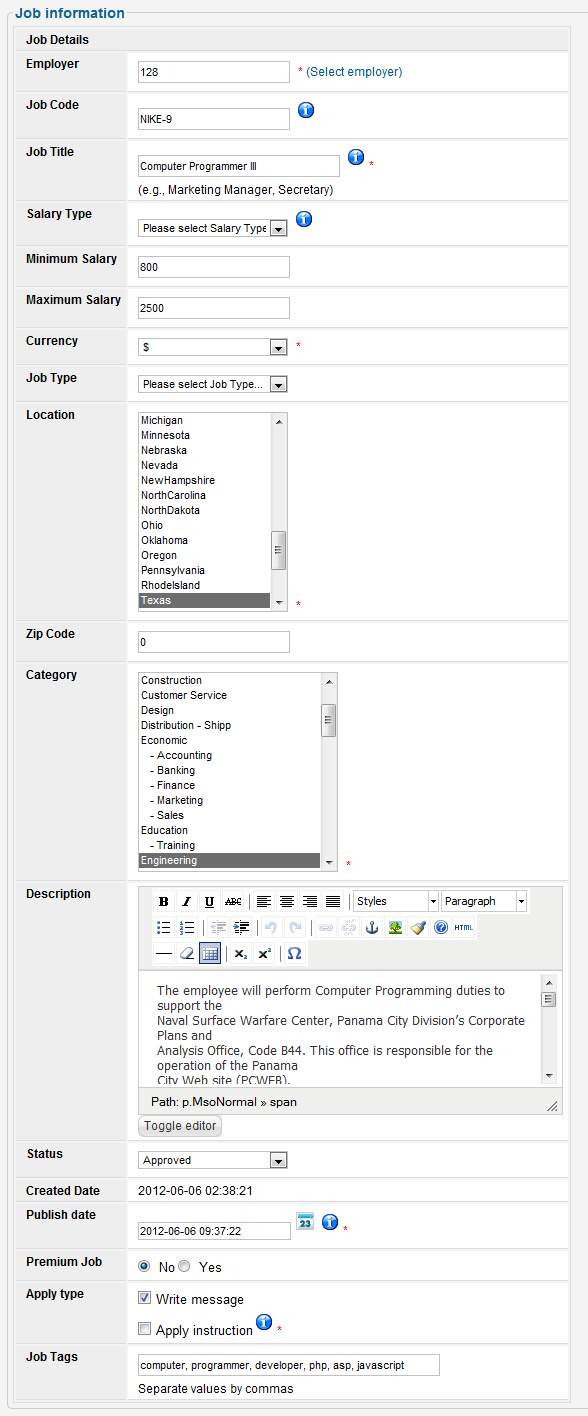
Each job has properties like the following.
You can change job lifetime, default job status and other settings from job posting section of system config category. The How many hours Expired jobs will be automatically checked and archived setting sets the time interval that Job Board checks expired jobs and mark them as expired.
Job post settings.
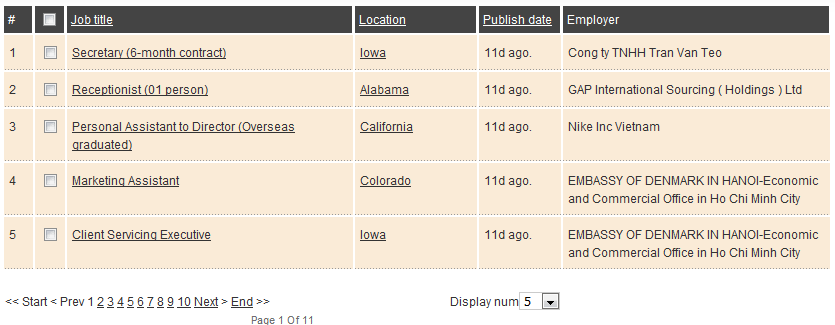
Job is displayed on jobs screen only if the employer of that job is approved and is not blocked, that job is approved, the effected date property of that job is less than the current date time and that job is not expired. Jobs table displays jobs on front-end user pages, you can easily customize this table by using customize job/ profile/ resume/ application table. You can filter jobs by job title, work locations, job category, jobs status, post type. You can add other filter by customize Job form, set field is on filter property of the field that you want to be filterable to yes.
Manage applications
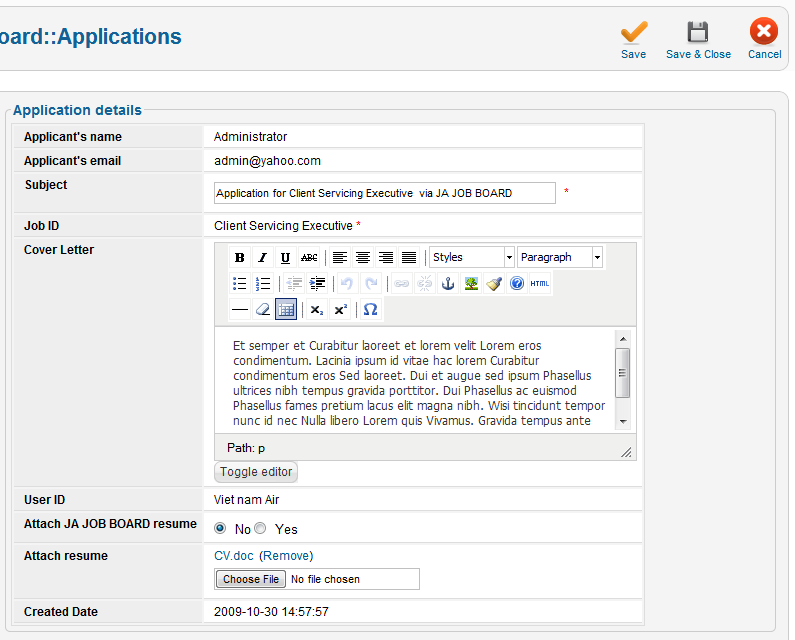
Applications is sent to employers by job seeker users or guest users. You can edit, create new, delete sent applications from applications manager.
Applications manager.
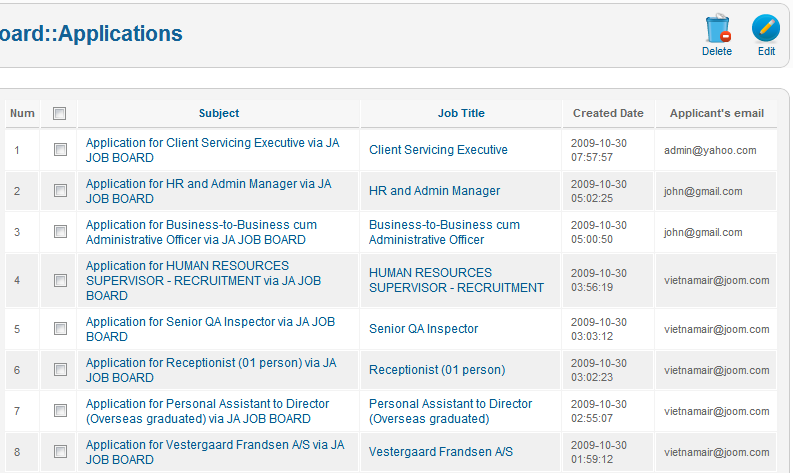
If you delete one sent application then that application will disappear on applications list of receiver and applications list of sender. You can create application as guest but not as job seeker, if you create application then on new application screen, you have to enter the correct user id for application receiver and title id for job post id. After created, the new create application will appear on application's receiver.
Each application has information like the following.
Manage front end users
Job Board Users are those who use Job Board's front end. There are three types of job board's front end users as belows:
- Job seeker: those who look for jobs
- Employer: Those who is looking for employees
- Guest users: Non-registrered users
Job Seeker and Employer have their own subscription, the subscription regulates which permissions the corresponding type of user has by default. After signing up, these users must update their information and to become Job Board seeker or Job Board employer. After information is updated, depend on your settings on Accounts & Permissions section of System config category the user may need to be approved by Job Board administrator.
Account & Permissions.
Job Seeker
Job Seeker can search jobs, view jobs, post their resumes, upload their CV, send application and CV to employers, save their favorite jobs.
Job Seeker Default subscription
The default permissions and lifetime of job seeker are set by Job Seeker Default subscription.
Job Seeker permissions
After created you can change job seeker permissions for each job seeker.
Approve Job Seeker resume
Click on the job seekers category, on the row of job seeker that you want to approve, select checkbox, then click approve, or you can click the unapproved icon to approve or click the view resume link, then set approved property of the resume to yes.
Employer
Employers can search, view resumes, post their jobs, view applications that job seekers sent, save their favorite resumes. What employers can do on Job Board is limited not only by permissions settings, but also by accounts & permissions settings, billing system settings. Billing system settings sets whether to charge employer fee on browse resumes or post job, the accounts & permissions settings sets the number of free jobs employer can post.
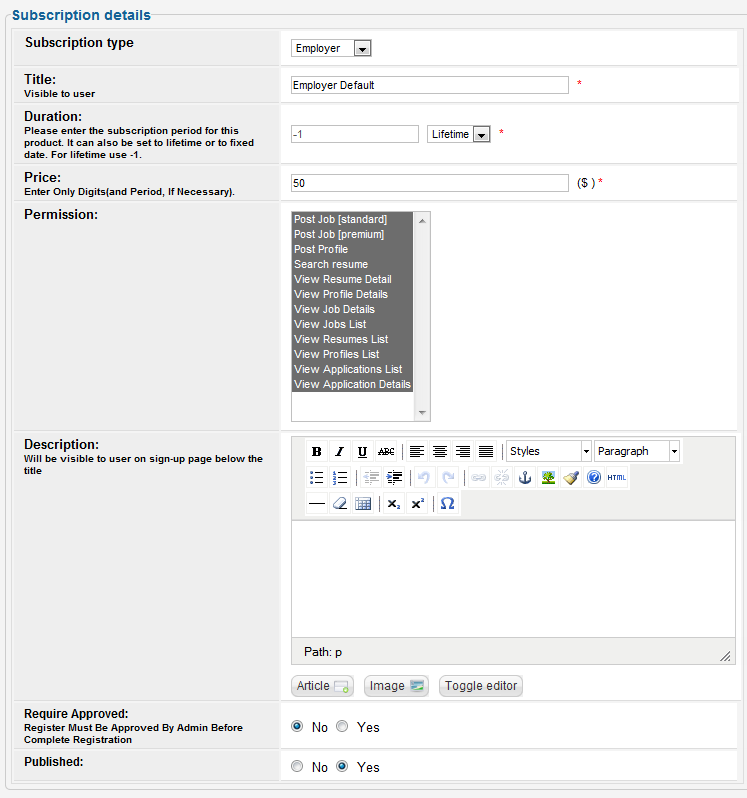
Employer Default subscription
The Employer Default subscription set default permissions and lifetime of job seeker.
Employer Permissions
You can change permissions of each employer.

Approve employer profile
Click on the employers category, on the row of employer that you want to approve, select checkbox, then click approve, or you can click the unapproved icon to approve or click the view profile link, then set approved property of the profile to yes.
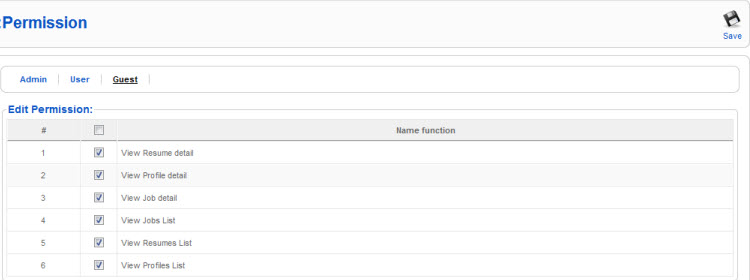
Guest
Guest users can search jobs, view jobs, send application and cv to employers. You can change Guest users permissions.
TimeZone Configuration
Configuring correct timezone (for both server side and user side) will help to resolve a problem of diffrent timezone when publishing job. Assume that your server is placed in US (UTC-06:00), and one of your employer comes from Japan (UTC+09:00), so offset between two timezone is 15 hours. If you do not configure timezone for your server and employer, then employer's time will not be converted when creating job, and that is a cause of problem since Jobs will not displayed as expected time. The following is an example about this. We give a situation where timezone is a big trouble.
- If current time is “08h:00 - 10 Sep 2012” (UTC(0)), then it is “17h:00 - 10 Sep 2012” (UTC+09:00) in Japan and “02h:00 - 10 Sep 2012” (UTC-6) in US
- Now, employer in Japan selects “publish time” for his job is “18h:00 - 10 Sep 2012” (UTC+09), and he expects that his job will be published in the next hour.
- But if timezone is not configured correctly, the “publish time” will be stored in database of server - “18h:00 - 10 Sep 2012” (UTC-06:00). And it will be published in next 16 hours (because current time in US is “02:00 - 10 Sep 2012”). That is incorrect.
- Expectation: this publish time must be converted to “03:00 - 10 Sep 2012” (US time) when stored in database. So, to resolve above issue, you need config correct timezome for your site (in global configuration page >> server tab >> “location settings” section. Then ask your user to update their timezone to correct value. Follow the instruction to configure the timezone.
Configure Timezone for Server
To configure timezone for server, from back-end of your site, go to: Site --> Global Configuration --> Server then set the Server Time Zone under the Location Setting.

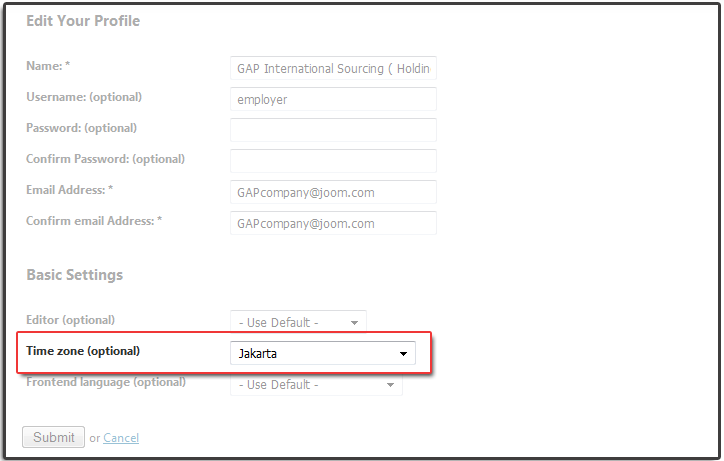
User configure their Timezone
If your user want to configure their timezone, they need to login then go to their profile page
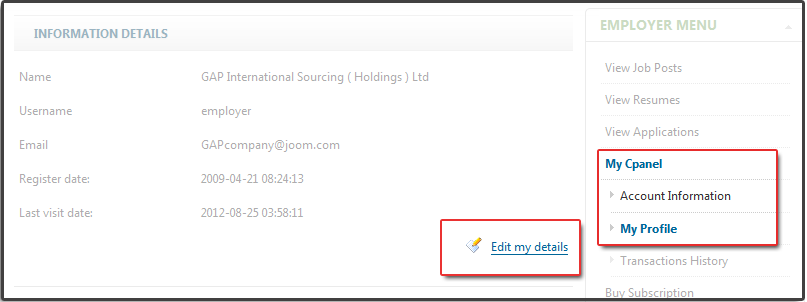
Then Edit their profile to edit their Timezone.