All frequently asked questions about how to use installed Job Board component as well as how to manage and administrate Job board site have been thoroughly answered within Section How tos & FAQs from the perspectives of Job Board end-user. Here you will find a quick tour of JA Job Board backend features and functionalities in screenshots for your easier follow up.
Admin Dashboard
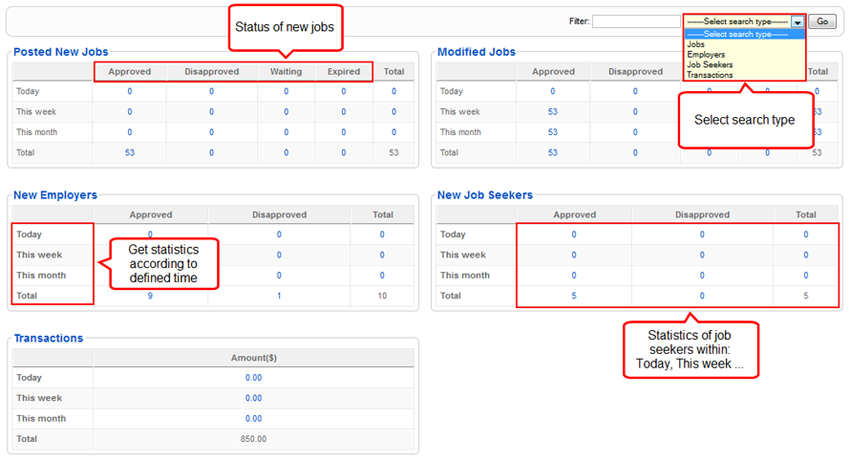
Upon signing in as JA Job Board Administrator, Job Board dashboard will provide you an overall view about JA Job Board activities by today, by this week, by this month and by total. It also provides JA Job Board's support and documents and license information.
Admin dashboard.
Job Board Manager
In the screenshot you are going to see below is the Job Manager that consist in a jobs list. Please note that this is sample data. In this panel you can edit jobs, delete, approve or dissaprove and even create new ones.
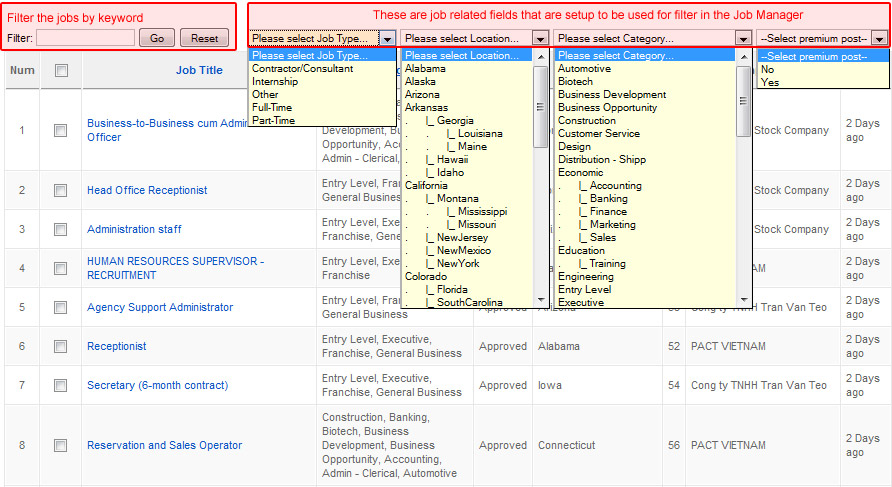
- Filter options can be added, removed automatically according to the attribute of the fields in the form: Form Customization. You can check the detail guide of the Form Customization in the next parts shown below.
- When search with a keyword, system will search based on the data of the fields set "Is on filter = Yes" in Form Customization.
Example: JobType has "Is on filter = Yes" --> JonType will be displayed so that user can filter using the field
- You can also add or remove displayed columns that are managed in Field List Customization. To have more detail, click HERE
Editing Jobs
For instance we would like to edit a job. We will select one and click the Edit button:
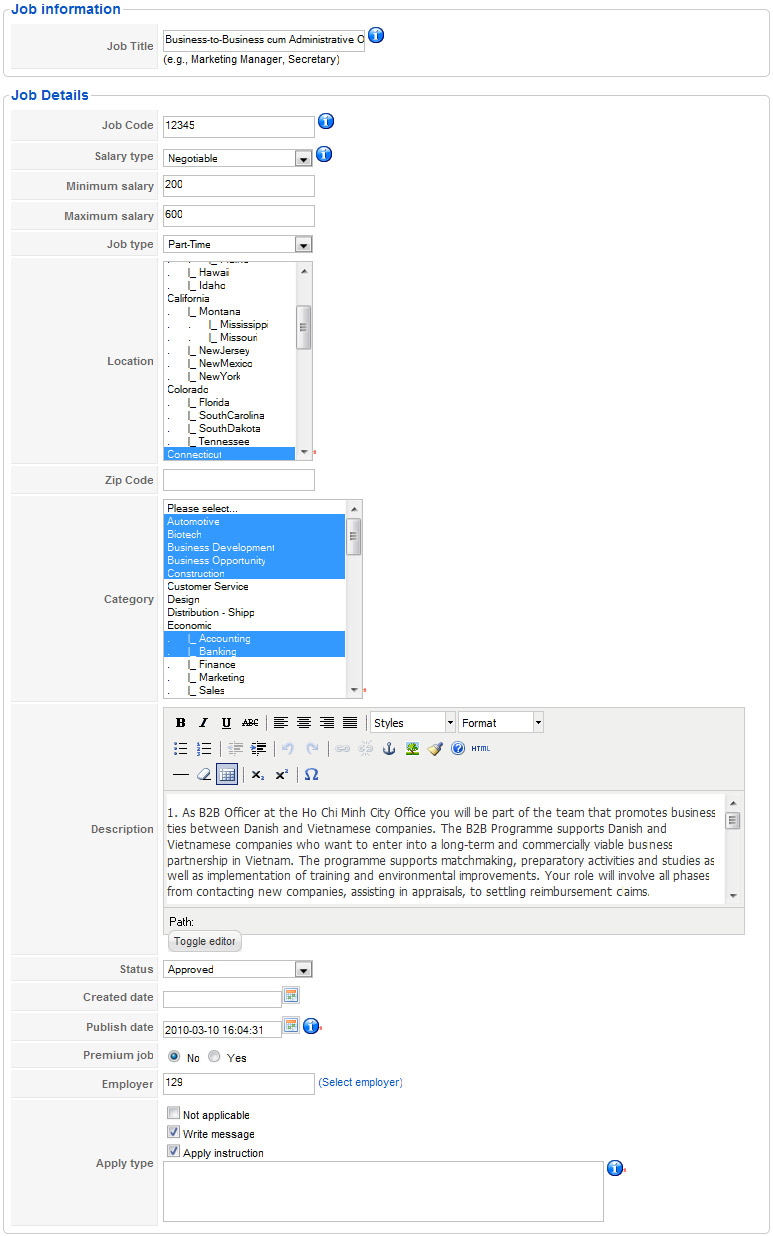
You can customize, add, edit fields in the Job Form that are managed in the Form Customization.
Some important fields in the Job Form
- Job Type fields, Currency, Status with options managed in the Form Customization => Edit field => Filter Options.
- Category fields, Location that can be changed from Multi Selectbox to Single Selectbox. The number of selected items can be limited in the Global Setting. The data of category, location can be managed in the Global Setting
- Status: the status of job. Job is only displayed in front-end when Status = Approved. User can also set the default status when employer post job in the Global Config.
- Publish Date: the date that the job is displayed in front-end. The supported Timezone system of Employer, Server --> execute the Publish Date in real server to publish this job.
- Premium job: featured job. With the default configuration of the system, premium job will be displayed on top of the job list in front-end
- Apply type: allow Job-Seeker select ways to apply the job.
- Write message: Job-seeker will apply the job by filling information in the Application Form, that is displayed under the Job details page
- Apply instruction: display the guide to apply job. Employer can fill information to guide JobSeeker to apply job. If the content of the apply instruction is an URL, the system will automatically redirect to the URL address when clicking on the Apply button
- Job Tags: When filling information for this field, the system will automatically give suggestions so that user can select tags in the system --> can not be duplicated. When saving job, system will automatically update the new tags, update the new number of jobs for the old tags.
Employers
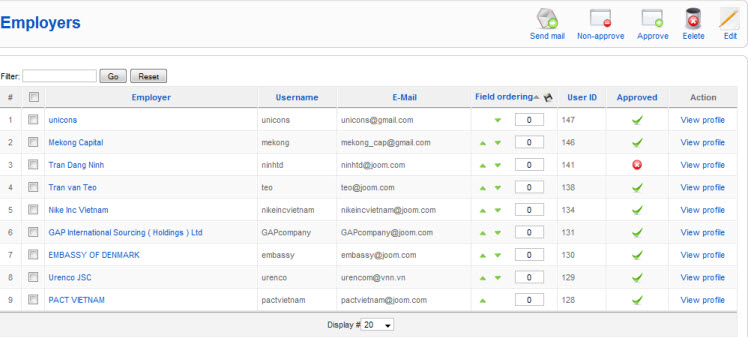
Employers are those advertising their company's vacancies on Job Board and looking for good match candidates for further selection. After clicking on Employer menu item in the vertical menu of the component, you can see a list of employers with associated status. Kindly take an immediate review for approval towards those who have not been approved for user's performance on the site (if this is configured within permissions section).
Employers list.
Select one employer randomly, you can view their associated membership, profiles, account & transaction details.
Main functions of the Employer List:
- Send Mail: send mail to the selected Employers. An email can be used to send to all selected employers.
- Export: export Employer profile data in the CSV file format.
- Delete Employer: delete employers from the system. The system will delete all the information of the selected employers in JobBoard except Joomla User account --> when delete by this way, Employer still has Joomla account --> Employer can still access from front-end with this account.
- Delete Employer and Joomla User: this function is same with the function: Delete Employer but it deletes Joomla User account
Membership details
This section contains all information about user's registration on the site.
Joomla user acccount details.
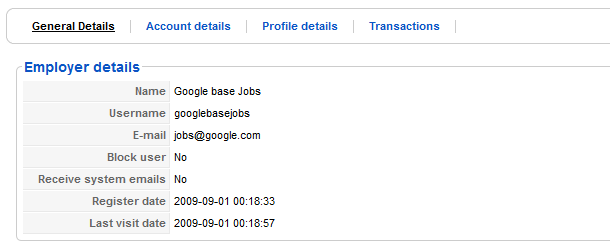
Main information of this option
- Block user: the status of user in the Joomla system. If the user is blocked, they can not login from front-end, they have to wait for Admin who will approve for them
- Receive system email: to define whether the user receives the Confirm email from the system .
- Register date: the date that the user register successfully.
- Last visit date: the time of the latest login of the user.
Account details
This section contains information about employer's credit money, employer's number of job posts remaining, employer's time interval to search resumes.
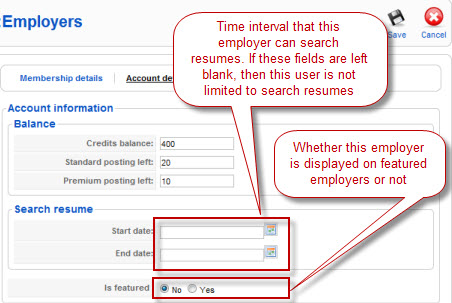
Main information of this option
- Subscription: the information of the registration of Employer in the system. The information contains the information of joining date and the expiry date of the system, the working status of the system
- Join date: the joining date JobBoard system.
- Expiry date: the expiry date to usse the system. After the expiry date, Employer can not login and use the system.
- Is Active: whether the account is active. If not, the system will not support Employer to login.
- Balance: the account information of Employer in the system
- Featured: whether the Employer is featured or not and how long the Employer is featured.
Profile details
This section displays employer profile.
Each profile has information like the following.
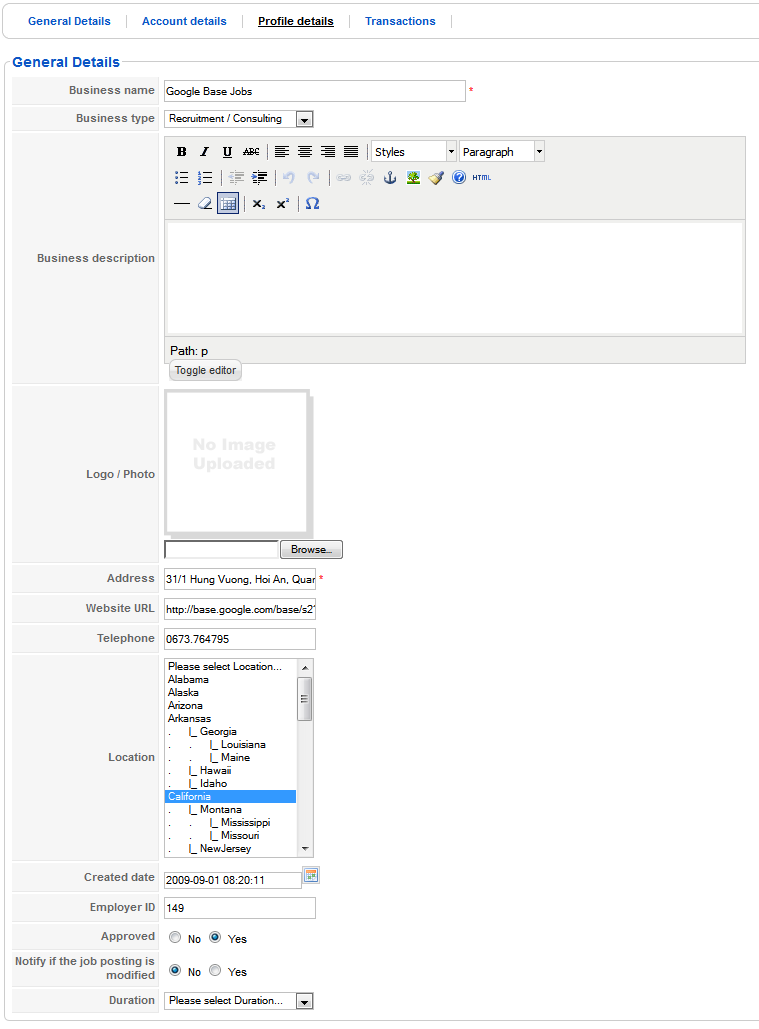
Fields in the Profile Form are also managed in the Form Customization. You can add, edit, delete the fields in the form
Transactions
This section displays transactions that employer has been performed.
Employer's transactions.
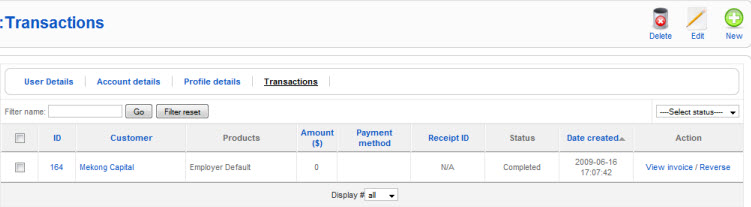
The guide to manage transaction will be shown in the next section.
Job Seekers
Job seekers are those who are looking for job advertisements for review or applications. After clicking on job seeker under the vertical menu "Job Board manager", you can see a list of job seekers with associated status. Noteworthingly, those users with "non-approved" status will not be able to permission on the site (if this is configured within permission section) until webmaster approve. Kindly take an immediate review for approval towards this group.
Job seekers list.
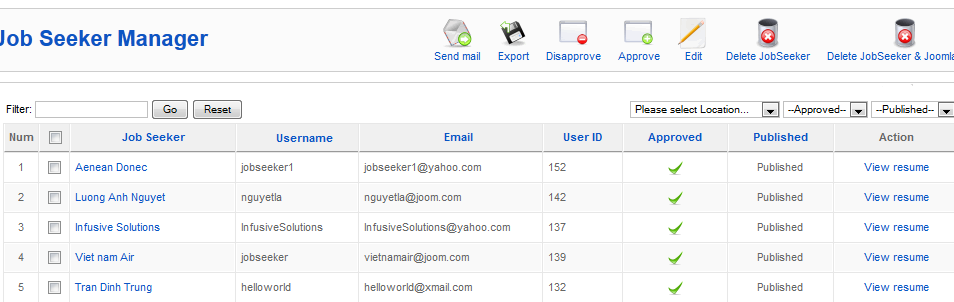
Randomly select randomly a specified job seeker, you can approve/ disapprove/ block/ unblock/ create/ edit/ delete job seeker, edit job seeker's resume.
Main functions of the JobSeeker List:
- Send mail: send mail to the selected JobSeeker. An email can be used to send to many selected JobSeekers.
- Export: export JobSeeker profile data in the CSV file format.
- Delete JobSeeker: delete employers from the system. The system will delete all the information of the selected employers in JobBoard except Joomla User account --> when delete by this way, Employer still has Joomla account --> JobSeeker can still access from front-end with this account.
- Delete JobSeeker: and Joomla User: this function is same with the function:Delete JobSeeker but it deletes Joomla User account
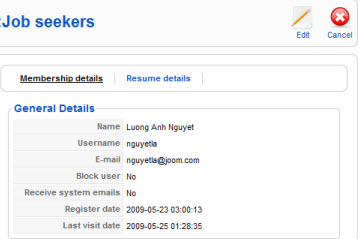
Membership details
This section contains information about Joomla user account.
Joomla user account details.
Account Details.
This page displays the account information of JobSeeker.
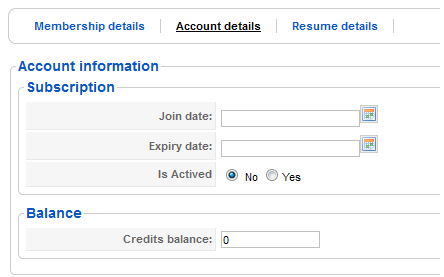 Main information in this page:
- Subscription: the information of the registration of JobSeeker in the system. The information contains the information of joining date and the expiry date of the system, the working status of the system
- Join date: the joining date JobBoard system.
- Expiry date: the expiry date to usse the system. After the expiry date, JobSeeker can not login and use the system.
- Is Active: whether the account is active. If not, the system will not support JobSeeker to login.
- Balance: the account information of Employer in the system
- Featured: whether the JobSeeker is featured or not and how long the JobSeeker is featured.
Resume details
This section displays job seeker's resume.
Job seeker resume details.
 Fields in the Resume Form can be added, edited, deleted and managed in the Form Customization.
Transactions
This is a convenient short cut menu for employer's transactions on Job Board site. Instead of going to employers submenu & view their associated transactions there, list of all Job Board transactions could be rapidly retrieved and viewed by going directly to this transaction menu. You can view transaction's invoice, edit, delete, create new transaction.
Transactions manager.
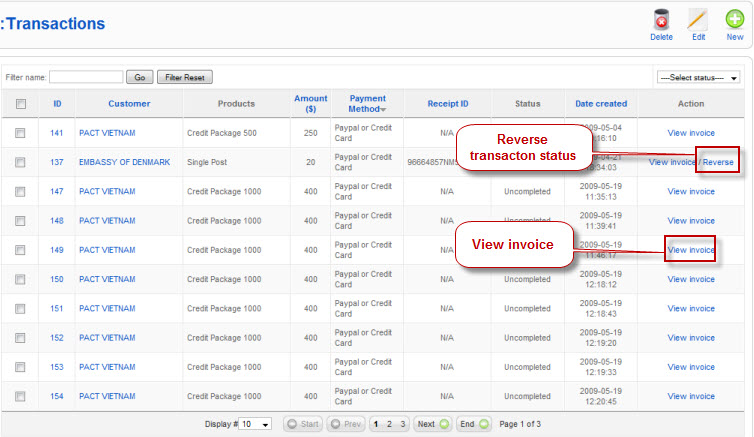 Main information:
- Customer: user creates transaction
- Products: product names that user selects to buy
- Amout: price of products that user selects to buy
- Payment method: the method that user select to pay for products they buy
- Reciept ID: the ID returned from Payment Gateway.
- Status: the status of the transaction: Uncompleted, Completed, Cancelled.
- View invoice: view invoice
- Reverse:reverse status of transaction from successful --> unsuccessful, from unsuccessful --> successful. When executing the function, the balance of the Employer's account will be changed due to the products that they select to buy.
Each transaction has information like the following.
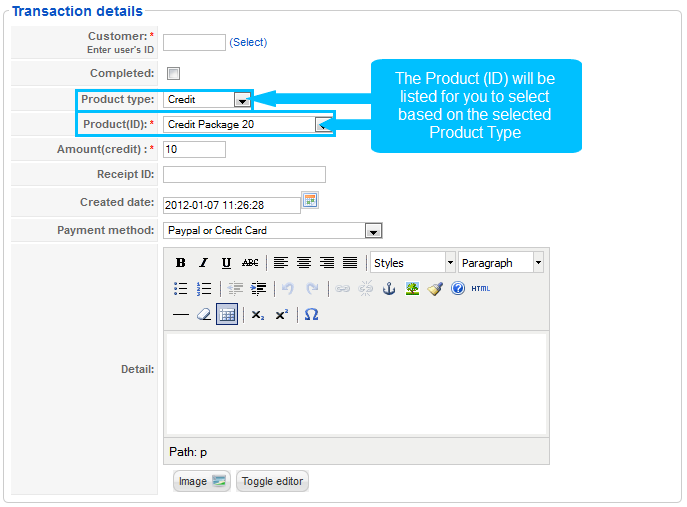
Main information:
- Customer ID: ID of customers in transaction.
- Completed: tick on the box to indicate that the transaction is complete.
- Product Type: select the product type. The product ID will be listed due to the selected product type.
- Product ID: ID of products in transaction. This field has reference to the tables: Subscription, Package, Credit.
- Amount (Credit): This field will be filled automatically due to the selected product ID.
- Reciept ID: the ID returned from Payment Gateway.
- Created Date: set the created date of the transaction
- Payment Method: set payment method for the transaction
- Detail: enter the detail information of the transaction (optional)
- When changing status of transaction from unsuccessful --> successful, value of the product package will be added to customer's account.
Example: when employer buys a package of 1 job post, this transaction is set to successful by Admin, + 1 job post is added to the employer's account
- When changing status of transaction from successful --> unsuccessful value of the product package will be removed from customer's account.
Example: employer buys 10 credits, when changing status from successful --> unsuccessful, the 10 credits will be removed from customer's account.
Applications
This page allows you view applications that job seekers and guest users sent to employers. On this page you can create new, edit, delete application easily.
Each application has information like the following.
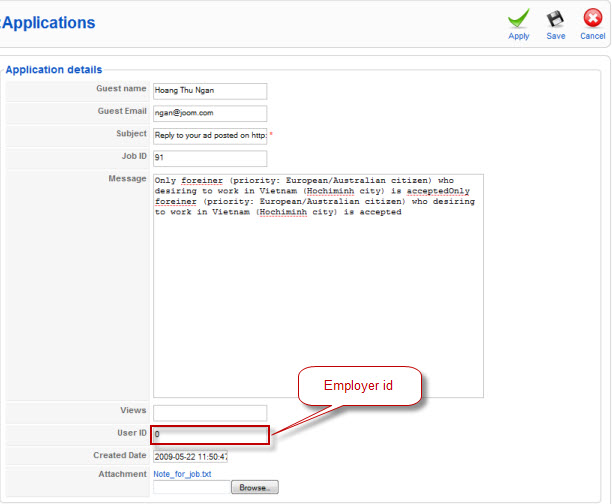 Some main important information.
- Guest Name: username who applied for job.
- Guest email: email of the user above (username who applied for job)
- Subject: title of the application form
- JobID: ID of job.
- Message: content of the message of the application form.
- UserID: ID of registered user.
- Created date: date of registration,
- Attachment: File CV that JobSeeker applied.
Fields in the Application Form are also managed in the Form Customization.
Subscription & Permission
Posting Plans
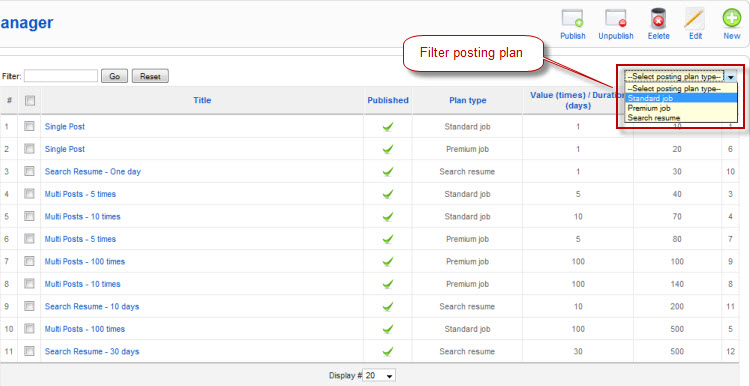
Posting plan offers various options of price & associated privileges for employer to post jobs or search resumes database on the site. The Posting plan includes three types:
- Standard Job
- Premium Job
- Search Resume
The term Duration (days) is applied if you create Posting Plan under Search Resume type.
The term Value (times) goes with Standard Job and Premium Job, which specifies the number of job Employer is entitled to post.
Currently, all these items are established for demo purpose and real webmaster of JA Job Board can edit/delete/add new/publish/unpublish these options within a few minutes
Posting plans.
Each posting plan has properties like the following.
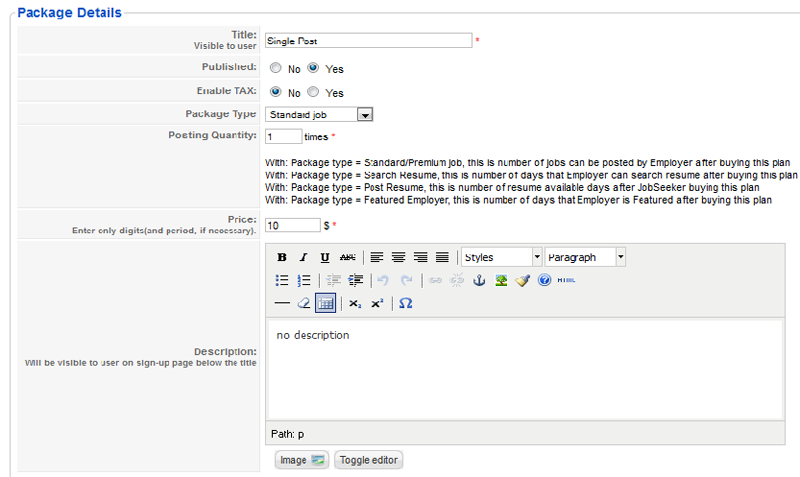 Main information in this form
- Title: title of package
- Publish: status of package (it is published or not).
- Enable TAX: When enabling TAX, the system will check to define whether the package has TAX applied.
- Package Type: type of package. There are 4 types of package.
- Posting Quantity: with each package type, system will apply value of Posting Quality in different ways and there is detail guide for each case.
- Price: price of the package.
- Description: description of the package. The description will be displayed when hovering the package title from front-end.
Note: to the field: Posting Quantity, there is detail guide for all cases.
Enable TAX: select whether to apply TAX when Employer/ JobSeeker buys this package.
Subscription
There are two subscriptions corresponding with two major types of Job Board users. They are Job Seeker and Employer. Within this subscription section, you can easily regulate and reset the default permissions, membership duration and associated price scheme for each membership (if any).
Job Seeker Default permission
By default, job seeker upon their registration will be given all basic permissions to find jobs. These default settings could be changed within a few minutes.
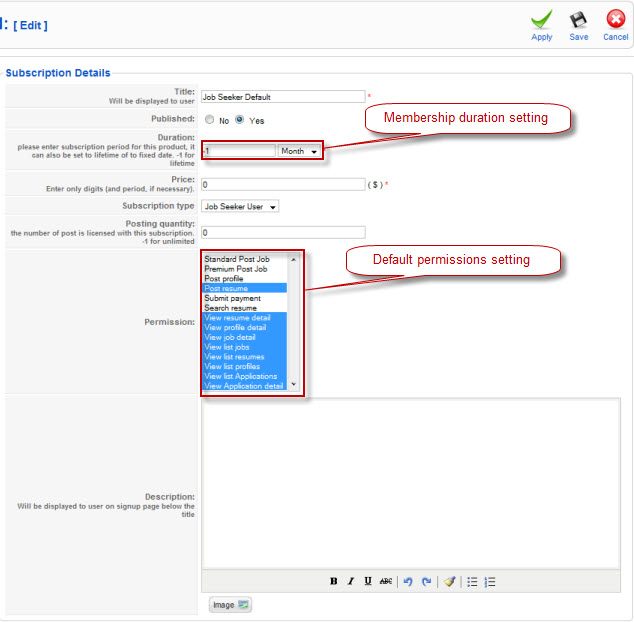
In this part, there is a part named: Require Approved, that means when Employer/JobSeeker registers in the system by using the package, they need to have admin approved before enabling and using.
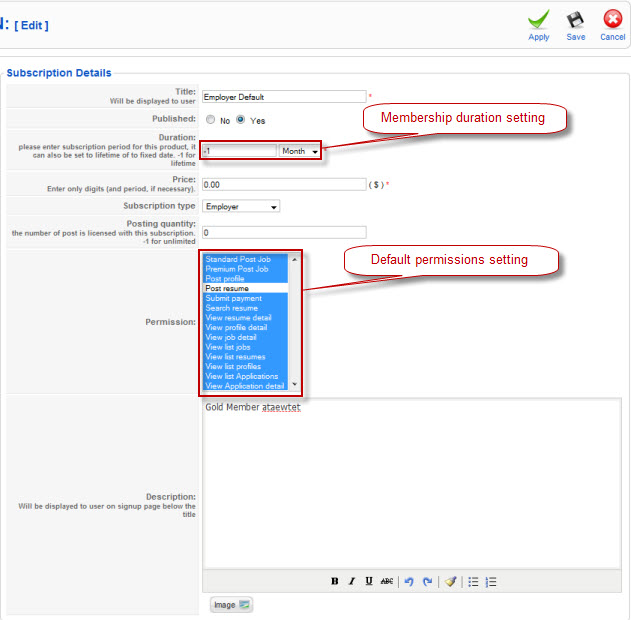
Employer Default permission
By default, employer upon their registration will be given all basic permissions to post job and recruit employees. These default settings could be changed within a few minutes.
 Main information
- Title: title of the subscription.
- Published: status of the subscription.
- Duration: the duration that Employer/JobSeeker is allowed to use the system when buying the Subscription package.
- Price: price of the subscription. System supports Price = 0, when Price = 0 and user buys this subscription, system set up Payment Success automatically.
- Subscription Type: type of subscription: Employer or JobSeeker
- Posting quantity: the number of jobs that can be posted after buying the Subscription. Set -1 to set the limitation = unlimited.
- Permission: the permission of user when buying this Subscription
- Description: description of the Subscription, it is displayed when hovering the Subscription title from front-end.
Subscription Manager
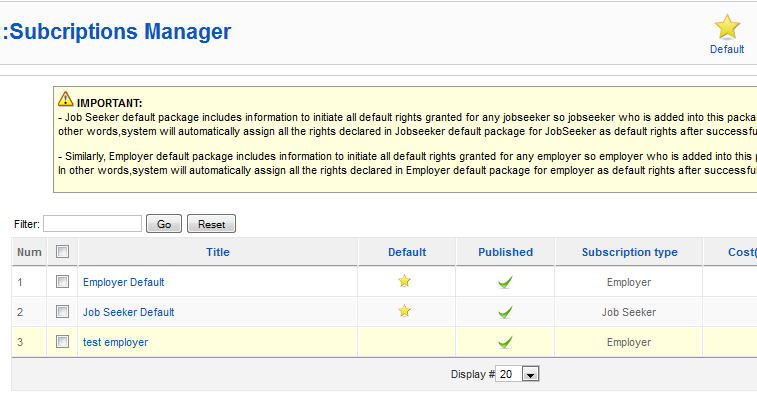
- In this part, you can create many subscriptions for Employer/JobSeeker. For each type of subscription, there is only one default subscription for each type of user.
- In the administration of the system, when system does not allow user to buy Subscription --> the default subscription will be assigned to user when they register.
Example: when Employer register, the Employer Default will be assigned to them.
User Permissions
This section is a convenient tool for you as Job Board administrator to filter/view/edit permissions of all users on Job Board from backend to front end except for those of Job Board super administrator. On back end, you could manage permissions of assigned administrator as follows.
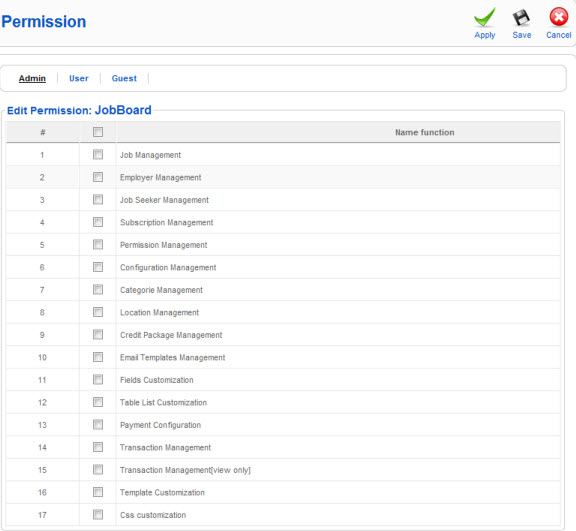
Admin
After going to User permissions category, Click on Admin section you will see a list of Job Board administrators. Each of those has different administrative permissions as assigned by super administrator. To view/edit the permission of a specific admin, kindly click on name of the user that you want to grant, a list of Job Board administrative permissions will appear, grant/remove permissions as you wish.
Set of Job Board administrator permissions.
User
Within User Permissions category, click on user section, you could see a full list of Job Board users. Using the dropdown box to filter group of user first or just click on a specific name, you could conveniently view/edit his/her permissions by checking/unchecking the box.
Job Seeker's permissions.
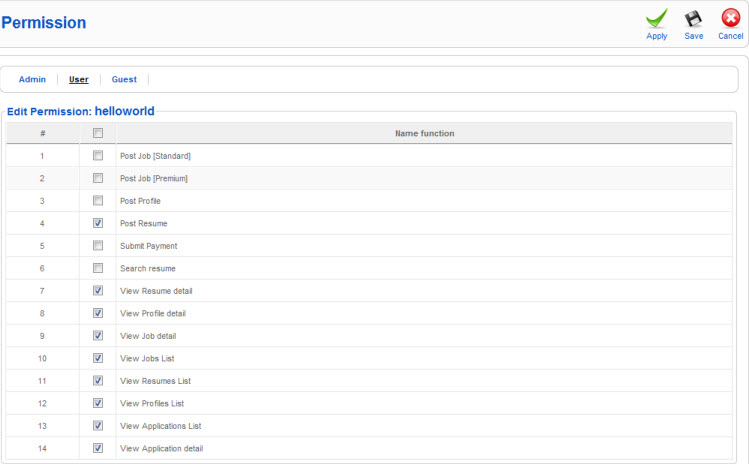
Employer's permissions.

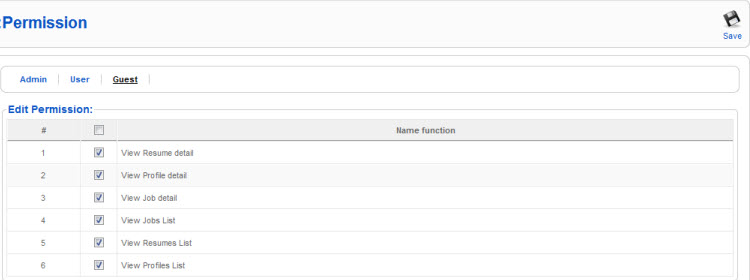
Guest
Guest users are anonymous users who do not register with Job Board. Guests are considered as anonymous Job Seekers who are given permissions to search jobs, send application without registration yet. These default settings could be changed within a few clicks.
Guest user permissions.
Available permissions in the system.
- View profile details: view the Profile details page
- View profile list: view the profile list page
- View resume details: view the resume details page
- View resume list: view the resume list page
- View job details: view the job details page
- View job list: view the job list page
- Apply job: set whether to apply job by Application form
Global Setting
System Config
System config is all the settings that relate to Job Board's operations.
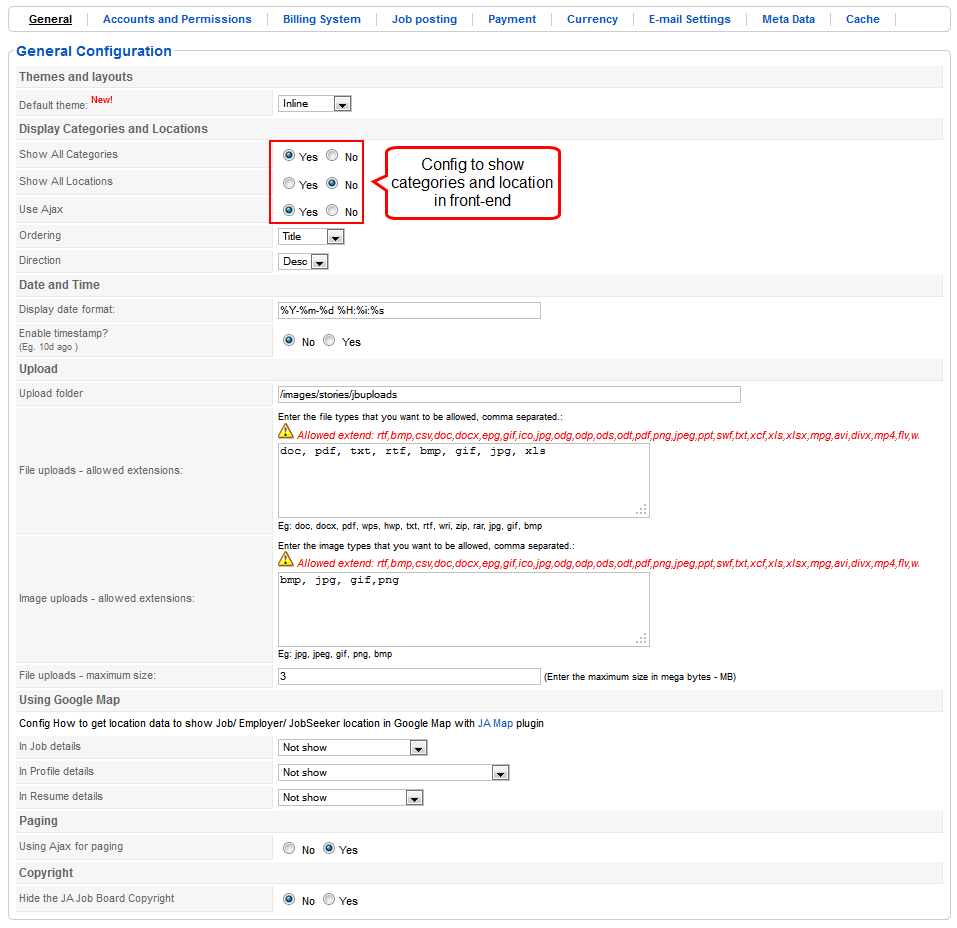
General
General configuration section let you change NEW jobs list theme, display of date format, allow resume file extensions that can be uploaded, allow image file extensions can be uploaded, allow maximum size of upload file.
 Details Configuration
- Default theme: theme is used for the following pages in front-end: job/profiles/resumes listing
- Show all Categories: select to display all categories or not in search form and filter form
- Show all Locations: select to display all locations or not in search form and filter form
- Use AJAX: select whether to use AJAX to load categories/locations
- Display date format: format of date.
- Enable TimeStamp: display date with the timestamp format (1 day ago, 2 days ago…)
- Upload Folder: file that stores the file uploaded to the JA Jobboard.
- File upload – Allowed extensions: file types that are allowed to upload to server.
- Image upload – Allowed extensions: image file types that are allowed to upload to server.
- File upload – maximum size: maximum size of file to be uploaded to server.
- Using Google Map: select whether to display map in the job/resume/profile details pages. If displaying map --> map is displayed from which field.
Example: For the Job detail page, map should get data and display in the Job Location field. Note: JA Map plugin must be installed and enabled
- Using Ajax for paging: using ajax when changing pages within the pages: job/profile/resume listing.
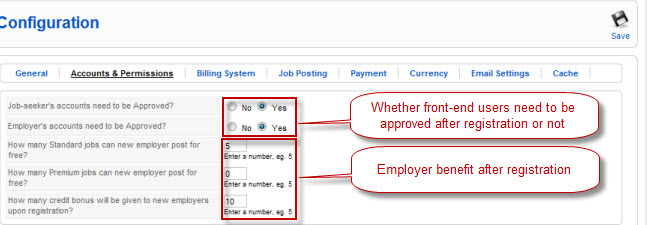
Accounts & Permissions
This section determines whether front-end users need to be approved or not, how many standard jobs and premium jobs a new employer can post for free, how many credit bonus will be given to new employers upon registration.
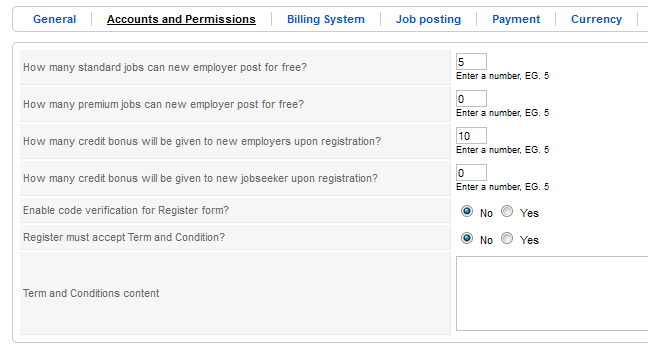 Configuration details
- How many standard jobs can new employer post for free: when an Employer register, this is the number of jobs that they can post without paying fees.
- How many premium jobs can new employer post for free: when an Employer register, this is the number of premium jobs that they can post without paying fees.
- How many credit bonus will be given to new employers upon registration: when an Employer register, this is the number of credits that they have as default in their account.
- How many credit bonus will be given to new jobseeker upon registration: when an JobSeeker register, this is the number of credits that they have as default in their account.
- Enable code verification for Register Form: allows to display Captcha image in registration form when JobSeeker or Employer register --> prevent spam users.
- Register must accept Term and Condition: this one allows to display Term and Condition in registration form when JobSeeker or Employer register
Billing System
This section determines whether to charge employer on job post, on resume browsing or not, whether to charge registration of front-end user or not.
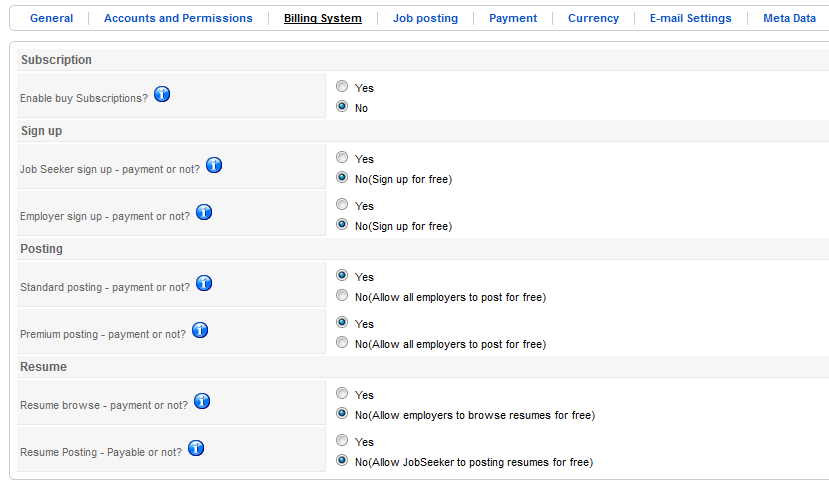
Detail of configuration
- Enable to buy Subscriptions: allows to buy subscription package. When selecting this option --> changes as below
- From front-end, when registering Employer/JobSeerker, they can select subscription packages to register. After registering, they have to pay the amount for the subscription and they can use the system in the duration as the provision of the subscription.
- When Employer/JobSeeker is using functions in the system, they can buy more subscriptions. After buying, the duration to use the system, permissions,... will be added to the account of Employer/JobSeeker
- JobSeeker Signup:If selecting to pay, JobSeeker will have to pay the amount of money of the selected Subscription to register.
- Employer Signup:If selecting to pay, Employer will have to pay the amount of money of the selected Subscription to register.
- Standard Posting:If selecting to pay, Employer will have to buy packages to get the permission to post standard jobs.
- Premium Posting:If selecting to pay, Employer will have to buy packages to get the permission to post premium jobs.
- Resume Browse:If selecting to pay, Employer will have to buy Resume package to get the permission to search for Resume in a specific duration.
- Resume Posting:If selecting to pay, JobSeeker will have to buy Post package to get the permission to post their own Resume in a specific duration.
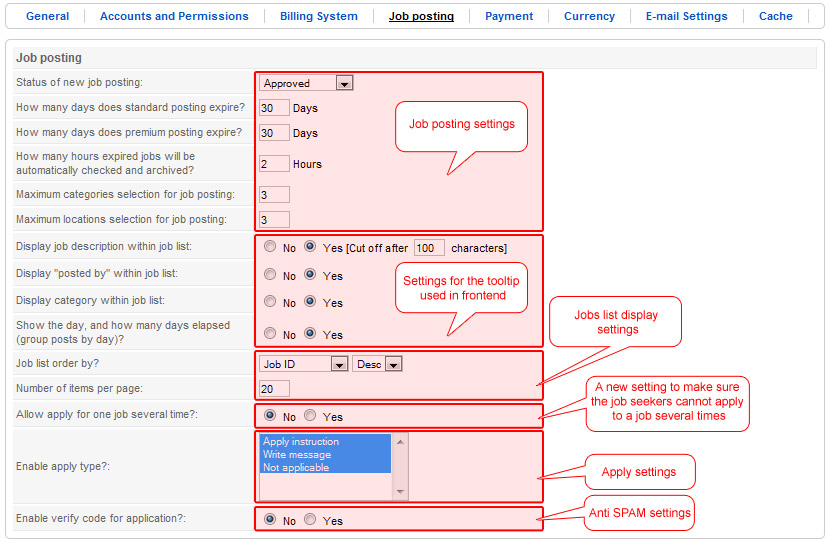
Job Posting
Job Posting determines how Job Board handles job posting and job displaying.
 User General config for posting expire:
- Yes: after Employer posts job, the available duration of the job in the system before expiry is configured in the same way with other posted jobs.
- No: after Employer posts job, the available duration of the job in the system before expiry is based on the Package that the Employer bought to post the job.
- Example: After selecting "No", the Package Manager will have a parameter named: "Expired days" for Standard posting package and Premium posting package. The available duration of the job will depend on the package that the Employer bought. Employer can buy more packages to extend the available duration.
- How many days does standard posting expire: the available duration of Standard job.
- How many days does premium posting expire: the available duration of Premium job.
- How many hours will expired jobs be automatically checked and archived: auto check and archive the expired jobs (in hours).
- Maximum categories selection for job posting: maximum number of categories that can be selected in the Post Job Form.
- Maximum locations selection for job posting: maximum number of locations that can be selected in the Post Job Form.
- Display job description within job list: description of job displayed in job list.
- Display "posted by" within job list: information of Employer who post job (image, name) in the job list.
- Display category within job list: information of category displayed in job list.
- Display Location within job list: information of Location displayed in job list.
- Show the Day, and how many days elapsed(Group posts by day): information of date displayed in job list.
- Number of items per page: number of items displayed per page.
- Allow user to apply for one job several times: allow JobSeeker to apply for one job many times.
- Enable apply type: types of Apply job that Employer can select in the Post Job Form.
- Enable Code verification for application: display captchia image in the Application Form.
Payment
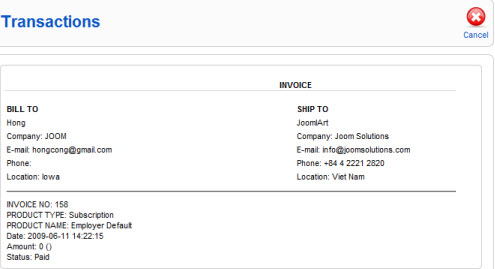
This section sets Job Board payment contact information and the default payment method, for now, there is only one payment method. Payment contact information will be display on the Ship to section in the transactions invoice.
This section has the following settings.
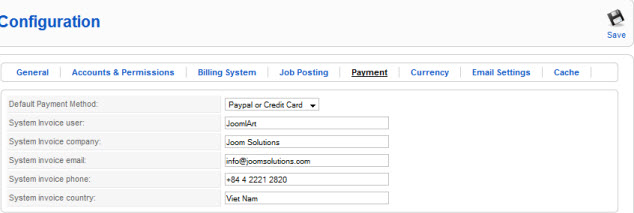 Main Information
- Default payment method: the default method of payment. When Employer selects to buy a package, they will be moved to Confirm page and select Payment Method with Default Payment Method. Payment methods are also managed in Admin.
- System Invoice User: the username displayed in the invoice.
- System Invoice Company: the company name displayed in the invoice
- System Invoice Mail: Mail address displayed in the invoice
- System Invoice Phone: Phone number displayed in the invoice
- System Invoice Country: Country name in displayed the invoice
Payment information on transaction invoice.
Currency
This section determines whether user pays real money to Job Board or user has to buy credit package for payment, this section also determines the currency in use on Job Board.
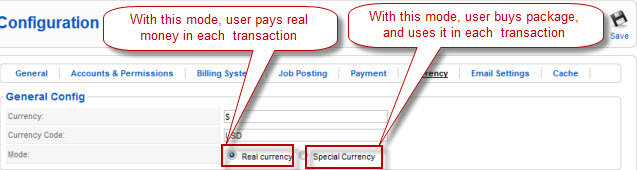 This one is to configure to use real currency or special currency.
- If using real currency, all the value of Price fields will be displayed in real currency --> on the front-end, the buying credit function will not be supported any more.
- If using special currency, all the value of Price fields will be displayed in virtual currency --> on the front-end, user can buy credit with real currency. User can buy credit many times to accumulate credit, using the credit to buy package in the system.
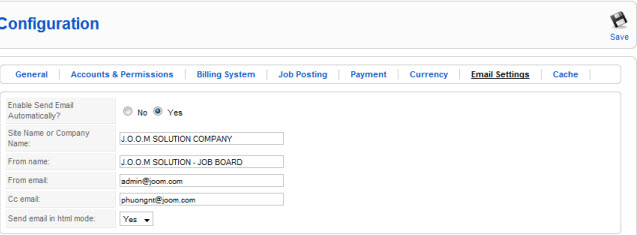
Email Settings
This section enables or disables Job Board to send email automatically, this section also sets Job Board email information that will be display in sent emails and format of sent emails.
 Main Information
- Enable Send Email Function: allow sending email in the system. If it is disabled, all emails when Jobboard works will be disabled as well.
- Site name or company name: name of site or company.
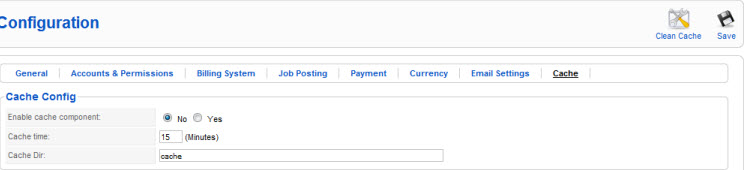
Cache
This section determines whether some user operations will be cached or not, how long caching will be expired in minutes and the directory for caching.
Meta Data
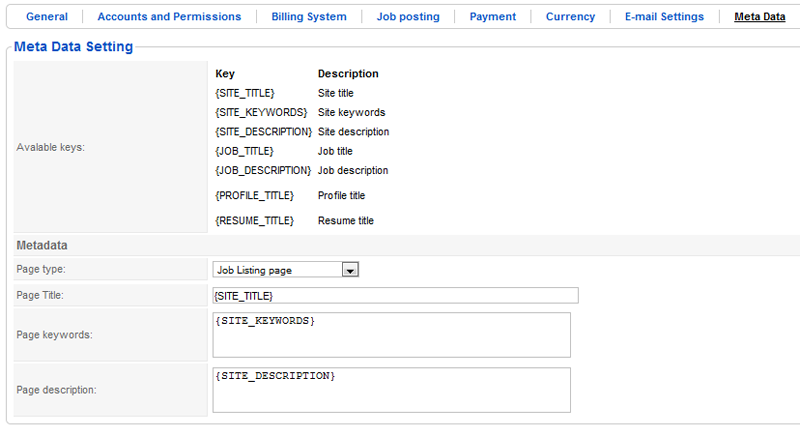 This part allows to manage Metadata tag in specific pages: job/profile/resume lising/details.
With each page, user can set title for the page, keywords, description. Additionally, it also allows to use other system parameters.
This part allows to manage Metadata tag in specific pages: job/profile/resume lising/details.
With each page, user can set title for the page, keywords, description. Additionally, it also allows to use other system parameters.
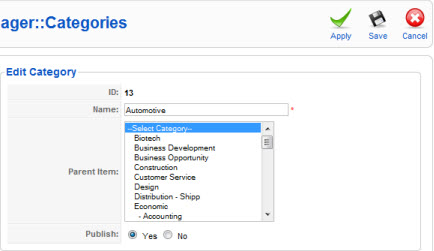
Categories
Category is field in which job belongs to. You can create new, edit, delete, publish, unpublish category easily. Note: If you delete or unpublish one category, its child categories also will be deleted or unpublished.

Each category has properties like the following.
Import categories:
Supporting to import categories from XML file that has structure as shown below.

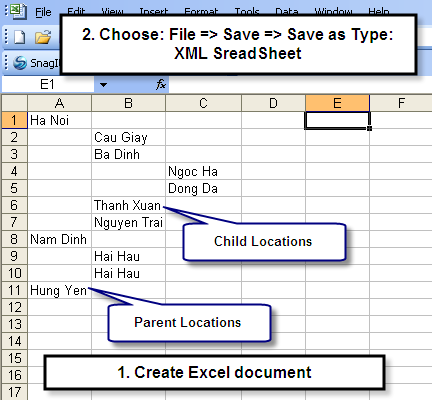 Steps to create new XML SpeadSheet.
1. Create new excel document
2. Input values with the structure as shown in the image above
3. Select: File – Save – Save as Type: XML SpreadSeet
4. Select the saved file to upload.
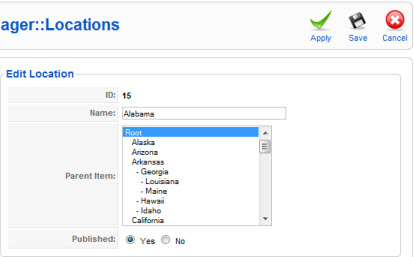
Locations
Location is place where employee will works. Note: If you delete or unpublish one location, its child locations also will be deleted or unpublished.
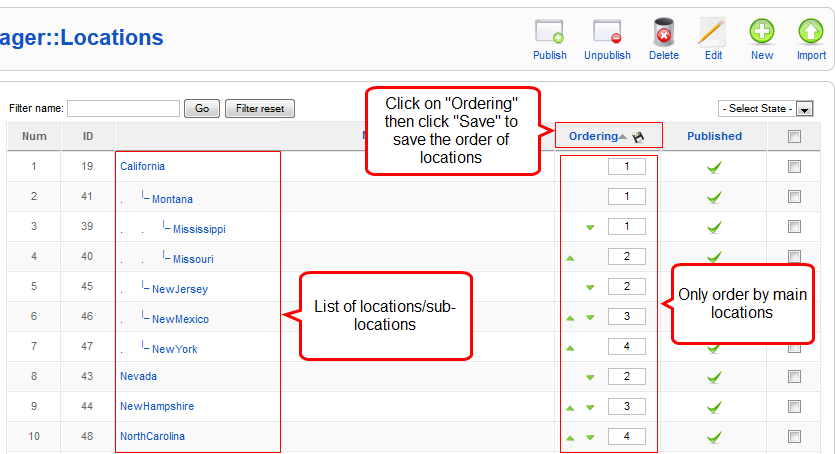
Each location has properties like the following.
Import categories:
Supporting to import location from XML file that has structure as shown below.
Steps to create new XML SpeadSheet.
5. Create new excel document
6. Input values with the structure as shown in the image above
7. Select: File – Save – Save as Type: XML SpreadSeet
8. Select the saved file to upload.
Feeds
Feed is a great way to subscribe new jobs to job seeker.
Each feed has settings like the following.
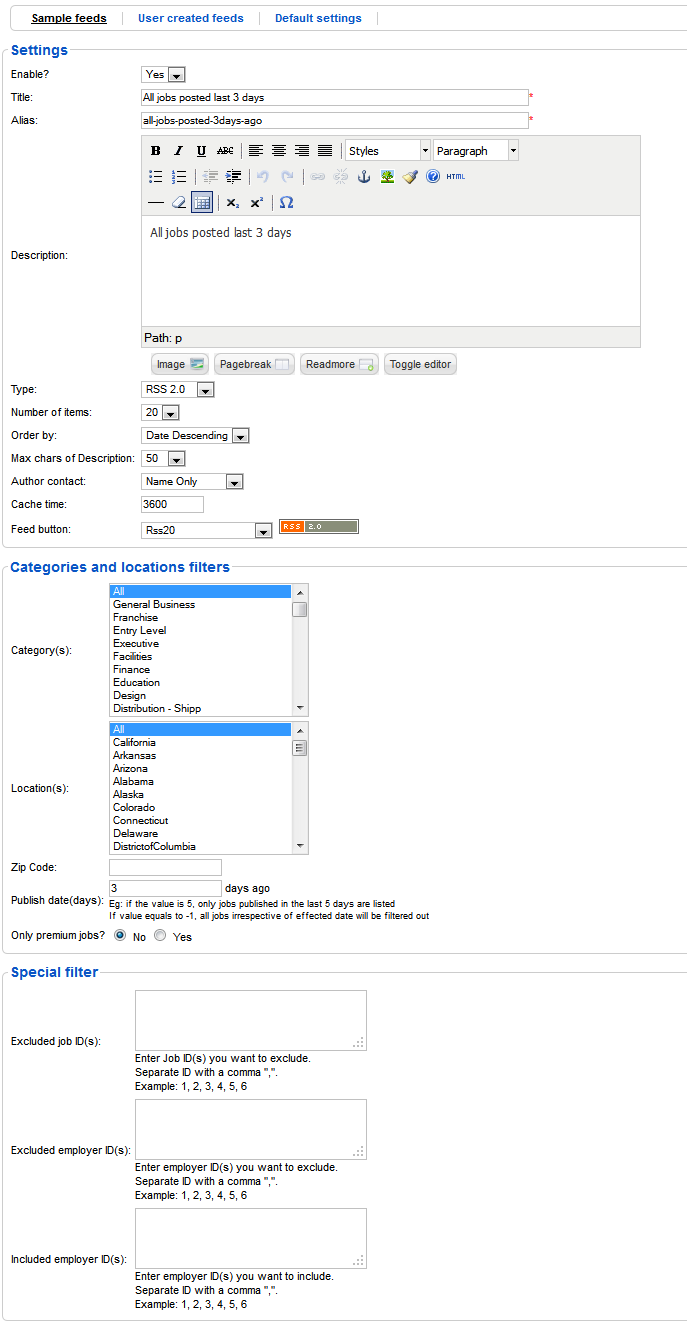
Sample feeds
You can create feeds for all job seeker users, these feeds will be displayed on this section and on job seeker's RSS Feed screen.
User created feeds
Job seeker users can also create their feeds, Job Board administrators can view these feeds on this section. Note that job seeker users can only create feed, they can not edit or delete feeds.
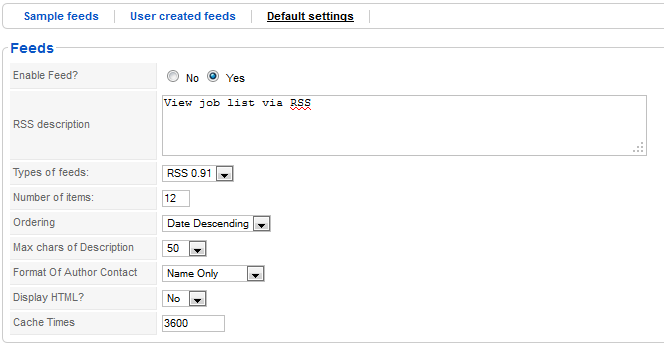
Default settings
This section sets the default values for user created feed.
Default settings.
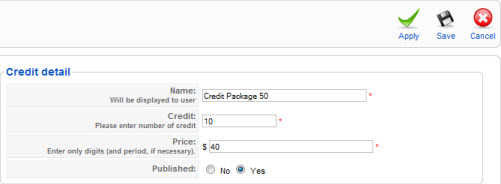
Credits
Credit package is Job Board currency package that employer can buy. Each employer has a credits balance, if you set Job Board to use special currency, then employer uses this credits balance to pay for employer's transactions. Each credit package has properties like the following.
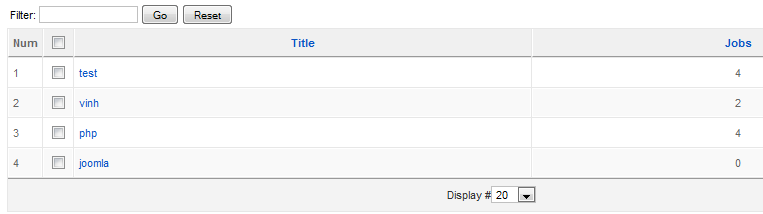
Tags
- This part is to manage tags in the system.You can create, edit, delete tags. Number of jobs in each tag is also stored in this part to support module JAJobsTags module to display on front-end.
- When Add/Edit jobs, tags and number of jobs in each tag will be updated automatically to this table.
Payment Setting
This section allows you install new payment, delete an existing payment. To install new payment, you have to create a php file like paypal.php under components\com_jajobbord\asset\payments folder, then on payment new payment page, browse that file to install.
Coupon Setting
- This part is to manage coupon ID for user when execute transaction of package in the system. When user has the coupon ID, they can use to get discount when they buy Packages.
- Add new coupon.
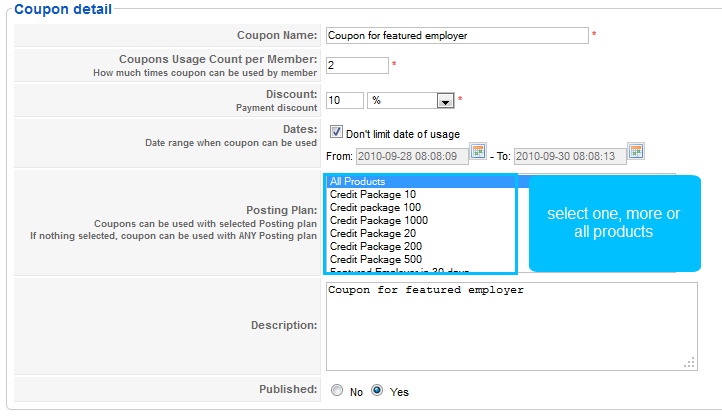 Some Important Parameters
- Coupon count: number of coupon key will be created.
- Coupons Usage Count: number of times that one coupon can be used.
- Code Length: the length of the coupon key.
- Coupons Usage Count Per Member: number of coupons that one person can use.
- Discount: the amount or % of discount when using the coupon.
- Date: the available duration to use the coupon keys.
- Posting plans: Packages that the coupon keys are available for.
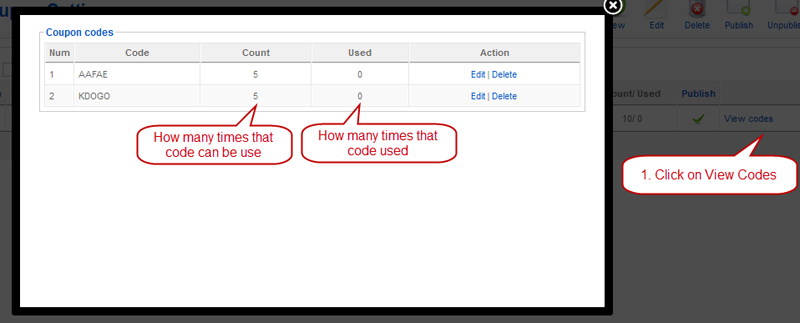
List of created coupon keys
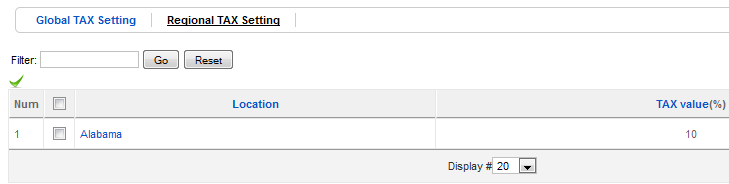
Tax Setting
When Employer buy packages in the system, they can have TAX weighted.
Note: When users have many locations and buy packages --> it will get the max tax value from user's locations.
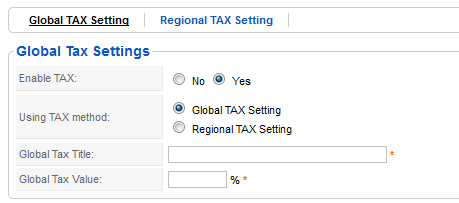
This part allows to configure to enable TAX for Package or not. For the settings of each Package, it has TAX setting parameter --> set TAX for specific packages.
There are 2 ways to count TAX.
- Global TAX: TAX is applied for all package.
- Regional TAX: TAX is applied for each Location of the Employer. ( If using this way, user should configure for Employer to depend on one Location only)
 When select Regional TAX, you have to set TAX information for each Location.
Design and Customization
Language customization
You can add another language, change displaying text on front-end and back-end pages.
Add another language
To add another language, first install the language that you want to add for Joomla, then go to customize language page, select the language that you have installed, that language file will open, this file contains key-value pairs with values in English, change value of each key to your language.
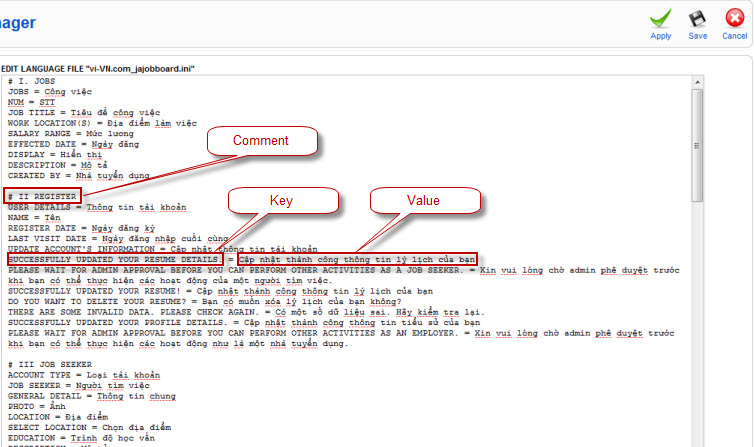
Change text
To change text on Job Board, you can edit value of the corresponding key on the language file like add another language section above.
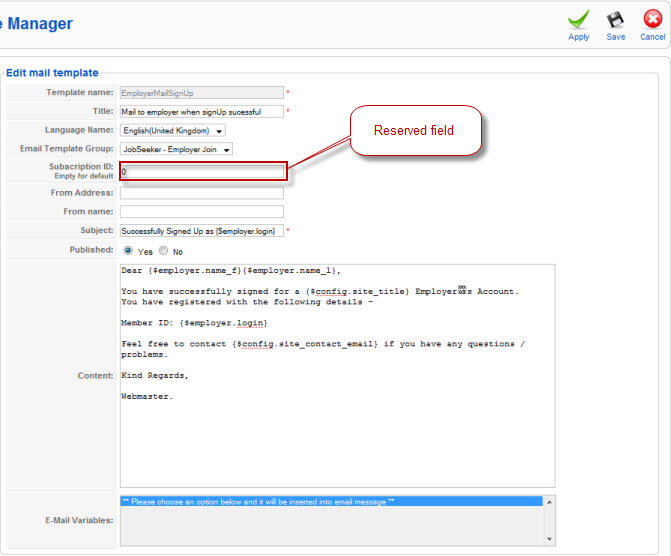
Email Template
This page let you manage email templates that is sent to front-end users automatically by Job Board. With each Job Board language, there is an email templates set. Job Board maps the event that need to send email with the template name. The language that Job Board will send email depend on language of the user that has the event occur. On this page, you can edit, create new, delete, publish, unpublish, import, export, copy to another language easily. To add email in another language you can use copy to to copy email in one language to another language, then edit the copied email template. You also can export email template, edit it, then import it to another language.
Each email template has information like the following.
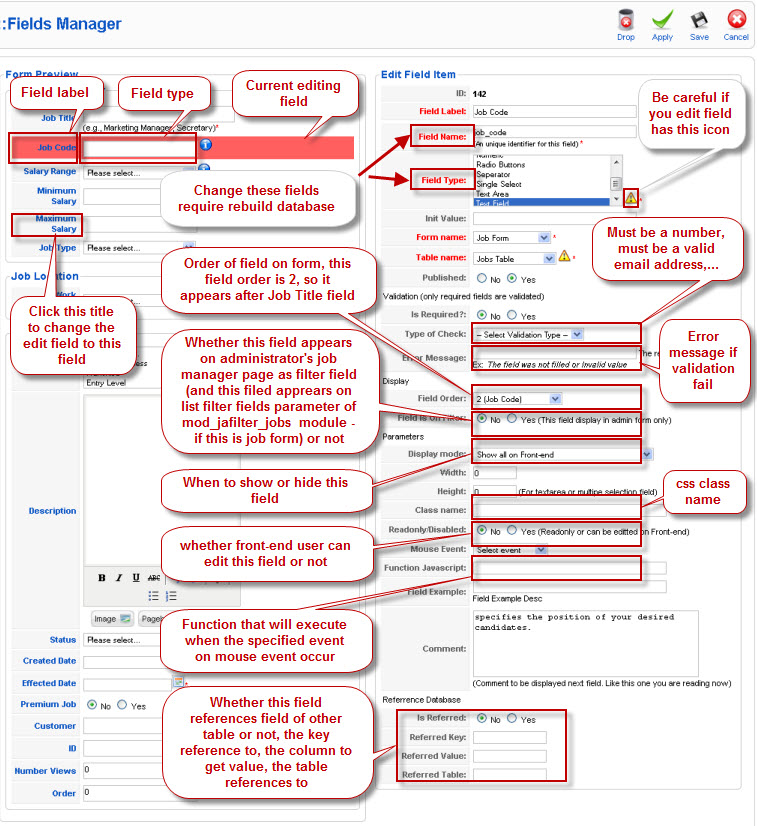
Forms customization
This page allows you to customize html forms used for collecting users'information, including:
- Job form
- Profile form
- Resume form
- Application form
You can customize form by adding, removing or editing fields of form, thus changing html control or field's data validation type. However, field name and field type and table name of system fields can not be edited. If you change field name or field type or table name or create a new field, you have to Rebuild database to take affect.
Each field has properties like the following.
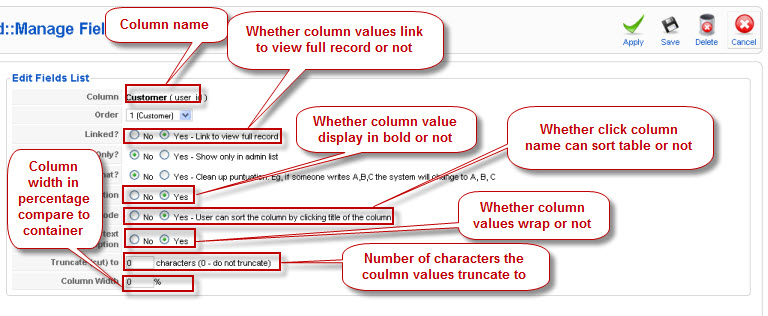
Field Lists customization
This page allows you to customize which column of tables display on screen. Each table's field is displayed as a table's column. There are four tables, they are job table, profile table, resume table, application table. You can customize these tables by add, remove, edit columns that will display.
Each field has properties like the following.
Layout customization
If you want to customize Job Board frontend interfaces you can do it by customize the layouts. Job Board comes with a built in code editor, so please refer to our designated documentation section to learn more how to customize the frontend layouts.
CSS customization
If you want to change Job Board interface's color, you can do it by customize CSS files. For now, you can only edit table, detail page and tooltip. To edit more, you should change the css source code files using the built in editor. For more information on how to customize the Job Board CSS file, please refer to this documentation section.
Import-Export XML job data
Import job data
This option supports to import job data from different XML Data source, called Feed.
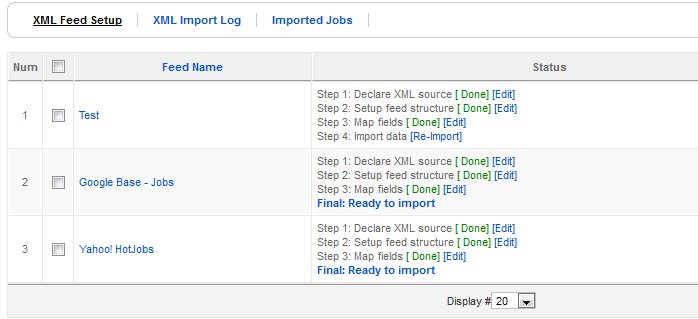
The Importing job data management section, there is some main parts:
- XML Feed Setup: list all XML data source.
- XML Import log: log the job importing process from XML file.
- Imported Jobs: list of jobs imported from XML file.
For each Feed, there are 4 steps to import job from the Feed.
- Step 1: define XML data source, source where the XML file get from.
- Step 2: Define the XML structure, which element in the structure of the XML file define the start of 1 job item.
- Step 3: Mapping fields.
- Step 4: importing job.
 Step 1: define XML data source
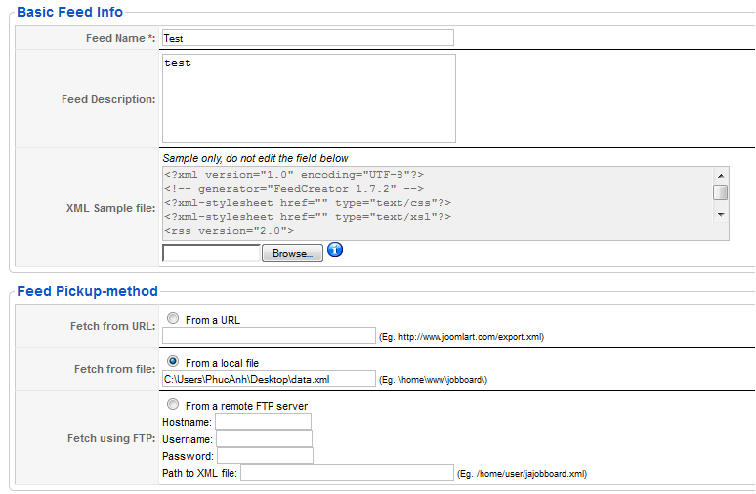 Some Notes
- XML sample file: sample XML File. The main aim of the file is to check the structure of the XML file --> define source for the next steps.
Example:
- Feed Pickup Method: method to get XML file, there can be 3 different sources: from an URL, from one file on your host, from an URL but using FTP account to get.
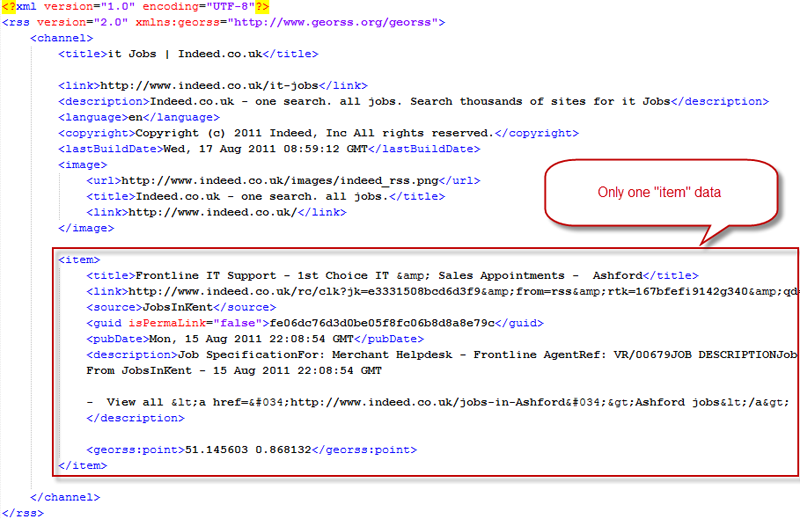
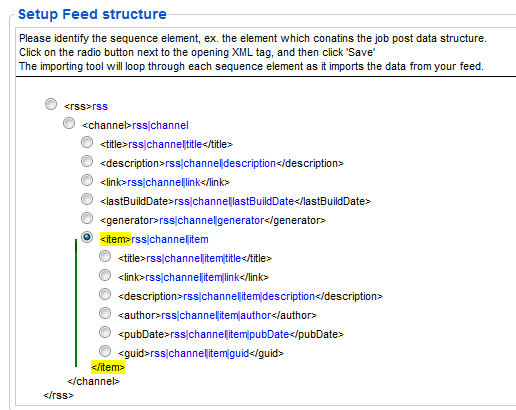
Step 2: define structure of XML file
From sample XML file in the Step 1, this step will model tags in the XML file to define item that contains data of job in the XML file. For example, in the image below, you have to select "item"
Step 3: Mapping fields
Account Option: which source that Employer account with each job imported to the system get.
Map jon fields to the XML attributes:
- Job identifier: with the XML source, which field will be used to distinguish jobs.
- For the text fields, system allows:
- Validate data: validate data in the XML file
- Ignore field and replace with: Import with the default data.
- For the category fields, when data is not found, system allows:
- Using default data.
- Using "not found data" is new data.
- Using data from other source to get data.
Export job data
This option supports to export job data to the XML file with the own defined structure.
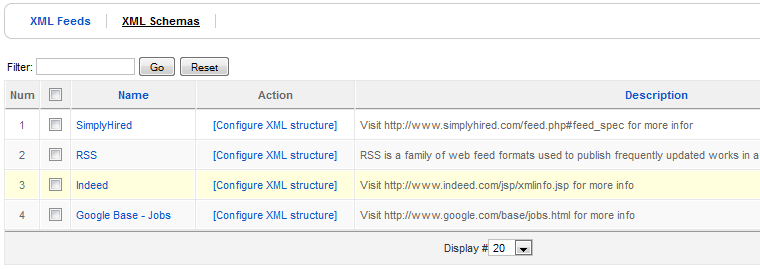
- XML Feeds: Feeds exported with a certain schema.
- XML Schemas: structure of XML file.
- Imported Jobs: list of jobs imported from XML file.
--> To export job data, firstly, define and build structure of XML file by using Tab: XML Schemas.
 Building new structure for XML file is quite simple. After creating new structure, with a name and description, we can start to building structure for XML file by clicking on the link: Configure XML structure
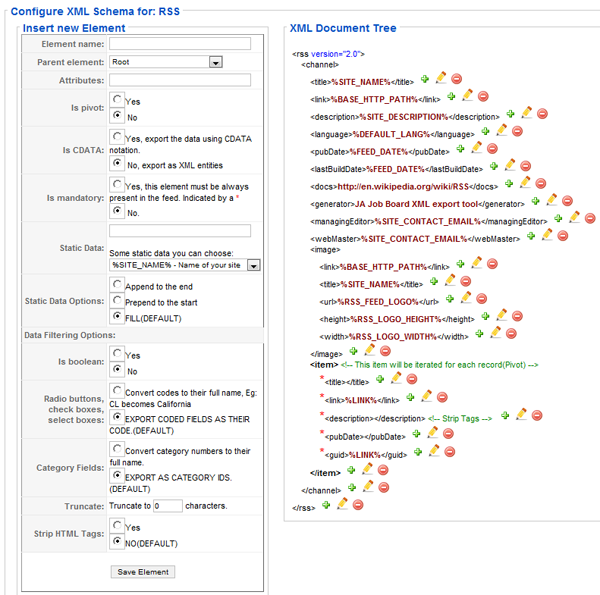 From the image above, the left column displays a form to add, edit elements in a XML file. Detail information of an element in the XML file.
- Element name: name of element.
- Parent Element: parent of element.
- Attribute: attribute of element. Example: <item name=”itemJob”> --> attribute is: name=”itemJob”.
- Is pivot: Item is to define child items that contain job data.
- Is CDATA:
- Is mandatory: Element must not be null.
- Static Data: static data for element.
- Static data option: where the static data is added?
- Is Boolean: data exported to Boolean type.
- Truncate: limitation of characters.
- Strip HTML Tags: remove HTML tags from data.
The right column shows the structure of XML file, each element has icon:
- Add new child element.
- Edit the element.
- Delete element.
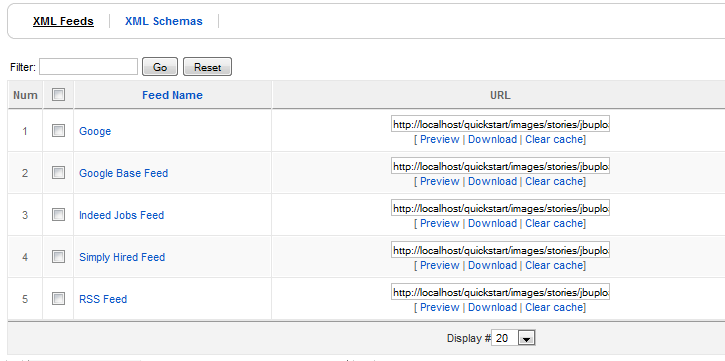
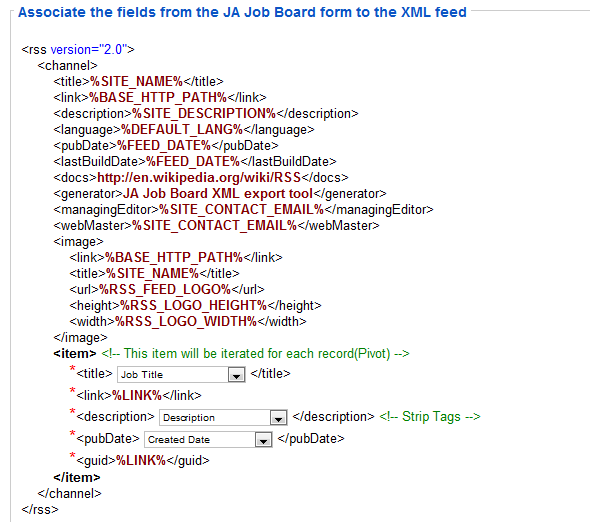
After you have XML Schemas, structure of XML file, we can export data through job data with the defined format above.
Each Feed column is exported to a format (schemas), you can:
- Preview: preview XML file in new tab
- Download: download XML file
- Clear cache: delete old XML file and create new file.
Create new Feed.
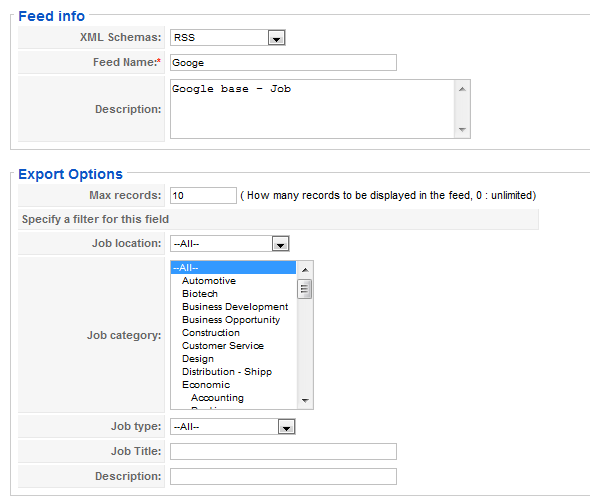
 Some information that you should pay attention to:
- XML Schema: schemas, structure of XML file that you intend to export, defined before.
- Max records: number of jobs exported to XML file.
- Job location: export jobs from selected location.
- Job category: export jobs from selected category.
- Job Type: export jobs from selected type.
- Job title, description: filter title, description of jobs.
Import Joomla Users
- When Joomla system has a certain number of users, they have to login from front-end and upgrade their accounts to become Employer/JobSeeker in JAJobBoard.
- This option allows Admin to import users in the system to Employer/JobSeeker in JAJobBoard.
- Note: system supports to import users from all groups except the following groups: Public BackEnd, Manager, Administrator, Super Administrator and users are Employer/JobSeeker trong JAJobBoard already.
- To import user, click on user in the user list then click on the button: Import as JobSeeker or Import as Employer
