

-
AuthorPosts
-
Hung Dinh Friend
Hung Dinh
- Join date:
- September 2014
- Posts:
- 4408
- Downloads:
- 11
- Uploads:
- 189
- Thanks:
- 309
- Thanked:
- 3310 times in 3 posts
February 3, 2010 at 11:21 am #147445JA Zeolite II- Userguide
A. Quickstart Installation(Recommended for Joomla Beginners)Quickstart Installation Guideline.
B. Template & Extensions installation
I. Install template- JA Zeolite II Template Installation and Configuration
- Configure JA Megamenu – New to JA Mega Menu, see more here: Introduction on JA Mega Menu
- iPhone + Handheld device setting
II. Install Extensions
1. We might use the same extension for different templates to enrich the functionality aspects, normally position defined for each extension varies across the templates. When following guides below, please make sure to update module positions if you see any difference.- JA Slideshow 1.0.0
- JA Content scroll
- JA Menu Parameters Plugin (view our detailed guideline for plugin HERE)
2. VirtueMart is an Open Source E-Commerce solution (a Component or Plug-in) for the Joomla! and Mambo Content Management Systems. It can be run as a Shopping Cart, or in Catalog mode.
3. In JA Zeolite II, default positions of those modules are:Note: [xx] stands for module position
- [ja-slideshow] JA Slideshow module
- [ja-slider] JA Content scroll module
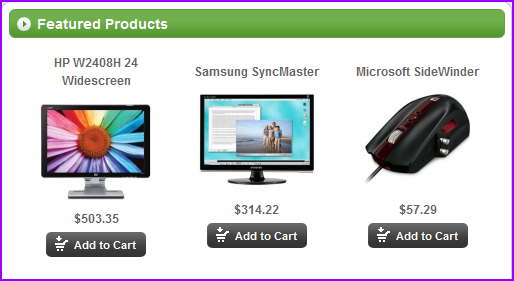
Note: JA Zeolite II uses mod_virtuemart_featureproduct module in position: vm-fp. You can see in Feature Product in Front-page as below:
III. What’s new in JA Zeolite II:
The JA Zeolite II bases on JoomlArt’s stable T3 Framework. If you are new to us, the following wiki provides in more details:- Overview – Downloads – Release Notes
- User & Developer Guides
- FAQs – How to customize T3
- Mega Menu – A missing menu system for Joomla!
- Sample & Showcase
III. TYPOGRAPHY
JA Zeolite II came with a rich typography to give users more ability to customize content look and feel. Please check all JA Zeolite II typography here at JA Zeolite II Typography
IV. Tips to create modules like our demo:
(1) JA Slideshow Module:
JA SlideShow on front-page: (at position: ja-slideshow): To manage this module, select Extensions >> Module Manager, then click module name, (i.e. Popular Entries). In configuration page, you set the suffix and parameters as you wish:
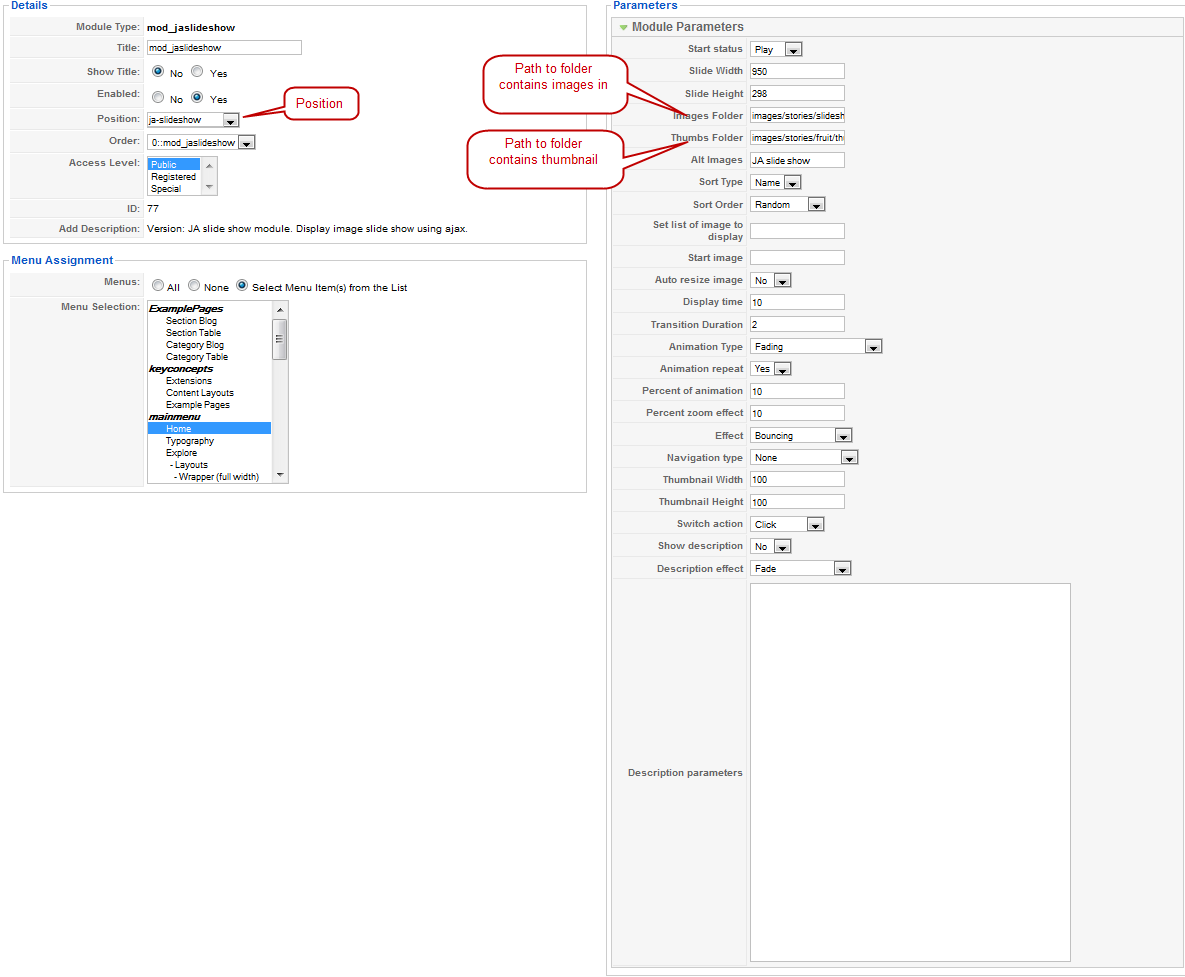
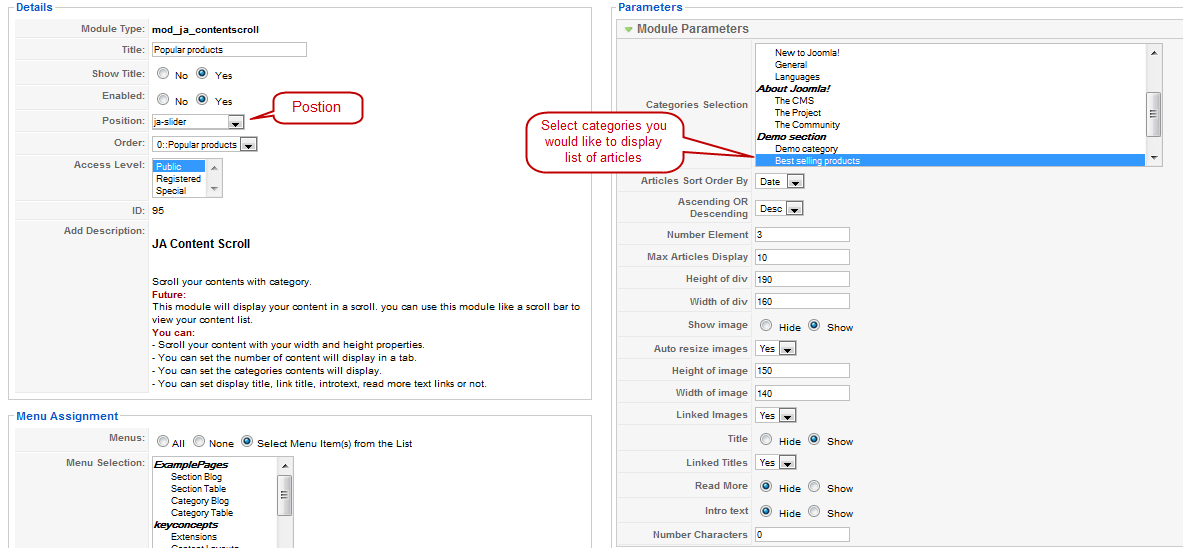
(2) JA Content Scroll Module:JA Content Scroll on front-page: (at position: ja-slider):
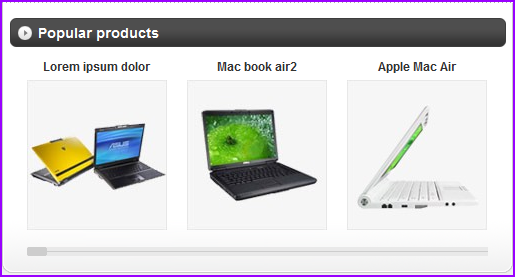
To manage this module, select Extensions >> Module Manager, then click module name, (i.e. Popular Products). In configuration page, you set the suffix and parameters as you wish:
[/LEFT]
April 12, 2010 at 5:20 pm #340105The typography page references the Purity template. Do you have a PDF or updated instructions on all the different typography classes are available in Zeolite II?
Also it appears that of the typography doesn’t work in IE and FF such as the star class list.
This is a sample Star List. Use <ul class=”star”><li><span class=”icon”> </span>List’s content goes here!</li></ul> This is a sample Star List.
Thank you.
Rich
Saguaros Moderator
Saguaros
- Join date:
- September 2014
- Posts:
- 31405
- Downloads:
- 237
- Uploads:
- 471
- Thanks:
- 845
- Thanked:
- 5346 times in 4964 posts
April 13, 2010 at 4:06 am #340169Dear Rich
Here is the user-guide of the typo, it always builds in the data sample.
http://templates.joomlart.com/ja_zeolite_ii/index.php?option=com_content&view=article&id=44&Itemid=53
As the demo, all typos are working well. may be your site is having a conflict of css between styles of type with other, if possible give me the link to your site, i would like to have a closer look on the issueThanks
April 13, 2010 at 1:00 pm #340224http://www.enterprisebcp.com/index.php?option=com_content&view=article&id=44&Itemid=53
The stars list does not work in FF or IE.
Thank you.
Saguaros
- Join date:
- September 2014
- Posts:
- 31405
- Downloads:
- 237
- Uploads:
- 471
- Thanks:
- 845
- Thanked:
- 5346 times in 4964 posts
April 23, 2010 at 1:58 am #341273Dear rjwatsoniii!
You are use the old version which have some mistake with the typo, so that you used this wrong guide
Please update content of the typography page by the following code:<p>This page presents most of typographical aspects of JA Purity ii. <span class=”highlight”>Make your readers happy</span> with great Typography and User Experience!</p>
<h1>This is an Heading 1</h1>
<p>Lorem tortor Curabitur urna interdum Maecenas ut felis Sed euismod id. Congue Quisque augue elit dolor nibh id lobortis egestas tristique fringilla. Laoreet elit.</p>
<h2>This is an Heading 2</h2>
<p>Wisi sed pede Phasellus Vestibulum elit consequat consequat eu pellentesque metus. Laoreet Vestibulum pharetra pede mattis nunc dapibus id magna a dictumst.</p>
<h3>This is an Heading 3</h3>
<p>Wisi sed pede Phasellus Vestibulum elit consequat consequat eu pellentesque metus. Laoreet Vestibulum pharetra pede mattis nunc dapibus id magna a dictumst. Nunc cursus sem et pretium sapien eget consectetuer malesuada Phasellus Curabitur.</p>
<h4>This is an Heading 4</h4>
<p>Wisi sed pede Phasellus Vestibulum elit consequat consequat eu pellentesque metus. Laoreet Vestibulum pharetra pede mattis nunc dapibus id magna a dictumst. Nunc cursus sem et pretium sapien eget consectetuer malesuada Phasellus Curabitur.</p>
<h2>Special Content</h2>
<p>Below is a sample of <strong><pre></strong> or <strong><div class=”code”></strong></p>
<pre>#ja-rightcol {<br /> width: 180px;<br /> float: right;<br /> color: #EEEEEE;<br />}<br /></pre>
<p>This is a <span class=”highlight”>highlight phrase</span>. Use <strong><span class=”highlight”>Your highlight phrase goes here!</span></strong>.</p>
<p><span class=”dropcap”>T</span>his is a Magazine Style Drop Cap. The first letter in this paragraph is big. JA Purity II bring into your Jooomla template the magazine drop cap technique and CSS2 includes the first-letter pseudo class. In all fairness to the paragraph itself we probably should type enough to see how it looks when it is surrounded by its textual friends by using more words.</p>
<blockquote><span class=”open”>T</span>his is a sample Blockquote. Use <strong><blockquote>Your quote goes here!</blockquote></strong> to form a quote!</blockquote>
<blockquote><span class=”open”>T</span>his is a sample Blockquote. Use <strong><blockquote><span class=”open”>Y</span>our quote goes her<span class=”close”>e!</span></blockquote></strong> to form a quote<span class=”close”>!</span></blockquote>
<h2>Lists Style</h2>
<div class=”clearfix”>
<div style=”width: 48%; float: left;”><ol>
<li>This is a sample <strong>Ordered List</strong>.</li>
<li>Lorem ipsum dolor sit amet consectetuer.</li>
<li>Condimentum quis.</li>
<li>Congue Quisque augue elit dolor nibh.</li>
</ol></div>
<div style=”width: 48%; float: right;”>
<ul>
<li>This is a sample <strong>Unordered List</strong>.</li>
<li>Condimentum quis.</li>
<li>Lorem ipsum dolor sit amet consectetuer.</li>
<li>Congue Quisque augue elit dolor nibh.</li>
</ul>
</div>
</div>
<div class=”clearfix”>
<div style=”width: 48%; float: left;”>
<ul class=”arrow”>
<li><span class=”icon”> </span>This is a sample <strong>Arrow list</strong>.</li>
<li><span class=”icon”> </span>Use <strong><ul class=”arrow”><li><span class=”icon”> </span>List’s content goes here!</li></ul></strong></li>
<li><span class=”icon”> </span>This is a sample Checklist.</li>
</ul>
<ul class=”star”>
<li><span class=”icon”> </span>This is a sample <strong>Star List</strong>.</li>
<li><span class=”icon”> </span>Use <strong><ul class=”star”><li><span class=”icon”> </span>List’s content goes here!</li></ul></strong></li>
<li><span class=”icon”> </span>This is a sample Star List.</li>
</ul>
<ul class=”checklist”>
<li><span class=”icon”> </span>This is a sample <strong>Checklist</strong>.</li>
<li><span class=”icon”> </span>Use <strong><ul class=”checklist”><li><span class=”icon”> </span>List’s content goes here!</li></ul></strong></li>
<li><span class=”icon”> </span>This is a sample Checklist.</li>
</ul>
</div>
<div style=”width: 48%; float: right;”>
<ul class=”phone”>
<li><span class=”icon”> </span>This is a sample <strong>Phone List</strong>.</li>
<li><span class=”icon”> </span>Use <strong><ul class=”phone”><li><span class=”icon”> </span>List’s content goes here!</li></ul></strong></li>
<li><span class=”icon”> </span>This is a sample Phone List.</li>
</ul>
<ul class=”address”>
<li><span class=”icon”> </span>This is a sample <strong>Address List</strong>.</li>
<li><span class=”icon”> </span>Use <strong><ul class=”address”><li><span class=”icon”> </span>List’s content goes here!</li></ul></strong></li>
<li><span class=”icon”> </span>This is a sample Address List.</li>
</ul>
<ul class=”email”>
<li><span class=”icon”> </span>This is a sample <strong>Email List</strong>.</li>
<li><span class=”icon”> </span>Use <strong><ul class=”email”><li><span class=”icon”> </span>List’s content goes here!</li></ul></strong></li>
<li><span class=”icon”> </span>This is a sample Email List.</li>
</ul>
</div>
</div>
<p class=”blocknumber”><span class=”bignumber-1″>01</span>This is a sample block number. Use <strong><p class=”blocknumber-1″><span class=”bignumber”>01.</span>Your content goes here!</p></strong> to form a block number!</p>
<p class=”blocknumber”><span class=”bignumber-1″>02</span>This is a sample block number. Use <strong><p class=”blocknumber-1″><span class=”bignumber”>02.</span>Your content goes here!</p></strong> to form a block number!</p>
<p class=”blocknumber”><span class=”bignumber-1″>03</span>This is a sample block number. Use <strong><p class=”blocknumber-1″><span class=”bignumber”>03.</span>Your content goes here!</p></strong> to form a block number!</p>
<p class=”blocknumber”><span class=”bignumber-2″>01</span>This is a sample block number. Use <strong><p class=”blocknumber-2″><span class=”bignumber”>01.</span>Your content goes here!</p></strong> to form a block number!</p>
<p class=”blocknumber”><span class=”bignumber-2″>02</span>This is a sample block number. Use <strong><p class=”blocknumber-2″><span class=”bignumber”>02.</span>Your content goes here!</p></strong> to form a block number!</p>
<p class=”blocknumber”><span class=”bignumber-2″>03</span>This is a sample block number. Use <strong><p class=”blocknumber-2″><span class=”bignumber”>03.</span>Your content goes here!</p></strong> to form a block number!</p>
<p class=”blocknumber”><span class=”bignumber-3″>01</span>This is a sample block number. Use <strong><p class=”blocknumber-3″><span class=”bignumber”>01.</span>Your content goes here!</p></strong> to form a block number!</p>
<p class=”blocknumber”><span class=”bignumber-3″>02</span>This is a sample block number. Use <strong><p class=”blocknumber-3″><span class=”bignumber”>02.</span>Your content goes here!</p></strong> to form a block number!</p>
<p class=”blocknumber”><span class=”bignumber-3″>03</span>This is a sample block number. Use <strong><p class=”blocknumber-3″><span class=”bignumber”>03.</span>Your content goes here!</p></strong> to form a block number!</p>
<h2 style=”margin: 0;”>Paragraph Style</h2>
<div class=”clearfix” style=”margin-bottom: 20px;”>
<div style=”width: 48%; float: left;”>
<p class=”error”><span class=”icon”> </span>Use <strong><p class=”error”><span class=”icon”> </span>Your message goes here!</p></strong> to make this.</p>
<p class=”message”><span class=”icon”> </span>Use <strong><p class=”message”><span class=”icon”> </span>Your message goes here!</p></strong> to make this.</p>
<p class=”tips”><span class=”icon”> </span>Use <strong><p class=”tips”><span class=”icon”> </span>Your message goes here!</p></strong> to make this.</p>
<p class=”key”><span class=”icon”> </span>Use <strong><p class=”key”><span class=”icon”> </span>Your message goes here!</p></strong> to make this.</p>
<p class=”tag”><span class=”icon”> </span>Use <strong><p class=”tag”><span class=”icon”> </span>Your message goes here!</p></strong> to make this.</p>
</div>
<div style=”width: 48%; float: right;”>
<p class=”cart”><span class=”icon”> </span>Use <strong><p class=”cart”><span class=”icon”> </span>Your message goes here!</p></strong> to make this.</p>
<p class=”doc”><span class=”icon”> </span>Use <strong><p class=”doc”><span class=”icon”> </span>Your message goes here!</p></strong> to make this.</p>
<p class=”note”><span class=”icon”> </span>Use <strong><p class=”note”><span class=”icon”> </span>Your message goes here!</p></strong> to make this.</p>
<p class=”photo”><span class=”icon”> </span>Use <strong><p class=”photo”><span class=”icon”> </span>Your message goes here!</p></strong> to make this</p>
<p class=”mobi”><span class=”icon”> </span>Use <strong><p class=”mobi”><span class=”icon”> </span>Your message goes here!</p></strong> to make this.</p>
</div>
</div>
<h2>Bubbles</h2>
<div class=”bubble bubble-l1 clearfix”>
<div class=”box-ct”><div class=”bubble <strong>bubble-l1</strong> clearfix”><br /> <div class=”box-ct”><br /> <div class=”box tl”> </div> <div class=”box tr”> </div> <div class=”box bl”> </div> <div class=”box br”> </div> <br /> Buble’s content goes here! <br /> </div> <br /> <span class=”arrow”> </span> <span class=”author”>Put author name here</span><br /> </div></div>
<span class=”arrow”> </span> <span class=”author”>Put author name here</span></div>
<div class=”bubble bubble-l2 clearfix”>
<div class=”box-ct”><div class=”bubble <strong>bubble-l2</strong> clearfix”><br /> <div class=”box-ct”><br /> Bubble’s content goese here!<br /> </div><br /> <span class=”arrow”> </span><br /> <span class=”author”>Put author name here</span><br /> </div></div>
<span class=”arrow”> </span> <span class=”author”>Put author name here</span></div>
<div class=”bubble bubble-d1 clearfix”>
<div class=”box-ct”><div class=”bubble <strong>bubble-d1</strong> clearfix”><br /> <div class=”box-ct”><br /> <div class=”box tl”> </div> <div class=”box tr”> </div> <div class=”box bl”> </div> <div class=”box br”> </div> <br /> Buble’s content goes here! <br /> </div> <br /> <span class=”arrow”> </span> <span class=”author”>Put author name here</span><br /> </div></div>
<span class=”arrow”> </span> <span class=”author”>Put author name here</span></div>
<div class=”bubble bubble-d2 clearfix”>
<div class=”box-ct”><div class=”bubble <strong>bubble-d2</strong> clearfix”><br /> <div class=”box-ct”><br /> Bubble’s content goese here!<br /> </div><br /> <span class=”arrow”> </span><br /> <span class=”author”>Put author name here</span><br /> </div></div>
<span class=”arrow”> </span> <span class=”author”>Put author name here</span></div>
<div class=”bubble bubble-hl1 clearfix”>
<div class=”box-ct”><div class=”bubble <strong>bubble-hl1</strong> clearfix”><br /> <div class=”box-ct”><br /> <div class=”box tl”> </div> <div class=”box tr”> </div> <div class=”box bl”> </div> <div class=”box br”> </div> <br /> Buble’s content goes here! <br /> </div> <br /> <span class=”arrow”> </span> <span class=”author”>Put author name here</span><br /> </div></div>
<span class=”arrow”> </span> <span class=”author”>Put author name here</span></div>
<div class=”bubble bubble-hl2 clearfix”>
<div class=”box-ct”><div class=”bubble <strong>bubble-hl2</strong> clearfix”><br /> <div class=”box-ct”><br /> Bubble’s content goese here!<br /> </div><br /> <span class=”arrow”> </span><br /> <span class=”author”>Put author name here</span><br /> </div></div>
<span class=”arrow”> </span> <span class=”author”>Put author name here</span></div>
<h2>Boxes and Legends Style</h2>
<p class=”box-sticky”>This is a sticky. Use <strong><p class=”box-sticky”>Your clip note goes here!</p></strong> to create a clip note!</p>
<p class=”box-download”>This is a download box. Use <strong><p class=”box-download”>Your download goes here!</p></strong> to create a download box!</p>
<p class=”box-grey”>This is a grey box. Use <strong><p class=”box-grey”>Your content goes here!</p></strong> to create a grey box!</p>
<p class=”box-hilite”>This is a hilite box. Use <strong><p class=”box-hilite”>Your content goes here!</p></strong> to create a hilite box!</p>
<div class=”legend”>
<h3 class=”legend-title”>Legend style</h3>
<p>Use <strong><div class=”legend”><h3 class=”legend-title”>Your title</h3><p></strong>Lorem ipsum dolor sit amet consectetuer at elit augue In lorem. Quis Donec libero at Vivamus mi fringilla neque commodo at vitae. A mauris risus consequat ac egestas netus est Vestibulum Curabitur consectetuer.<strong></p></div></strong></p>
</div>
<div class=”legend-hilite”>
<h3 class=”legend-title”>Legend style highlight</h3>
<p>Use <strong><div class=”legend-hilite”><h3 class=”legend-title”>Your title</h3><p></strong>Lorem ipsum dolor sit amet consectetuer at elit augue In lorem. Quis Donec libero at Vivamus mi fringilla neque commodo at vitae. A mauris risus consequat ac egestas netus est Vestibulum Curabitur consectetuer.<strong></p></div></strong></p>
</div>
<h2>Special Module Style</h2>
<div class=”clearfix”>
<div class=”moduletable moduletable_badge badge-top” style=”border: 1px solid #dddddd; margin: 0pt 0pt 10px; padding: 0pt; width: 45%; float: left;”><span class=”badge”> </span>
<div class=”ja-box-ct”>Use module suffix: <strong>_badge badge-top</strong> to put this badge on any module you like!</div>
</div>
<div class=”moduletable moduletable_default badge-new” style=”border: 1px solid #dddddd; margin: 0pt 0pt 10px; padding: 0pt; width: 45%; float: right;”><span class=”badge”> </span>
<div class=”ja-box-ct”>Use module suffix: <strong>_badge badge-new</strong> to put this badge on any module you like!</div>
</div>
</div>
<div class=”clearfix”>
<div class=”moduletable moduletable_default badge-pick” style=”border: 1px solid #dddddd; margin: 0pt 0pt 10px; padding: 0pt; width: 45%; float: left;”><span class=”badge”> </span>
<div class=”ja-box-ct”>Use module suffix: <strong>_badge badge-pick</strong> to put this badge on any module you like!</div>
</div>
<div class=”moduletable moduletable_default badge-hot” style=”border: 1px solid #dddddd; margin: 0pt 0pt 10px; padding: 0pt; width: 45%; float: right;”><span class=”badge”> </span>
<div class=”ja-box-ct”>Use module suffix: <strong>_badge badge-hot</strong> to put this badge on any module you like!</div>
</div>
</div>April 26, 2010 at 8:35 pm #341688Well I pasted that HTML code but still do not see the ordered lists for stars, nor do I see the phone list, email list or address list. Look down below my page and you will see this in IE 7.
Rich
Saguaros
- Join date:
- September 2014
- Posts:
- 31405
- Downloads:
- 237
- Uploads:
- 471
- Thanks:
- 845
- Thanked:
- 5346 times in 4964 posts
April 27, 2010 at 3:05 pm #341801Dear Rich!
The typography works well on our demo and my site, develop site. can you pls give me the link to your site, i ‘m guessing that some images missing while you uploading the problem to the live site.
June 3, 2010 at 5:15 am #345795Hi there,
I have looked all around this site for a guide on what the available module class suffixes are for Zeolite ii and cannot find anything… can you please provide a list of what module class suffixes are avilable for what positions or point me to where to find this information?
Thanks,
DanteSaguaros
- Join date:
- September 2014
- Posts:
- 31405
- Downloads:
- 237
- Uploads:
- 471
- Thanks:
- 845
- Thanked:
- 5346 times in 4964 posts
 Josh
Friend
Josh
Friend
Josh
- Join date:
- October 2008
- Posts:
- 68
- Downloads:
- 262
- Uploads:
- 11
- Thanks:
- 14
- Thanked:
- 1 times in 1 posts
September 23, 2010 at 6:53 am #356449i’m currently using Zeolite now..
how may i use this class suffix at any other module position? i’ve tried the regular way by adding the _hilite at module class suffix in module manager, but it doesn’t work..
please advise..
January 10, 2011 at 4:52 pm #371145Hello,
I’m new to this, and despite this guide I can’t understand how all this work, too much questions, not enough help / intuitive questions. Thank you !– For these modules : how to assign a different configuration on home than on each page ?
(example : slideshow showing products from the category we’re in)– How to specify Urls for slideshows images ?
– I can’t manage JA Content scroll to display some products, only some articles from a category !
– It is displayed on all pages, how can I make it display only on some pages ? with a different configuration on each page (different products), of course.
– mod_virtuemart_featureproduct module isn’t install with the template, is it normal ? how can I install it ?
– How can I populate automatically some menu items with virtuemart categories ? (not assign them manually, but automatically); mixed with standard menu items (articles, links, ..)
– How can I display automatically the available manufacturers in a virtuemart menu ?
– What are the basic entry point to basic template edition ? (heaer customization, …)
I have found how to change the logo, but, for example if I want to get rid of the basket, and display a 2nd picture instead ?Ok, let’s start with these basic issues, we will see afterwards for fine-grained customization.
Thank’s a lot !
– Arnaud
houstonator Friend
houstonator
- Join date:
- December 2010
- Posts:
- 29
- Downloads:
- 0
- Uploads:
- 0
- Thanks:
- 3
- Thanked:
- 4 times in 2 posts
January 11, 2011 at 9:38 am #371316<blockquote>- For these modules : how to assign a different configuration on home than on each page ?
(example : slideshow showing products from the category we’re in)</blockquote>You can change in the Menu Assignment on Module Options<blockquote>How to specify Urls for slideshows images ?</blockquote>JA Zeolite II is using JA Slideshow and it supports images folder for slideshow only.
<blockquote>I can’t manage JA Content scroll to display some products, only some articles from a category !</blockquote>JA ContentSlide is written for com_content (slide only articles in joomlat), your products are using VirtueMart component.
<blockquote>It is displayed on all pages, how can I make it display only on some pages ? with a different configuration on each page (different products), of course.</blockquote>Look at my first answer, its the same option
<blockquote>mod_virtuemart_featureproduct module isn’t install with the template, is it normal ? how can I install it ?</blockquote>You can go to: Extensions > Install/Uninstall to install that module.
<blockquote>- How can I populate automatically some menu items with virtuemart categories ? (not assign them manually, but automatically); mixed with standard menu items (articles, links, ..)
– How can I display automatically the available manufacturers in a virtuemart menu ?</blockquote> This would be best answered at Virtuemart Forums, as this relates more to the VM and joomla configs.– What are the basic entry point to basic template edition ? (header customization, …)
I have found how to change the logo, but, for example if I want to get rid of the basket, and display a 2nd picture instead ?
You can edit code on templatesja_zeolite_iilayoutsblocks and css on templatesja_zeolite_iitemplate.cssFebruary 9, 2011 at 3:04 pm #375891<em>@mredwan 195183 wrote:</em><blockquote>i’m currently using Zeolite now..
how may i use this class suffix at any other module position? i’ve tried the regular way by adding the _hilite at module class suffix in module manager, but it doesn’t work..
please advise..</blockquote>
Anybody have a solution for this as I want it too!
I want to be able to use the black -hilite for my side modules.
Thanks in advance
 Ninja Lead
Moderator
Ninja Lead
Moderator
Ninja Lead
- Join date:
- November 2014
- Posts:
- 16064
- Downloads:
- 310
- Uploads:
- 2864
- Thanks:
- 341
- Thanked:
- 3854 times in 3563 posts
February 10, 2011 at 8:27 am #375989you have to add “_hilite” with no space on the left, please check, if still not work, PM me your admin & ftp account, I shall check.
February 11, 2011 at 3:00 pm #376222Hi I wanted to be able to use ” _hilite” and ” _black” within side modules, but no matter how this was typed it doesn’t without altering some code in the CSS files.
I raised a support ticket and got this response back, which I have just tested and it works great!
Now, i will give you a customization to complete the work
Example with _black:
1)You put this text into the suffix class: ” moduletable_black” ( has a blank character before this text)
2) you open the template.css filediv.moduletable h3 span,
div.moduletable_menu h3 span,
div.moduletable_text h3 span,
div.moduletable_blank h3 span,
div.moduletable_hilite h3 span,
div.moduletable_black h3 span {
display: block;
height: 29px;
padding-left: 28px;
}and replace with:
div.moduletable h3 span,

div.moduletable_menu h3 span,

div.moduletable_text h3 span,

div.moduletable_blank h3 span,

div.moduletable_hilite h3 span,

div.moduletable_black h3 span {

display: block;

height: 29px !important;

padding-left: 28px !important;

}
3) you find:
/* Black module */

div.moduletable_black h3 {

background: url(../images/h3-r-black.gif) no-repeat right top #666666;

color: #FFFFFF;

}
div.moduletable_black h3 span {
background: url(../images/h3-l-black.gif) no-repeat left top;
}and replace with:
/* Black module */

div.moduletable_black h3 {

background: url(../images/h3-r-black.gif) no-repeat right top #666666!important;

color: #FFFFFF!important;

}
div.moduletable_black h3 span {
background: url(../images/h3-l-black.gif) no-repeat left top!important;
}With others you do same as this way.
Thanks
Sincerely,Tien Ha Cong
-
AuthorPosts
This topic contains 17 replies, has 11 voices, and was last updated by thuanlq 13 years, 1 month ago.
We moved to new unified forum. Please post all new support queries in our New Forum