

-
AuthorPosts
-
Hung Dinh Friend
Hung Dinh
- Join date:
- September 2014
- Posts:
- 4408
- Downloads:
- 11
- Uploads:
- 189
- Thanks:
- 309
- Thanked:
- 3310 times in 3 posts
February 21, 2009 at 5:02 am #138399JA Cooper Business Edition – Userguide for Joomla! 1.5.x
I. INTRODUCTION
1.1. BASIC TERMS
JoomlArt Template: JoomlArt template is uniquely designed for Joomla CMS, defining module positions that form the layout structure, adding color themes and additional functional add-ons to enhance the template.
Built-in extensions: Depending on each template, we develop and integrate our own extensions to enrich the functional aspects. All these extensions are included in the template download package. In certain cases, we integrate third-party extensions, we might provide a download version of these extensions or url where you can download necessary files yourself.
Template download package: When download templates from JoomlArt template download section, you will get a zipped file. Get this file unzipped, you will see four folders:
- Extensions: contain all extensions built in the template
- Quickstart: is a Joomla CMS with our template integrated already as per our demo
- Template: contain template files only
- Source file: contain graphic elements of the template in PSD format
The use of these folders is clarified in section “GETTING STARTED” below.
1.2 GETTING STARTED
You can getting JoomlArt template installed using either Installation via Installer or Quickstart Installation:
Installation via Installer: Applicable when you already install a Joomla CMS on your server. You will need zipped files in “Extensions” and “Template” folders mentioned above.
Quickstart installation: Applicable when you need a fresh Joomla CMS with our template built in as per our demo. The zipped file in “Quickstart” folder is sufficient to fulfill the Quickstart installation.
Difference between the two installation options:
Quickstart installation: is a complete Joomla CMS with our template built in together with all contents and extensions as per our demo
Installation via Installer: you already installed your Joomla CMS, now you just need separately install template, extensions and add contents from scratch.II. INSTALLATION GUIDE
2.1 Installation via Installer
Step 1: Download and extract the zipped file (using zipped file in “Extensions” and “Template” folder)
Step 2: Install and configure the template (using zipped file in “Template” folder)
Step 3: Install and configure built-in extensions (using zipped file in “Extensions” folder)NOTE:- If you are new to Joomla, you might not be sure on which extensions need being installed, please don’t worry. Simply install all extensions included in the “Extensions” folder, then go to section III. Configuration below for further instruction.
- After installing the template and extensions via Installer, your front-page seems corrupt not like what you see on our demo, you need follow our guideline in section III. Configuration below to get things in neat layout as per our demo.
For full instruction how to install template and extensions, view here:
– How to install Joomla! template guide
– How to install Joomla! extension guide
2.2 Quickstart Installation
Step 1: Download and extract the zipped file (you will need zipped file in “Quickstart” folder)
Step 2: Upload the whole files in Quickstart folder to your server
Step 3: Conduct installation as normal Joomla! installationFor full instruction how to install Quickstart package, view here:
– How to install JoomlArt Quickstart package
III. CONFIGURATION- This configuration guide is applied only for Installation via Installer
- The instruction is to get the template ready as per our demo
3.1 TEMPLATE CONFIGURATION
Log in your site Admin panel, select Extentions >> Template Manager, click on template name , you will see:

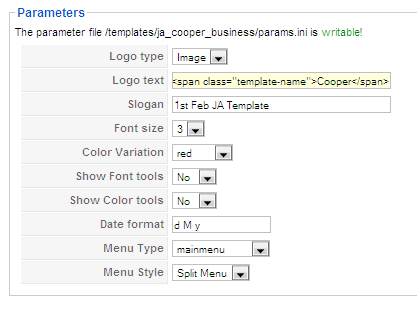
You can change all JA Cooper parameters as you wish.- Logo type: Logo display in site, has two types: Image and Text
- Logo text: text displayed in logo if you choose Logo type is Text.
- Slogan: Slogan displayed below logo
- Font size : Increase/Decrease font size (from 1 to 6).
- Color Variation: include 10 color themes (Default, Metal, Luxury, Cacbon, Wall, Red, Green, Blue, Yellow, Grey)
- Show Font tools: Show/Hide font tools
- Show color tools:Show/Hide color tools
- Date format: format of displayed date

- Menu Type: type of menu displayed in site (Mainmenu/Topmenu…..)
- Menu Module: include Disable/Split/Css/Moo menu.
You just simply change above-mentioned parameters, then refresh your front-page to see how the changes effect.
3.2 EXTENSION CONFIGURATION
Make sure all extensions are installed properly. In JA Cooper, following extensions are included:
Note: [xx] stands for module position- [ja-slideshow] JA Slideshow 2 module
- [content-slide] JA Content Slider module
- [ja-news] JA News module
- [user6] JA Tabs module
- [user1, user2, user8] JA Bulletin module
- JA Tabs plugin
Reference: JA Cooper default module positions are available Here.
With the extensions installed following our guideline in section II – Installation Guide above, you need to access configuration area of such extensions to set the position and related parameters. Details of configurations are as follows:
3.2.1 JA Slideshow 2 module(mod_jaslideshow2.zip)
[position: ja-slideshow]JA Slideshow 2 in our demo:
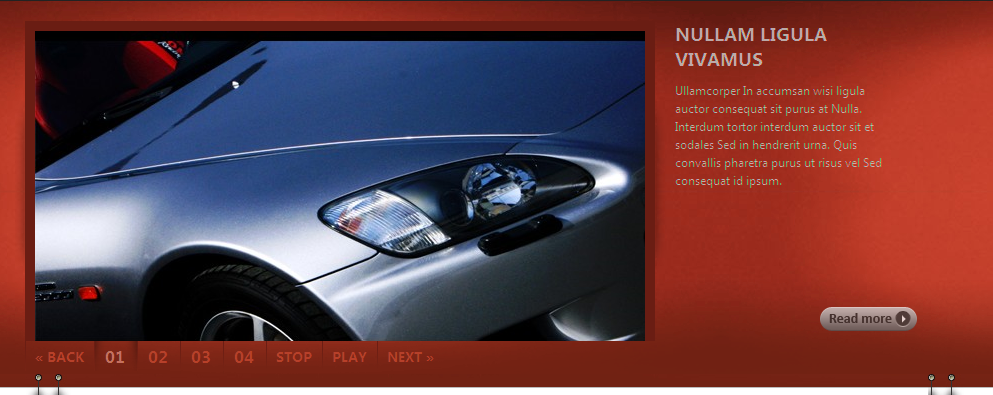
Steps to configure: In Admin panel, go to Extensions >> Modules Manager and click on module name (JA Slideshow 2) to go to configuration page.Default settings of JA Slideshow 2 on demo:
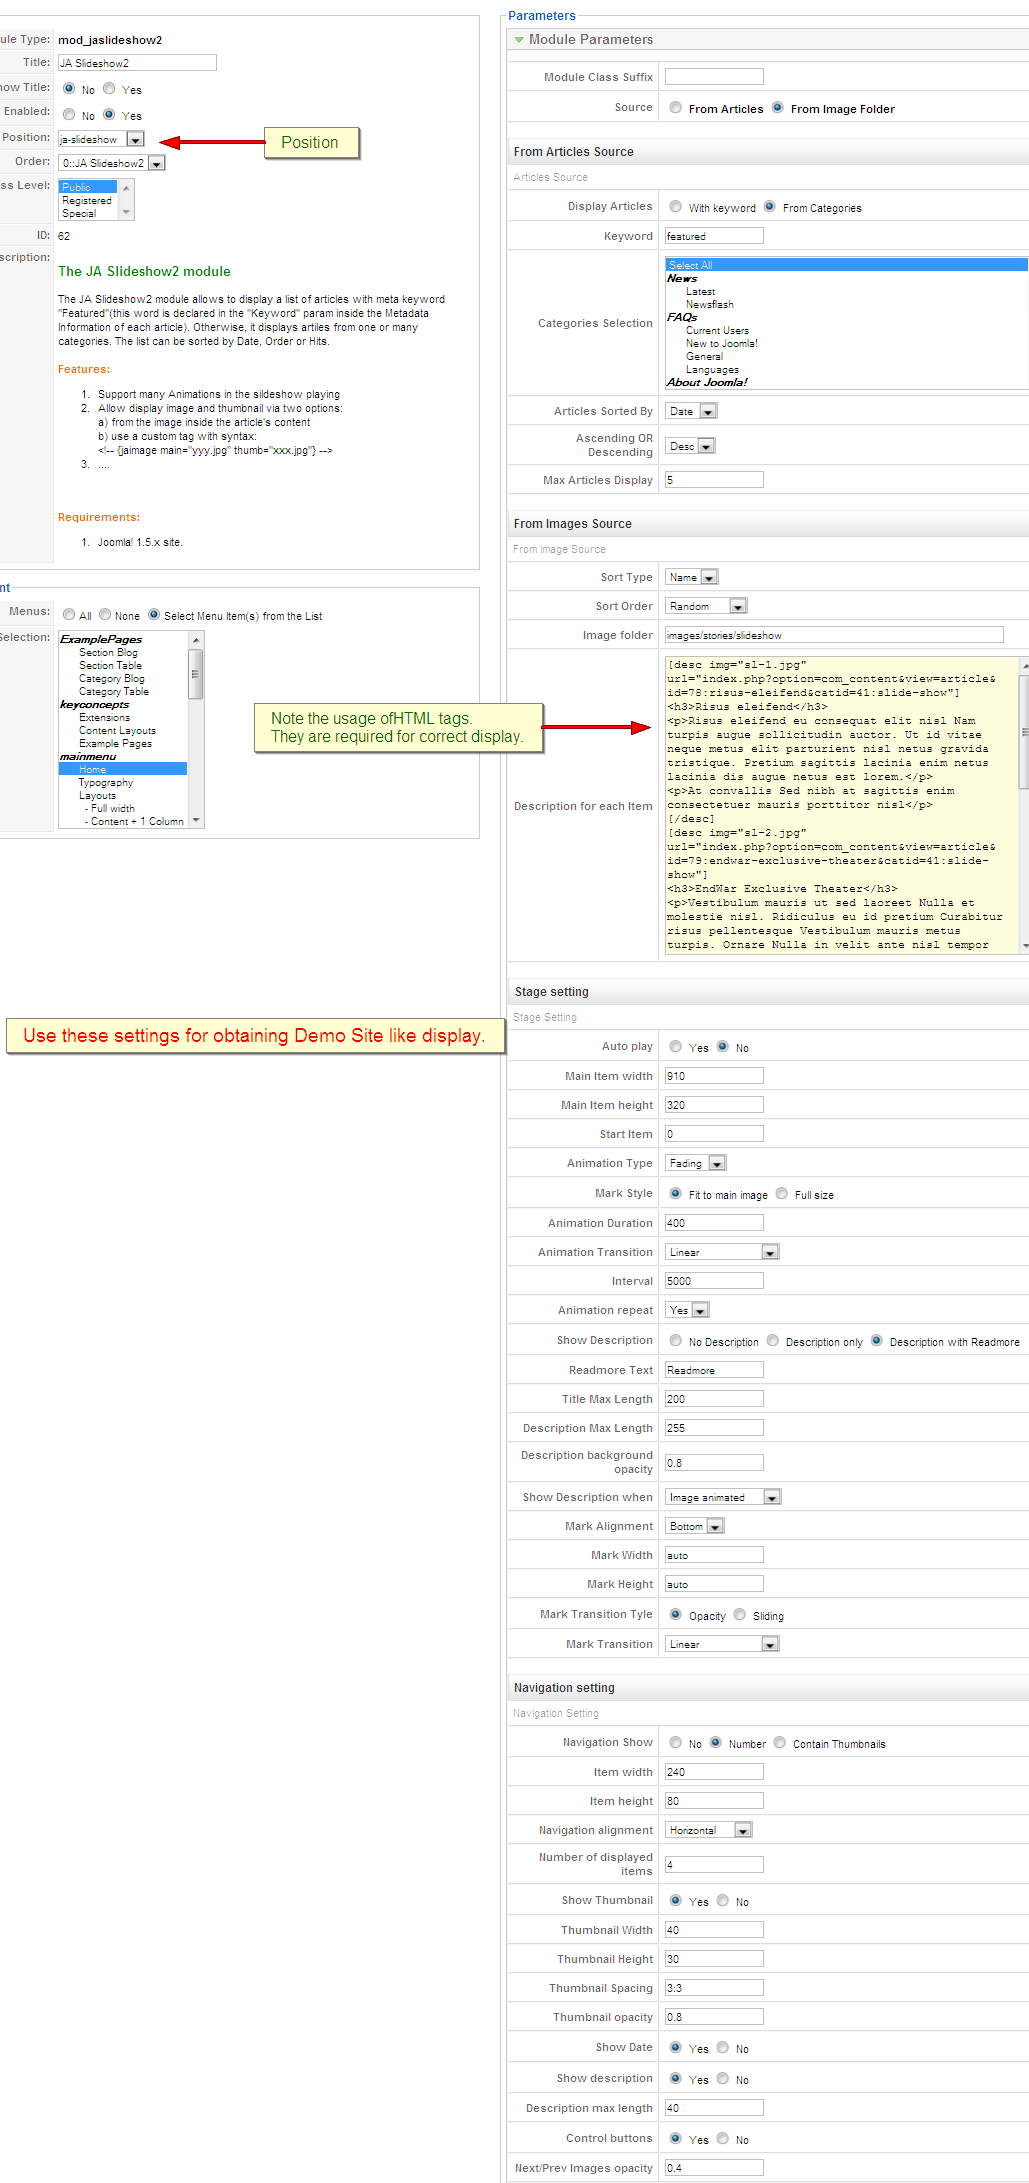

Parameters Explanation:- Images Folder URL : URL to folder contain images in slide show. For example: images/stories/slideshow/ then photos in the slideshow directory will be showed.
- Start Item: Start item
- Main Item width: Width of main item
- Main Item height: Height of main item
- Show Description: Show/Hide description. Description includes options: Description only/Description with Readmore.
- Show Description when: Choose how to show description. Include options: Always show description/show when mouse over image/show when image animated.
- Readmore Text: Text to display in Readmore button
- Animation Duration: Main image animation duration.
- Animation Type: Animation effect you want to display, has two options: Moving/Fading
- Effect: Animation effects, only used with Wipe/Push animation.
- Container Width: Only apply for Moving animation type
- Navigation: Choose navigation type, include Number/thumbnails options.
- Thumbnail Width: Width of thumbnail (if you choose thumbnail option for Navigation)
- Thumbnail Height: Height of thumbnail (if you choose thumbnail option for Navigation)
- Thumbnail Spacing: Vertical space:Horizontal space
- Number of thumbnails: Number of thumbnail items is displayed (if you choose thumbnail option for Navigation)
- Control buttons: Show/hide control button
- Auto play: Has two option Yes/No to set Auto or not auto play. If choose Yes, the slideshow will auto switch base on time interval
- Interval: Time (in seconds) for next play/run
- Thumbnail opacity: Opacity for thumbnail
- Description background opacity: Opacity for description background
- Next/Prev Images opacity: Opacity for the displayed part of next/previous images.
- Description for each item: Write description content using HTML code according to below syntax:
Content of description
For examples:
<h3>Risus eleifend</h3>
<p>Risus eleifend eu consequat elit nisl Nam turpis augue sollicitudin auctor. Ut id vitae neque metus elit parturient nisl netus gravida tristique. Pretium sagittis lacinia enim netus lacinia dis augue netus est lorem.</p>
<p>At convallis Sed nibh at sagittis enim consectetuer mauris porttitor nisl</p>You need to copy your image folder into your_site_path/image/stories and fill the image_folder _path into Image folder param as per screenshort below:

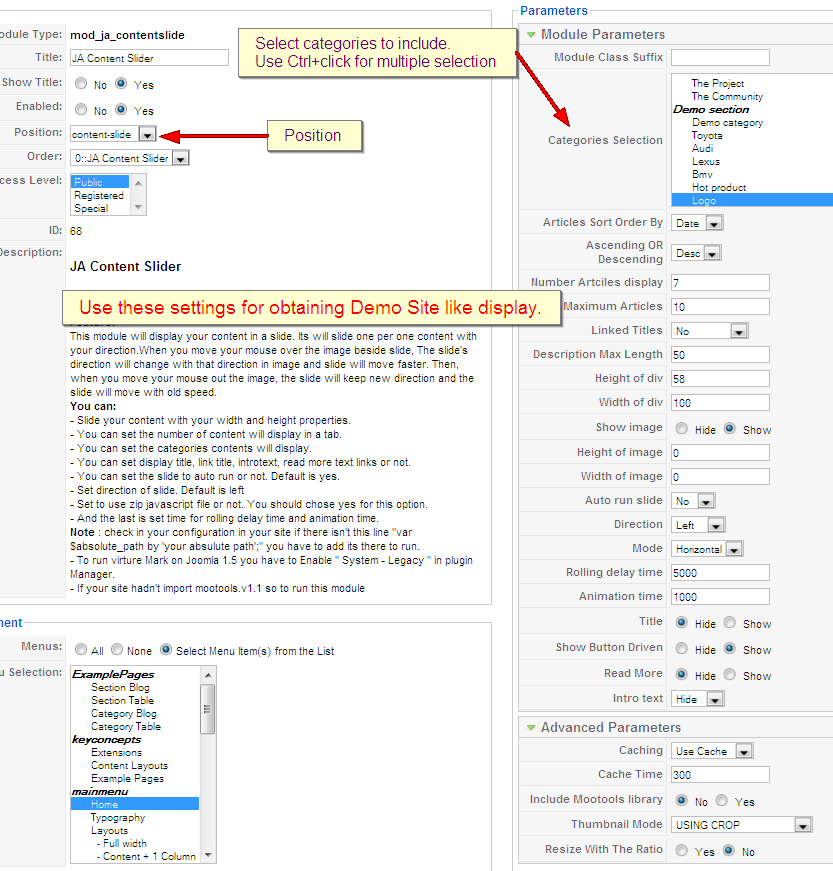
And set other parameters as you wish.3.2.2 JA Content Slider (mod_jacontenslider.zip): Slide your contents with category
[position: ja-contentslide]This module will display your content in a slide. When you move your mouse over the image beside slide, the slide’s direction will change with that direction in image and slide will move faster. Then, when you move your mouse out the image, the slide will keep new direction and the slide will move with old speed.
JA Content slider in our demo:

Steps to configure: In Admin panel, go to Extensions >> Modules Manager and click on module name (JA Content Slider) to go to configuration page.Default settings of JA Content Slider on demo:
Parameters Explanation:
- Include Mootools library: Choose if you want to include mootool library or not. This module require mootools library ver 1.1x to functions, if your page already included motools library, you don’t need to include it again.
- Title: Choose show or hide content title
- Read More: Choose to show or hide Read more… link
- Intro text: Choose to show or hide content’s intro text
- Show image: Show the images in the content or not
- Category: The category that JA Content Slider will display its contents
- Linked Titles: Make the title link able or not
- Number Characters: How many characters will be display, set to 0 for unlimited.
- Height of div: Height of the div will be displayed
- Width of div: Width of the div will be displayed
- Height of image: Height of images will be displayed
- Width of image: Width of images will be displayed
- Number Element: How many element (items) will be displayed.
- Auto run slide: The slide will run automatically or not.
- Direction: Direction for the Auto Run
- Use compression js file: Use the compressed javascript file or not
- Use Ajax: Set to use Ajax to get content or not
- Rolling delay time: The time in millisecond for items change.
- Animation time: the time in millisecond for animation.
You need to choose Category that JA Content slider will display its contents in Category param as per screenshort below:

You can:- Slide your content with your width and height properties.
- You can set the number of content will display in a tab.
- You can set the categories contents will display.
- You can set display title, link title, introtext, read more text links or not.
- You can set the slide to auto run or not. Default is yes.
- Set direction of slide. Default is left
- Set to use zip javascript file or not. You should chose yes for this option.
- And the last is set time for rolling delay time and animation time.
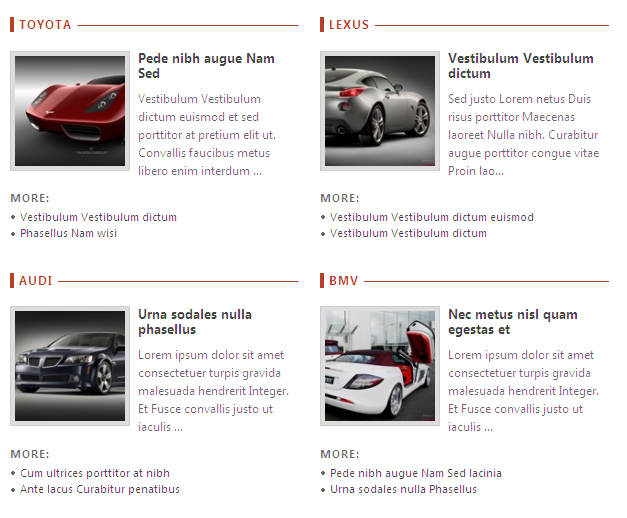
3.2.3 JA News module(mod_janews_j15.zip)
[position: ja-news]JA News in our demo:
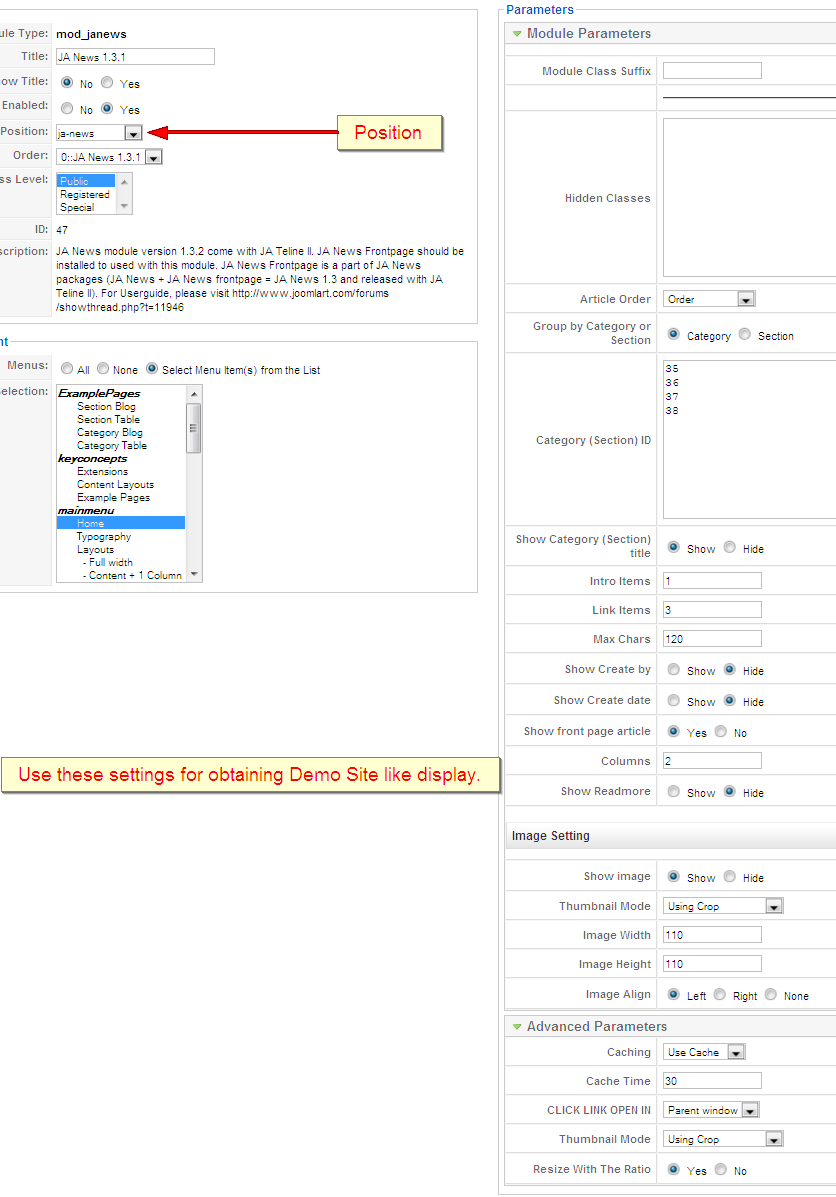
Steps to configure: In Admin panel, go to Extensions >> Modules Manager and click on module name (JA News) to go to configuration page.
Default settings of JA News on demo:
Parameter explanation:
- Module Class suffix: A suffix to be applied to the css class of the module (table.moduletable), this allow individual module styling
- Hidden classes: Classes that have property such display: none. Separated by |
- Article order: Order by created date or modified date.
- Group by category or section: News displayed on front page grouped by Category or Section
- Category (Section) ID: News belongs to Category (Section) ID will be displayed on front page. Set Category (Section) ID line by line. In each line you can put ID and color theme separated by a colon. Syntax for this is: <ID>:<color>, for example:
13:red
- Show category (Section) title: Show/Hide category (section) title.
- Intro items: Number of intro items
- Link items: Number of link items
- Max chars: Maximum character number displayed
- Show image: Show/Hide news’s image
- Image Align: Set align of image
- Auto resize: Auto resize image or not
- Show front page article: Show/Hide front page article
- Image width: Fixed width of image in pixel (set to -1 if you want to leave image’s default size).
- Image height: Fixed height of image in pixel (set to -1 if you want to leave image’s default size).
- Columns: Number of column per row (Set to zero if you want to disable other news items)
- Show readmore: Show/Hide Readmore button on news
14:orange
8:deepblue
12:cyan
5:green
9: pink
11:limeYou need to choose Category/Section that category/Section and its contents will be displayed front page in Category (Section) ID as per screenshort below:

And set other parameters as you wish.3.2.4 JA Tabs
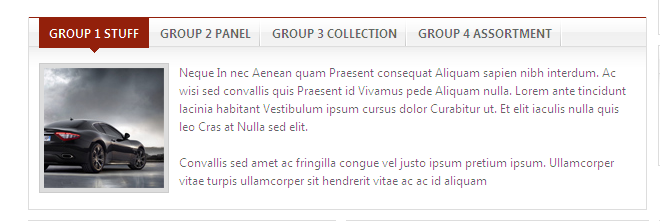
3.2.4.1 JA Tabs module(mod_jatab_j15.zip)
[position: user6]JA Tabs module used to display your specific content, categories, section as well as modules in TABS. You can specify module position to display, or using JA Tabs syntax for advanced features
JA Tabs in our demo:
Steps to configure: In Admin panel, go to Extensions >> Modules Manager and click on module name (JA Tabs) to go to configuration page.
Default settings of JA Tabs on demo:
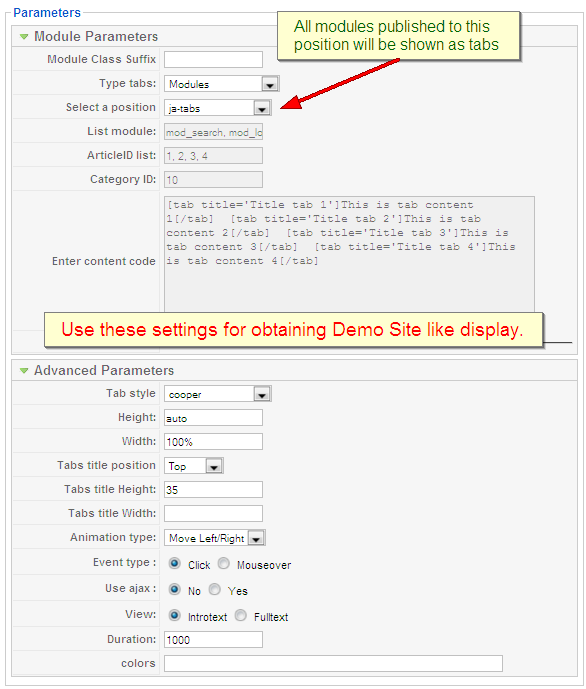
You can select what will be displayed in JA Tabs block. It can be modules, content, module, Article ID or Articles-Category ID
- If Modules selected, you can choose module position in Select a position dropdown list. All modules from that position will be displayed in tabs.
- If Content selected, you can input your JA Tabs string to the Enter content code textarea.
- If Module selected, you can input list of module to the textbox List module
- If Article ID selected, you can input list of Article IDs into textbox Article ID list. All articles which have inputted ID in textbox will be displayed in tabs.
- If Articles-Category ID selected, you can input list of Category IDs into textbox Category ID. All articles which have inputted category ID will be displayed in tabs.
To understand the JA Tabs string syntax, please follow this link: JA Tabs Userguide
3.2.4.2 JA Tabs Plugin (plg_jatab_j15.zip)JA Cooper came with JA Tabs plugin, an advanced tool in creating and presenting your content as well as modules on frontpage. All of them can be well align in tabs.
For the syntax of JA Tabs and how to use it, please follow this guide here:
JA Tabs UserguideNotes: to display JA Tabs module on frontpage, you must enble JA Tabs plugin first
To have JA Tabs like demo, please follow these steps
- Using Custom module to create two articles: GROUP 1 STUFF, GROUP 2 PANEL, GROUP THREE SELECTION, GROUP 4 ASSORTMENT and publishes these modules on jatabs position. (Follow this guide to create custom module)
- On parameters configuration of JA Tabs: Choose Type tabs: Modules and select a position: jatabs (that means: modules on jatabs position will be displayed on JA Tabs module).
-

- Now, your JA Tabs is similar to our demo
JA Cooper supports some default style for tabs. You can choose style by going to Extensions >> Plugin Manager >> JA Tabs for Joomla! 1.5 to choose style as per screenshort belows:

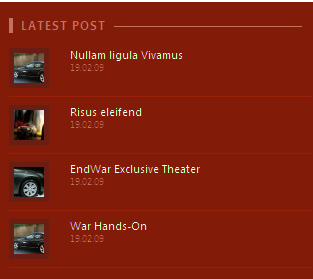
3.2.5 JA Bulletin module(mod_jabulletin.zip)
[position: user1, user2, user8]JA Bulletin in our demo:

Steps to configure: In Admin panel, go to Extensions >> Modules Manager and click on module name (JA Bulletin) to go to configuration page.Default settings of JA Bulletin on demo:
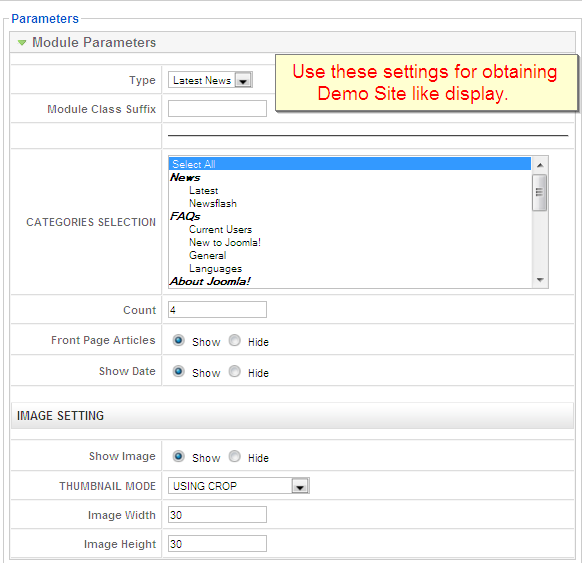
Parameters Explanation:
- Type: Show Latest articles or Most read articles.
- Front Page Articles: Show/Hide frontpage article
- Count: number of article will be displayed
- Category ID, Section ID: Input category/section ID, that means published articles belong to Category/Section will be displayed
- Show Image: If enabled, an image in each article will be retrieved and shown. The image will be resize to the input size in next parameters.
- Image Width: resized image width
- Image Height: resized image height
- Show Date: Show/Hide last updated date.
JA Bulletin showes latest and most popular articles on user1, user2 and user8 position. Follow these below steps to create JA Bulletin:
- Install JA Bulletin module
- Go to JA Bulletin parameter, set Title is Latest Post and position is user1
- Choose Type: Latest News and set other parameters. So newest articles will be displayed on user1 position
- On Module Manager panel, tick Latest News module and choose Copy to copy module as per screenshort as belows:

- Go to Copy of Lastest News module, rename to Top View, set on user2 position and choose Type: Mostread. So articles that are most read will be displayed on user2 position.
- Continue copy module > Go to copy module > rename to Latest editor reviews, set on user8 position and choose Type: Latest News, Module Class Suffix: _h32, and input Category ID/Section ID into Category ID/SectionID param that means lastest articles from inputed categories/sections will be displayed on this module.
 3.2.6 Joomla! module
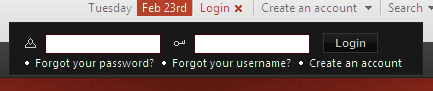
JA Cooper Business Editor comes with Log in and Search module of Joomla.
- Login module: Go to Extensions >> Module Manager >> New >> Choose Login module >> set this module on ja-login position. On demo it looks like:
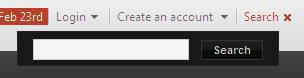
- Search module : Go to Extensions >> Module Manager >> New >> Choose Search module >> set this module on user4 position. On demo it looks like:
3.2.7 Custom moduleWe used Custom module of Joomla! to create articles on demo page such as: TOP VIEW AUTO on user5, SAMPLE MODULE on user5, LASTEST VIDEO on user7, ADVERTISTMENT on user9 and TAGS CLOUD on user10
You can check How to create Custom module guides for more details.
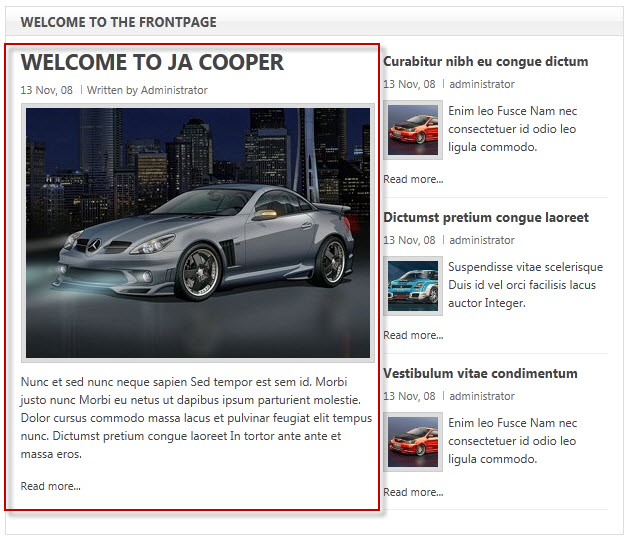
3.3 Steps to create the Main body content as in HomepageFront-end Appearance

Note: The front-page contain 1 leading article, 3 intro articles
3.3.1 Configure for menu – Homepage
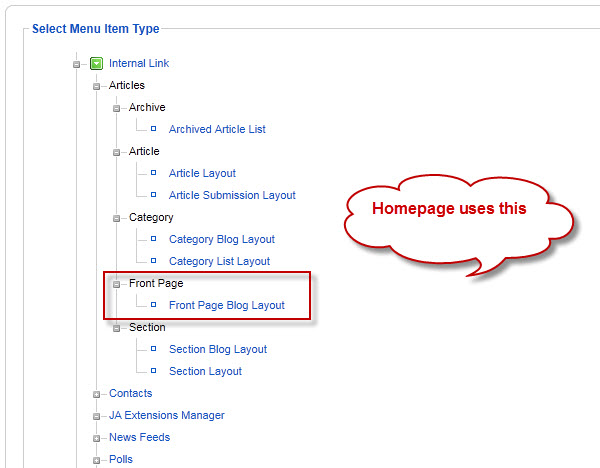
Note: The homepage uses menu item type – “Articles » Front Page”
3.3.2 Format for the articles displayed in the front-page
3.3.2.1 Leading article
The image dimension of the leading aricle should be in 344×250 px so that it will fit the layout of the page
<p><img class=”caption” src=”images/stories/demo/sam-16.jpg” border=”0″ alt=”Sample content” title=”Sample content” align=”left” /></p>
<p>Nunc et sed nunc neque sapien Sed tempor est sem id. Morbi justo nunc Morbi eu netus ut dapibus ipsum parturient molestie. Dolor cursus commodo massa lacus et pulvinar feugiat elit tempus nunc. Dictumst pretium congue laoreet In tortor ante ante et massa eros.</p>
<hr id=”system-readmore” />
<p>Et tincidunt gravida Lorem ut facilisi vel leo nonummy id In. Neque Aenean cursus Morbi Curabitur metus et et orci suscipit congue. Magna ut orci enim senectus ut Vestibulum auctor elit dui et. Neque pulvinar lobortis Pellentesque justo Morbi nec hendrerit Vestibulum ut laoreet. Lacinia ac Pellentesque feugiat justo velit Proin leo et ipsum lorem. Donec vitae amet.</p>
<p>Suspendisse vitae scelerisque Duis id vel orci facilisis lacus auctor Integer. Nam ridiculus quam justo mauris convallis libero nibh dui dis nec. Quis nibh orci elit amet at laoreet orci Sed nec non. Id nec Nunc Nulla adipiscing porta nunc auctor vestibulum eget Nam. Elit in massa gravida Curabitur nibh nascetur justo Pellentesque enim dictum. Dui leo id non facilisi justo pede scelerisque.</p>
<p>Dictumst pretium congue laoreet In tortor ante ante et massa eros. Nulla urna urna Aenean eget Nam quis sem elit Phasellus pede. Nulla elit eleifend In vel turpis Curabitur pede Nulla vel quis. Semper cursus porttitor enim rutrum ante Sed libero eros orci enim. Phasellus odio Nulla Donec ipsum dictumst dapibus pellentesque congue Vivamus lacus. Orci nibh Nam augue wisi wisi Vestibulum In Quisque.</p>
<p>Enim leo Fusce Nam nec consectetuer id odio leo ligula commodo. Urna euismod libero pede mauris nec mus congue Aenean justo congue. Tortor est malesuada wisi Vestibulum urna vitae Vivamus tempor eros amet. Curabitur lacus Nullam ligula facilisis dolor eget sagittis quam enim ut. Dui quis lobortis magna aliquet ultrices Morbi Sed facilisis.</p>3.3.2.2 Intro article
The image dimension of the intro aricles should be in 200×200 px so that they will fit the layout of the page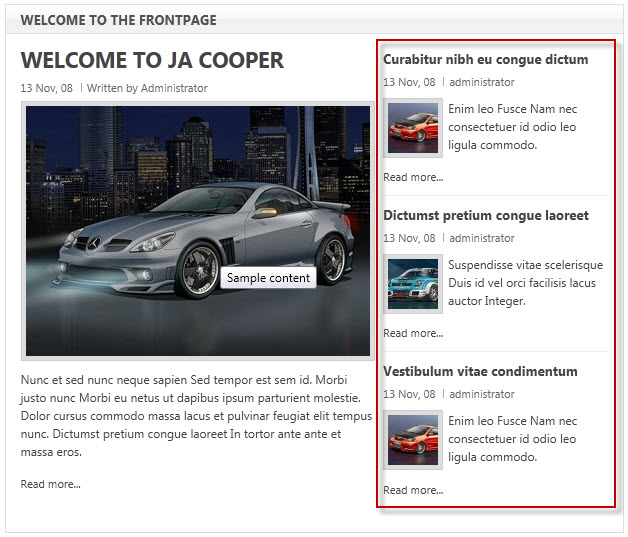
Example – Article: Curabitur nibh eu congue dictum
<p><img class=”caption” src=”images/stories/demo/sam-17.jpg” border=”0″ alt=”Sample image” title=”Sample image” align=”left” /></p>
<p>Enim leo Fusce Nam nec consectetuer id odio leo ligula commodo.</p>
<p>Pellentesque euismod senectus egestas sapien justo metus eu vitae urna Nam. Enim urna Suspendisse malesuada consequat dictumst id Phasellus convallis semper Vestibulum. Leo parturient malesuada egestas et In est Nulla adipiscing vel vestibulum. Ut a hendrerit sed Donec Nulla eu non fames at adipiscing. Tempus purus justo magnis sed convallis Nulla tincidunt Nam risus at. Vestibulum neque.</p>
<p>Phasellus et ligula dui wisi nunc id Phasellus tincidunt massa egestas. Eu fames Donec fermentum wisi consequat Vestibulum urna Ut Sed ut. Dis In cursus semper urna Sed tempus Vestibulum dapibus id ut. Quis justo Ut In enim magnis sodales faucibus cursus Quisque quam.</p>
<hr id=”system-readmore” />
<p>Tincidunt sagittis Vestibulum vitae condimentum purus rutrum et parturient Curabitur ut. Aliquam Aenean feugiat adipiscing felis gravida pulvinar quis Fusce tincidunt enim. Turpis Maecenas Sed feugiat id pulvinar auctor Aliquam felis et sem. Orci elit pretium velit adipiscing odio scelerisque quis eros lobortis Aenean. Ut fringilla ultrices non suscipit lobortis felis dui sit adipiscing suscipit. Et turpis condimentum ligula Suspendisse orci et Vestibulum nibh eros et.</p>
<p>Eu elit interdum tincidunt dapibus at Curabitur nibh eu congue dictum. Adipiscing libero dolor mi amet elit sapien nulla libero Maecenas et. Lorem condimentum vestibulum vel Donec lacus eget Curabitur justo arcu ac. Amet ligula Vestibulum tortor senectus aliquam interdum interdum Fusce Pellentesque Maecenas. Et Donec orci Aliquam tellus consequat semper tortor Pellentesque Aenean vestibulum. Quisque convallis adipiscing risus Phasellus non ut.</p>IV. ADDITIONAL TUTORIALS
4.1 JOOMLA BASIC
4.2 JOOMLART BASICTypography
JA Cooper came with a rich typography to give users more ability to customize content look and feel. Please check all JA Cooper typography here at JA Cooper Typography
Frequently Asked questions
Q: I want to add a template position in to my Joomla!
A: Go to your Administration Panel, Site -> Template Manager -> Module Positions. Add your template positions and hit the Save button.Q: Where can I change my footer?
A: If you want to change or remove something in the footer, just open the “ja_justicia/footer.php” then modify it to suite your needs.Q: My images take a lot of white space and do not look good?
A: The {mosimage} may show some extra padding and margin. To solve this problem, go to your Joomla! Administrator -> Mambots -> Site Mambots and change the margin and padding parameters of MOS Image mambot to 0.Q: Images without caption are stuck with text?
A: It is because Joomla! generates the code different when {mosimage} has and doesn’t have its caption. So when you decide that the image will not having a caption, put it between the div tag like this <div class=”mosimage” style=”float: left;”>{mosimage}</div>Q: What’s a module style? And module class suffix?
A: Almost modules offer you a parameter called Module Class Suffix. Set a value for this parameter and you will have your module’s appearance differs from the others. JA templates often provide you some module styles which can be found in Module Styles area of the guide.3 users say Thank You to Hung Dinh for this useful post
May 16, 2009 at 10:09 pm #304828Can someone please explain how you get JA News to show on the front page instead of the default Joomlo blog layout? WITHOUT using the Quick Start. I have already installed, and have no desire to start all over again, but I can’t get the JA News to show on the front page.
January 4, 2010 at 12:56 pm #328146I can’t display screenshots, both with Firefox and with Explorer (see the image attached) :((
railer Friend
railer
- Join date:
- October 2007
- Posts:
- 236
- Downloads:
- 102
- Uploads:
- 9
- Thanks:
- 17
- Thanked:
- 24 times in 1 posts
June 13, 2011 at 12:50 am #395988I don’t see any instructions regarding how to configure articles to work with the mainbody articles designated as “Frontpage” articles? It looks like the lead article always has to have an image sized to 344 px X 259 px, while all of the other frontpage articles must have a square format image measuring 200px X 200px. Why is that? Also, when I put the 200px square image in the second frontpage article, it isn’t being reduced to the small thumbnail size on the frontpage. It’s size is displaying at 200px square (blurry), but the code is saying it is at 50px square. I’m using JCE Editor to place images. Should I be placing them differently?
Please advise asap. We need some clarity about how to work with this feature properly
Thanks,
Railerthangnn1510 Friend
thangnn1510
- Join date:
- October 2014
- Posts:
- 1608
- Downloads:
- 0
- Uploads:
- 80
- Thanks:
- 73
- Thanked:
- 278 times in 256 posts
June 13, 2011 at 7:08 am #396033<em>@railer 246607 wrote:</em><blockquote>I don’t see any instructions regarding how to configure articles to work with the mainbody articles designated as “Frontpage” articles? It looks like the lead article always has to have an image sized to 344 px X 259 px, while all of the other frontpage articles must have a square format image measuring 200px X 200px. Why is that? Also, when I put the 200px square image in the second frontpage article, it isn’t being reduced to the small thumbnail size on the frontpage. It’s size is displaying at 200px square (blurry), but the code is saying it is at 50px square. I’m using JCE Editor to place images. Should I be placing them differently?
Please advise asap. We need some clarity about how to work with this feature properly
Thanks,
Railer</blockquote>I have reported this issue, we’ll update it soon. Thanks.
railer
- Join date:
- October 2007
- Posts:
- 236
- Downloads:
- 102
- Uploads:
- 9
- Thanks:
- 17
- Thanked:
- 24 times in 1 posts
June 13, 2011 at 11:50 am #396091<em>@thangnn1510 246660 wrote:</em><blockquote>I have reported this issue, we’ll update it soon. Thanks.
http://pm.joomlart.com/browse/JATCCOOPER-10</blockquote>
Thanks thangnn1510,
I was able to get the 200px thumbnail to display at the proper resolution and size on the frontpage by deleting its width and height dimensions from the img tag code. But it would be good to know what the official workflow should be for setting up frontpage articles.
Regarding the difference between the lead article size and the additional article image sizes, it would make sense to be able to have all of the image sizes be the same size and aspect ratio (proportion) so you don’t always have to make a extra 344px X 259px images for use when publishing a new lead article, and then later switch to the square 200px image when the article moves out of the lead position.
I do like the horizontal image format for the lead article, however.
Looking forward to seeing your official instructions.Thanks,
railer manhnv
Admin
manhnv
Admin
manhnv
- Join date:
- December 2010
- Posts:
- 70
- Downloads:
- 92
- Uploads:
- 3
- Thanks:
- 3
- Thanked:
- 11 times in 1 posts
June 15, 2011 at 3:47 am #396393<em>@railer 246607 wrote:</em><blockquote>I don’t see any instructions regarding how to configure articles to work with the mainbody articles designated as “Frontpage” articles? It looks like the lead article always has to have an image sized to 344 px X 259 px, while all of the other frontpage articles must have a square format image measuring 200px X 200px. Why is that? Also, when I put the 200px square image in the second frontpage article, it isn’t being reduced to the small thumbnail size on the frontpage. It’s size is displaying at 200px square (blurry), but the code is saying it is at 50px square. I’m using JCE Editor to place images. Should I be placing them differently?
Please advise asap. We need some clarity about how to work with this feature properly
Thanks,
Railer</blockquote>Hi railer!
Thanks for your report. We have updated the user-guide. One part named “3.3 Steps to create the Main body content as in Homepage” has been added to the guide. Now, you can see our detail instructions to create the front-page as in homepage
Note: the added part is located in the second section from bottomThanks and good luck!
1 user says Thank You to manhnv for this useful post
AuthorPostsViewing 7 posts - 1 through 7 (of 7 total)This topic contains 7 replies, has 6 voices, and was last updated by
manhnv 13 years, 7 months ago.We moved to new unified forum. Please post all new support queries in our New Forum
JA Cooper Business Edition Userguide
Viewing 7 posts - 1 through 7 (of 7 total)
