-
AuthorPosts
-
 TomC
Moderator
TomC
Moderator
TomC
- Join date:
- October 2014
- Posts:
- 14077
- Downloads:
- 58
- Uploads:
- 137
- Thanks:
- 948
- Thanked:
- 3155 times in 2495 posts
August 19, 2011 at 11:11 pm #167600How To Perform A QUICKSTART Installation – A STEP-BY-STEP GUIDE
As I have been seeing a good number of questions and Support Tickets with regard to some having difficulty or not fully understanding how to successfully perform a QUICKSTART INSTALLATION of a JoomlArt Template, I decided to put together this tutorial in hopes of assisting those of you who, like me, sometimes like to have things spelled out for us. 😎
NOTE:
This tutorial is premised upon a J1.5 quickstart installation. However, the process is – by in large – the same for J1.6 and/or J1.7. The most notable difference (i’ve seen) is that when you reach Step Eleven, you can simply click a “remove installation folder” button rather than having to manually delete the folder from your server account. (Not a big ole’ difference if you ask me – moreso one of convenience).Here we go . . . . . . .
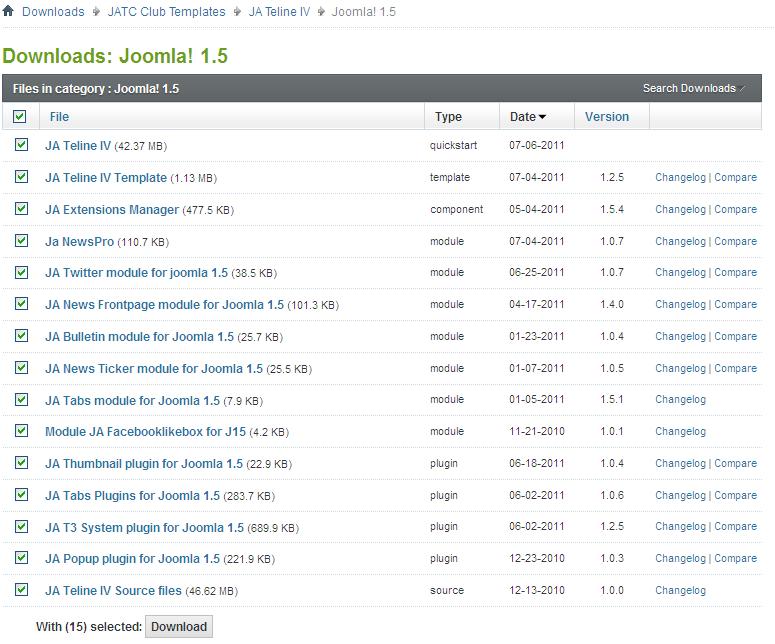
STEP ONE:
Download the selected template files. (I generally just download all the files – just in case (better safe than sorry)).
STEP TWO:
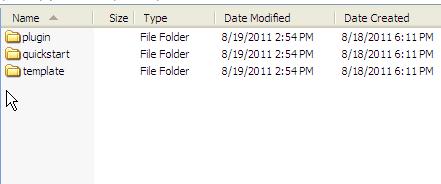
Extract the template files to a folder on your desktop. In most cases, the extracted contents will be similar to this . . .STEP THREE:
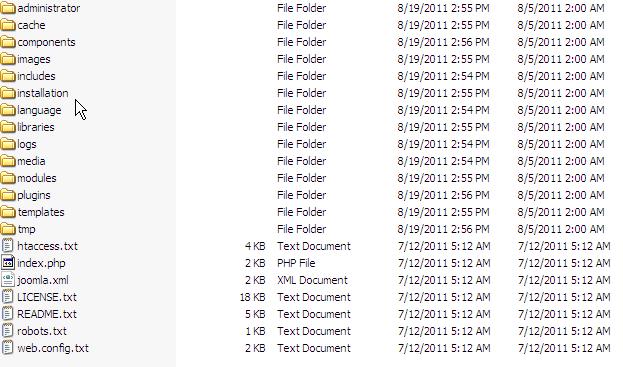
Open the folder “quickstart” and you will usually find an another zipped folder. Unzip and extract these files to your desktop.TIP –> I usually create a separate file just for the quickstart files. Saves a lot of hassle later trying to separate the quickstart files from the “template only” files you already downloaded.
The files you extract will be very similar to this – INCLUDING a file called “installation.”
This next step is premised on using an FTP client – such as FileZilla for transferring files to a webhost server account. If you need assistance on how to use FileZilla (or really, most any FTP client), here is a handy-dandy video tutorial for ya . . . .
STEP FOUR:
Upload all of the files you extracted from the quickstart zip/package to your webhost server account. Though some webhosts have a different structure, in MOST cases, you will upload them into a folder called “public_html.” (When in doubt, consult your webhost support staff).
STEP FIVE:
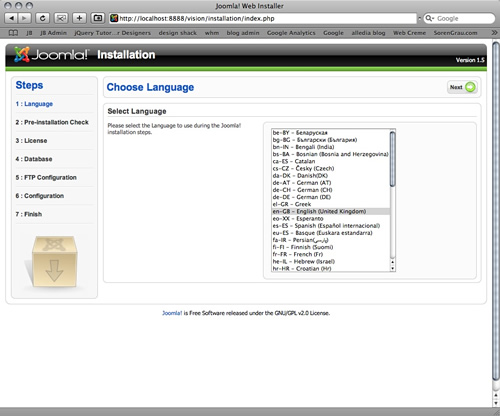
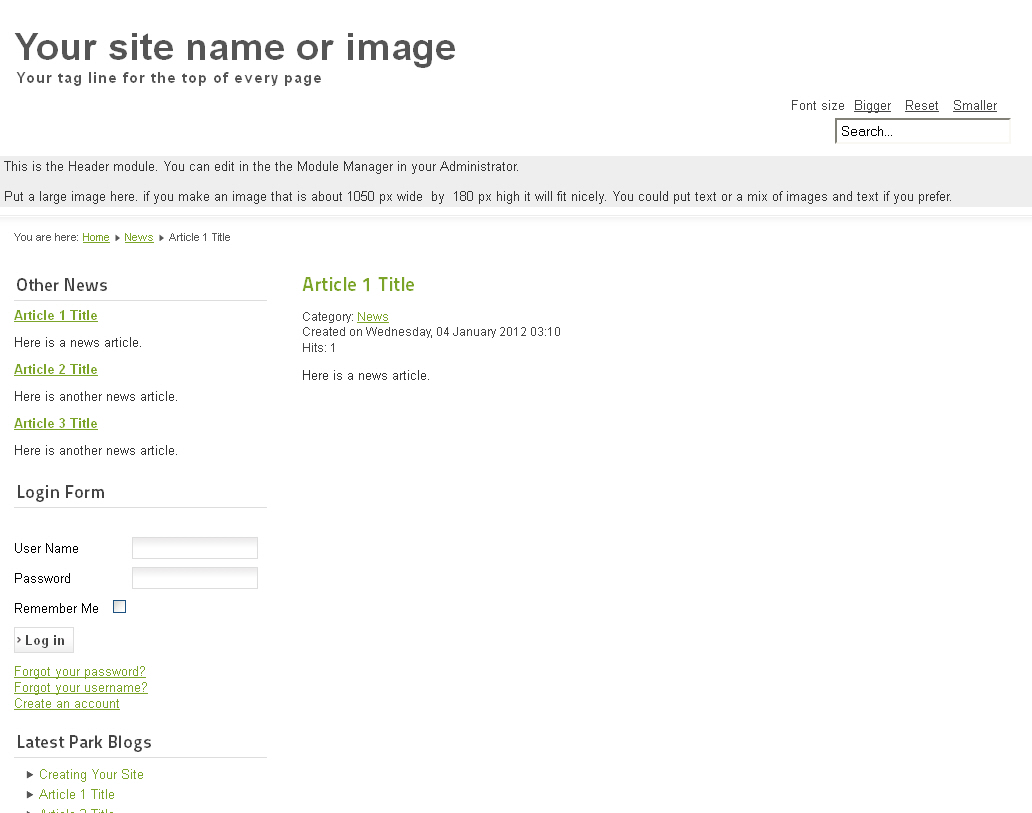
Once you have uploaded all of the files/folders from the quickstart folder into your public-html folder, you need to then navigate (via your web browser) your url (i.e http://www.yoursite.com )Once the page opens it should look something like the image below.Select the language you want to use with your installation and press next.
STEP SIX:
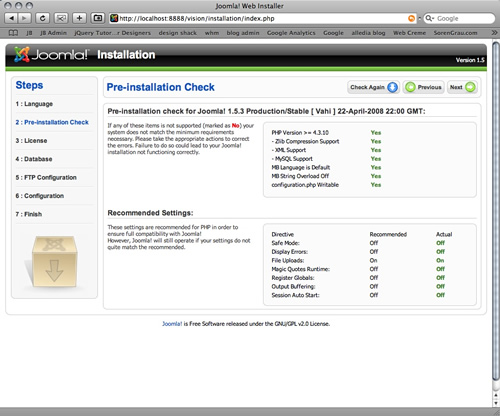
The next page will give you a sense of your server compatibility. You will need to troubleshoot any of the flagged areas that are unsuitable for a Joomla installation before you continue here. Once you get the all clear … click next again.(To be honest, I have never experienced a problem – so I always click “next” right away)
STEP SEVEN:
The next page is the GNU/GPL page .. you need to agree to the terms before continuing.
(NOTE -just click “next” right away) 😎
STEP EIGHT: – IMPORTANT
Install page 4 is the database page. The details you enter here are important as this is where the actual information for your Joomla installation are going to be stored. In a nutshell you need to create a mysql database, a user for the database and then assign that user to the database you created.This step requires a slight detour and we need to open up cpanl on our server.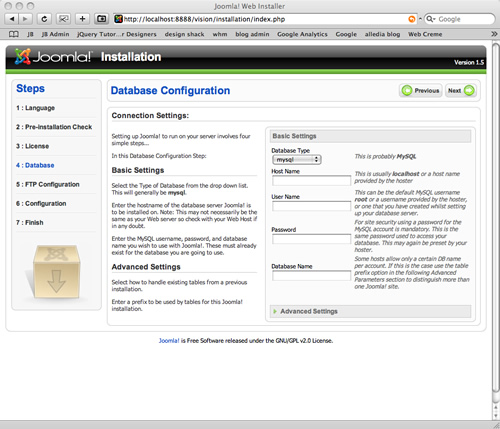
STEP 8.2: (if applicable):
IF YOU HAVEN’T ALREADY SET UP YOUR DATABASE . . . .
Open the Cpanel account on your server. Once you have logged in navigate to the database area of the cpanel account. This may look different on your server depending on the theme … but the image below shows you what it looks like on many webhost Cpanel accounts.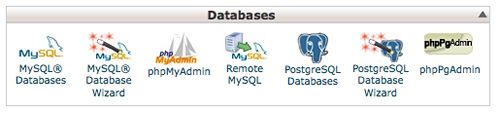
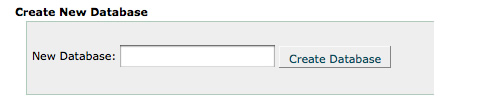
You can use the database wizard to step through the process – but if, for some reason, you don’t have the wizard on your CPanel, click on the mysql database icon and write the name of the database you want to use for your site in the window provided. You can use any name you want to here. Click on the Create database button and you should receive a success message telling you that the database has been created.
Navigate back to the mysql database page and scroll down to where the Create new mysql user input boxes are.
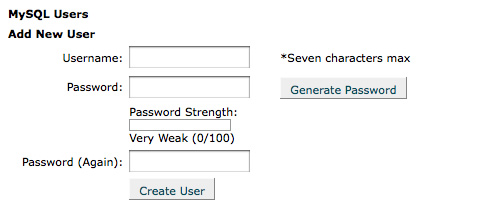
The username and password you put in here are really up to you, but for your Joomla site security its advisable that you use the random password generator if you have it on the page.After clicking Create New User you should receive the success message and you should then be able to navigate back to the mysql page and scroll down the page again. Take a note of the username and password – as we will need this later.
You now need to assign the user to the database. So where it says “Add user to database” select the database and the user you have just created and make sure they appear in the top and the bottom drop down boxes.
Once you have the new user and new database in the select boxes click add.
The next screen you will see is the “User Privileges” settings. Assign full or all privileges to the user and click “make changes,” submit or add user or whichever submit button you have there. You should receive another success message telling you that your user ha been added to the database. You need to pay close attention to the names they use here as the database prefix and user prefix will be needed when filling out the information in the next step.
STEP 8.3:
You are now ready to enter the information into the fourth installation screen. It gives you the option of choosing whether to use mysl or mysqli – in most cases you will choose MYSQL.In the label where it says host name you need to write the name provided by your host for your hosting plan. In most cases this should be localhost but on other server environments this may be different. (I always use “localhost”)In the username and password field enter the details from the previous step. Don’t forget to put in the prefix to the database. Next is the database name field – grab the name of the database and put it in that field – when ready press next.
STEP NINE:
The next page is where you configure the ftp settings for the site. The ftp layer was brought into J1.5 as way of helping out with file permissions in some server configurations. Using it is optional and can be initiated later on when using your site. So you can either fill out the details and click next or simply click next. (Don’t hassle with this one . . . simply click “next.”) 😎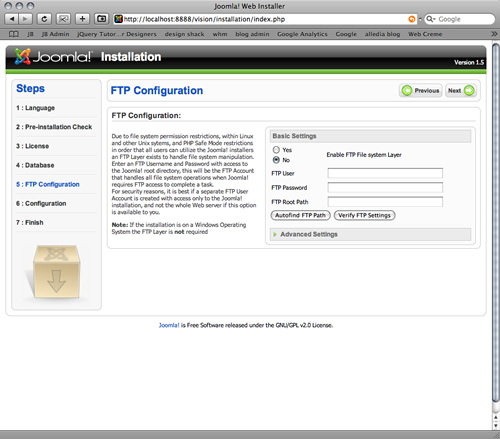
STEP TEN: – IMPORTANT
The next page is the sample data page and when using the quick start packages its really very important to install the sample data. Fill out the site name, email, admin name and password and then scroll down to the button that says “Install sample Data” and click it.You should get a success message shortly afterwards which means all of the content from the demo site has been loaded into the database you created.
STEP ELEVEN
After clicking next you should reach the final page that tells you that you have successfully installed the package. There are two links on the top right hand corner that will take you to the front end and back end of your site but before you do that you need to remove or rename the instllation file in the Joomla directory. Navigate to the folder on your server and delete or rename.(I usually delete … but it’s completely up to you)
J1.6/J1.7 NOTE:
As I mentioned initially, the most notable difference (i’ve seen) between the J1.5 and J1.6/J1.7 quickstart installation process is that – with J1.6/J1.7 – when you reach Step Eleven, you can simply click a “remove installation folder” button rather than having to manually delete the folder from your server account. (Not a big ole’ difference if you ask me – moreso one of convenience).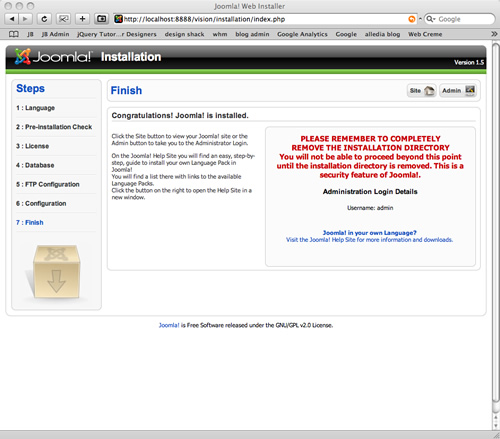
FINISH:
Once you have reached this step, you should successfully be able to navigate to the front end of your site and see the template set up exactly the same way as the demo site.You are now free to edit, change and add to the site to personalise it and start to market your Joomla web presence.SUPPLEMENTAL VISUAL RESOURCE:
As I’ve always found (for myself) that seeing a process performed – visually – always helps me to better understand and learn to do it myself. Therefore I’ve provided you with several resources for just that purpose … which I hope will assist you to see and better understand how the quickstart installation process works. (This is how I learned, incidentally) 😎
NOTE:
While some of these discuss uploading files to a localhost server, the principles/process remain the same for uploading to the public-html folder on your webhost server account.I hope this has been helpful to you. Feel free to provide any constructive feedback you may have.
TOM
5 users say Thank You to TomC for this useful post
December 10, 2011 at 9:31 pm #429143Hello Tom,
Thanks a lot for this awesome manual.
I am having some problems after transferring all the files (Step Four). After navigating to my site (Step Five) the page displayed is the “Step Seven – Finish” of the installation process (Step Eleven in your guide – This means that all the settings were somehow automatically done) . At this point I am not able to navigate back to verify if the previous steps were done according with your instructions.
Another “irregularity” was that I FTP’ed all the files into my root folder because GoDaddy don’t provides a “html_public” folder. Do I need to redirect some of the modules/components/plugins to the root folder?
Please check my site at http://coastwildlife.ca/
Thanks a lot
Mj
TomC
Moderator
TomC
- Join date:
- October 2014
- Posts:
- 14077
- Downloads:
- 58
- Uploads:
- 137
- Thanks:
- 948
- Thanked:
- 3155 times in 2495 posts
December 10, 2011 at 9:42 pm #429145Hey MJ:
Hmmmmm … I am not entirely certain what may have occurred during the process – unless, in between “re-tries” you did not completely clear out your previous installation, including whatever database you had previously established. It all has to be wiped clean and you need to start as if you never had anything there to begin with. (Just some “brainstorming” thoughts).
If I may ask, who is your webhost provider?
Also, here is a (for the most part) similar, though ever so slightly different version of this same tutorial –>
How To Clone The Demo Using QUICKSTART Installation.If you try one more time and it still does not work … let me know and we’ll move on to the next step/idea.
1 user says Thank You to TomC for this useful post
December 10, 2011 at 10:10 pm #429147Hello Tom,
Thanks for your extra quick answer!
My provider is GoDaddy (I am not sure if this is the US or the Canadian version)
I had a full functional website before. I upgraded Joomla! from 1.5 to 1.7 and everything went relatively well. I will try the guide that you suggested.If worst come to worst I guess I can download/backup all content and wipe up the whole site. Which will be a shame as you can imagen. I will keep you posted.
MJ
December 10, 2011 at 11:23 pm #429152Hello Tom,
No luck. I followed the guide but I had the exact same problem: after FTPing the files, I navigated to my site but the page displayed was “Step Seven – Finish” instead of “Step One – Language”. I cleaned both caches the JA T3 and the “Purge cache” from Administration/Site/Maintenance. Any ideas? I can create a superuser for you to use so you can check the backend if you want.
Thanks
MJ
TomC
Moderator
TomC
- Join date:
- October 2014
- Posts:
- 14077
- Downloads:
- 58
- Uploads:
- 137
- Thanks:
- 948
- Thanked:
- 3155 times in 2495 posts
December 10, 2011 at 11:37 pm #429154<em>@mjevelyn 288476 wrote:</em><blockquote>Hello Tom,
Thanks for your extra quick answer!My provider is GoDaddy . . . . . . </blockquote>
UGGGGH … GoDaddy . . . say no more. 😉
I just sent you a PM with some information I need to try to assist you further.
1 user says Thank You to TomC for this useful post
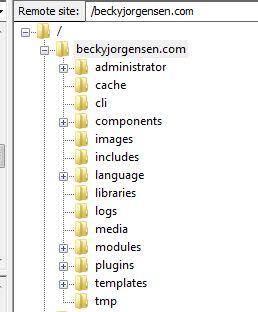
October 4, 2012 at 4:41 am #469084i am having a bit of an issue trying to find the public_html file. i am using filezilla and have dreamhost as the provider. in filezilla i made a file with that name and uploaded the quickstart to it, it totally worked fantastic, but the http ended up as http://beckyjorgensen.com/public_html.
i have removed that folder and am wondering how to i get this quickstart uploaded to the correct file! So i end up with just my .com and not a file name afterwards.
I have looked and looked and cannot find a public file anywhere. Is there some way to add it? Or make is show up? lol
this is all i show in the directory:please help so i can end this madness 🙂
What are the other options using filezilla that will allow it to be uploaded and work? i have tried everything and looked for answers, cannot find one.
thank you-
beckyswissa Friend
swissa
- Join date:
- November 2011
- Posts:
- 1955
- Downloads:
- 7
- Uploads:
- 277
- Thanks:
- 175
- Thanked:
- 717 times in 572 posts
October 4, 2012 at 7:31 am #469108<em>@whosies 340988 wrote:</em><blockquote>i am having a bit of an issue trying to find the public_html file. i am using filezilla and have dreamhost as the provider. in filezilla i made a file with that name and uploaded the quickstart to it, it totally worked fantastic, but the http ended up as http://beckyjorgensen.com/public_html.
i have removed that folder and am wondering how to i get this quickstart uploaded to the correct file! So i end up with just my .com and not a file name afterwards.
I have looked and looked and cannot find a public file anywhere. Is there some way to add it? Or make is show up? lol
this is all i show in the directory:please help so i can end this madness 🙂
What are the other options using filezilla that will allow it to be uploaded and work? i have tried everything and looked for answers, cannot find one.
thank you-
becky</blockquote>Your website is on http://beckyjorgensen.com – that is in effect your public_html folder
I take it that you want to replace what you currently have with the quickstart package so that you get all the data etc.
In which case, clear everything under beckyjorgensen.com and then upload the quickstart package. Normally your use cpanel or plesk from your provider to expand the archive there – this is quicker than uploading the files individually.
Then you just go to your domain. Make sure you know the database name, user name and password before you begin the install and follow the instructions from the Joomla instance.
October 5, 2012 at 3:47 am #469196i did what told and it came up with a forbidden error. i looked around and found that the htaccess files need to be renamed or deleted. that did the trick and all is well now! thanks for the help-
beckyOctober 9, 2012 at 9:46 pm #469565I have installed the JA Wall quickstart package, but the sample data is not the same as the demo.
I have tried installing all 3 provided sample data… Blog Sample Data is the best, in that there are at least 3 blog posts visible on the home page, but none of the articles with images, etc.
Brochure sample data is totally different to demo…
And Default Sample Data does not complete. I just get a constant rotating progress indicator, which I have to cancel by going back. I have tried installing this sample data using 2 browsers (IE8 and FF15.01)
I can confirm that the pager and lazy load, etc plugins have been installed.
Being a bit of a Joomla novice, I would really appreciate being able to install the sample data as shown in the demo (even with images replaced with blanks)
Your help is appreciated.
D

Luna Garden Moderator
Luna Garden
- Join date:
- July 2011
- Posts:
- 2617
- Downloads:
- 80
- Uploads:
- 96
- Thanks:
- 78
- Thanked:
- 453 times in 425 posts
October 10, 2012 at 10:00 am #469634Hi,
When you install in step 6, please choose to Install Default English (GB) Sample Data, it will take a bit longer, wait until installing is done.
I just download and install JA Wall and it still works well.
Please download and install again.
 Taflin Gebhardt
Friend
Taflin Gebhardt
Friend
Taflin Gebhardt
- Join date:
- March 2013
- Posts:
- 1
- Downloads:
- 26
- Uploads:
- 0
- Thanked:
- 1 times in 2 posts
TomC
Moderator
TomC
- Join date:
- October 2014
- Posts:
- 14077
- Downloads:
- 58
- Uploads:
- 137
- Thanks:
- 948
- Thanked:
- 3155 times in 2495 posts
March 12, 2013 at 4:11 pm #486208<em>@donks100 364069 wrote:</em><blockquote>Thanks a ton, easy to understand! Perfect score for thorough help!:D</blockquote>
Glad you found the info helpful😎
October 9, 2013 at 6:14 pm #508512Is there no quick start tutorial for Joomla 3.0?
phong nam Friend
phong nam
- Join date:
- May 2015
- Posts:
- 3779
- Downloads:
- 1
- Uploads:
- 587
- Thanks:
- 499
- Thanked:
- 974 times in 888 posts
October 10, 2013 at 11:33 am #508592Hi dfish17,
You can refer below tip to reach your requirement at http://www.joomlart.com/forums/topic/how-to-install-and-upload-a-ja-quickstart-3-x-installation-on-a-website-domain/
-
AuthorPosts
This topic contains 16 replies, has 9 voices, and was last updated by
TomC 11 years, 3 months ago.We moved to new unified forum. Please post all new support queries in our New Forum
Jump to forum
melih