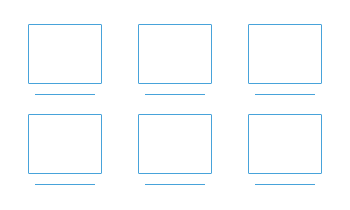
Default Layouts
Purity III is a perfect starting point for every Joomla builder as it strengthens the Joomla Com_comtent (we don't use any 3rd extensions) and supports multiple layouts including Magazine, Portfolio, Coporate, Blog and many more, which would surely fits in various types of Joomla sites.
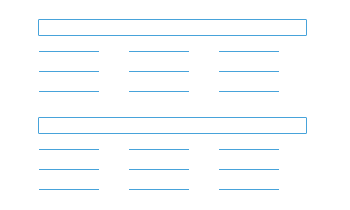
Magazine Layout
Corporate Layout
Blog Layout
Features Intro 1 Layout
Features Intro 2 Layout

Portfolio Layout
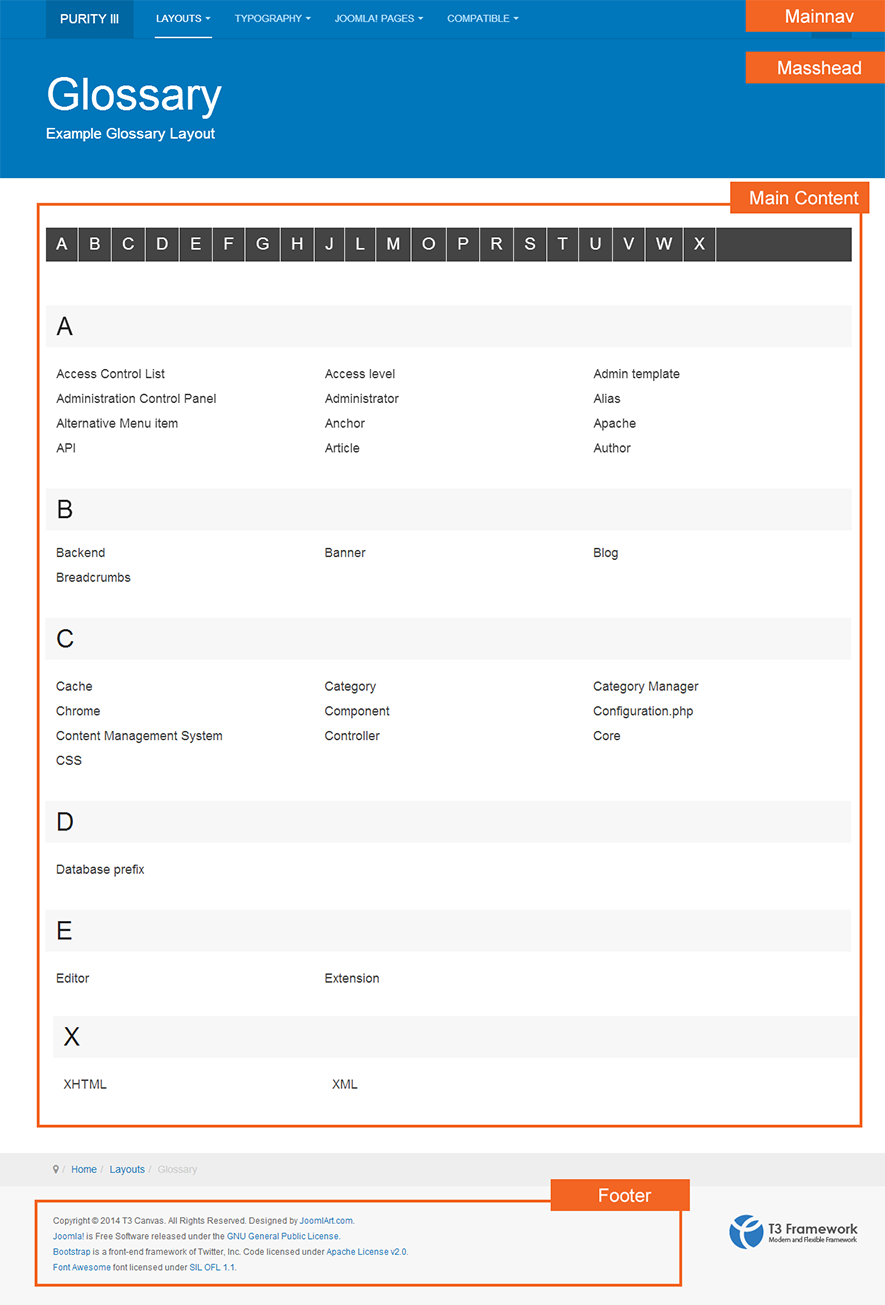
Glossary Layout
Classic Layout
Build up your own page
To assign a layout to a certain page, please follow our instruction below.
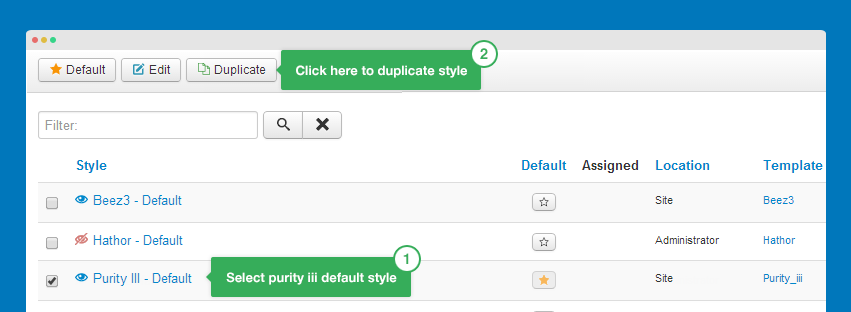
Step 1: Clone the default style
When you install Purity III template, there is only one style: the default style. However, you can create an unlimited number of different styles for your template.
Why do you need to create new style?
To have multiple layouts on your site, you need to create multiple styles. Each of these styles will be assigned to one layout.
So what is the difference between template and template style? - Check this out
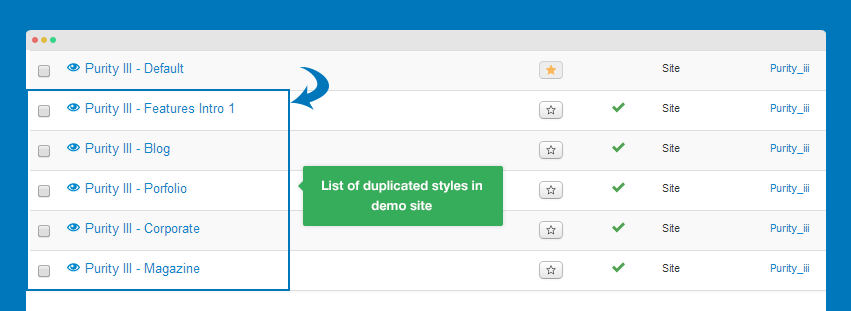
To create a new style in Purity III, open the template manager panel, select Purity III default style then hit the Duplicate button.
On the demo site, we have already duplicated a number of styles for different layouts.
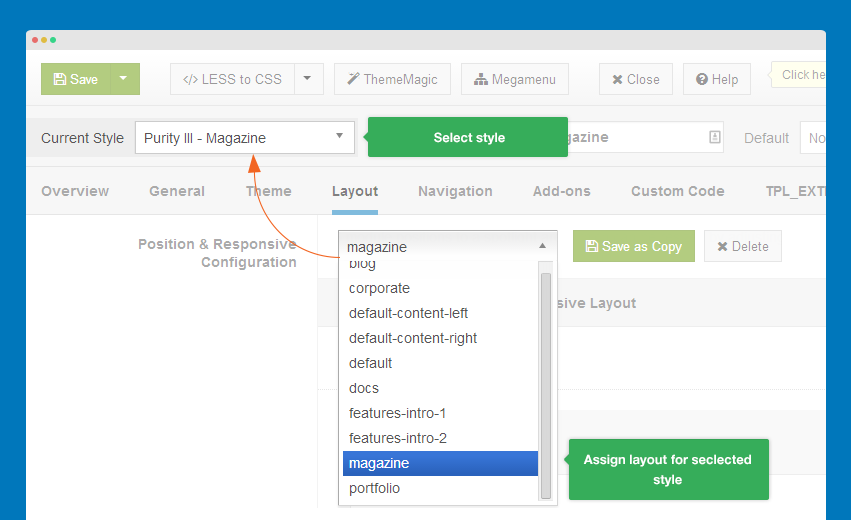
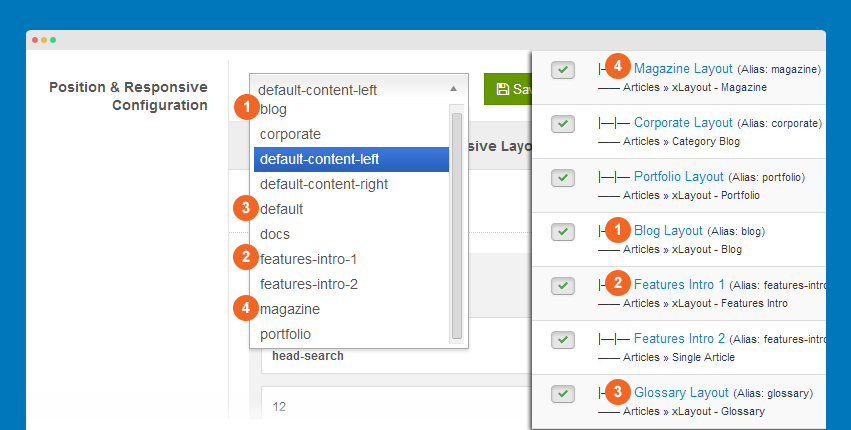
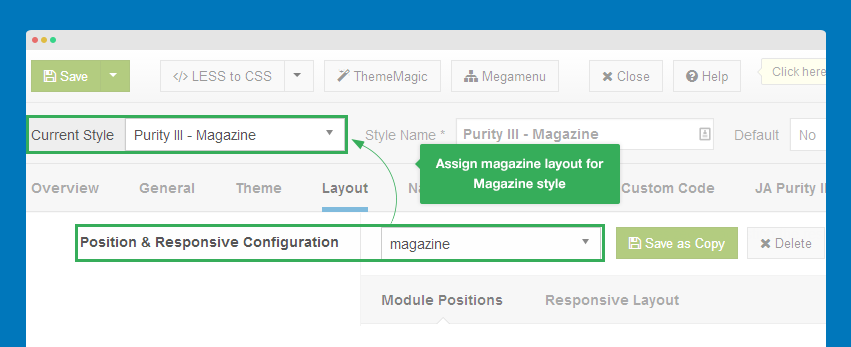
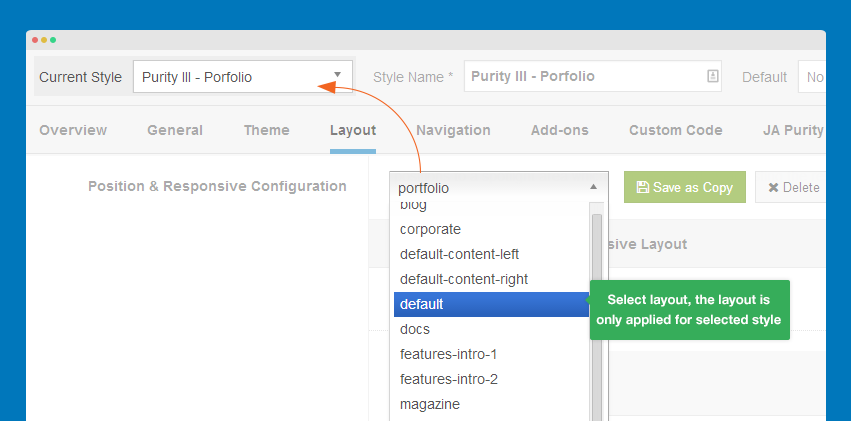
Step 2: Assign layout to the newly created style
Open the new style then select the respective layout that you want to assign to.
Step 3: Assign menu type
Now open menu item that you have assigned to the newly created style to configure it.
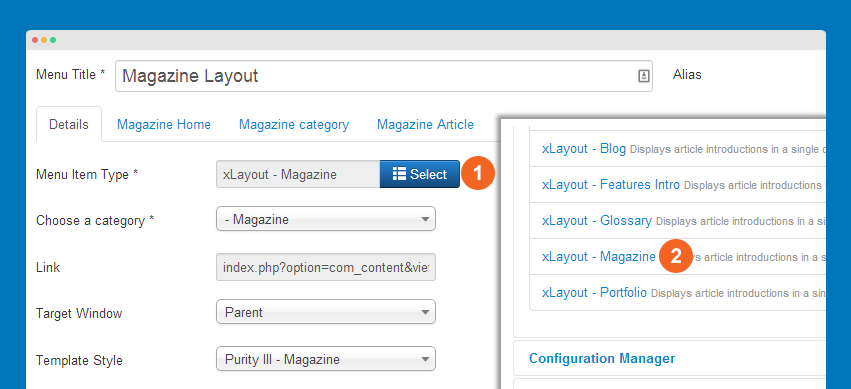
We add new menu type for each layout, so you have to select the correct menu type.
Matching layout with menu type:
Please note that each layout will go with its menu type, so please make sure you select the correct menu type for your layout.
| Page | Layout | Menu type |
|---|---|---|
| Blog page | blog | xLayout-Blog |
| Magazine page | magazine | xLayout - Magazine |
| Coperate page | coperate | Category Blog |
| Portfolio | portfolio | xLayout - Portfolio |
| Features Intro 1 | features-intro-1 | xLayout - Features Intro |
| Features Intro 2 | features-intro-2 | No specific menu type is required |
| Glossary page | default | xLayout - Glossary |
Here is the list of all extented menu types:
- xLayout-Blog
- xLayout-Features Intro
- xLayout-Grossary
- xLayout-Magazine
- xLayout-Portfolio
Step 4: Assign style to each menu item
This is called "style override". The menu item that is assigned to a specific style will have the style override the default style.
There are 2 ways to assign style to menu items: in the style back-end setting or in the setting panel of menu item.
#1: In the style back-end setting
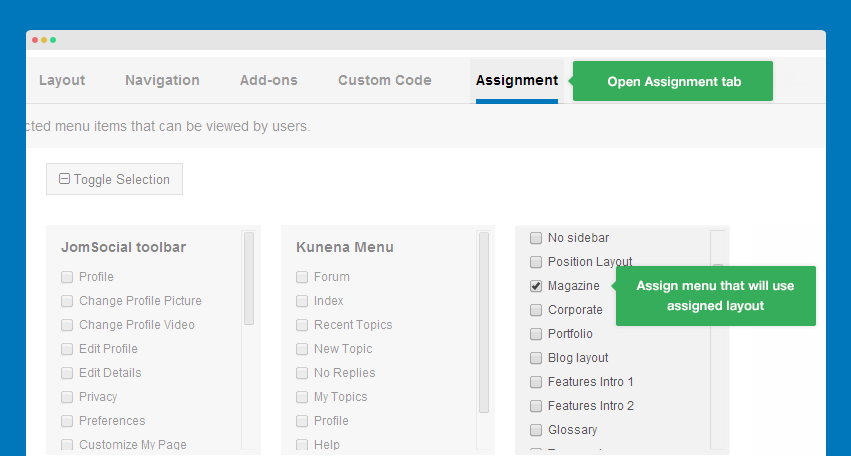
#2: In the setting panel of menu item
I. Magazine Layout
The magazine layout displays articles from selected categories and sub-categories.
1.1 Layout structure
The magazine layout has 2 view types: Magazine home and Magazine category. You can configure the display of each view type in the menu setting panel. Details on this will be covered in Step 3: Magazine menu setting.
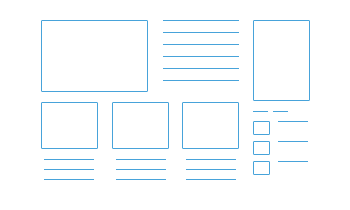
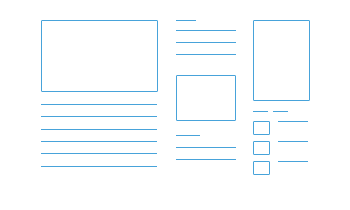
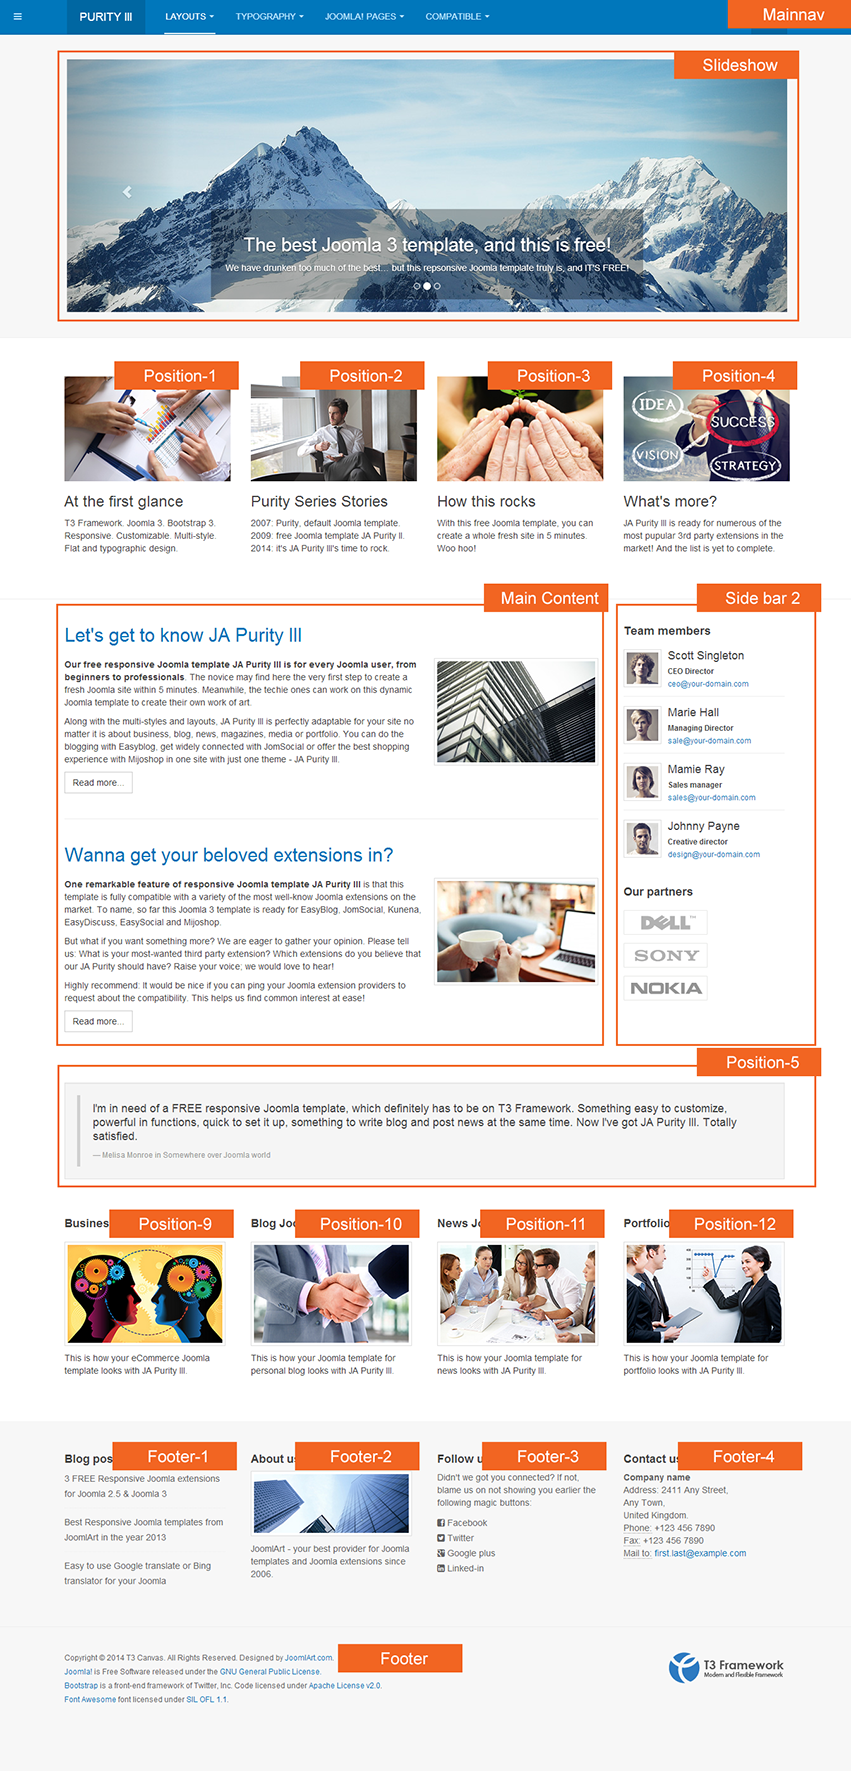
Magazine home view
The magazine home view includes leading articles, intro articles, featured columns, and category list. You can check the image below to see the layout structure of the Magazine home view.

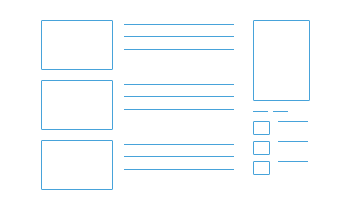
Magazine category view
The magazine category view includes leading articles, intro articles and columns
1.2 Build a Magazine page
Below are 4 steps to build a magazine page for your site.
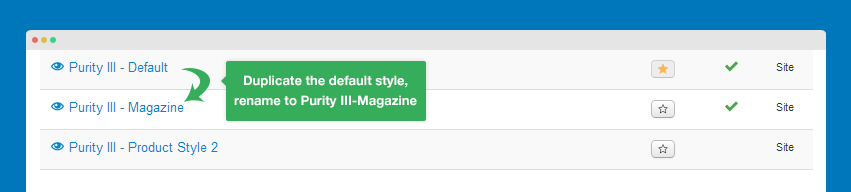
Step 1: Create "Magazine" style
Create a new style by duplicating the default style and rename it to Purity III-Magazine.
Step 2: Assign "Magazine" layout to the newly created style
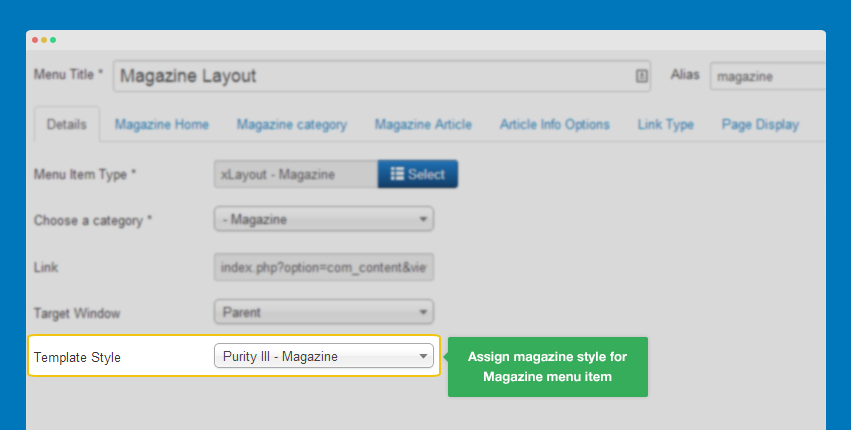
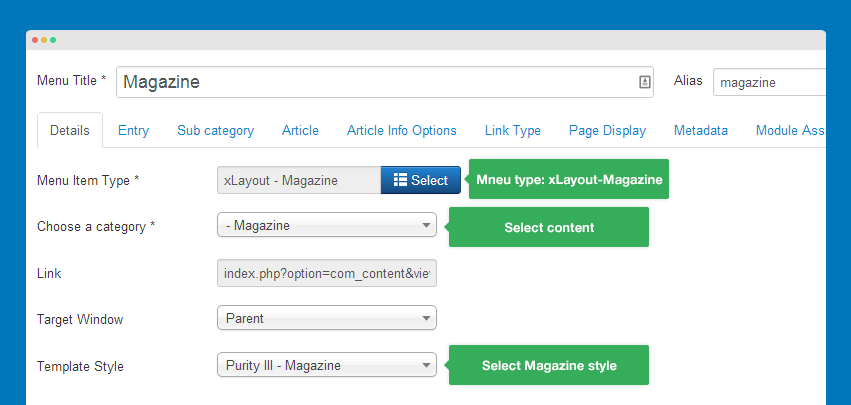
Step 3: Magazine menu setting
Refer to the images below for your Magazine menu setting.
Menu Type: xLayout - Magazine
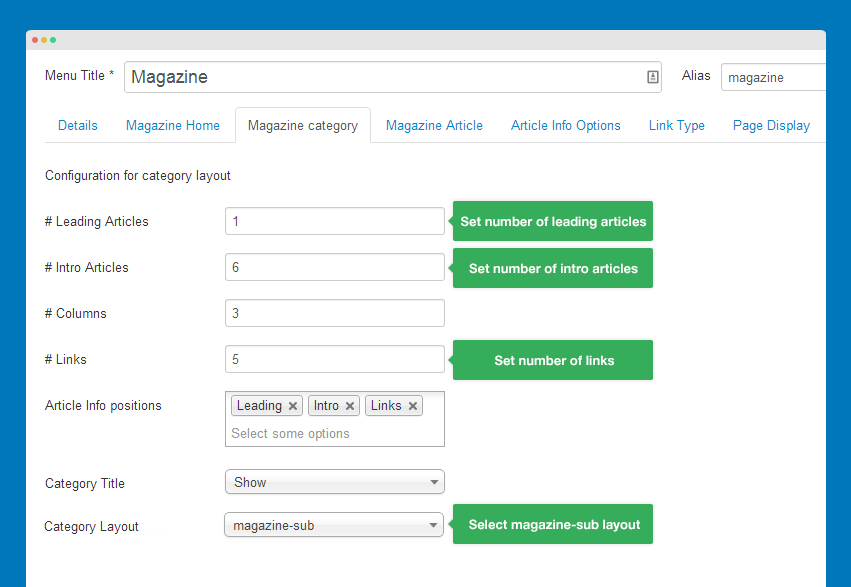
- Magazine Home settings
- Magazine Category settings
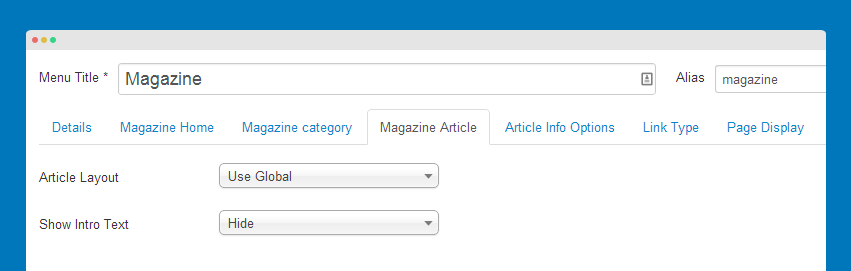
- Magazine Article settings
You can customize the view of each article detail page by overriding its layout. You can also configure to show or hide the intro text in the detail page.
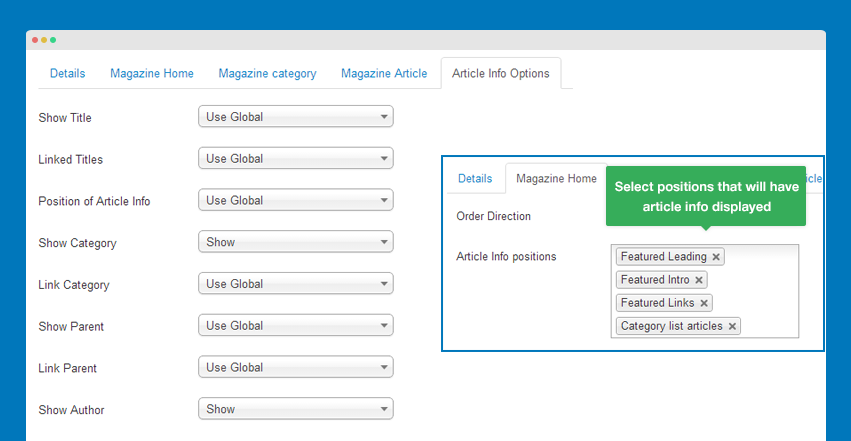
- Article Info Options settings
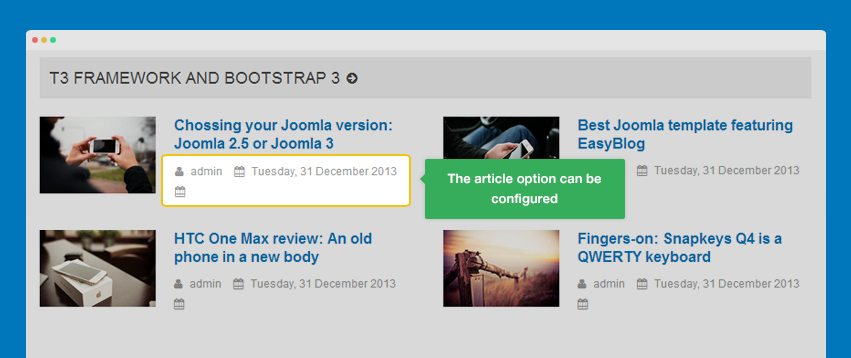
Note:
The article options can be different among these view types: Magazine home, Magazine category or sections inside a view.
To enable Article info, open the Magazine view type you want to configure (Magazine home or Magazine category). Select the positions you want to display article info then open Article Info Options to configure all other details such as Show Title, Show Category, Show Parent,etc.
Step 4: Assign "magazine" style to "magazine" menu item
Content in sidebar-2 position?
The content in sidebar-2 position is just Joomla modules, if you want to have the same module, please check in the Extension Configuration writing.
II. Corporate layout
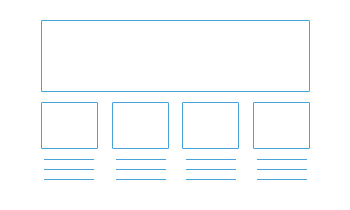
The Corporate layout includes slideshow, modules in spotlight block and main content (article list). The main content of the corporate layout is the articles from selected category.
2.1 Layout structure
2.2 Build a Corporate page
Important:
All steps of how to create a Corportate page is the same as Magazine page. You can follow the detail instructions here: How to build up Magazine page.
- Step 1: Create "Coporate" style
- Step 2: Assign "corporate" layout to "Corporate" style
- Step 3: Create "Corporate" menu
- Step 4: Assign "Corporate" style to "Corporate" menu item
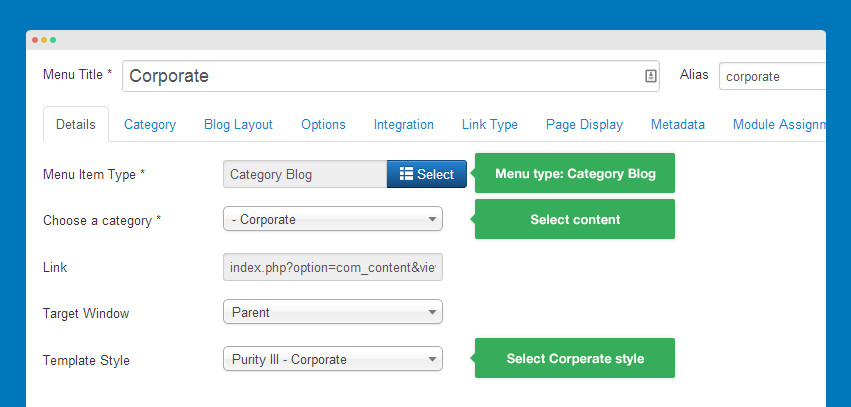
2.3 Corporate menu setting
This menu item uses the default Joomla menu type - Category Blog.
Menu Type: Category Blog
Detail settings
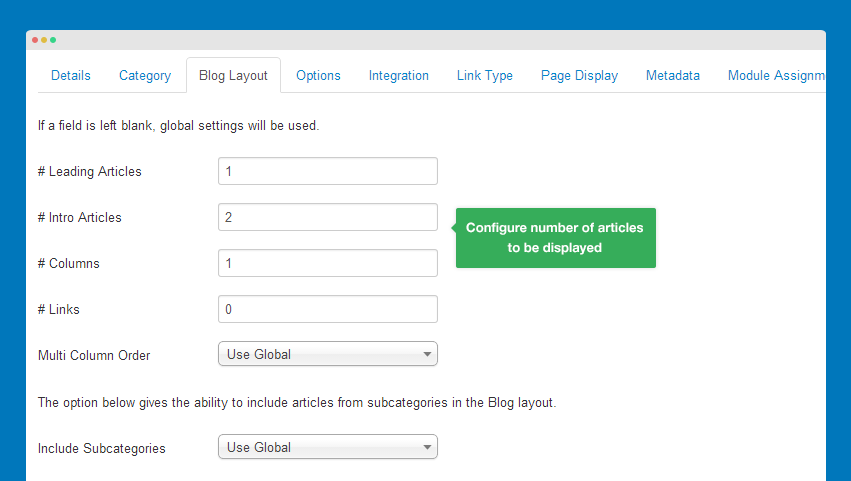
Blog layout settings
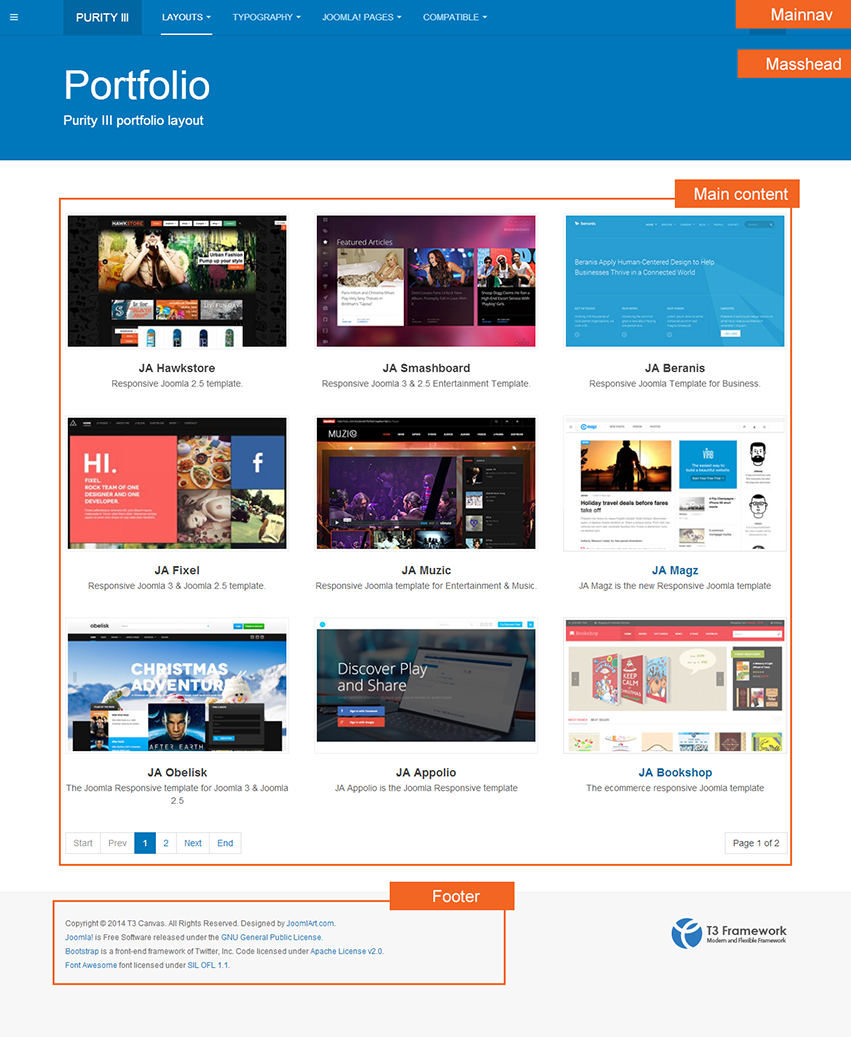
III. Portfolio layout
3.1 Layout structure
3.2 Build a Portfolio page
Important:
All steps of how to build a Portfolio page is the same with Magazine page. You can follow the detail instructions here: How to build up Magazine page.
- Step 1: Create "Porfolio" style
- Step 2: Assign "Portfolio" layout to "Portfolio" style
- Step 3: Create "Portfolio" menu
- Step 4: Assign "Portfolio" style to "Portfolio" menu item
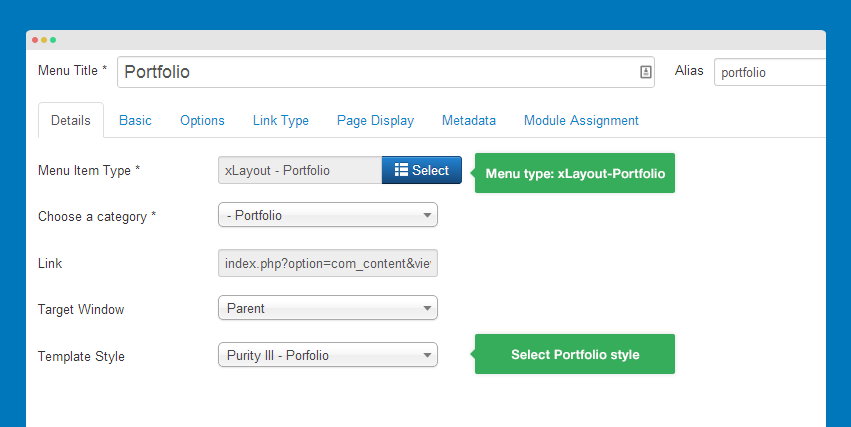
3.3 Portfolio menu setting
Menu Type: xLayout-Portfolio
Detail settings
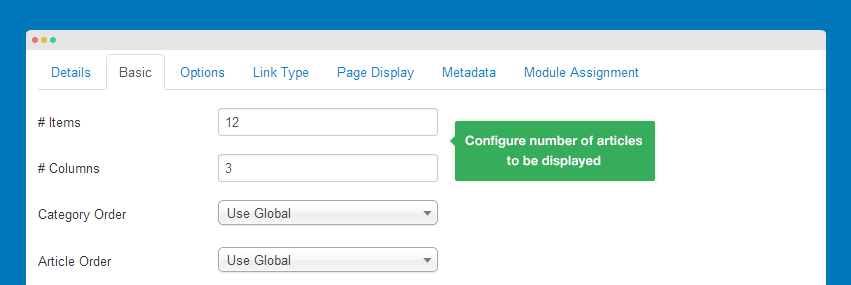
Basic settings
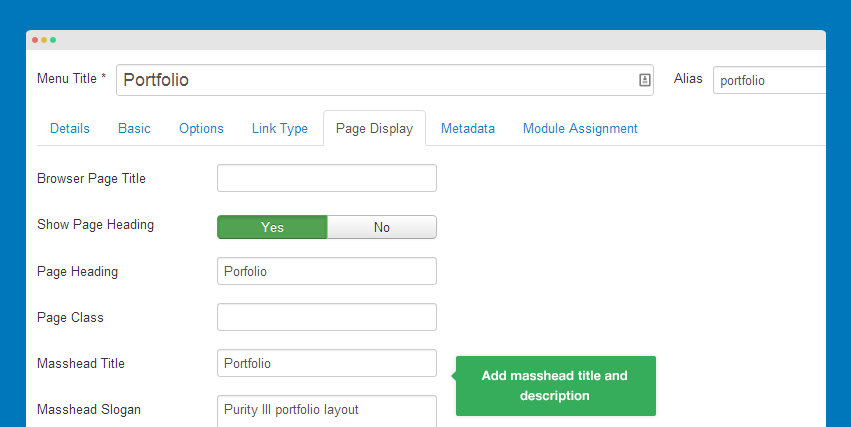
Page display settings
IV. Blog Layout
4.1 Layout structure
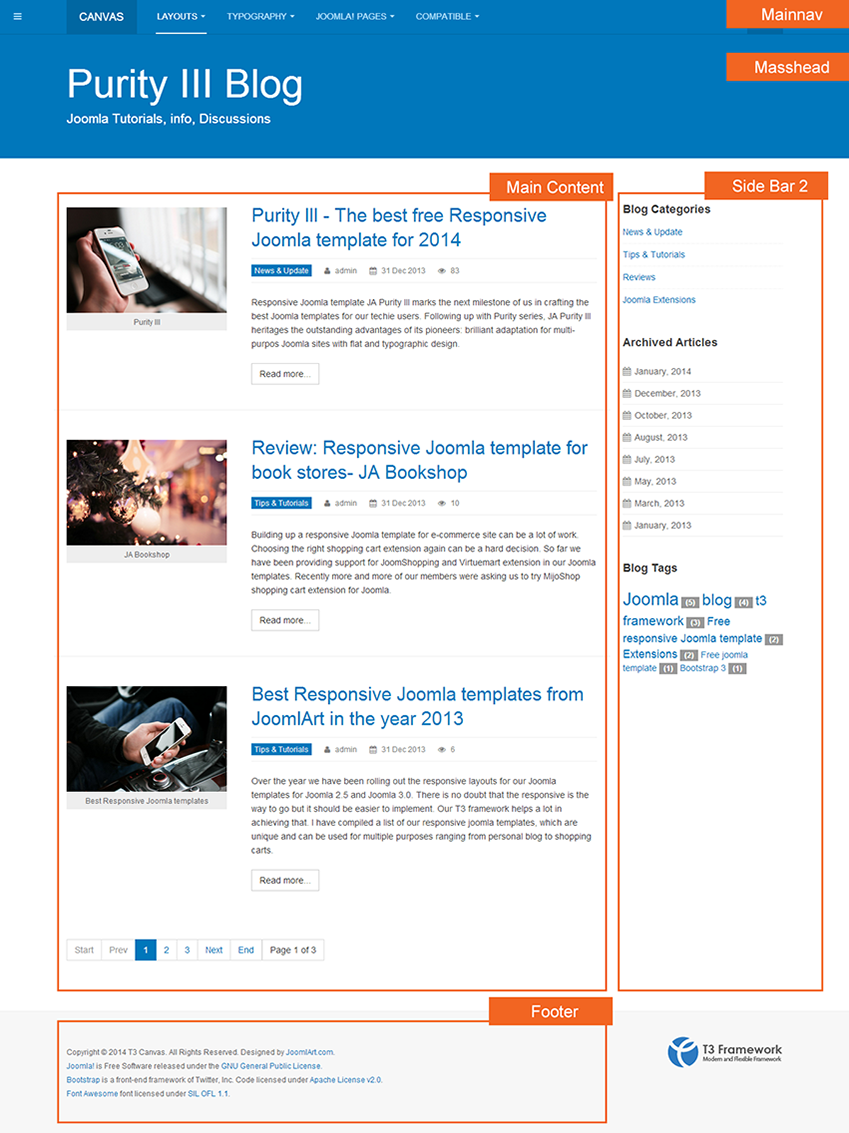
4.2 Build a Blog page
Important:
All steps of how to build a Blog page is the same with Magazine page. You can follow the detail instructions here: How to build up Magazine page.
- Step 1: Create "Blog" style
- Step 2: Assign "Blog" layout to "Blog" style
- Step 3: Create "Blog" menu
- Step 4: Assign "Blog" style to "Blog" menu item
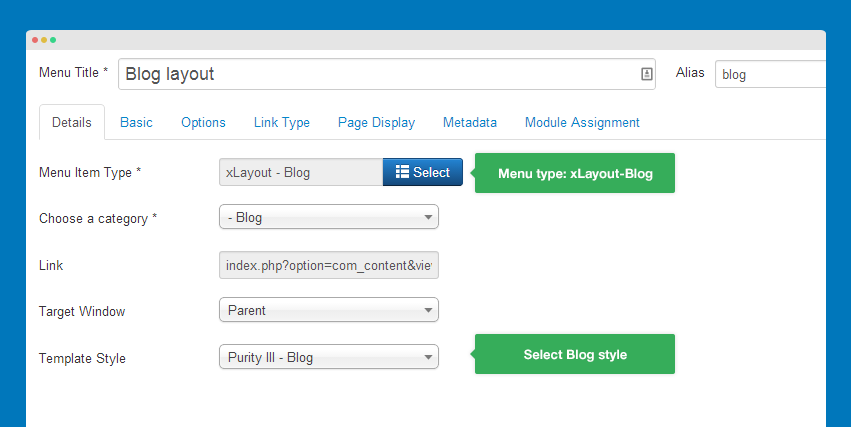
4.3 Blog menu setting
Menu Type: xLayout - Blog
Detail settings
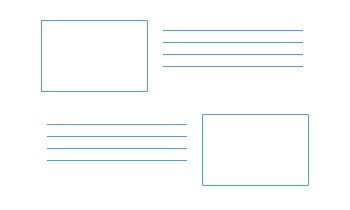
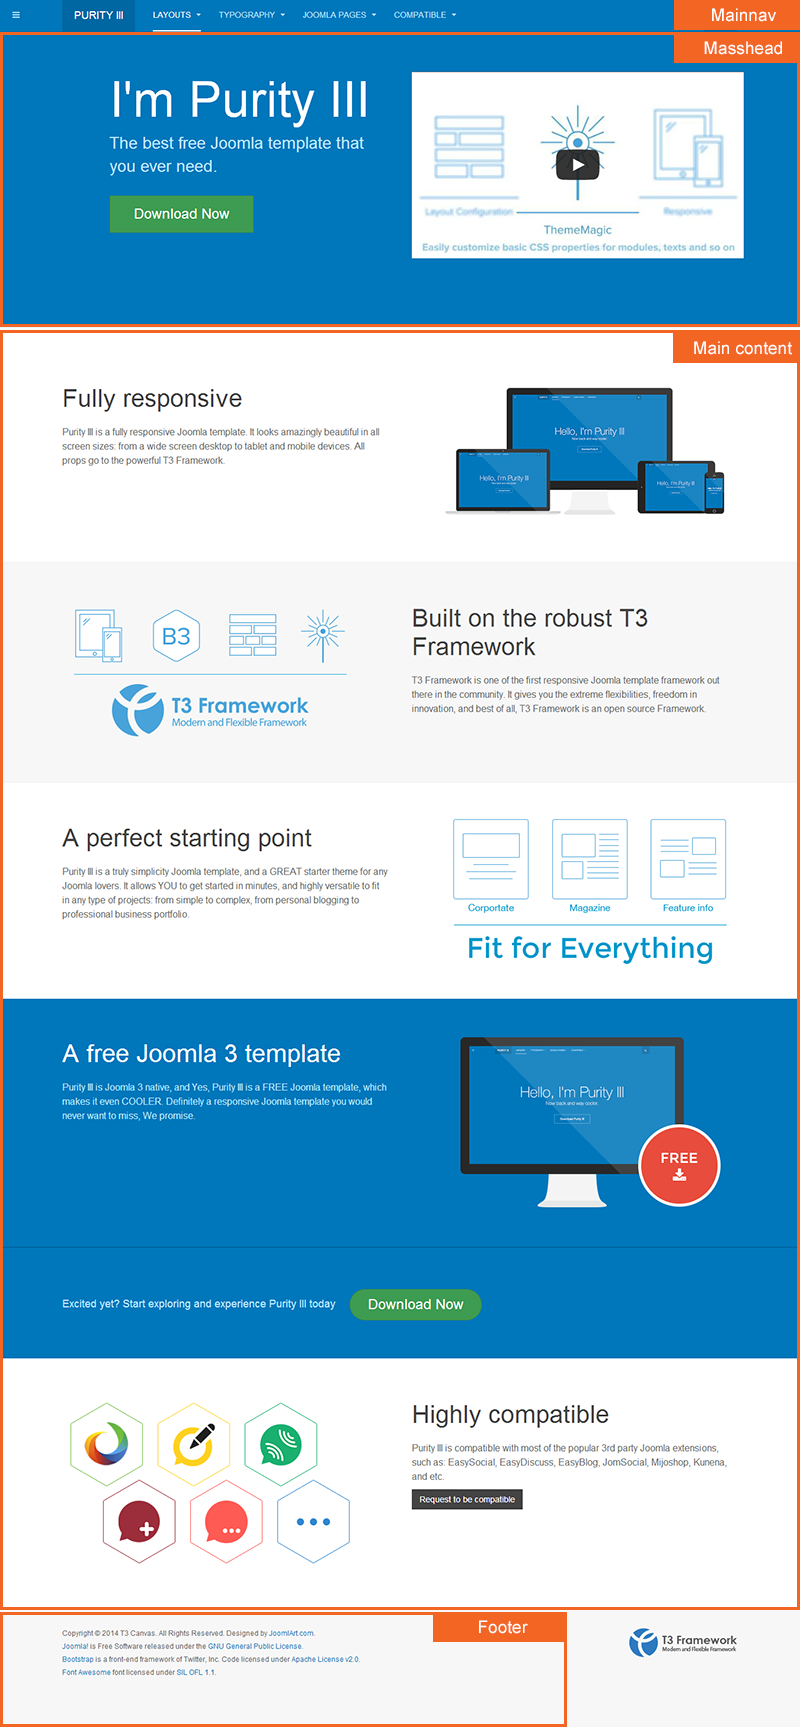
V. Features Intro 1 layout
5.1 Layout structure
5.2 Build Features Intro 1 page
Important:
All steps of how to build Features Intro 1 page is the same with Magazine page. You can follow the detail instructions here: how to build up Magazine page.
- Step 1: Create "Features intro 1" style
- Step 2: Assign "Features intro 1" to "Features intro 1" style
- Step 3: Create "Features Intro 1" menu
- Step 4: Assign "Features intro 1" style to "Features Intro 1" menu item
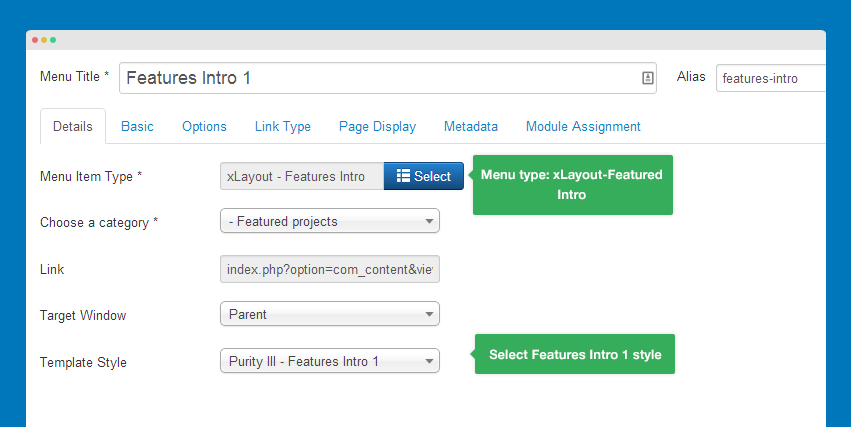
5.3 Features Intro 1 menu setting
Menu Type: xLayout-Features Intro
Detail settings
5.4 Article configuration
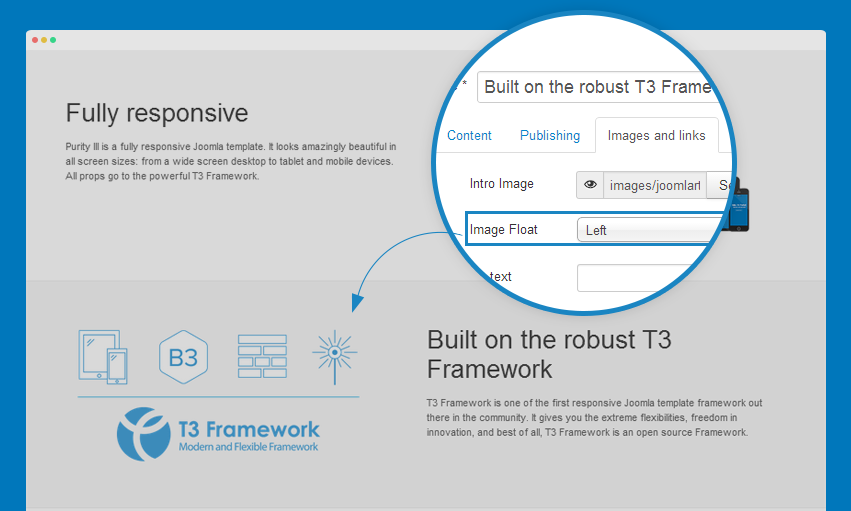
The articles used in the layout can be configured to have different styles. You can set the image alignment or add class to style the articles.
5.4.1 Align article image
With each article, you can set the alignment of article image in the list page by following these steps: Open the article editting panel, in the tab Images and Links, set the Image Float to Left or Right.
5.4.2 Supported classes for articles
Articles in the page Features Intro 1 have different styles. You can use the default supported classes or add new styles.
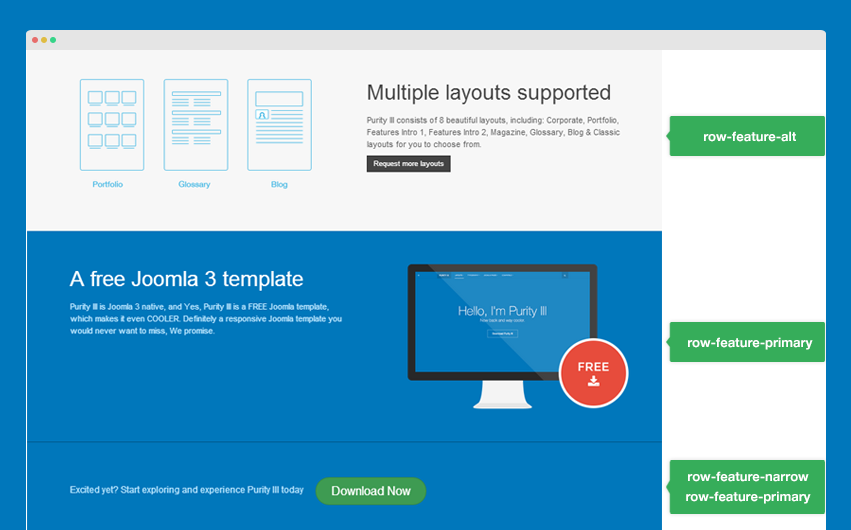
Default supported classes
row-feature-narrow
row-feature-primary
row-feature-alt
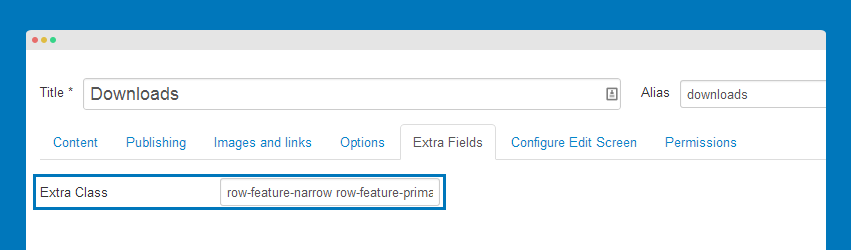
To add new classes, open the article editting panel, in the tab Extra Fields add your classes to the box Extra Fields
5.5 Masthead configuration
To have the same masthead like our demo, you need to create a Custom HTML module and assign it to position masthead.
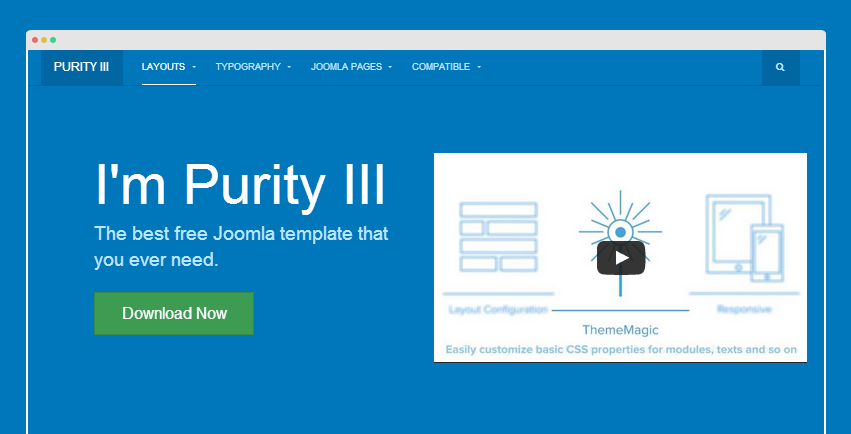
Module Position: masthead
Module Suffix: row-feature-primary
HTML code
<div class="jumbotron jumbotron-primary masthead btn-action">
<div class="col-md-6" align="left">
<h1>I'm Purity III</h1>
<p>The best free Joomla template that you ever need.</p>
<div class="btn-action" style="margin-bottom: 20px;"><p><a href="http://bit.ly/purity_iii" class="btn btn-success btn-lg">Download Now</a></p></div>
</div>
<div class="col-md-6">
<div class="video-wrapper">
<iframe width="560" height="315" frameborder="0" src="//www.youtube.com/embed/KSK2OR9pEUY?modestbranding=1&;showinfo=0&;autohide=1&;rel=0&;hd=1" allowfullscreen=""></iframe>
</div>
</div>
</div>
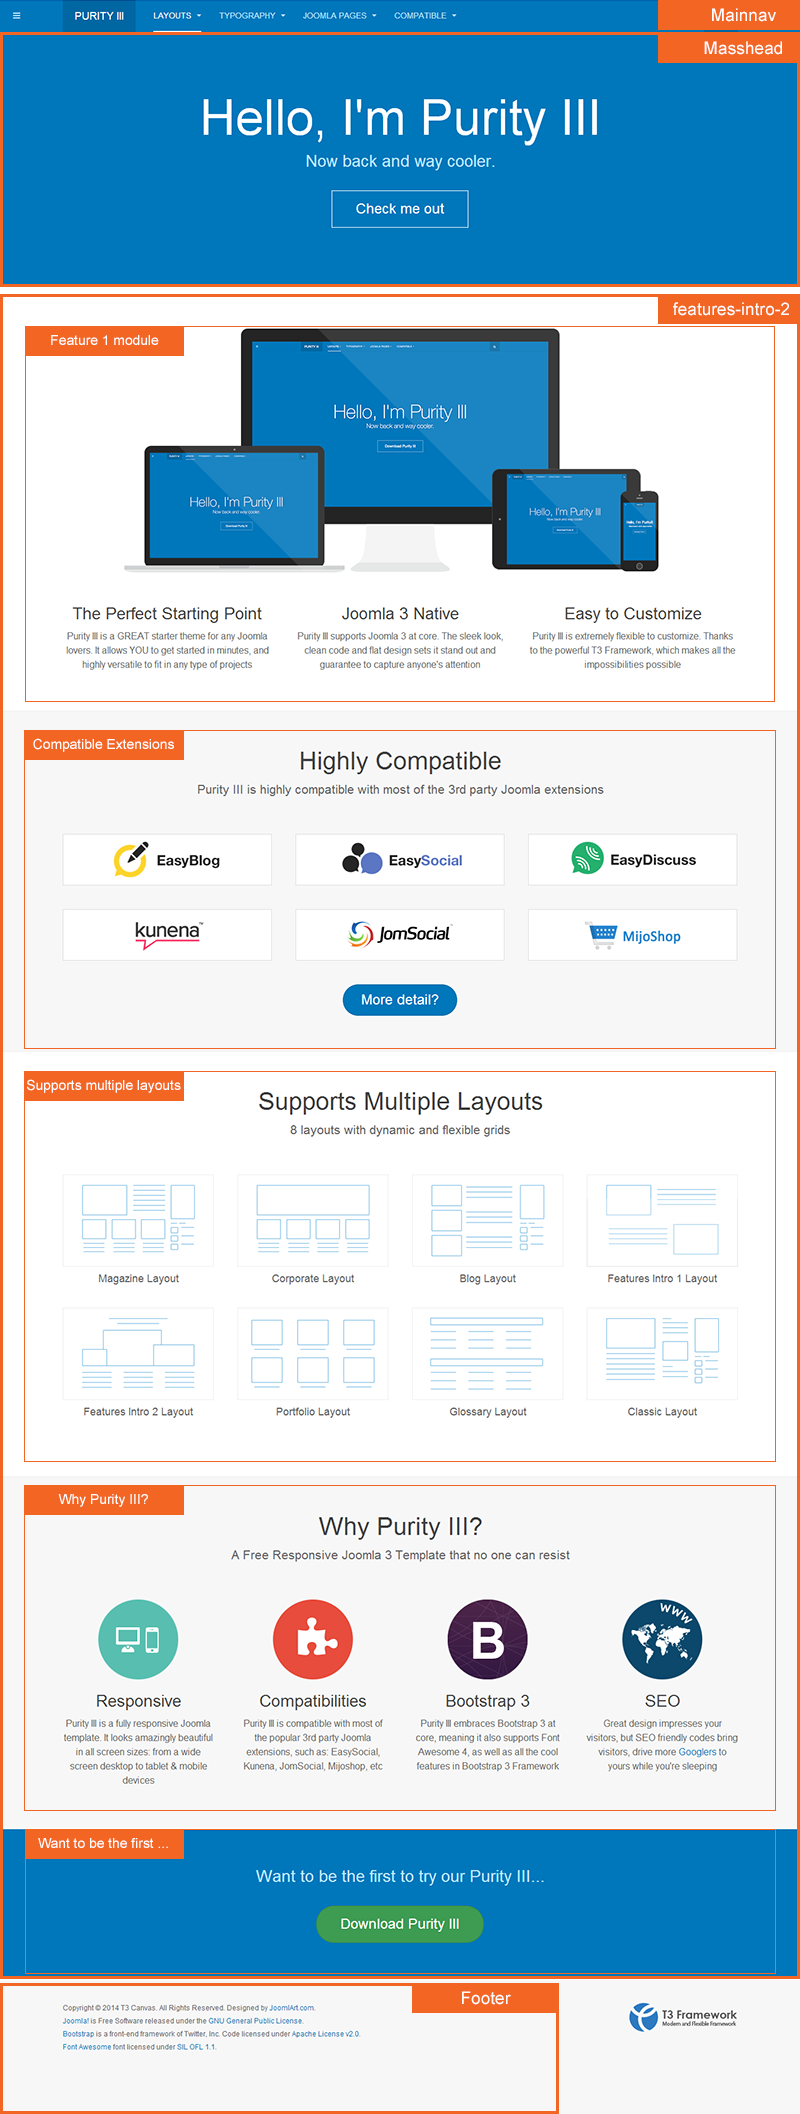
VI. Features Intro 2 Layout
6.1 Layout position/structure
6.2 Build Features Intro 2 page
Important:
All steps of how to build Features Intro 2 page is the same with Magazine page. You can follow the detail instructions here: How to build up Magazine page.
- Step 1: Create "Features intro 2" style
- Step 2: Assign Features-intro-2" layout to "Features intro 2" style
- Step 3: Create "Features Intro 2" menu
- Step 4: Assign "Features intro 2" style to "Features Intro 2" menu item
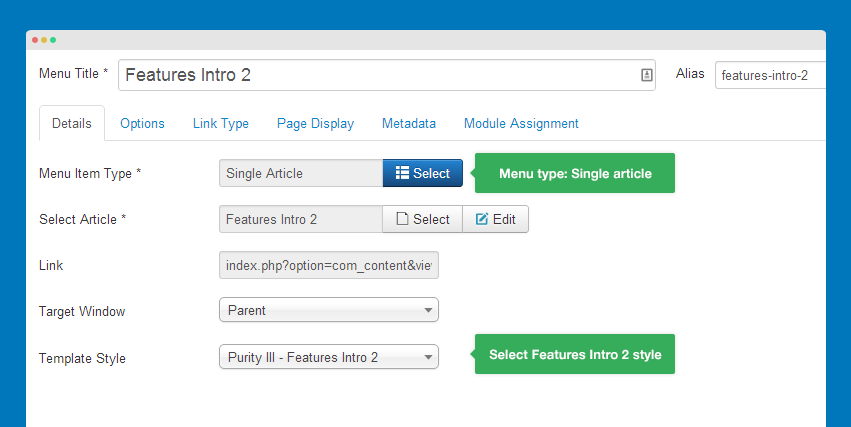
6.2.1 Features Intro 2 menu setting
Menu Type: xLayout-Features Intro
Detail Settings
6.3 Module configuration
Note:
The features-intro-2 has no com_content, so no matter what its menu type is, its layout will not change. On the demo site, the main content of the Features Intro 2 page is from modules that assigned to this position: features-intro-2.
6.3.1 Masthead
Module type: Custom HTML
Module Position: masthead
Module Suffix: row-feature-primary
HTML code
<div class="jumbotron jumbotron-primary masthead btn-action">
  <h1>Hello, I'm Purity III</h1>
  <p>Now back and way cooler.</p>
  <p><a href="http://bit.ly/purity_iii" class="btn btn-primary btn-lg"> Check me out</a></p>
</div>
6.3.2 Feature 1
Module Position: features-intro-2
Module Suffix: NOT USED
HTML code
<div class="text-center">
<div class="item-image"><img class="img-responsive" pagespeed_url_hash="557298203" alt="T3 Framework" src="/images/joomlart/intro-page/fullresponsive.png"></div>

<div class="col-md-4">
  <h3>The Perfect Starting Point</h3>
  <p>Purity III is a GREAT starter theme for any Joomla lovers. It allows YOU to get started in minutes, and highly versatile to fit in any type of projects</p>
 </div>

<div class="col-md-4">
  <h3>Joomla 3 Native</h3>
  <p>Purity III supports Joomla 3 at core. The sleek look, clean code and flat design sets it stand out and guarantee to capture anyone's attention</p>
</div>

<div class="col-md-4">
  <h3>Easy to Customize</h3>
  <p>Purity III is extremely flexible to customize. Thanks to the powerful T3 Framework, which makes all the impossibilities possible</p>
</div>

</div>
6.3.3 Compatible Extensions
Module Position: features-intro-2
Module Suffix: NOT USED
HTML code
<header class="jumbotron">
  <h2>Highly Compatible</h2>
  <p>Purity III is highly compatible with most of the 3rd party Joomla extensions</p>
</header>


  <div class="col-xs-6 col-md-4">
    <a class="thumbnail" href="/index.php/compatible/easyblog">
      <img src="/images/joomlart/compatible-extension/easyblog.png" alt="Easy Blog" />
    </a>
  </div>

  <div class="col-xs-6 col-md-4">
    <a class="thumbnail" href="/index.php/compatible/easysocial">
      <img src="/images/joomlart/compatible-extension/easysocial.png" alt="easysocial" />
    </a>
  </div>

  <div class="col-xs-6 col-md-4">
    <a class="thumbnail" href="/index.php/compatible/discussions">
      <img src="/images/joomlart/compatible-extension/easydiscuss.png" border="0" alt="easydiscuss" />
    </a>
  </div>


  <div class="col-xs-6 col-md-4">
    <a class="thumbnail" href="/index.php/forum/index">
      <img src="/images/joomlart/compatible-extension/kunena.png" border="0" alt="Kunena" />
    </a>
  </div>

  <div class="col-xs-6 col-md-4">
    <a class="thumbnail" href="/index.php/compatible/jomsocial">
      <img src="/images/joomlart/compatible-extension/jomsocial.png" border="0" alt="JomSocial" />
    </a>
  </div>

  <div class="col-xs-6 col-md-4">
    <a class="thumbnail" href="/index.php/compatible/mijoshop">
      <img src="/images/joomlart/compatible-extension/mijoshop-logo.png" border="0" alt="mijoshop" />
    </a>
  </div>

<div class="wrap btn-actions text-center">
    <a class="btn btn-primary btn-lg" role="button" href="http://bit.ly/purity_iii">More detail?</a>
  </div>
6.3.4 Supports multiple layouts
Module Position: features-intro-2
Module Suffix: NOT USED
HTML code
<header class="jumbotron">
<h2>Supports Multiple Layouts</h2>
<p>8 layouts with dynamic and flexible grids</p>
</header>

<div class="gallery">

  <div class="col-xs-6 col-md-3">
    <div class="thumbnail">
      <a target="_blank" title="magazine layout" href="/index.php/layout/new-layouts/magazine">
        <img pagespeed_url_hash="2579736203" alt="" src="/images/joomlart/supported-layout/magazine.png" class="img-responsive">
      </a>
      <h4 class="text-center">Magazine Layout</h4>
    </div>
  </div>

  <div class="col-xs-6 col-md-3">
    <div class="thumbnail">
      <a target="_blank" title="Coperate layout" href="/index.php/layout/new-layouts//corporate">
          <img pagespeed_url_hash="2874236124" alt="" src="/images/joomlart/supported-layout/corporate.png" class="img-responsive">
      </a>
      <h4 class="text-center">Corporate Layout</h4>
    </div>
  </div>

  <div class="col-xs-6 col-md-3">
    <div class="thumbnail">
      <a target="_blank" title="blog layout" href="/index.php/layout/new-layouts/blog">
        <img pagespeed_url_hash="3168736045" target="_blank" alt="" src="/images/joomlart/supported-layout/blog.png" class="img-responsive">
      </a>
      <h4 class="text-center">Blog Layout</h4>
    </div>
  </div>

  <div class="col-xs-6 col-md-3">
    <div class="thumbnail">
      <a target="_blank" title="features intro 1" href="/index.php/layout/new-layouts/features-intro">
        <img pagespeed_url_hash="3757735887" alt="" src="/images/joomlart/supported-layout/features_1.png" class="img-responsive">
      </a>
      <h4 class="text-center">Features Intro 1 Layout</h4>
    </div>
  </div>

  <div class="col-xs-6 col-md-3">
    <div class="thumbnail">
      <a target="_blank" title="features intro 2" href="http://joomla-templates.joomlart.com/purity_iii/">
        <img pagespeed_url_hash="4052235808" alt="" src="/images/joomlart/supported-layout/features_2.png" class="img-responsive">
      </a>
      <h4 class="text-center">Features Intro 2 Layout</h4>
    </div>
  </div>

  <div class="col-xs-6 col-md-3">
    <div class="thumbnail">
      <a target="_blank" title="portfolio layout" href="/index.php/layout/new-layouts/portfolio">
        <img pagespeed_url_hash="3463235966" alt="" src="/images/joomlart/supported-layout/portfolio.png" class="img-responsive">
      </a>
      <h4 class="text-center">Portfolio Layout</h4>
    </div>
  </div>

  <div class="col-xs-6 col-md-3">
    <div class="thumbnail">
      <a target="_blank" title="" href="/index.php/layout/new-layouts/glossary">
        <img alt="" src="/images/joomlart/supported-layout/glossary.png" class="img-responsive">
      </a>
      <h4 class="text-center">Glossary Layout</h4>
    </div>
  </div>

  <div class="col-xs-6 col-md-3">
    <div class="thumbnail">
      <a target="_blank" title="" href="/index.php/layout/new-layouts/home-classic/3-columns">
        <img alt="" src="/images/joomlart/supported-layout/classic_layout.png" class="img-responsive">
      </a>
      <h4 class="text-center">Classic Layout</h4>
    </div>
  </div>

</div>
6.3.5 Why Purity III?
Module Position: features-intro-2
Module Suffix: NOT USED
HTML code
<header class="jumbotron">
<h2>Why Purity III?</h2>
<p>A Free Responsive Joomla 3 Template that no one can resist</p>
</header>

<div class="text-center">

<div class="col-md-3">
  <p><img pagespeed_url_hash="932791188" alt="Responsive" src="/images/joomlart/banners/responsive-icon.png" /></p>
  <h3>Responsive</h3>
  <p>Purity III is a fully responsive Joomla template. It looks amazingly beautiful in all screen sizes: from a wide screen desktop to tablet & mobile devices</p>
</div>

<div class="col-md-3">
  <p><img pagespeed_url_hash="2048194936" alt="Compatibilities" src="/images/joomlart/banners/html5-icon.png"></p>
  <h3>Compatibilities</h3>
  <p>Purity III is compatible with most of the popular 3rd party Joomla extensions, such as: EasySocial, Kunena, JomSocial, Mijoshop, etc</p>
</div>

<div class="col-md-3">
  <p><img pagespeed_url_hash="1985577692" alt="Bootstrap 3" src="/images/joomlart/banners/bootstrap-icon.png"></p>
  <h3>Bootstrap 3</h3>
  <p>Purity III embraces Bootstrap 3 at core, meaning it also supports Font Awesome 4, as well as all the cool features in Bootstrap 3 Framework</p>
</div>

<div class="col-md-3">
  <p><img pagespeed_url_hash="1616445301" alt="SEO" src="/images/joomlart/banners/seo-icon.png"></p>
  <h3>SEO</h3>
  <p>Great design impresses your visitors, but SEO friendly codes bring visitors, drive more <a target="_blank" href="http://www.google.com">Googlers</a> to yours while you're sleeping</p>
</div>

</div>
6.3.6 Want to be the first to try our Purity III
Module Position: features-intro-2
Module Suffix: row-feature-primary
HTML code
<div class="container jumbotron masthead" style="margin:0;">
  <span class="section-arrow-alt"></span>
  <p>Want to be the first to try our Purity III...</p>
<div class="btn-actions">
    <a class="btn btn-success btn-lg" role="button" href="http://bit.ly/purity_iii">Download <span class="hidden-phone">Purity III</span></a>
  </div>
</div>
VII. Glossary layout
Important:
The Glossary page uses default layout so you don't need to create style for the Glossary page. You need to assign the right menu type to the "Glossary" menu. And please make sure assign "Glossary layout" in the "Add-ons" tab of template manager.
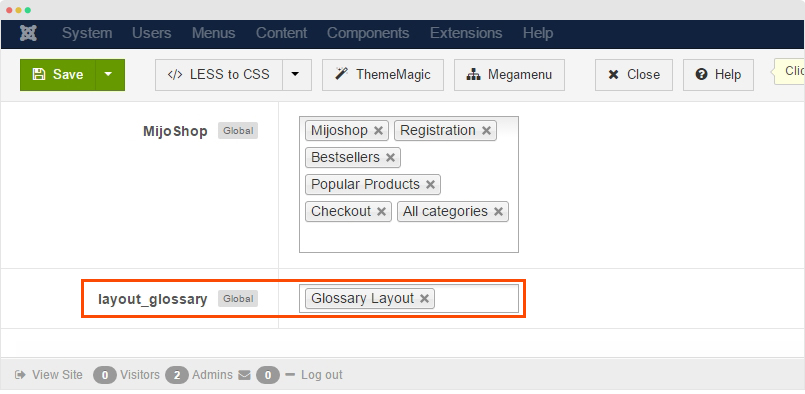
1. Assign Glossary layout setting
Go to: Extensions > Template Manager and open the Purity III default template style, in the "Add-ons" tab, find the "layout_glossary" field and assign the Glossary layout for the field, please check the screenshot below.
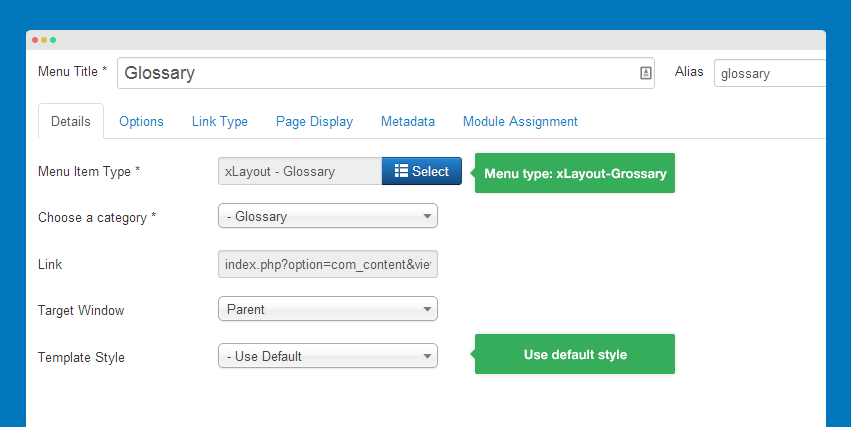
2. Glossary menu setting
Menu Type: xLayout-Grossary
Detail settings
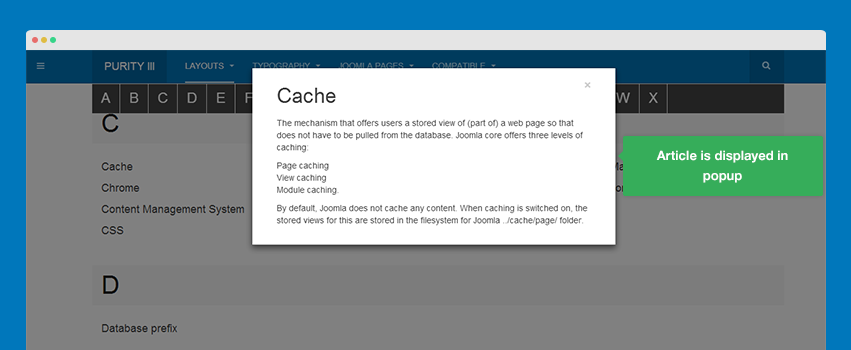
Front-end Appearance
Article displayed in popup
Layout configuration
One of the highlight feature of T3 Framework is the visual layout configuration. You can see the structure of your layout when configuring. There are 2 parts in layout configuration: Layout Structure and Responsive Layout
Open the style that you want to assign layout. This layout will be only applied to the current style.
Layout structure
The layout structure allows you to change the structure of your layout.
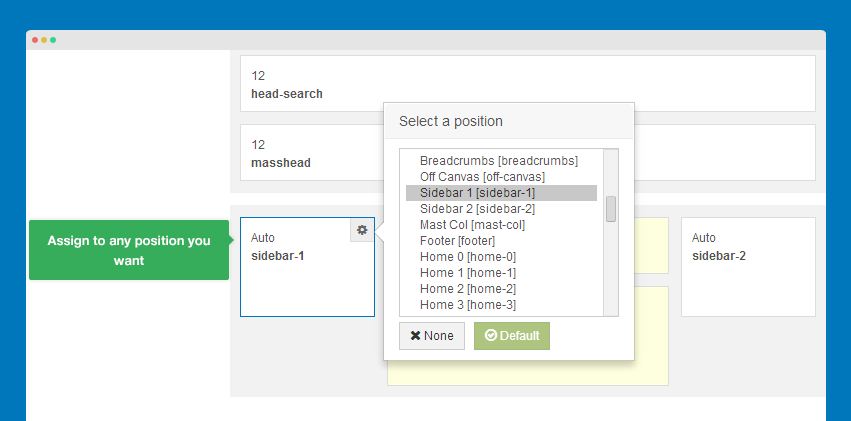
Step 1: Assign module position
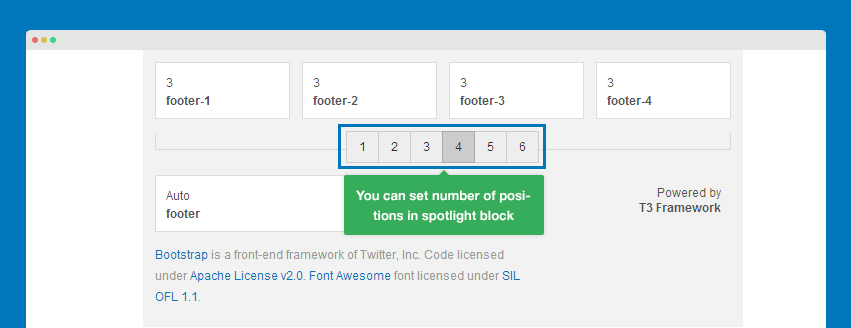
Step 2: set the order of positions for spotlight blocks
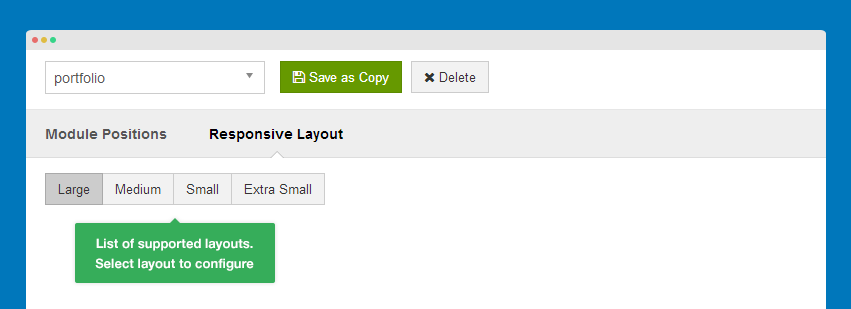
Responsive layout configuration
Step 1: Select the responsive layout to configure
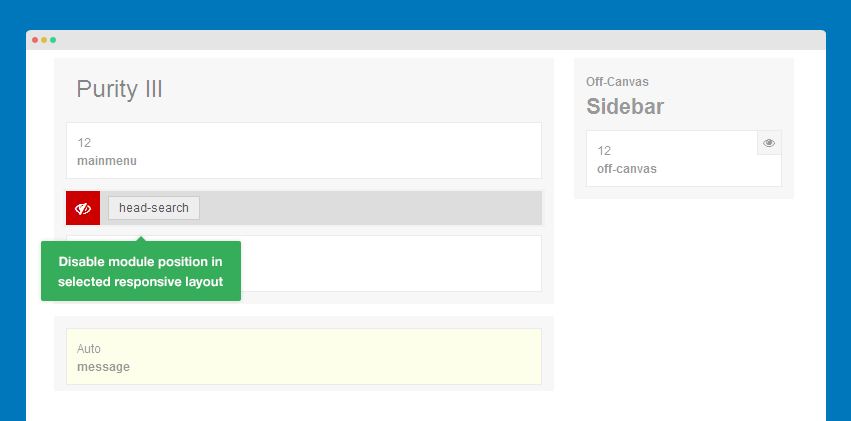
Step 2: Disable the module position that you don't want to display in a specific responsive layout
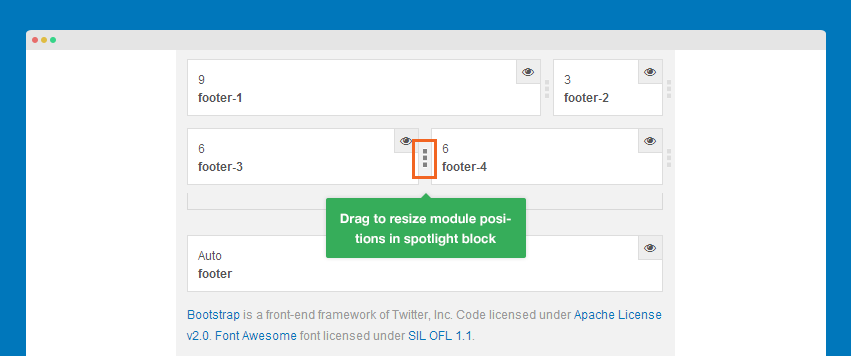
Step 3: Resize module positions in spotlight block. For module positions in other block type, you can not resize.
Saved settings
The settings of your layout configuration are not saved in Database, but in .ini files located in templates\purity_iii\etc\layout.
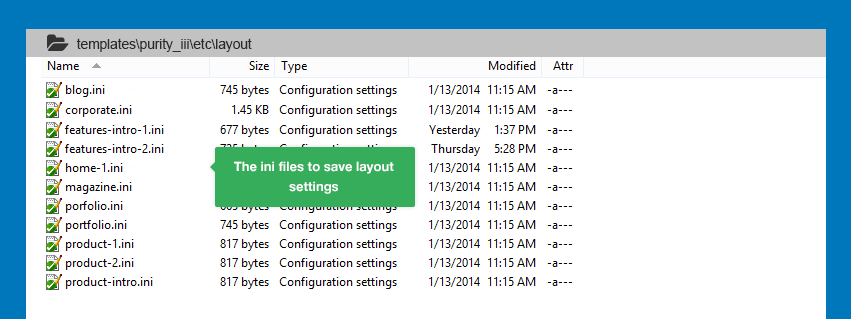
You can also configure your layout in those .ini files but we don't recommend that.
References
Important:
Purity III is built on T3 Framework. Therefore, you can follow the documentation of T3 Framework when managing your layout. The following references will help you.
T3 Framework layout documentation
T3 Framework layout video tutorials
Layout configuration
T3 Framework makes it easy when it comes to layout configuration. This video will be about Layout configuration. The visual of layout configuration in back-end allows you to configure your Joomla 2.5 and Joomla 3 templates layout easier and faster. Watch and see!
Still have trouble?Layout Customization
This video tutorial is about T3 Framework layout customization. Also in this video, we will show you how to create and customize a layout and how to customize blocks in a layout for your Joomla 2.5 and Joomla 3 templates.
Still have trouble?