Template Installation
The section will help you with steps to install JA Moviemax template - Quickstart and Manual installation.
System requirement
JA Moviemax template is native with Joomla 3. Please make sure your system meets the following requirements:
Software
- Software: PHP (Magic Quotes GPC off): 5.3.1 + (5.4+ recommended)
Databases
- MySQL(InnoDB support required): 5.1+
- MSSQL 10.50.1600.1+
- PostgreSQL 8.3.18+
Web Severs
- Apache 2.x+
- Microsoft IIS 7
- Nginx 1.0 (1.1 recommended)
Browser requirement
- Firefox 4+
- IE (Internet Explorer) 8+
- Google Chrome 10+
- Opera 10+
- Safari 5+
Development Environment
During development process, Localhost is preferred. You can use the following servers on your PC to develop your site.
Windows
- WAMPSEVER
- XAMPP for Windows
Linux
- LAMP Bubdle
- XAMPP for Linux
Mac OS
- MAMP & MAMP Pro
- XAMPP for Mac OS
Download packages
Important:
1. JA Moviemax template is built on T3 Framework so it requires T3 Framework to be installed and enabled in your system.
2. We highly recommend you to use stable version of Joomla 3.
Download Packages
The download package includes:
- Quickstart package
- JA Moviemax template
- T3 Framework plugin
- JA Content Type plugin
- JA Content Type Ajax plugin
- JA Disqus Debate Echo Plugin
- System - JA Tabs Plugin
- System - JA Google Map
- Source file
Quickstart installation
Why Quickstart
The quickstart allows you to replicate JA Moviemax demo to your server. It means, after install the quickstart, you will have a site exactly the same as the demo site.
Download JA Moviemax quickstart package →, upload to your server and extract it.
Step 1 - Configuration: add Site name, Admin email, Admin username and password
Step 2 - Database: select database type, host name, database username, password, database name & table prefix
Step 3 - Overview: select sample data to install, we suggest to use Default English (GB) Sample Data. You can install multilingual in the step.
Step 4 - Remove/Rename "installation" folder: for security purpose, you need to rename or remove the "installation" folder
Detail documentation with screenshots
Manual Installation
Install T3 Framework
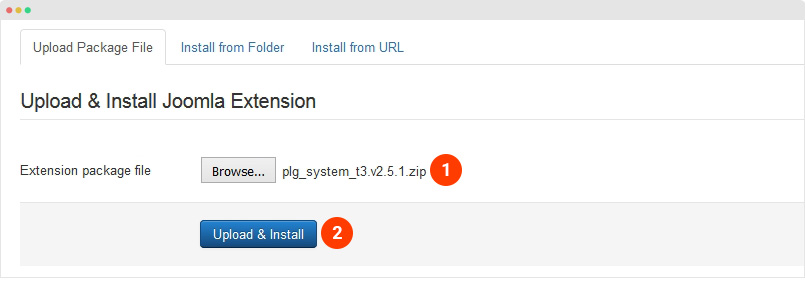
Step 1 - Install T3 Framework
From your back-end setting panel, go to: "Extensions → Extension Manager", browse T3 plugin installation package then hit the "Upload and Install"
Step 2 - Enable T3 Framework
When you install T3 Framework, it's auto enabled by default. You can check this by going to: "Extensions → Plugin Manager" then find T3 Plugin.
Install JA Moviemax template
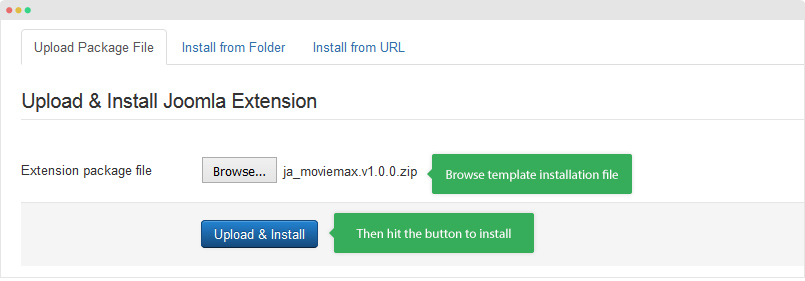
Step 1 - Install JA Moviemax template
From your back-end setting panel, go to: "Extensions → Extension Manager", browse JA Moviemax template installation package then hit the "Upload and Install"
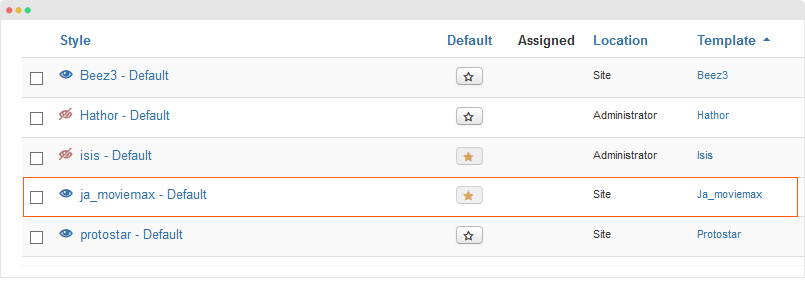
Step 2 - Set default template style
Go to: "Extensions → Template Manager", set JA Moviemax template style as your default template style.
Install all supported extensions
- JA Content Type plugin
- JA Content Type Ajax plugin
- JA Disqus Debate Echo Plugin
- System - JA Tabs Plugin
- System - JA Google Map
- Kunena component
Template folder structure
This section is to help you understand the folder structure of JA Moviemax template, where to find the files you want.
JA Moviemax template
JA Moviemax template is built on T3 Framework so its folder structure is almost the same with any other JA Templates that are developed with T3 Framework.
templates/ja_moviemax/
+-- less/                 /*  all LESS files */
¦    +-- template.less
¦    +-- style.less
¦    +-- home.less
¦    +-- joomla.less
¦    +-- themes/            /*theme folders and theme files */
+-- css/                     /*compiled files from less*/
¦    +-- template.css
¦    +-- style.css
¦    +-- home.css
¦    +-- joomla.css
¦    +-- themes/            /*Compiled themes */
+-- tpls/             /* all layout files and block files*/
¦    +-- default.php
¦    +-- default-left-sidebar.php
¦    +-- default-mainnav.php
¦    +-- blocks/       /*block files*/
¦    ¦    +-- header.php
¦    ¦    +-- header-2.php
¦    ¦    +-- mainbody.php
¦    ¦    +-- mainbody-left-sidebar.php
¦    ¦    +-- off-canvas.php
¦    ¦    +-- content-mast-top.php
¦    ¦    +-- content-mast-bottom.php
¦    ¦    +-- slideshow.php
¦    ¦    +-- footer.php
¦    ¦    +-- mainbody/
+-- contenttype/               /*extended content types*/
¦    +-- forms/
¦    ¦    +-- article_edit.xml
¦    +-- fields/
¦    +-- types/
¦    ¦    +-- gallery.xml
¦    ¦    +-- video.xml
+-- html/               /*override modules and Joomla com_content*/
¦    +-- com_content/
¦    ¦    +-- article/
¦    ¦    +-- category/
¦    ¦    +-- featured/
¦    +-- com_contact/
¦    +-- layouts/
¦    +-- ...
+-- fonts/
¦    +-- font-awesome/
¦    ¦    +-- css/
¦    ¦    +-- fonts/
+-- js/
¦    +-- script.js
¦    +-- infinitive-paging.js
¦    +-- jquery.infinitescroll.js
¦    +-- jquery.infinitescroll.min.js
¦    +-- gallery/
¦    +-- owl-carousel/
¦    +-- sick/
+-- images/
+-- language/
+-- templateDetails.xml
+-- templateInfo.php/
+-- thememagic.xml/     /*the file is to add new group, parameters to ThemeMagic*/
+-- templateHook.php/
T3 Framework
You can find the folder structure of T3 Framewotk at: http://t3-framework.org/documentation/installation#folder-structure.
Recommendation
Any customization in the T3 plugin is not recommended. To customize your template, please do it in the "local" folder: templates/ja_moviemax/local. Check out detail documentation →
Upgrade Instruction
Take a full backup
Please always make a back-up before proceeding to any of the upgrade process. In case there is any problem, you can always restore from the back-up files.
1. Set up JA Extension Manager Component
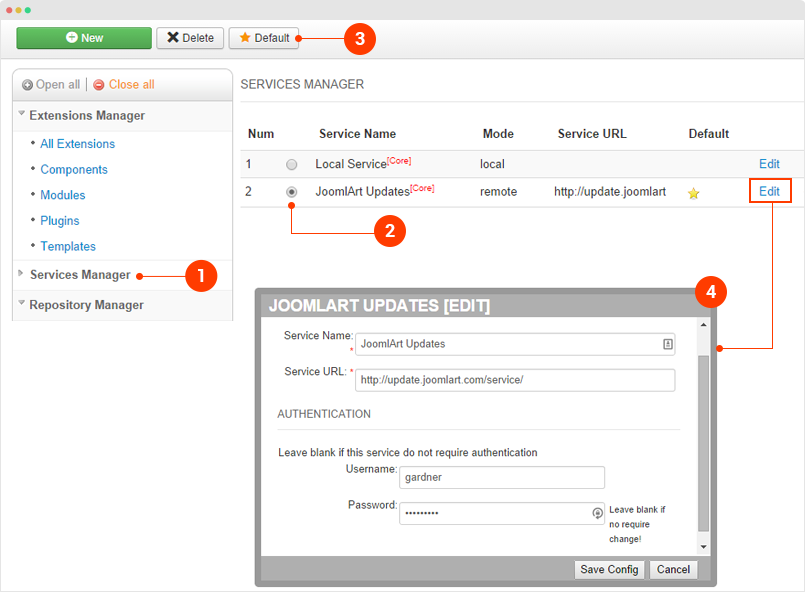
The best method to upgrade JoomlArt products is using JA Extension Manager. The FREE extension brings a new way to manage extensions: upgrade, roll back, remote install, internal repository and compare versions.
From back-end, go to: Components → JA Extension Manager then select Service Manager, now set JoomlArt as your default service. Next, hit the "Edit" button then add your Username and Password that you signed up in JoomlArt.com.
2. Upgrade JA Moviemax template
Step 1 - check the new version of JA Moviemax template. Using the filter to find the JA Moviemax template then hit the "Check Update" button.
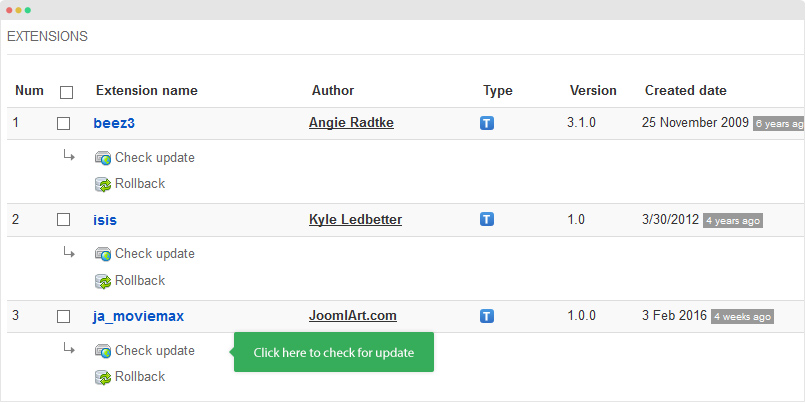
Step 2 - Upgrade JA Moviemax template to latest version. You should compare the changes before upgrading. We only pay attention to conflicted files - files that have been modified by both user and developer. When upgrading, the conflicted files will be overridden by files in new version, that means what you customized in the files will be lost.
3. Upgrade T3 Framework and other JA extensions
Using the filter to find the extensions you want to upgrade (JoomlArt products only), hit the "Check Update" button to check for new version then hit the Upgrade Now to upgrade the extension to latest version.
Content Types
Supported Content Types
JA Content Type plugin is developed to extend Joomla core content component (com_content). In details, it allows you to create more content types. JA Moviemax adds 3 extra custom content types: Gallery and Video. In each content type, we add more custom fields while keeping all default Joomla Article fields and each content type has its own view, structure and style.
- Gallery
- Video
Requirement
To make the content types available in your site, install and enable the JA Content Type System plugin and JA Content Type Ajax plugin.
Create new content
In each content type, we add more custom fields, all default fiels of Article content type is kept. Each content type has its own view, structure and style.
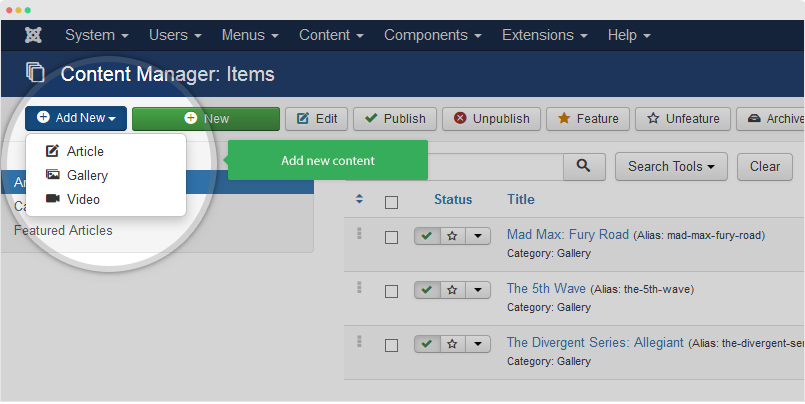
The content types are managed in the "Article Manager". You can add new item by hitting the "Add New" button then select the content type you want.
Below you can find steps to create each custom content type and assign its view to frontpage as you can see in JA Moviemax template.
Create new item
From back-end setting, please go to: Content » Article Manager » hit the "Add New" button and select content type.
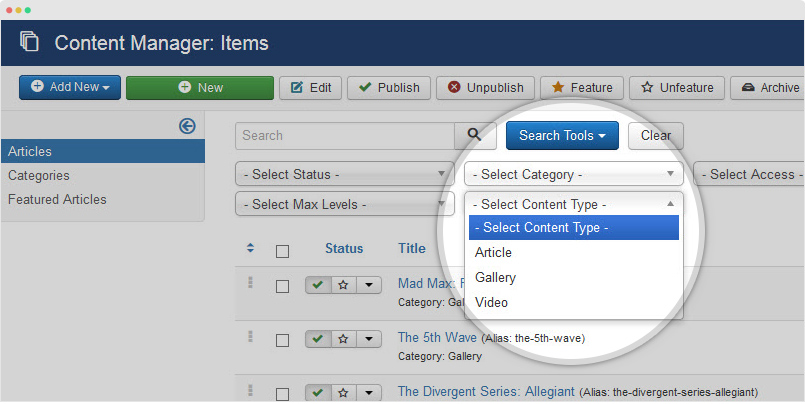
Search for content to edit
To find the content to edit, you can filter by content type. Expand the Search tools bye hit the "Search Tools" button, select content type to filter.
Joomla Article - for News and Movies layout
Create Joomla Article
- First, you create category to store article items. This remains the default Joomla category as usual. It will help you manage items and build views for articles easier.
- Then, create articles (simply click "Add new" in Joomla article manager panel) and assign to the category you just create above.
Step 2: Assign view for your Joomla Article
This is default content type of Joomla com_content so you can use all the standard ways to display the content in front-page: menu, module. However, the layout and style are customized to fit the template design. Please refer to the News page config and Movies page config for detail configuration of the menu items.
Video Content Type
Video content type is aimed to manage your video from given sources, at present it supports Youtube, Vimeo and Local upload.
The extended fields for Video content type includes:
- All settings from default Joomla Article
- Video-specific custom fields:
- Video source
- Thumbnail
- Description
- Video width & height
Create new video article
- First, you should create category to store video items. This remains the default Joomla category as usual. It will help you manage items and build category view for video items easier.
- Then, create video items (simply click ‘Add new’ in Joomla article manager panel) and assign to the category you just create above.
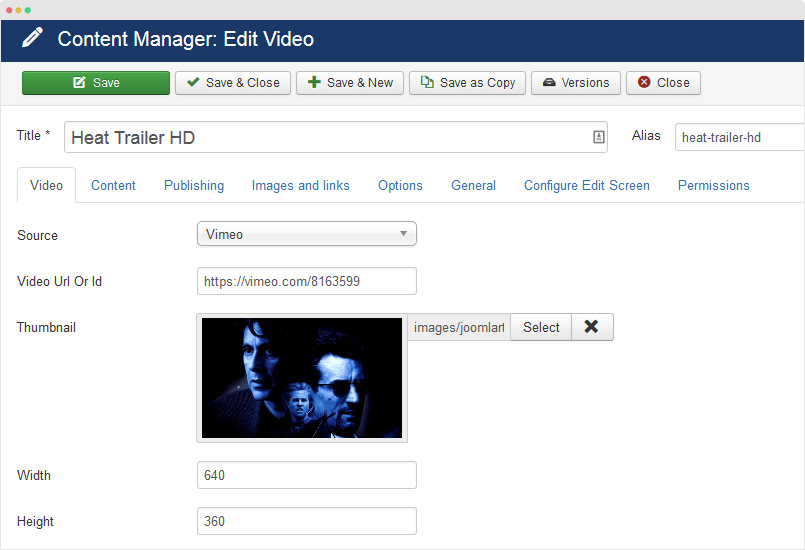
Manage your videos directly via Joomla com_content
For now, we are supporting 3 video sources: Youtube, Vimeo and local (videos uploaded to your hosting). Here are the formats to add the videos. For Youtube and Vimeo video sources, you just need to add full video url, for local video source, just browse the video uploaded to your hosting (inside the image folder).
Gallery Content Type
Similar way like other content types, here are steps to create and assign view for Gallery content. You should see the following settings when creating a new Gallery item:
- All settings from default Joomla Article
- Gallery-specific custom fields (in the Gallery tab): Image, Class, Caption and Link.
Create Gallery content
- First, create a standard Joomla category to store your Gallery items
- Then, create new Gallery items (simply click "Add new" in Joomla article manager panel) and assign them to the category you just create above.
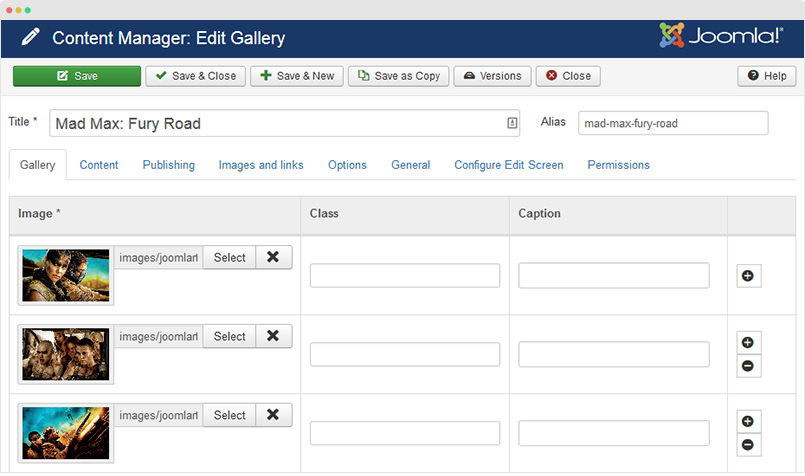
Typical Gallery item via Joomla com_content
Kunena Component configuration
JA Moviemax template supports Kunena components to build forum page. Here is the instruction to configure the extension as the demo site.
Install Kunena component
Kunena is free extension, you can download it from the links:
Once you have installation package of the extension, install it via installation panel: Extensions > Extension Manager.
Set JA Moviemax as default Kunena template
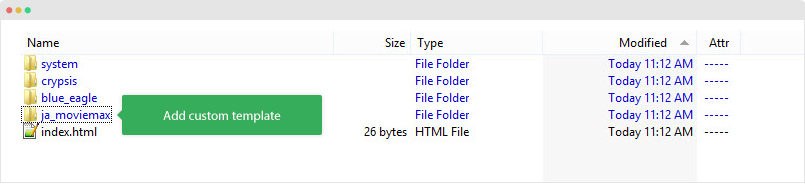
Step 1 - Once Kunena is installed, please download the custom template for Kunena, extract it and upload to the folder: components/com_kunena/template/.
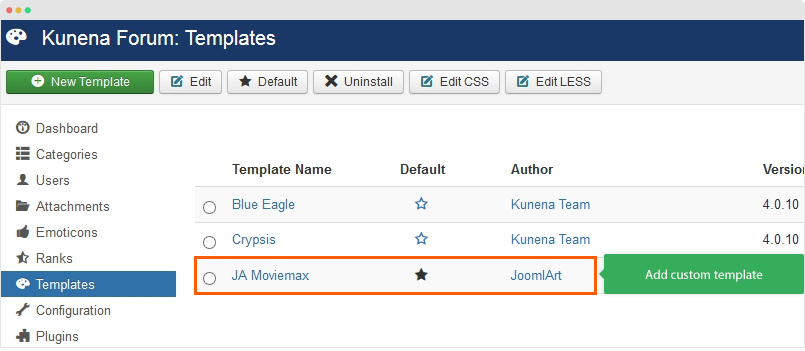
Step 2 - Go to Components » Kunena Forum » Template and set JA Moviemax as default template for Kunena.
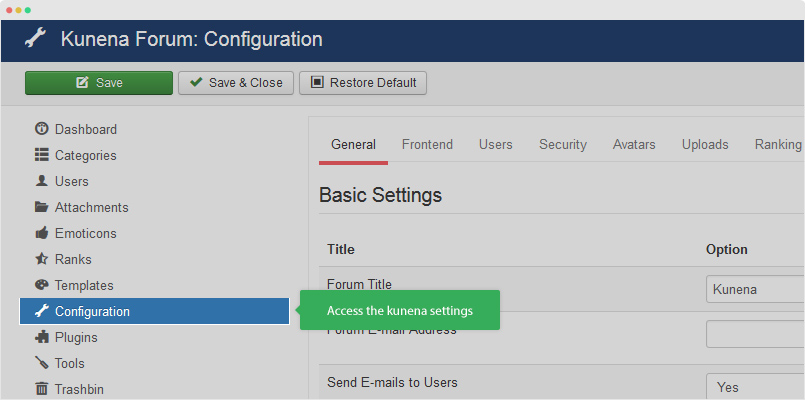
Kunena Configuration
From your site admin, go to: Components » Kunena Forum » Configuration. We use default settings in the demo site.
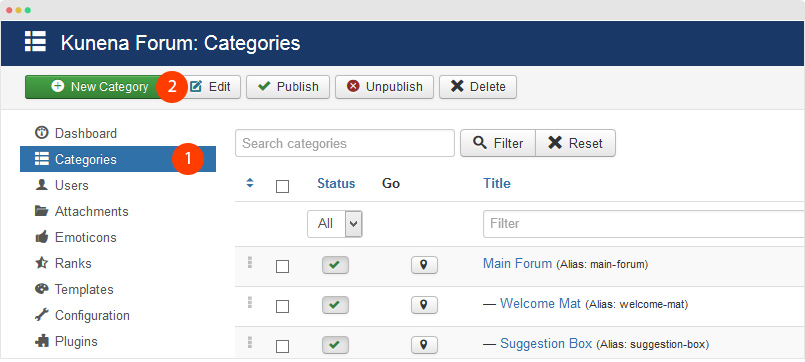
Create categories
Access the Categories tab and hit the "New Category" button to create new category.
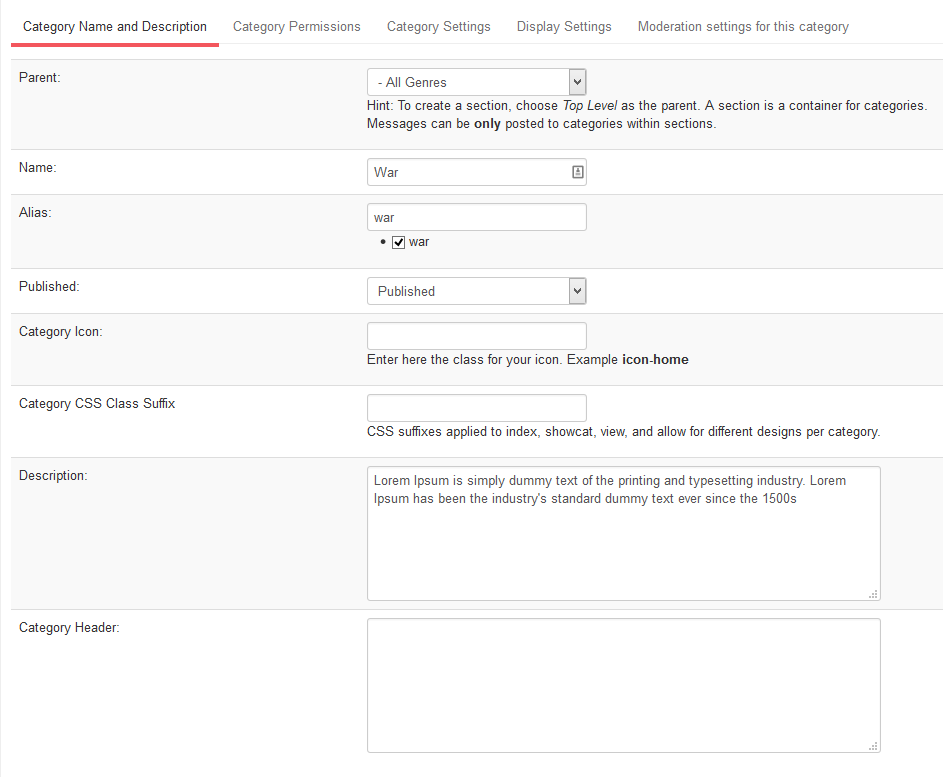
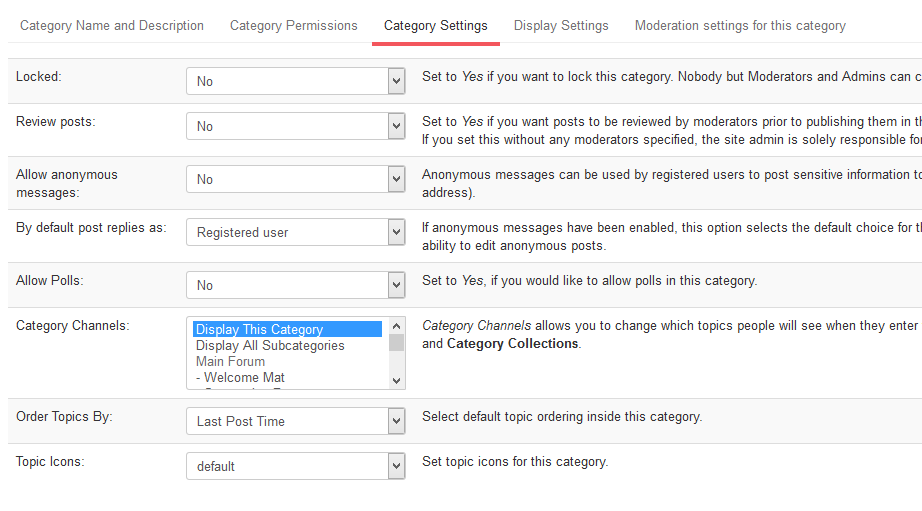
Category setting:
Step 3: create Kunena menu items
Once Kunena component is installed successfully, the Kunena menu is auto created, you can see list all menu items from: Menu » Kunena Menu.
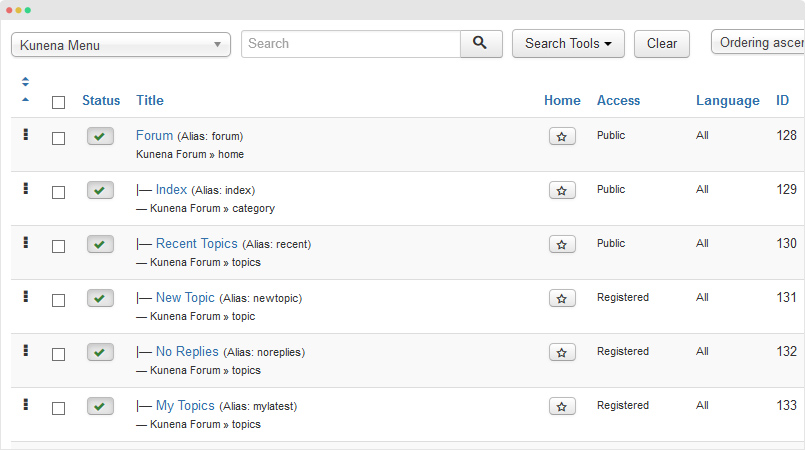
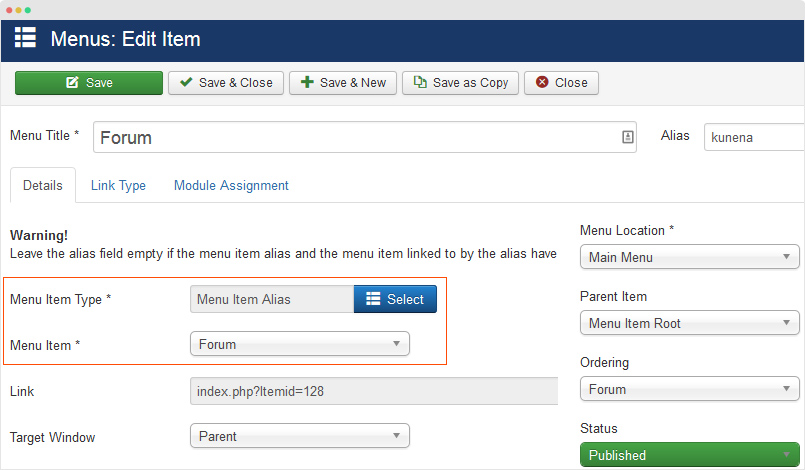
You can display any Kunena menu item in the Main menu by creating an alias menu item. Go to Menu » Main Menu » new menu item, select menu type: System Links » Menu Item Alias and select "Forum" menu item.
Assign Custom Style
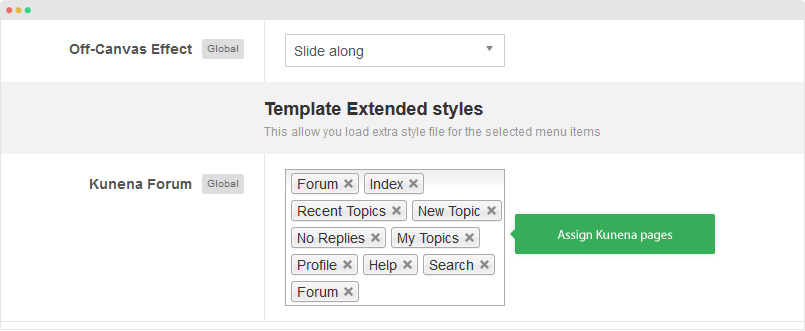
The custom style of Moviemax is stored in an independent .less file - templates/ja_moviemax/less/extras/com_kunena.less. That means, if you upgrade Kunena, the custom style will not be lost. If you want to customize style of the component, you should use the .less file.
You can assign the custom style to the pages you want. In any JA Moviemax template style, open the Add-ons tab and assign the pages you want to load the custom style.
VirtueMart Component configuration
JA Moviemax template supports VirtueMart components. Here is the instruction to configure the extension as the demo site.
Install VirtueMart component
Virtuemart is free eCommerce extension for Joomla, you can download it from the links:
- Download VirtueMart - Please select the DOWNLOAD VM3 NOW - VirtueMart 3 component (Core, AIO and TCPDF) package.
Once you have installation package of the extension, install it via installation panel: Extensions > Extension Manager.
VirtueMart Configuration
Step 1: configuration
Go to Configuration panel and select config tab to configure.
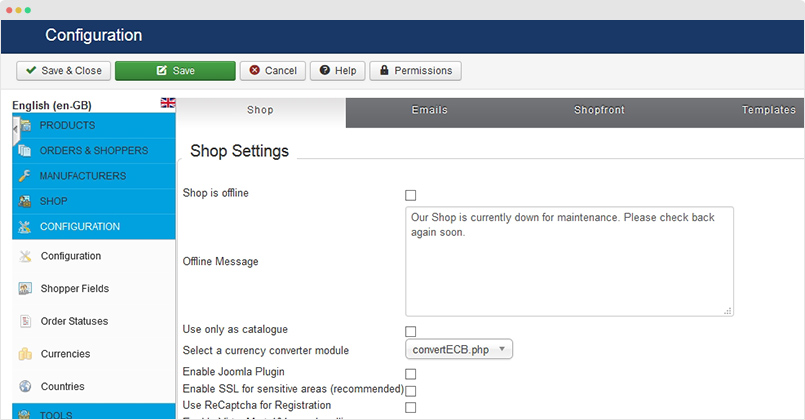
In the demo site, we keep default settings.
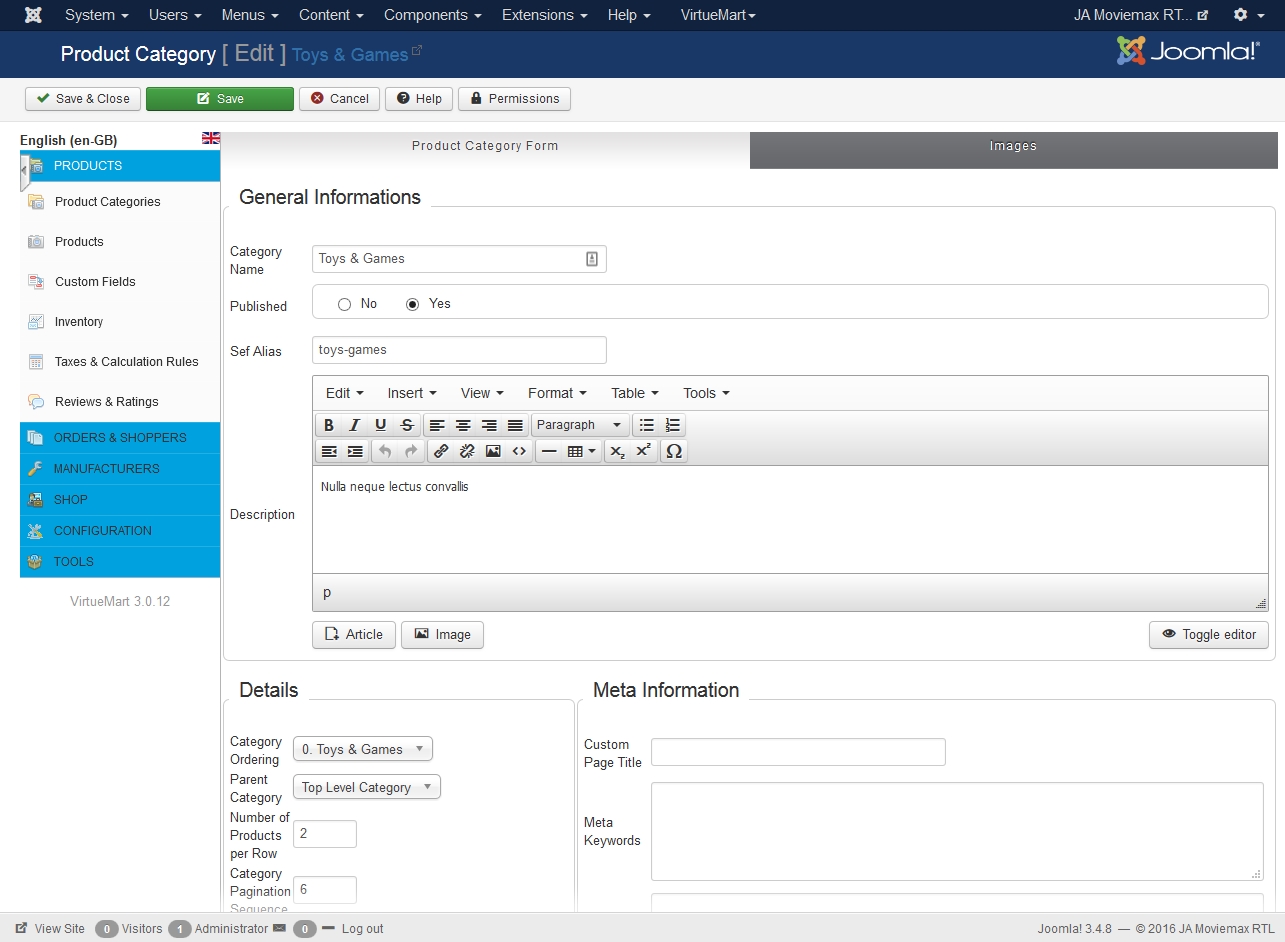
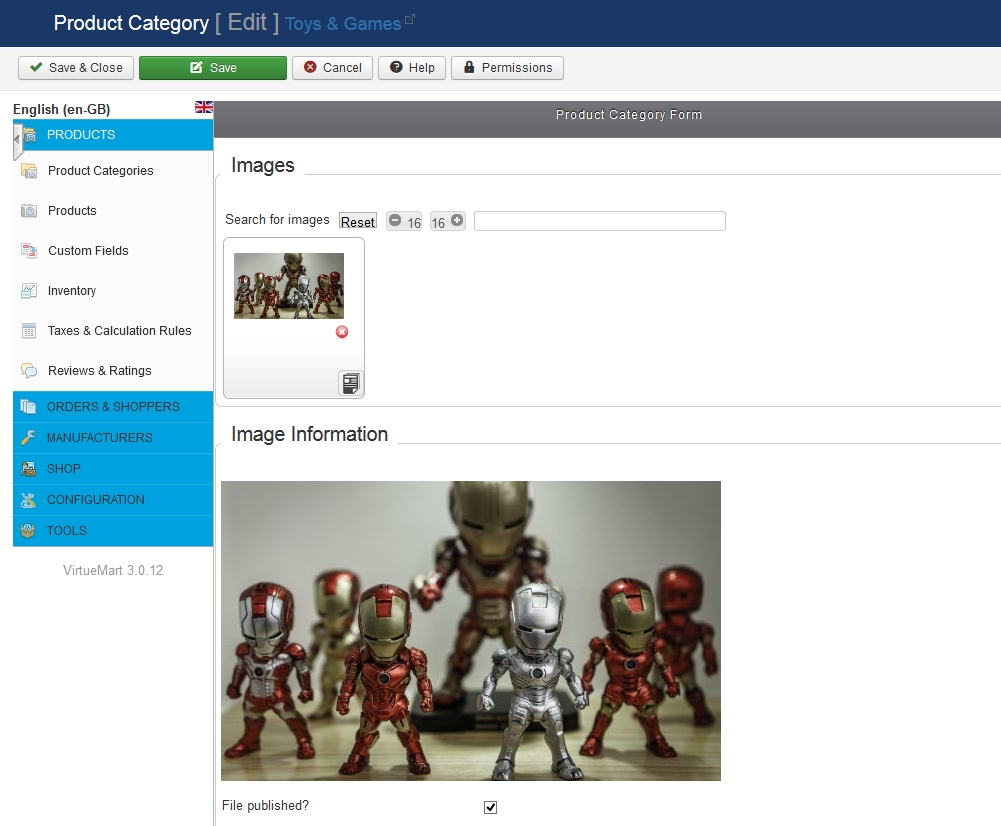
Step 2: create categories
Access the Product Categories tab and create new category.
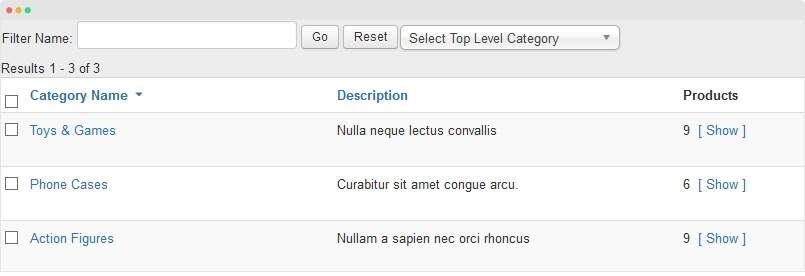
Category setting:
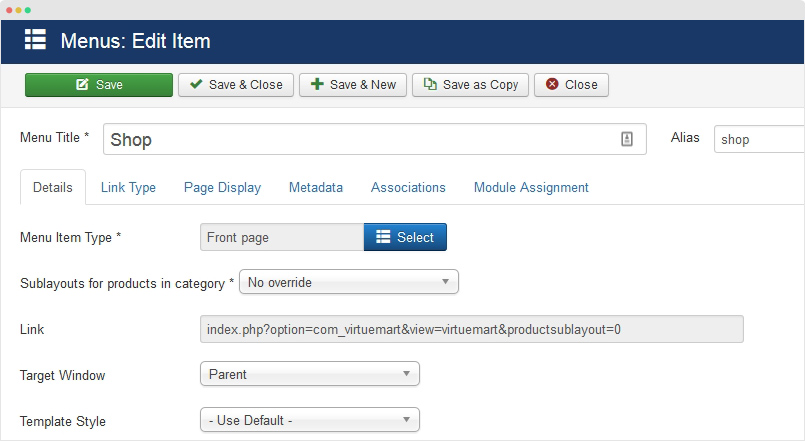
Step 3: create Virtuemart menu item
1. Shop Menu: Display category list - Shop page screenshot
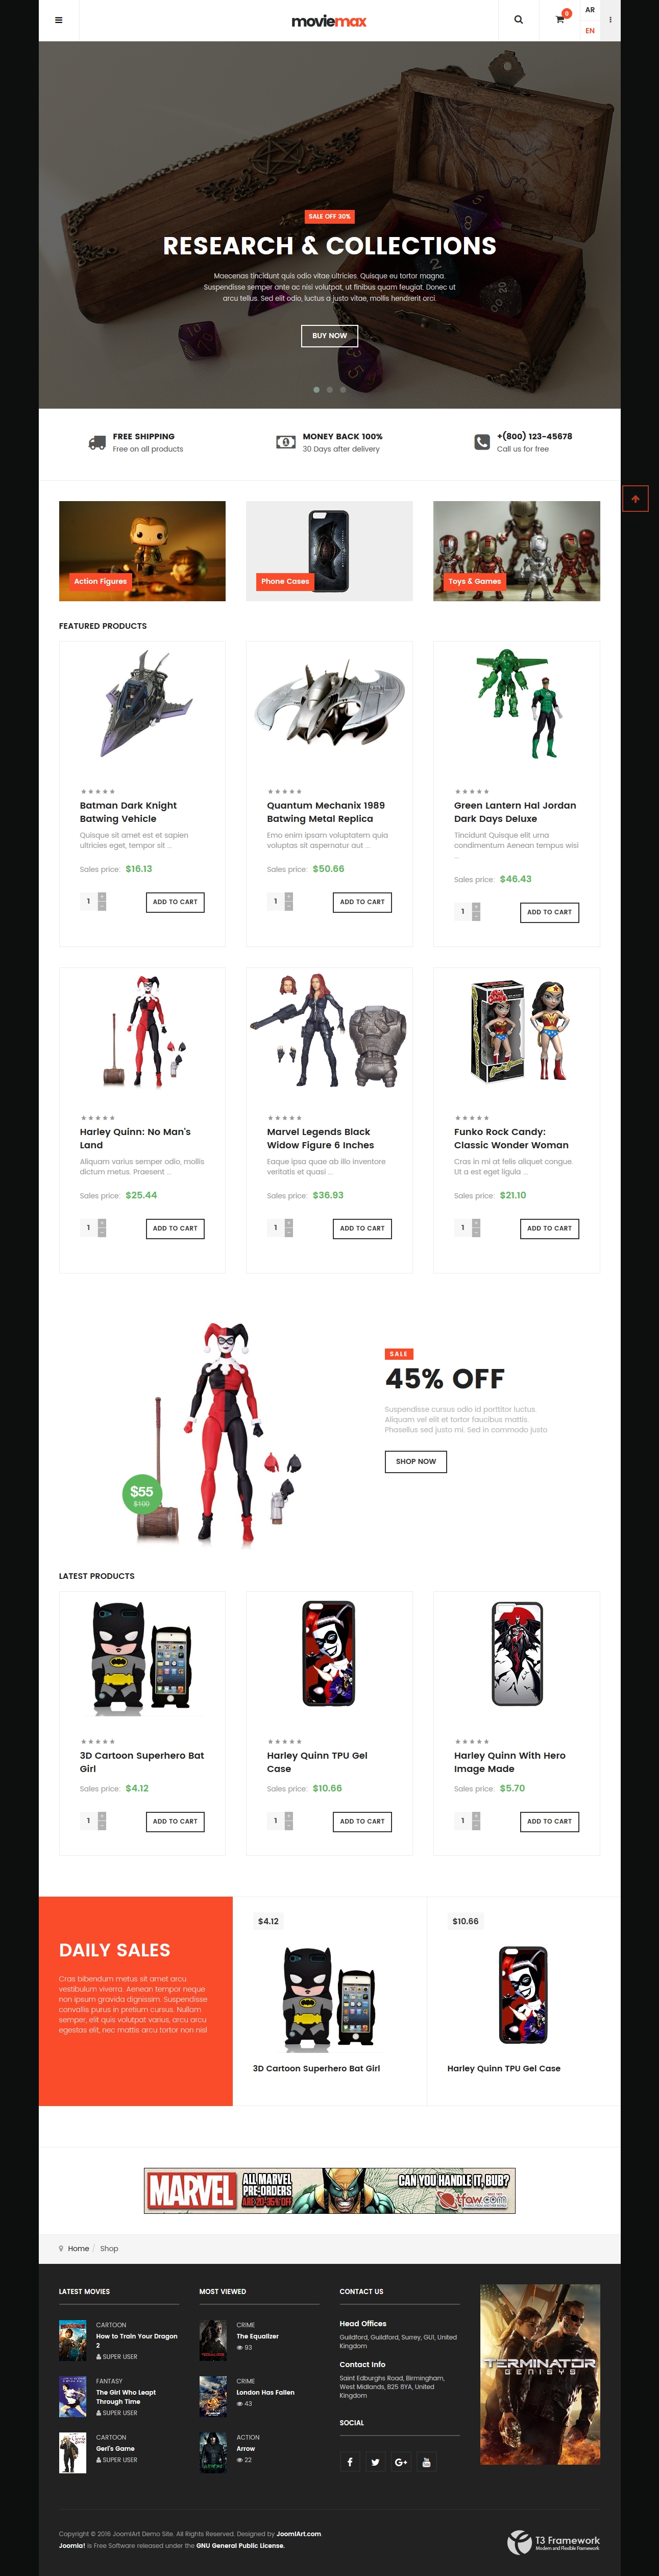
Create new menu item, select menu type VirtueMart » virtuemart. Check out the menu setting in the screenshot below:
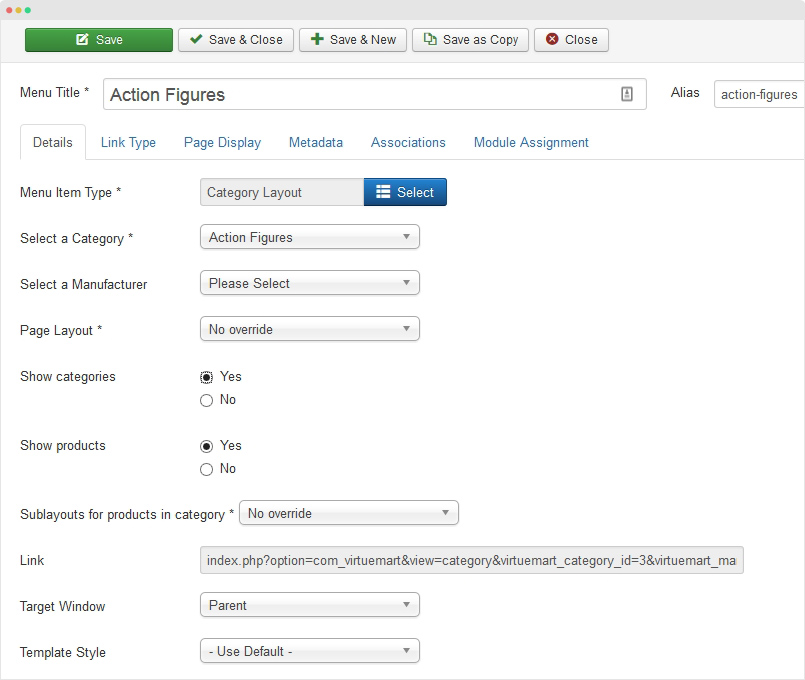
2. Product List Page - Product list page screenshot
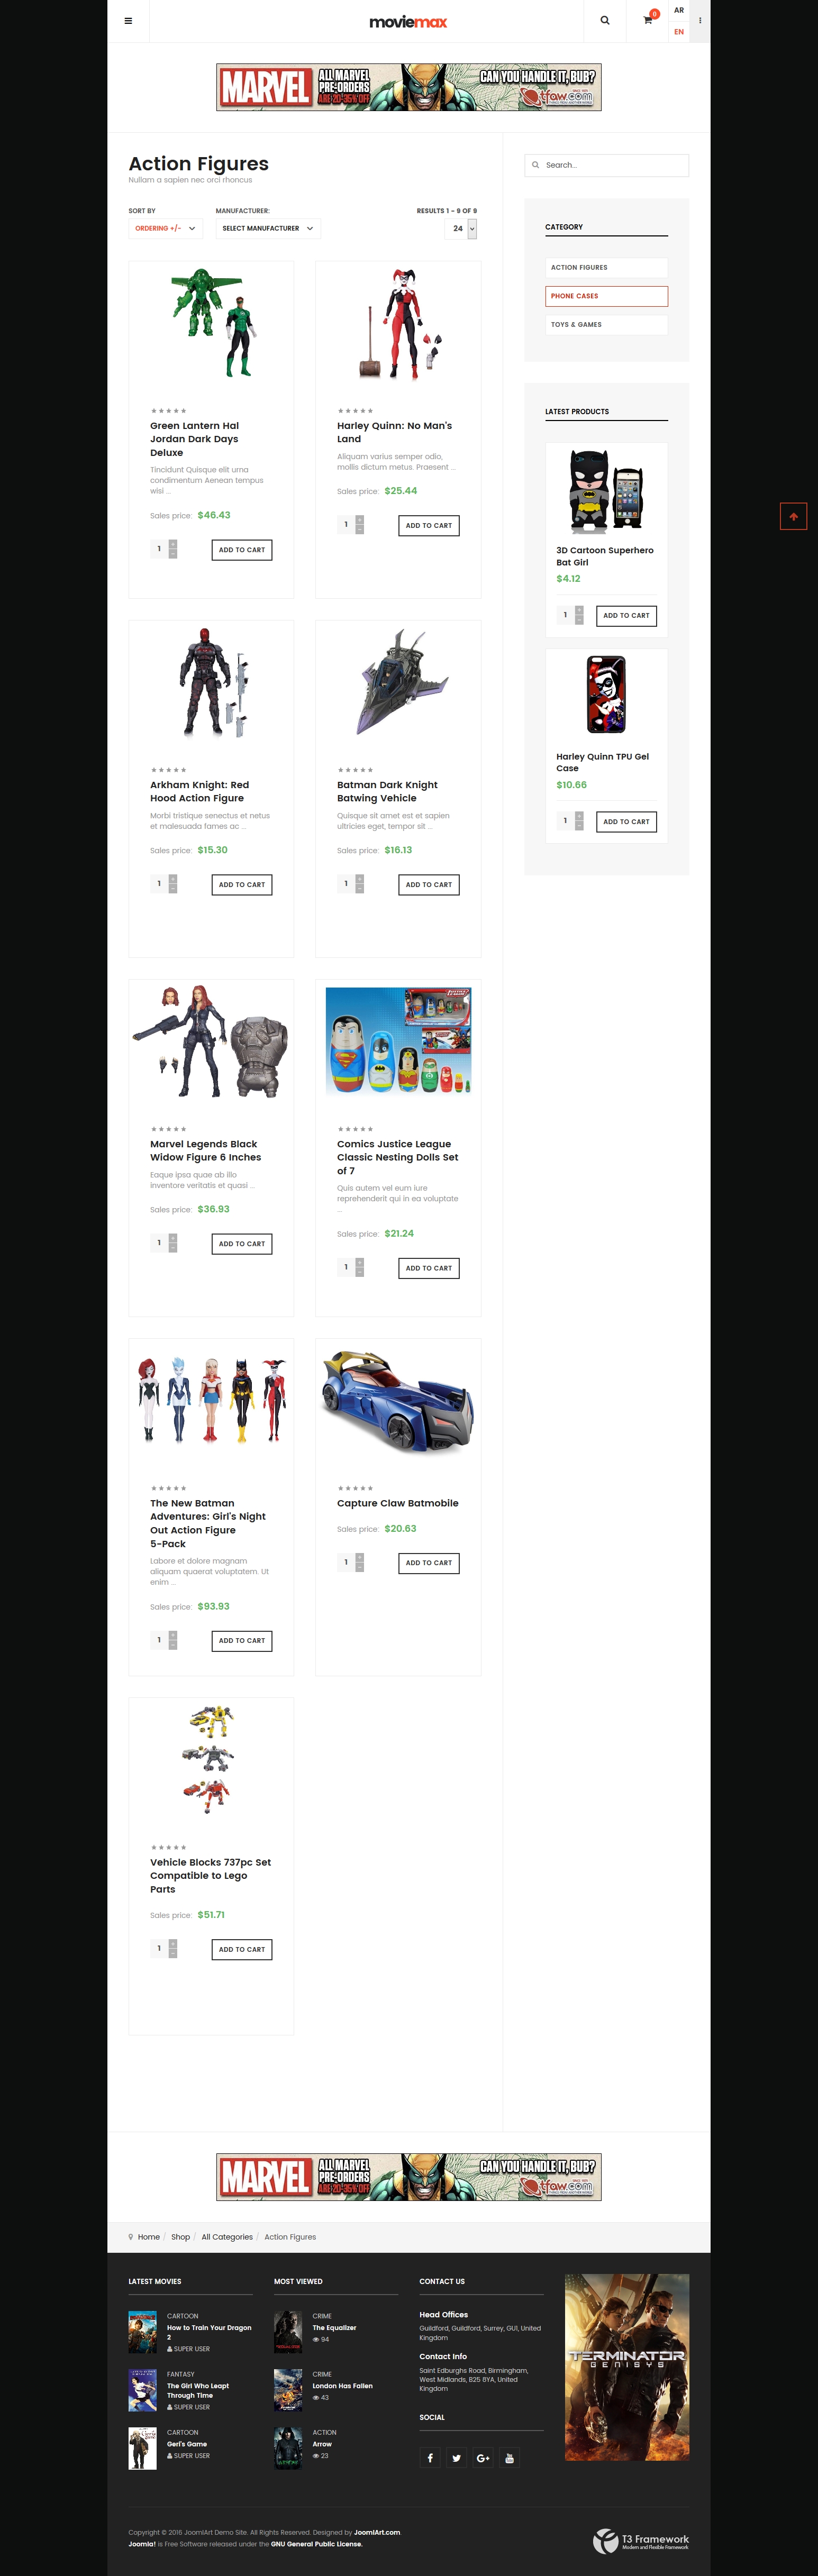
Create new menu item, select menu type vir-category-page, assign category to display products from. Check out the menu setting in the screenshot below:
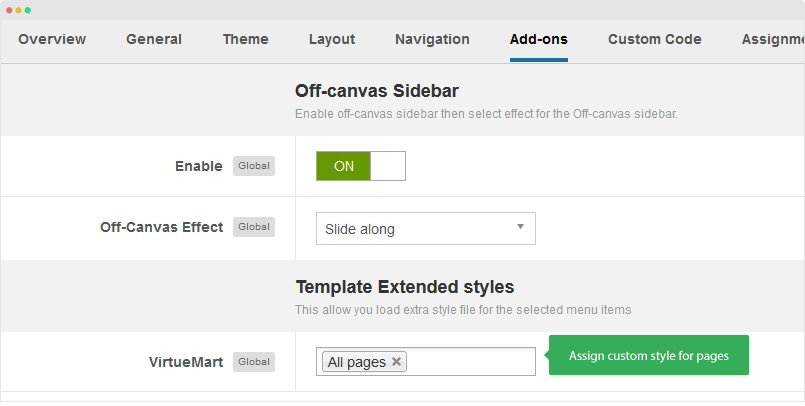
Assign Custom Style
The custom style of Viruemart is store in an independent .less file - templates/ja_elicyon/less/extras/com_virtuemart.less. That means, if you upgrade Virtuemart, the custom style will not be lost. That mean, if you want to customize style of the component, you should use the .less file.
You can assign the custom style to the pages you want. In any JA Elicyon template style, open the Add-ons tab and assign the pages you want to load the custom style.
Build Demo Pages
This section will help you build default Joomla pages the same as JA Moviemax demo site.
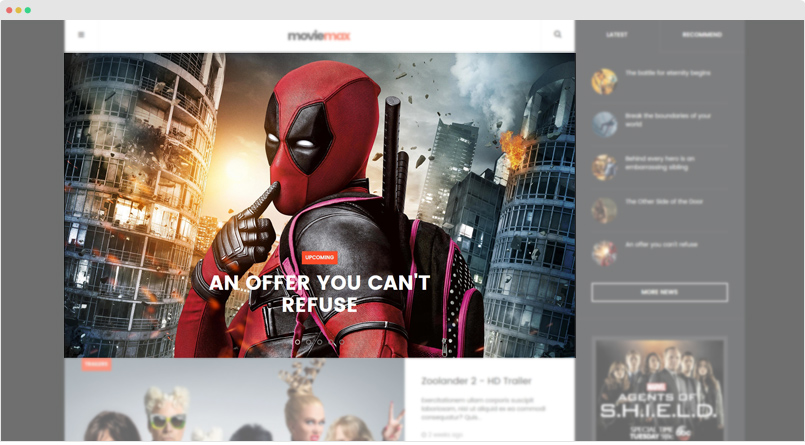
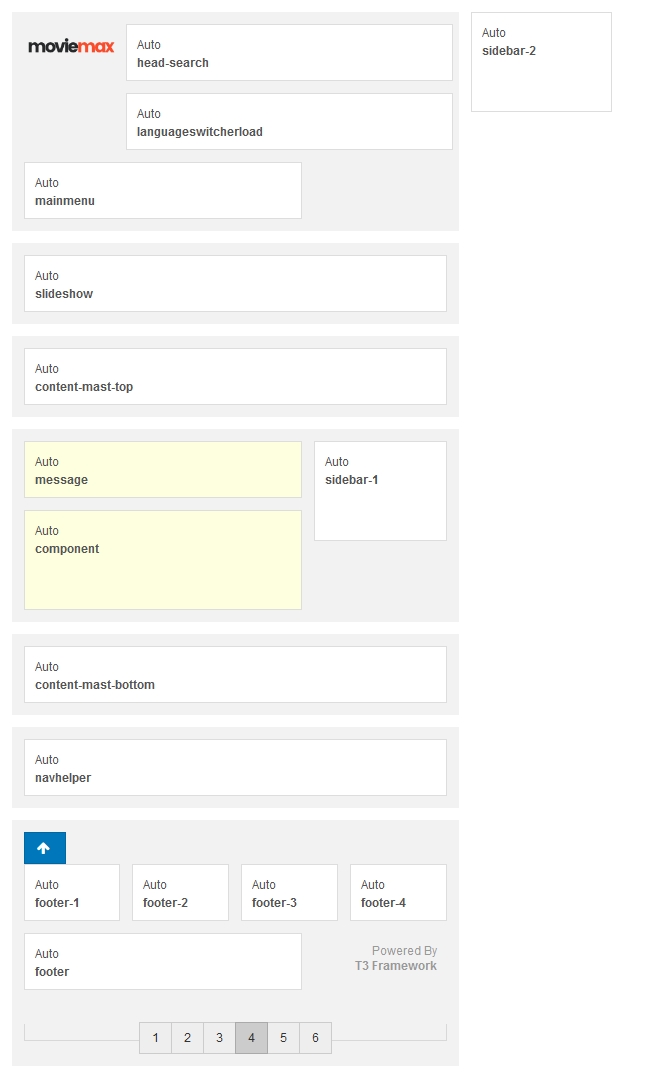
Home page
Front-end Layout Structure Back-end Layout Structure
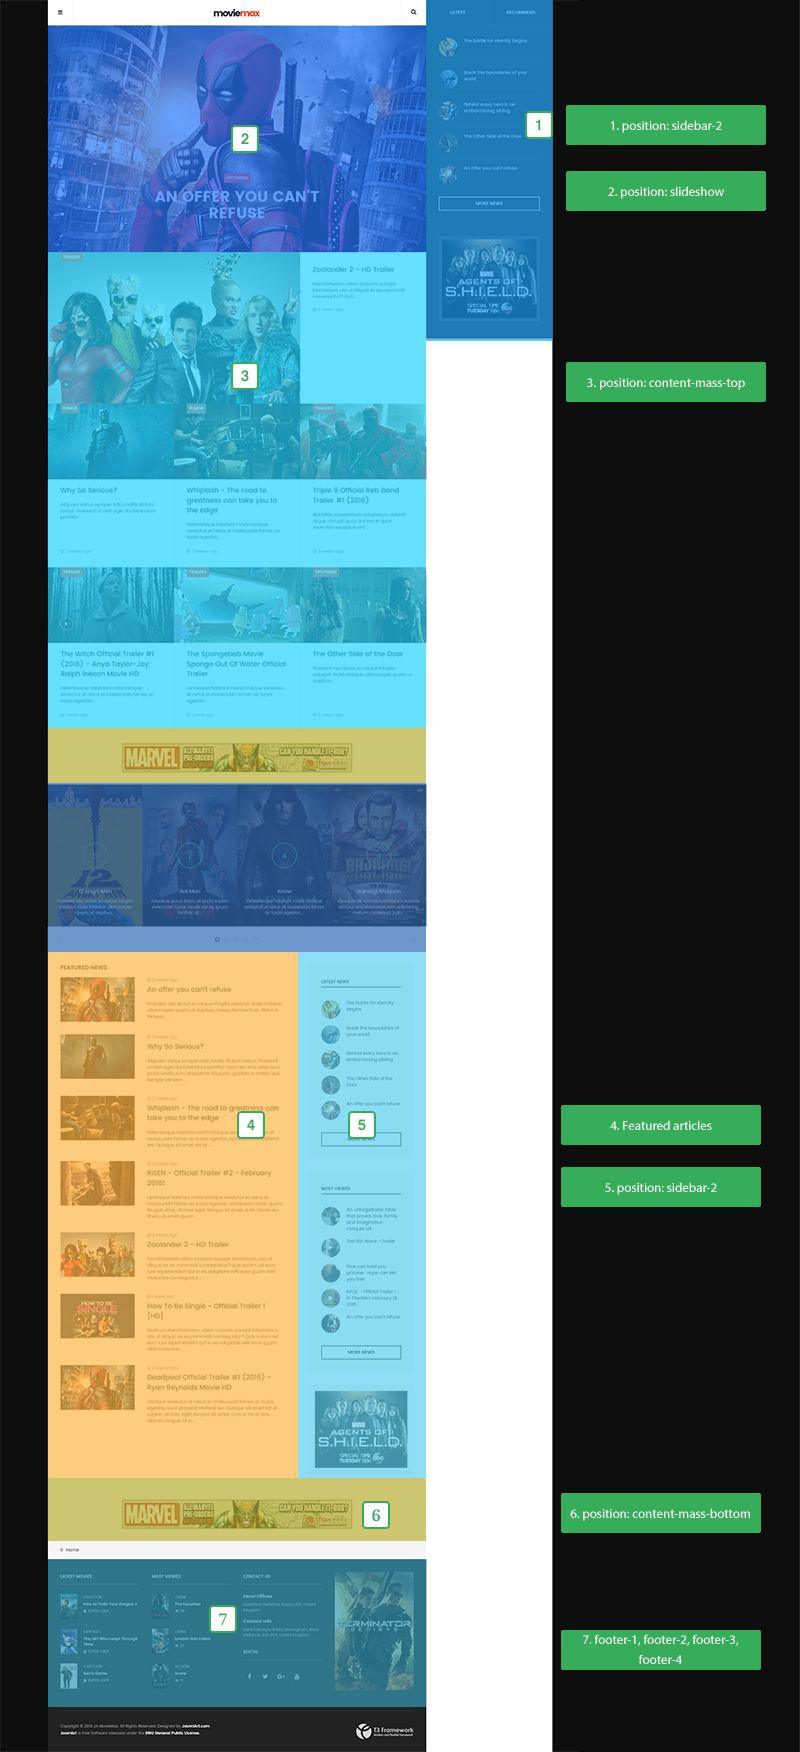
Here are steps to replicate the same Home page.
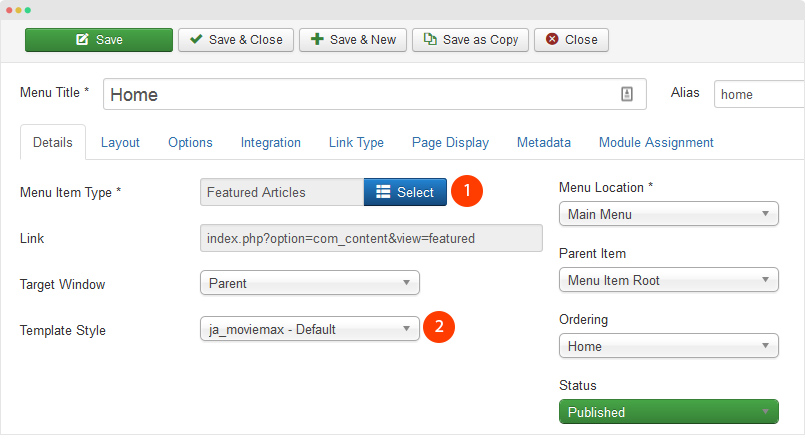
Step 1 - Create Home menu item
Go to Menu > Main menu, add new menu item, select Articles » Featured Articles menu type and assign "ja_moviemax - Default" template style.
Step 2 - Assign content to the homepage
Content of Home page includes the featured articles sections and modules assigned to the page. Here is the detail configuration of each module.
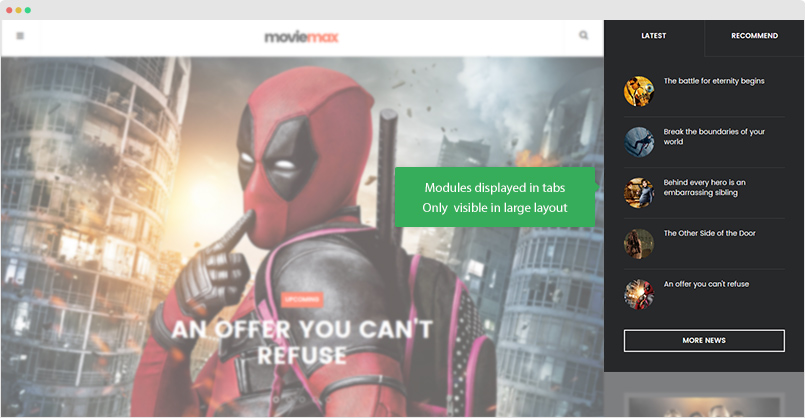
1. Tabs to display Latest | Recommended News - JA Tabs plugin
Step 1 - To create such content blocks, you will need to install and enable JA Tabs plugin
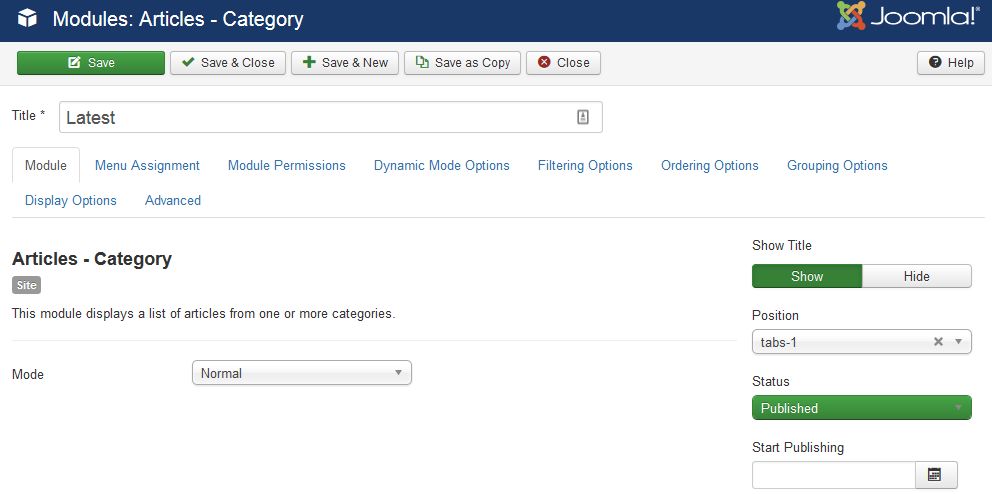
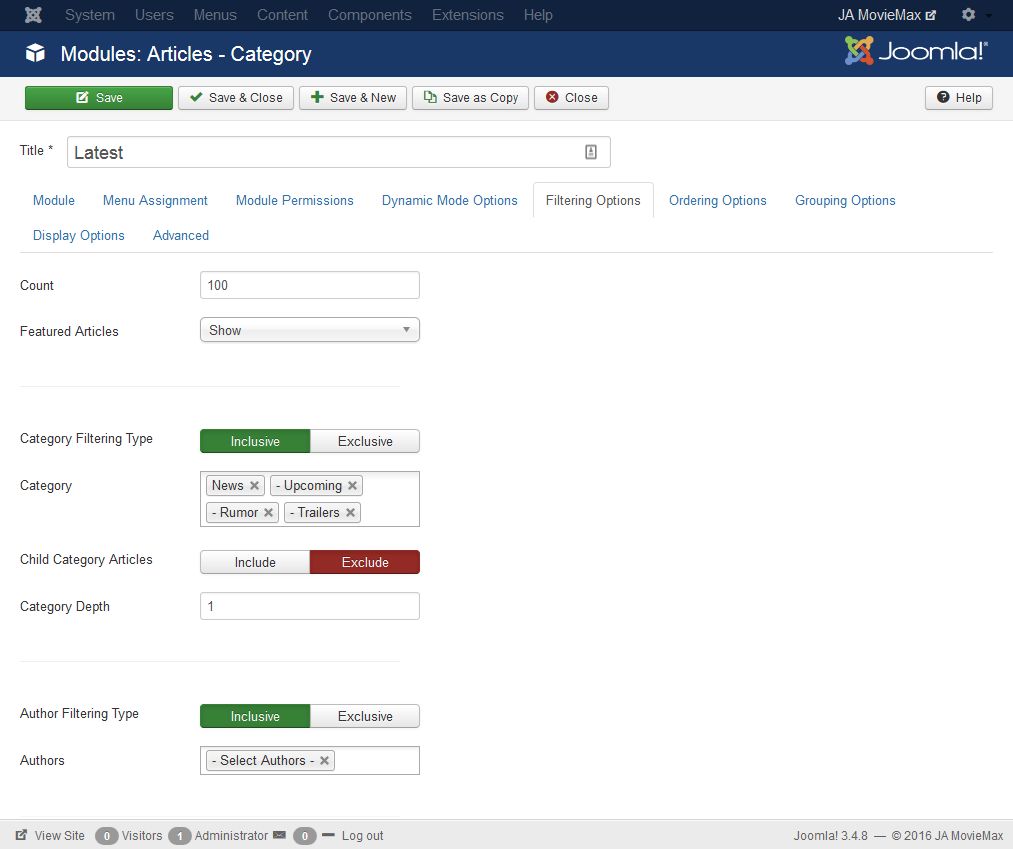
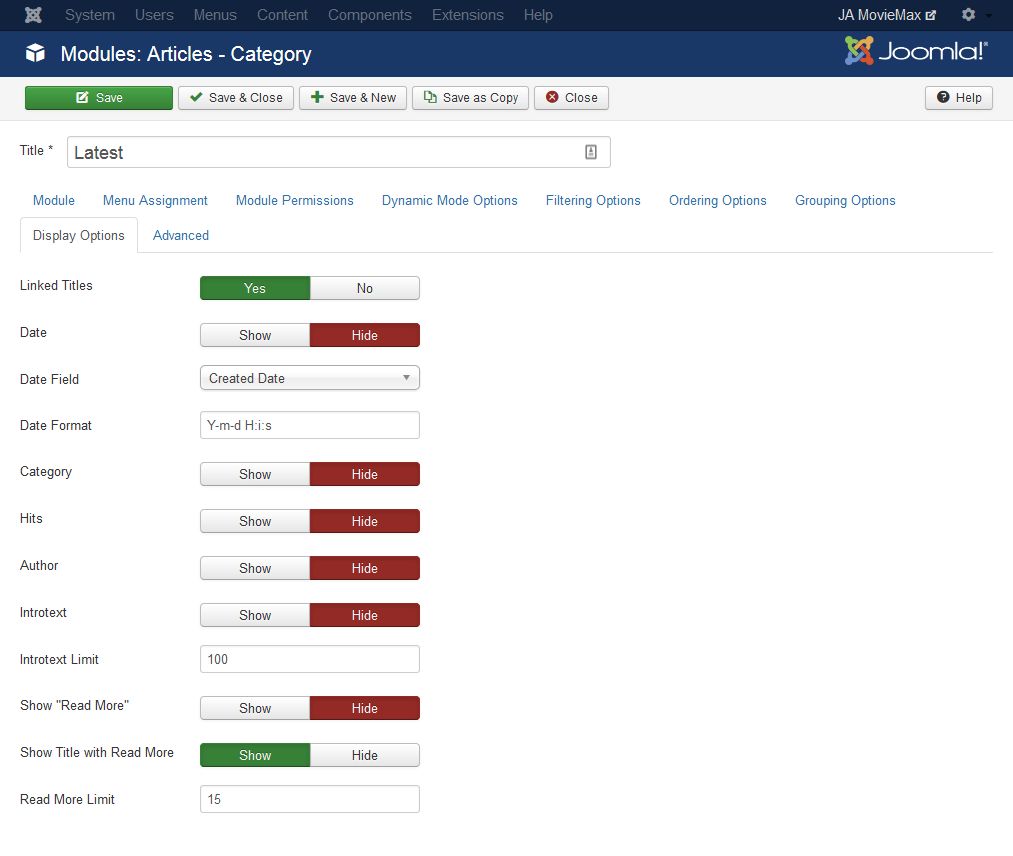
Step 2 - Create modules to display in tabs. In the demo site, we use 2 Articles - Category modules to display in the tabs. Here is the configuration of the module.
Please assign all modules you want to display in tabs in 1 position - tabs-1.
Module position: tabs-1
Module Suffix: NOT USED
Alternative Layout: infinity
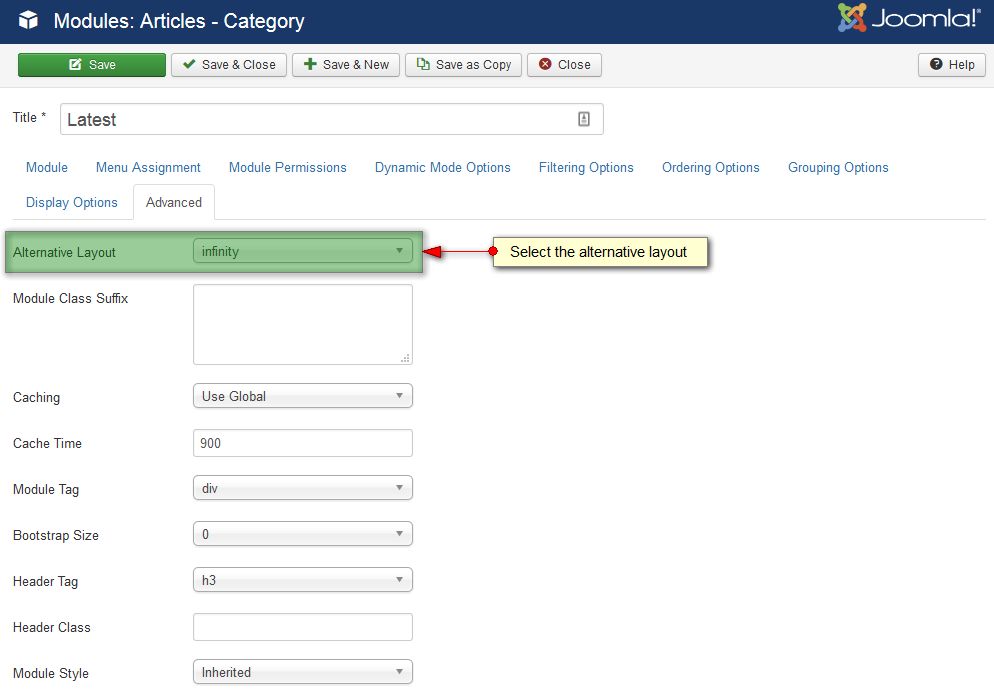
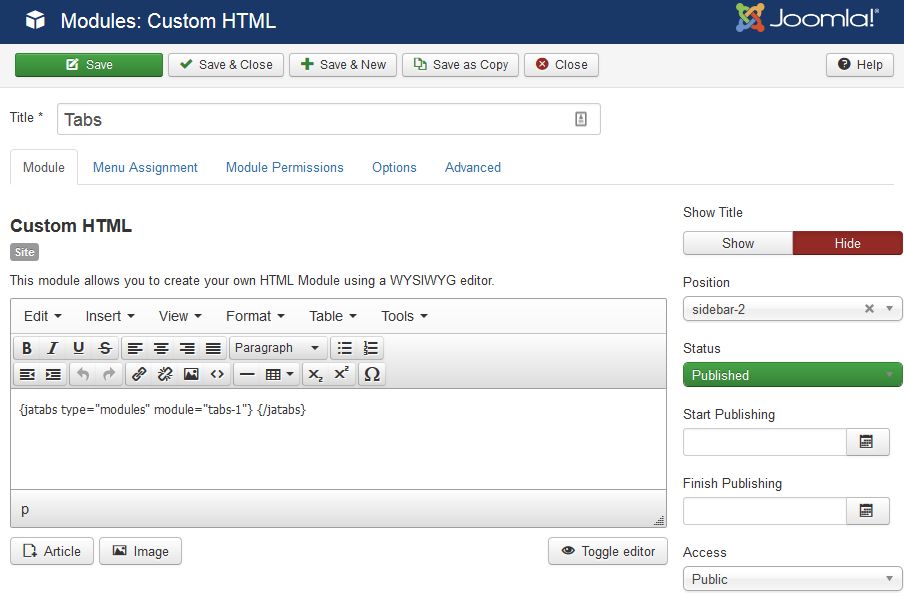
Step 3 - Create CUSTOM HTML module to add tags that will load the modules in.
Module position: sidebar-2
Module Suffix: no-padding
Add the following tags in the "Custom HTML" field.
{jatabs type="modules" module="tabs-1"} {/jatabs}
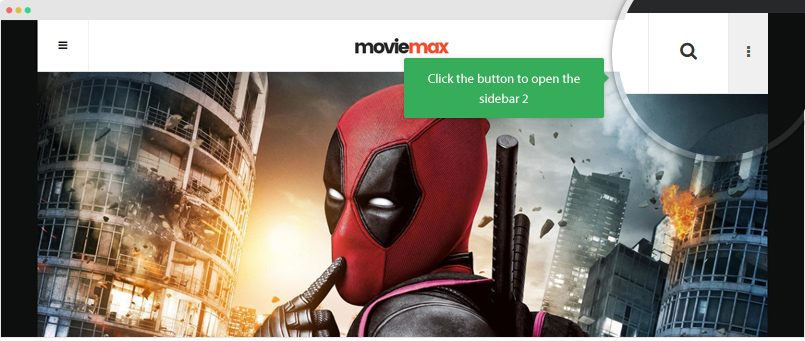
The sidebar-2 is only visible in the large layout - Desktop, in the Medium - Laptop, the sidebar-2 is collapsed and user can expand the sidebar-2 by clicking the icon in the header.
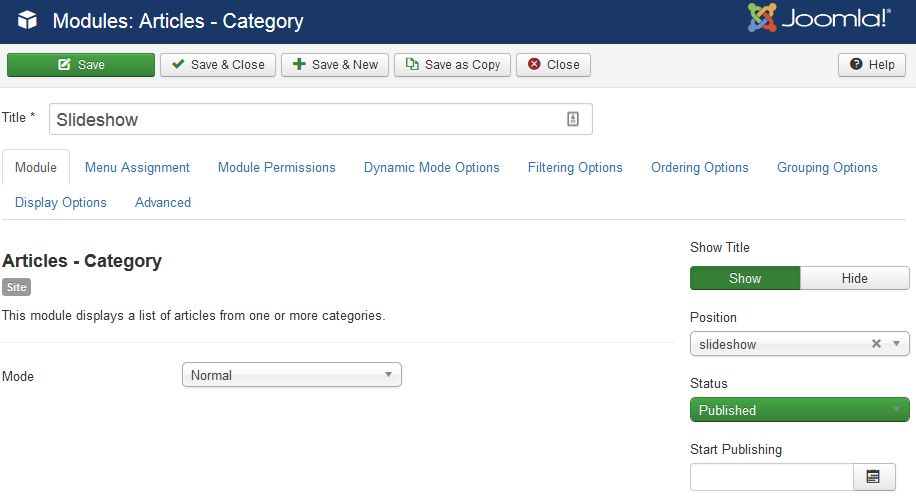
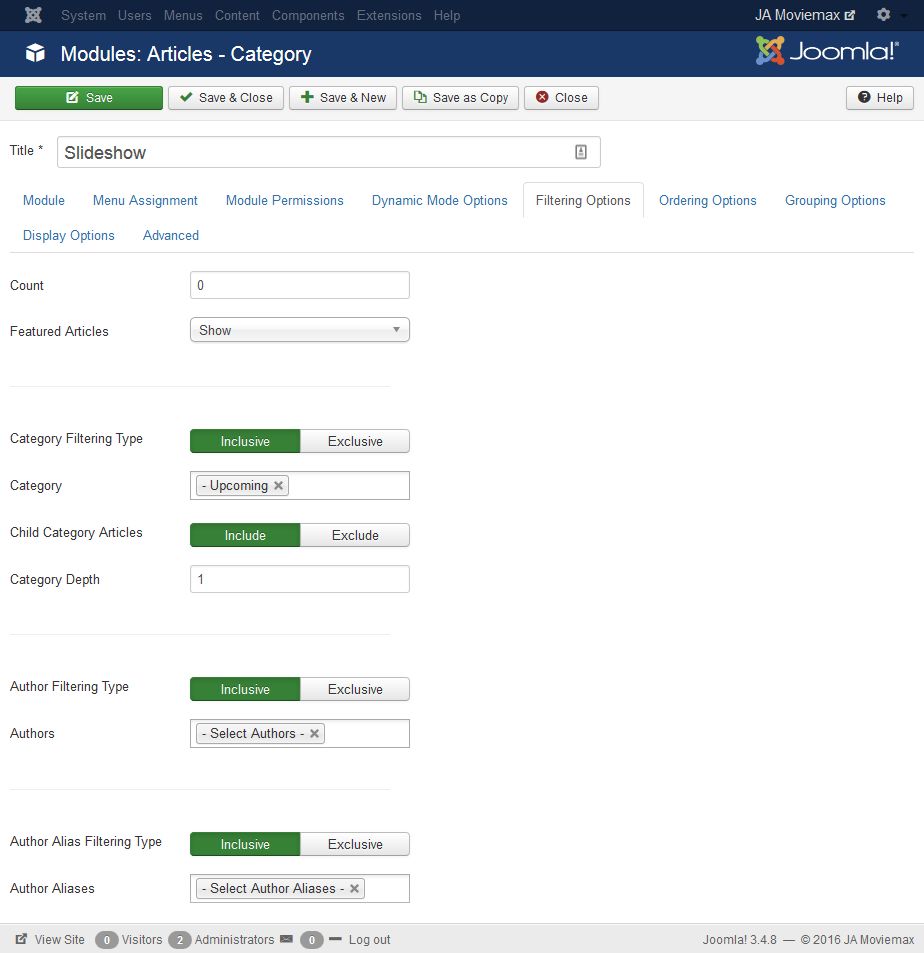
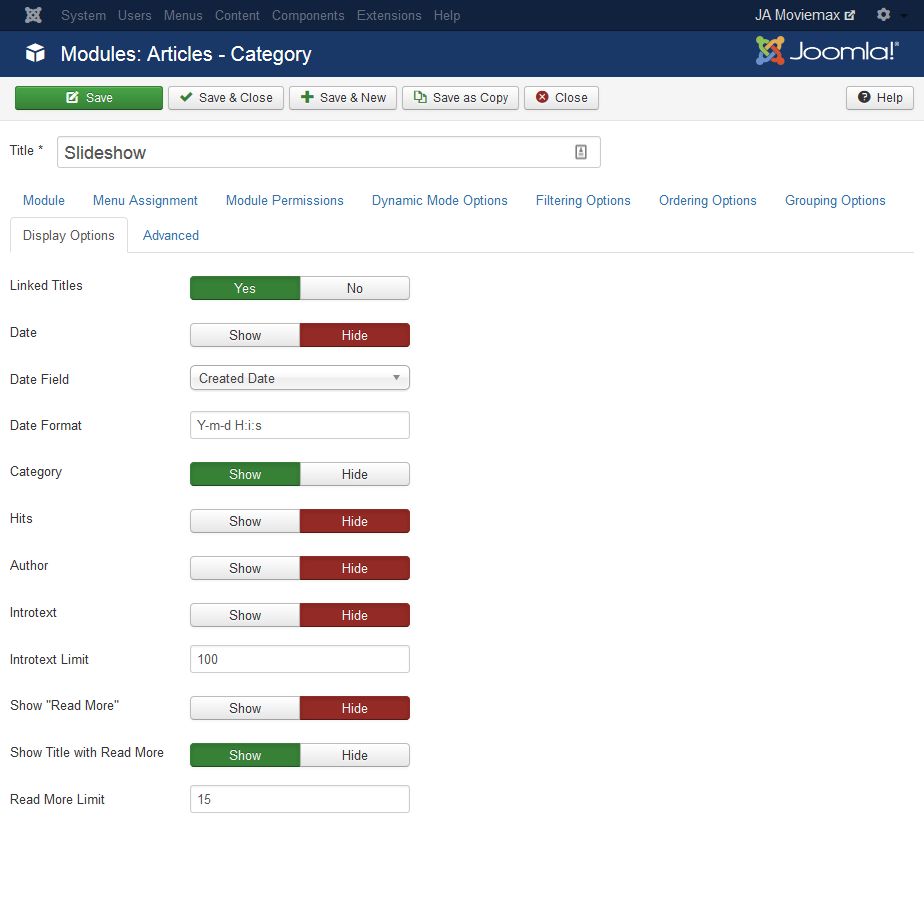
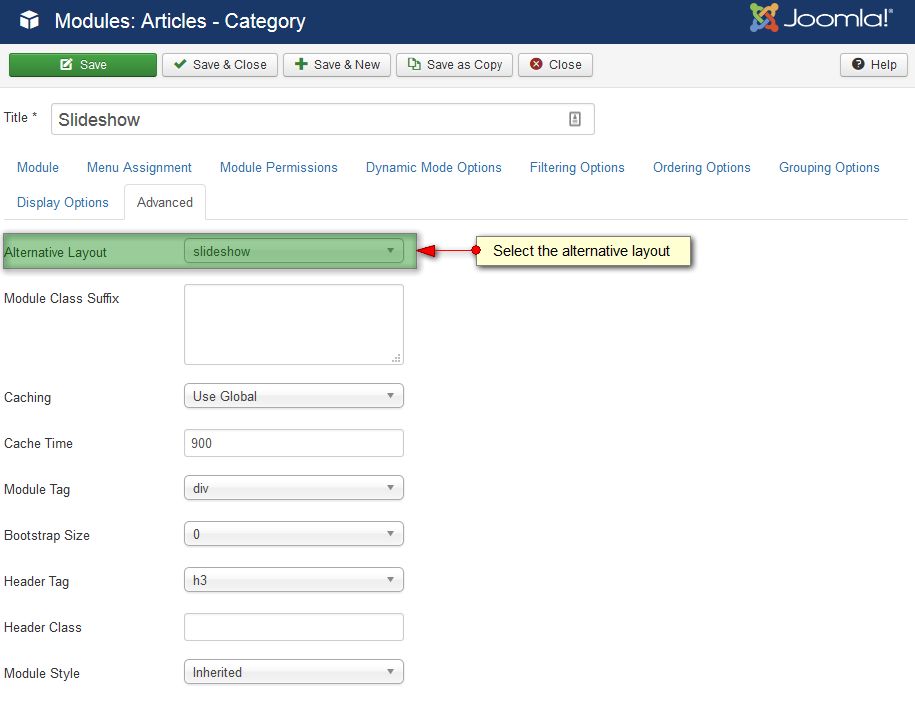
2. Slideshow: Articles - Category Module
Create new module, select Articles - Category Module.
Module position: slideshow
Module Suffix: NOT USED
Alternative Layout: slideshow
3. Featured Articles: Articles - Category Module
Create new module, select Articles - Category Module.
Module position: content-mass-top
Module Suffix: NOT USED
Alternative Layout: articlelist
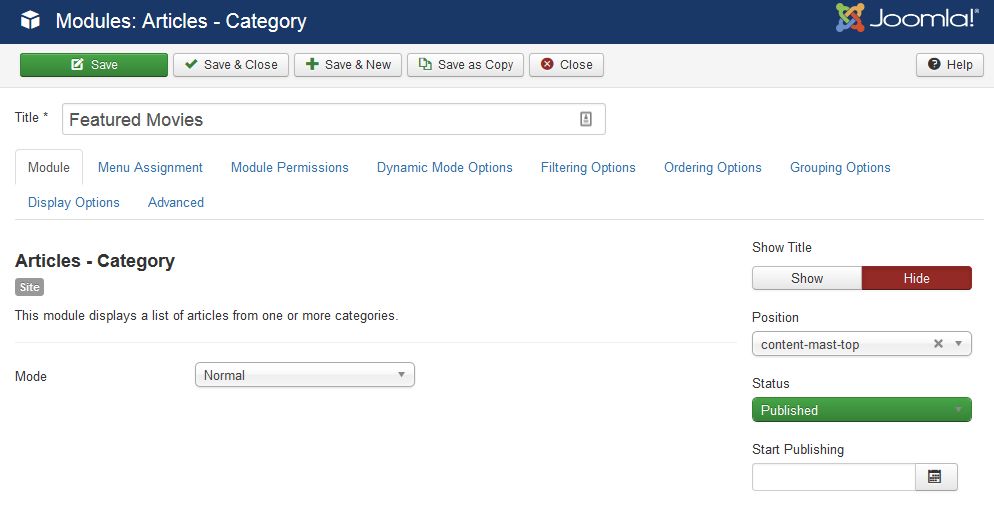
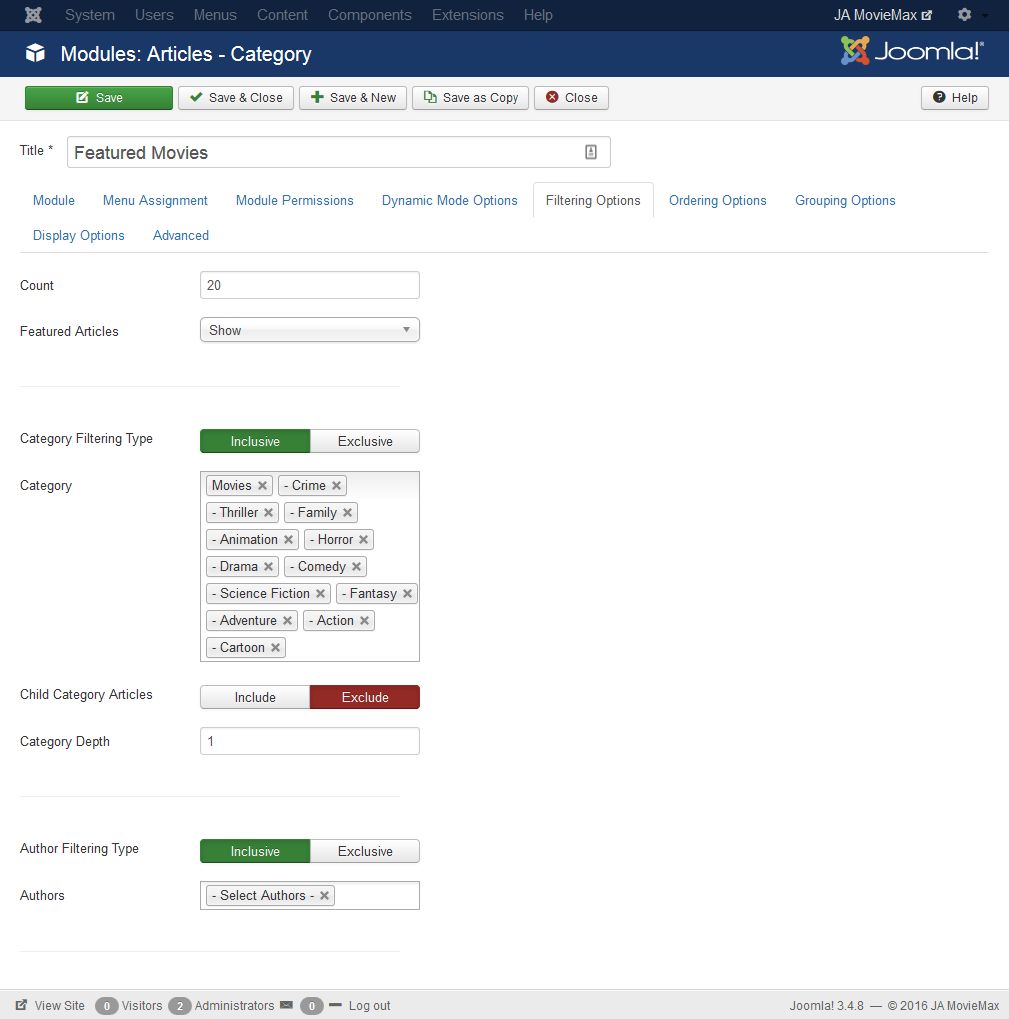
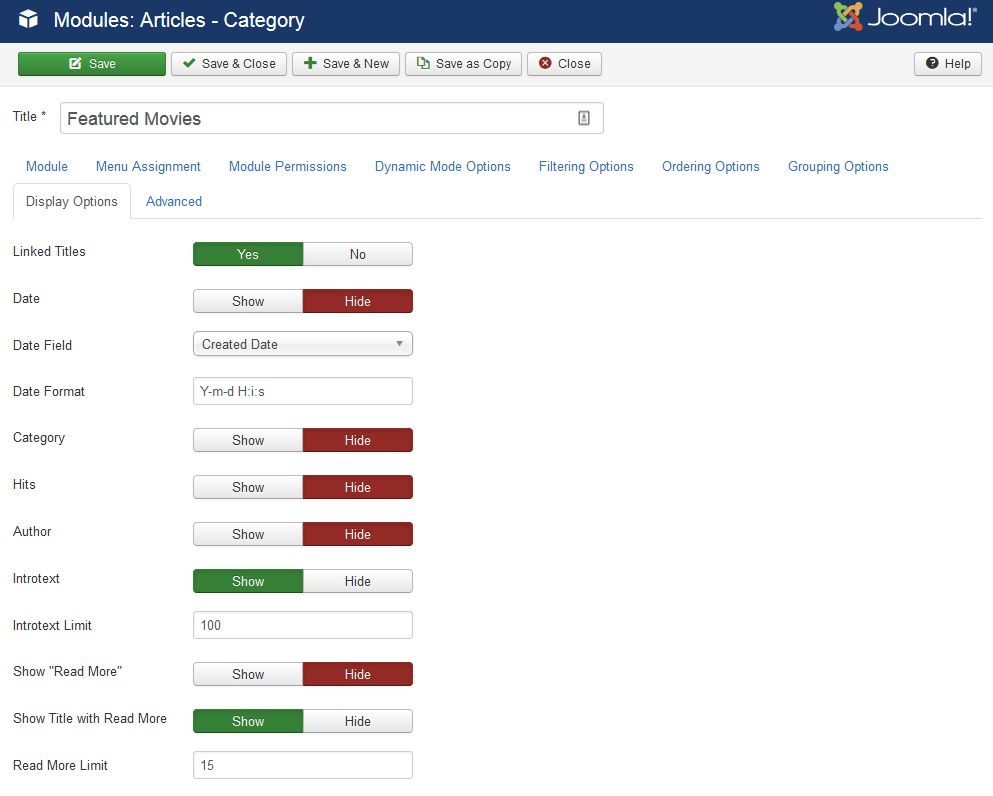
4. Featured Movies: Articles - Category Module
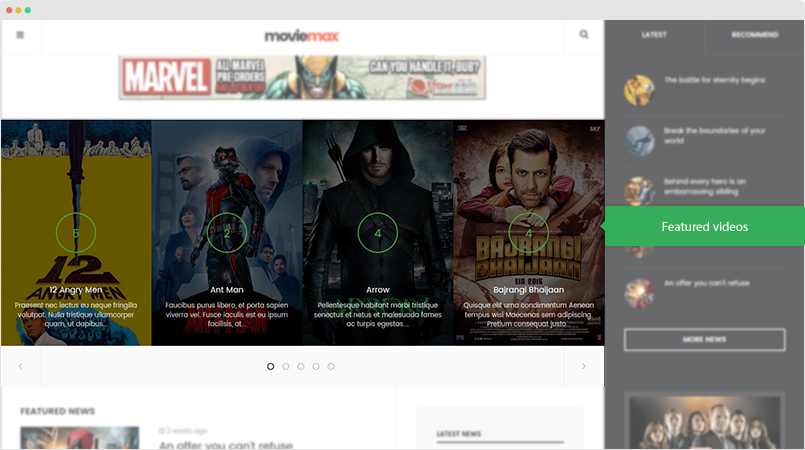
Create new module, select Articles - Category Module and follow the configuration shown in the screenshots below:
Module position: content-mass-top
Module Suffix: NOT USED
Alternative Layout: slide
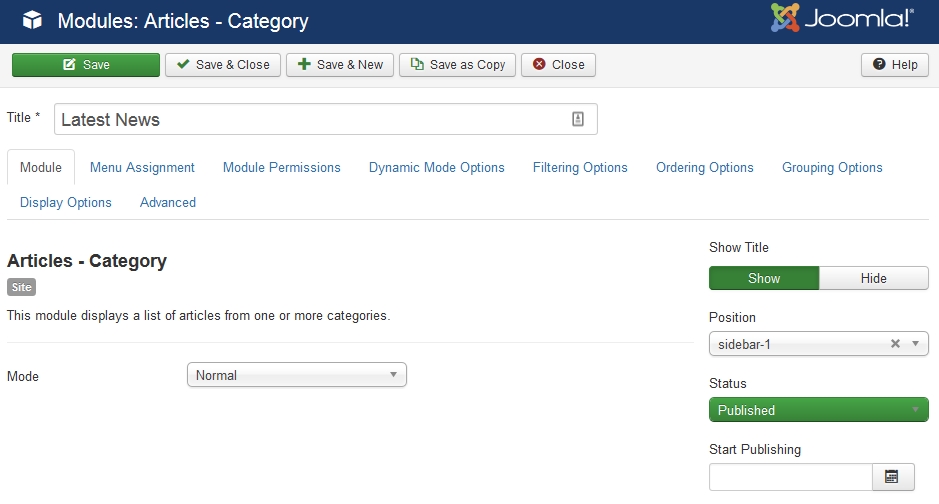
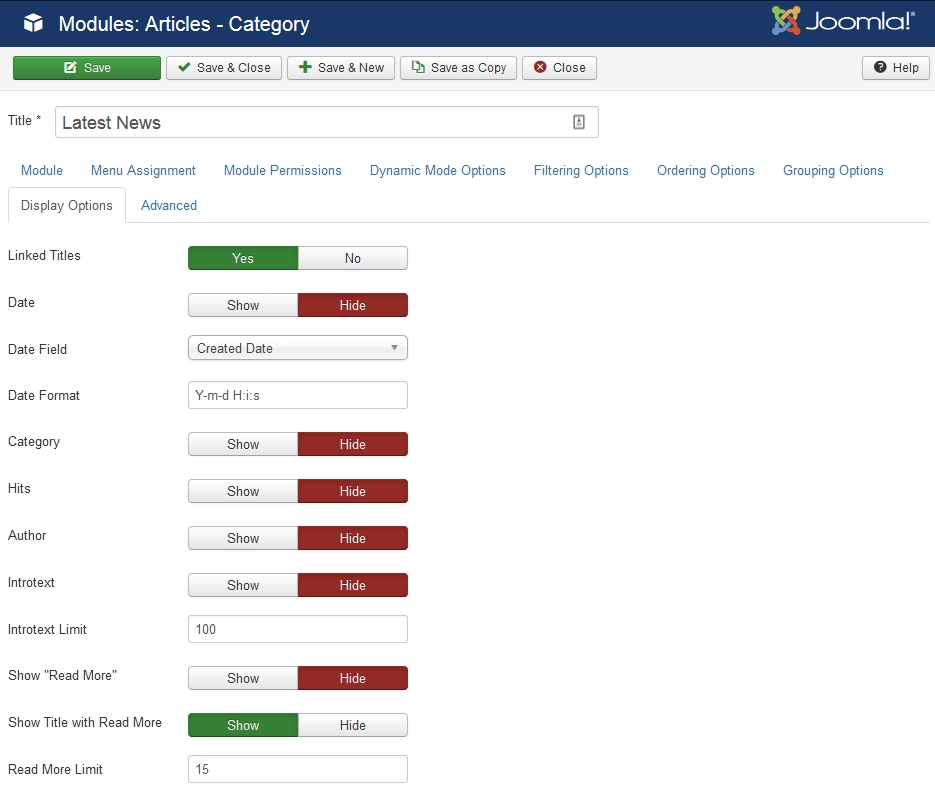
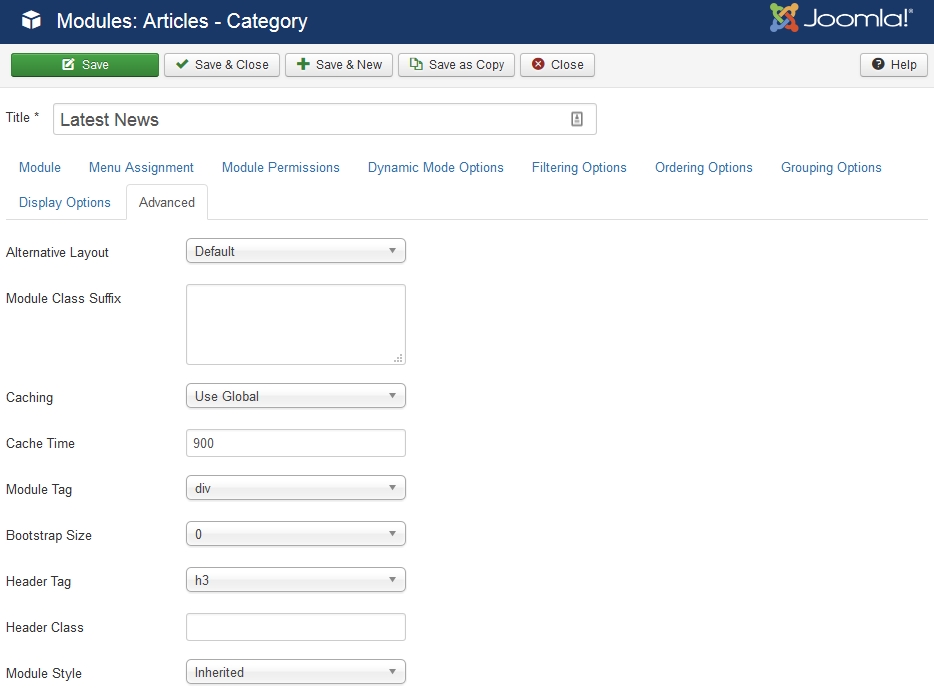
5. Latest News: Articles - Category Module
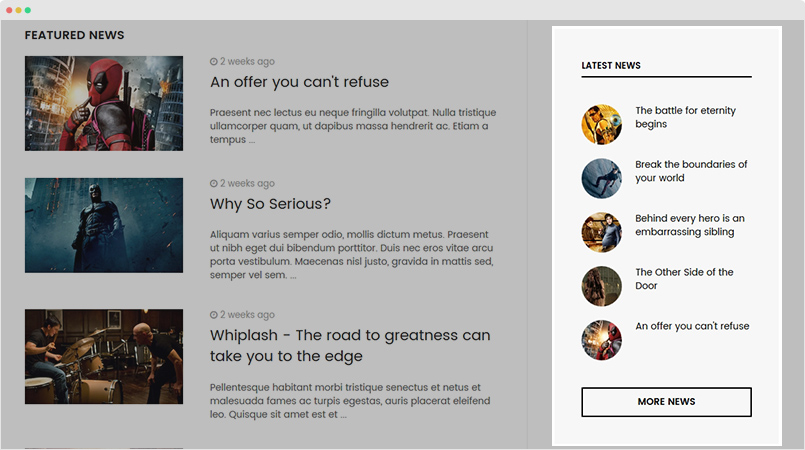
Create new module, select Articles - Category Module and follow the configuration shown in the screenshots below:
Module position: sidebar-1
Module Suffix: NOT USED
Alternative Layout: Default
6. Modules in footer
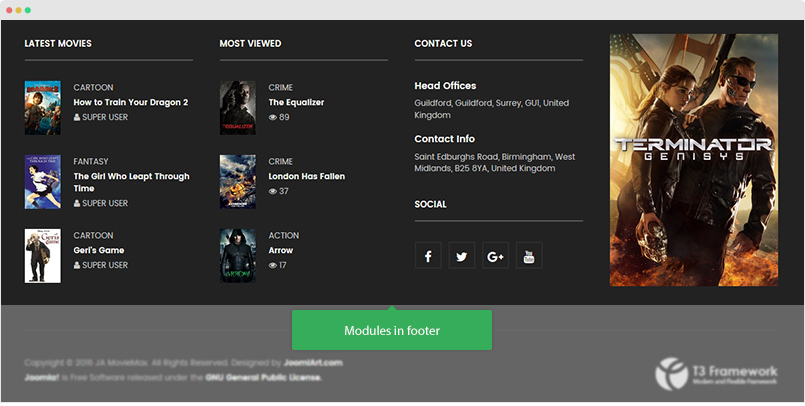
The footer section includes 4 modules assigned to positions: footer-1, footer-2, footer-3, footer-4. Here is detail configuration of those modules.
6.1 Latest Movies: Articles - Latest module
Module position: footer-1
Module Suffix: NOT USED
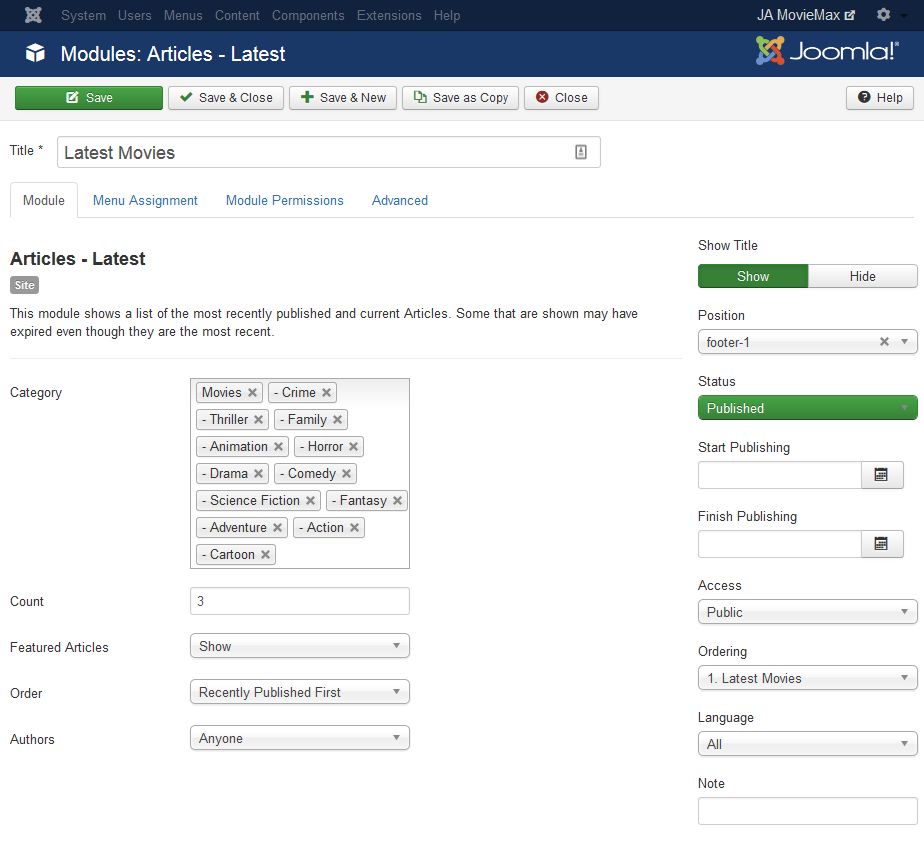
6.2 Most Viewed: Articles - Most Read module
Module position: footer-2
Module Suffix: NOT USED
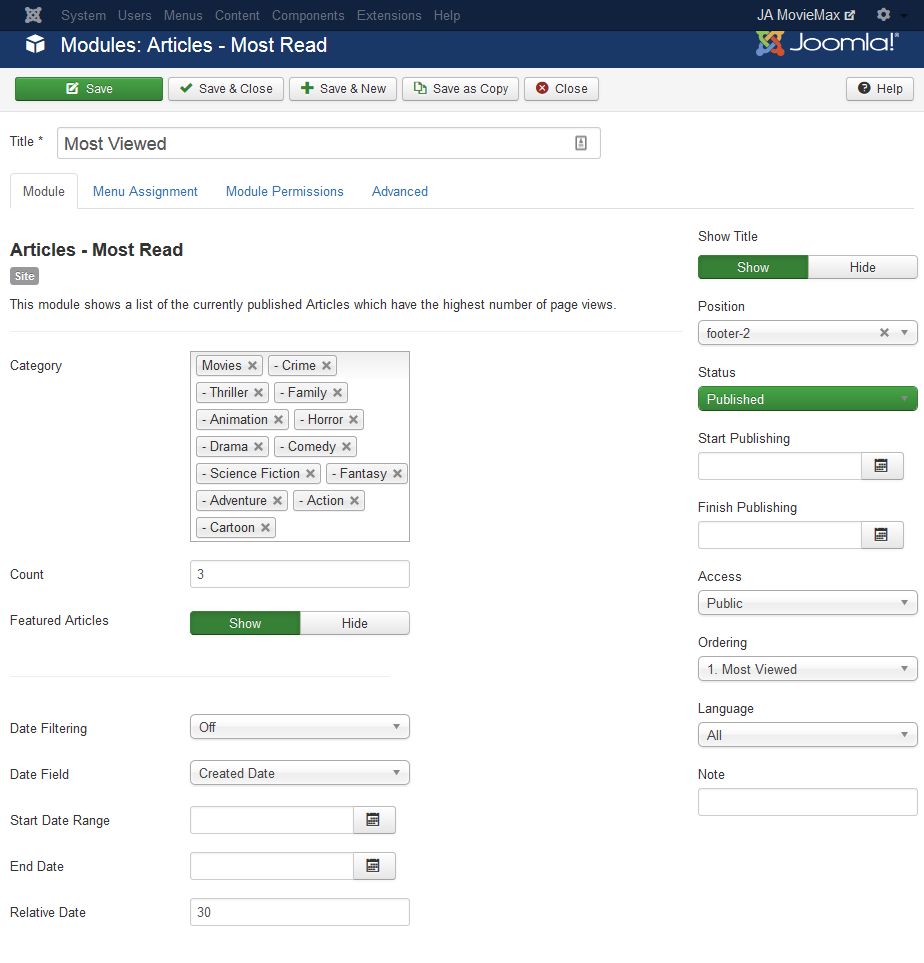
6.3 Contact Us: Custom HTML module
Module position: footer-3
Module Suffix: NOT USED
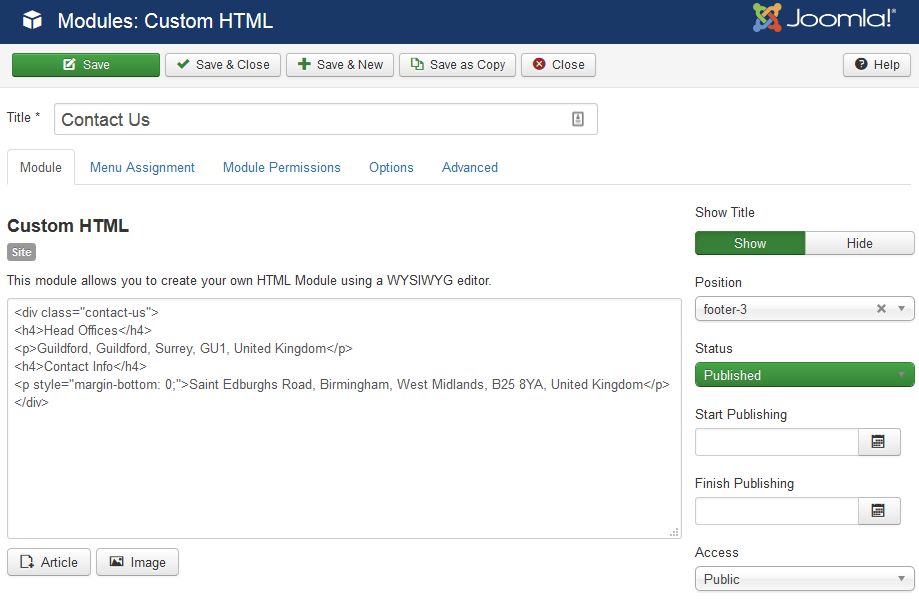
Custom HTML code:
<div class="contact-us">

<h4>Head Offices</h4>

<p>Guildford, Guildford, Surrey, GU1, United Kingdom</p>

<h4>Contact Info</h4>

<p style="margin-bottom: 0;">Saint Edburghs Road, Birmingham, West Midlands, B25 8YA, United Kingdom</p>

</div>
6.4 Social: Custom HTML module
Module position: footer-3
Module Suffix: NOT USED
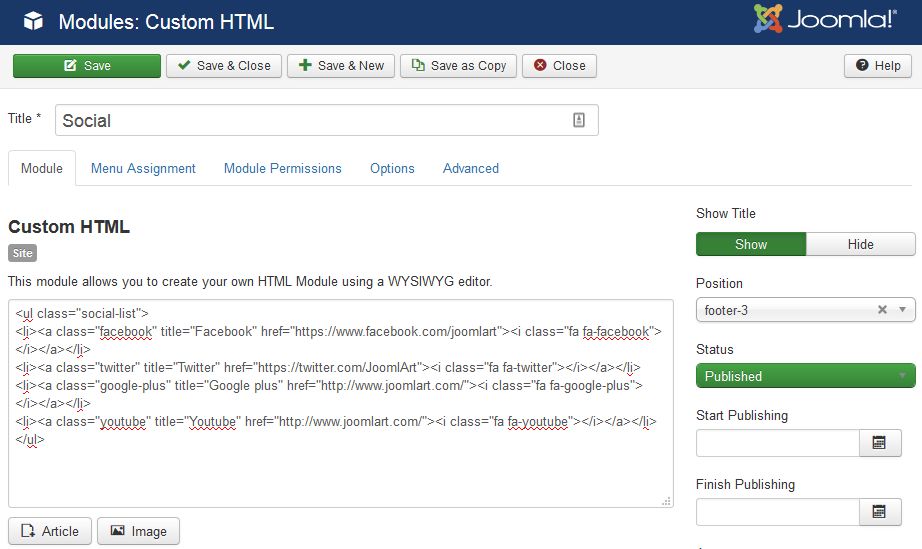
Custom HTML code:
<ul class="social-list">

<li><a class="facebook" title="Facebook" href="https://www.facebook.com/joomlart"><i class="fa fa-facebook"></i></a></li>

<li><a class="twitter" title="Twitter" href="https://twitter.com/JoomlArt"><i class="fa fa-twitter"></i></a></li>

<li><a class="google-plus" title="Google plus" href="http://www.joomlart.com/"><i class="fa fa-google-plus"></i></a></li>

<li><a class="youtube" title="Youtube" href="http://www.joomlart.com/"><i class="fa fa-youtube"></i></a></li>

</ul>
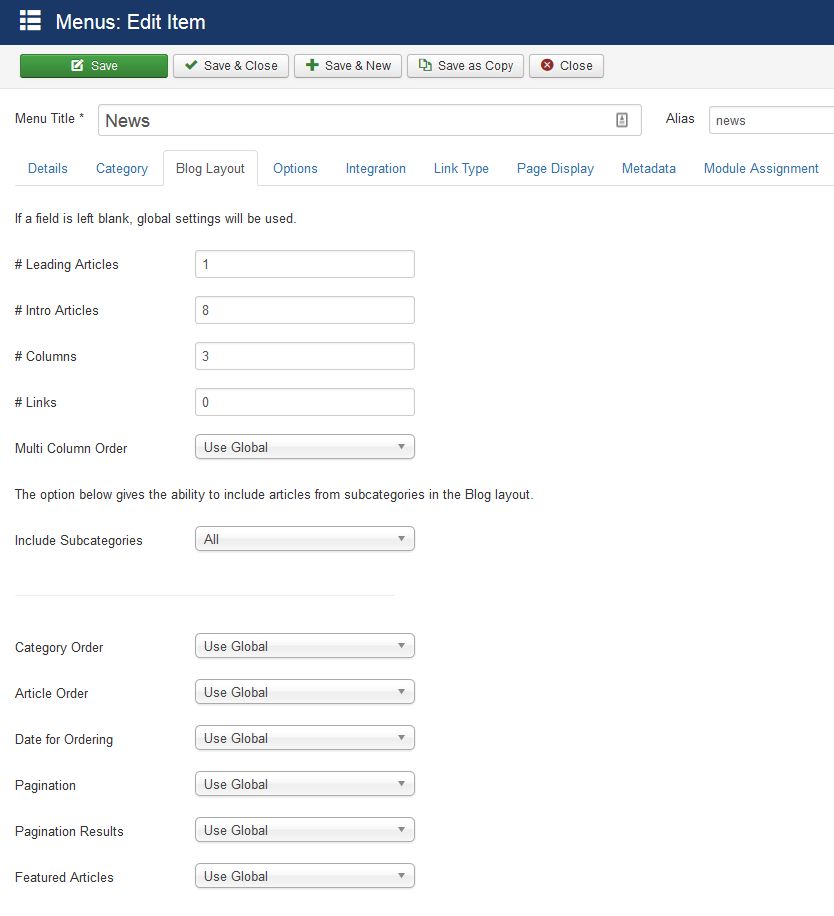
News page - News page live demo
The page display list of articles from selected category in blog view with leading article and intro articles in configured number of columns.
Create News menu item
Go to Menu > Main menu, add new menu item, select Articles » Category Blog menu type and assign "ja_moviemax - Default" template style.
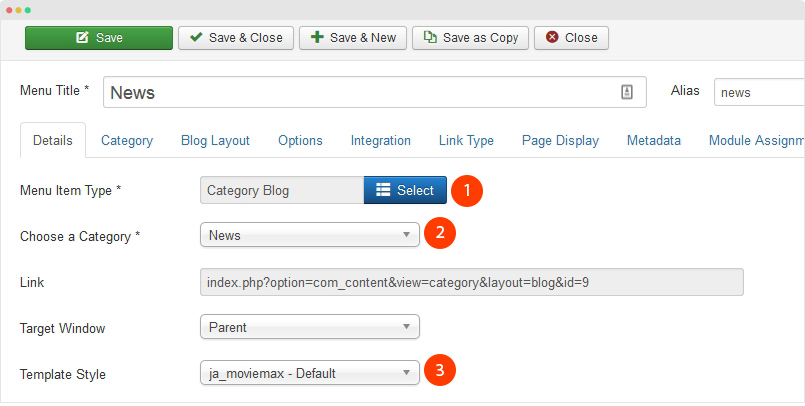
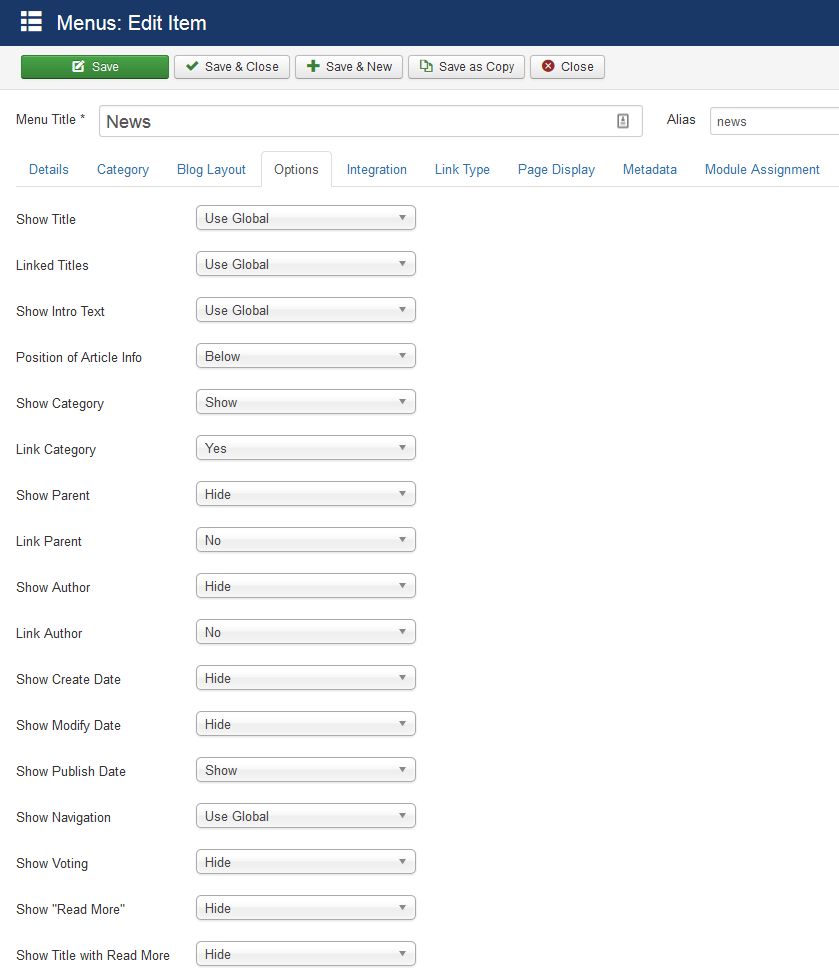
Other settings:
Movies page - Movies page live demo
The page display list of articles from selected category in blog view with leading article and intro articles in configured number of columns.
Create Movies menu item
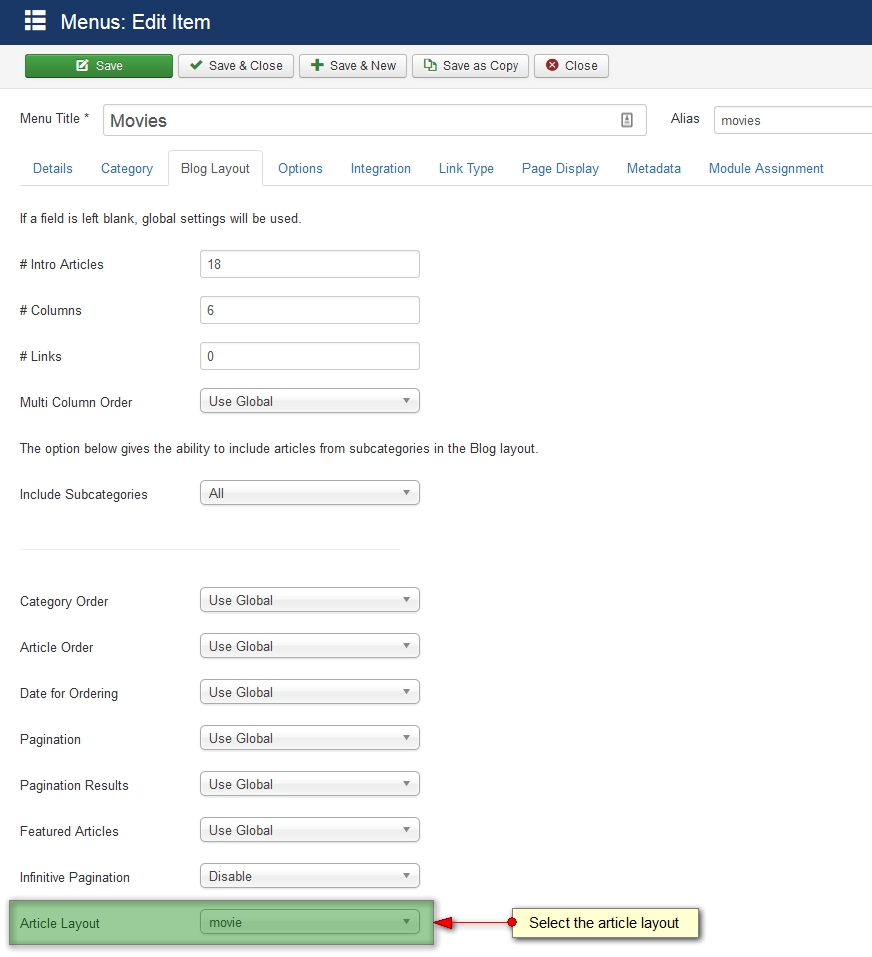
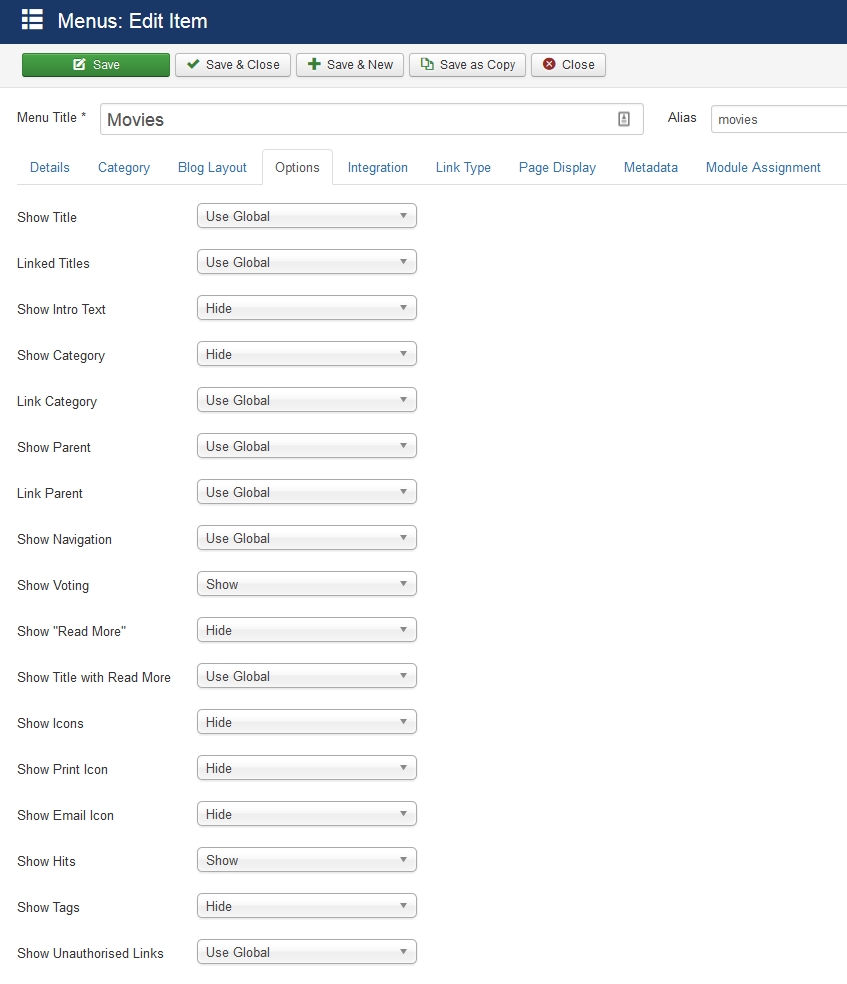
Go to Menu > Main menu, add new menu item, select Articles » Movie List menu type and assign "ja_moviemax - Default" template style. This menu type is extended from Category Blog menu type.
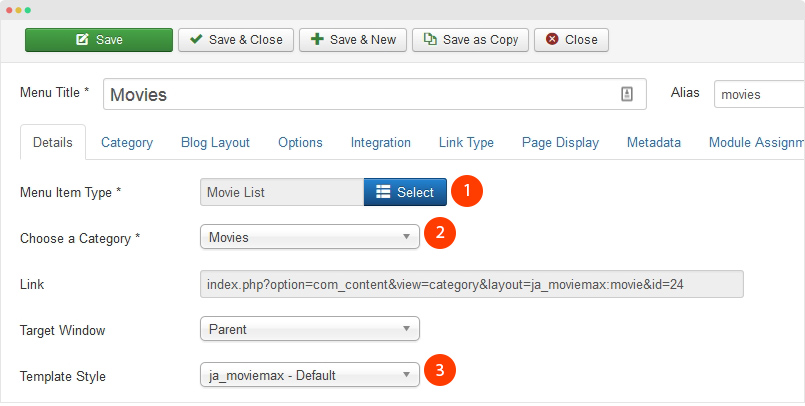
Other settings:
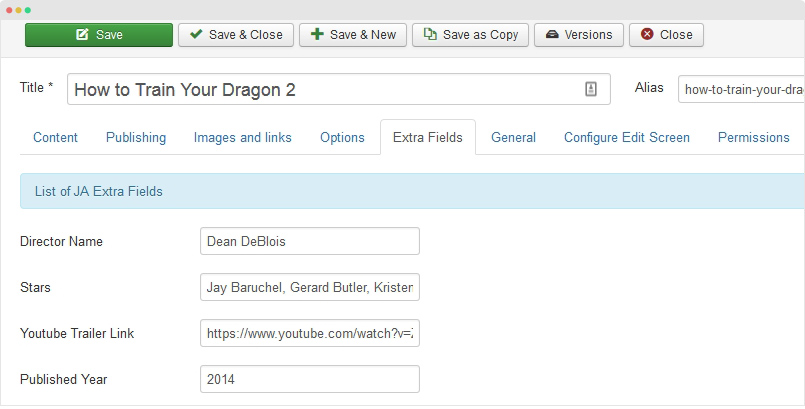
In the detail pages, you will see the movie info sections: director, stars, years, trailer ...The info are extra fields.
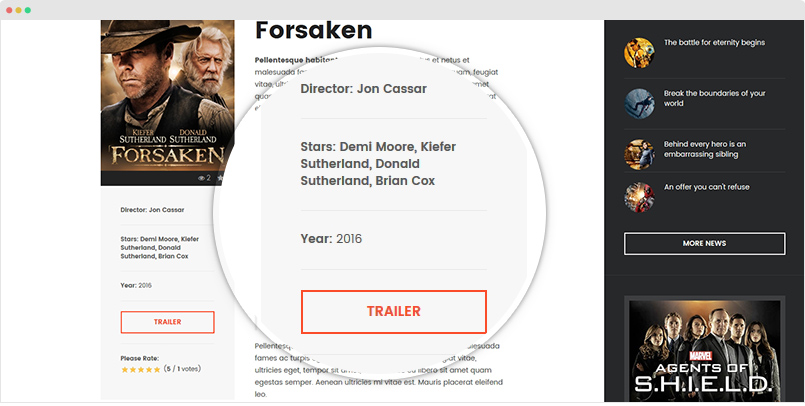
To add extra fields for article, you will need to assign extra field group for category that contain the article.
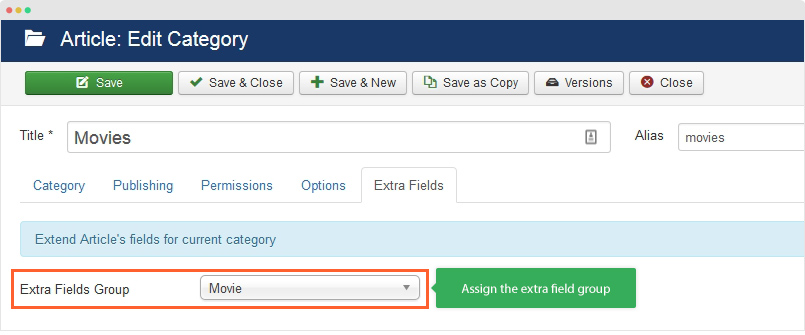
Next, open the article editing page, in the Extra Fields tab, add content for extra fields.
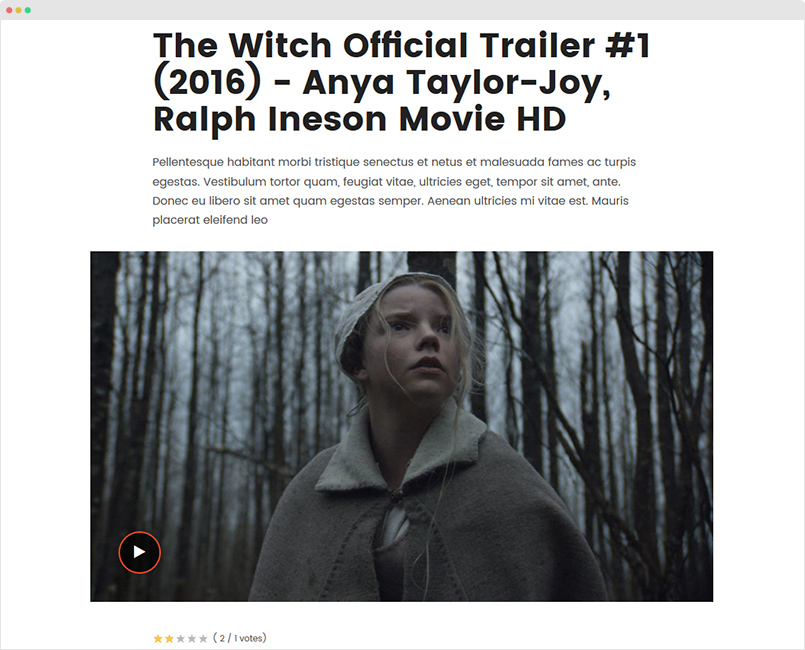
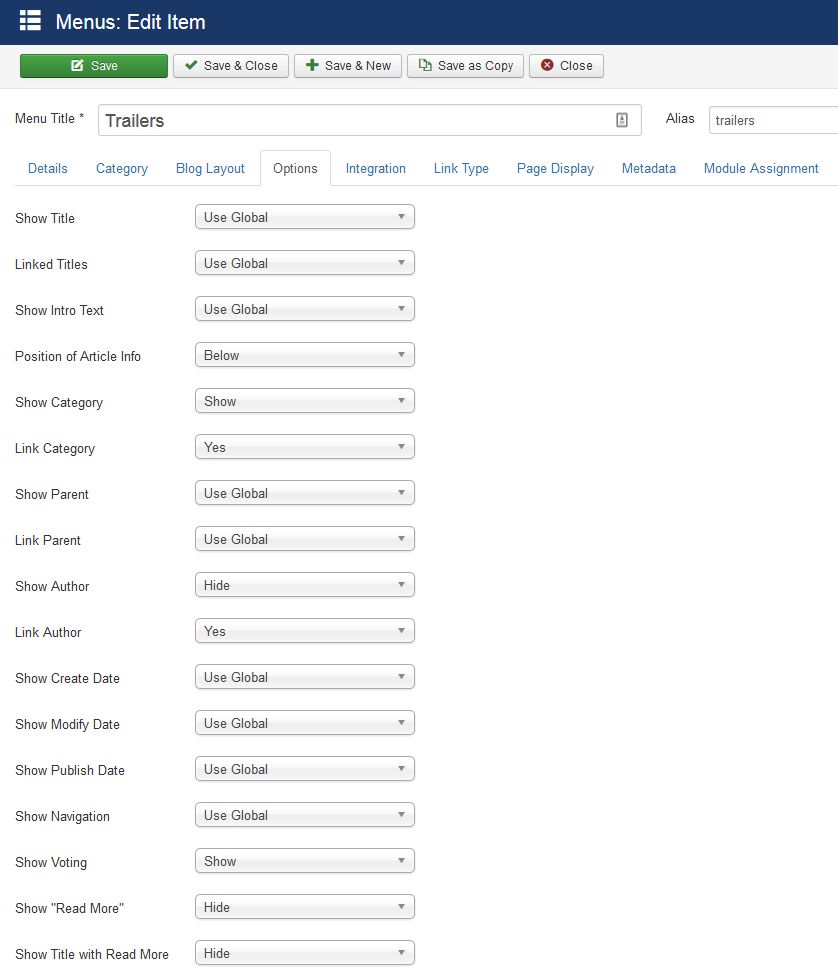
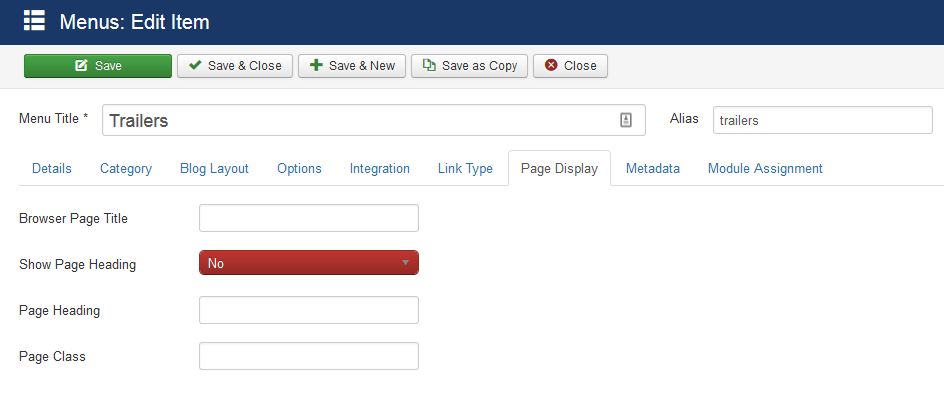
Trailer page - Trailer page in demo site
The page display list of Video articles from selected category in blog view with leading article and intro articles in configured number of columns.

The video detail page inlcude the video added in the extra field and article description.
To create Video article, please refer to the Video Content Type section.
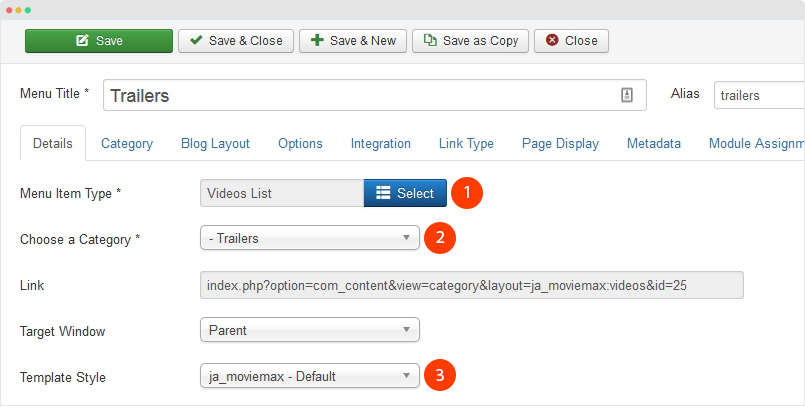
Create Trailer menu item
Go to Menu > Main menu, add new menu item, select Articles » Videos List menu type and assign "ja_moviemax - Default" template style. This menu type is extended from Category Blog menu type.
Other settings:
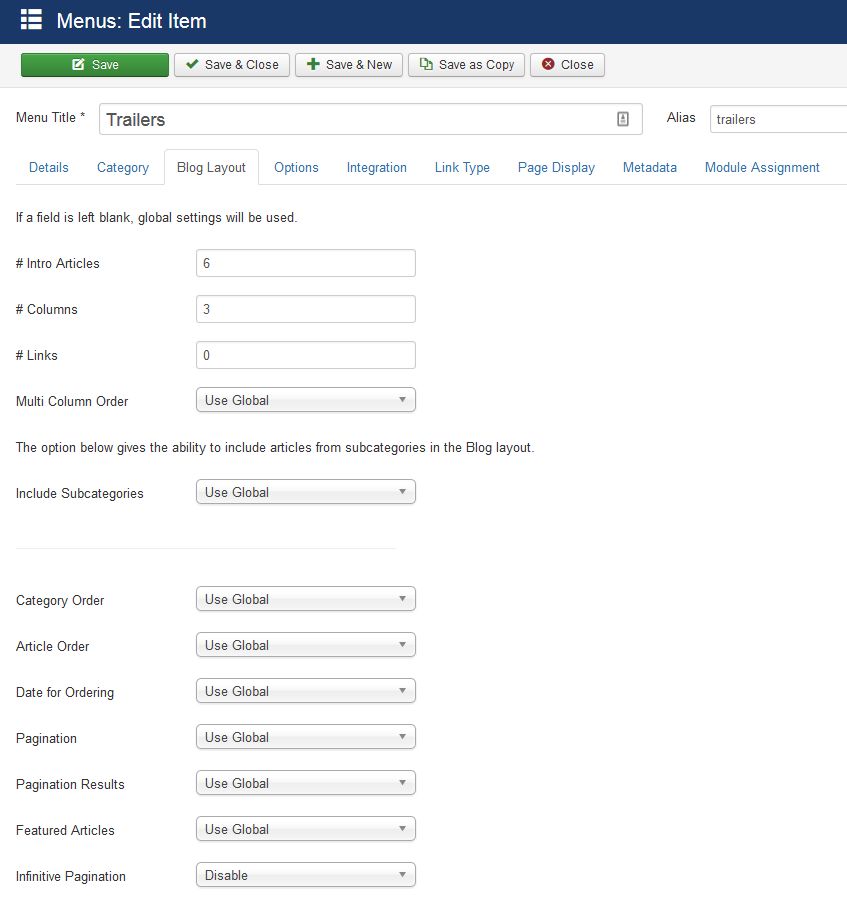
Gallery page - Gallery page in demo site
The page display list of Gallery articles from selected category in blog view with leading article and intro articles in configured number of columns.
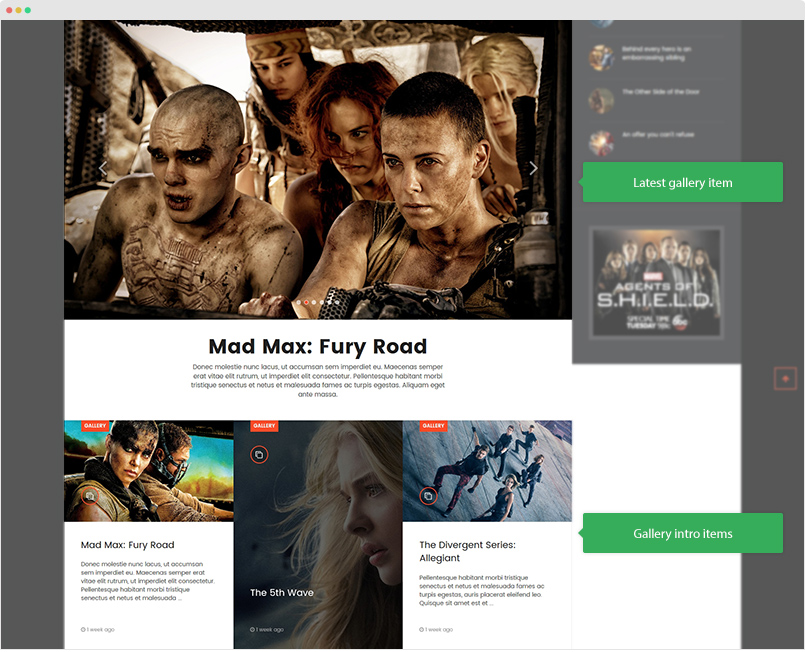
In front-page, the Gallery detail page includes 2 sections: gallery images and description.
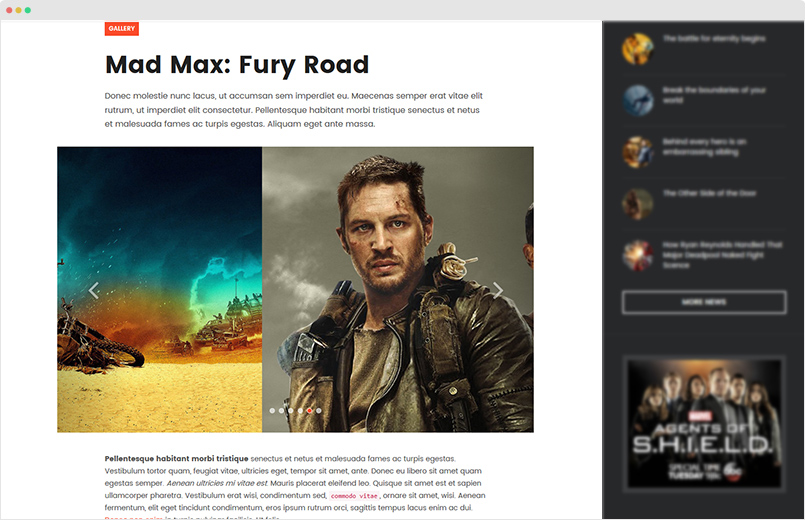
To create Gallery article, please refer to the Gallery Content Type section.
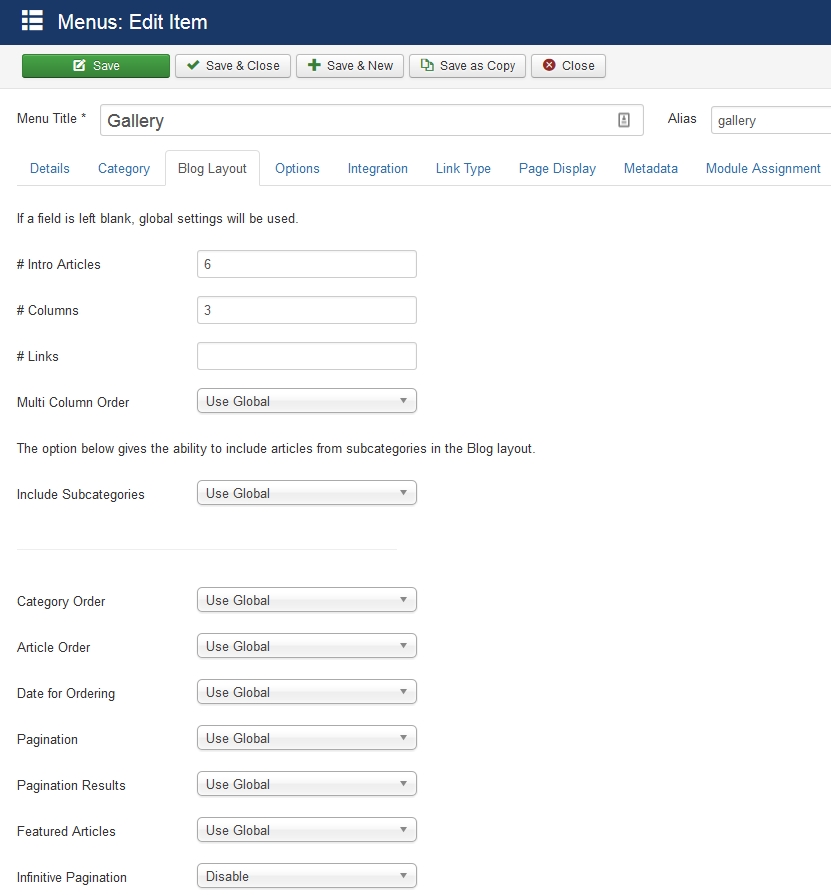
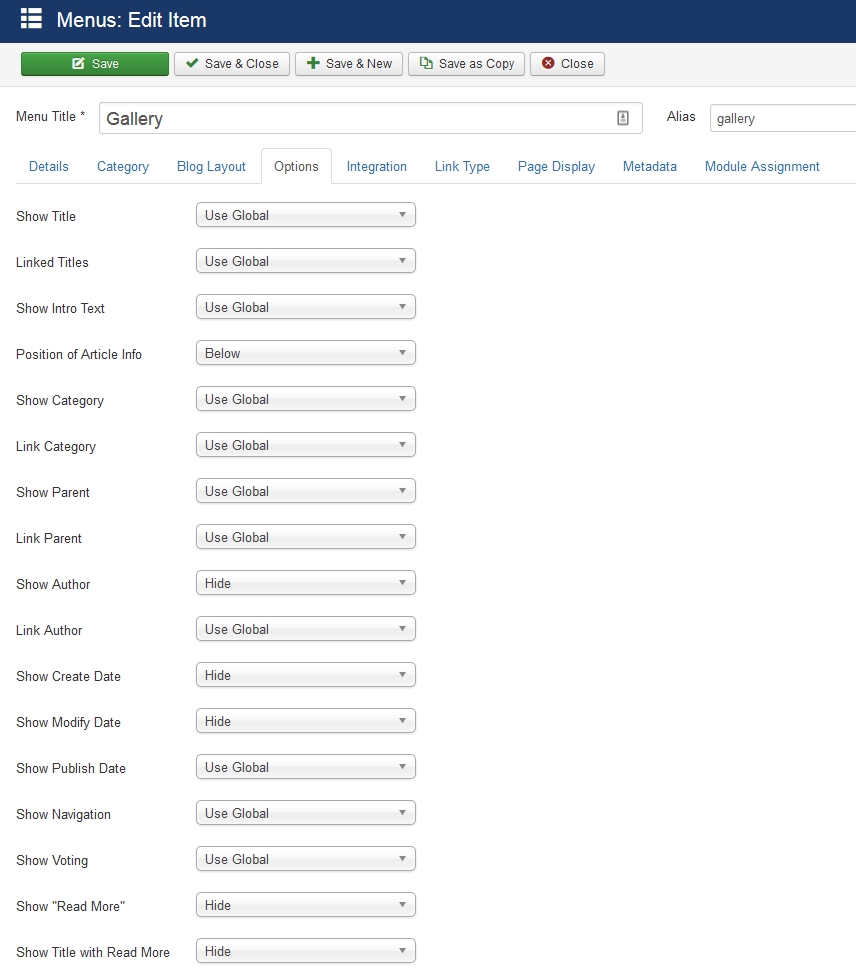
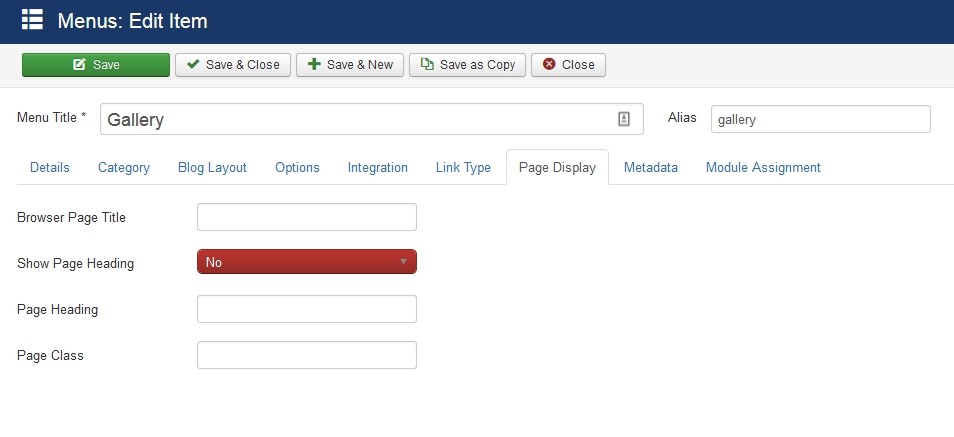
Create Gallery menu item
Go to Menu > Main menu, add new menu item, select Articles » Gallery List menu type and assign "ja_moviemax - Default" template style. This menu type is extended from Category Blog menu type.
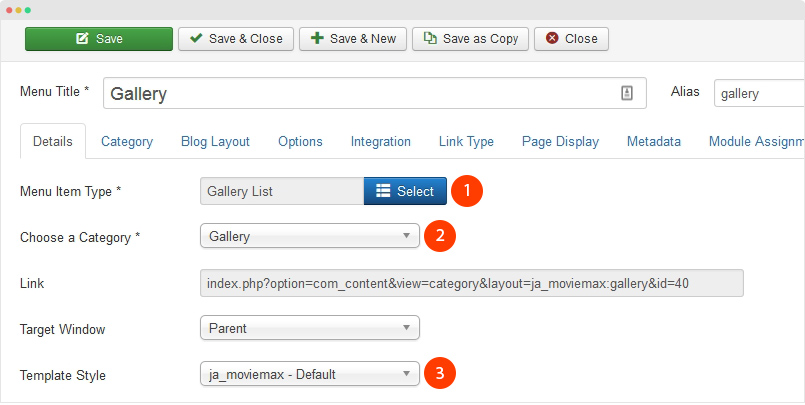
Other settings:
Configuration
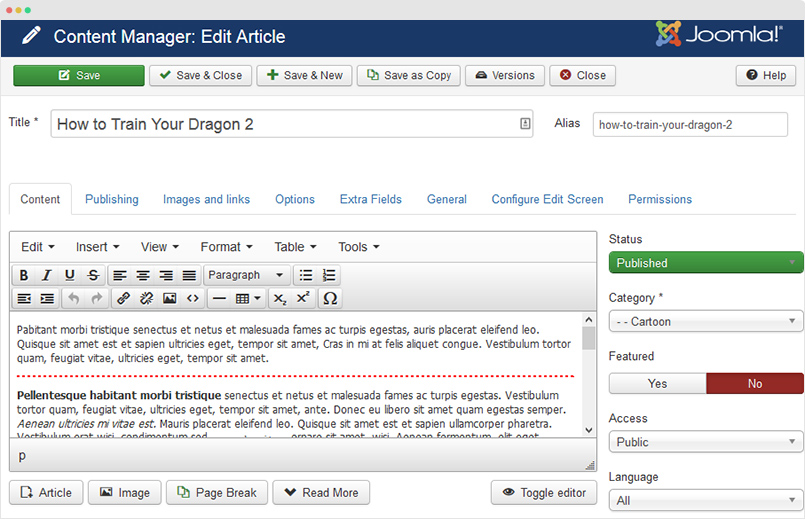
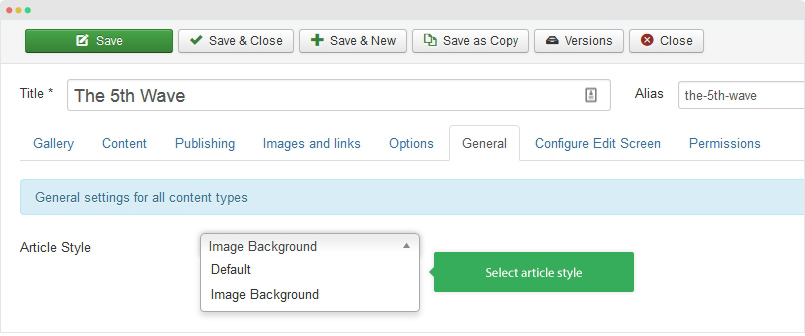
Article Style
The template support 2 article styles: Default and Image Background. Each template style has different views in front-page.
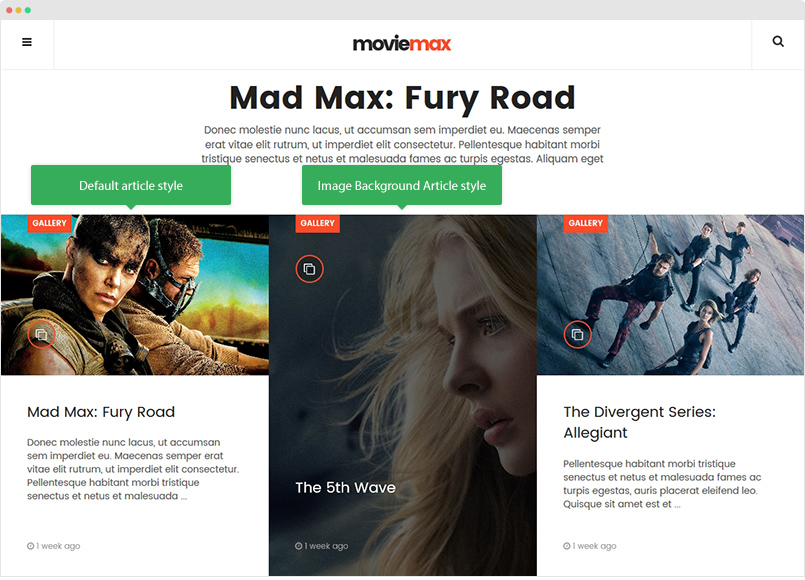
To configure the article style for article, open the editing page of article, in the General setting panel, assign the Article style: Default or Image Background.
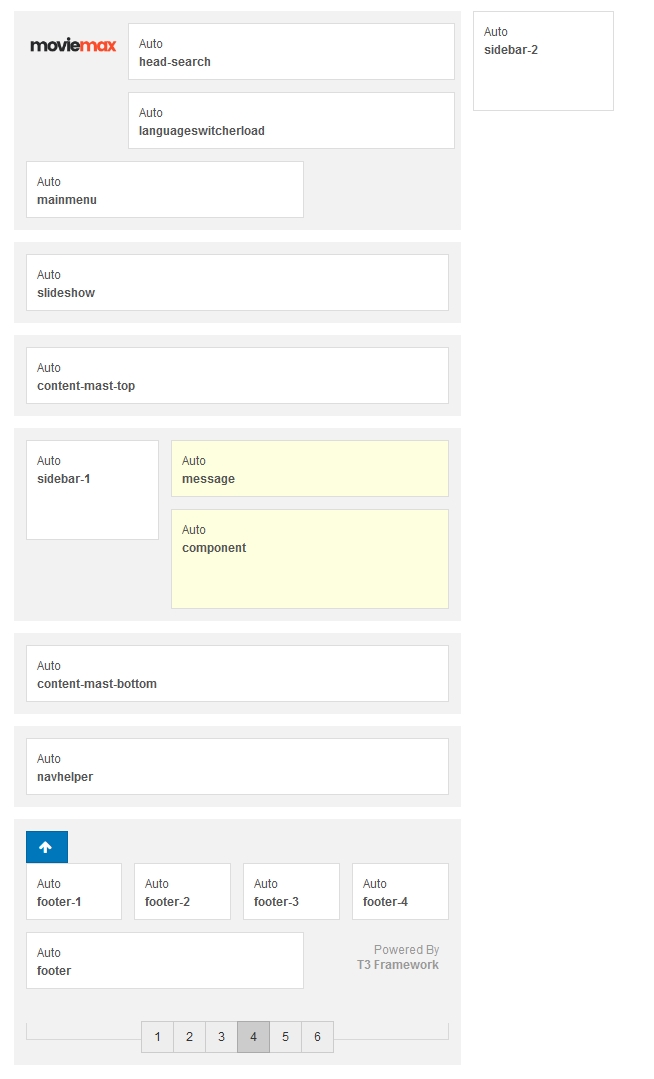
Supported Layouts
JA Moviemax supports 3 layouts by default: default, default-mainnav and default-left-sidebar. Here are the structure of the supported layouts.
- "default" layout screenshot
- "default-mainnav" layout screenshot
- "default-left-sidebar" layout screenshot
Assign Layout for a template style
To assign a layout for a JA Moviemax template style, open the template style > Layout setting panel > assign layout for the template style.
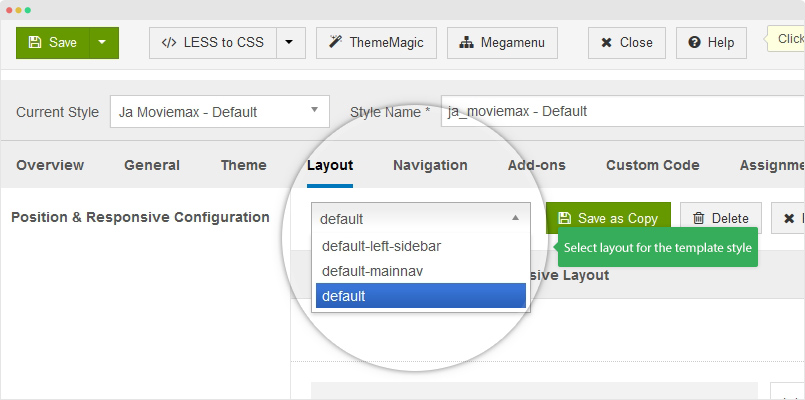
You can create multiple templates style for JA Moviemax template, each template style is assigned to one layout and the template style is assigned to specific menu items so that in one site, you use 1 template but you can use as many layouts as you want.
Layout configuration
Once you assign layout for a template style, you can configure the layout to meet your requirements. There are 2 configuration panels: Layout Structure configuration and responsive layout configuration.
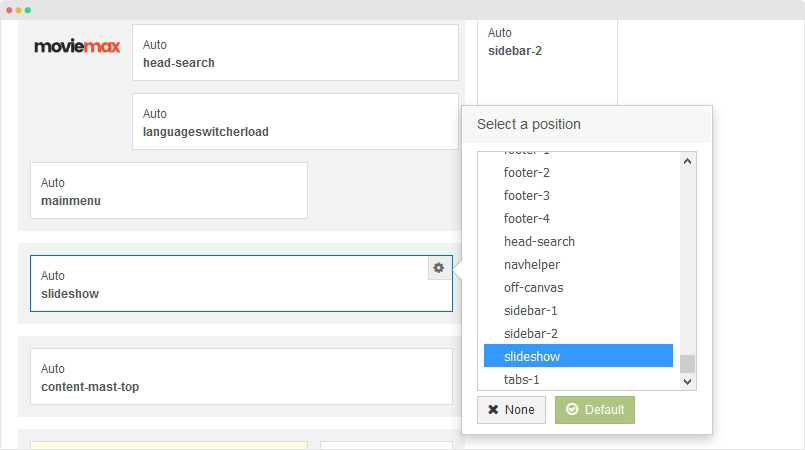
1. Layout Structure configuration
The layout structure allows you to change position for any position in the layout, configure number of positions in spotlight block.
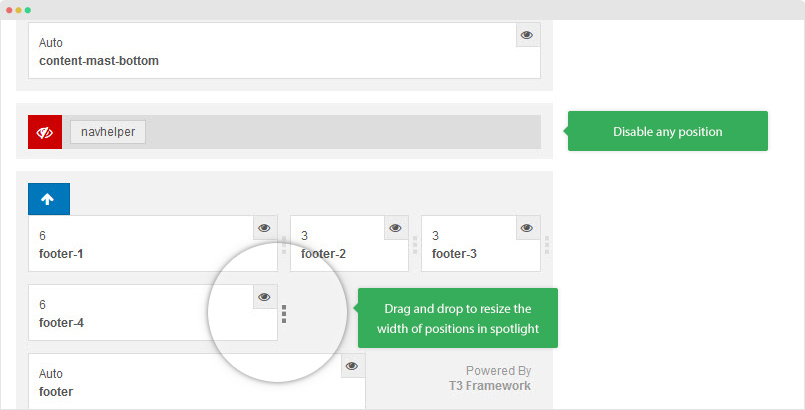
2. Responsive Layout configuration
In the "Responsive Configuration", select the responsive layout you want to configure layout for.

In the responsive layout configuration, you can disable any position you don't want to show in the layout, resize positions in spotlight block.
Logo Setting
![]()
The logo settings are included in the Template Setting panel and its not global settings so you can use different logo for each template style. To change the logo, open template style setting panel > Theme Setting and you would see the logo setting
![]()
Text Logo
There are 2 Logo types: Text and Image. For the Text Logo, just type the Site Name and Slogan.
The text logo is the same in all responsive layouts.
Image Logo
Browse image you want to display as your site logo. If you want to use different logo in small screens like tablet and mobile, enable the "Small Logo" option and browse logo image.
2. Megamenu, Off-canvas menu & Mobile Menu Configuration
JA Moviemax supports 2 menu systems: Megamenu on Desktop layout and Bootstrap dropdown menu on collapsed layouts: Tablet and Mobile.
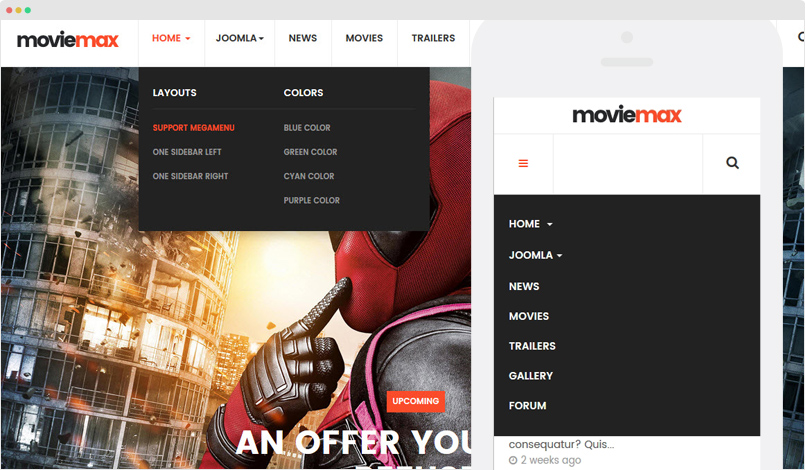
3.1 Megamenu Menu
By default, megamenu is enabled for the layout: default-mainnav, for other layouts: default and default-left-sidebar, megamenu is disabled and it uses off-canvas menu as main menu system.
Enable Megamenu option
In the Navigation setting panel, enable Megamenu, assign Menu and hit the Megamenu button to open the Megamenu configuration panel.
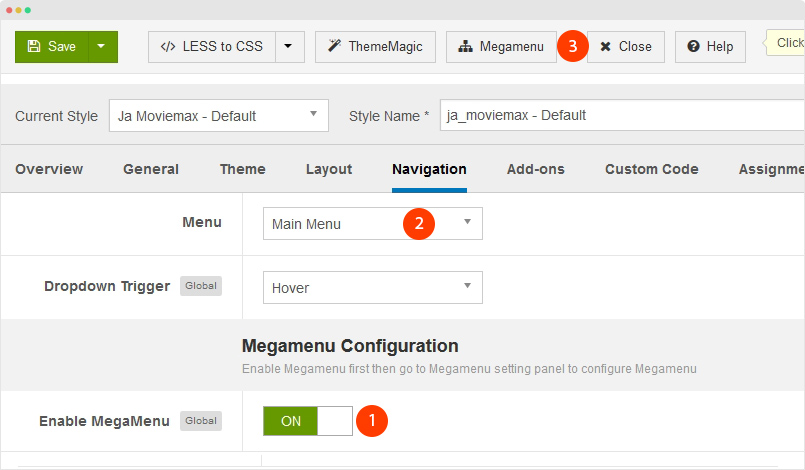
In the configuration panel, select menu item and use the built-in options to configure the megamenu for the menu item.

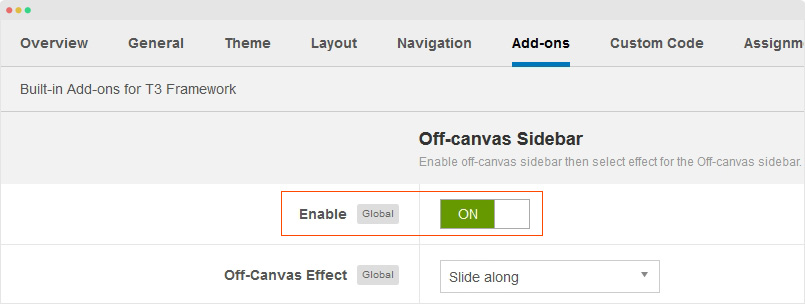
3.2 Off-canvas Sidebar
There are 2 steps to activate Off-canvas sidebar.
1. To enable Off-canvas sidebar, go to JA Moviemax template style » Addon-ons and enable the Off-canvas sidebar option.
2. Create Menu module and assign to the off-canvas position. Check out the module settings below:
Module position: off-canvas
Module Suffix: NOT USED
Back-end Settings
3.2 Bootstrap dropdown menu for Mobile layout
The dropdown meu is used for collapsed layouts: mobile and tablet, it loads the main menu and display in dropdown (default mobile menu system of Joomla). To enable this dropdown menu, simply go to JA Moviemax template style, in the "Navigation" tab, enable the Collapse navigation for small screens option.

Footer Info modification
The footer info includes 2 sections: Copyrights and T3 footer logo.

Copyrights Info modification
To change the copyrights info, open the templates/ja_moviemax/html/mod_footer/default.php file, find the following info and change to what you want.
<small><?php echo $lineone; ?> Designed by <a href="http://www.joomlart.com/" title="Visit Joomlart.com!" <?php echo method_exists('T3', 'isHome') && T3::isHome() ? '' : 'rel="nofollow"' ?>>JoomlArt.com</a>.</small>

	<small><?php echo JText::_( 'MOD_FOOTER_LINE2' ); ?></small>
Disable T3 Footer Logo
You can disable the T3 Footer Logo in the template style manager, open the General setting panel, disable the Show T3 Logo option.
![]()
Documentation is a WIP. If you have any specific request or feedback as well as suggestions, feel free to drop us a line in JA Moviemax template forum. We'll try to cover them all.