

-
AuthorPosts
-
Hung Dinh Friend
Hung Dinh
- Join date:
- September 2014
- Posts:
- 4408
- Downloads:
- 11
- Uploads:
- 189
- Thanks:
- 309
- Thanked:
- 3310 times in 3 posts
January 30, 2011 at 8:46 am #158633I: Installation
You follow simple steps below:1. Install the module via Joomla Installer
Then, the plugin is instantly available in your front-end. If you are new to this stuff, follow detailed guideline below:
—-How to install plugin2. Enable the module
From the back-end of your Joomla site (administration) select Extensions->Plugin Manger, then click on module title System – JA Tabs to enter configuration panel:

Parameters Explanation:
- Enable: To enable or disable the plugin in the system
- Access: To set the permission to view plugin in the frontend
- Ordering: The ordering of plugin in the Plugin listing of the system
II: Configuration
1. General Settings:
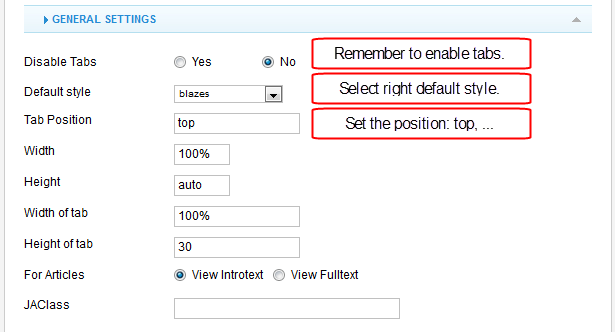
Parameters Explanation:- Disable Tabs: Select to disbale all tabs on your website and remove their code
- Default Style: set the default style for the module. You should select the right style for the template you use. For example: If you use template – JA Blaze, you should use the default style – blazes
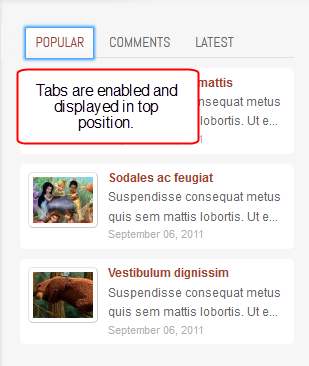
- Tabs Position: Position of the tabs ( top, left, right, bottom).
- Width: Set width of frame. for ex: 100% or 400
- Height: Set height of frame. for ex: auto or 300
- Width of tab: It should be empty for “Top/Bottom” position and 150 for “Left/Right” position
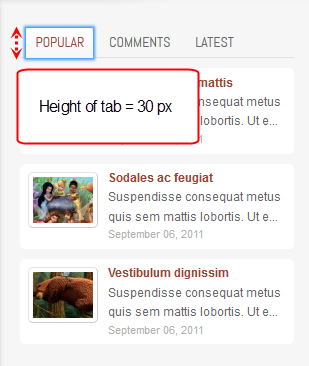
- Height of tab: It should be empty for “Left/Right” amnd “30′ FOR top/bottom
- For Article: View Mode foor the Article. Ex: view=”introtext”
- JAClass: enter class for each tab in format: 0:class1, 1:class2, 2:class3 …The supported class depends on the tab style.
2. Animation Settings:
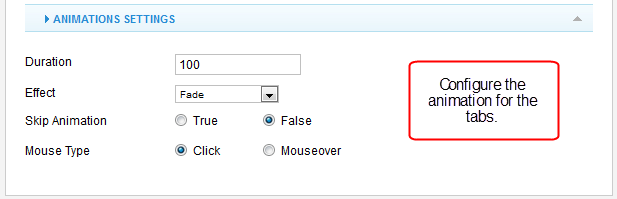
Parameters Explanation:- Duration: set the duration for the effect when you change from one tab to an other tab.
- Effect: set the effect of tabs transition: Fade, Move horizontal, Move verticle or None.
- Skip Animation: True/ False. Default = False
- Mouse Type Action behavior of the control panel (click, mouseover, none). Default = Click
3. How to add Tab in your content
You can display tabs in Article content or in a Custom HTML module.
3.1 Display Tab in custom HTML module.
Go to: Extension >> Module Manager >> Custom HTML then add new custom module, in the content box, add tag to enable and configure for tabs.
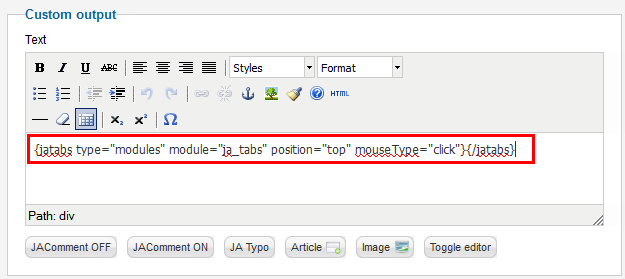
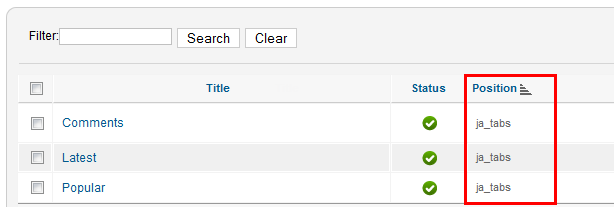
After that, assign the modules you want to display in the tabs in the position that is configured in the Custom HTML module – ja-tabs position.
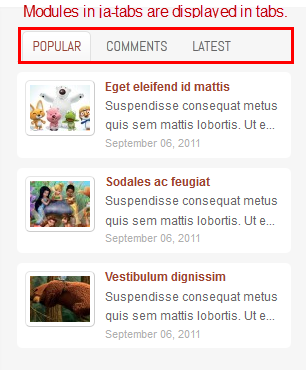
Front-end Appearance:
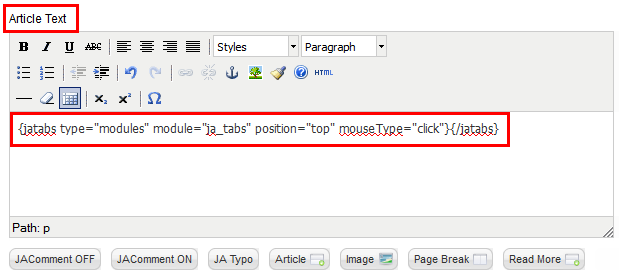
3.2 Display Tabs in the article content.
Go to: Content >> Article Manager then open an article. In the content box, add tag to enable and configure for tabs.
4. All available parameter options for JA Tabs Plugin.
- type:
- position:
- style:
- width:
- height:
- widthtabs:
- heightTabs:
- duration (ms):
- animType:
- mouseType:
- skipAnim:
- ajax:
- view:
- jaclass:
- module:
- modulename:
- ids:
- catid:
- maxitems:
(modules, module, content, articles). JA Tabs type.
(top, left, right, bottom). Position of the tabs. Default value is top.
JA Tabs styling (basic). The default setting is basic.
Width of the tabs. It can be fixed or automatic. Example: empty or ‘100%’ or ‘600’
Height of the tabs. It can be fixed or automatic. Example: empty or ‘auto’ or ‘400’.
Width of the tabs. It should be ’empty’ for the ‘Top/Bottom’ position of tabs title and fixed (such as ‘150’) for the ‘Left/Right’ position of tabs title.
Height of the tabs. It should be ’empty’ for ‘Left/Right’ position of tabs title and fixed (such as ’30’) for ‘Top/Bottom’ position of tabs title.
set the duration for the effect when you change from one tab to an other tab.
(animFade, animMoveHor, animMoveVir, none). Define type of effect transition. The default setting is animMoveVir.
(click, mouseover, none). Action behavior of Control Panel. Default value is click.
(true, false). Skip animation. The default setting is false.
(true, false). Set to “True” if you want to use AJAX to load content in tabs (Does not apply for HTML Content type). The default setting is False.
(introtext, fulltext). Apply for Articles.
Input the class for each tab in format: 1:class1,2:class2. The supported class depend on the tab style.
Apply for type=”modules”. Input module position which will display in tabs. For example: articleslatestload
Apply for type=”module”. Input one or more module names which are separated by commas. For example: mod_articles_news, mod_articles_latest
Apply for type=”articles”. Input one or more article IDs which are separated by commas. For example: 1, 2, 3, 4
Apply for type=”articles”. Input one catergory from which you want to display its articles in tabs. For example: 1
Maximum number of articles to display
5. The Plugin supports 5 types of Tab:
- Type = modules
- Type = module
- Type = content
- Type = articles
- Type = article categories
{jatabs type="modules" module="position-7" position="top" mouseType="click" animType="animFade"} {/jatabs}
{jatabs type="module" modulename="mod_menu, mod_login" position="left" widthTabs="150" animType="animMoveVir"} {/jatabs}
{jatabs type="content" position="top" height="240" mouseType="mouseover" animType="animMoveHor"} <img src="images/sampledata/fruitshop/apple.jpg" alt="Sample image" align="left" class="caption" />... <img src="images/sampledata/fruitshop/bananas_2.jpg" /> <img src="images/sampledata/fruitshop/tamarind.jpg" /> {/jatabs}
{jatabs type="articles" ids="25, 26, 27" ajax=true view="introtext" position="right" widthTabs=150 width=530 animType="animMoveVir"} {/jatabs}
{jatabs type="articles" catid="55" view="introtext" ajax=true position="bottom" animType="animMoveHor"} {/jatabs}
March 12, 2011 at 5:51 pm #381029Hi,
This is a great plug-in! Thanks for the instructions as well.
There’s a couple of things I can’t replicate yet, aand I’m hoping you can help.
I have a tab setup like the one in the portfolio template. I’m trying to add the icon images like the one in the demo. I tried to ad an image tag in the code string, but it didn’t work. Would you mind letting me know how to do this?
Also, I can’t figure out how to set the order of the articles. I keep rearranging the article id’s in the code string, but it doesn’t change the order of the tabs.
Other than those two things, this was really easy to set-up and get configured. Great job!
Thanks,
Billhuypl Friend
huypl
- Join date:
- February 2011
- Posts:
- 162
- Downloads:
- 0
- Uploads:
- 1
- Thanks:
- 2
- Thanked:
- 20 times in 20 posts
March 16, 2011 at 4:18 pm #381695Hello willroz,
So you want to make a tab like portfolio template. Now I’m gonna show you how to do it.
For example, you want to have two tabs, the first tab is “Tab 1” and the second one is “Tab 2″.
1. Go to plugin manager -> JA tabs. Set the template to portfolio.
2. Go to module manager and create a custom HTML module, then write an article in this module. Remember to add the Module Class Suffix for this module. For example: you add a _icon1 class for tab 1. Set the position for tab 1 to tabs
3. Do the same for tab 2. Add a _icon2 class for it. Also Set the position for tab 2 to tabs
4. Create another Custom HTML module, for example, you name it as Home page tabs. And insert this code:
{jatabs type=”modules” module=”tabs” position=”your position” mouseType=”click” } {/jatabs}
Done
Now you want to change the icon images. Follow these steps:
The icons are located in pluginssystemjatabsjatabsthemesportfolio ( if you had selected the template portfolio in JA Tab plugin)
You can change to another icons. The css is located in the same folder. Look at it:
.portfolio ul.ja-tabs-title li.ja-tab-title_icon1 h3 { background-image:url(icon1.png); }
.portfolio ul.ja-tabs-title li.ja-tab-title_icon2 h3 { background-image: url(icon2.png); }Notice that you can see li.ja-tab-title_icon1 and li.ja-tab-title_icon2. This should match the Module Class Suffix you had set before.
-
AuthorPosts
This topic contains 3 replies, has 3 voices, and was last updated by huypl 13 years, 10 months ago.
We moved to new unified forum. Please post all new support queries in our New Forum