System requirement
JA Nuevo is native with Joomla 3 and Joomla 2.5. Please make sure your system meets the following requirements:
Joomla 3 System requirement
Software
- Software: PHP (Magic Quotes GPC off): 5.3.1 + (5.4+ recommended)
Databases
- MySQL(InnoDB support required): 5.1+
- MSSQL 10.50.1600.1+
- PostgreSQL 8.3.18+
Web Severs
- Apache 2.x+
- Microsoft IIS 7
- Nginx 1.0 (1.1 recommended)
Joomla 2.5+ system requirement
Software
- Software: PHP 5.2.4+ (5.4+ recommended)
- MySQL: 5.0.4+
Web Sever
- Apache: 2.x+
- Microsoft: IIS 7
- Nginx: 1.0 (1.1 recommended)
Browser requirement
The requirements are the same for both Joomla 2.5 and Joomla 3
- Firefox 4+
- IE (Internet Explorer) 8+
- Google Chrome 10+
- Opera 10+
- Safari 5+
Development Environment
The requirements are the same for both Joomla 2.5 and Joomla 3
During development process, Localhost is preferred. You can use the following servers on your PC to develop your site.
Windows
- WAMPSEVER
- XAMPP for Windows
Linux
- LAMP Bubdle
- XAMPP for Linux
Mac OS
- MAMP & MAMP Pro
- XAMPP for Mac OS
Download packages
Important:
JA Nuevo template is built on T3 Framework so it requires T3 Framework to be installed and enabled in your system.
JA Nuevo template supports Joomla 3 and Joomla 2.5. We highly recommend you use the stable version of the 2 Joomla versions.
Download Packages
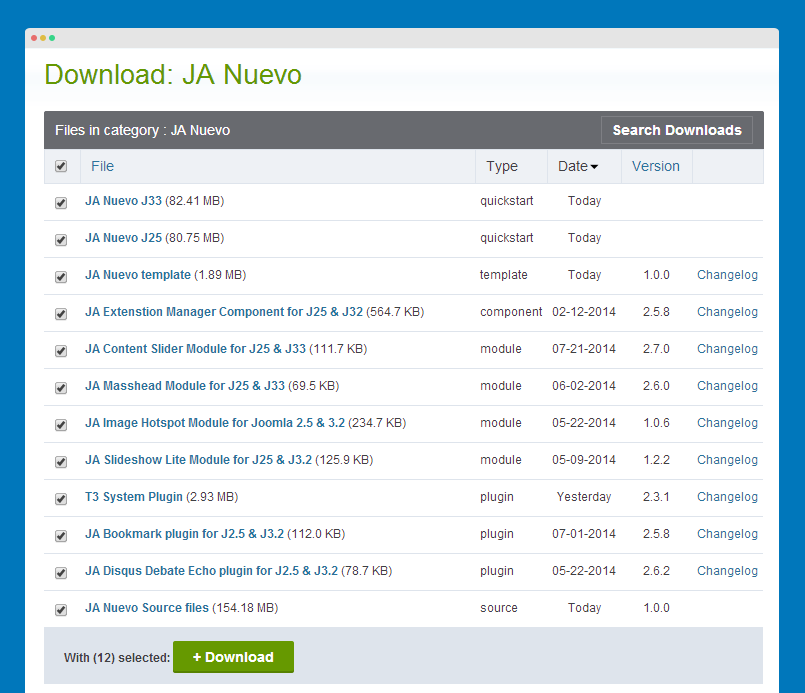
The download package includes:
- Quickstart package >> for quickstart installation
- JA Nuevo template >> for manual installation
- T3 Framework >> for manual installation.
- Supported JA extensions
- Source file
Manual Installation
Install T3 Framework
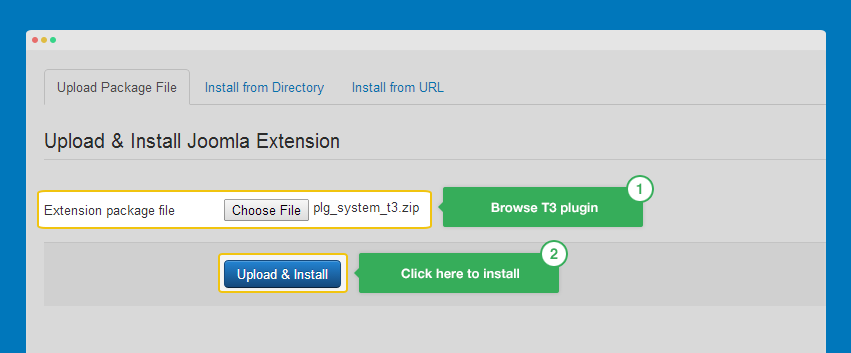
Step 1: Install T3 Framework
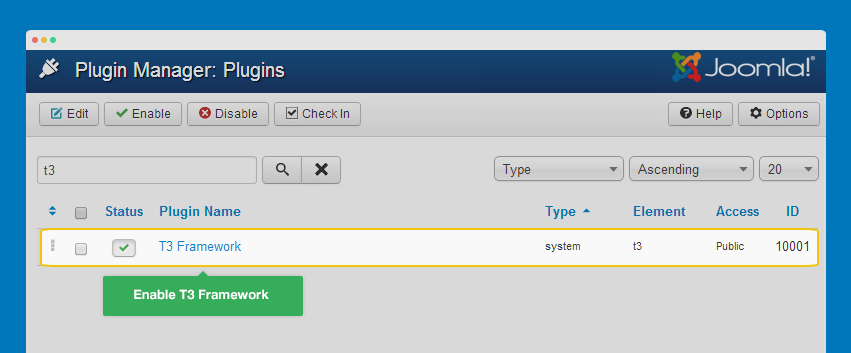
Step 2: Enable T3 Framework
When you install T3 Framework, it's auto enabled by default. You can check this by going to: "Extensions >> Plugin Manager" then find T3 Plugin.
Install JA Nuevo template
Step 1: Install JA Nuevo template

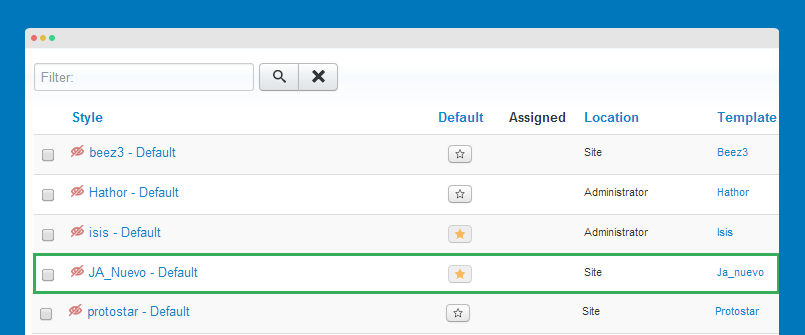
Step 2: Set JA Nuevo template style as your default template style. Go to: "Extensions >> Template Manager >>" set JA Nuevo template style as your default template style.
Quickstart installation
Why Quickstart:
The Quickstart package includes sample data and extensions. Once you install the Quickstart, your site will look the same as View JA Neuvo Demo
In short, the installation has 5 steps in Joomla 3 and 7 steps in Joomla 2.5
Joomla 3 quickstart installation steps:
- Step 1: Select default language
- Step 2: Main configuration
- Step 3: Database configuration
- Step 4: Install sample data
- Step 5: remove or rename the "installation" folder
Joomla 2.5 quickstart installation steps:
- Step 1: Select language
- Step 2: Pre-installation check
- Step 3: License
- Step 4: Database setup
- Step 5: FTP configuration (optional)
- Step 6: Site configuration
- Step 7: Remove/rename the "installation" folder
View more detail documentation with screenshots for each step at: http://www.joomlart.com/documentation/other/quickstart-installation. The docs includes guideline for both Joomla 2.5 and Joomla 3 quickstart installation.
Template folder structure
This section is to help you understand the structure of Purity III template, the function of folders and files and where you should start.
JA Nuevo template
JA Nuevo template is built on T3 Framework so its folder structure is almost the same with any other JA Templates that are developed with T3 Framework such as: JA Obelisk, JA Muzic, JA Appolio, JA T3 blank, JA T3 BS3 Blank, etc.
templates/ja_nuevo/
+--less/            		/*  all LESS files */
¦    +-- rtl/			/*all files of right to left language style*/
¦    +-- extras/			/*less files for extended template style like 3rd extensions*/
¦    +-- themes/         	/*theme folders and theme files */
¦    +-- bootstrap.less
¦    +-- core.less
¦    +-- home.less
¦    +-- joomla.less
¦    +--  ...
+-- css/                     /*compiled files from less*/
¦    +-- rtl/			/*compiled CSS files of right to left layout*/
¦    +-- themes/             /*compiled theme folders and files*/
¦    +-- bootstrap.css
¦    +-- home.css
¦    +-- megamenu.css
¦    +-- template.css
+-- fonts/
+-- js/
¦    +-- scripts.js
+-- tpls/             /* all layout files and block files*/
¦    +-- blocks/       /*block files*/
¦    ¦    +-- header.php
¦    ¦    +-- mainbody.php
¦    ¦    +-- footer.php
¦    ¦    +-- ...
¦    +-- default.php
+-- html/ 				/*override modules, 3rd extension, com_content...*/
¦    +-- com_content
¦    +-- com_k2
¦    +-- mod_jacontentslider
¦    +-- ...
+-- images/
+-- language/
¦    +-- en-GB.tpl_ja_nuevo.ini
¦    +-- en-GB.tpl_ja_nuevo.sys.ini
+-- templateDetails.xml
+-- templateInfo.php/
+-- thememagic.xml/ 	/*the file is to add new group, parameters to ThemeMagic*/
+-- templateHook.php/
T3 Framework
You can find the folder structure of T3 Framewotk at: http://t3-framework.org/documentation/installation#folder-structure.
Recommendation
Any change or customization in the T3 Framework is not recommended. To customize your template, please do it in the "local" folder: templates/ja-nuevo/local.
Upgrade instruction
Take a full backup
Please always make a back-up before proceeding to any of the upgrade process. In case there is any problem, you can always restore from the back-up files.
Upgrade template and T3 framework
Which upgrading method to use?
There are 2 ways of upgrading to new version: using Joomla Update (install directly) or using JA Extension Manager. The best method is using JA Extension Manager which will make sure your customization is not lost.
To upgrade template through JAEM (JA Extension Manager Component) you need to install the component and configure it properly. Please check DETAIL GUIDE of how to use the extension.
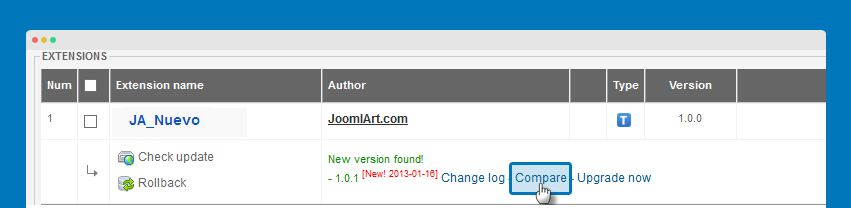
Next, check the new version of template to upgrade
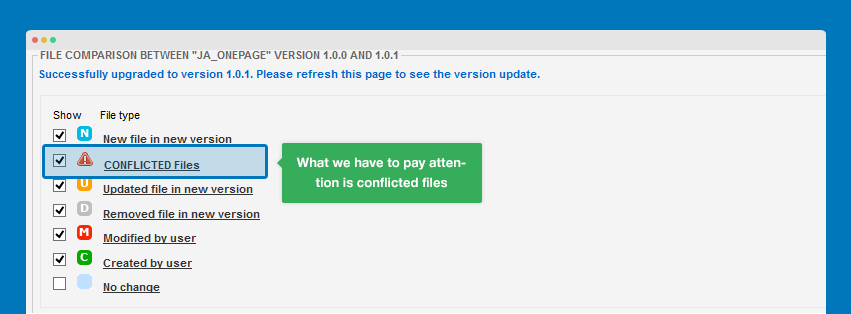
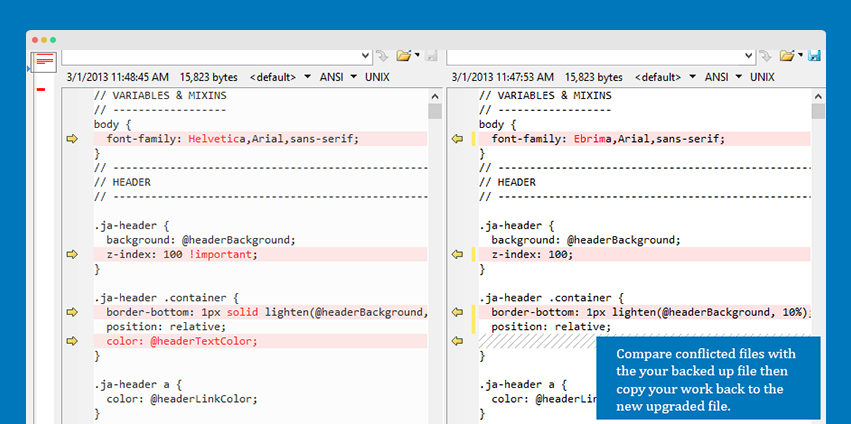
When upgrading, the conflicted files will be overridden by files in new version, that means what you customized in the files will be lost.
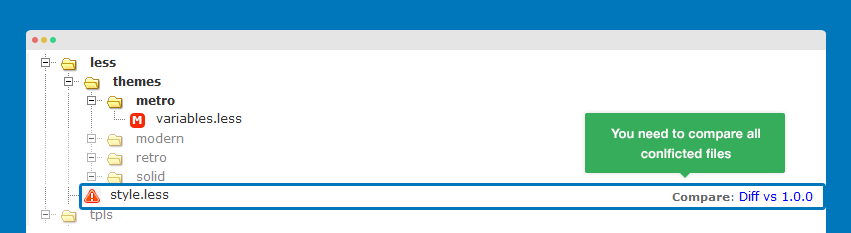
Now, upgrade template to new version. After upgrading successfully, you need to compare the conflicted files (using your back-up files) then copy what you customize to the new upgraded files.