Template Installation
The section will help you with steps to install JA Events II template - Quickstart and Manual installation.
System requirement
JA Events II template is native with Joomla 3. Please make sure your system meets the following requirements:
Software
- Software: PHP (Magic Quotes GPC off): 5.3.1 + (5.4+ recommended)
Databases
- MySQL(InnoDB support required): 5.1+
- MSSQL 10.50.1600.1+
- PostgreSQL 8.3.18+
Web Severs
- Apache 2.x+
- Microsoft IIS 7
- Nginx 1.0 (1.1 recommended)
Browser requirement
- Firefox 4+
- IE (Internet Explorer) 8+
- Google Chrome 10+
- Opera 10+
- Safari 5+
Development Environment
During development process, Localhost is preferred. You can use the following servers on your PC to develop your site.
Windows
- WAMPSEVER
- XAMPP for Windows
Linux
- LAMP Bubdle
- XAMPP for Linux
Mac OS
- MAMP & MAMP Pro
- XAMPP for Mac OS
Download packages
Important:
1. JA Events II template is built on T3 Framework so it requires T3 Framework to be installed and enabled in your system.
2. We highly recommend you to use stable version of Joomla 3.
Download Packages
The download package includes:
- Quickstart package
- JA Events II template
- T3 Framework plugin
- Supported JA extensions
- Source file
Manual Installation
Install T3 Framework
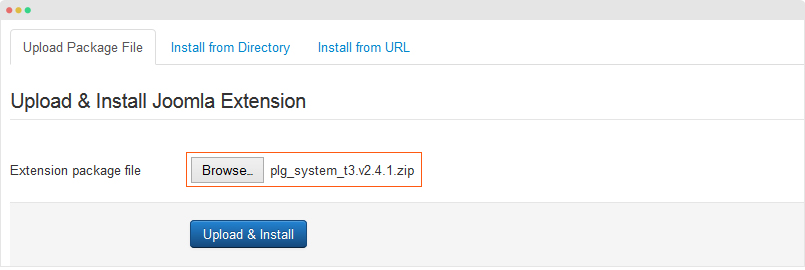
Step 1 - Install T3 Framework
From your back-end setting panel, go to: "Extensions → Extension Manager", browse T3 plugin installation package then hit the "Upload and Install"
Step 2 - Enable T3 Framework
When you install T3 Framework, it's auto enabled by default. You can check this by going to: "Extensions → Plugin Manager" then find T3 Plugin.
Install JA Events II template
Step 1 - Install JA Events II template
From your back-end setting panel, go to: "Extensions → Extension Manager", browse JA Events II template installation package then hit the "Upload and Install"

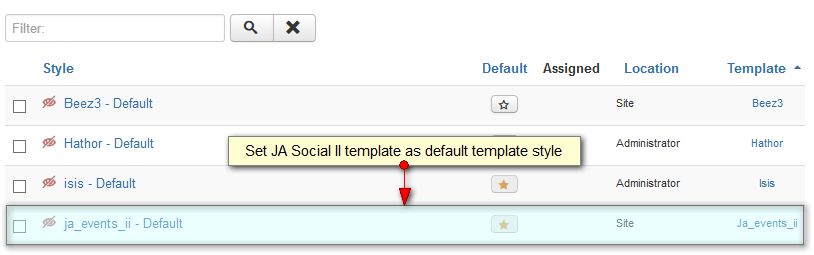
Step 2 - Set default template style
Go to: "Extensions → Template Manager", set JA Events II template style as your default template style.
Install all supported extensions
- JEvent Component or Events Booking component
- JA Login Module
- JA Google map plugin
- JA ACM module
- JA Masthead module
Quickstart installation
IMPORTANT NOTE
The quickstart package does not include JEvent Component and Events Booking component as the extensions are commercial so once the quickstart installation is done, the site is not exactly the same with JA Events II Demo site, we are using Joomla content to replace content of the 2 components in demo site. To have the JEvent Component and Events Booking component worked the same way as our Demo site, please follow the instruction in the JEvent Component and Events Booking Component section.
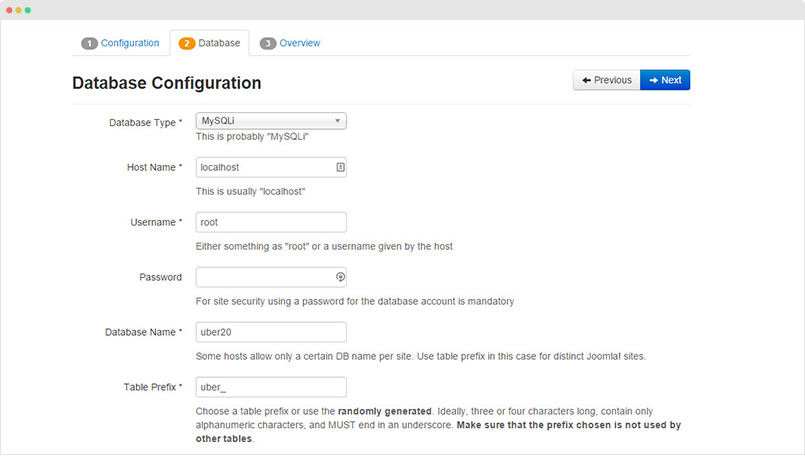
Step 1 - Configuration: add Site name, Admin email, Admin username and password

Step 2 - Database: select database type, host name, database username, password, database name & table prefix
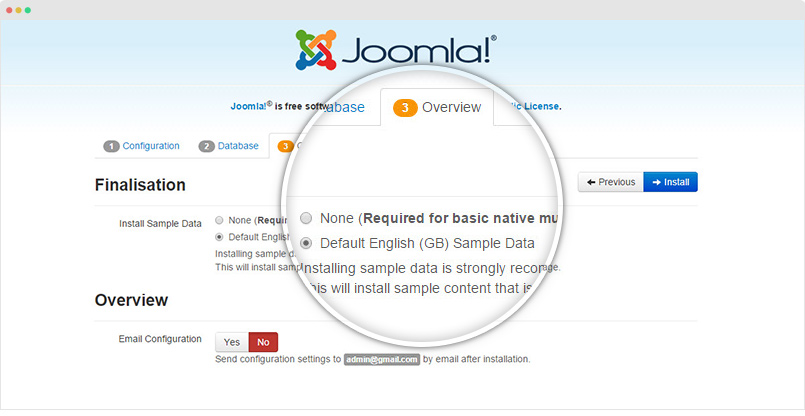
Step 3 - Overview: select sample data to install, we suggest to use Default English (GB) Sample Data. You can install multilingual in the step.
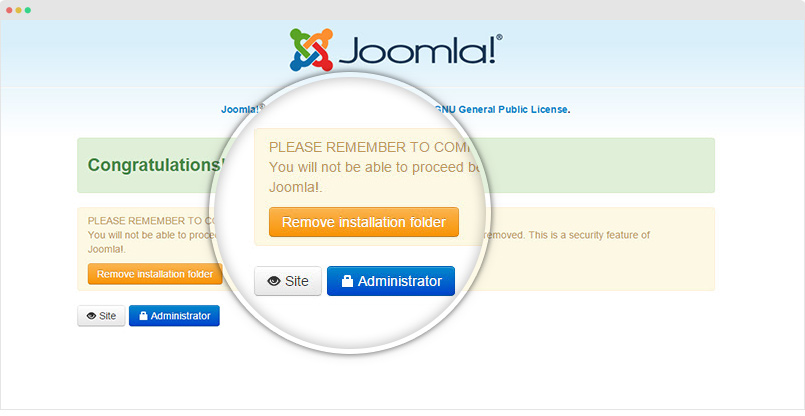
Step 4 - Remove/Rename "installation" folder: for security purpose, you need to rename or remove the "installation" folder
Template folder structure
This section is to help you understand the folder structure of JA Events II template, where to find the files you want.
JA Events II template
JA Events II template is built on T3 Framework so its folder structure is almost the same with any other JA Templates that are developed with T3 Framework.
templates/ja_events_ii/
+--less/                 /*  all LESS files */
¦    +-- template.less
¦    +-- style.less
¦    +-- home.less
¦    +-- joomla.less
¦    +-- themes/            /*theme folders and theme files */
¦    ¦  +-- blue/
¦    ¦  +-- green/
¦    ¦  +-- orange/
¦    +-- extras/            /*override style files of 3rd extensions */
¦    ¦  +-- com_eventbooking.less
¦    ¦  +-- com_jevents.less
+-- css/                     /*compiled files from less*/
¦    +-- template.css
¦    +-- style.css
¦    +-- home.css
¦    +-- joomla.css
¦    +-- themes/            /*Compiled themes */
¦    ¦  +-- blue/
¦    ¦  +-- green/
¦    ¦  +-- orange/
¦    +-- extras/            /*Compiled themes */
¦    ¦  +-- com_eventbooking.css
¦    ¦  +-- com_jevents.css
+-- acm/
¦    +-- feature-intro/
¦    ¦  +-- config.xml/
¦    ¦  +-- tmpl/
¦    ¦  +-- less/
¦    ¦  +-- css/
¦    +-- slideshow/
¦    +-- clients/
¦    +-- contact-info/
¦    +-- pricing/
¦    +-- teams/
¦    +-- timeline/
¦    +-- video/
+-- fonts/
¦    +-- font-awesome/
+-- js/
¦    +-- script.js
¦    +-- jquery.inview.js
¦    +-- jquery.inview.min.js
¦    +-- owl-carousel/
+-- tpls/             /* all layout files and block files*/
¦    +-- default.php
¦    +-- features-intro.php
¦    +-- blocks/       /*block files*/
¦    ¦    +-- header.php
¦    ¦    +-- mainbody.php
¦    ¦    +-- spotlight-1.php
¦    ¦    +-- spotlight-2.php
¦    ¦    +-- slideshow.php
¦    ¦    +-- off-canvas.php
¦    ¦    +-- masthead.php
¦    ¦    +-- footer.php
¦    ¦    +-- mainbody/
+-- html/               /*override modules and Joomla com_content*/
¦    +-- com_content/
¦    ¦    +-- article/
¦    ¦    +-- category/
¦    ¦    +-- categories/
¦    ¦    +-- featured/
¦    +-- com_jevents/
¦    ¦    +-- default/
¦    +-- com_eventbooking/
¦    ¦    +-- calendar/
¦    ¦    +-- categories/
¦    ¦    +-- events/
¦    ¦    +-- event/
¦    ¦    +-- location/
¦    +-- mod_footer/
¦    +-- ...
+-- images/
+-- language/
+-- templateDetails.xml
+-- templateInfo.php/
+-- thememagic.xml/     /*the file is to add new group, parameters to ThemeMagic*/
+-- templateHook.php/
T3 Framework
You can find the folder structure of T3 Framewotk at: http://t3-framework.org/documentation/installation#folder-structure.
Recommendation
Any customization in the T3 Framework is not recommended. To customize your template, please do it in the "local" folder: templates/ja_events_ii/local. Check out detail documentation →
Upgrade Instruction
Take a full backup
Please always make a back-up before proceeding to any of the upgrade process. In case there is any problem, you can always restore from the back-up files.
1. Set up JA Extension Manager Component
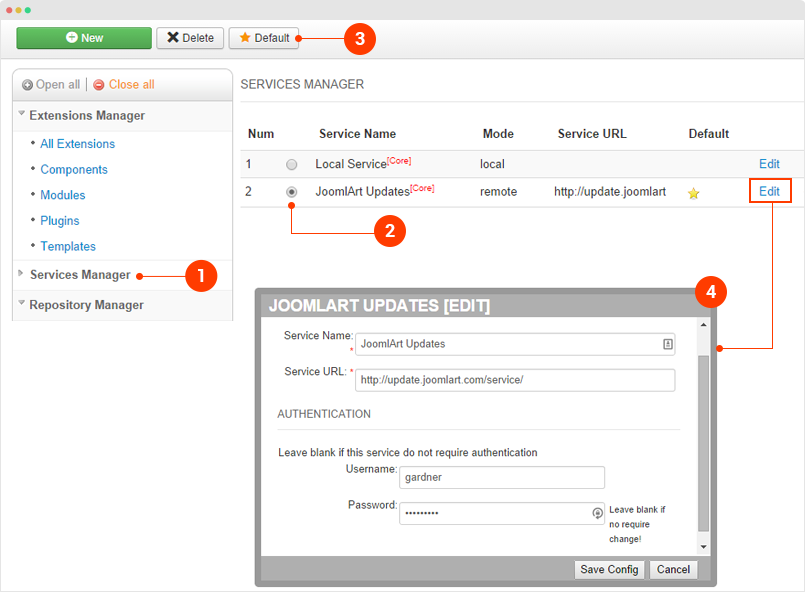
The best method to upgrade JoomlArt products is using JA Extension Manager. The FREE extension brings a new way to manage extensions: upgrade, roll back, remote install, internal repository and compare versions.
From back-end, go to: Components → JA Extension Manager then select Service Manager, now set JoomlArt as your default service. Next, hit the "Edit" button then add your Username and Password that you signed up in JoomlArt.com.
2. Upgrade JA Events II template
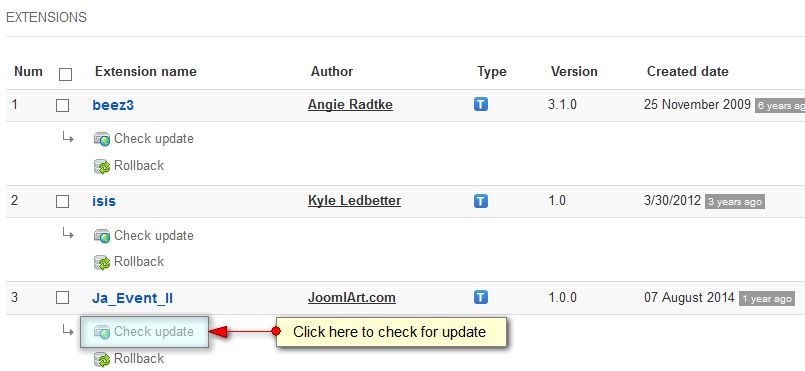
Step 1 - check the new version of JA Events II template. Using the filter to find the JA Events II template then hit the "Check Update" button.
Step 2 - Upgrade JA Events II template to latest version. You should compare the changes before upgrading. We only pay attention to conflicted files - files that have been modified by both user and developer. When upgrading, the conflicted files will be overridden by files in new version, that means what you customized in the files will be lost.
3. Upgrade T3 Framework and other JA extensions
Using the filter to find the extensions you want to upgrade (JoomlArt products only), hit the "Check Update" button to check for new version then hit the Upgrade Now to upgrade the extension to latest version.
Extensions Configuration
Here are the steps to configure extensions and third party extensions used in JA Events II.
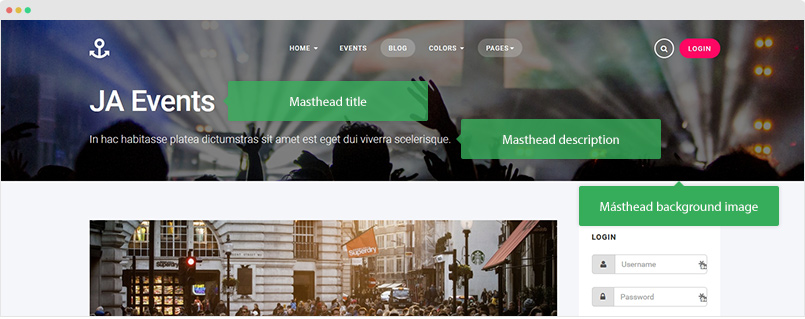
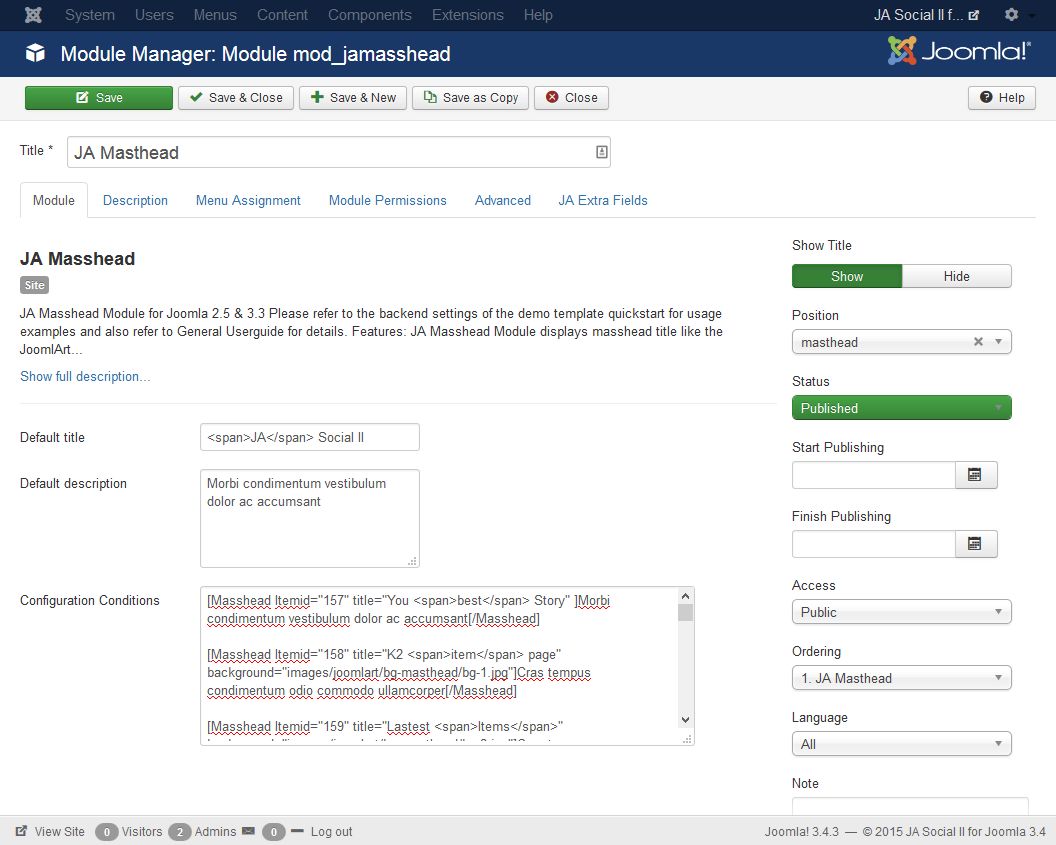
JA Masthead Module
JA Masthead Module displays masthead title like the JoomlArt masthead. Title and description can be configured for any page.
Module Setting
Module position: masthead
Module Suffix: NOT USED
Sample configuration condition
[Masshead Itemid="158" title="Latest Blog items" background="images/joomlart/bg-masthead/bg-1.jpg"]Cras tempus condimentum odio commodo ullamcorper[/Masshead]Itemid is the menu item ID, title is the masthead title, background is the masthead background image.
Back-end Settings
For more info, please check the JA Masthead Module documentation →
JA ACM Module
JA ACM Module is to build content block based on pre-defined types and style, each type has its own parameters.
Create new JA ACM instances
Here is the step to create a content block with JA ACM Module.
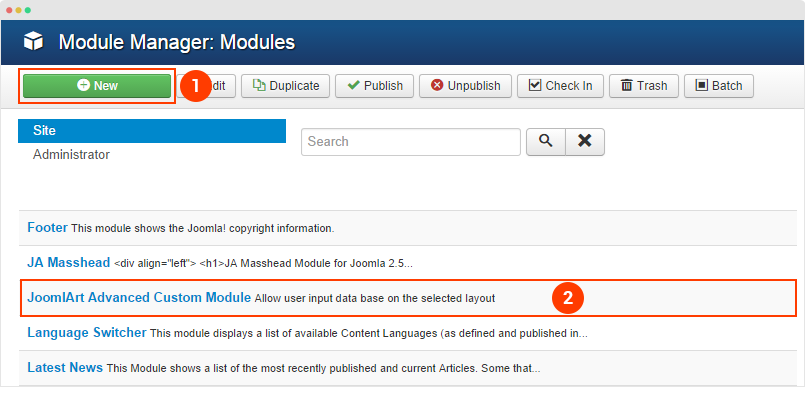
Step 1 - Create JA ACM module
From your site back-end, go to: Extensions > Module Manager, hit the "New" button to create module then select JoomlArt Advanced Custom module
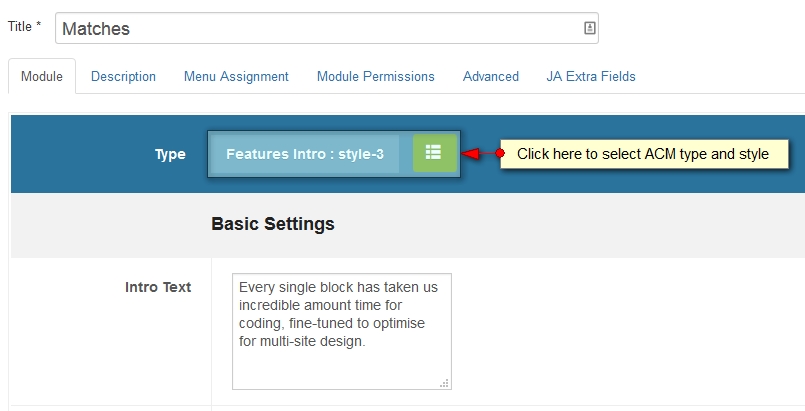
Step 2 - Select type, style
The module supports many types, each type has multiple styles. Once you select type, the corresponding setting fields are loaded. For each type, it includes sample data by default that help you understand the structure of content block. Now you can change setting of the fields, add content, etc.
We use ACM to build views for content used in the JA Events II, check out the list of ACM Types supported in the template.
- slideshow
- clients
- features-intro
- contact-info
- pricing
- teams
- timeline
- video
JA ACM module content type structure
Each content type of JA ACM module is a folder stored in templates\ja_events_ii\acm\.
templates/ja_events_ii/acm/
+--features-intro/
¦    +-- config.xml             /*define fields for the content type*/
¦    +-- tmpl/
¦    ¦  +-- style-1.xml
¦    ¦  +-- style-1.php
¦    ¦  +-- style-2.xml
¦    ¦  +-- style-2.php
¦    +-- less/
¦    ¦  +-- style.less
¦    ¦  +-- style-1.less
¦    ¦  +-- style-2.less
¦    +-- css/
¦    ¦  +-- style.css
¦    +-- js/
¦    +-- images/
In each folder, it includes:
config.xmlfile: define title and description about the content type- tmpl folder: include all style files that the content type support. Each style has one
.xmlfile (define fields in the style) and a.phpfile (define how the fields defined in the.xmlfile displayed in front-page). - less folder: include
.lessfiles to style for the content type and each style. - css folder: the compiled CSS file from the .less files, all files are joined so you just have
style.cssin this folder. - js folder (if necessary): include JavaSripts files for the content type.
Customization
You can customize style for any content block and style that the content block supports. Open .less file in the less folder of the content type, for example: acm/features-intro/less/style.less then go ahead with your customization. Once done, please save the file and compile LESS to CSS via template style admin panel.
Please do not use .css files to customize as the file is overridden any time you compile LESS to CSS.
1. Create new fields for a style
You can add new fields for any type, open the .xml file of the style (example: acm/features-intro/tmpl/style-1.xml)then define new fields using the format below:
<field name="button" type="text" default="" label="FIELD_LABEL" description="FIELD_DESC" required="1" />
2. Create new style for a content type
For example, I want to create a new style (style 1) for the news-featured so I have to create the following files:
- Create .xml file - acm/features-intro/tmpl/style-3.xml
- Create .php file - acm/features-intro/tmpl/style-3.php
- Create .less file - acm/features-intro/less/style-3.less
The best way to create new style for a type is cloning files of an existing style.
3. ACM modules used in JA Events II demo
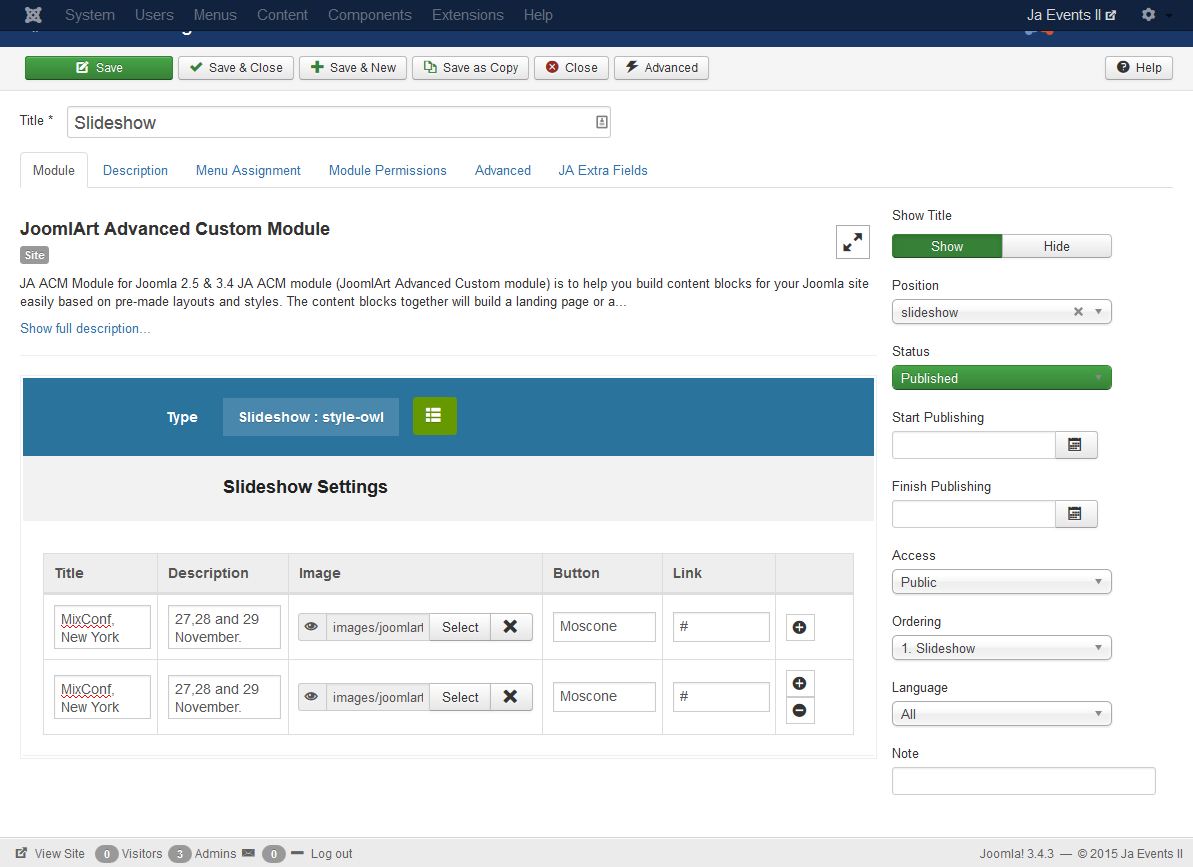
3.1 Slideshow - in Home page
Module Setting
Module position: slideshow
Module Suffix: NOT USED
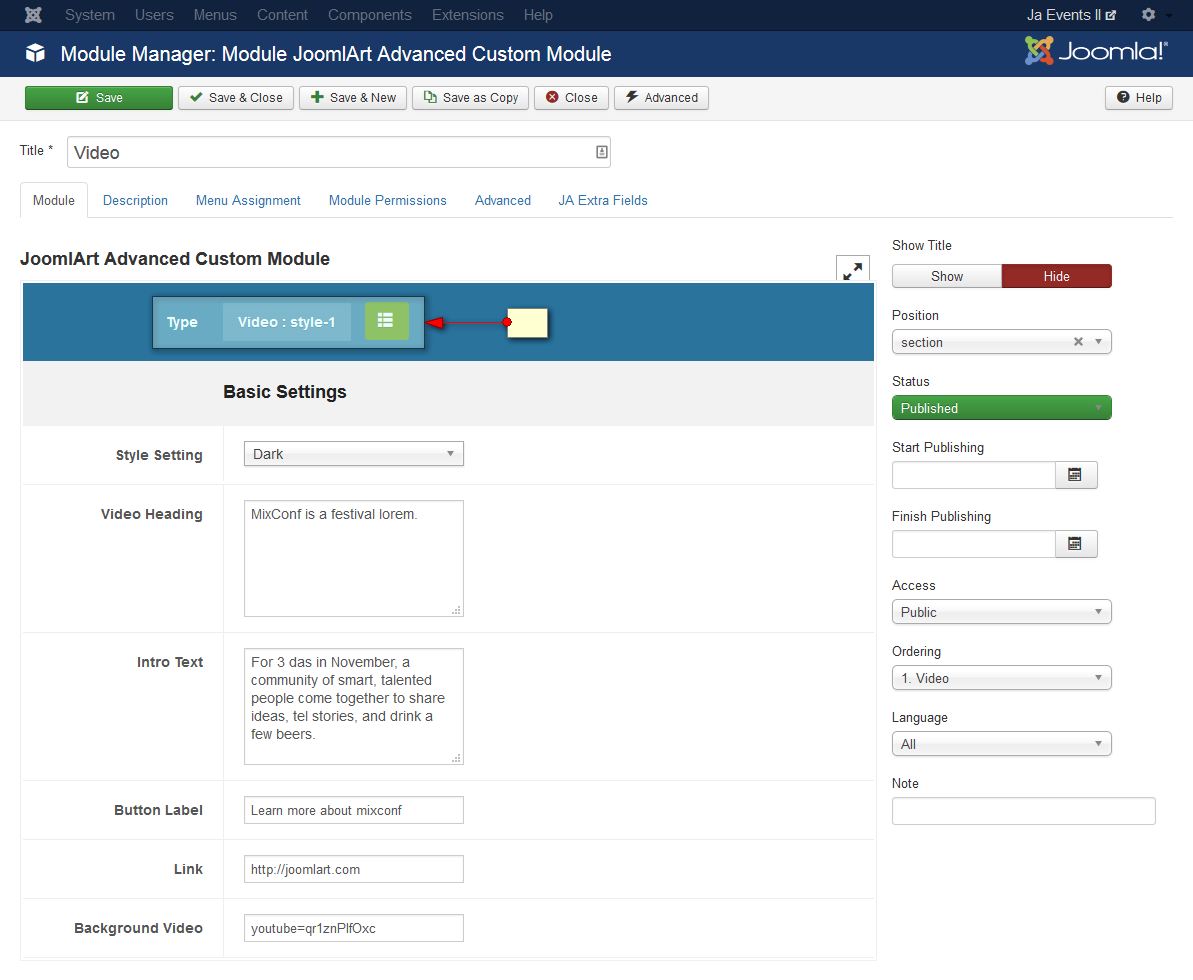
3.2 Video - in Home page
Module Setting
Module position: section
Module Suffix: bg-transparent
The module supports 2 video types: Youtube and Vimeo. For youtube, please use the format youtube=videoid, and for vimeo, use the format: vimeo=videoid.
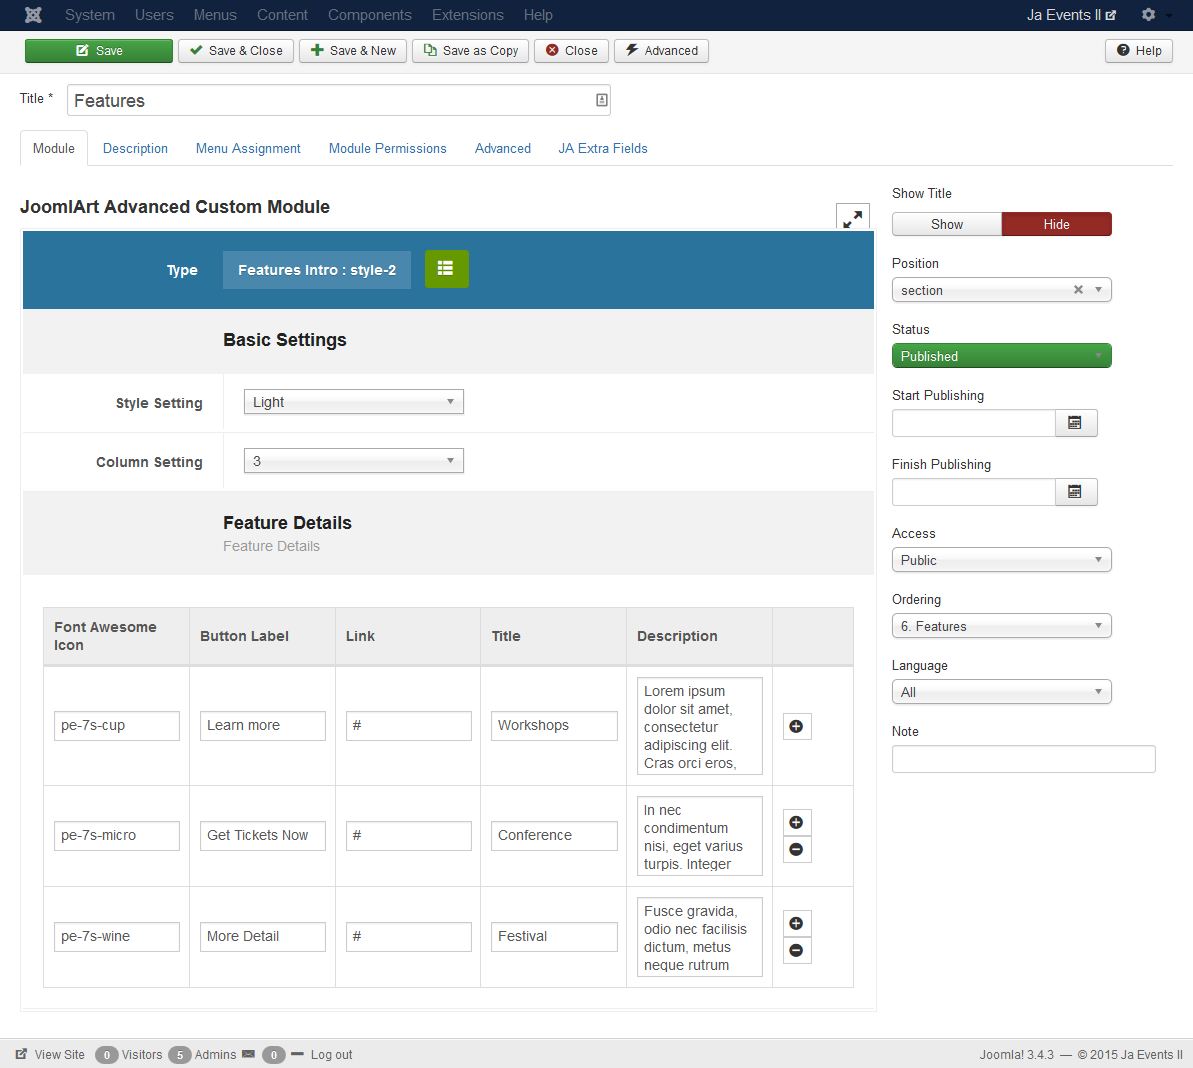
3.3 Features - in Home page
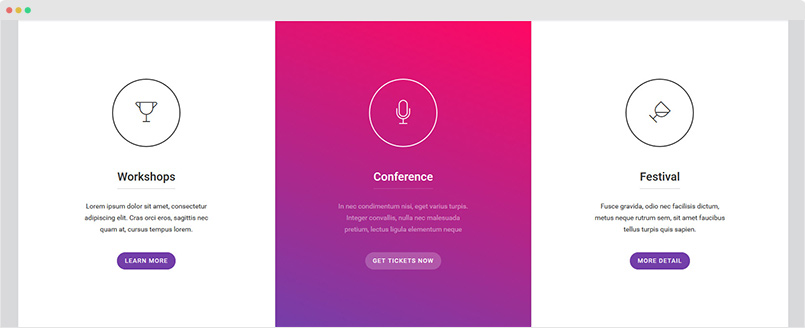
Module Setting
Module position: section
Module Suffix: bg-light
3.4 Speakers Include - in Home page
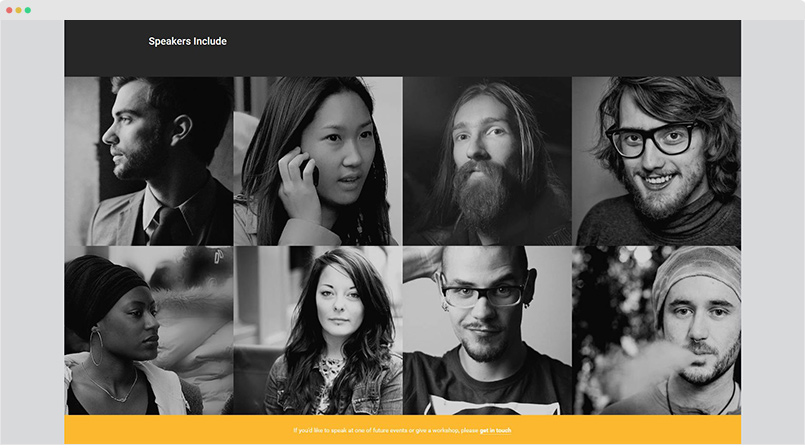
Module Setting
Module position: section
Module Suffix: bg-dark
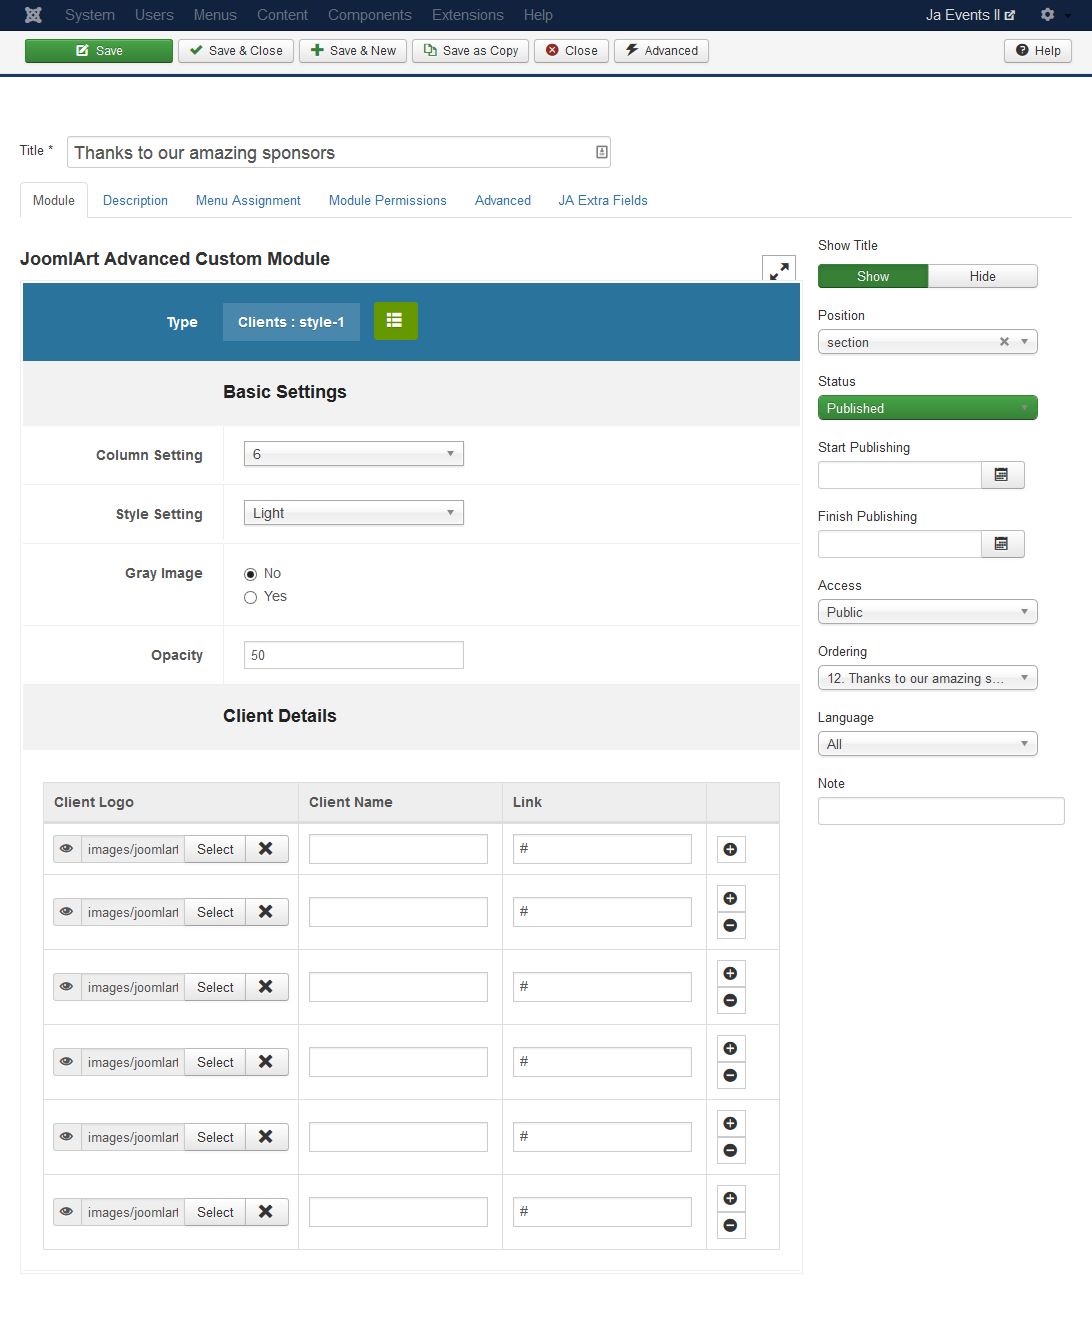
3.5 Thanks to our amazing sponsors - in Home page
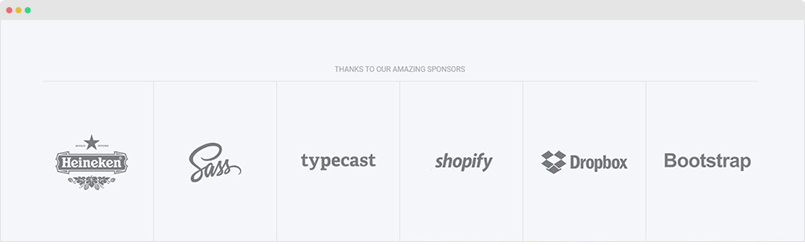
Module Setting
Module position: section
Module Suffix: pt-x2 pb-0
2.6 Feature Intro - in Home page
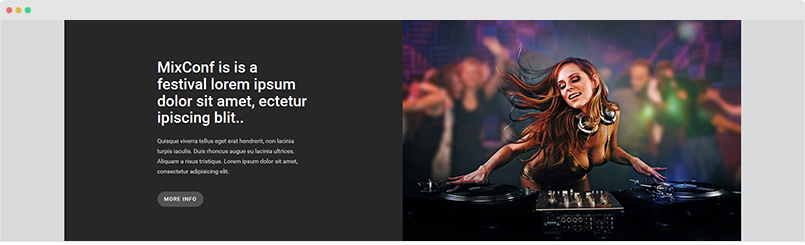
Module Setting
Module position: section
Module Suffix: bg-dark
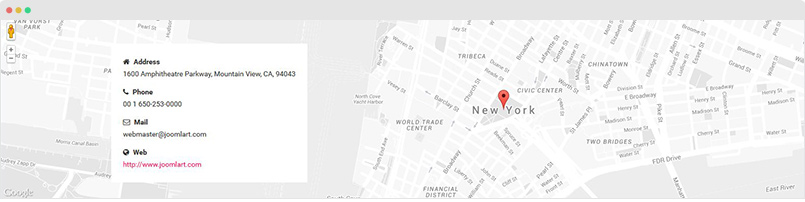
3.7 Google Map - in Home page
This will require JA Google Map plugin to be installed and enabled.
Module Setting
Module position: section
Module Suffix: NOT USED
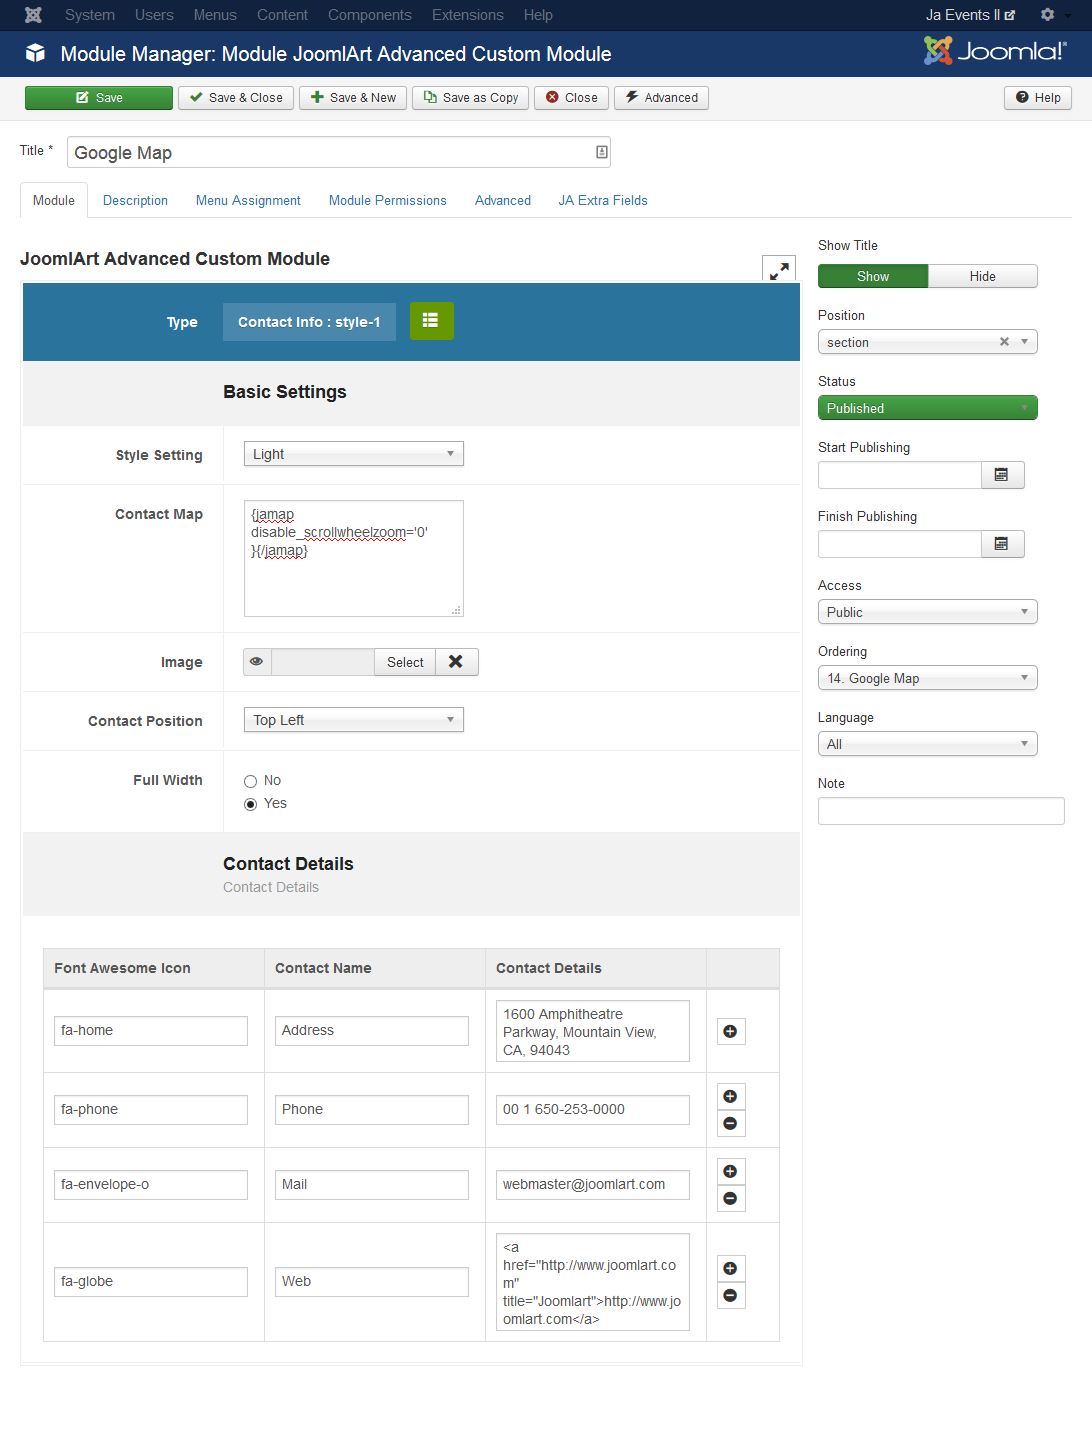
In the field Contract Map, please add the the tag to embed Google map, the following is a sample.
{jamap disable_scrollwheelzoom='0' }{/jamap}
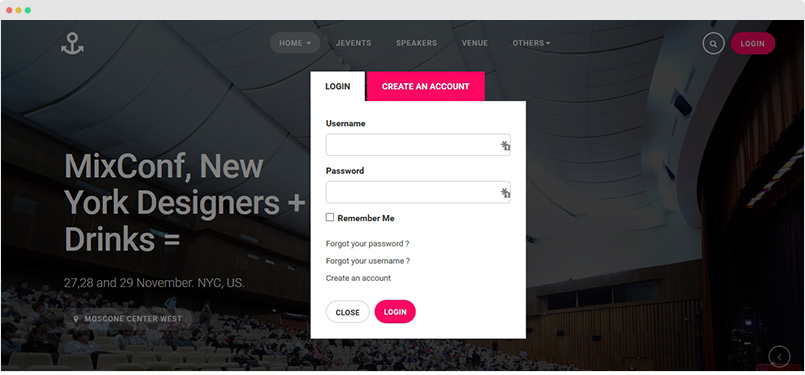
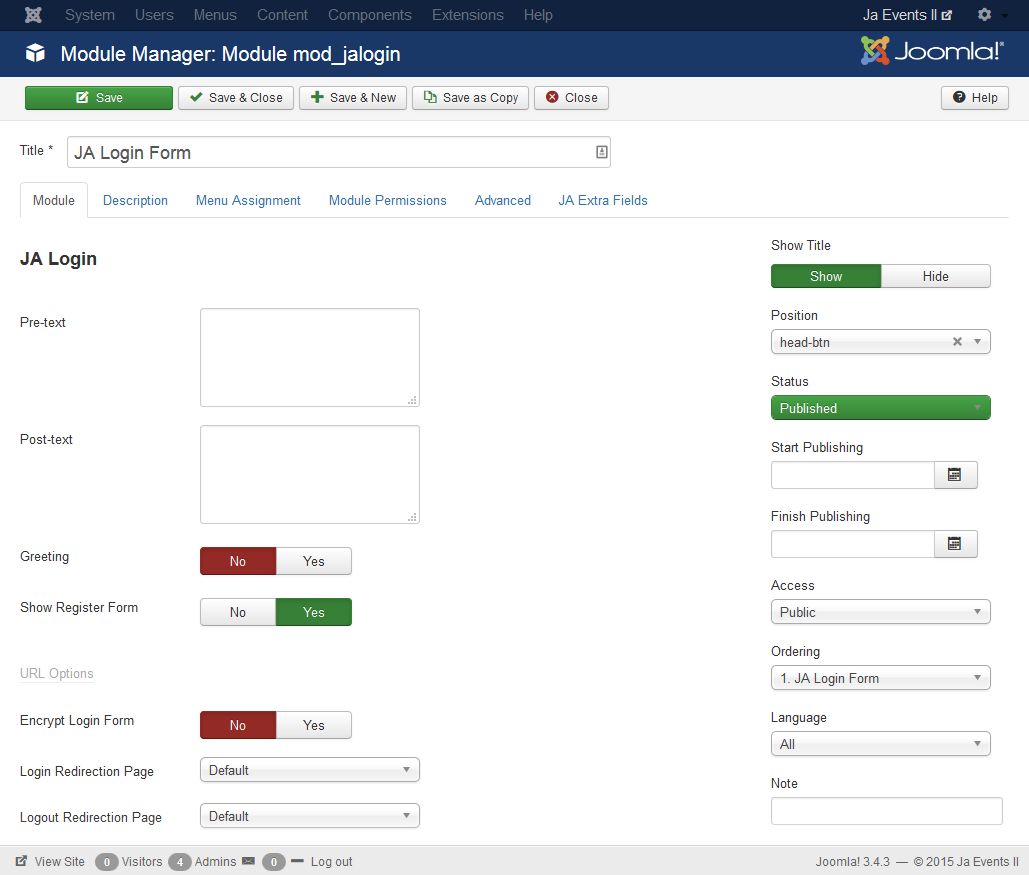
JA Login Module
JA login module is alternate login module for Joomla!, so that CSS overrides can be made for the same, without affecting the default Joomla login module.
Module Setting
Module position: head-btn
Module Suffix: NOT USED
JA Google Map plugin
The plugin allows you to embed Google map to your any content in your site. Install the plugin, go to the: Extension > Plugin Manager, find the JA Google Map plugin, enable it and configure it as the following screenshot.
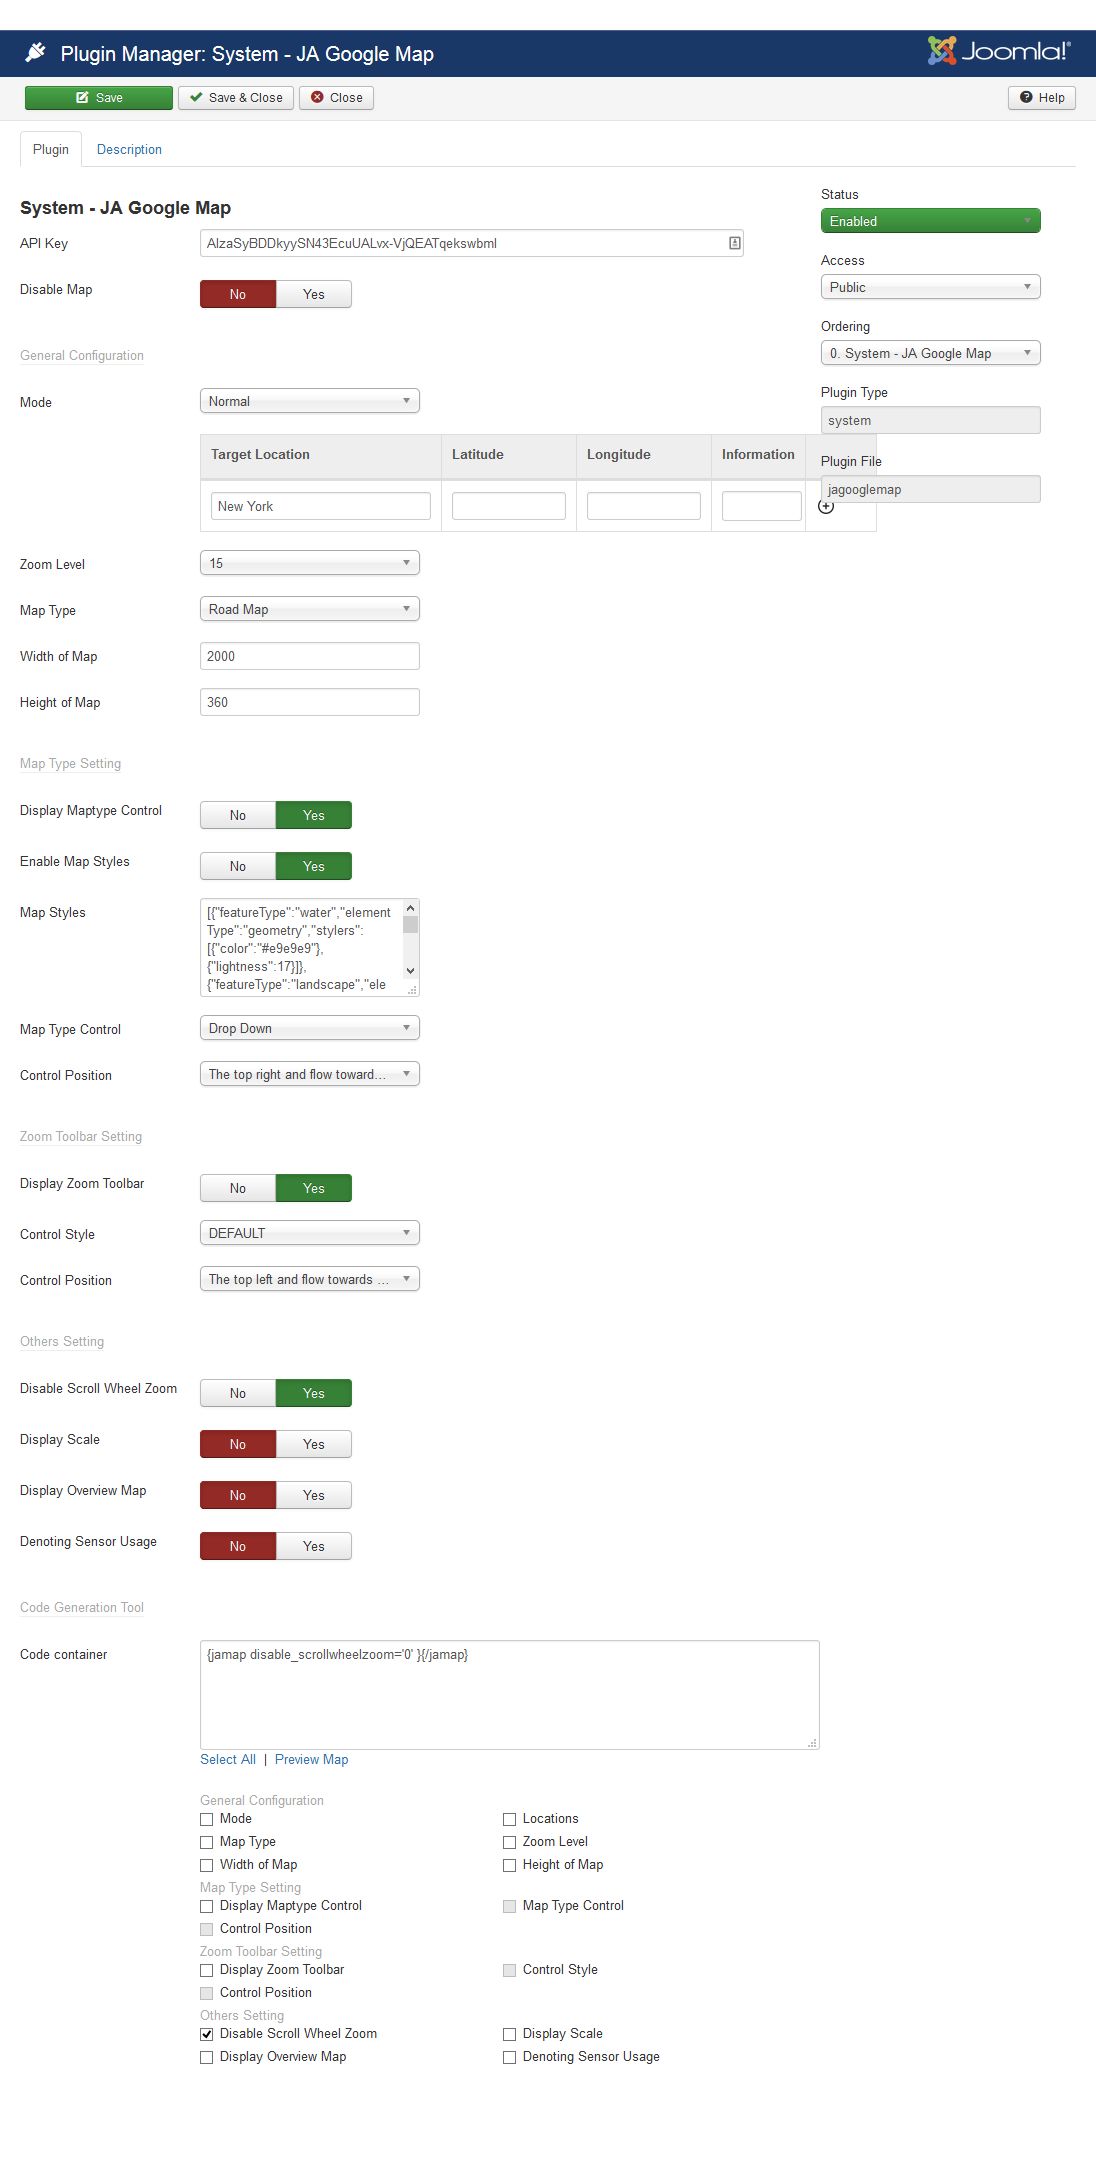
To register Google Map API key, please refer to the Google Developer site →, follow its instruction to create Google Maps APIs for your site.
To embed Google map to content, please add the following tag to the content field: Article, Custom HTML module, Contact, etc.
{jamap disable_scrollwheelzoom='0' }{/jamap}
Please check out JA Google Map detail documentation →
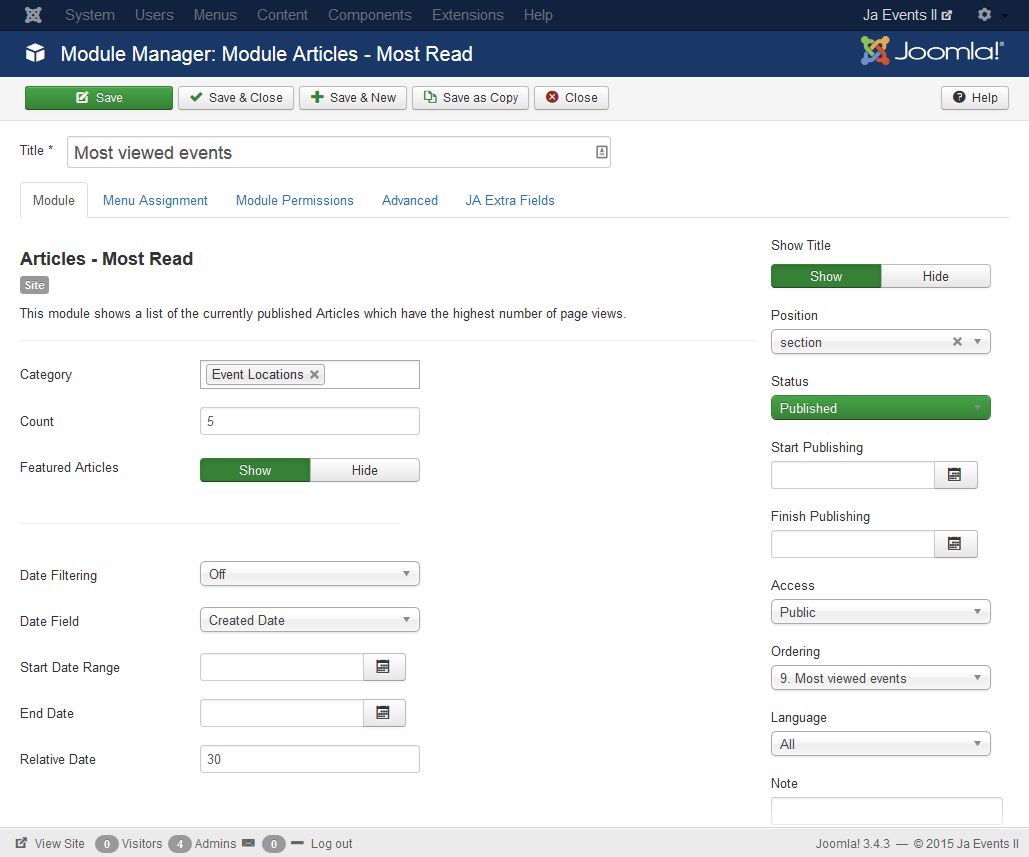
Articles - Most Read Module
This module shows a list of the currently published Articles which have the highest number of page views.
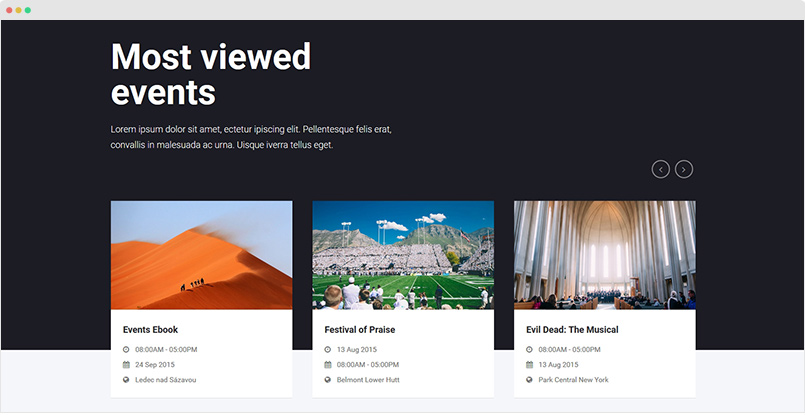
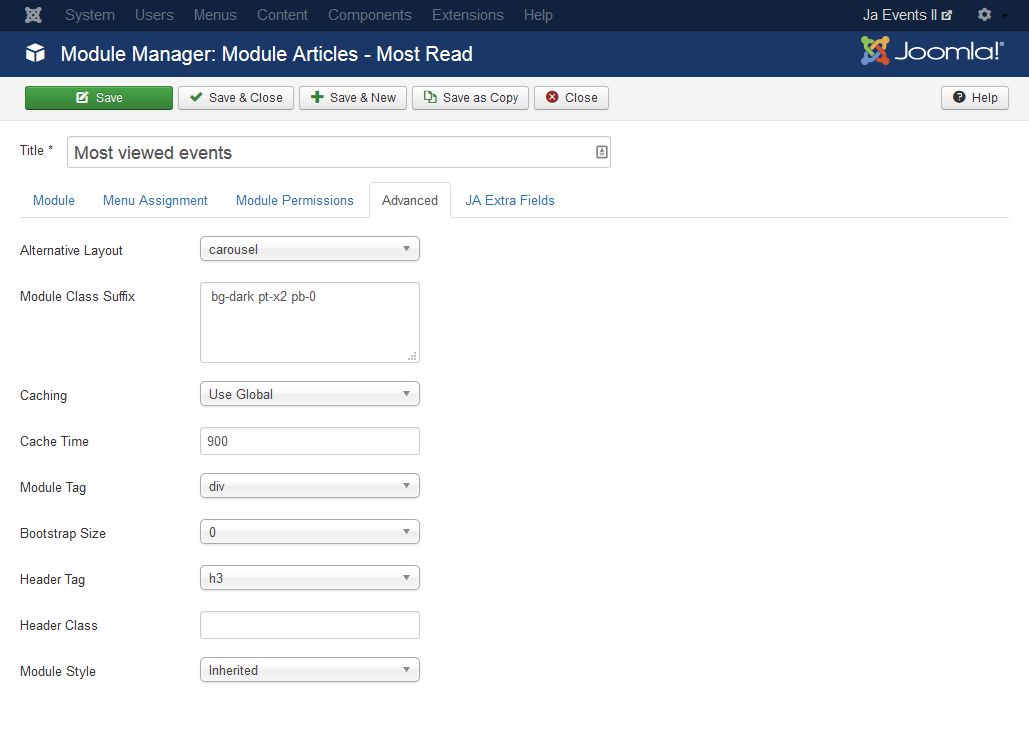
Module Setting
Module position: section
Module Suffix: bg-dark pt-x2 pb-0
Alternative Layout: carousel
Custom HTML module
We use Custom HTML modules in the footer positions.
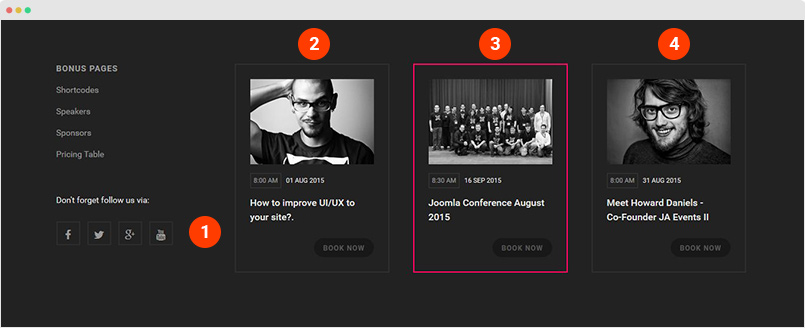
1. [Footer 1] Socials
Module position: footer-1
Module Suffix: NOT USED
HTML code
<div>Don't forget follow us via:</div>

<ul class="social-list">

<li><a href="#" title="Facebook" class="facebook"><i class="fa fa-facebook"></i></a></li>

<li><a href="#" title="Facebook" class="twitter"><i class="fa fa-twitter"></i></a></li>

<li><a href="#" title="Facebook" class="google-plus"><i class="fa fa-google-plus"></i></a></li>

<li><a href="#" title="Facebook" class="youtube"><i class="fa fa-youtube"></i></a></li>

</ul>
2. [Footer 2] Custom module
Module position: footer-2
Module Suffix: mod-border mod-notitle
HTML code
<img class="img-responsive" src="/images/joomlart/misc/footer-1.jpg" alt="Sample image" />

<time><span>8:00 AM</span> 01 Aug 2015</time>

<h4>How to improve UI/UX to your site?.</h4>


<div class="readmore"><a href="#" title="Book now">Book now</a></div>
3. [Footer 3]Joomla Conference August 2016
Module position: footer-3
Module Suffix: mod-hilite mod-notitle
HTML code
<img class="img-responsive" src="/images/joomlart/misc/footer-2.jpg" alt="Joomla day" />

<time><span>8:30 AM</span> 16 Sep 2015</time>

<h4>Joomla Conference August 2015</h4>

<div class="readmore"><a href="#" title="Book now">Book now</a></div>
4. [Footer 4] Custom module
Module position: footer-4
Module Suffix: mod-border mod-notitle
HTML code
<img class="img-responsive" src="/images/joomlart/misc/footer-3.jpg" alt="Joomla day" />

<time><span>8:00 AM</span> 31 Aug 2015</time>

<h4>Meet Howard Daniels - Co-Founder JA Events II</h4>

<div class="readmore"><a href="#" title="Book now">Book now</a></div>
JEvent Component Configuration
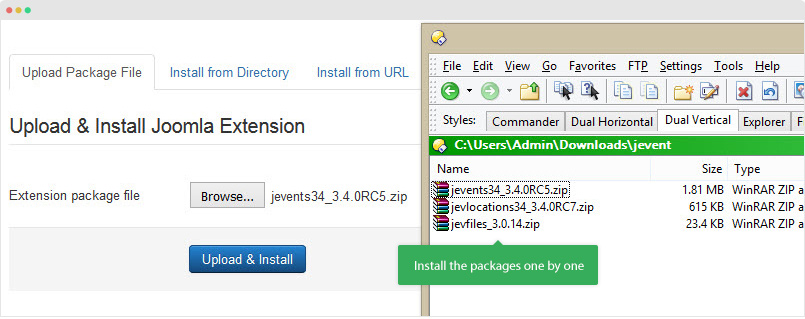
Installation
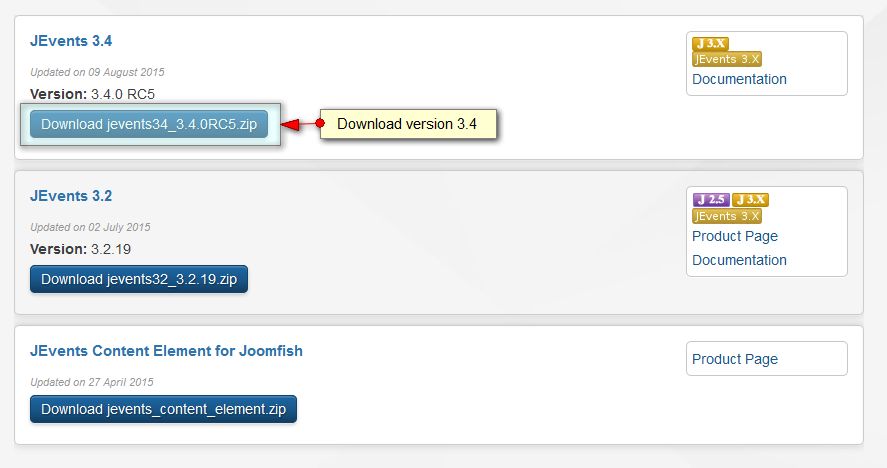
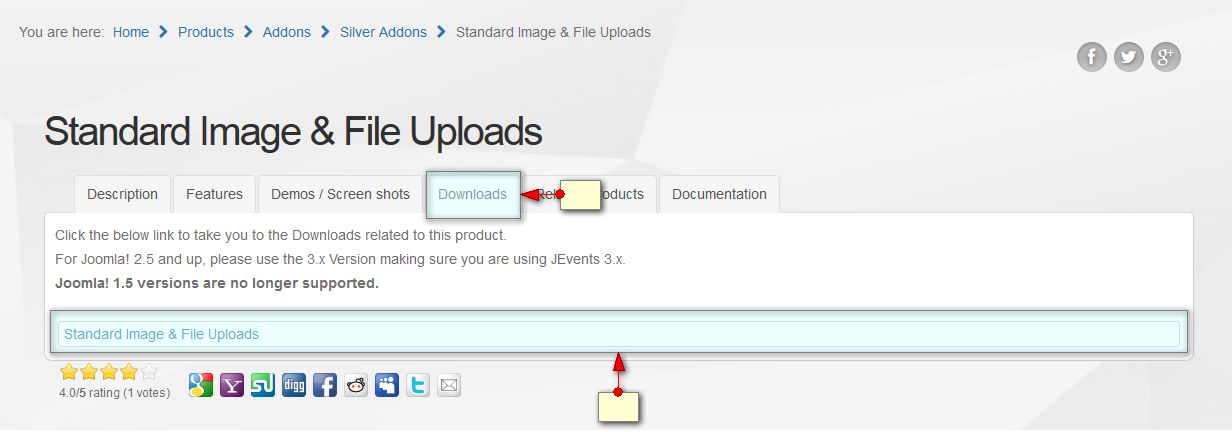
To proceed you need to download and install the following packages:
- JEvent component version 3.4 - download screenshot - FREE
- JEvents Standard Image and File Uploads - download screenshot - Commercial
- JEvents Managed Locations 3.4 - download screenshot - Commercial
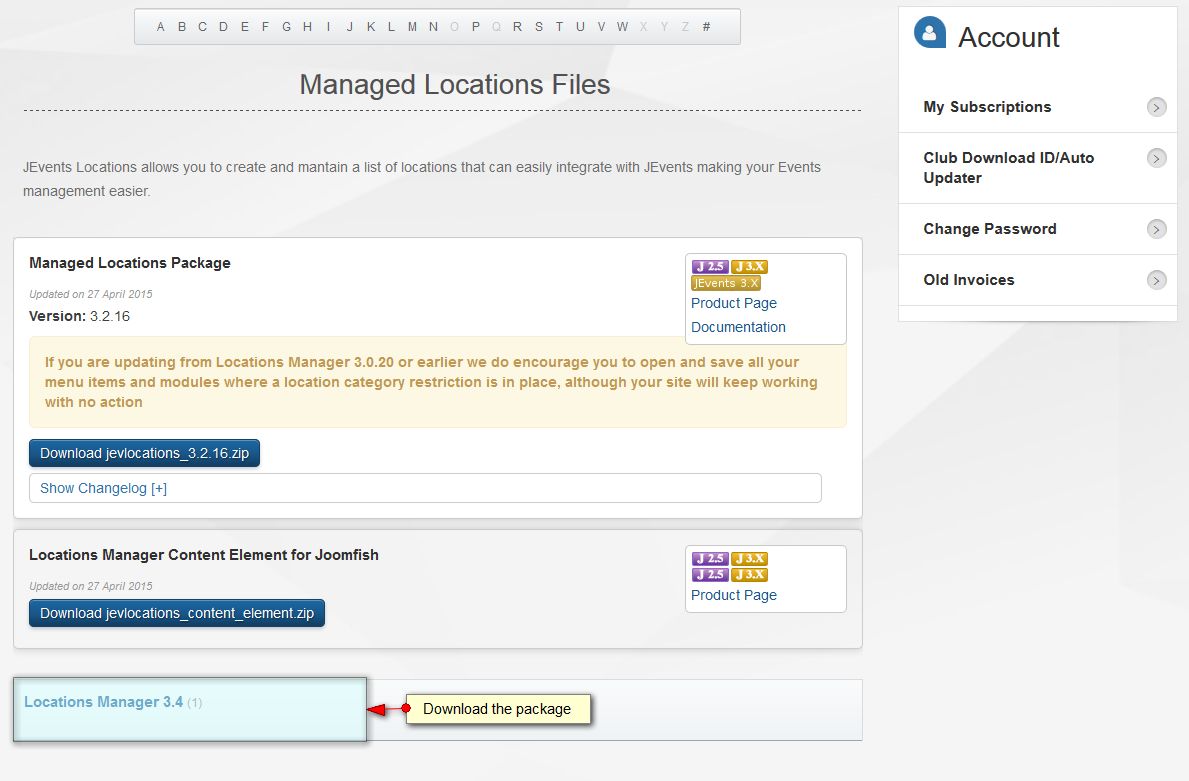
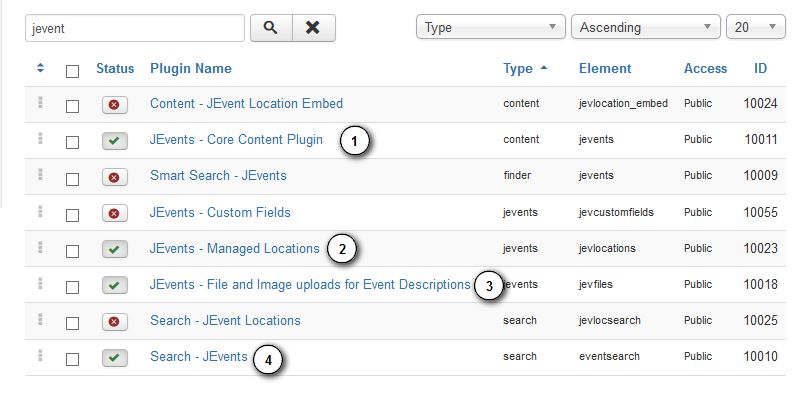
Please make sure the following JEvent plugins are enabled:
- JEvents - Core Content Plugin
- JEvents - Managed Locations
- JEvents - File and Image uploads for Event Descriptions
- Search - JEvents
Go to next step: configuration.
Configuration
Step 1 - Configure JEvents - File and Image plugin.
Go to Extension -> Plugin Manager and search for: JEvents - File and Image then click the title to open this plugin. Set the Upload Images Levels - You must select EACH and Every user level you want to allow access to upload images.
- Set 'Attach Image details in lists/calendars' to YES
- Set 'Scaled Image Width' to 300
- Set 'Scaled Image Height' to 225
- Set 'Thumbnail Width' to 300
- Set 'Thumbnail Height' to 225
- Now finally set the 'Status' to 'Enabled' and click 'Save & Close'.
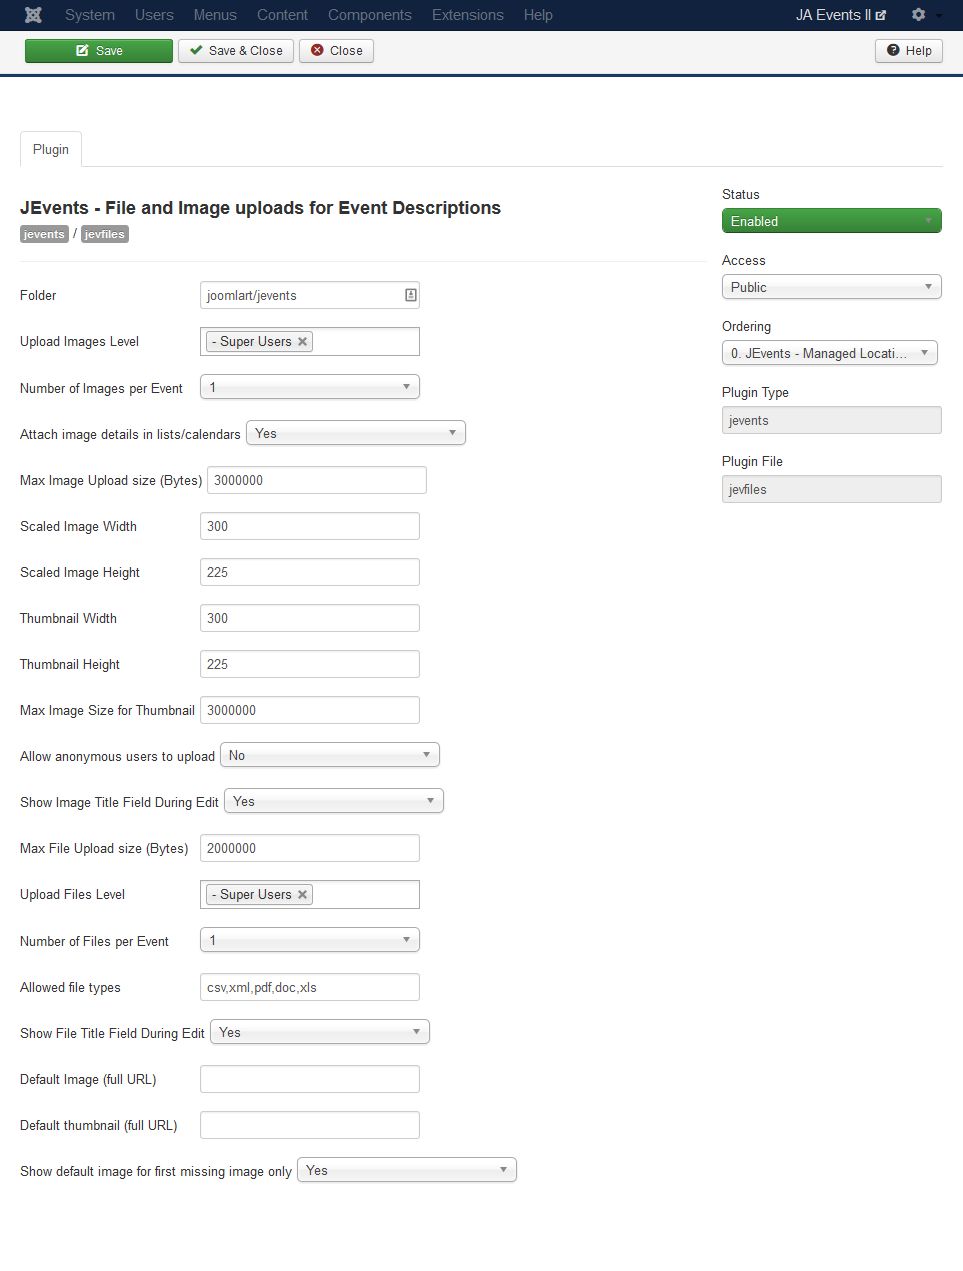
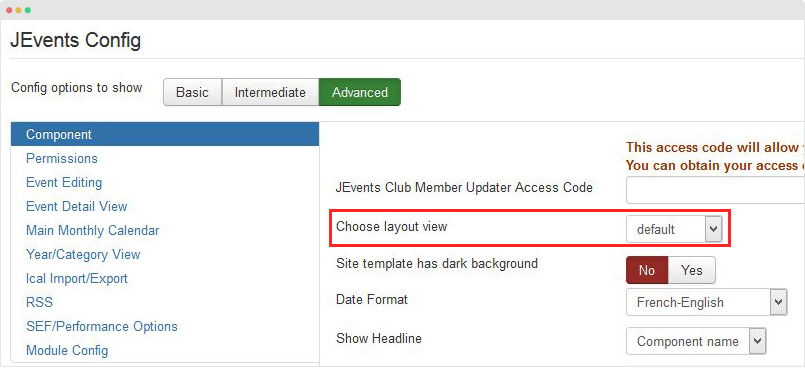
Step 2 - Configure JEvents component. Go to: JEvents cPanel -> Configuration and set Layout to Default.
Create menu items
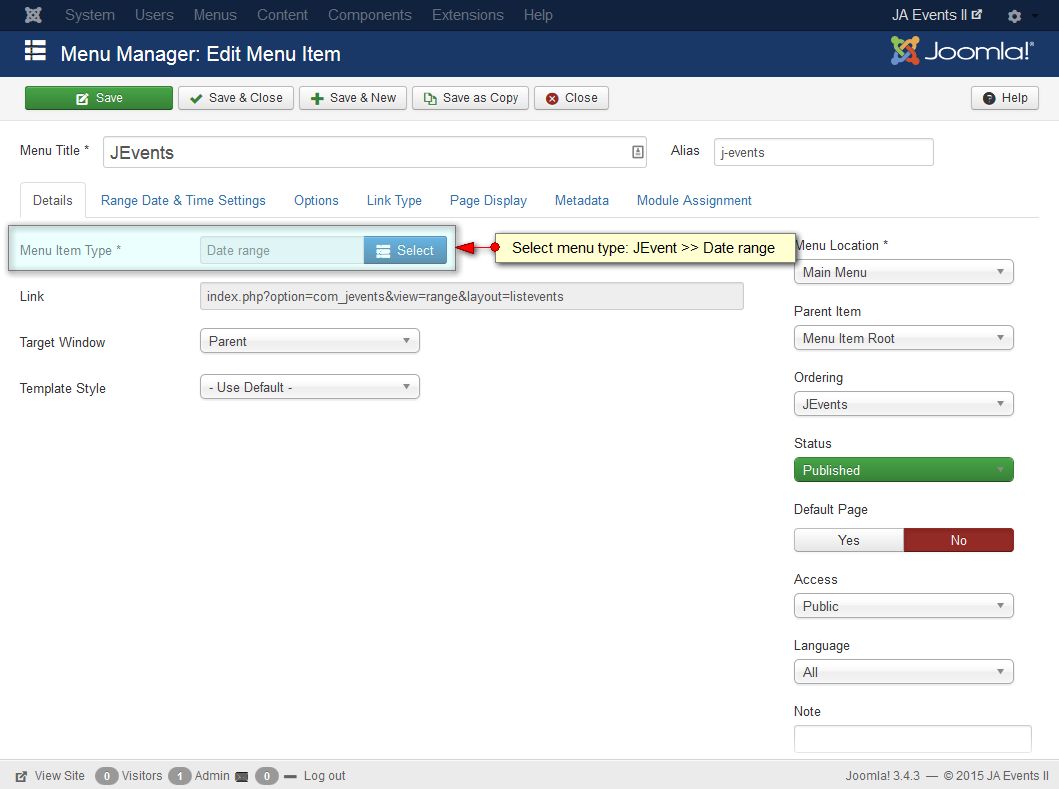
1. JEvents » Date range Menu
Create new menu item from the Joomla! Menu Manager and select menu type: JEvents » Date range - Live Demo
The menu displays list of events from selected JEvent categories. It uses JA Event default layout. It includes the masthead and JEvent modules on sidebar-2 position. Please refer to the JA Masthead module config and Jevent module config
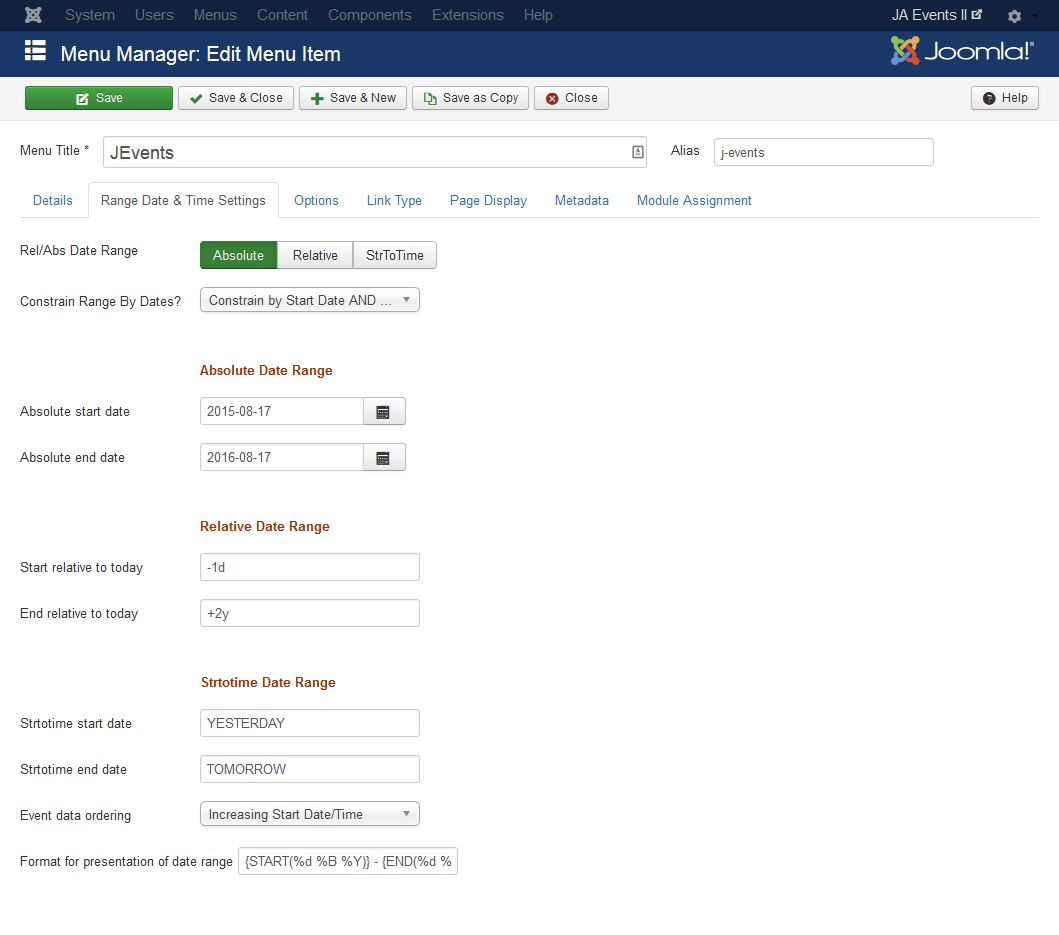
Click Range Date & Time Settings, tick 'Relative' and set Relative date range as follows
- Start relative to today: -1d
- End relative to today: +2y
This allows the menu item to search events back 1 day and 2 years into the future. You can customise it as you wish.
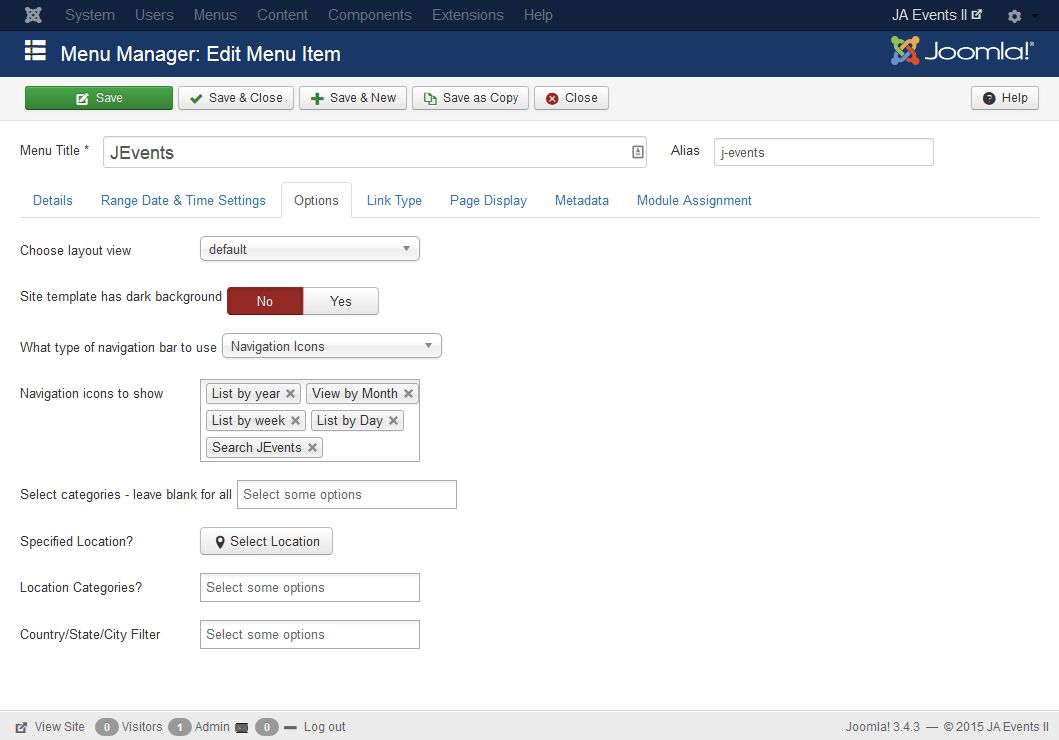
Make sure 'Choose Layout View' is set to 'Default'
We are done here! Click 'Save & Close'
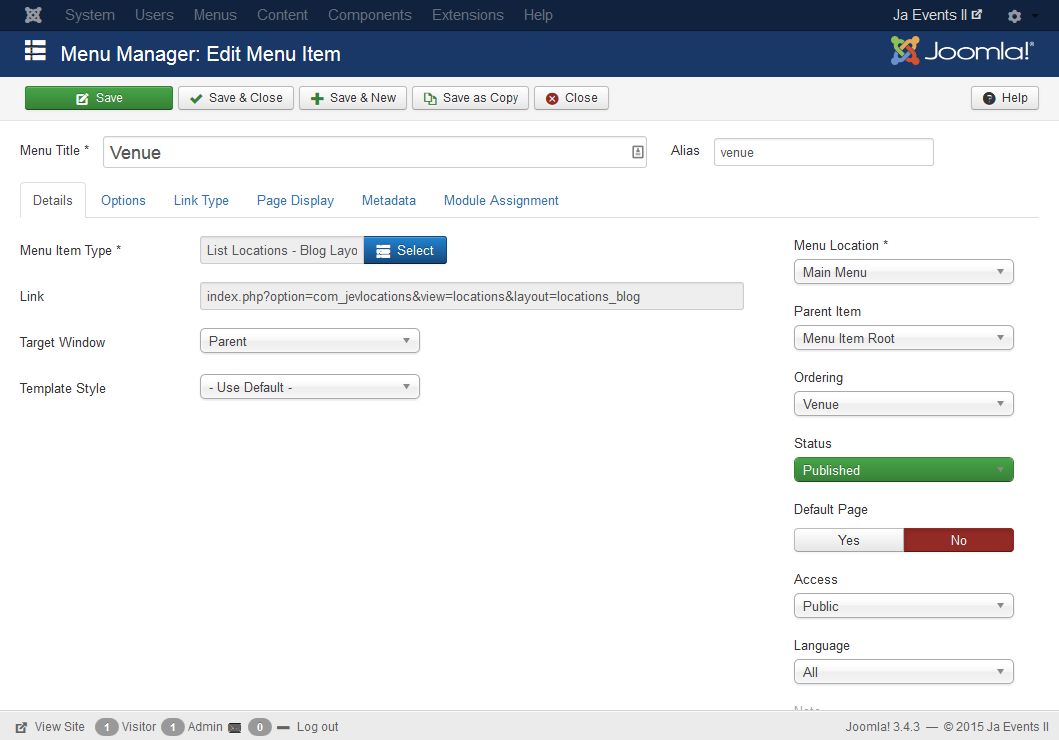
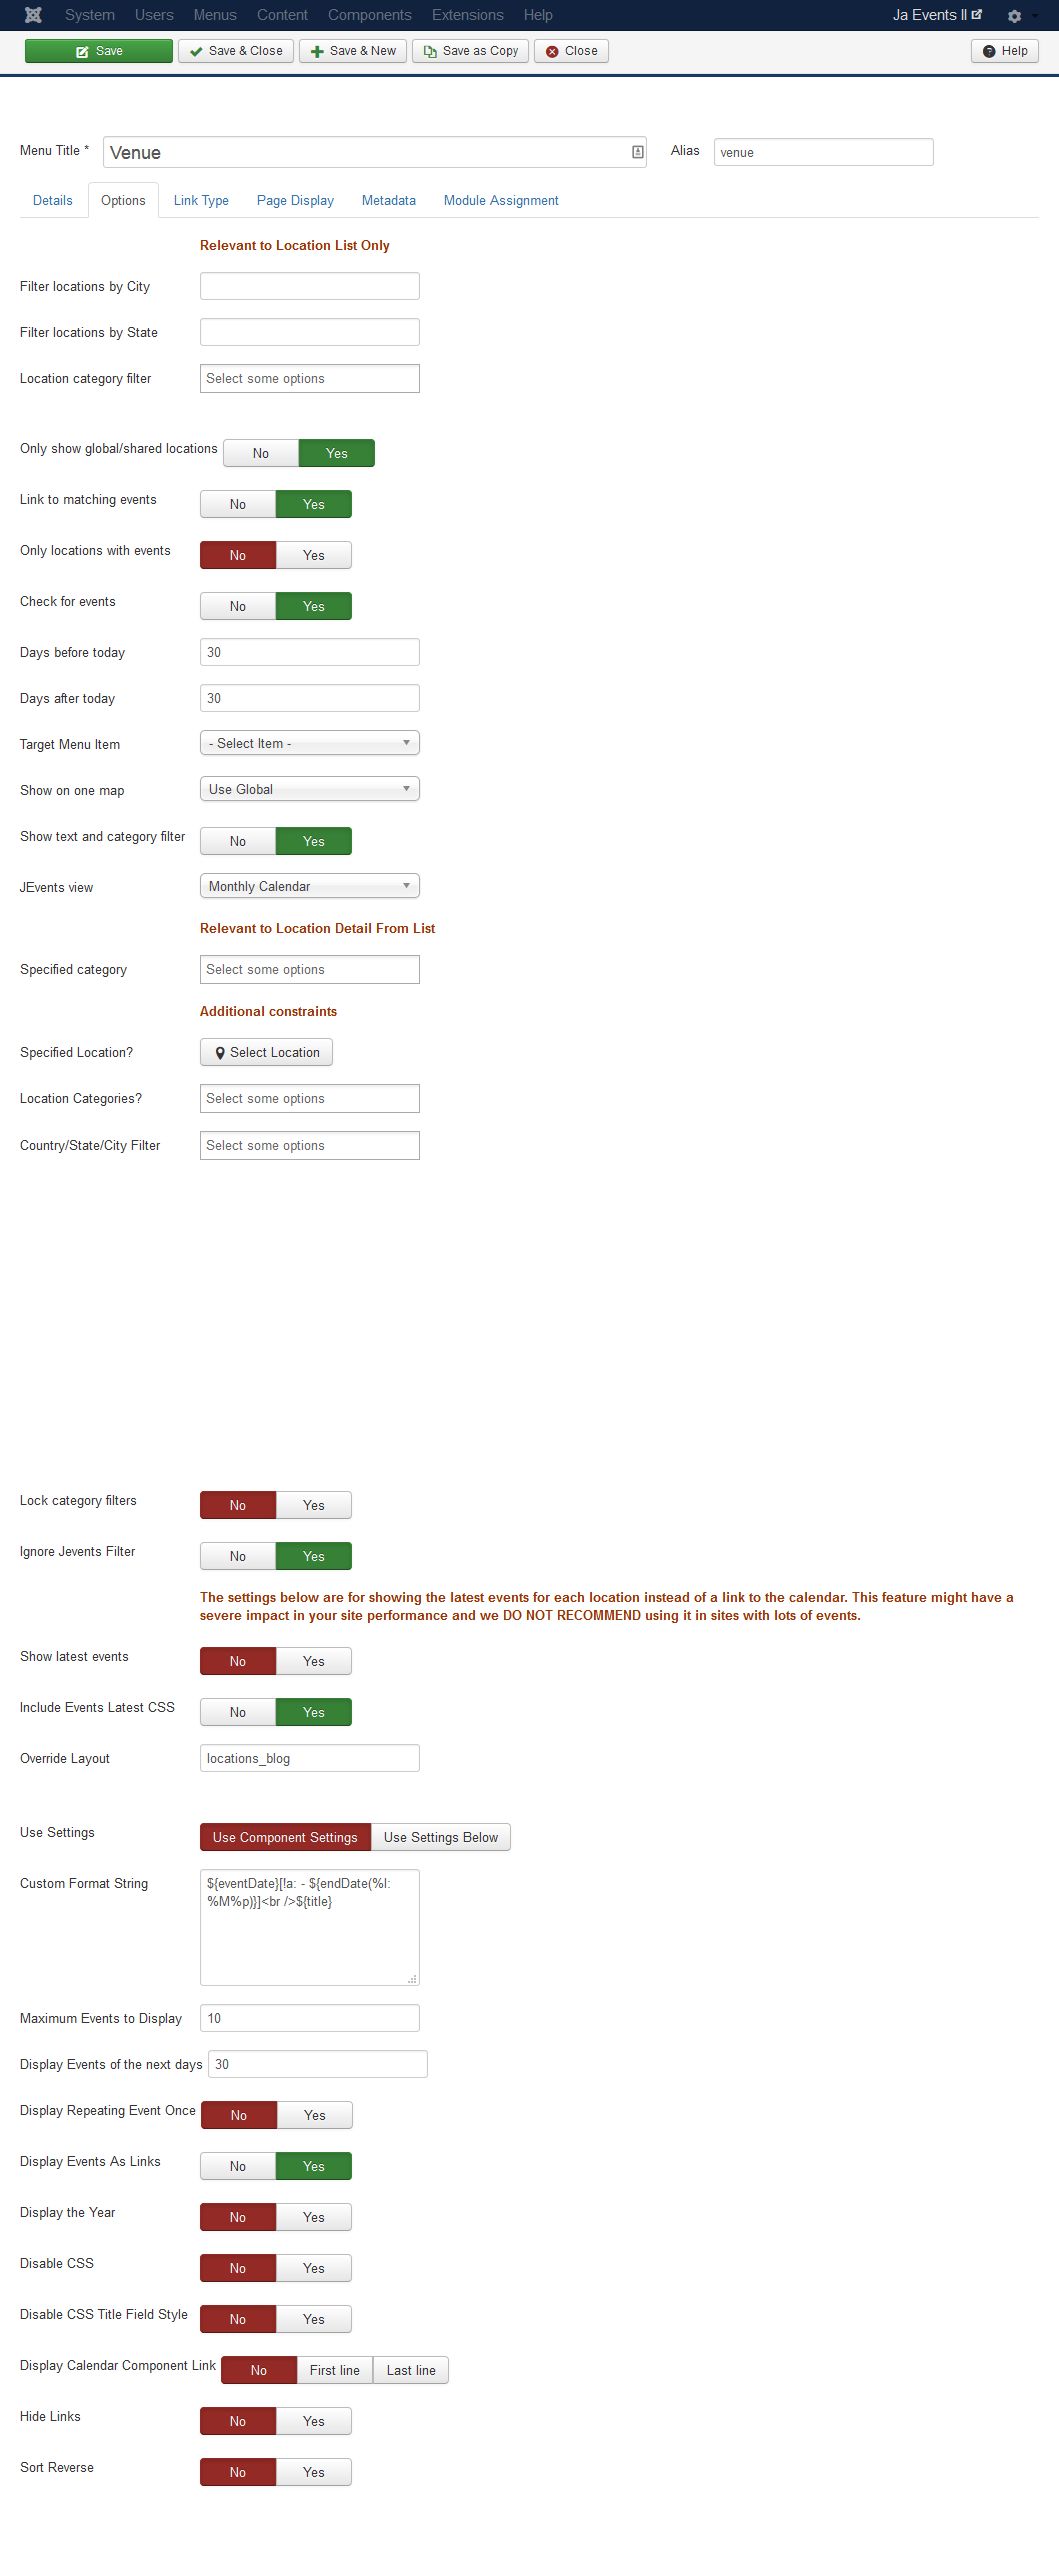
2. JEvents Locations Menu
Create new menu item from the Joomla! Menu Manager and select menu type: JEV Location » List Locations - Blog Layout - Live Demo
The menu displays list of locations in the main content section, the masthead on the top and JEvent modules on sidebar-2 position. Please refer to the JA Masthead module config and Jevent module config
3. JEvents Locations Menu
Create new menu item from the Joomla! Menu Manager and select menu type: JEV Location » List Locations - Blog Layout - Live Demo
The menu displays list of locations in the main content section, the masthead on the top and JEvent modules on sidebar-2 position. Please refer to the JA Masthead module config and Jevent module config
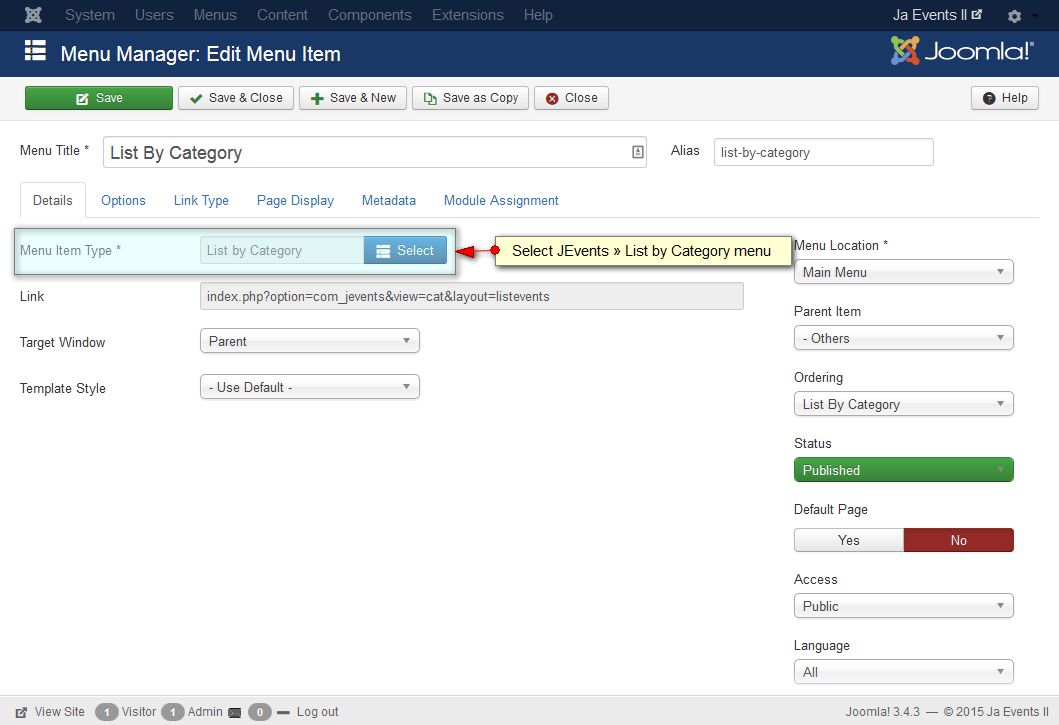
4. JEvents » List by Category Menu
Create new menu item from the Joomla! Menu Manager and select menu type: JEvents » List by Category - Live Demo
The menu displays list of events in the main content section to be filtered by category, the masthead on the top and JEvent modules on sidebar-2 position. Please refer to the JA Masthead module config and Jevent module config
There are other menu JEvent menu types used in JA Events II demo: JEvents » List by Day, JEvents » List by week, JEvents » List by year, JEvents » View by Month. Its settings are almost the same with JEvents » List by Category menu.
Create JEvent modules
The module used in JA Events II are included in the component package. It means that when you install the JEvent component, the modules are also installed.
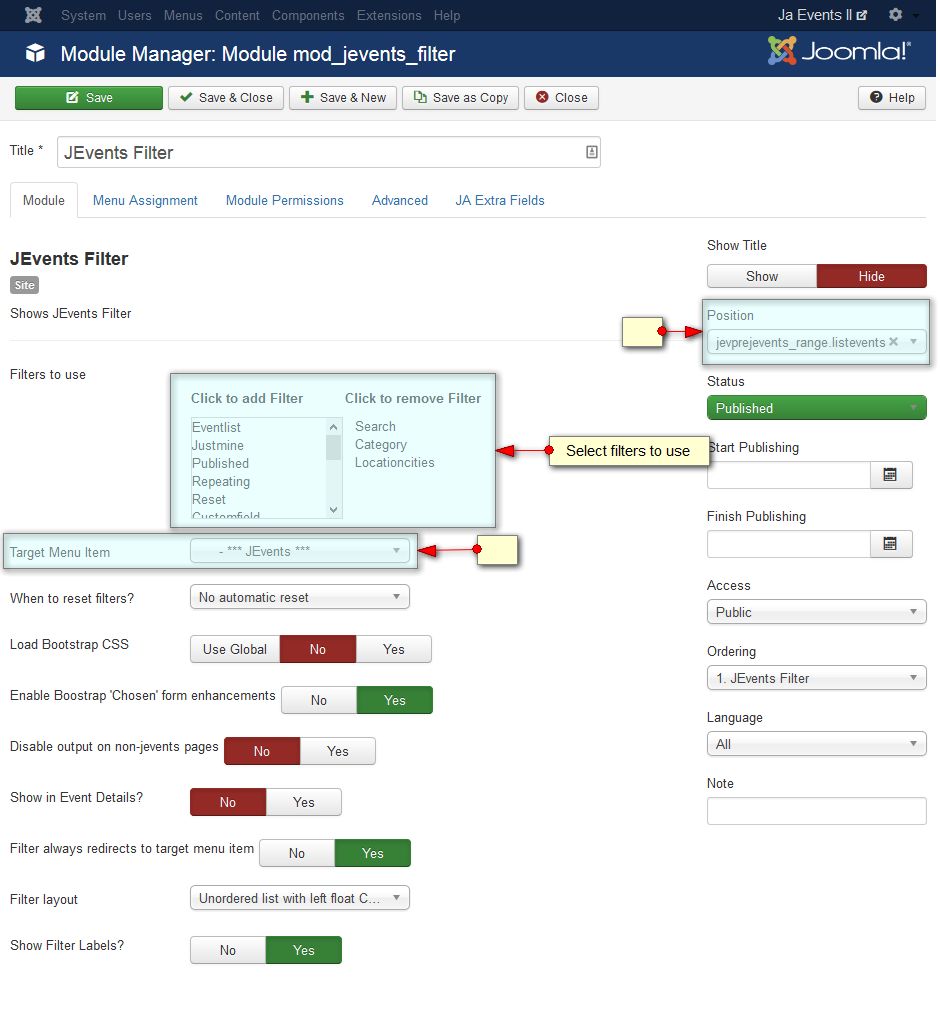
Go to: Extensions -> Module Manager and click New. Select 'JEvents Filter'.
1. JEvent Filter module
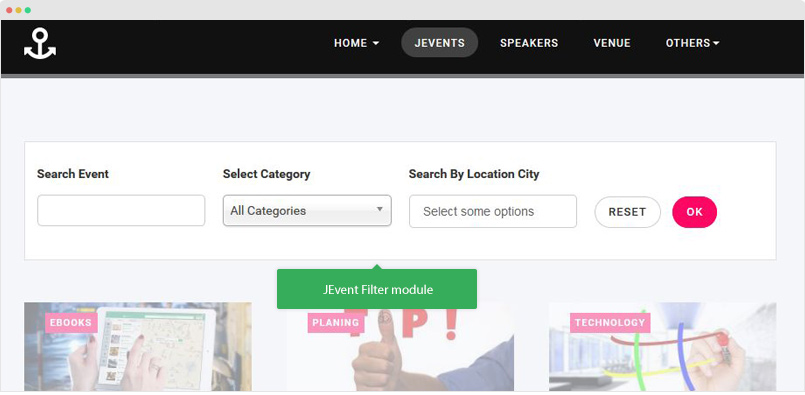
Module position: jevprejevents_range.listevents
Module Suffix: NOT USED
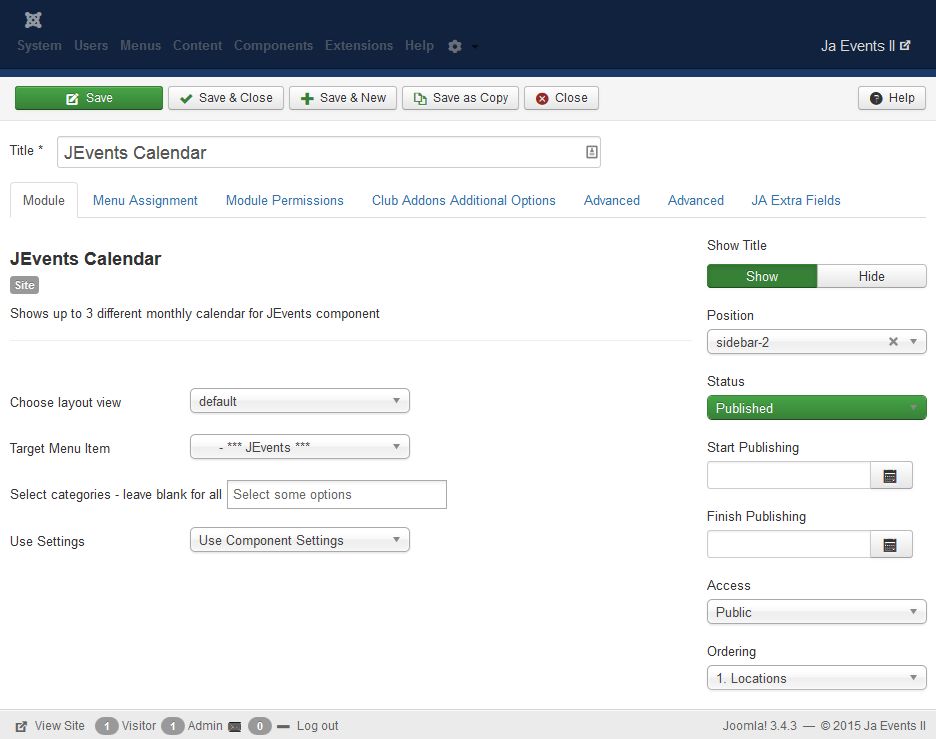
2. JEvent Calendar module
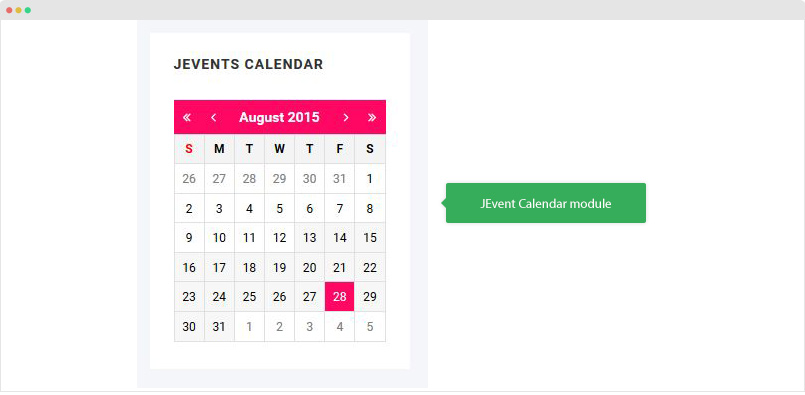
Module position: sidebar-2
Module Suffix: NOT USED
3. JEvents Legend module
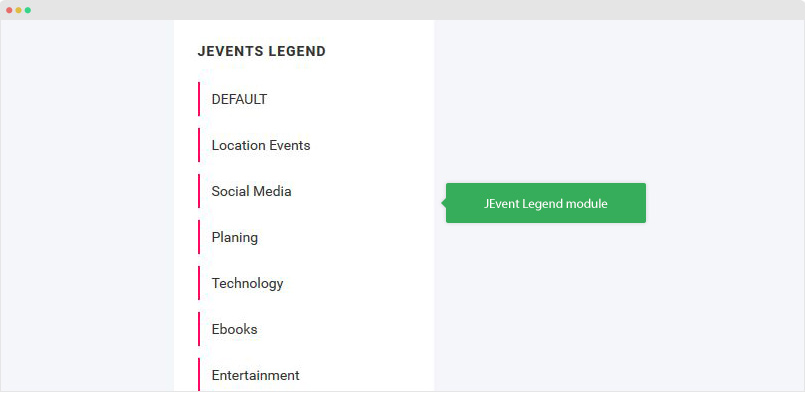
Module position: sidebar-2
Module Suffix: NOT USED
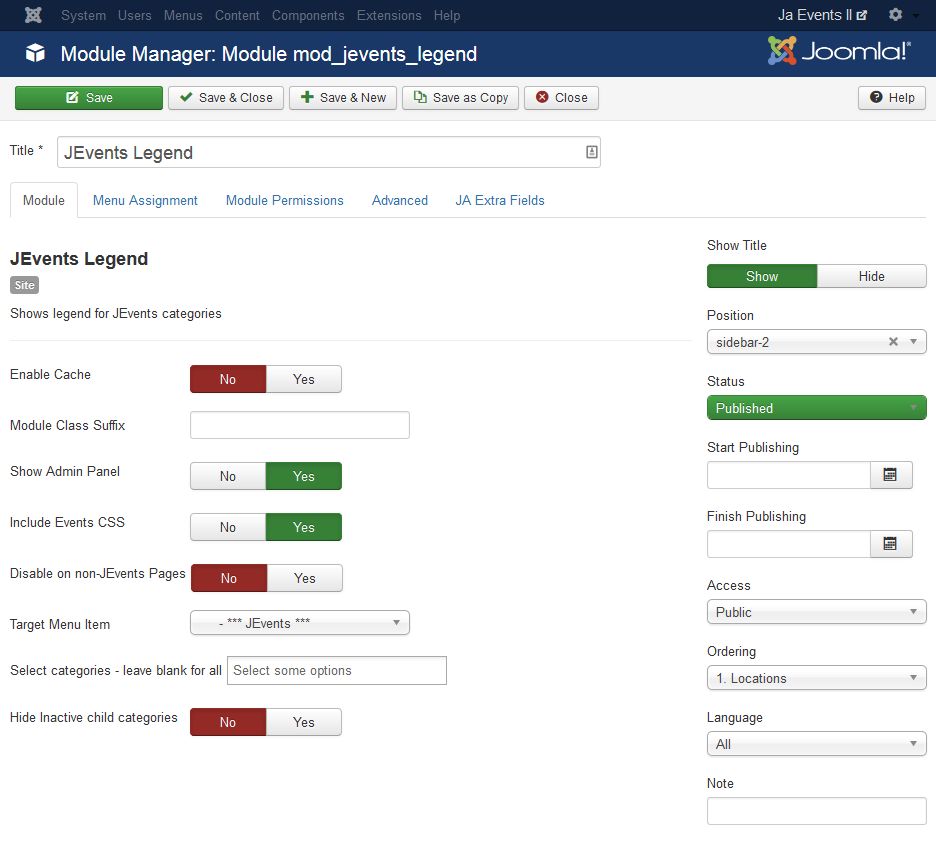
4. JEvents Latest Events Module
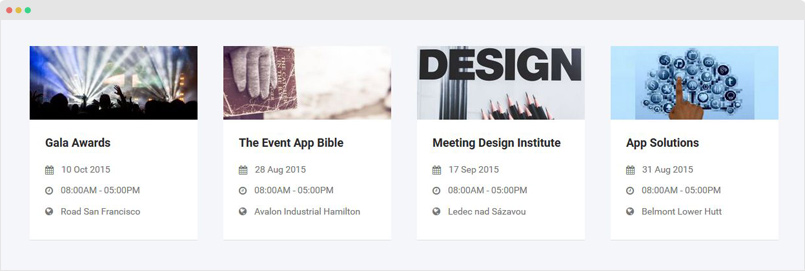
The module is used in Homepage.
Module position: section
Module Suffix: NOT USED
Custom Format String
<a href="/${eventDetailLink}" target="_self" style="float:left;margin:0px 10px 10px 0px;${JEV_LIST_THUMBNAIL_1##display:none;}">${JEV_LIST_THUMBNAIL_1}</a><strong>${title}</strong>

<span class="icon-calendar"></span>${startDate(%d %b %Y)}

<span class="icon-time"></span>${startDate(%I:%M%p)} - ${endDate(%I:%M%p)}

${JEVLOCATION_TITLE#<span class="icon-globe"></span>%s}
5. JEV Location Module
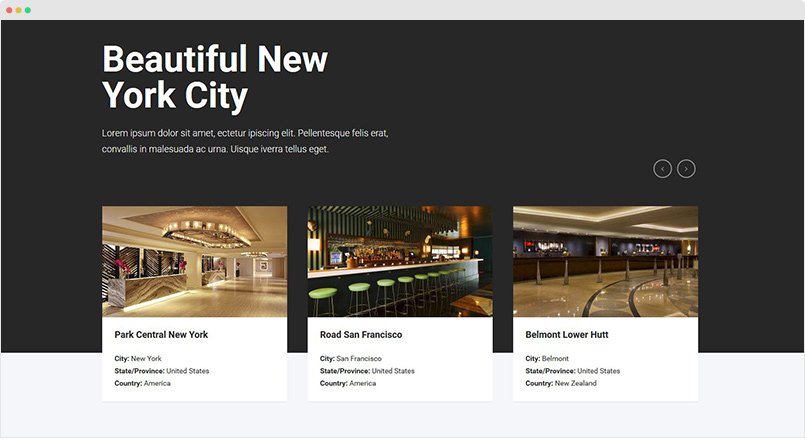
The module is used in Homepage.
Module position: section
Module Suffix: bg-dark pt-x2 pb-0
5. Load customized style
We put all customized style of the component in an independent .less file. The file is: templates/ja_events_ii/less/extras/com_jevents.less so when you do upgrade for the component, the work will not be lost.
To load the customized style for the JEvent pages, please go to any template style of JA Events II, open the Add-ons tab and assign Events Booking Pages in the field JEvents, we suggest to load All pages.
Events Booking Component Configuration
1. Download and install Events Booking Component
Events Booking component is commercial extension so it's not included in download forum of the template, you have to buy it and install the component manually. The instruction is to help you build Events Booking as it is in JA Events II demo site.
Download Events Booking component
After download the component, go to your site back-end > Extension > Extension Manager > browse Events Booking component .zip file and hit the "Upload and Install" button.
The package is all in one, it means that, you don't need to install any add-ons.
2. Configure Events Booking Component
Go to your site back-end > Components > Events Booking > Configuration and configure the component. There are some settings in the "General" tab you should notice in the screenshot below:
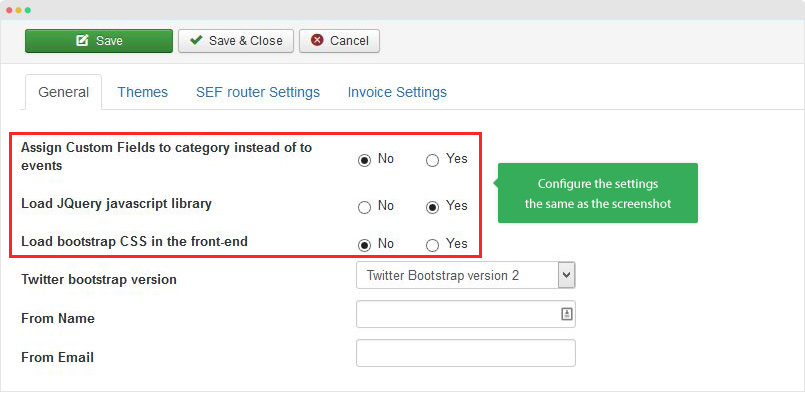
For other settings, you can use default.
3. Events Booking pages
Here are the steps replicate Events Booking pages in JA Events II demo.
All the pages use default layout so you don't need to create template style for such page if you already have JA Events II template activated as default template style.
- Timeline menu - menu type: Events Booking » Category Timeline Layout
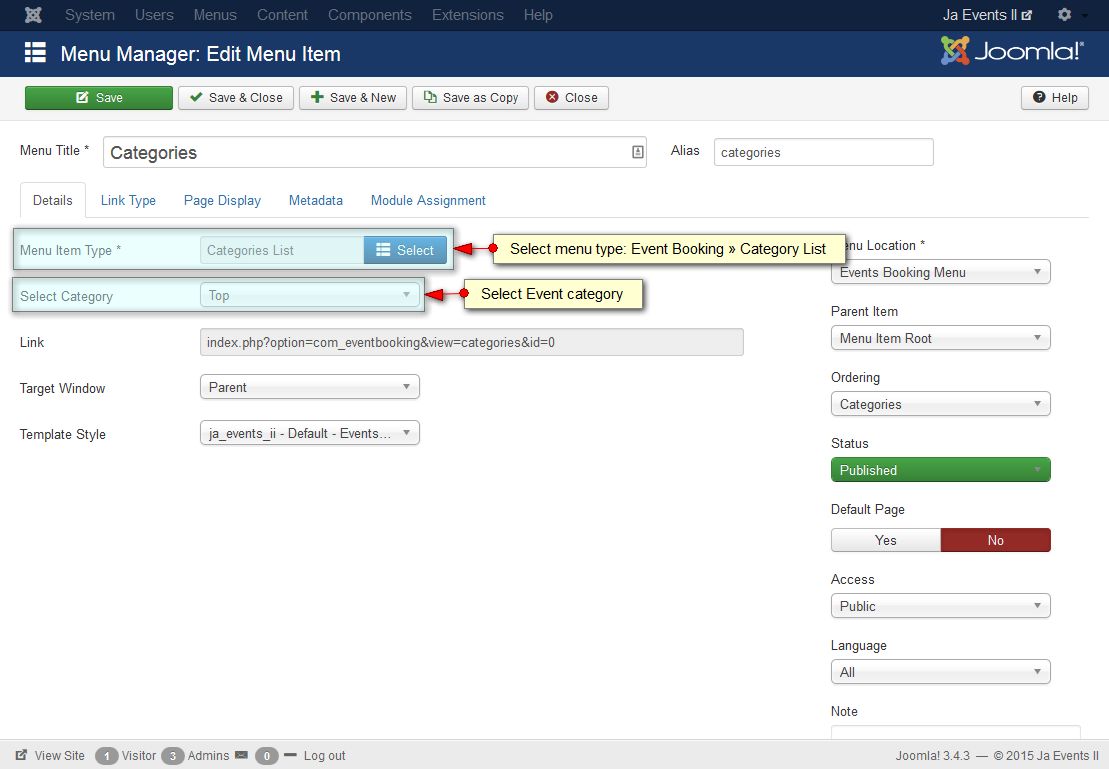
- Categories menu - menu type: Events Booking » Category List
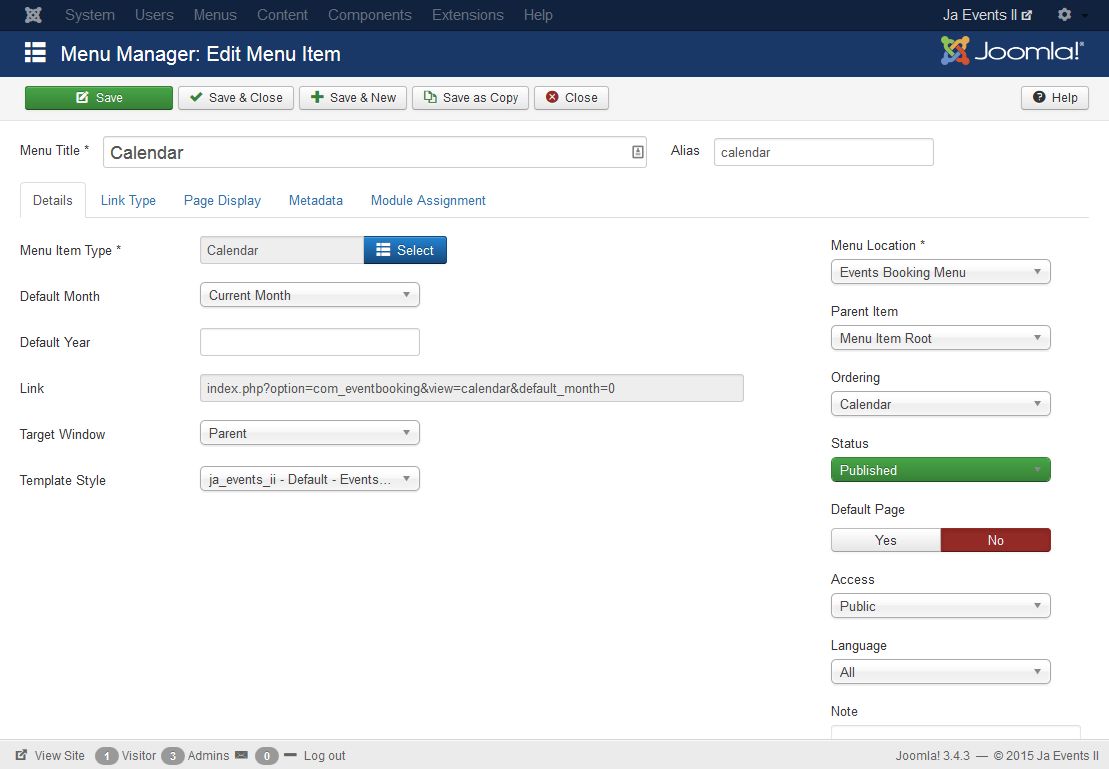
- Calendar menu - menu type: Events Booking » Calendar
- Submit Event menu - menu type: Events Booking » Submit Event
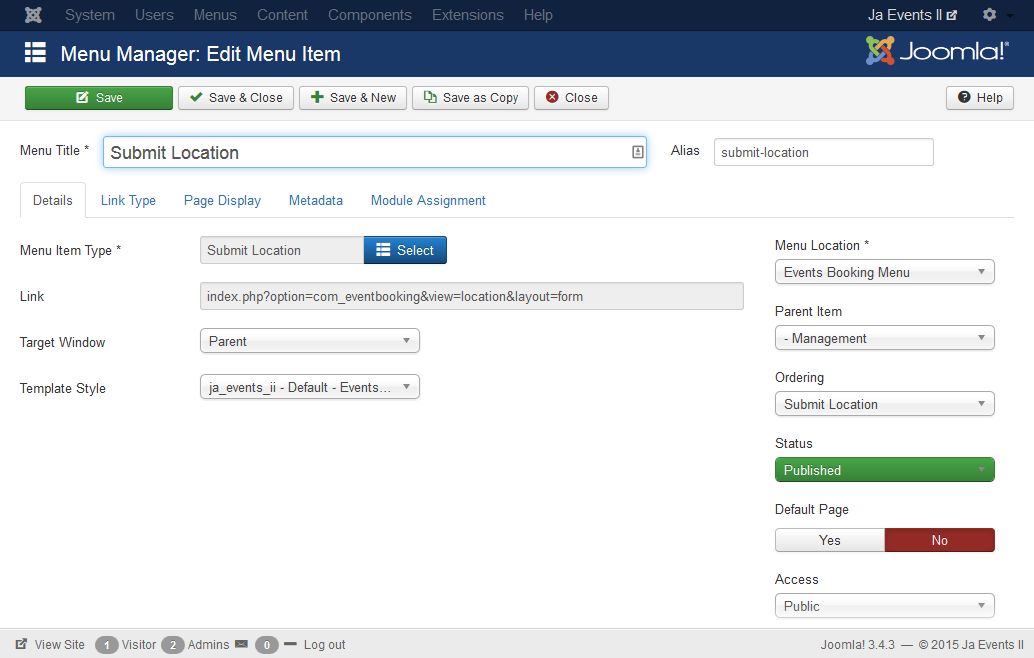
- Submit Location menu - menu type: Events Booking » Submit Location
- My Events menu - menu type: Events Booking » My Submitted Events
- My Locations menu - menu type: Events Booking » My Locations
4. Events Booking Modules
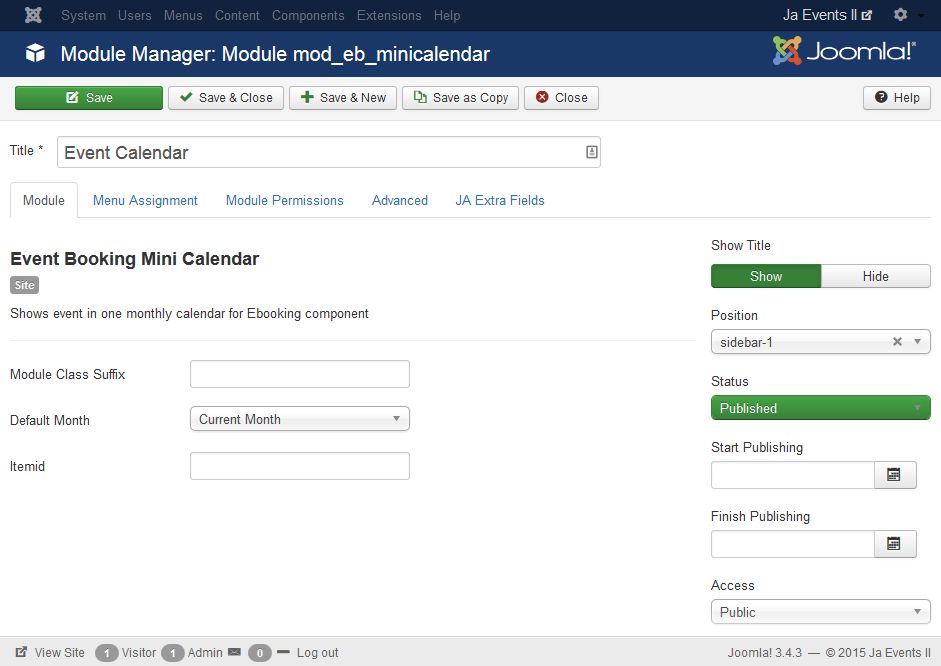
4.1 Events Booking Mini Calendar Module
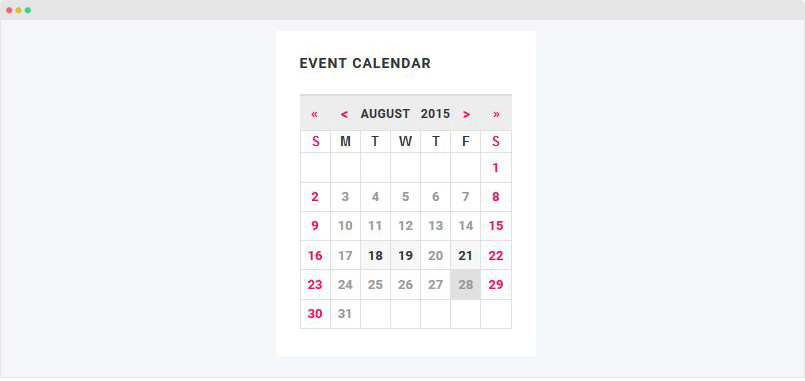
Module position: sidebar-1
Module Suffix: NOT USED
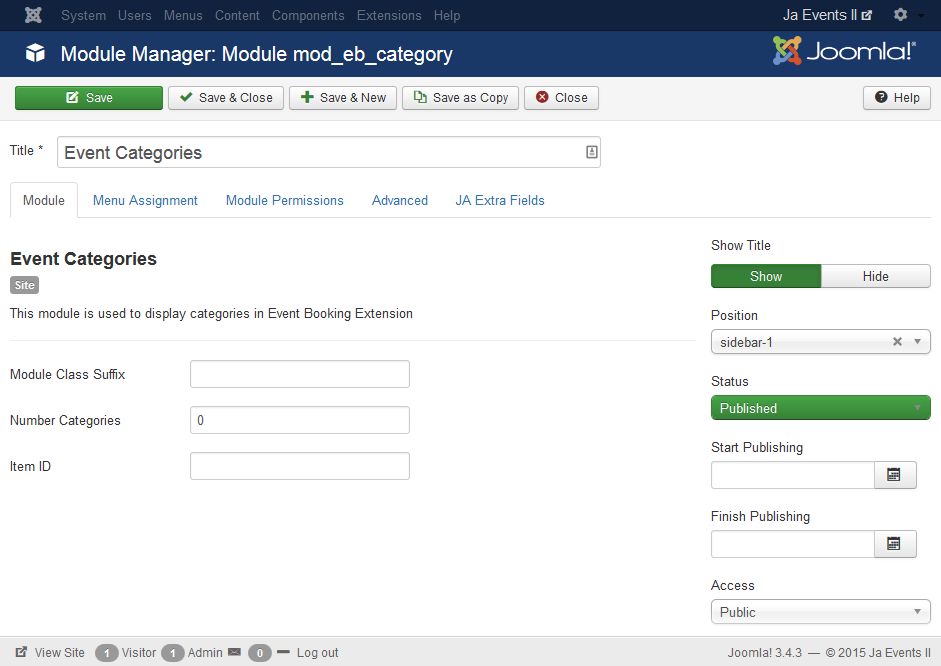
4.2 Event Categories Module
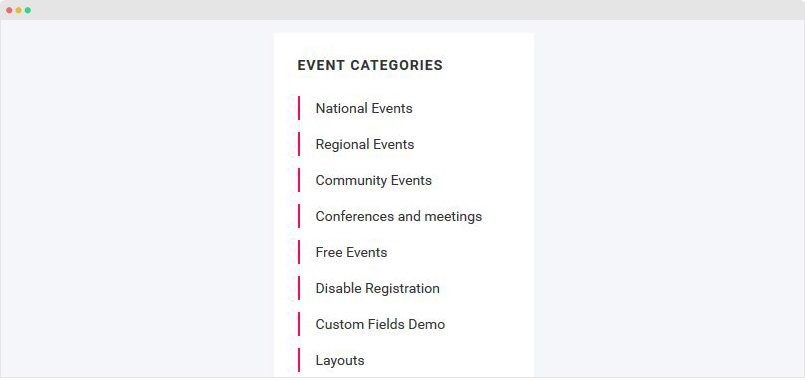
Module position: sidebar-1
Module Suffix: NOT USED
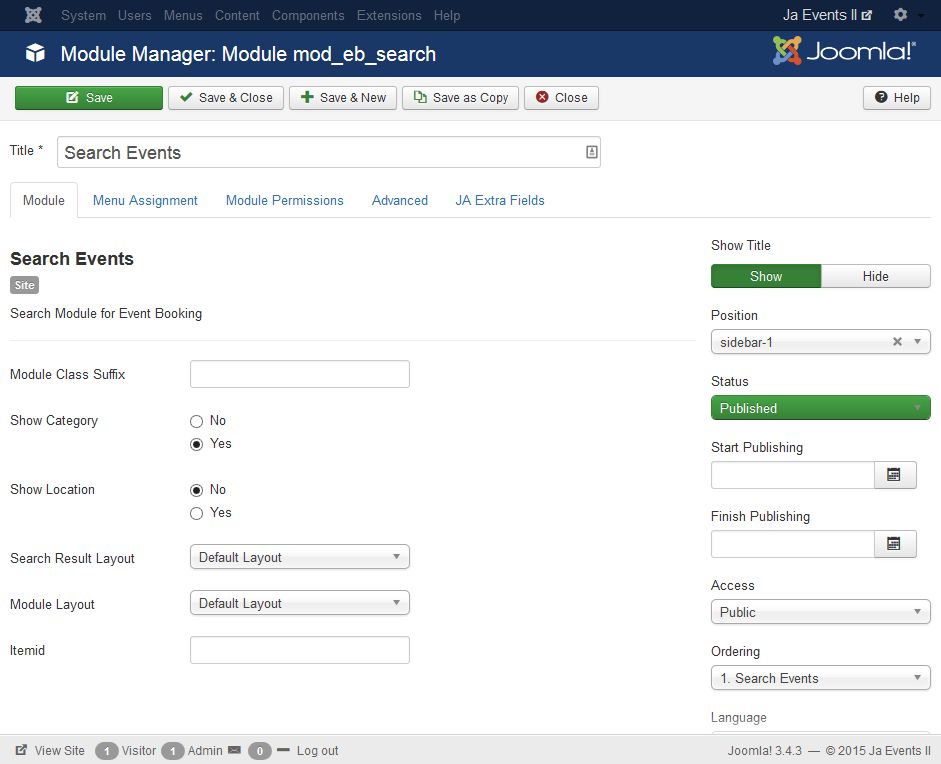
4.3 Search Events Module

Module position: sidebar-1
Module Suffix: NOT USED
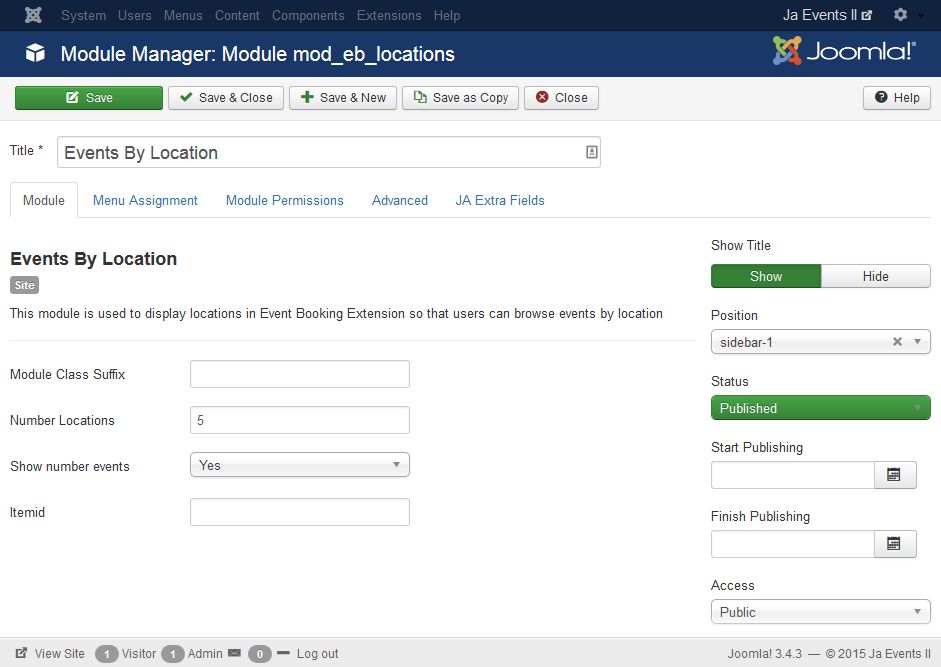
4.4 Events By Location Module
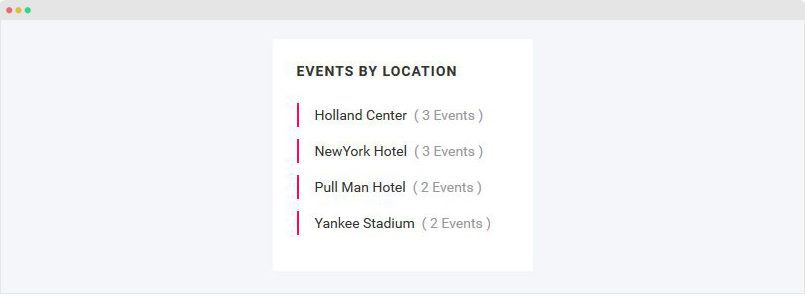
Module position: sidebar-1
Module Suffix: NOT USED
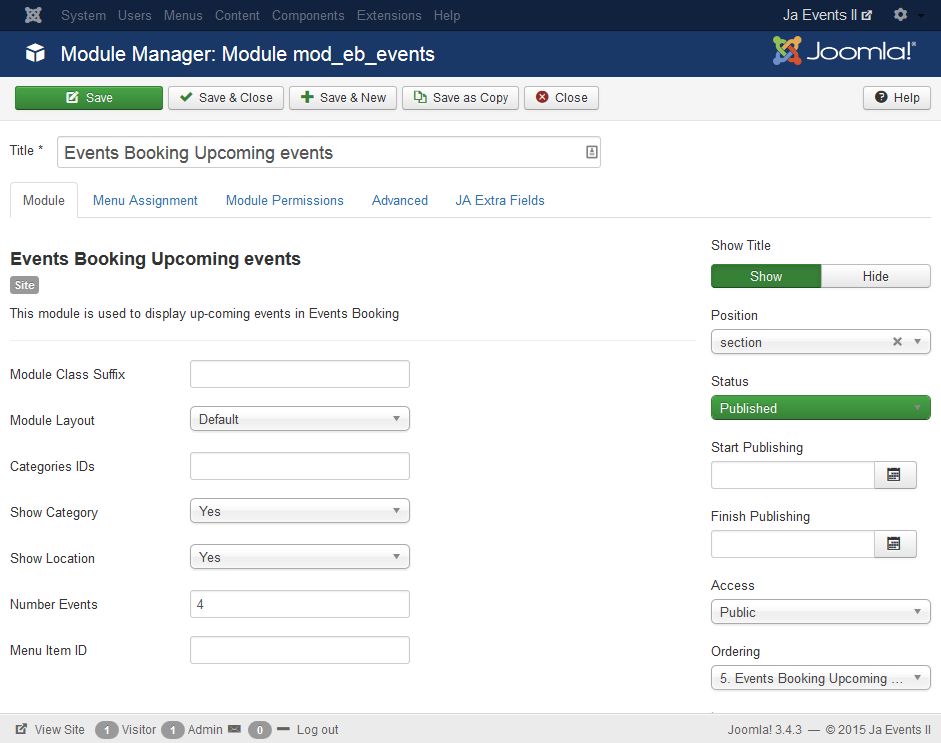
4.5 Events Booking Upcoming events Module
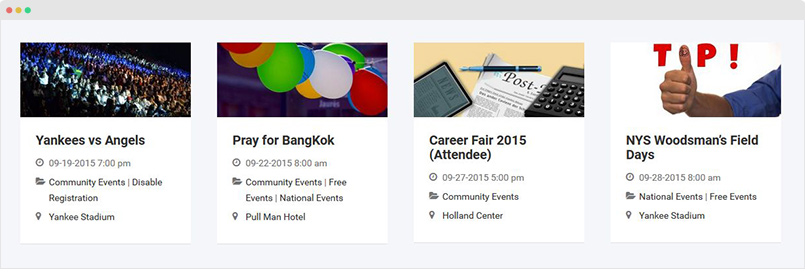
The module is used in Homepage
Module position: section
Module Suffix: NOT USED
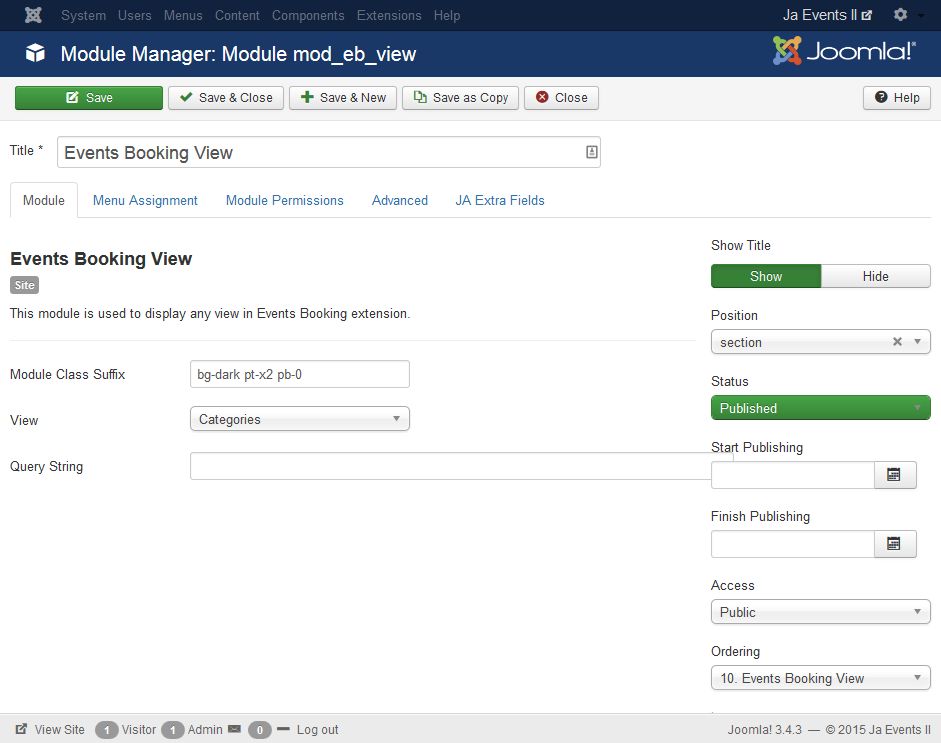
4.6 Events Booking View Module
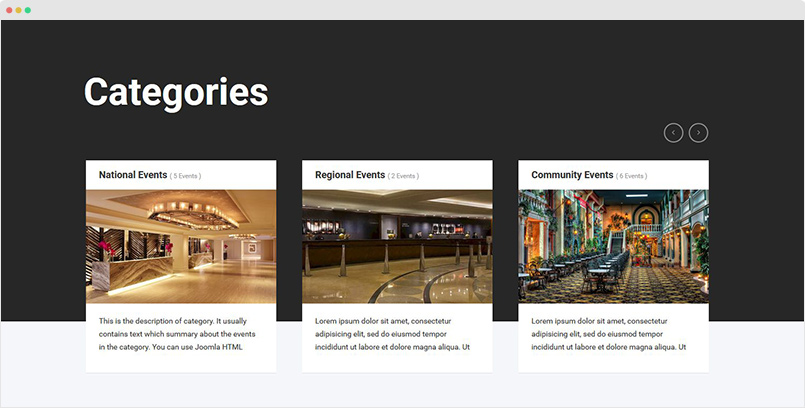
The module is used in Homepage
Module position: section
Module Suffix: bg-dark pt-x2 pb-0
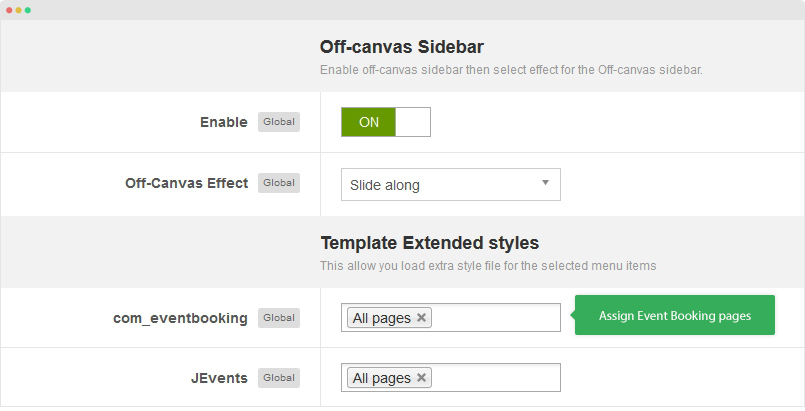
5. Load customized style
We put all customized style of the component in an independent .less file. The file is: templates/ja_events_ii/less/extras/com_eventbooking.less so when you do upgrade for the component, the work will not be lost.
To load the customized style for the Events Booking pages, please go to any template style of JA Events II, open the Add-ons tab and assign Events Booking Pages in the field com_eventbooking, we suggest to load All pages.
JTicketing Component Configuration
1. Download and install JTicketing Component
JTicketing component is commercial extension so it's not included in download forum of the template, you have to buy it and install the component manually. The instruction is to help you build Events Booking as it is in JA Events II demo site.
After download the component, go to your site back-end > Extension > Extension Manager > browse JTicketing component .zip file and hit the "Upload and Install" button.
The package is all in one, it means that, you don't need to install any add-ons.
2. Configure JTicketing Component
Go to your site back-end > Components > JTicketing then hit the Options button.
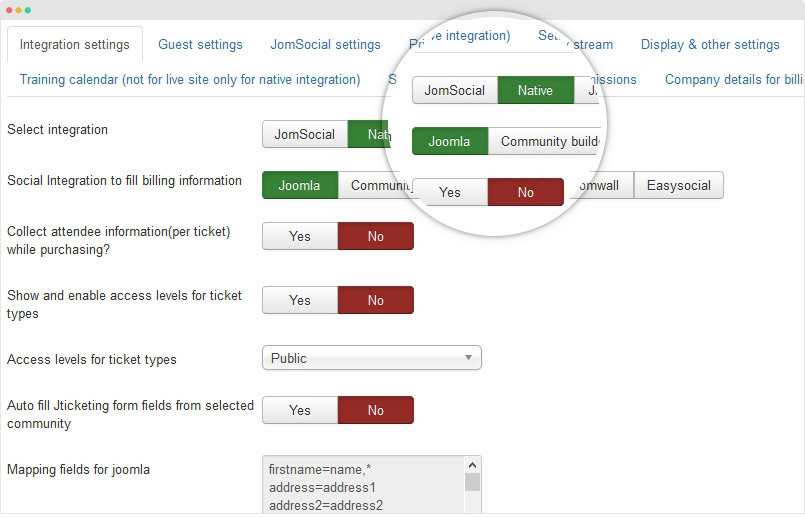
Almost settings are default settings.
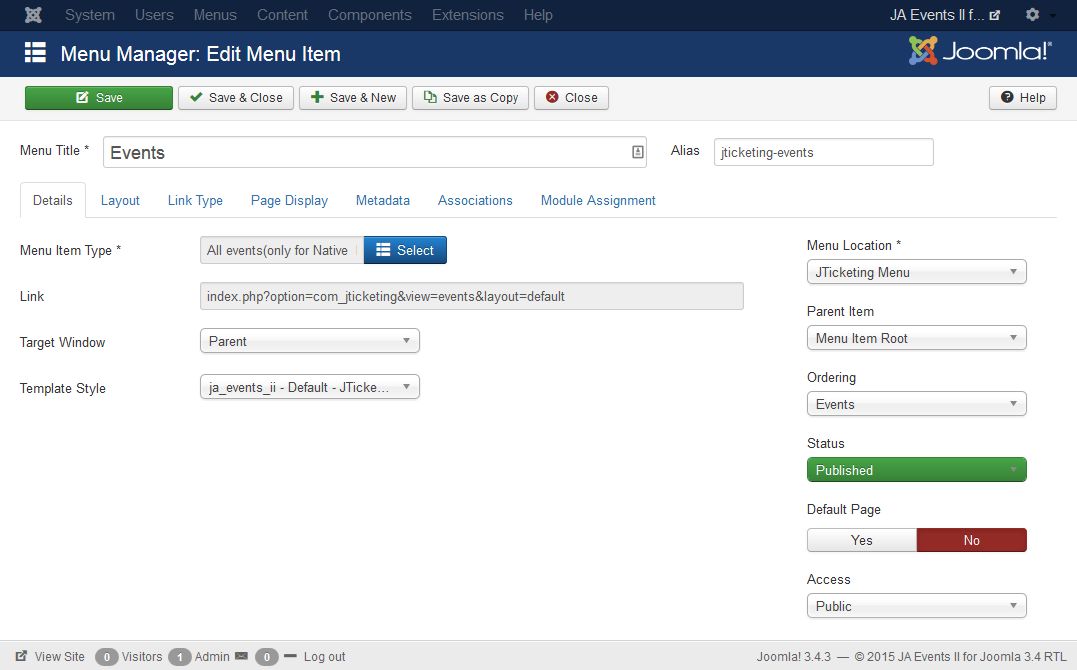
3. JTicketing pages
Here are the steps replicate JTicketing pages in JA Events II demo.
All the pages use default layout so you don't need to create template style for such page if you already have JA Events II template activated as default template style.
- Events menu - menu type: Jticketing » All events(only for Native Integration)
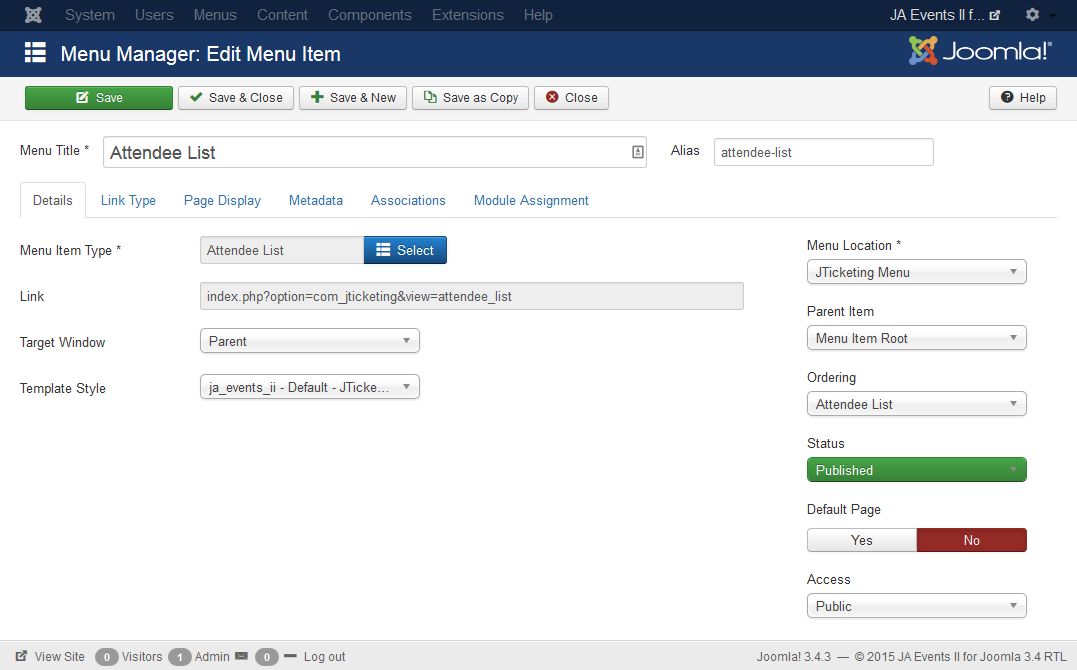
- Attendee List menu - menu type: Jticketing » Attendee List
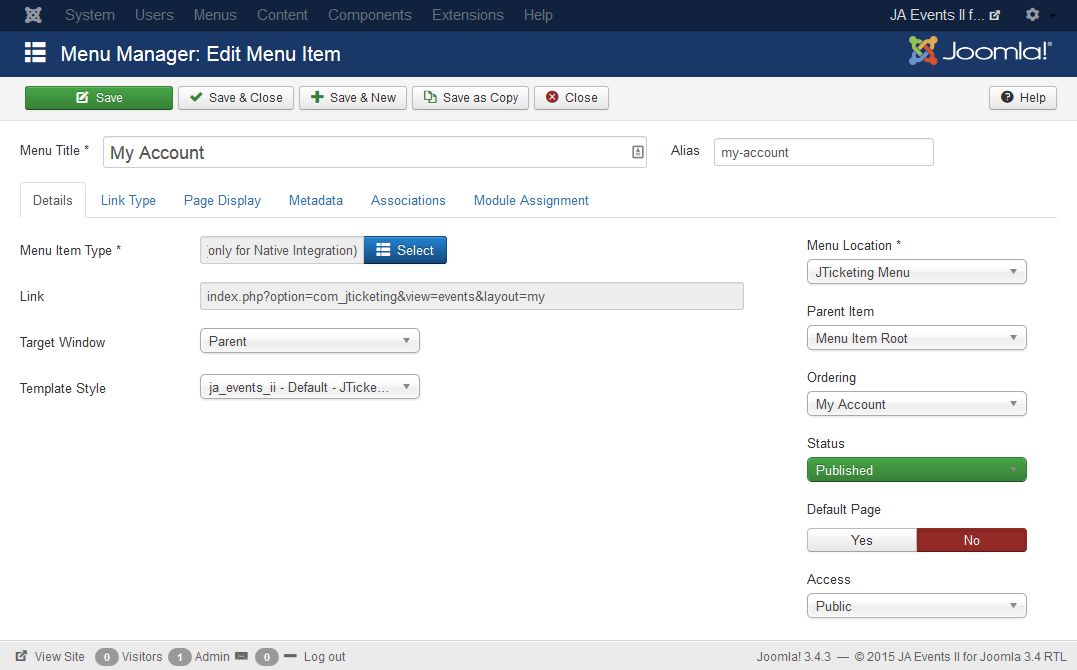
- My Account menu - menu type: Jticketing » My events(only for Native Integration)
4. JTicketing Modules
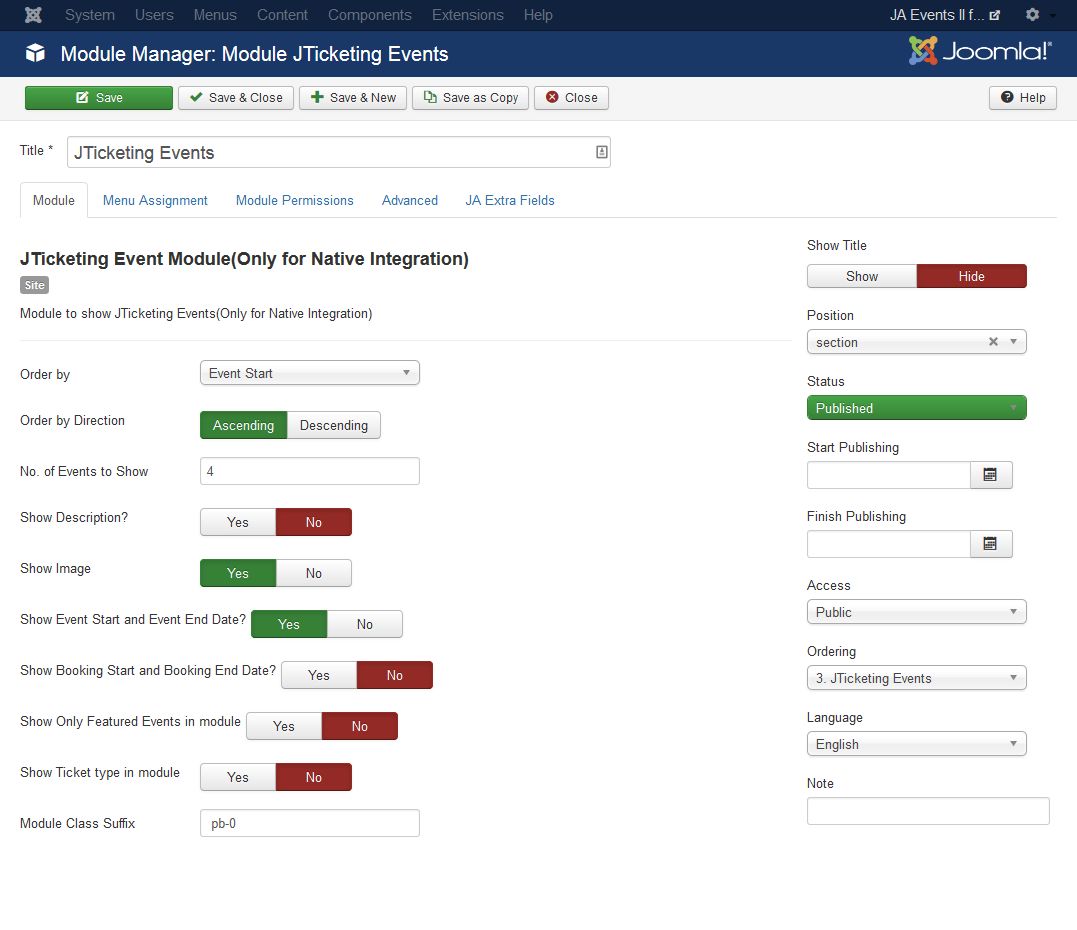
4.1 JTicketing Event Module(Only for Native Integration) Module
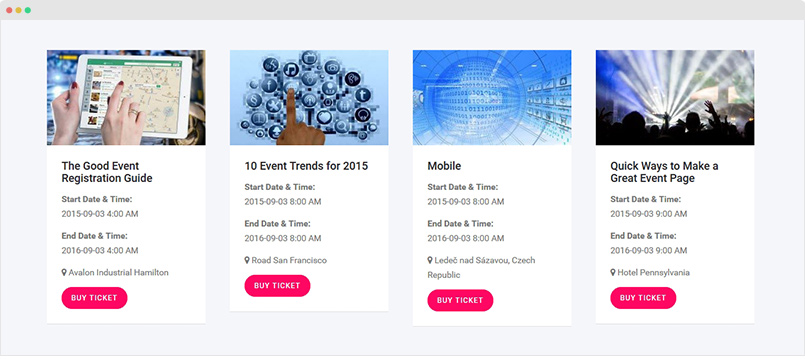
Module position: section
Module Suffix: pb-0
4.2 JTicketing Event Module(Only for Native Integration) Module
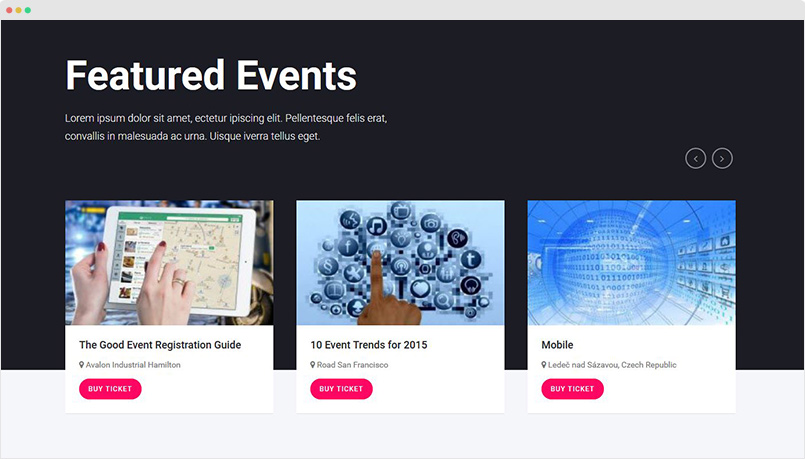
Module position: section
Module Suffix: bg-dark pt-x2 pb-0
4.3 Jticketing Event Calendar
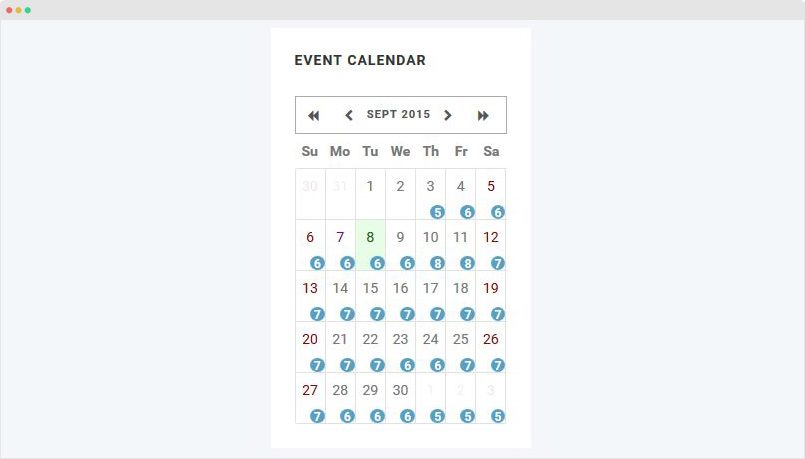
Module position: section
Module Suffix: bg-dark pt-x2 pb-0
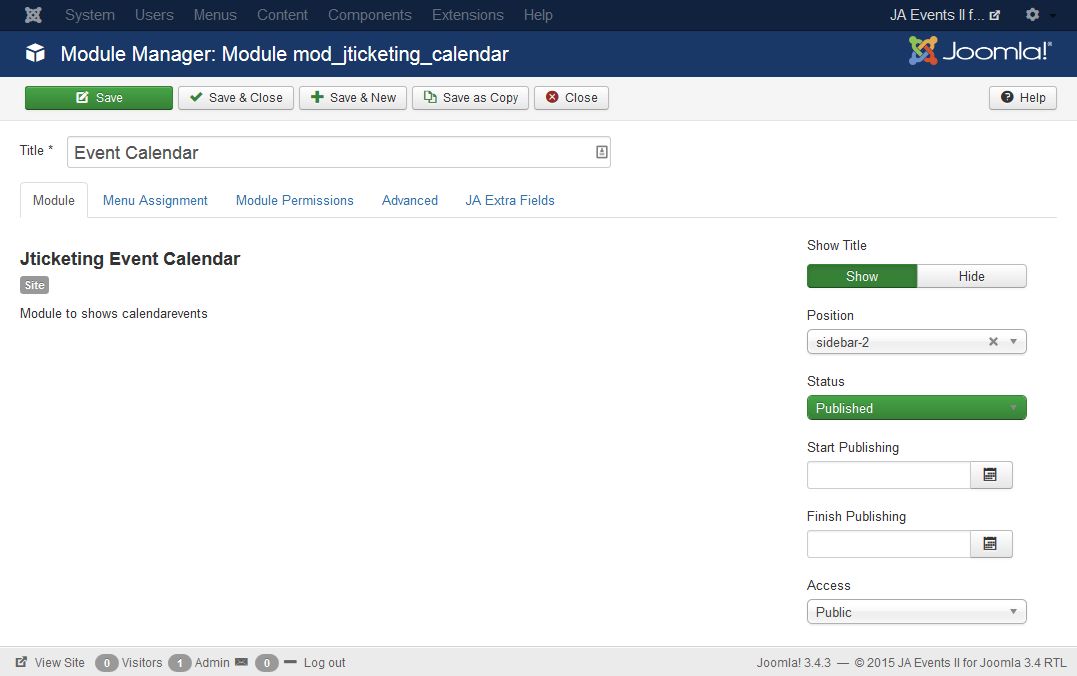
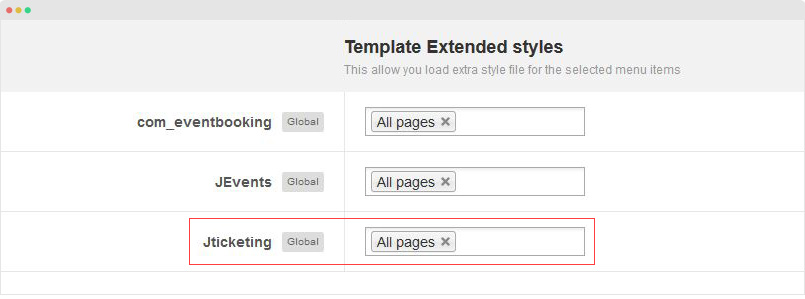
5. Load customized style
We put all customized style of the component in an independent .less file. The file is: templates/ja_events_ii/less/extras/com_jticketing.less so when you do upgrade for the component, the work will not be lost.
To load the customized style for the Events Booking pages, please go to any template style of JA Events II, open the Add-ons tab and assign Events Booking Pages in the field Jticketing, we suggest to load All pages.
Template configuration
Supported Layouts
JA Events II supports 2 layouts by default: default, features-intro. Here are the structure of the supported layouts.
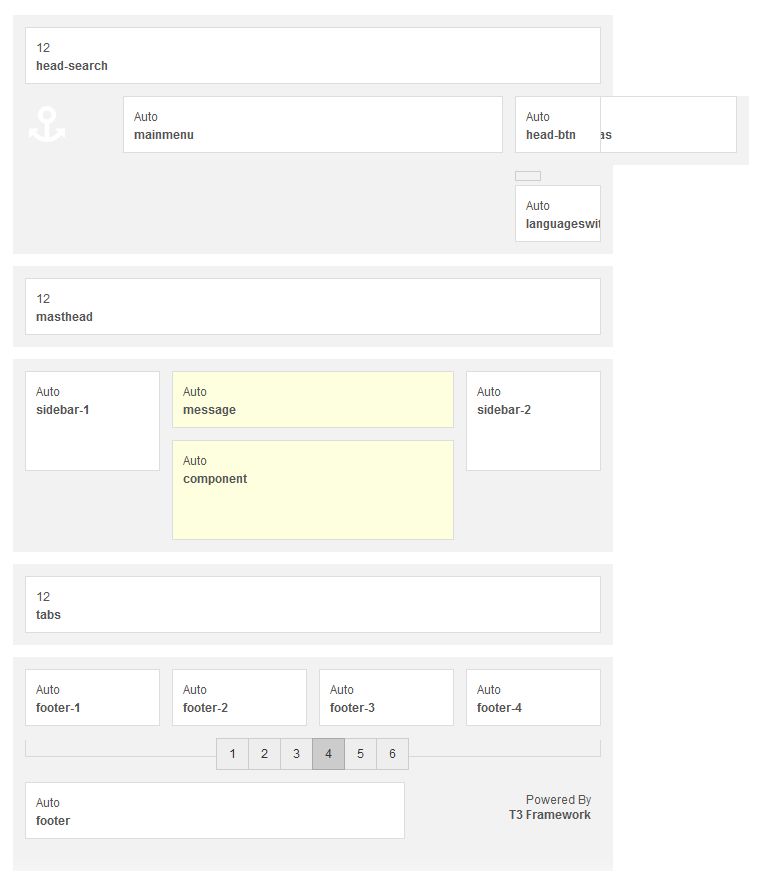
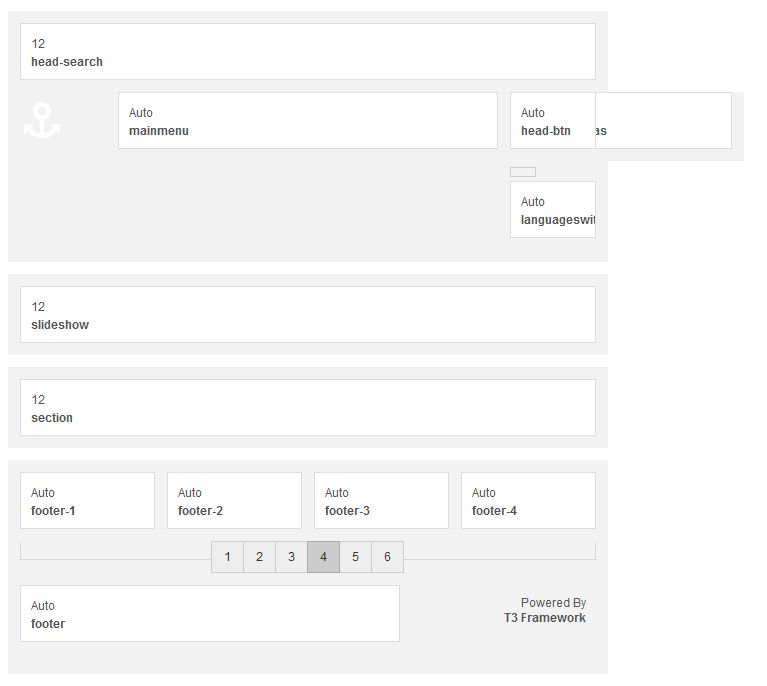
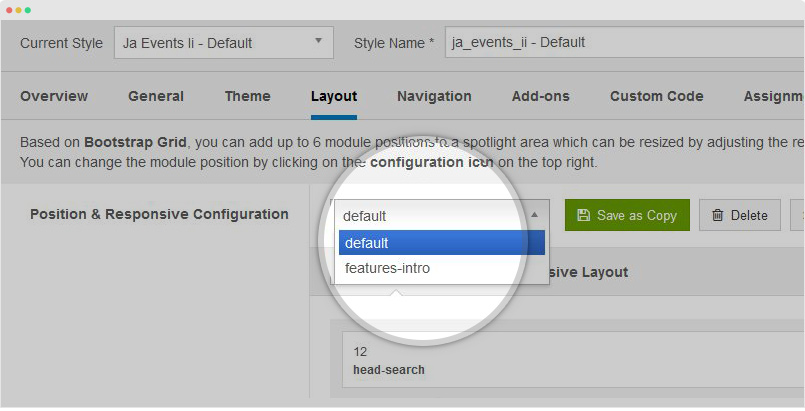
Assign Layout for a template style
You can create multiple templates style for JA Events II template, each template style is assigned to one layout and the template style is assigned to specific menu items so that in one site, you use 1 template but you can use as many layouts as you want.
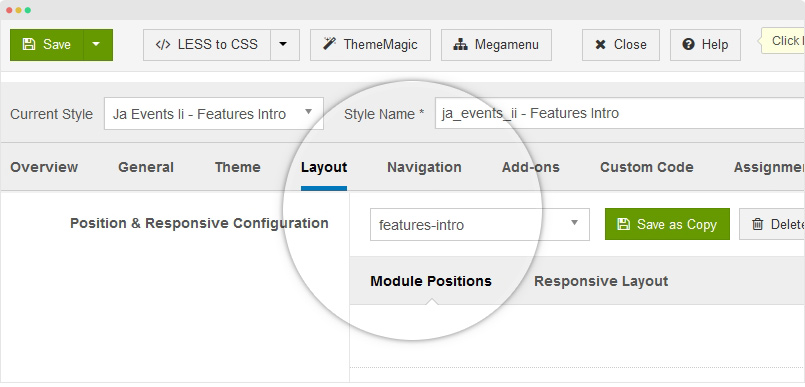
To assign a layout for a JA Events II template style, open the template style > Layout setting panel > assign layout for the template style.
Layout configuration
Once you assign layout for a template style, you can configure the layout to meet your requirements. There are 2 configuration panels: Layout Structure configuration and responsive layout configuration.
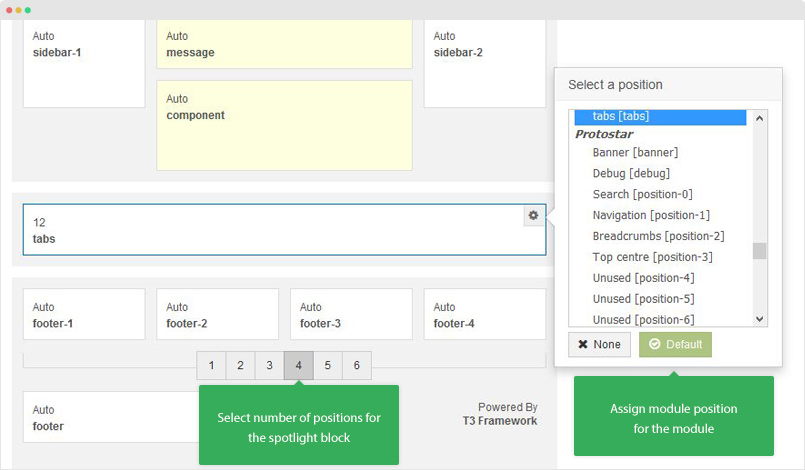
1. Layout Structure configuration
The layout structure allows you to change position for any position in the layout, configure number of positions in spotlight block.
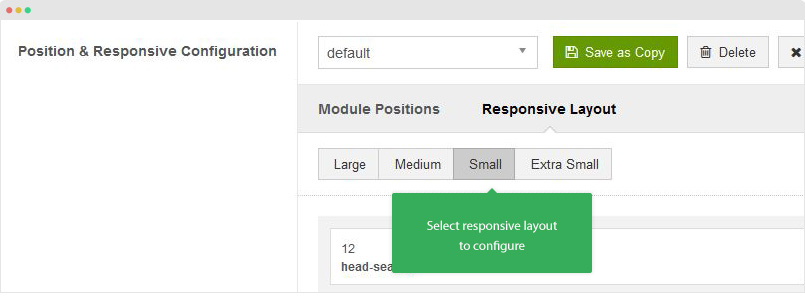
2. Responsive Layout configuration
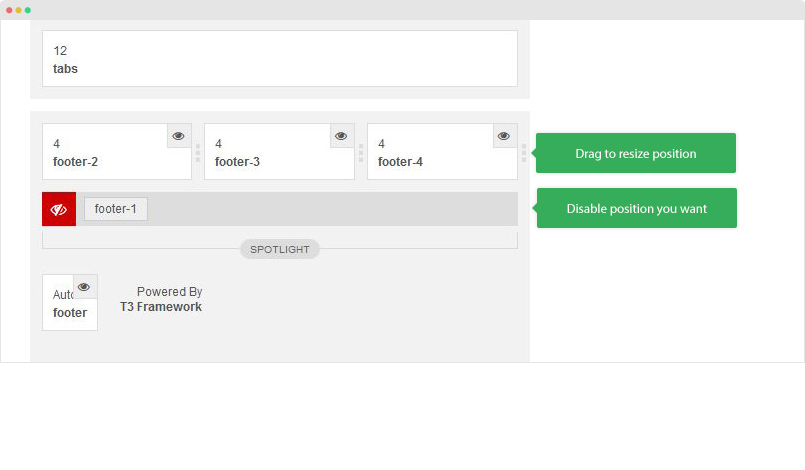
In the "Responsive Configuration", select the responsive layout you want to configure layout for.
In the responsive layout configuration, you can disable any position you don't want to show in the layout, resize positions in spotlight block.
Logo Setting
![]()
The logo settings are included in the Template Setting panel and its not global settings so you can use different logo for each template style. To change the logo, open template style setting panel > Theme Setting and you would see the logo setting
![]()
Text Logo
There are 2 Logo types: Text and Image. For the Text Logo, just type the Site Name and Slogan.
The text logo is the same in all responsive layouts.
Image Logo
Browse image you want to display as your site logo. If you want to use different logo in small screens like tablet and mobile, enable the "Small Logo" option and browse logo image.
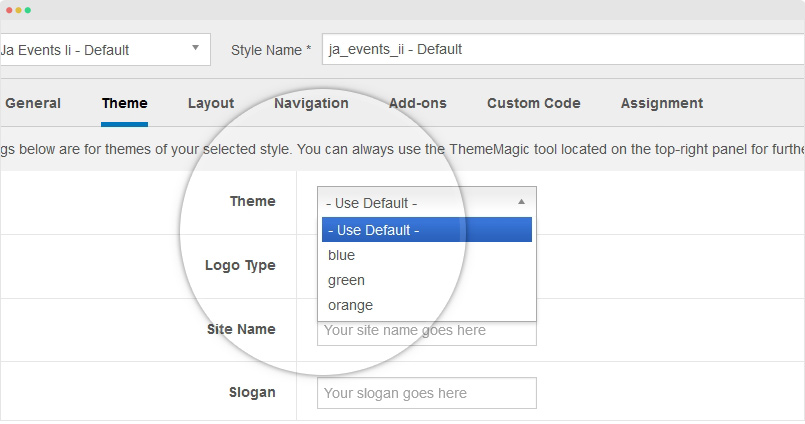
Theme Setting
JA Events II supports 4 themes by default: Default, Blue, Orange and Green.
To configure theme, open the template style you want, go to the "Theme" setting panel
Customize theme style
Each theme has its own folder that is located in: templates/ja_events_ii/less/themes folder, you can use the .less files in each theme folder to customize style for the theme.
Menu system
The template supports 3 menu systems: Megamenu for desktop layout, Off-canvas and Dropdown menu for collapsed screens: Mobile and tablet.
1. Megamenu
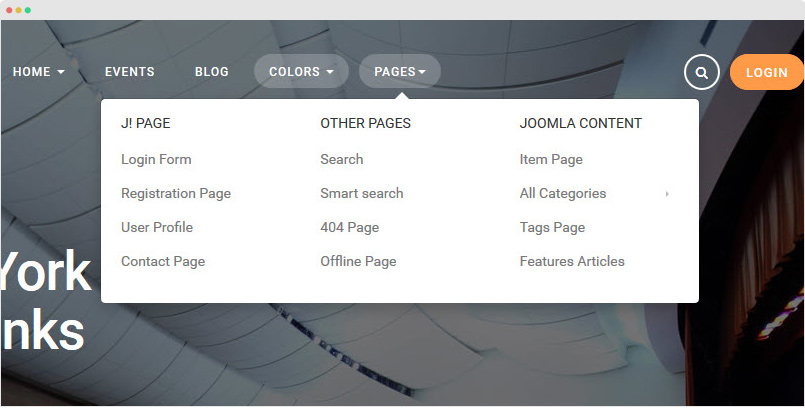
Megamenu allows you to build flexible menu system: display menu items in columns, enable/disable sub-menu, configure width for each column, assign module to display in megamenu, etc. Here is the quick steps to enable Megamenu and configure it your way.
Step 1: Enable Megamenu - From the back-end, open any template style, in the "Navigation" tab, enable Megamenu option and select the menu you want to display in the Megamenu.
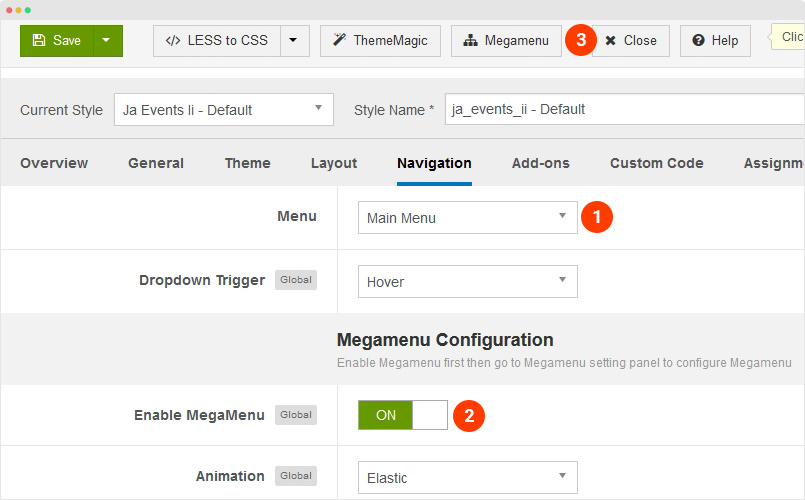
Step 2: Configure Megamenu - Hit the "Megamenu" button on the top bar then you are navigated to the visual Megamenu builder panel.

To understand more about Megamenu options, please check out the detail documentation
2. Mobile Menu
JA Events II supports both Off-canvas and Dropdown menu on mobile.
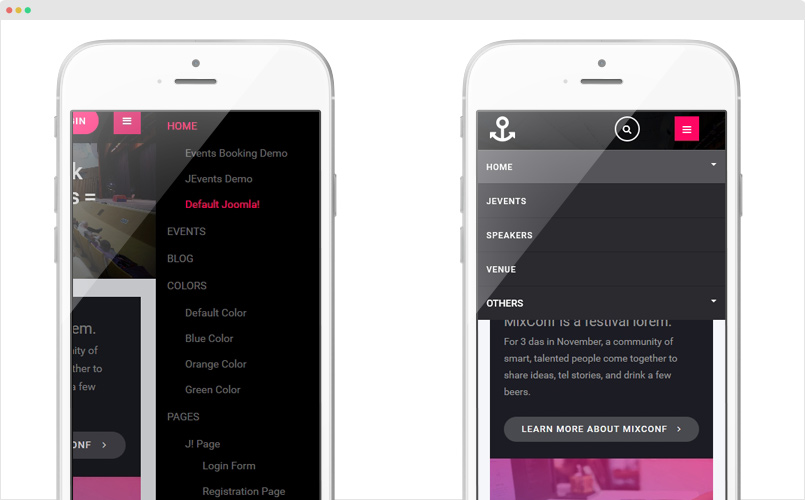
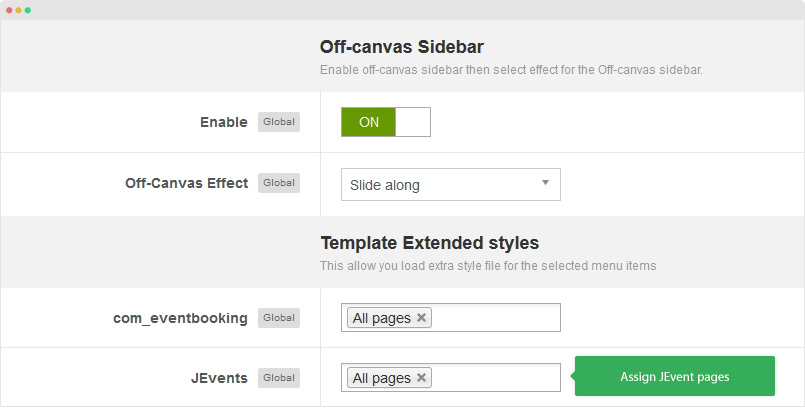
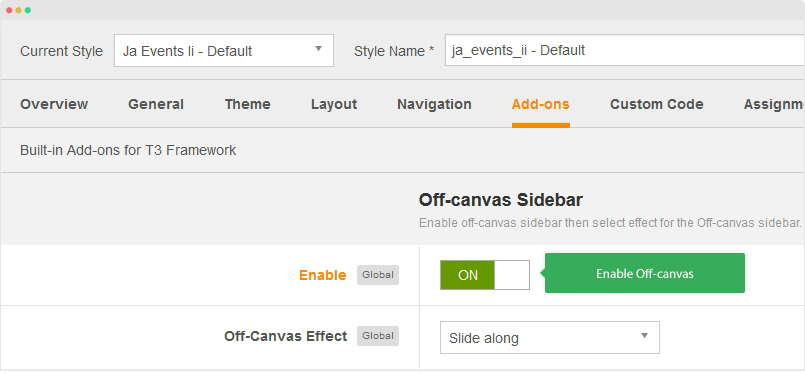
3.1 Off-canvas Sidebar
There are 2 steps to activate Off-canvas as mobile menu.
Step 1: Enable Off-canvas - Open JA Events II template style, in the "Add-On" tab, enable the Off-Canvas sidebar option, you can select effect when opening the off-canvas.
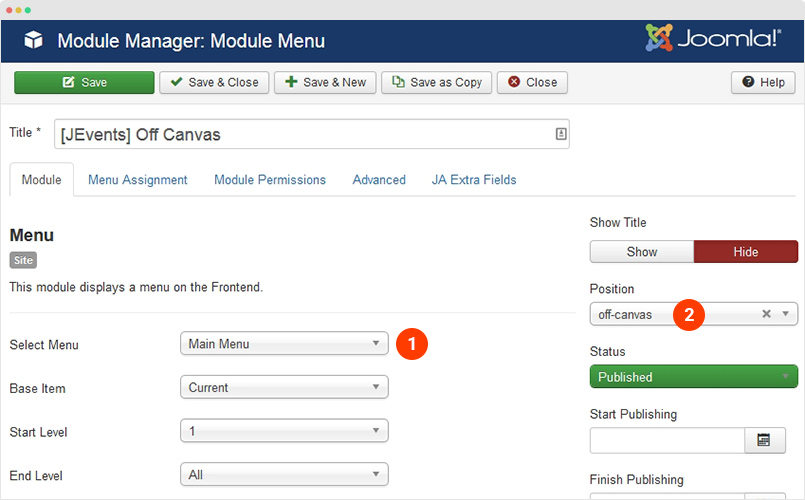
Step 2: Create Menu module - assign the module to the off-canvas position and select to display in all pages.
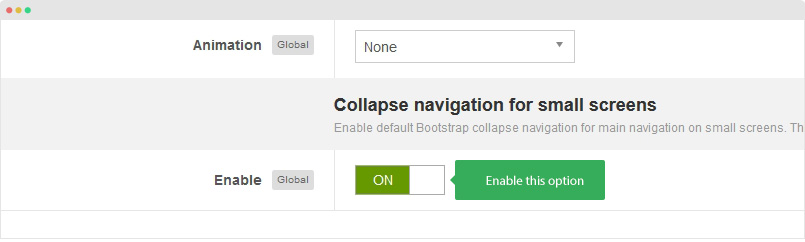
3.2 Dropdown Menu
In case you want to use Dropdown menu on mobile, we suggest you to disable Off-canvas sidebar first then enable the Collapse navigation for small screens option in the "Navigation" tab of JA Charity template style editing panel.
Footer Info modification
The footer info includes 2 sections: Copyrights and T3 footer logo.
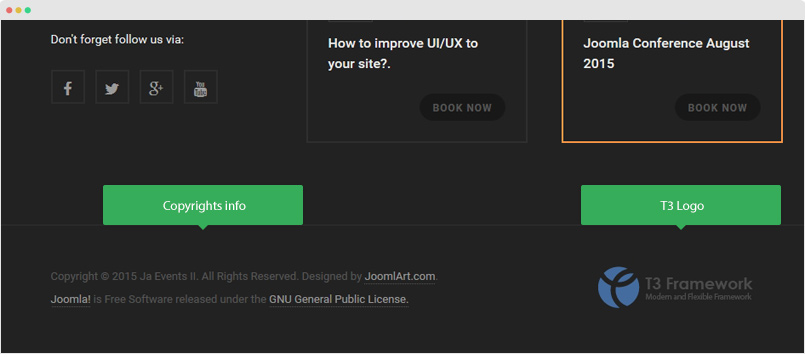
Copyrights Info modification
To change the copyrights info, open the templates/ja_events_ii/html/mod_footer/default.php file, find the following info and change to what you want.
<small><?php echo $lineone; ?> Designed by <a href="//www.joomlart.com/" title="Visit Joomlart.com!" <?php echo method_exists('T3', 'isHome') && T3::isHome() ? '' : 'rel="nofollow"' ?>>JoomlArt.com</a>.</small>
Disable T3 Footer Logo
You can disable the T3 Footer Logo in the template style manager, open the General setting panel, disable the Show T3 Logo option.
![]()
Extra Fields
JA Events II template uses Extra fields for module and Joomla article for specific purposes.
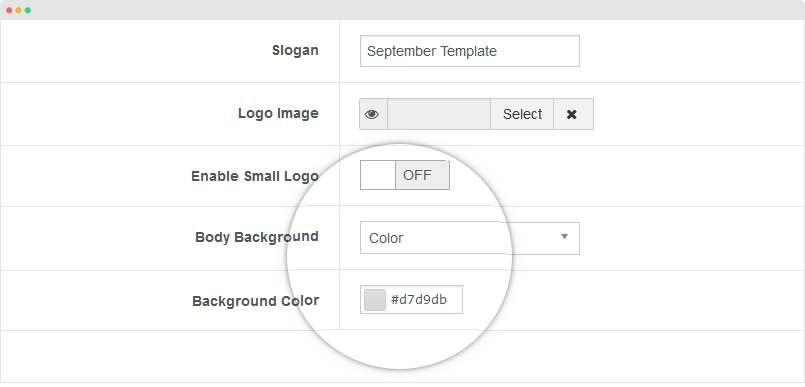
1. Template Extended Setting
JA Events II allows you to add background image or color for a page based on extended setting. The extended setting is included in the "Theme" setting » Body Background.
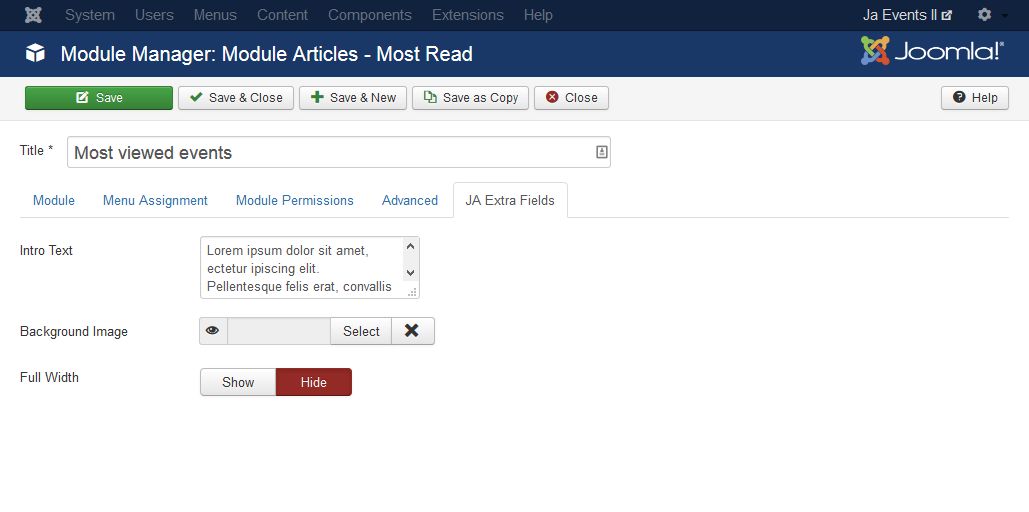
2. Module Extra Fields
There are 3 extra fields for Module: Intro Text, Background Image and Full Width, all the settings are included in the tab: JA Extra Fields in the module setting panel.
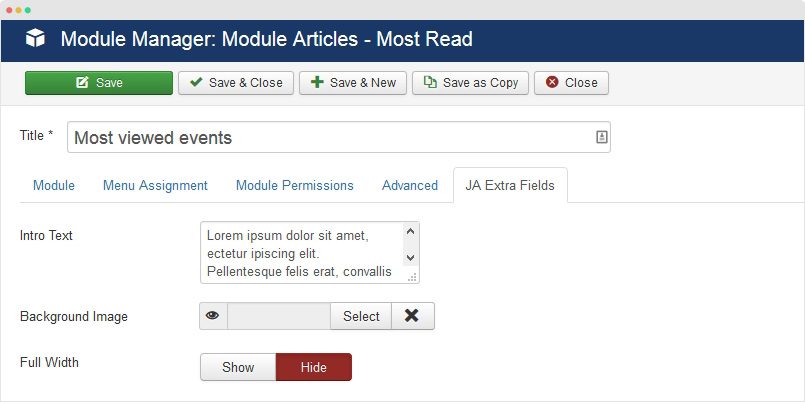
- Intro Text: add intro text for module, the intro text is displayed just after the module title
- Background Image: select background image for the module
- Full Width: select "Yes" to make the module full width
For more details, please check the detail documentation →
3. Article Extra Fields
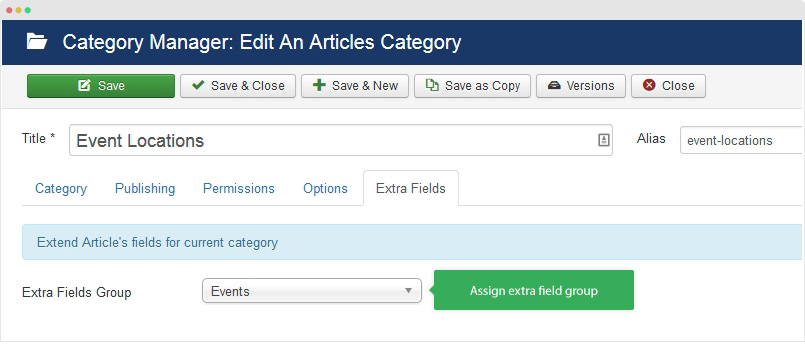
In case you want to build an Event site with Joomla com_content without help from 3rd extension, you can use Extra Fields to create an Event item that has some dedicated fields such as: Event Date, Event Time, Event Location, Location map. Those extra fields are all pre-defined in JA Social II template. Here are steps to use the extra fields.
Step 1 - create Category, open the Extra Fields tab and assign extra field group for the category.
Step 2 - create article in the category created in step 1 and add content for extra fields in the Extra Fields tab.
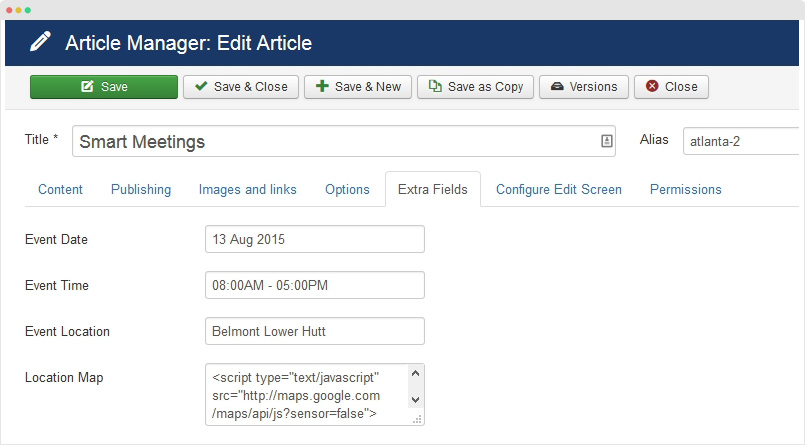
- Event Date: add date for the event
- Event Time: add time for the event
- Event Location: add location the event happens
- Location Map: add map to the location of the event, to get the Google embed code for location you want, please refer to the site: http://www.map-embed.com/, select the address and map type then generate code, paste the code to the Location Map field. Here is a sample code.
<script type="text/javascript" src="http://maps.google.com/maps/api/js?sensor=false"></script><div style="overflow:hidden;height:125px;width:300px;"><div id="gmap_canvas" style="height:125px;width:300px;"></div><style>#gmap_canvas img{max-width:none!important;background:none!important}</style><a class="google-map-code" href="http://www.themecircle.net" id="get-map-data">The Breslin</a></div><script type="text/javascript"> function init_map(){var myOptions = {zoom:14,center:new google.maps.LatLng(40.805478,-73.96522499999998),mapTypeId: google.maps.MapTypeId.ROADMAP};map = new google.maps.Map(document.getElementById("gmap_canvas"), myOptions);marker = new google.maps.Marker({map: map,position: new google.maps.LatLng(40.805478, -73.96522499999998)});infowindow = new google.maps.InfoWindow({content:"<b>The Breslin</b><br/>2880 Broadway<br/> New York" });google.maps.event.addListener(marker, "click", function(){infowindow.open(map,marker);});}google.maps.event.addDomListener(window, 'load', init_map);</script>
Here is how the extra fields look like in front-page.
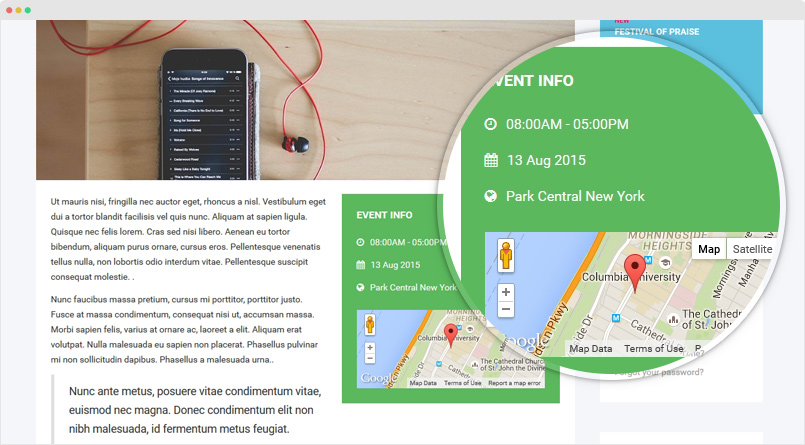
For more details, please check the detail documentation →
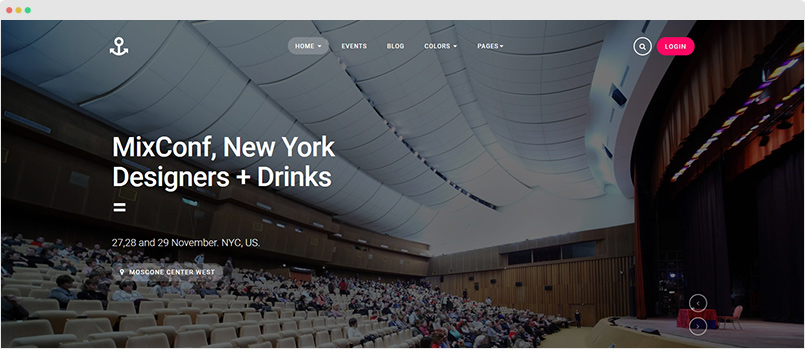
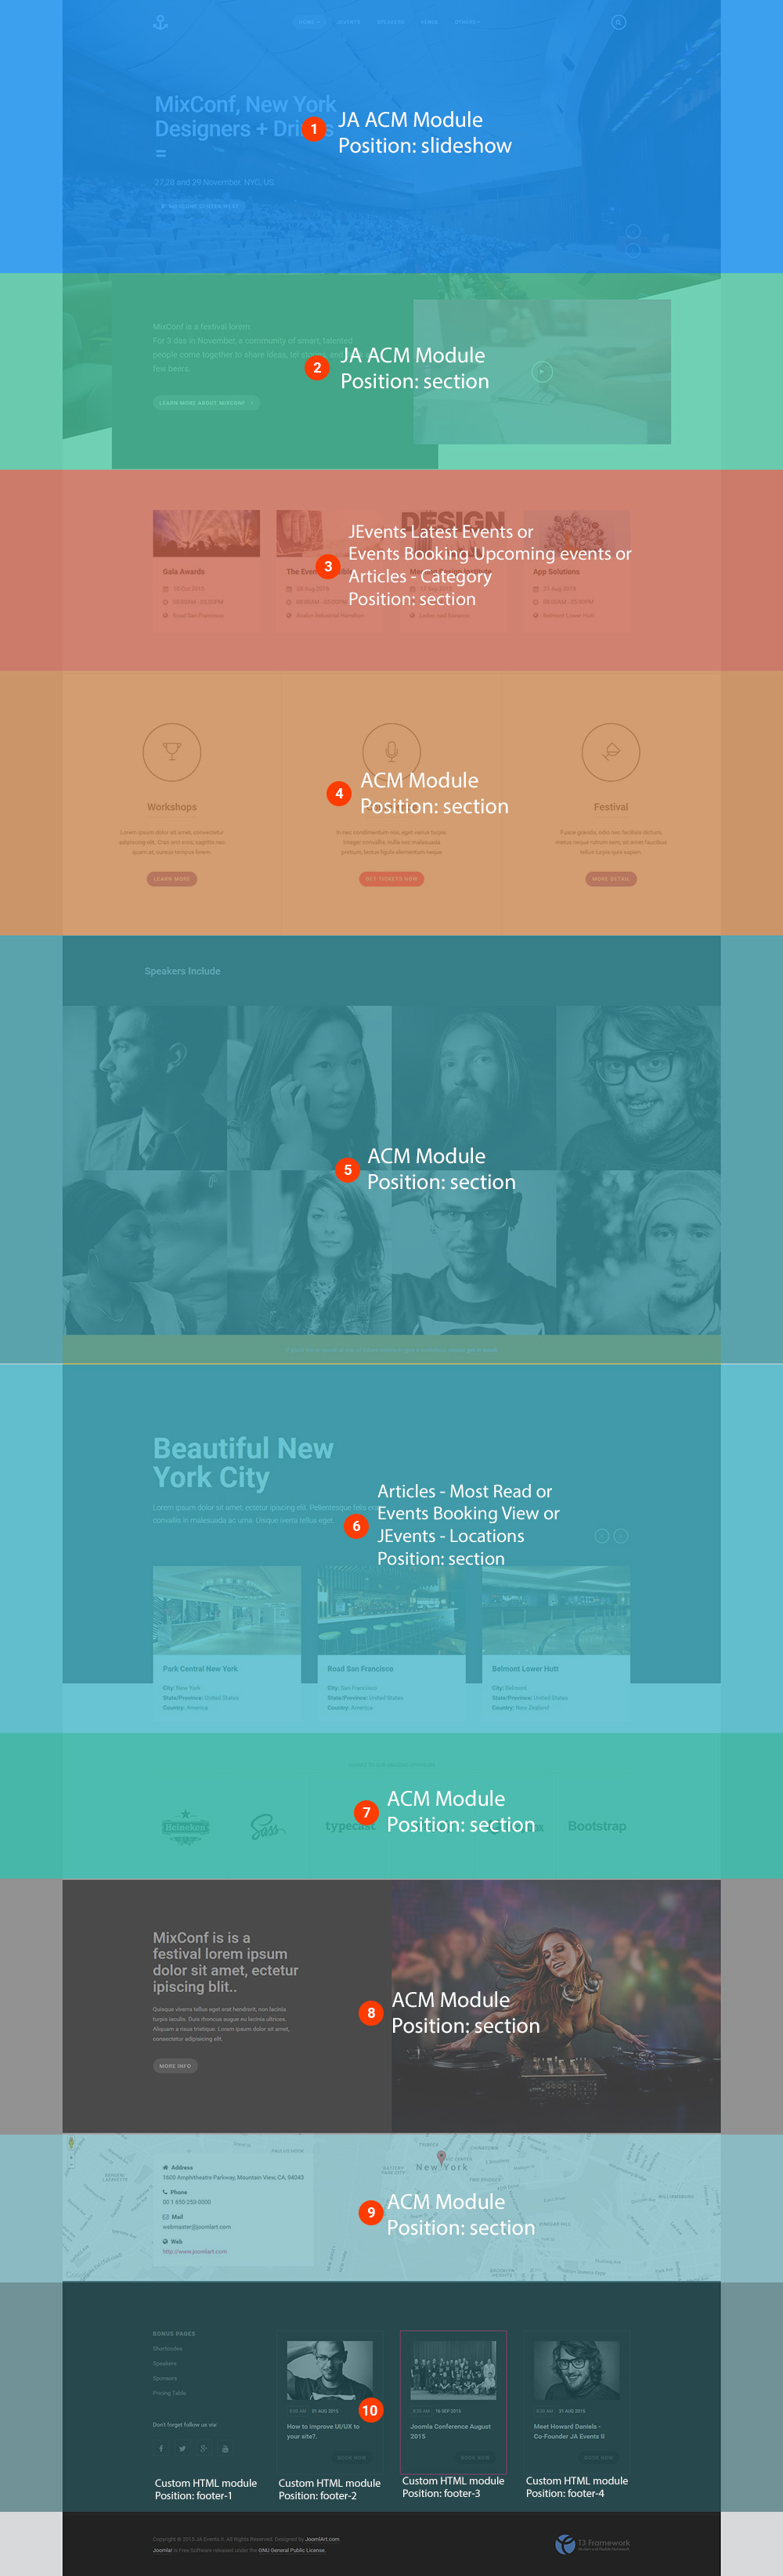
Build Home Page
The section is to give you instructions to build Home page as you see in the JA Events II demo.
In the demo, there are 3 home pages, they are almost the same, the difference in the 3 home pages is the 2 modules (section 3 and 6 in the home page layout structure image) depends on which extension you used.
Follow the steps to replicate such homepage for your site.
Step 1 - Create Template Style
The Homepage uses features-intro layout so we need to create new template style. The best way to create a new template style is duplicating the "ja_events_ii - Default" template style. Tick on the template style then hit the duplicate button, open the template style and assign the features-intro layout for the template style.
The background image of the Homepage is configured in the "Theme" setting » Body Background
Step 2 - Create Home Menu
Go to "Menu > Main Menu > Add New Menu", the Homepage menu type is "Articles » Special page: Blank Content" and assigned the template we created in the first step: ja_events_ii - Features Intro.
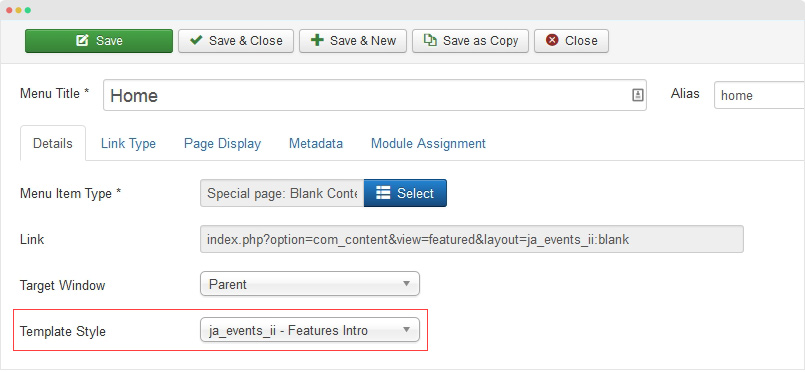
For other settings, you can use default settings.
Step 3 - Assign content for the Home Menu
Content of the Home page is from modules. Here are the configuration of the modules in the Home page.
- JA ACM Modules
- Articles - Most Read Module
- JEvents Latest Events Module
- JEV Location Module
- Events Booking Upcoming events Module
- Events Booking View Module
Documentation is a WIP. If you have any specific request or feedback as well as suggestions, feel free to drop us a line in JA Events II template forum. We'll try to cover them all.